When working on your Mac, it’s more than easy to find yourself with hordes of open windows; I’d say it’s inevitable. These open apps can be productivity killers when you’re spending more time hunting a window than actually working.
With macOS Ventura, Apple is making things more streamlined than ever by adding another tool to your arsenal for managing your open windows – Stage Manager. With Stage Manager, switching between apps and focusing on the current app will be easier than ever.
How is Stage Manager Different from Mission Control?
You must be thinking why does your Mac need another feature for window hunting when it already has Mission Control. Mission Control is all well and good when you want to find one of your open windows but it does nothing for the clutter on your screen. After you switch to a different app using Mission Control, the chaos that is on your desktop stays the same way.
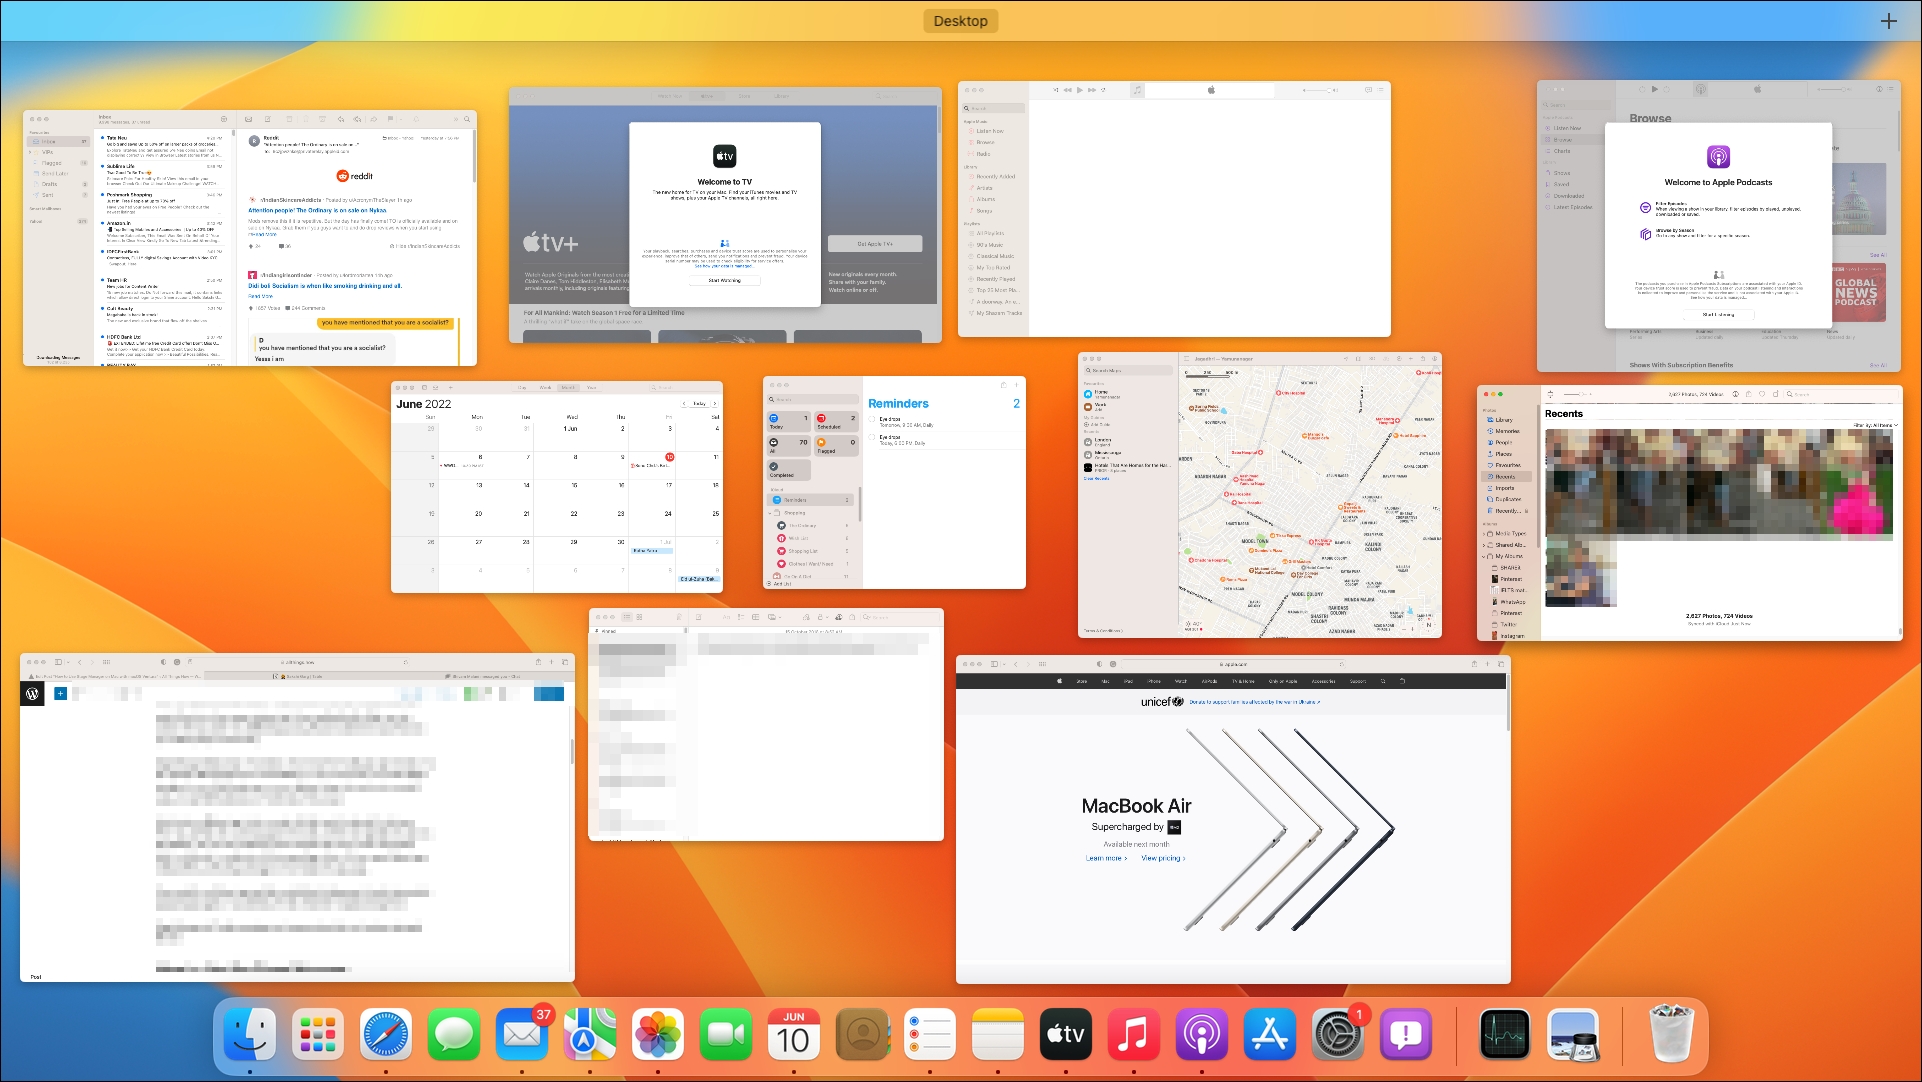
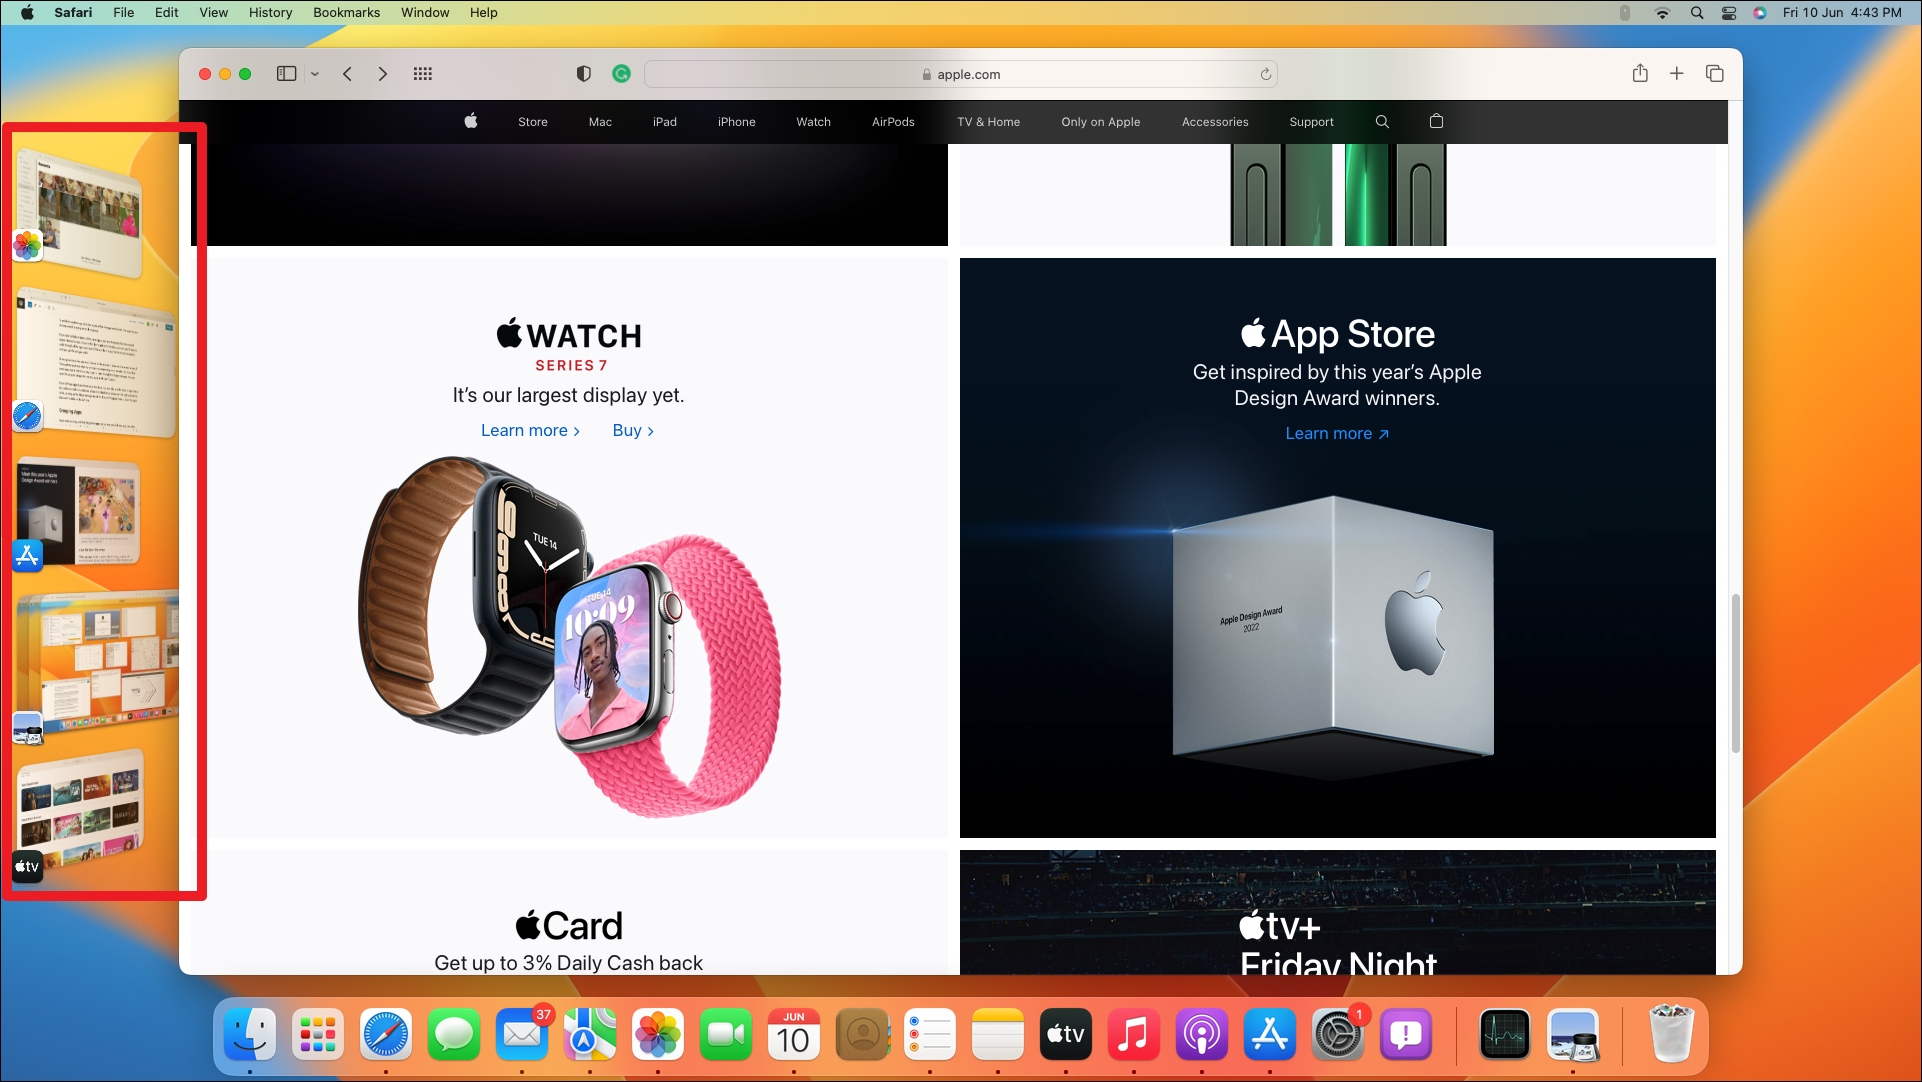
Stage Manager helps reign in that chaos. It’s not a tool for hunting an open window, it is an organizer that arranges your entire desktop in a jiffy. As soon as you activate Stage Manager, it sorts all the open apps on your desktop, except the one you’re currently using, in neat little thumbnails on the left side of the screen.

Switching to a different app is then a matter of clicking the thumbnail for that app. When you do that, the current app goes to the side, and the new app takes its place on the desktop. You can even create groups for certain apps. Say, you’re using Notes, Safari, and Books in combination while researching a topic. You can group these apps without effort, and the Stage Manager will remember this grouping.
Stage Manager in action.
If you switch to a different app and then switch back to the group, it won’t just open the grouped apps again on your desktop, it’ll also retain their original arrangement.
Stage Manager will make managing your insane productivity work sessions extremely efficient.
How to Use the Stage Manager
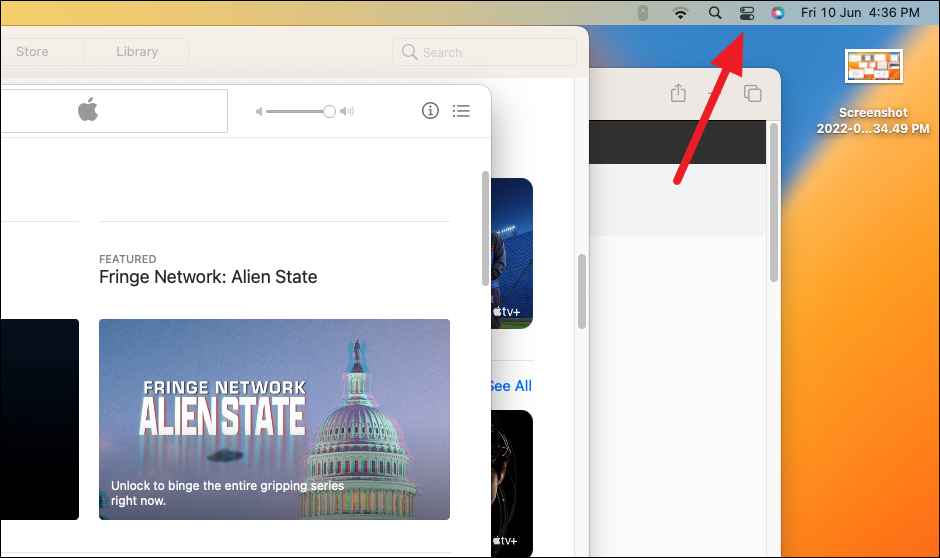
Unlike Mission Control, there’s no trackpad gesture or keyboard key to activate Stage Manager. The control for Stage Manager is accessible from the Control Center instead. You don’t have to add the option to the Control Center, though. Once you update to macOS Ventura, it’ll automatically appear in the Control Center.
Activating the Stage Manager
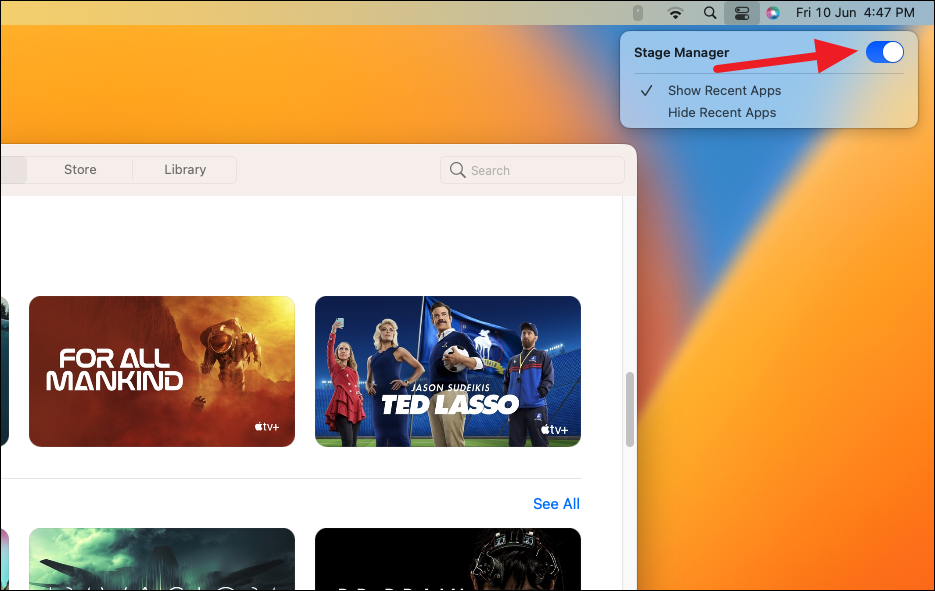
To activate Stage Manager, go to the upper-right corner of the screen and click the icon for ‘Control Center’ from the Menu Bar.
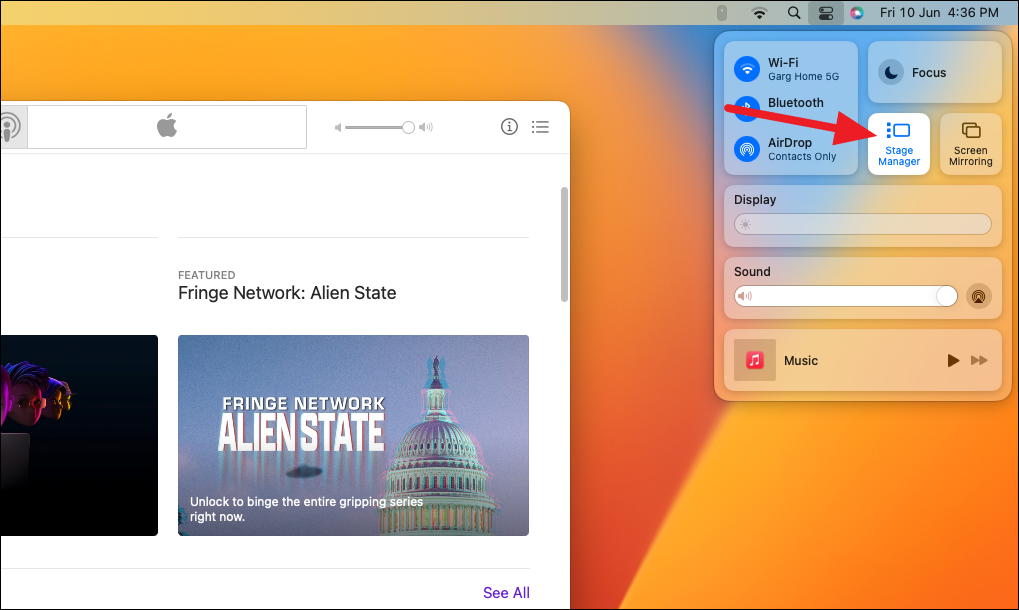
The Control Center will appear on your screen. Click the icon for ‘Stage Manager’ to activate it. It will be highlighted when it’s active.
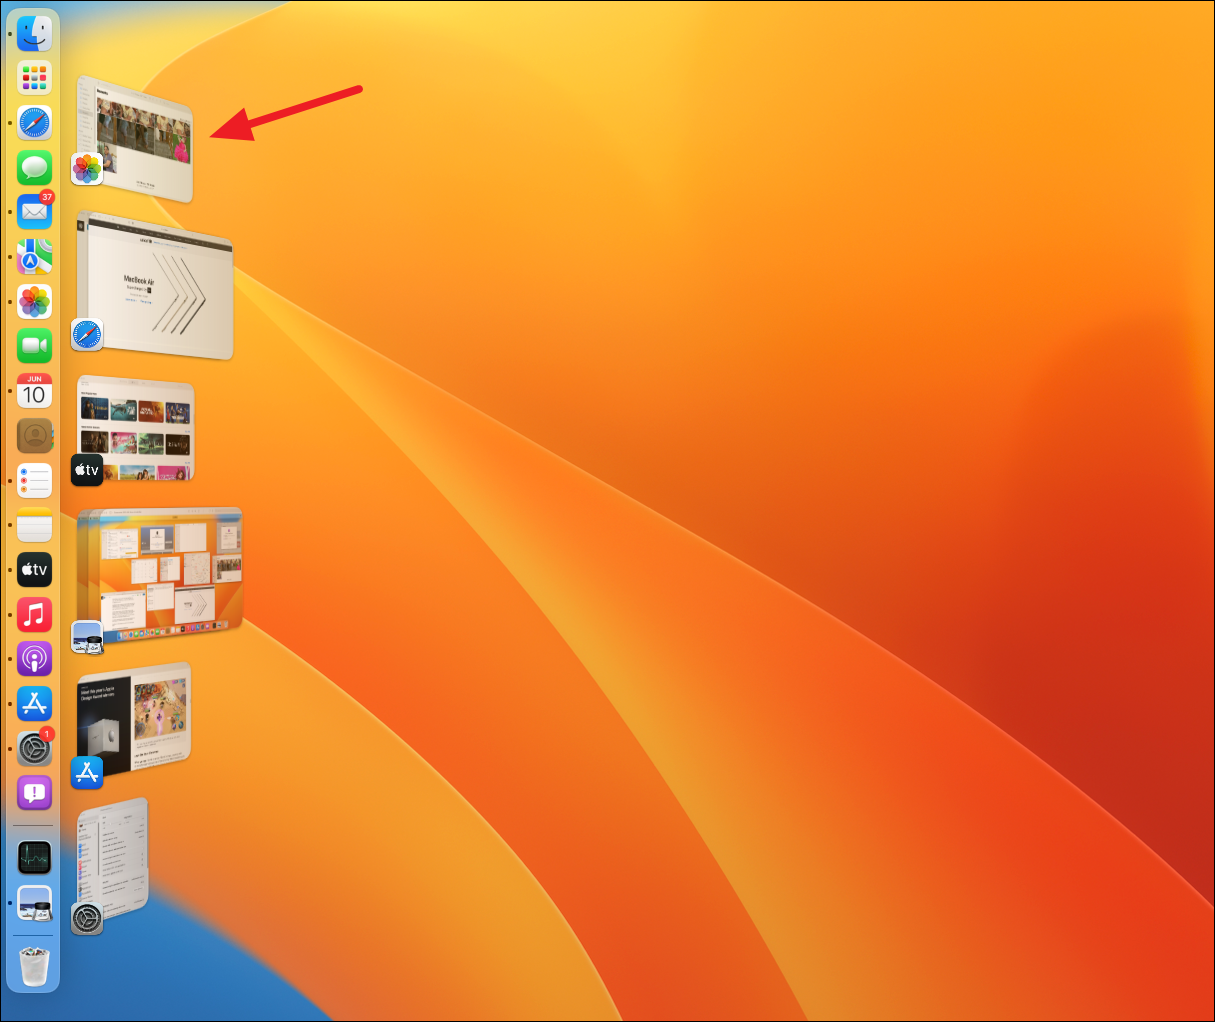
As soon as you do that, all the open windows on your desktop would go away to the left, only leaving the one you were currently using on the desktop. The rest of the apps would tuck away as thumbnails in the left corner, ready to be beckoned again with a single click. The thumbnails also show the content of the open window.
If any apps were minimized before you enabled the Stage Manager, instead of the app thumbnail that shows the preview of the open window, only the app icon will appear on the left side. Once you maximize the app from the dock, it’ll appear in the Stage Manager.
Learning the Ropes of the Stage Manager
To switch to another app, click the thumbnail for the app from the left. The apps on your desktop would instantly switch their places.
If you had multiple windows of the same app open, the thumbnails for them would appear stacked on top of each other. But to get to the window you want, you’d have to cycle through all the open windows of that app by clicking the thumbnail repeatedly until you get the one you want.

At any given time, the maximum number of thumbnails it shows on the screen is only 5. These prime spots are taken up by apps you were using most recently. So, if you had more apps open, there’s no way to get to them through the Stage Manager. You can open those apps using other means, such as Mission Control.
If any of those apps have shortcuts in the dock, you can also use the dock to open them. But unlike normal circumstances where minimized apps appear on the right side of the dock, as long as the Stage Manager is active, the apps you minimize after activating the Stage Manager won’t appear there – even the apps that aren’t visible on the left side.
Grouping Apps
Now when working with the Stage Manager, as soon as you click one app, the other automatically goes to the left. If you want to work on any apps together, switching back and forth between these apps can be a headache. So, what’s the solution? Grouping the apps. Being able to group the apps is one of the most attractive qualities of the Stage Manager.
Open any one app that you want to group with other apps. Then, drag the thumbnail for the other app onto the desktop. It’s as simple as that. Keep dragging all the apps you want to include in the group from the left.
Arrange them on your desktop however you like. When you switch to another app, you’ll find your group preserved in the left thumbnails as it is. Click it to open the group. When you open it, you’ll find that even their arrangement on the screen is preserved.
You can even have two different windows of the same app in two different groups. So, while one window of Safari that has all the tabs with your research-related content could be in one group, the other window could be in another group.
To remove an app from the group without closing it, drag it away from the desktop and onto the thumbnails on the left.
Viewing Desktop Files
When the Stage Manager is active, any files on your desktop are not visible. If you want to view the files on your desktop, you can tuck away even the open app. Click anywhere on the desktop and the current app will gracefully hide away, leaving only the desktop in view.
If you click on the desktop again, the app you previously hid will appear again.
While you’re viewing the desktop, you can also open any file on it. The rest of the desktop files would disappear again if you open a file.
But there’s a trouble with the Stage Manager. Even if you have no apps open, the files on your desktop would remain elusive. You have to click the empty desktop to make your desktop files appear. And if you click the desktop again, they’d go away.
You can also view the desktop by clicking the ‘Minimize’ (yellow) button on the open app window. But after this, when you click anywhere on the desktop again, it won’t open the app that you minimized. Instead, the app whose thumbnail is at the top of the list would open. Instead of clicking the desktop, you can instead directly click the thumbnail for the app you want to open if it’s not at the top of the list.
Hiding Recent Apps
By default, the Screen Manager is configured to show the recent apps on the left. But you can also hide the recent apps from the left side if you want extra space on the screen. Open the Control Center and click the icon for Stage Manager.
Few options will appear where ‘Show Recent Apps’ will be selected by default. Click ‘Hide Recent Apps’ to select it instead.
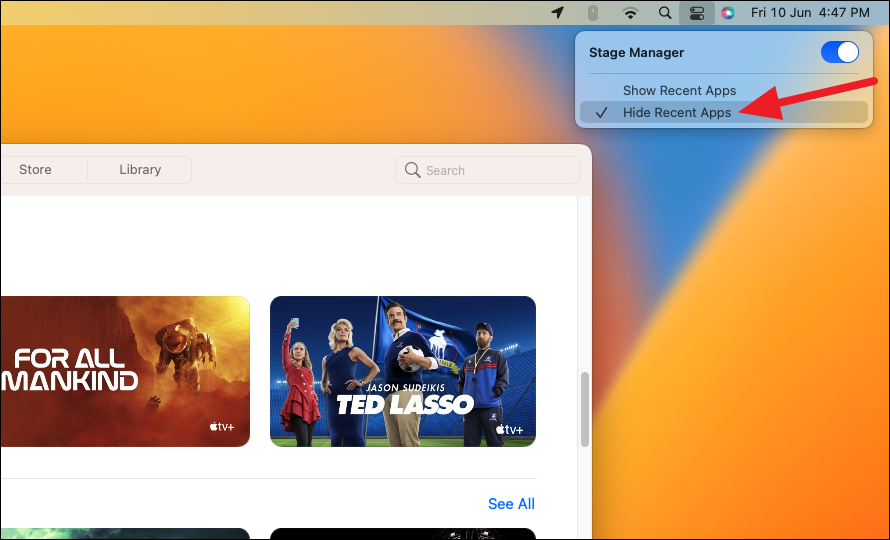
The app thumbnails from the left side of the screen will disappear. To view them, move your mouse pointer to the left edge of the screen, just like you do with the dock at the bottom edge to view it when it’s hidden.
If you have the dock placed at the left edge of the screen, the recent apps will appear to its right. Even in this situation, if the apps are hidden, going to the left edge will make them visible again. Curiously, in this arrangement, the Stage Manager shows 6 thumbnails instead of 5.
Disabling the Stage Manager
The Stage Manager stays active until you explicitly disable it. It stays active even after you turn on your computer after shutting it down.
To disable the Stage Manager, open the Control Center from the Menu bar. Then, click the icon for ‘Stage Manager’. From the options that appear, disable the toggle for ‘Stage Manager’.
Limitations
Even though the whole setup for the Stage Manager looks rather promising, there are a few quirks with it.
For starters, the whole process to turn it on and off is rather cumbersome; the latter even more so than the former. If this is to be the future of using Mac, there needs to be a keyboard shortcut or a trackpad gesture to make it a faster process, in my opinion.
Also, the thumbnails on the left are rather inert. They offer no other functionality. You can’t resize or rearrange them. Neither are there any options available when you right-click a thumbnail. A context menu could potentially implement so much functionality. Right now, you can’t even quit an app from its thumbnail. You first have to open the app to close it. But that’s how things have been with Mission Control also, so maybe it’s foolish to expect anything else.
But you should note that any of these quirks hardly weigh against using Stage Manager. If anything, they are more like wishes that I hope Apple would address. But since the feature is still in beta, there’s still a lot of scope for improvement.
Even in these early stages, the Stage Manager makes it easier to work by organizing the clutter on the desktop. After using it for a while, it’ll make you wonder where it has been till now. And don’t think of it as a replacement for Mission Control or Spaces. They are not each other’s competitors. When used right, these features would complement each other. You can use Stage Manager when there are tons of apps open to declutter your desktop but only use Mission Control when working with a small number.