Managing multiple tabs in your web browser can be overwhelming and inefficient. Thankfully, browsers like Google Chrome and Microsoft Edge offer an experimental feature called 'Tab Groups' that helps organize your tabs for a more streamlined browsing experience. Although still in development, you can enable and start using Tab Groups right now to keep your tabs tidy.
Note: The Tab Groups feature is experimental and not yet rolled out to the public. Enabling it may risk browser data loss or compromise security and privacy. Proceed with caution.
How to enable Tab Groups in Chrome
Step 1: Open Google Chrome on your computer and click on the address bar at the top.
Step 2: Type chrome://flags into the address bar and press Enter.
Step 3: In the 'Search flags' box, type Tab Groups to locate the feature flag.
Alternative: Directly access the flag by typing chrome://flags/#tab-groups in the address bar and pressing Enter.
Step 4: When you find the 'Tab Groups' flag, click on the drop-down menu next to it and select Enabled.

Step 5: Chrome will prompt you to relaunch the browser to apply the changes. Click on the Relaunch button to restart Chrome immediately.

How to enable Tab Groups in Microsoft Edge
If you're using the new Chromium-based Microsoft Edge, you can enable Tab Groups in a similar way.
Step 1: Open Microsoft Edge and click on the address bar.
Step 2: Type edge://flags into the address bar and press Enter.
Step 3: In the 'Search flags' box, type Tab Groups to find the feature flag.
Alternative: Directly navigate to the flag by entering edge://flags/#tab-groups in the address bar and pressing Enter.
Step 4: When you locate the 'Tab Groups' flag, click on the drop-down menu next to it and select Enabled.

Step 5: Click the Restart button at the bottom of the screen to relaunch Edge and apply the Tab Groups feature.

The Tab Groups feature enhances your browsing experience by allowing you to organize tabs efficiently. Once enabled, you can start grouping your tabs for better management.
Creating a new tab group
After relaunching your browser, you won't notice any immediate changes. Start by opening a few tabs to see the feature in action.
Step 1: Right-click on a tab that you want to include in a group.
Step 2: Select Add to new group from the context menu.
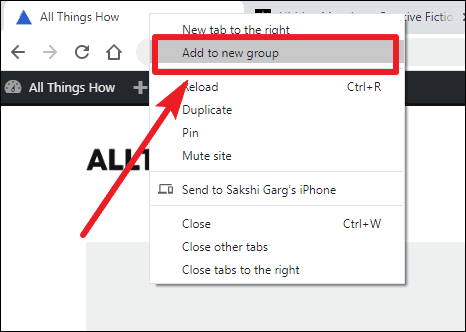
A new tab group will be created, indicated by a colored circle next to the tab. All tabs in this group will share the same color boundary.
Naming a tab group
Assigning a name to your tab group helps keep your tabs organized.
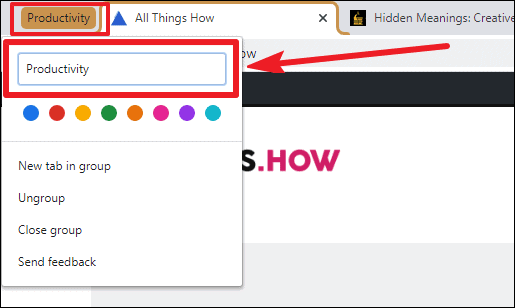
Step 1: Click on the colored circle beside the tab group to open the group menu.
Step 2: In the text box at the top of the menu, type the desired name for your group.
The name you enter will replace the colored circle, making it easier to identify the group.
Changing the color of a tab group
You can change the color of your tab group to differentiate it from others.
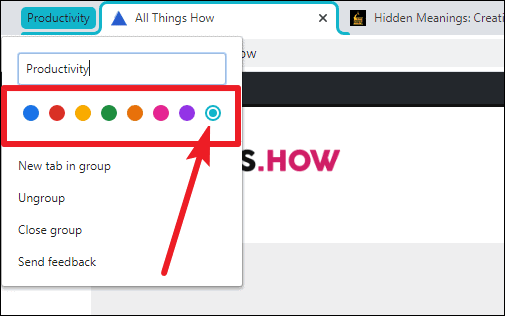
Step 1: Click on the colored circle or group name to open the group menu.
Step 2: Choose a new color from the eight available options.
Using different colors helps in visually organizing your tab groups, especially if you haven't named them.
Launching a new tab in a tab group
You can add new tabs directly into an existing group.
Step 1: Click on the group name or colored circle to open the group menu.
Step 2: Select New tab in group from the options.
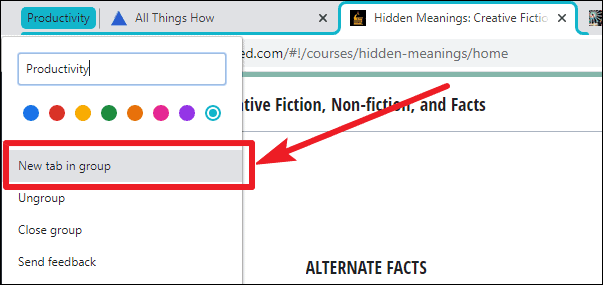
The new tab will open within the group, highlighted with the group's color.

Adding an open tab to an existing tab group
To add an already open tab to a group, follow these steps:
Step 1: Right-click on the tab you want to add to a group.
Step 2: Hover over Add to existing group in the context menu.
Step 3: Select the desired group from the list that appears.
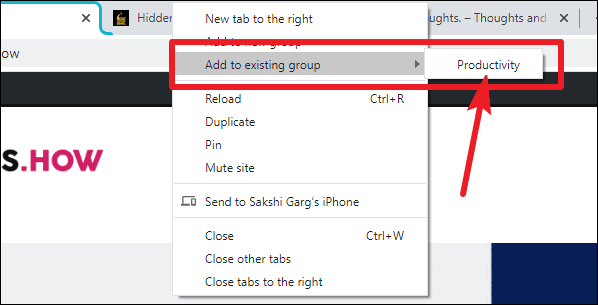
💡 Tip: You can also drag a tab into a group. Click and hold the tab, then drag it into the group until it adopts the group's color, and release it.
Removing a tab from a group
If you need to remove a tab from a group:
Step 1: Right-click on the tab you wish to remove.
Step 2: Select Remove from group from the context menu.
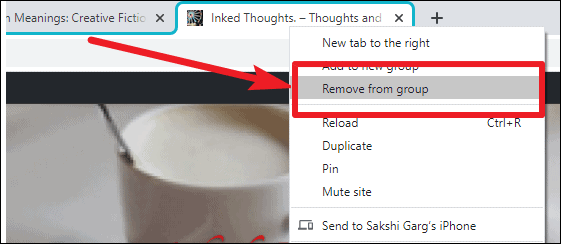
Note: You can also remove a tab by dragging it out of the group. Simply click and drag the tab away from the group until it no longer displays the group's color.
How to ungroup a tab group
To dissolve a tab group and separate all its tabs:
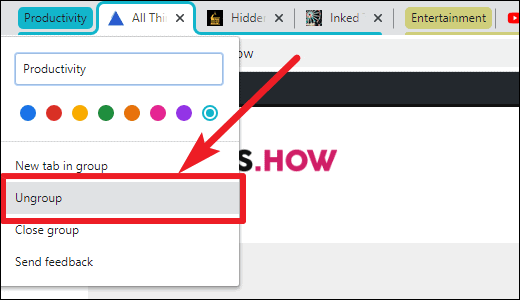
Step 1: Click on the group name or colored circle to open the group menu.
Step 2: Select Ungroup from the options.
Closing a tab group
To close all tabs within a group at once:
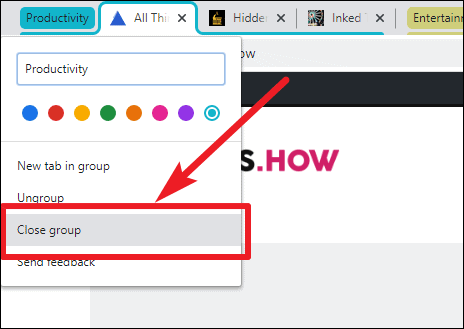
Step 1: Click on the group name or colored circle.
Step 2: Choose Close group from the menu.
Arranging tab groups
You can rearrange tabs within a group or move entire groups to different positions.
To rearrange tabs: Click and drag a tab within the group to your preferred position.
To rearrange groups: Click and hold the group name or colored circle, then drag the entire group to a new location among your tabs.
By utilizing the Tab Groups feature in Chrome or Edge, you can keep your browser organized and improve your productivity while navigating the web.

