

Windows Photos app is one amazing tool added by Microsoft to its stock arsenal of apps, that being said, it is also one of the most underrated and underused apps by a majority of users.
One of the great under-explored functionality of the Windows Photos app is the built-in video editor. The built-in video editor can even give some third-party apps a run for their money when it comes to creating videos from photos, adding media elements, or any other not-so-over-the-top feature.
If you are also not much aware of the Windows built-in video editor in the Photos app, you should definitely give this article a thorough read.
Launching the Built-in Video Editor in Windows 11
The built-in video editor can be launched in two ways, let’s take a quick look at both of the ways.
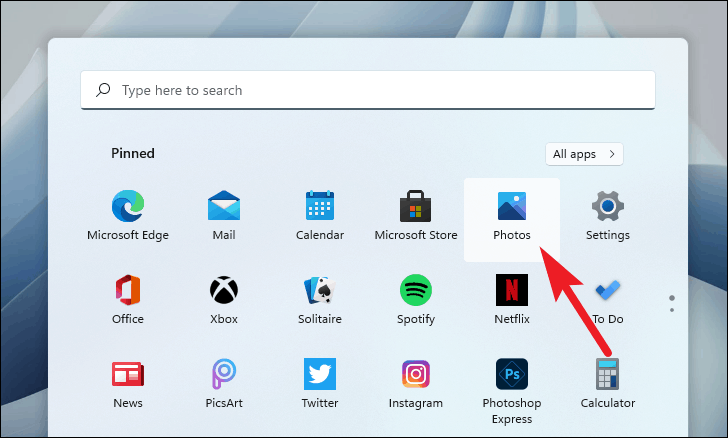
To access the built-in video editor from within the Windows Photos app, first launch the Photos app using Start Menu, taskbar, or search for it in your app library.
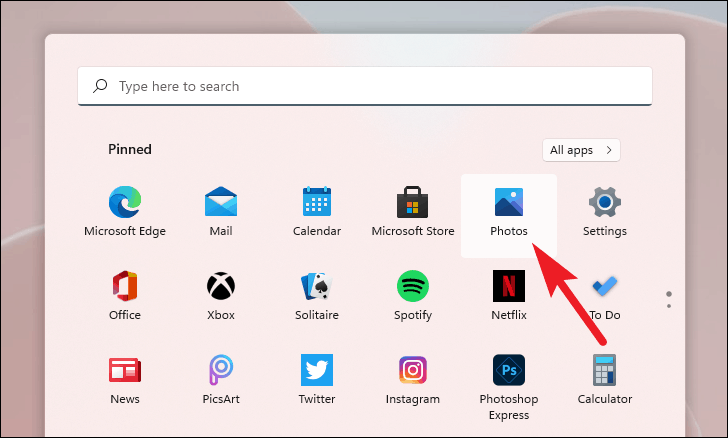
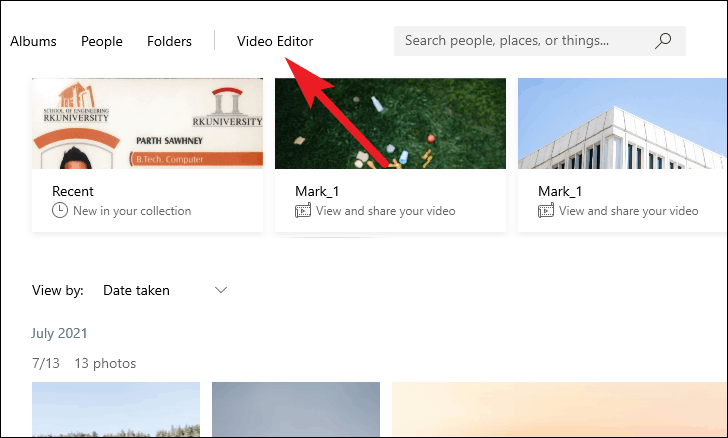
Once the Photos app has opened, click on the ‘Video Editor’ tab from the ribbon menu present on top of the window.
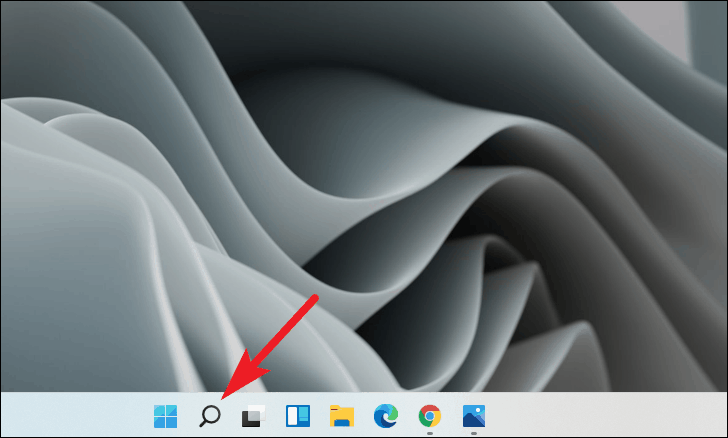
Windows also allow you to directly open the Video Editor. To do so, click on the ‘Search’ icon present on your taskbar.
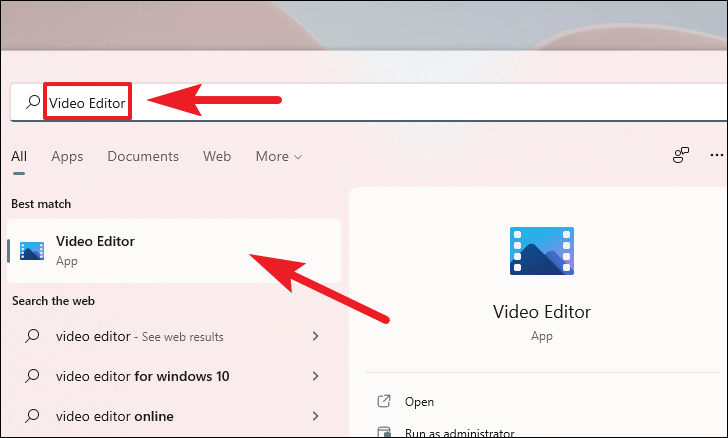
Then type Video Editor in the search box and click on the ‘Video Editor’ app from the search results to open the app.
Using the Free Video Editor in Windows 11
Windows built-in video editor offers a plethora of options for creating and editing your videos. Let’s first start with the creation of a video process and then move on to learn editing for a video project.
Create a Video Automatically from your Photos
The Windows Photos app can also create videos for you using the photos already present in your gallery. This feature is can come in real handy when you want to make a quick video of your family vacation memories, or create one for your friend on their birthday, or literally with anything you want to share.
To do so, first open the Windows Photos app from the Start Menu, taskbar, or your app library.

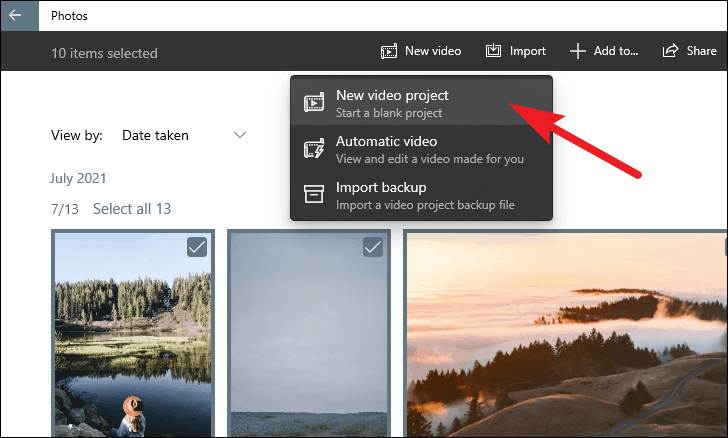
Now, select the pictures present in the gallery by clicking on the individual checkboxes present on each picture thumbnail.
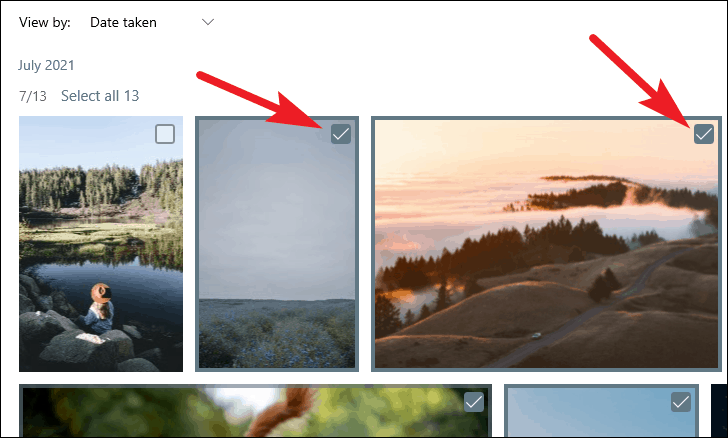
Once you have selected your desired pictures, click on the ‘New video’ option from the ribbon menu present on the top of the Photos app window. Then, click on the ‘Automatic video’ option from the overlay menu.

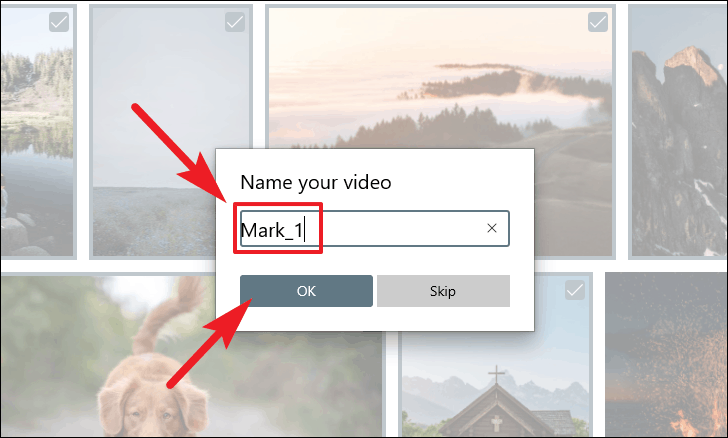
After that, type a preferred video name in the space provided and click on ‘OK’ to proceed.
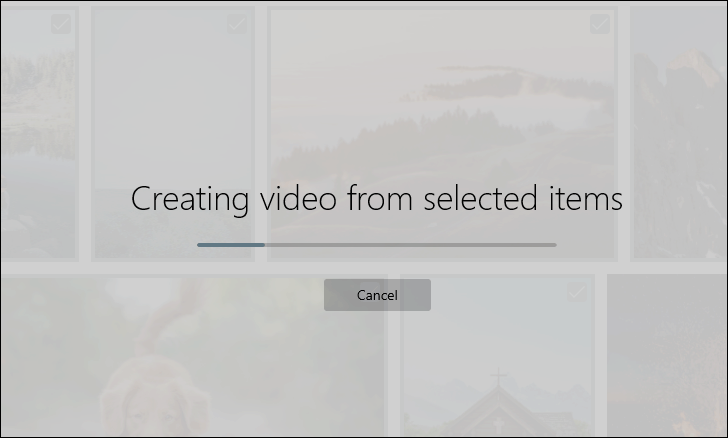
It might take a minute for the video editor to create a video for you, hang on while it does that.
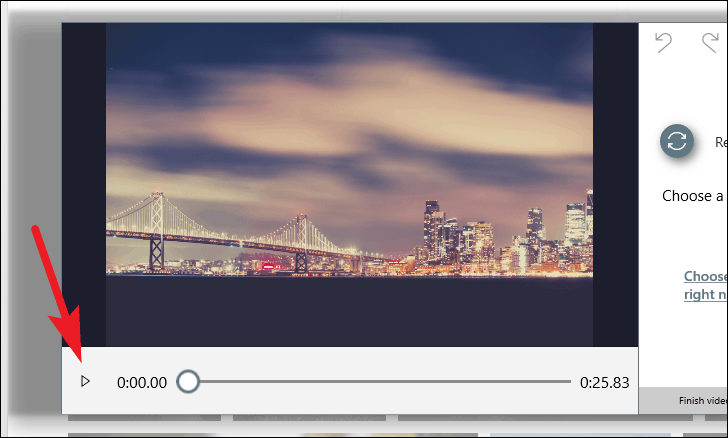
Once your video is created, an overlay window will open showcasing your newly created video file. Click on the ‘Play’ button to review your video.
Now, if you feel the need to change the pacing, background music, and theme for the video, click on the ‘arrows’ icon followed by the ‘Remix it for me’ field to change these parameters.
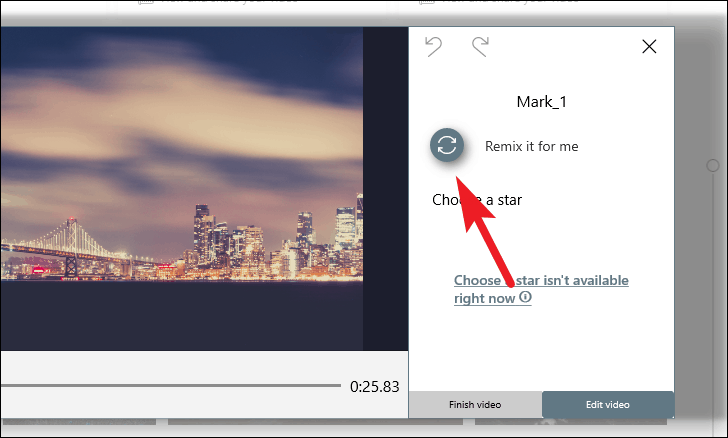
Then, you can also edit your videos by clicking on the ‘Edit video’ button present in the bottom corner of the window. Otherwise, click on the ‘Finish Video’ option to close the window and return to the Photos app.
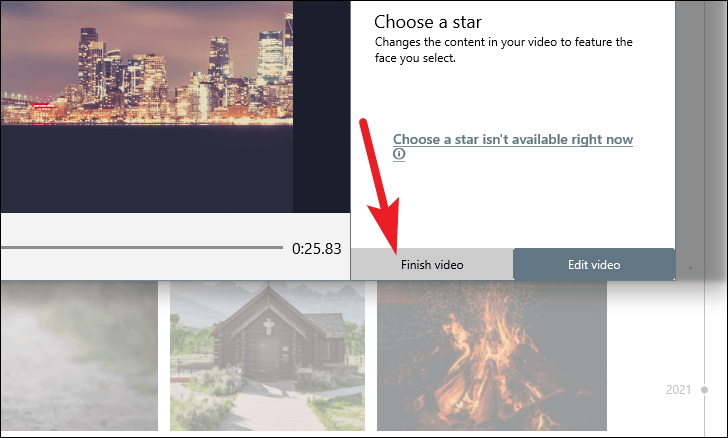
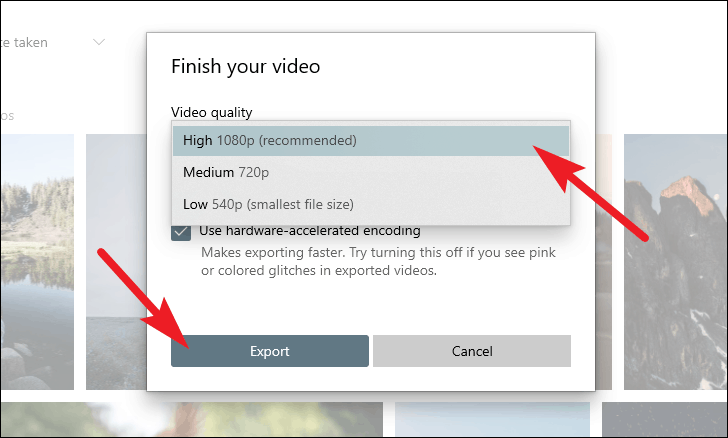
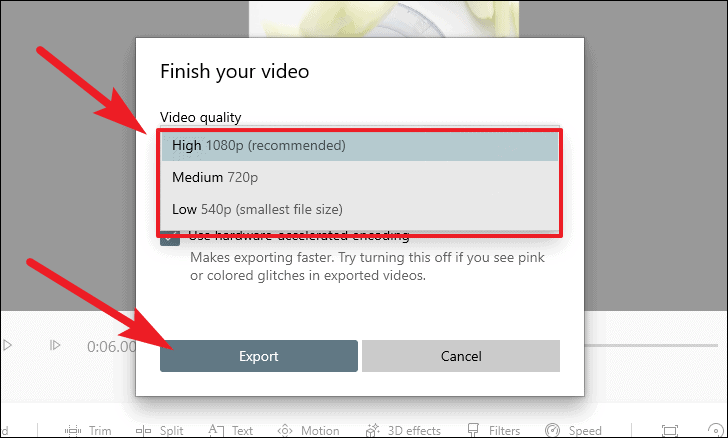
After clicking on the ‘Finish video’ option, click on the drop-down menu and select the preferred quality for your video. Then, click on the ‘Export’ button to export the video.
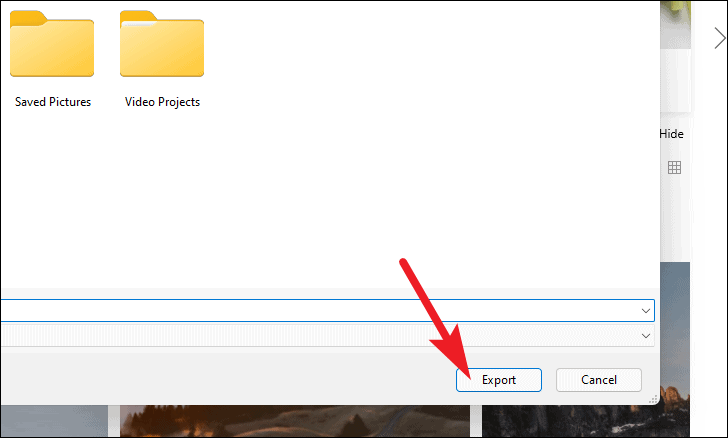
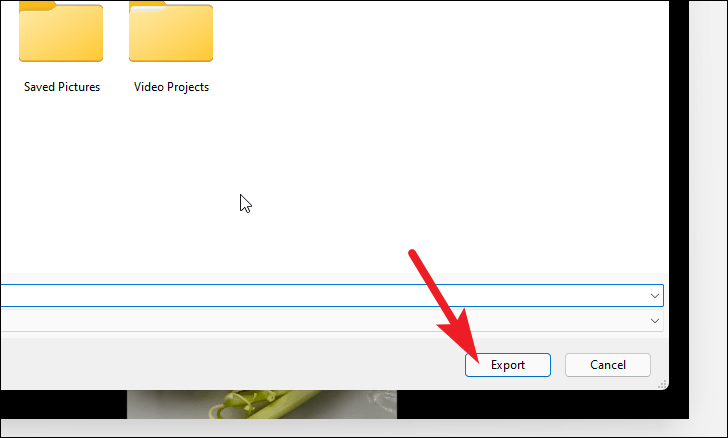
After that browse the location you want to save your video from the explorer window. Then hit the ‘Export’ button to finally save it.
Manually Create or Edit Videos
If you wish to create a video using existing pictures in your gallery or edit videos already present in your photo gallery and at the same time want to have complete control over all the aspects, this feature is made for you.
To do so, first open the Windows Photos app from the Start Menu, taskbar, or the app library of your PC.
Now, select your preferred pictures by clicking on the individual checkboxes present on each picture thumbnail.

Then, click on the ‘New video’ button from the ribbon menu present at the top of the window. Then, click on the ‘New video project’ option from the overlay menu.
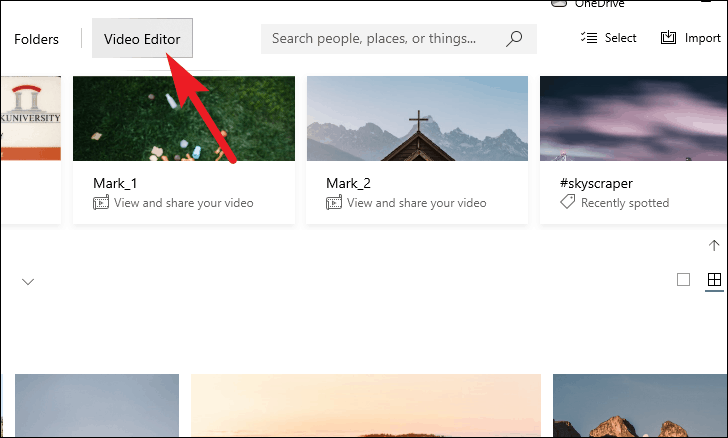
Alternatively, if you wish to open an existing video file or picture not present in the Windows Photos app gallery. Click on the ‘Video Editor’ tab from the Photos app.
Then click on the ‘New video project’ button present on the screen.
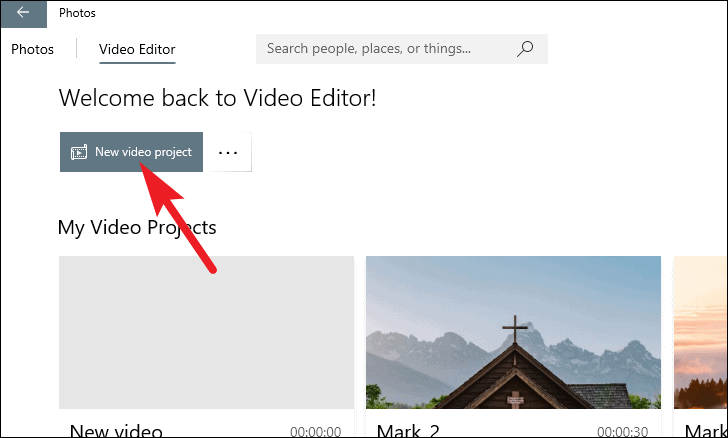
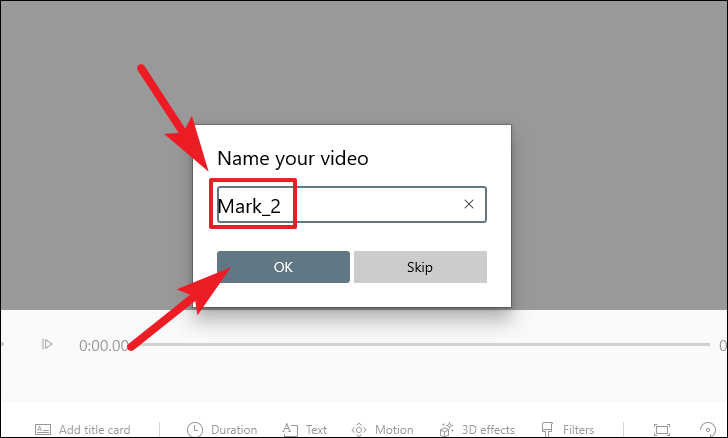
After that, give an appropriate name for your video project, and click ‘OK’ to confirm.
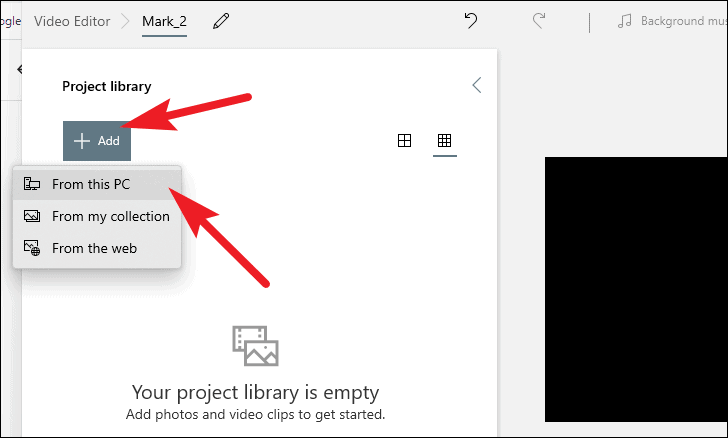
Next, click on the ‘Add’ button present under the ‘Project Library’ pane. Then, select the ‘From this PC’ option from the overlay menu and select the video by browsing your local storage drive.
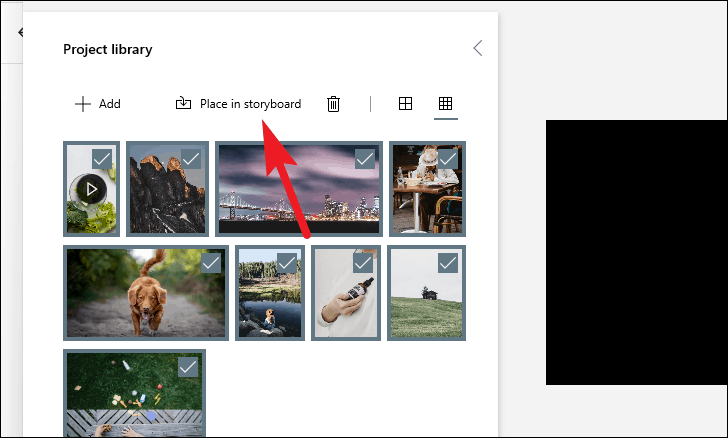
After you have selected the video(s) from your local storage, click on the ‘Place in storyboard’ option present in the ‘Project library’ pane.
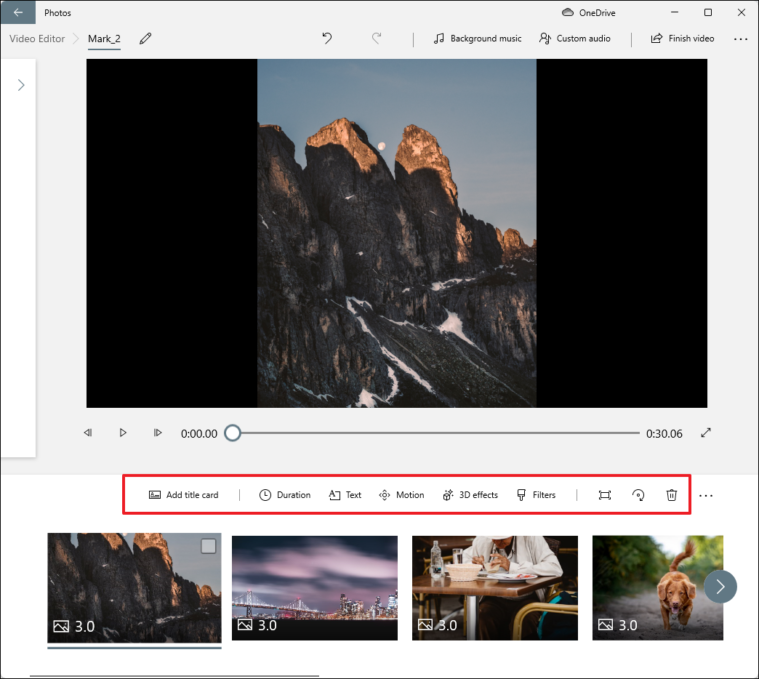
Once you have imported your video or select existing pictures from the Photos gallery, you will now see the storyboard screen for editing the video. Thus, let’s start exploring all of the options you have available on the storyboard toolbar.
Adding a Title Card to Video
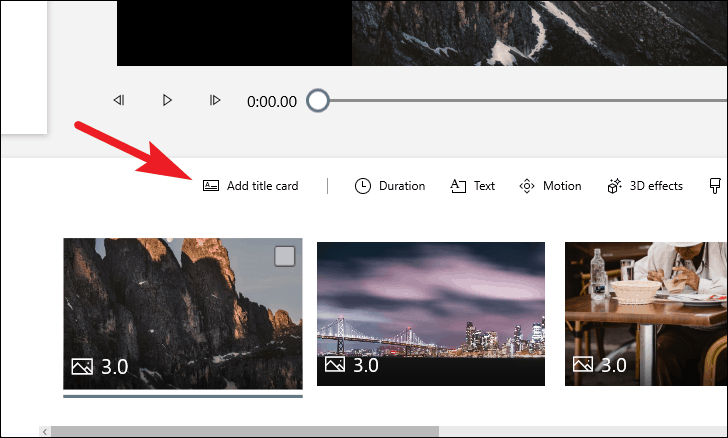
One of the first things you might want to add in your video is a title card displaying the context for that particular video.
To do so, click on the ‘Add title card’ button present on the storyboard pane, which will result in adding an extra frame before your selected picture/ video on the storyboard.
Note: By default, the Windows Video Editor will add a title card having a frame duration of 3 seconds.
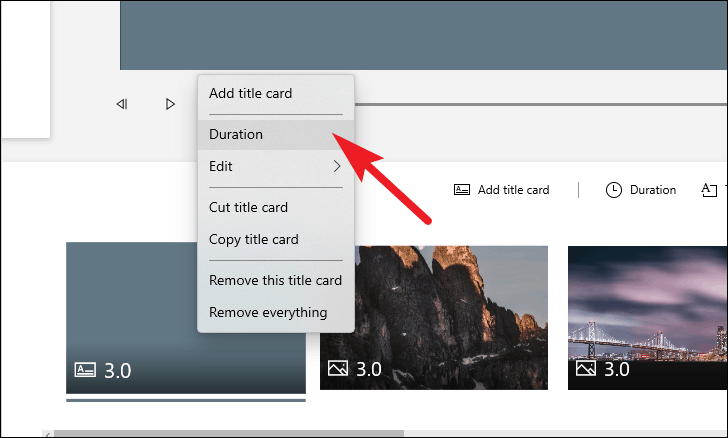
To change the default duration for the title card, right-click on the added card and then click on the ‘Duration’ option from the overlay menu.
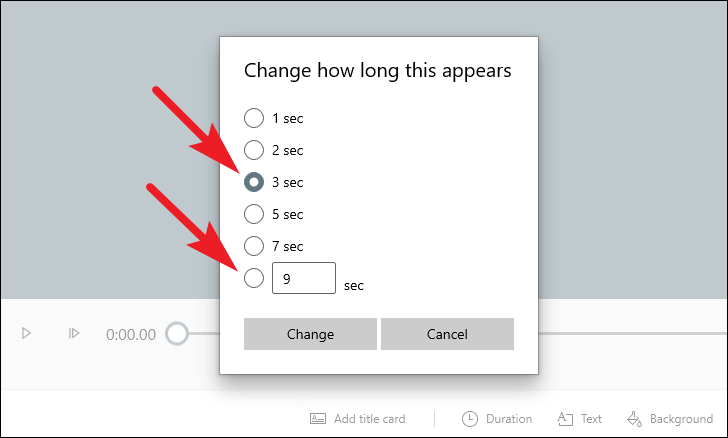
Now, select your preferred duration by either clicking on the radio button preceding the desired duration or by clicking on the radio button preceded by the text box and enter your preferred duration. Then, click on the ‘Change’ button to change the duration.
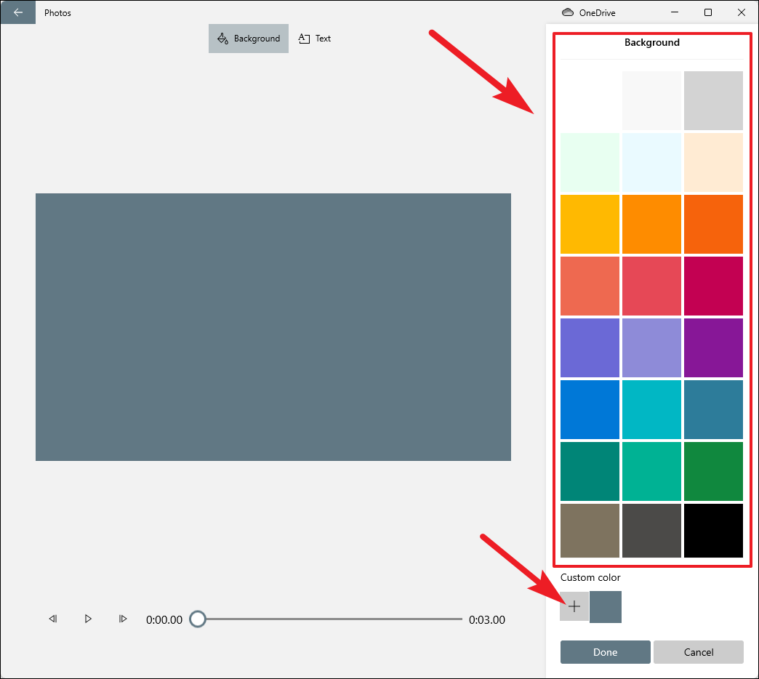
Now to change visual elements of the title card, right-click on the title card and hover over the ‘Edit’ option from the overlay menu, and click on the ‘Background’ option.
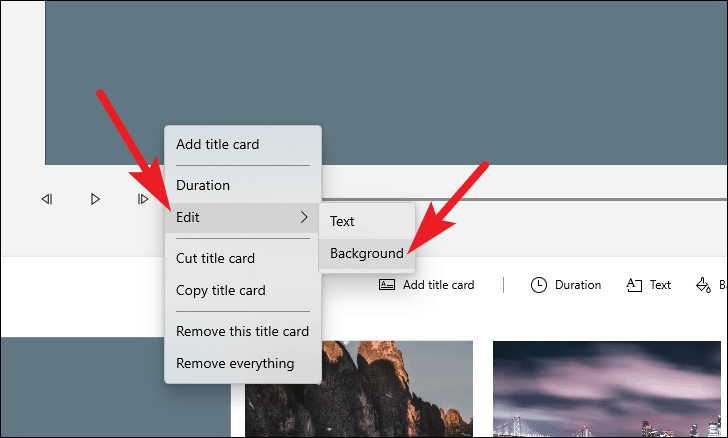
Then, select your desired color from the color palette present on the left section of the window to change the background. Alternatively, you can also click on the ‘+’ icon present under the ‘Custom color’ field to select a color of your choice using a color picker.
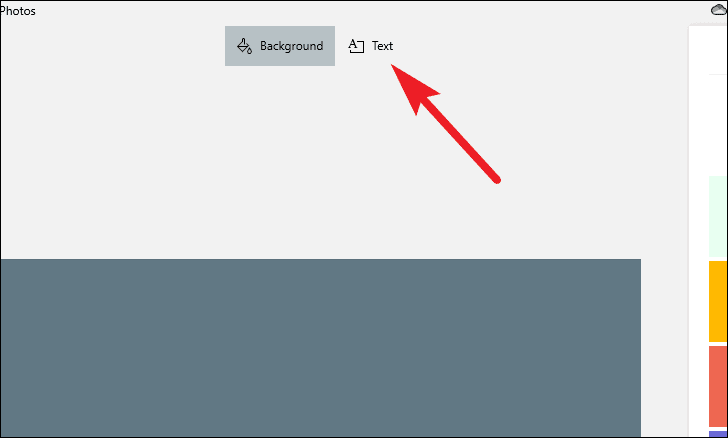
Next, click on the ‘Text’ option present at the top of your window to edit the text, style, layout, and duration for it.
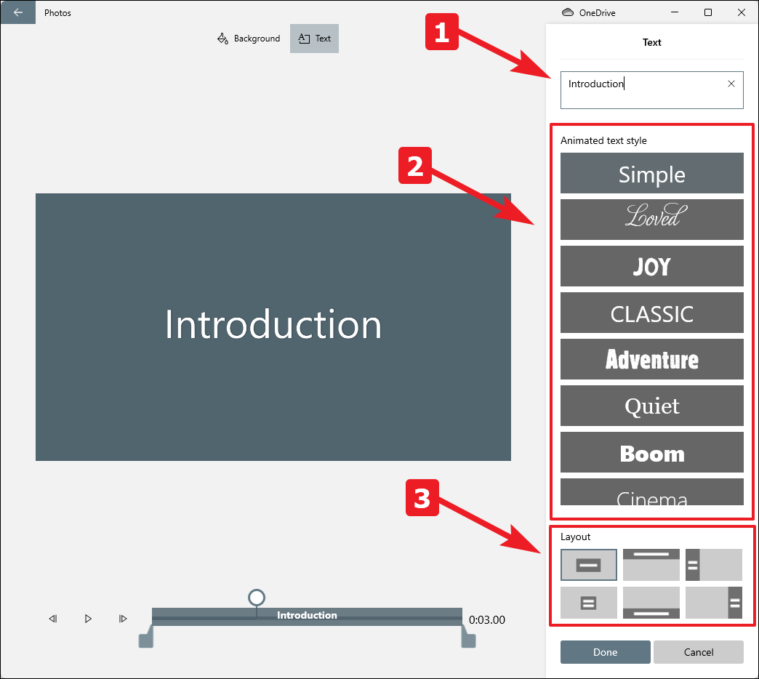
After that, type the text in the text box present on the top of the right sidebar. Then, to change the text style, click on the options from the list present right below it. Next, select your preferred layout for the title card by clicking on the individual thumbnail present on the bottom right section of the screen.
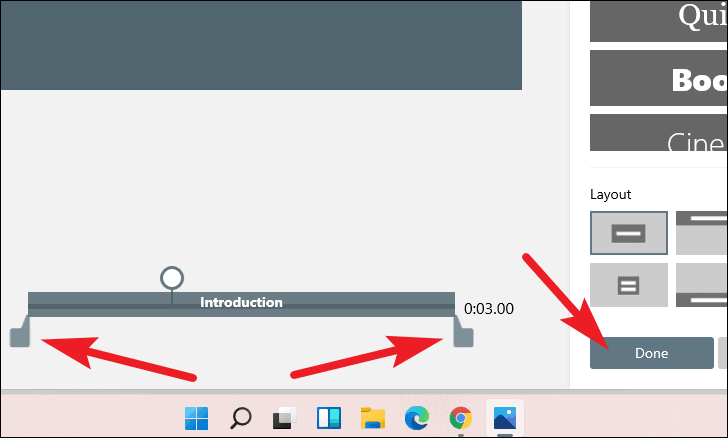
You can also drag the pointers present on the timeline to adjust the display duration for the text by left-clicking and holding the mouse button. Once everything is adjusted as per your preference, click on the ‘Done’ button present at the bottom right section of the window to confirm and apply your changes.
Trimming a Video
Trimming a video can be really beneficial when you are working with existing videos and want to chop off those extra minutes or seconds from the beginning or end of a video file.
To do so, click on the ‘Trim’ option present on the ‘Storyboard’ pane. If you have a mix of video files and pictures or you have multiple video files present on your storyboard, first select the file you want to trim by clicking on it.
Note: ‘Trim’ option would be available only if you selected a video file present in your storyboard.
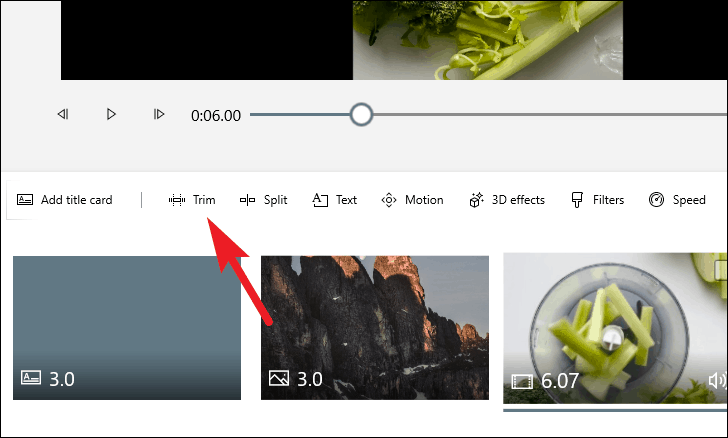
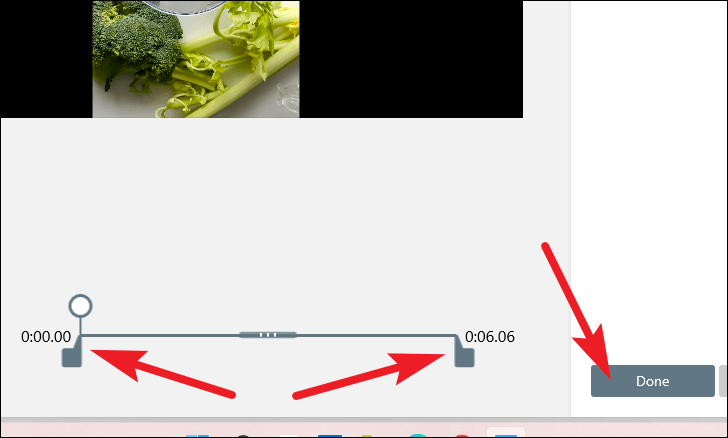
Next, click and hold the left mouse button to drag the pointer across the timeline to adjust the video clip time. Once the clip is adjusted according to your preference, click on the ‘Done’ button present on the bottom right section of the window.
Splitting a Video
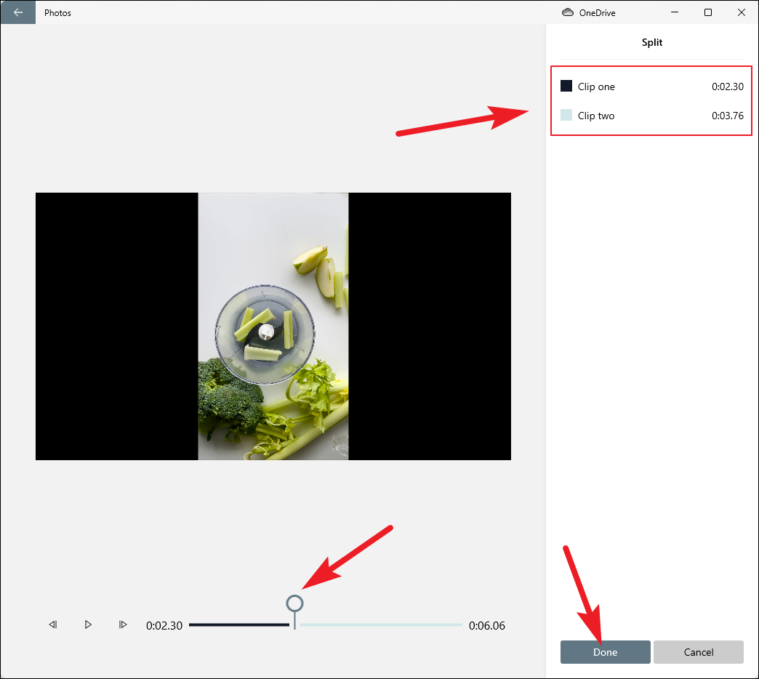
Splitting a video is a relatively less used functionality but can prove to be really essential when needed. With the splitting function, you can divide a single video file into two parts and edit them separately if you want. Moreover, you can also add frames in-between them if needed.
Now to split your video file, click on the ‘Split’ option from the storyboard pane.

Then, drag the pointer to your desired position on the timeline by clicking and holding the left mouse button. You will also be able to see the duration of both the splits on the right sidebar. Then, click on the ‘Done’ button from the bottom of the sidebar to confirm.
Adding Overlay Text in a Video
You can also add text to any picture or video file individually to provide some context or to add some funny bit to it.
To do so, click on the ‘Text’ button present on the storyboard pane.
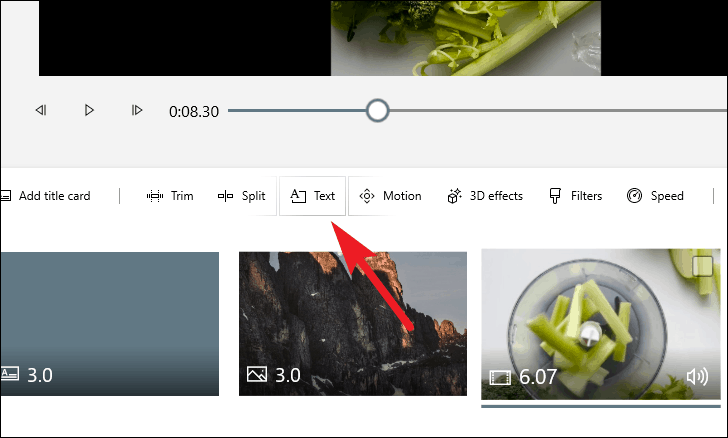
Then, on the next screen, you can type in the text you want to add in the provided text box. Then, you can select the text style from the list present on the sidebar. Also, click on the layout option situated just under the text style column to change the layout of inserted text.
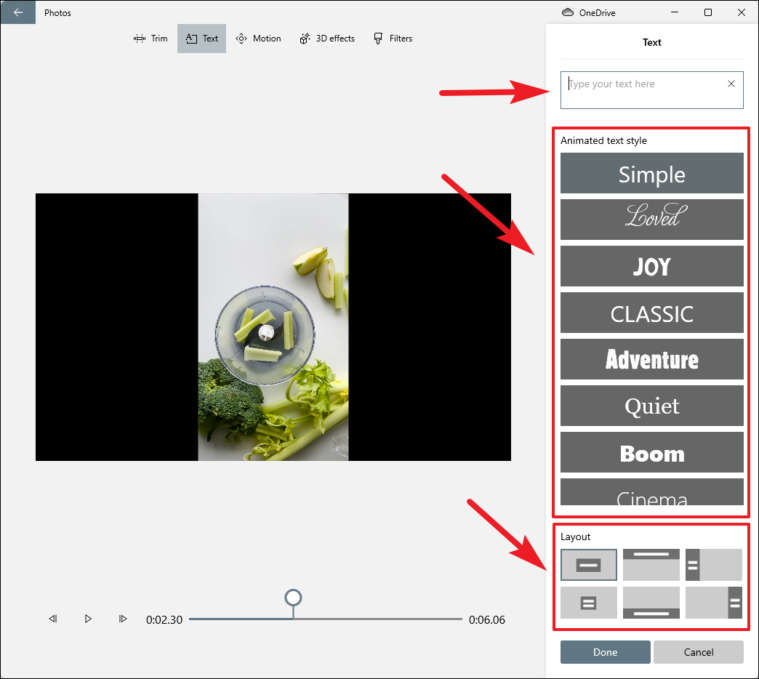
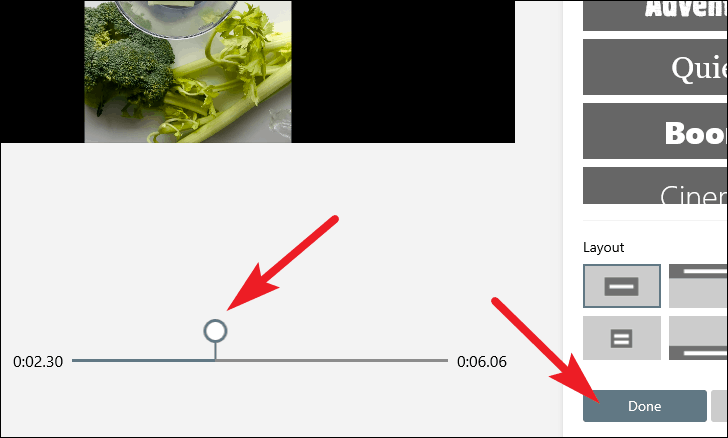
After that, drag the pointers to adjust the duration for the display of overlay text. Once everything is set as per your preference, click on the ‘Done’ button to confirm and apply.
Adding Motion Effects
Windows Video Editor also allows you to add motion effects to your videos, should you ever feel the need for that in your videos.
To do so, click on the ‘Motion’ button present on the storyboard toolbar.
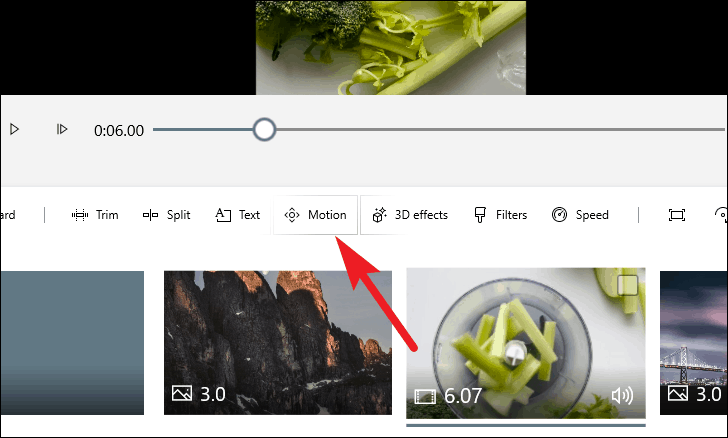
After that, select the motion effect and hit the play button adjacent to the specific frame timeline. Once you have found the desired motion effect, click on the ‘Done’ button to confirm and apply the effect.

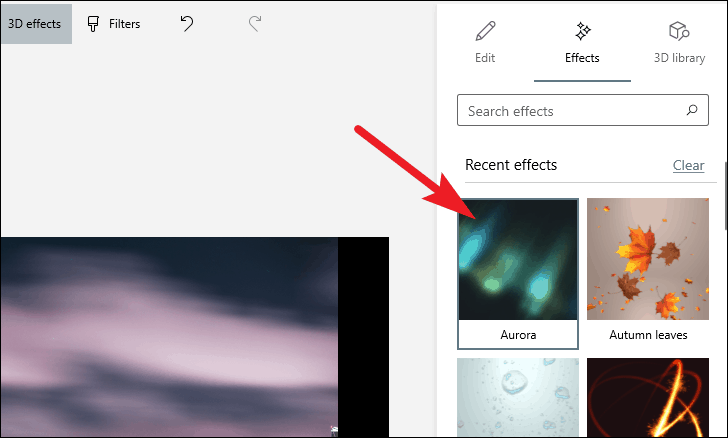
Applying 3D Effects
You can also add 3D effects to your videos. 3D effects allow you to add a layer on top of your video to provide some extra visual elements.
To apply a 3D effect, click on the ‘3D effects’ option present on the storyboard toolbar.
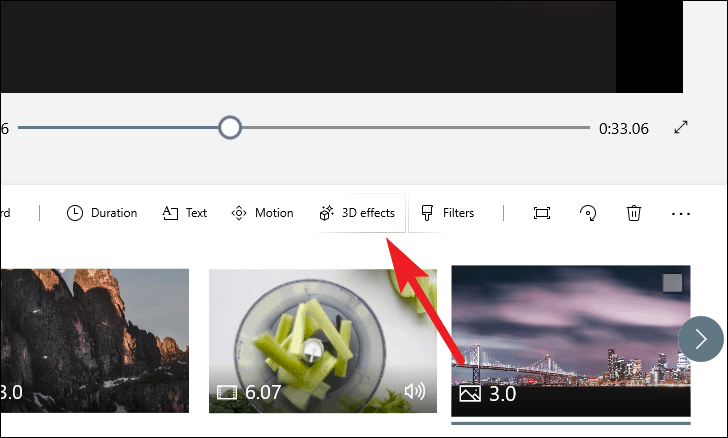
Next, click on any of the effect thumbnails present on the sidebar to select it.
Now click and hold the left mouse button by bringing the cursor inside the effect frame to reposition it. Then, use the curved arrows to revolve the effect on its axis to position it better according to your video.
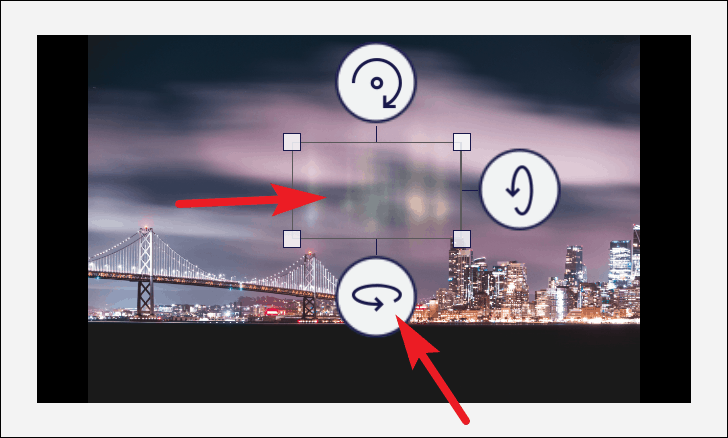
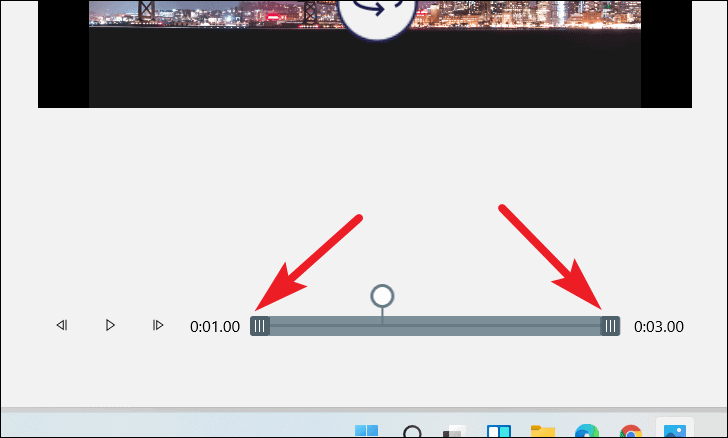
You can also adjust the 3D effect’s display time by dragging the pointers across the video timeline present on the screen.
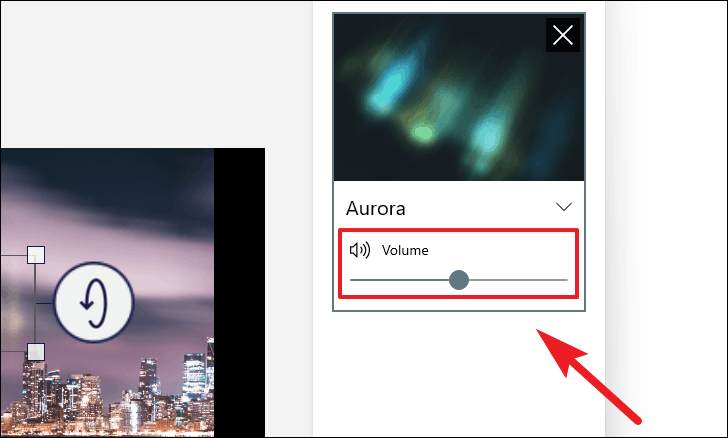
Also, you can adjust the volume of the effect by dragging the slider present under the ‘Volume’ label present on the sidebar.
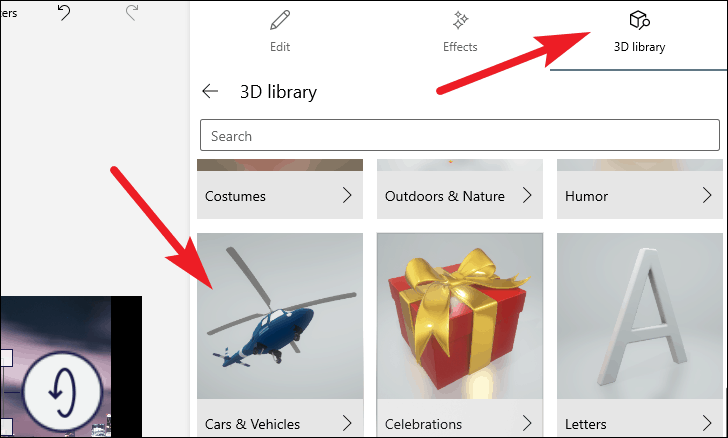
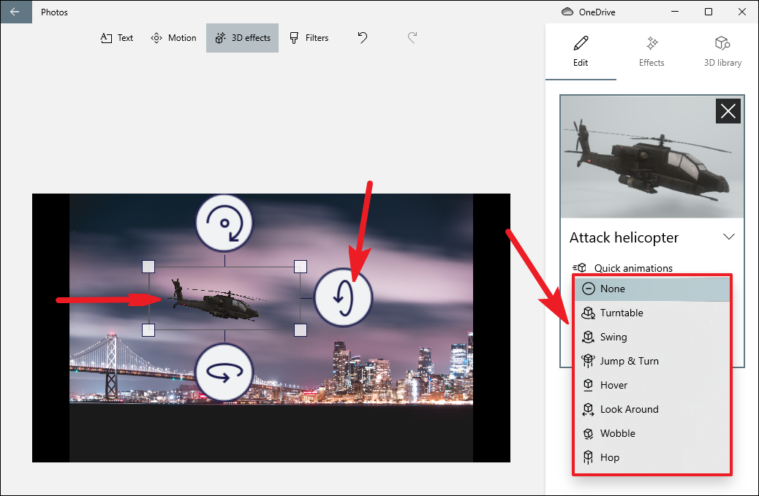
Next, if you want to add 3D objects to your video, click on the ‘3D library’ tab situated on the top right section of the sidebar. Then click on the individual category to browse all the options listed under it.
Once you have selected your desired 3D object, similarly to the 3D effects you can reposition it and revolve it on its axis to position it according to your preference. Also, you can add a quick animation by clicking on the dropdown menu options present under the ‘Quick animations’ label on the sidebar.
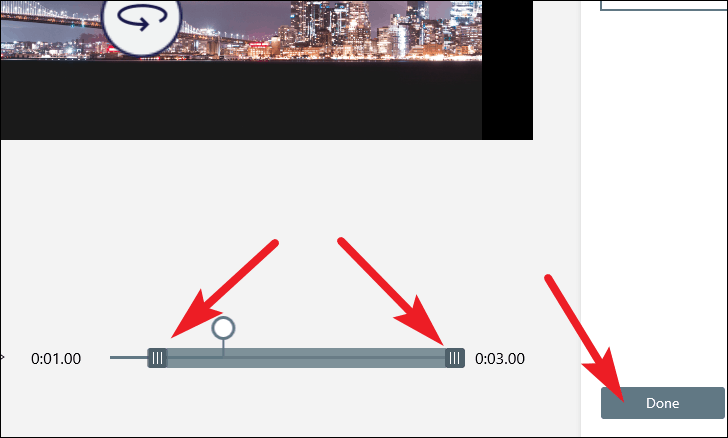
Next, you can also drag the pointers present on the timeline to adjust the display time of the object. Once you have added the desired effects and objects, click on the ‘Done’ button from the bottom section of the sidebar to confirm and apply.
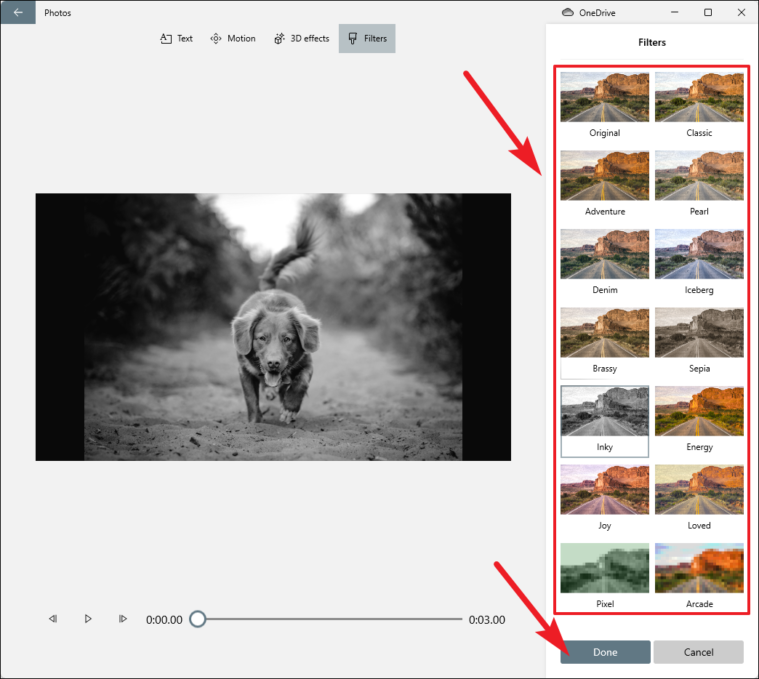
Adding Video Filters
There’s no introduction needed when you listen to the words ‘Filters’ in the context of photography or videography. They are always a welcome addition to make the pictures and videos more vibrant and pleasing to the eye.
To add filters, click on the ‘Filters’ button present on the storyboard pane.
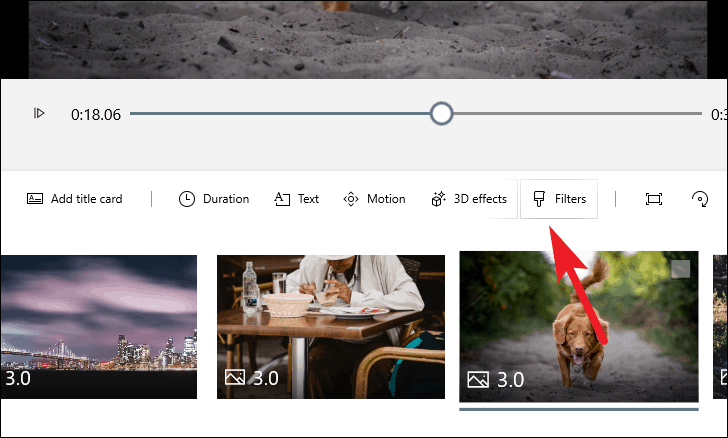
Now, select one by clicking on the individual thumbnails present on the sidebar. Once you have applied your preferred filter, click on the ‘Done’ button from the bottom section of the sidebar to confirm and apply.
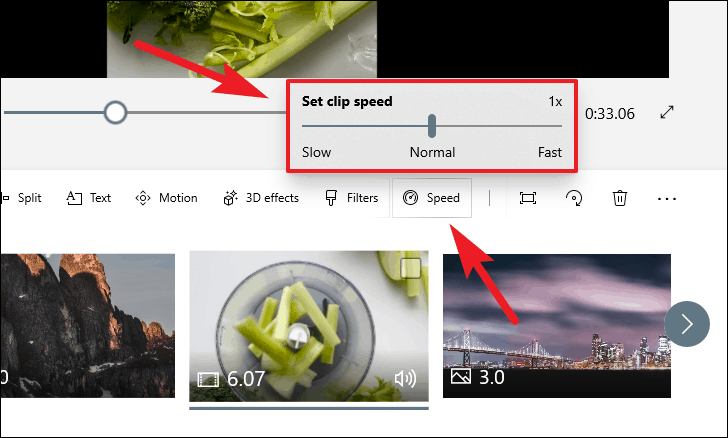
Change Video Speed
Changing video speed can prove to be helpful when you want to show a time-lapse or perhaps a slow-mo for a particular part of the video. Though the feature available in the Windows Video Editor does not explicitly allow you to configure the video speed for a particular part of the video, you can always split a section from the main video and apply it to achieve the desired result.
Now to change the video speed, click on the ‘Speed’ button present on your screen. Then, drag the slider rightwards to increase the playback speed and drag it leftwards to decrease the playback speed. The video can be slowed down to 0.02x and sped up as much as 64x the original playback speed of the video.
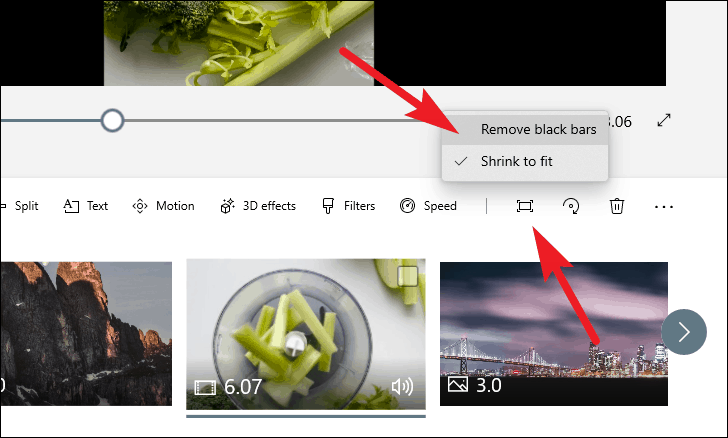
Remove Blackbars
Your video or some pictures you placed in the storyboard might have black bars present on the side, while some might be comfortable with it, others might want to remove them as soon as they see them.
To remove the black bars, click on the ‘Remove or show black bars’ icon present on the storyboard pane just beside the speed option. Then, from the overlay menu select the ‘Remove black bars’ option by clicking on it.
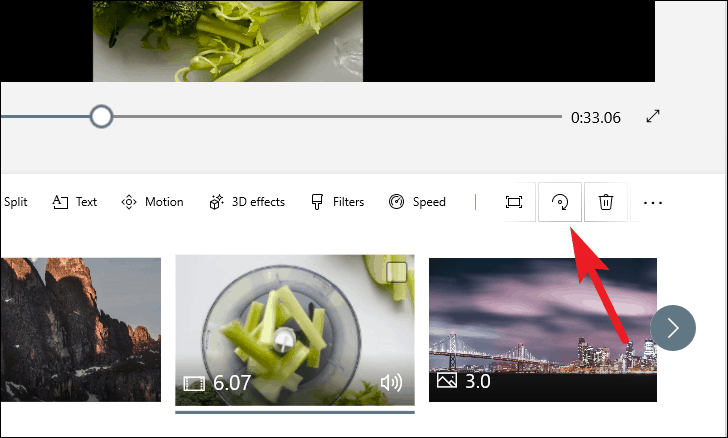
Rotating a Video
Well, there can be definitely instances where you might need to rotate the video and it’s necessary that you should know how to do that.
To rotate a video or a picture placed on your storyboard, click on the ‘Rotate’ button present on the screen. Alternatively, you can also use the Ctrl+R shortcut on your keyboard to do that.
Removing a Frame
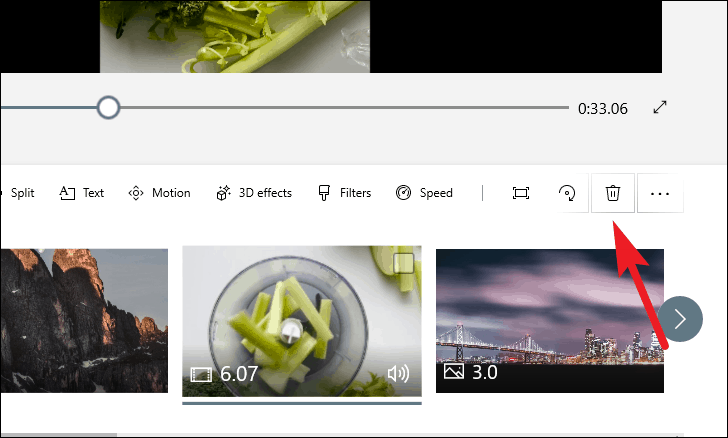
If you are creating a video using a series of pictures or you split the video, there might come a situation you would need to delete a particular frame.
To do so, select the particular frame by clicking on it, then click on the ‘Trash bin’ icon present on the storyboard pane to delete the chosen frame or video file.
Adding Background Music to the Video
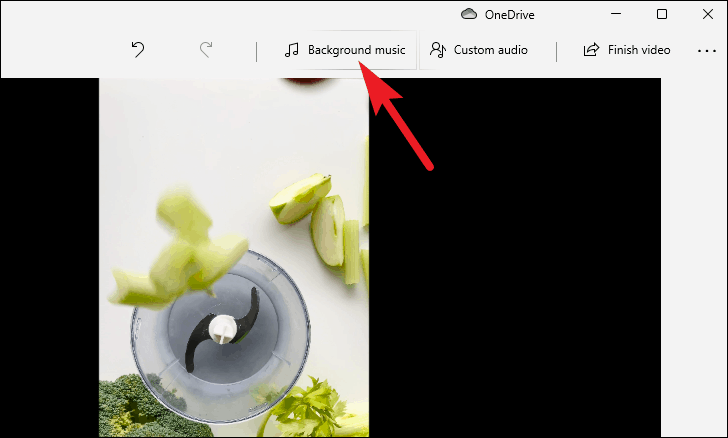
You can also add background music to your video to give that professional feel to it. Moreover, the Windows Video Editor allows you to choose music from a pre-defined list as well as you can also select a custom audio present ton your local storage.
To do so, click on the ‘Background music’ button from the top section of the video editor.
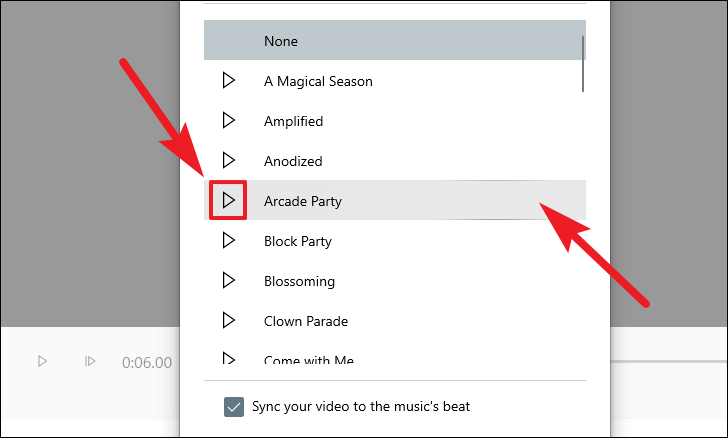
Then, select a music track from the list in the overlay window. You can also preview the track by clicking on the ‘Play’ button preceding each track name.
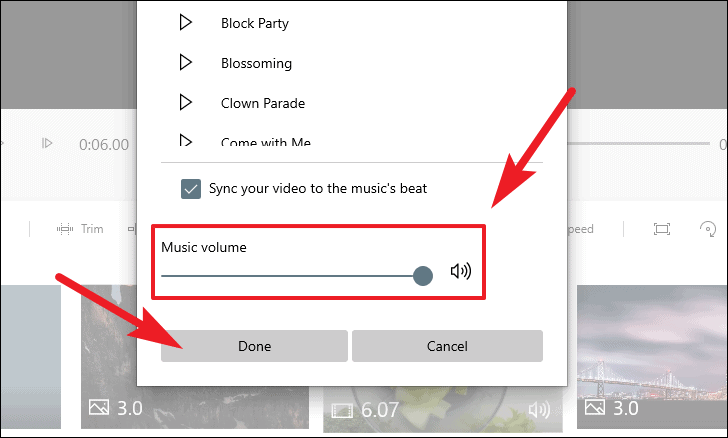
Then drag the slider present under the ‘Music volume’ to adjust the volume for the background track. Then, click on the ‘Done’ button to confirm and apply.
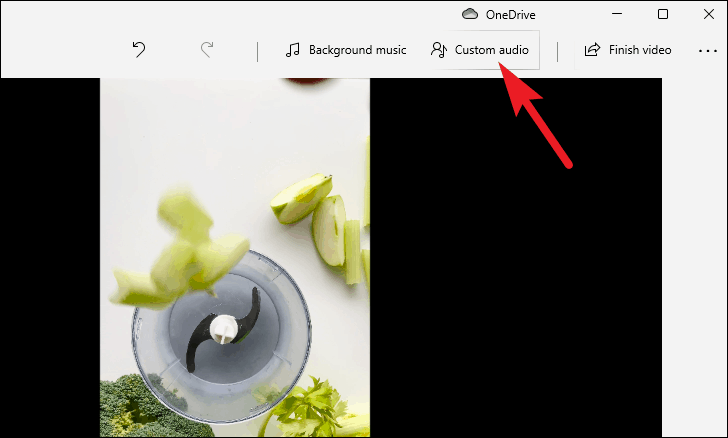
To import your own audio file, click on the ‘Custom audio’ button from the top section of the window.
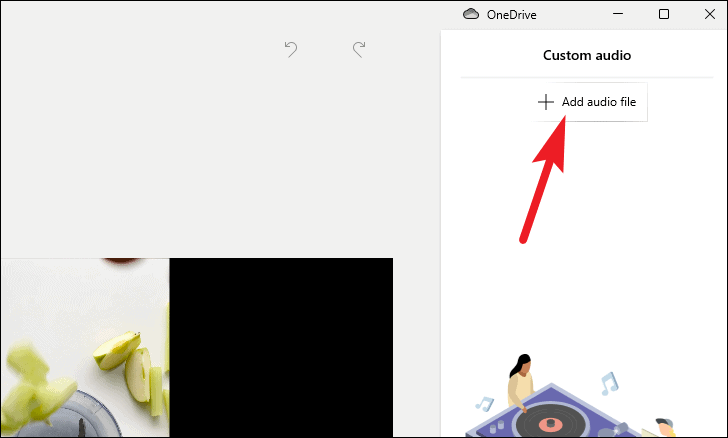
Then, click on the ‘Add audio file’ button present on the sidebar, then browse and select an audio file to import from your local storage. Alternatively, you can also drag an audio file and drop it onto the sidebar to import it.
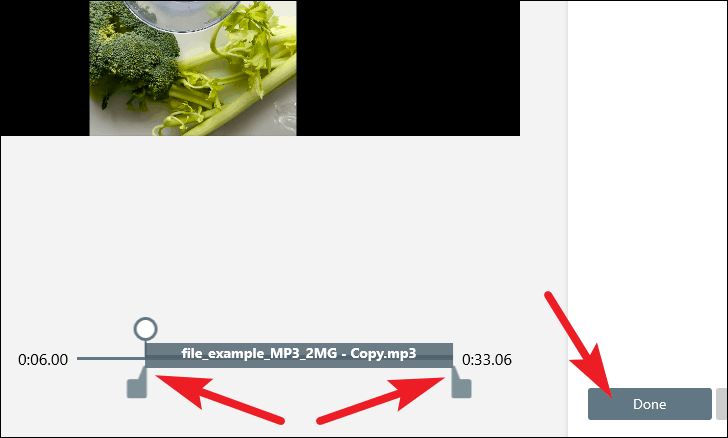
After the file has been imported, you can drag the pointers across the timeline to adjust the playtime for the audio file. Once you have set the playtime according to your preference, click on the ‘Done’ button from the bottom of the sidebar to confirm and apply.
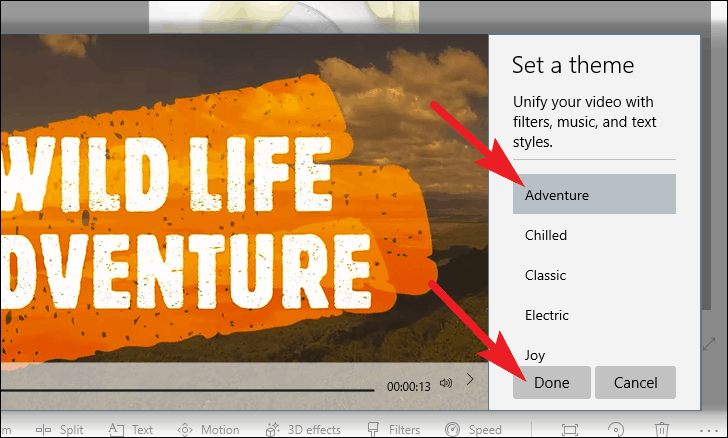
Adding a Preset Theme
Windows Video Editor also allows you to add or change themes for your video. The theme function will give your video a professional feel.
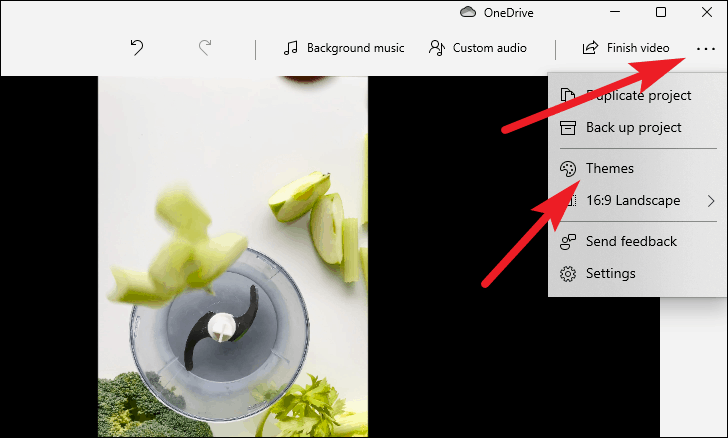
To do so, click on the ellipsis (three horizontal dots) from the top right corner of the window. Then select the ‘Themes’ option from the overlay menu.
Then, select your desired theme from the overlay ribbon and click on ‘Done’ to confirm and apply.
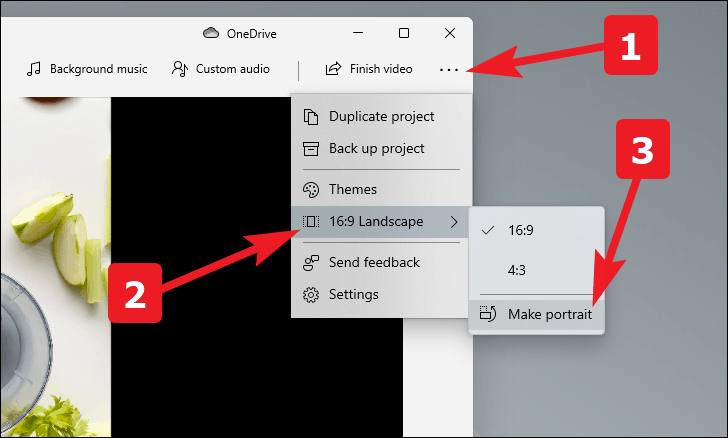
Change Aspect Ratio and Orientation
You can also change the aspect ratio and the orientation for your video depending on the platform you want to upload or view it.
To do so, click on the ellipsis (three horizontal dots) present on the top right corner of the window. Then, hover over the option mentioning your current aspect ratio and orientation situated just below the ‘Themes’ option from the overlay menu. Next, click on the aspect ratio to change it.
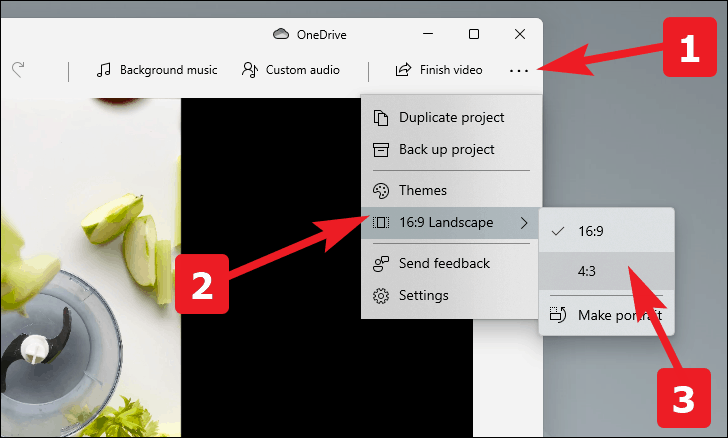
If you want to change the orientation, click on the ‘Make portrait’ or ‘Make landscape’ option depending on your current orientation from the overlay menu.
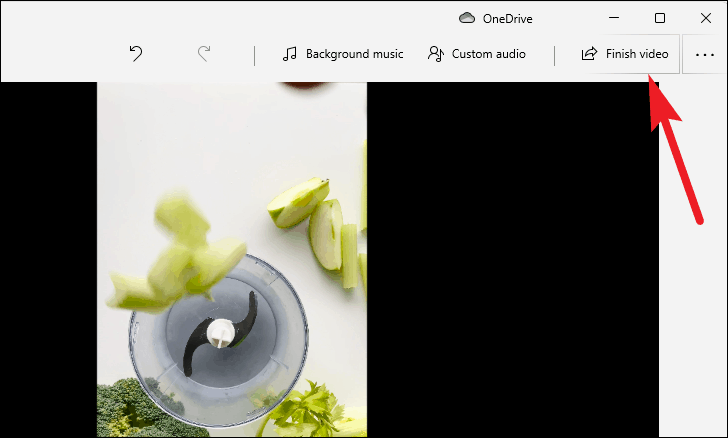
Export Video
Once you are done editing your video, you have to export it. And exporting a video needs a bit of changing the options here and there according to your needs.
To export your video, click on the ‘Finish video’ button present on the top right section of the window.
Then, select the video quality using the dropdown menu situated under the ‘Video quality’ label. Then, click on the ‘Export’ button to export your video.
After that, provide an appropriate name for your video file and also browse the location for the same. Then, click on the ‘Export’ button to export your video file.


Member discussion