Typing accented characters on Windows 11 is essential for communicating accurately in languages that use diacritics or special symbols. Whether you're writing in Spanish, French, German, or any other language that includes accents, Windows 11 provides several methods to help you type these characters efficiently. This guide explores various ways to input accented characters on your Windows 11 device.
Typing accents with keyboard shortcuts on Windows 11
Using keyboard shortcuts is one of the quickest methods to type accented characters. By enabling the United States-International keyboard layout, you can access a wide range of accented letters directly from your standard keyboard.
Adding the United States-International Keyboard Layout
- Open the Settings app by clicking the Start button and selecting Settings.
- In the Settings window, click on Time & language from the left-hand menu, then select Language & region.

- Under the Preferred languages section, find your current language (e.g., English (United States)) and click on the three horizontal dots beside it. Choose Language options.
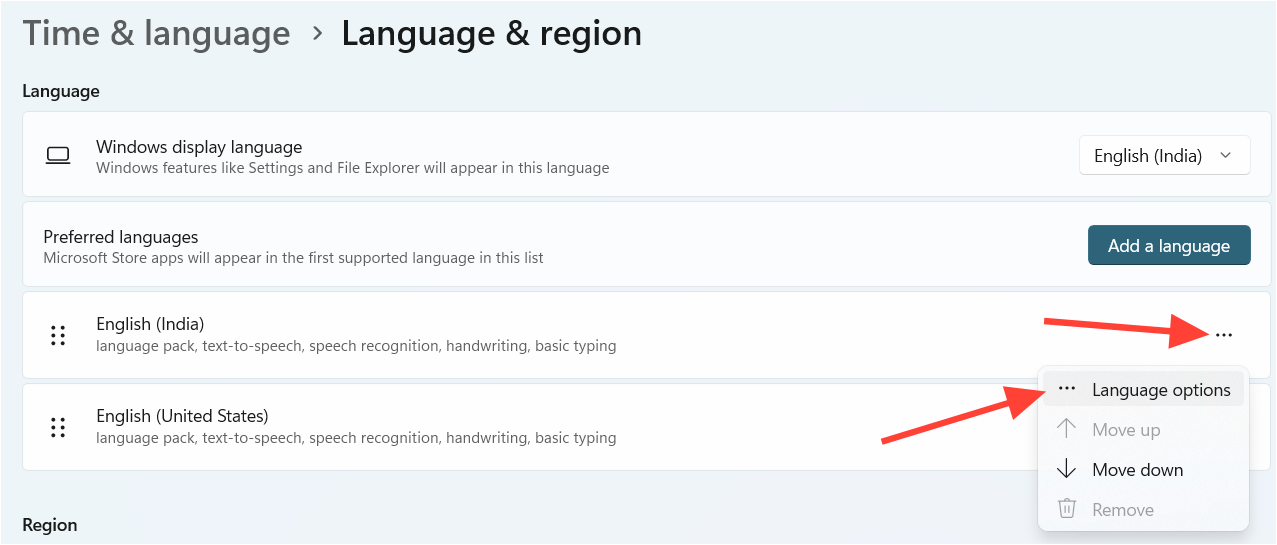
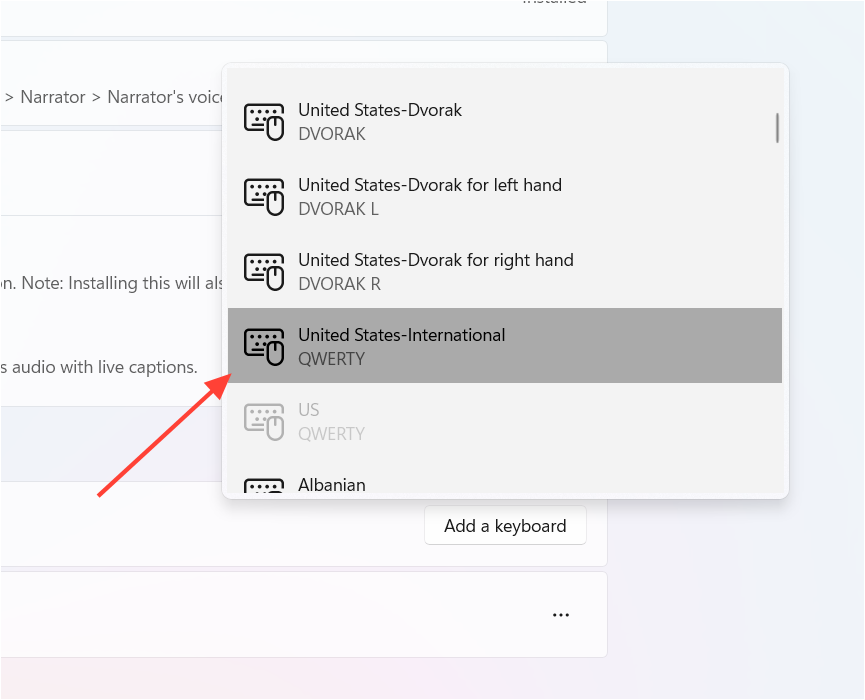
- Scroll down to the Keyboards section and click the Add a keyboard button.

- Select United States-International from the list of available keyboards.
Switching to the United States-International Keyboard Layout
- Click on the language abbreviation (e.g., ENG) in the taskbar near the system clock.

- Select United States-International from the list of keyboard layouts.
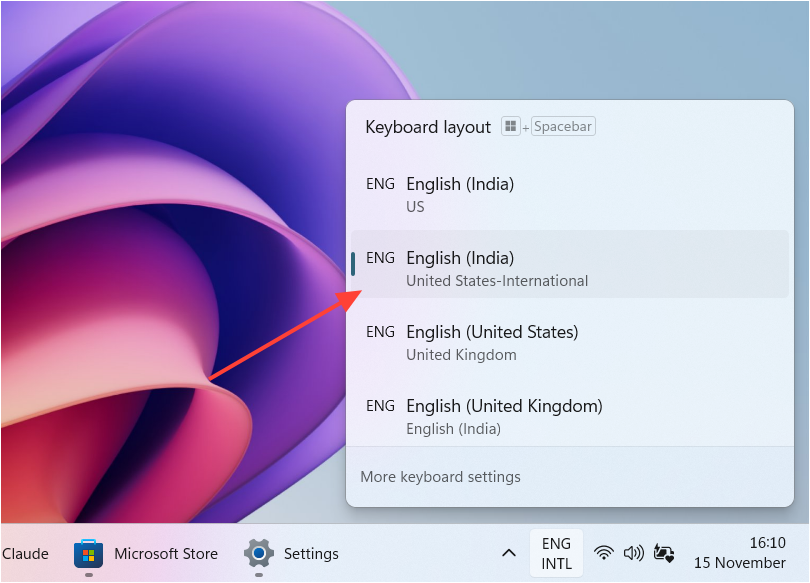
You can also switch between keyboard layouts by pressing Windows key + Spacebar.
Using Keyboard Shortcuts to Type Accented Characters
With the United States-International keyboard active, you can type accented characters using specific key combinations. Certain punctuation marks serve as "dead keys" to modify the letters that follow. Here are the common combinations:
- Acute accent and cedilla (ç): Press ' (apostrophe), then the letter.
- Grave accent: Press ` (grave accent), then the letter.
- Tilde: Press Shift + ~ (tilde), then the letter.
- Umlaut (diaeresis): Press " (quotation mark), then the letter.
- Circumflex: Press Shift + ^ (caret), then the letter.
Below is a table showing how to type various accented characters:
| Accent | Key Combination | Letter | Resulting Character |
|---|---|---|---|
| Acute Accent (lowercase) | ' (apostrophe) | a, e, i, o, u, c | á, é, í, ó, ú, ç |
| Acute Accent (uppercase) | ' (apostrophe) | A, E, I, O, U, C | Á, É, Í, Ó, Ú, Ç |
| Grave Accent (lowercase) | ` (grave accent) | a, e, i, o, u | à, è, ì, ò, ù |
| Grave Accent (uppercase) | ` (grave accent) | A, E, I, O, U | À, È, Ì, Ò, Ù |
| Umlaut (lowercase) | " (quotation mark) | a, e, i, o, u | ä, ë, ï, ö, ü |
| Umlaut (uppercase) | " (quotation mark) | A, E, I, O, U | Ä, Ë, Ï, Ö, Ü |
| Circumflex (lowercase) | Shift + ^ (caret) | a, e, i, o, u | â, ê, î, ô, û |
| Circumflex (uppercase) | Shift + ^ (caret) | A, E, I, O, U | Â, Ê, Î, Ô, Û |
| Tilde (lowercase) | Shift + ~ (tilde) | a, n, o | ã, ñ, õ |
| Tilde (uppercase) | Shift + ~ (tilde) | A, N, O | Ã, Ñ, Õ |
For example, to type "é", press ' followed by e. To type "Ñ", press Shift + ~ and then N.
Typing accents with Alt codes on Windows 11
Alt codes allow you to type accented characters using the numeric keypad on your keyboard. This method involves holding down the Alt key while typing a specific numerical code.
Using Alt Codes to Type Accented Characters
- Ensure that Num Lock is enabled on your keyboard.
- Hold down the Alt key.
- Type the numeric code for the desired character using the numeric keypad.
- Release the Alt key, and the accented character will appear.
Here is a table of common accented characters and their Alt codes:
| Character | Alt Code |
|---|---|
| Á | Alt + 0193 |
| á | Alt + 0225 |
| É | Alt + 0201 |
| é | Alt + 0233 |
| Í | Alt + 0205 |
| í | Alt + 0237 |
| Ó | Alt + 0211 |
| ó | Alt + 0243 |
| Ú | Alt + 0218 |
| ú | Alt + 0250 |
| Ñ | Alt + 0209 |
| ñ | Alt + 0241 |
For example, to type "ñ", hold down Alt, type 0241 on the numeric keypad, and then release Alt.
Typing accents using the touch keyboard on Windows 11
The touch keyboard provides an intuitive way to type accented characters, especially on touch-enabled devices.
Enabling the Touch Keyboard
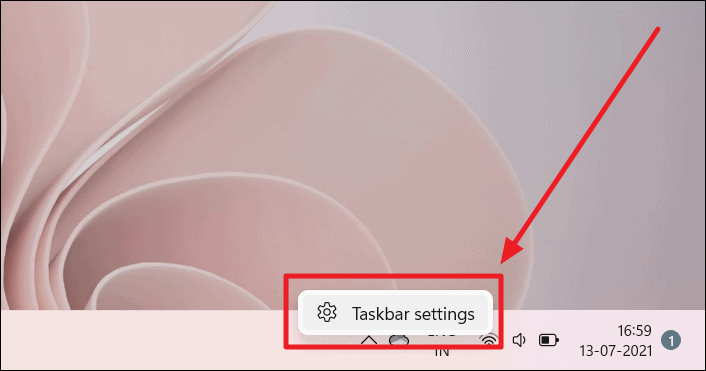
- Right-click on the taskbar and select Taskbar settings.
- In the Taskbar settings, scroll down to Taskbar corner icons and toggle the switch for Touch keyboard to On.
Using the Touch Keyboard to Type Accents
- Click the Touch keyboard icon on the taskbar to open it.
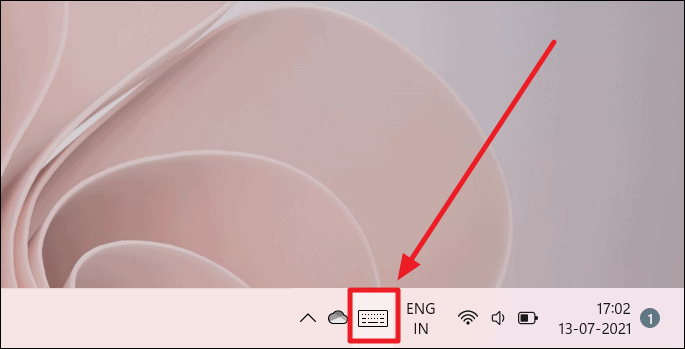
- Press and hold the letter you want to accent. A small menu with accented variations will appear.
- Select the accented character from the menu.
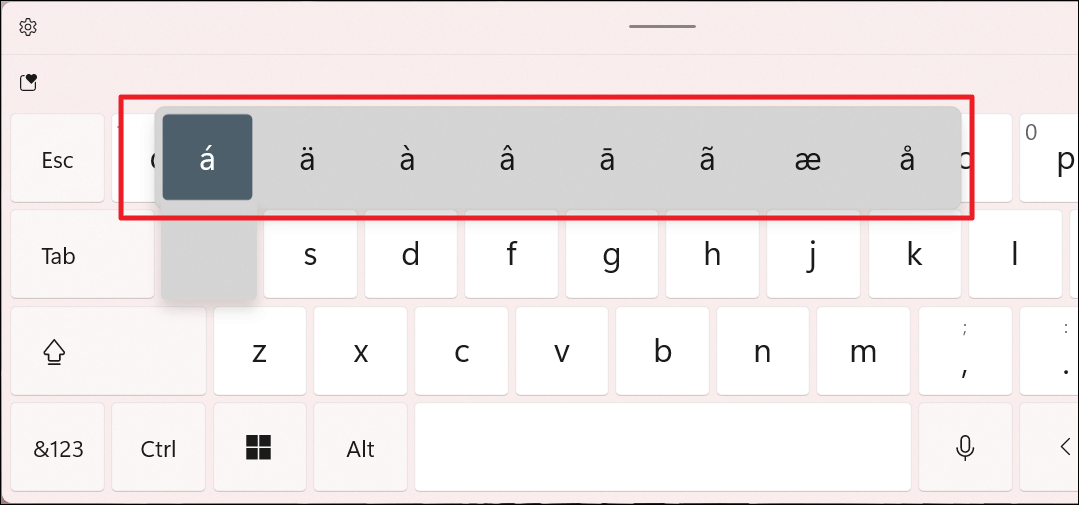
The selected accented character will be inserted into your text. To close the touch keyboard, click anywhere outside of it or press any key on your physical keyboard.
Typing accents with Windows Character Map on Windows 11
The Windows Character Map is a built-in tool that allows you to copy and paste accented characters and symbols.
Using the Character Map to Type Accents
- Click the Search icon on the taskbar and type Character Map.
- Select the Character Map app from the search results.
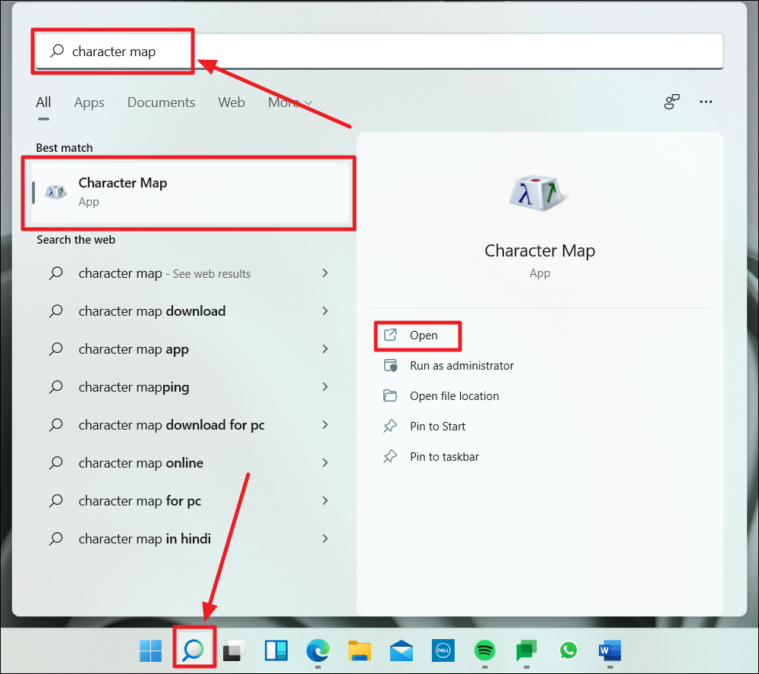
- In the Character Map window, choose your desired font.
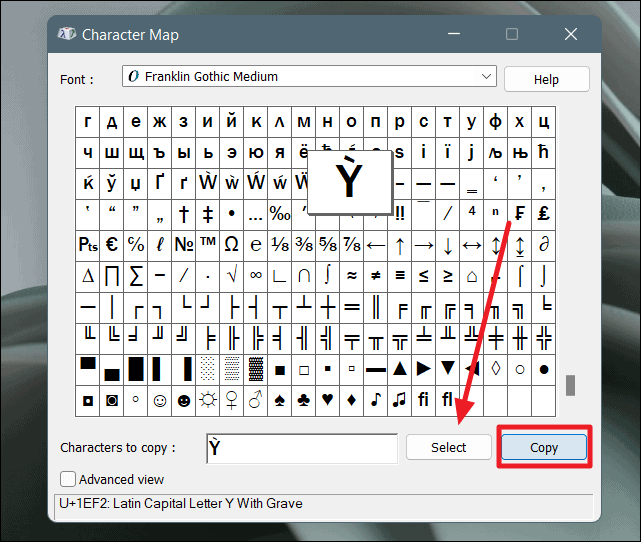
- Scroll through the character list to find the accented character you need.
- Click on the character, then click Select.
- Click Copy to copy the character to your clipboard.
- Paste the character into your document by pressing Ctrl + V.
How to add a new keyboard on Windows 11
Adding a keyboard layout for a different language can make typing accents more straightforward.
Adding a New Keyboard Layout
- Open the Settings app and select Time & language, then click on Language & region.
- Under Preferred languages, click on Add a language.
- Search for the language you wish to add (e.g., French, Spanish) and select it.
- Click Next, then Install.
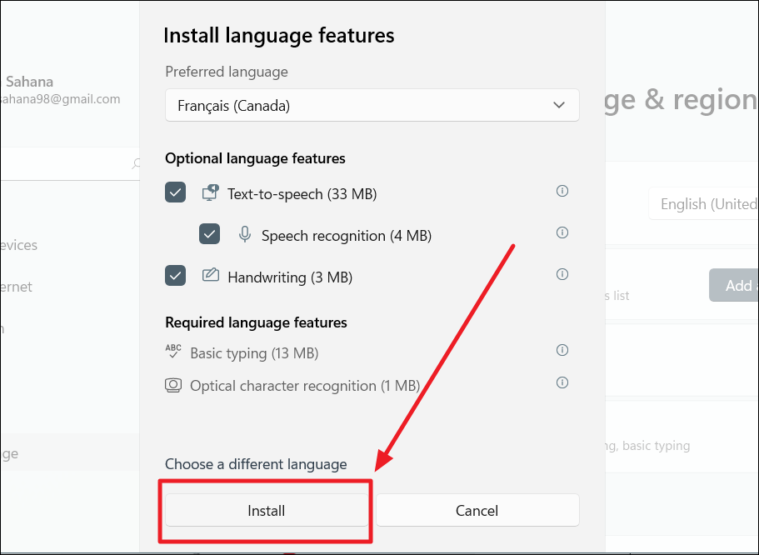
You can now switch to the new keyboard layout when typing.
Switching Between Keyboard Layouts
- Click on the language abbreviation in the taskbar and select the desired keyboard layout.
- You can also use Windows key + Spacebar to switch between layouts.
How to remove a keyboard on Windows 11
If you no longer need a keyboard layout, you can remove it to streamline your options.
Removing a Keyboard Layout
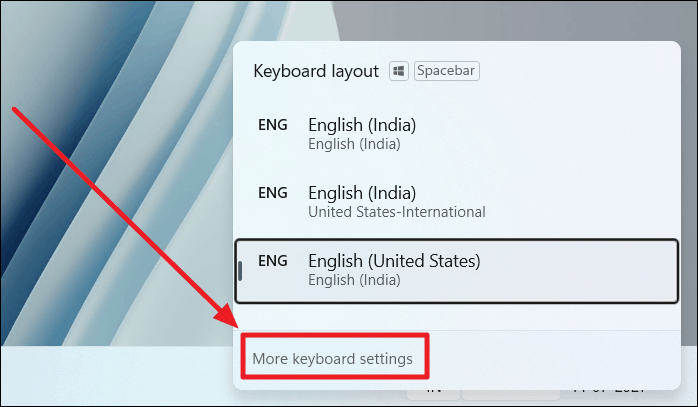
- Click on the language abbreviation in the taskbar and select More keyboard settings.
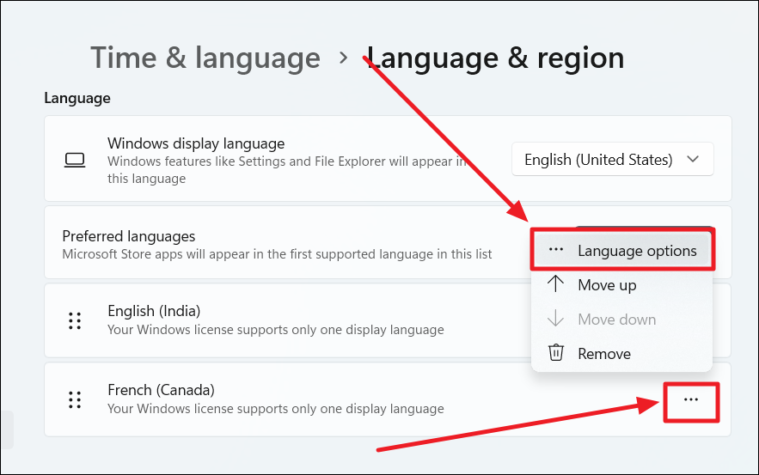
- In the Settings window, under Preferred languages, click the three dots next to the language whose keyboard you want to remove and select Language options.
- Under the Keyboards section, find the keyboard you wish to remove, click the three dots next to it, and select Remove.
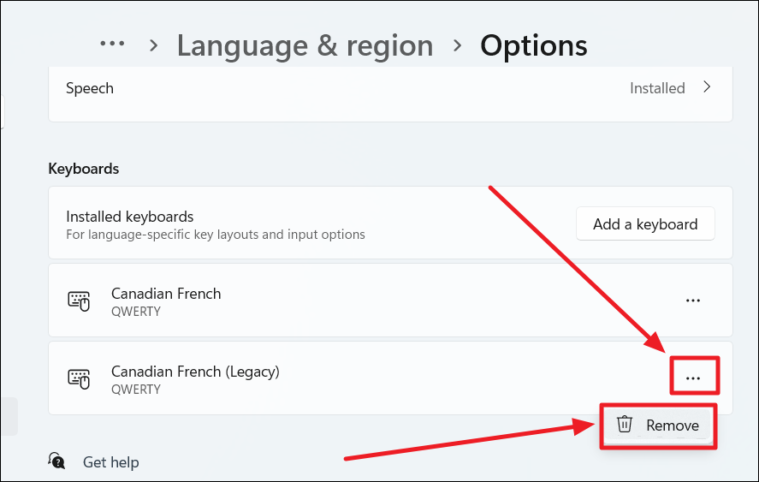
The keyboard layout will be removed from your system.
By utilizing these methods, you can easily type accented characters on Windows 11, enhancing your ability to communicate effectively in different languages.




Member discussion