

Windows 11 comes with its own built-in calendar app that helps you schedule tasks, meetings, reminders, appointments, and other events from your personal agenda. Windows Calenders also allows you to synchronize with your accounts like Google calendar, Outlook, iCloud, etc., and view various calendars at the same time in one place.
The Calendar app works offline, so you don’t have to connect to the internet every time you want to check your schedule or agenda. However, you may need to sign in to your Microsoft account to synchronize the calendar across your devices.
Microsoft has made a few changes to the Calendar in Windows 11, one of these changes is removing events integration in the calendar flyout from the taskbar. On Windows 10, if you click on the date and clock on the taskbar corner, the calendar flyout will appear. There, you can access your agenda and add events to the calendar. But in Windows, you can no longer view your agendas at the bottom of the calendar flyout.
In this tutorial, we will show you how to create a new event, manage agendas, customize the calendar app, sync the calendar and use the calendar app in Windows 11.
View or Glance at your Calendar
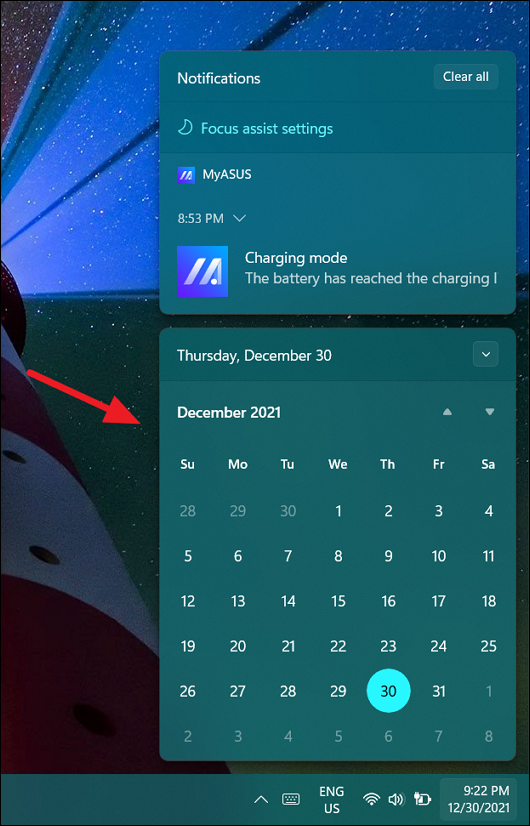
To quickly glance at your calendar, simply click on the time and date icon at the right corner of your taskbar to see the calendar flyout. Unfortunately, you will not be able to view the agenda from the calendar flyout, you can only see dates and days here.

To view and manage events and agendas, you would have to open the built-in Calendar app. To do that, open the Start menu and click ‘Calendar’ from the Pinned section.
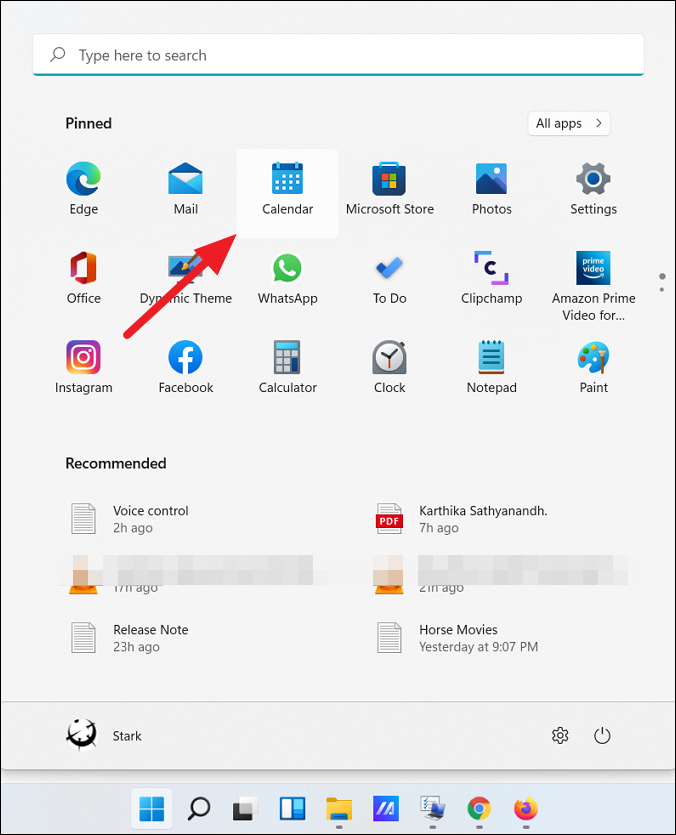
Alternatively, you can also search for Calendar in the Windows search and select the top result.
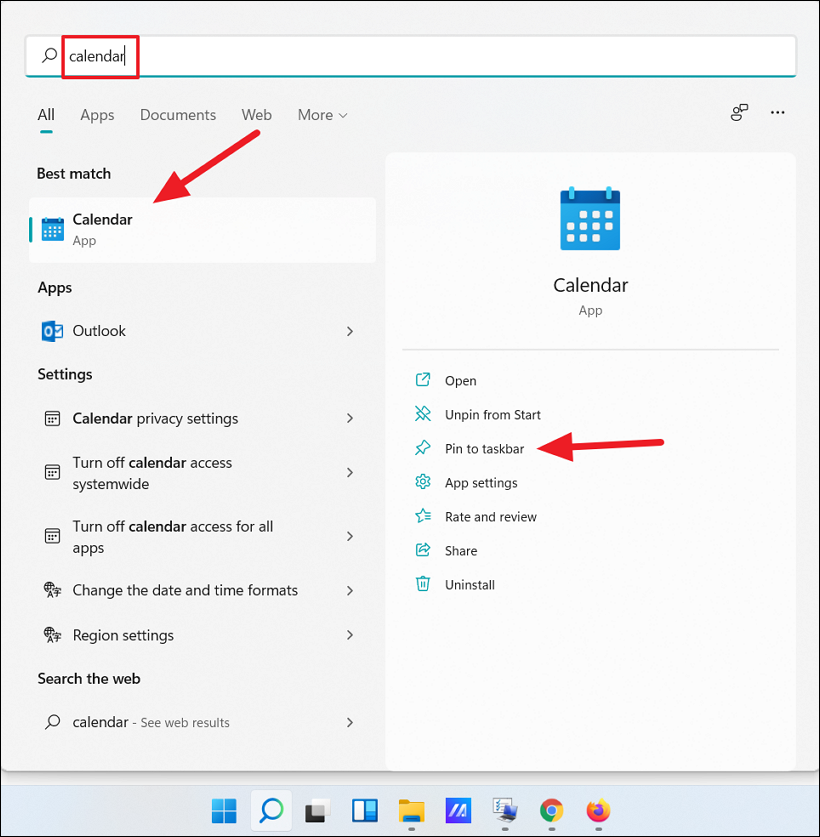
You can also add the Calendar app to the Taskbar by selecting ‘Pin to taskbar’ for easy access.
In the Calendar app, you can access different synced calendars, accounts, and more from the left panel, while on the right panel, you can view and manage agendas.
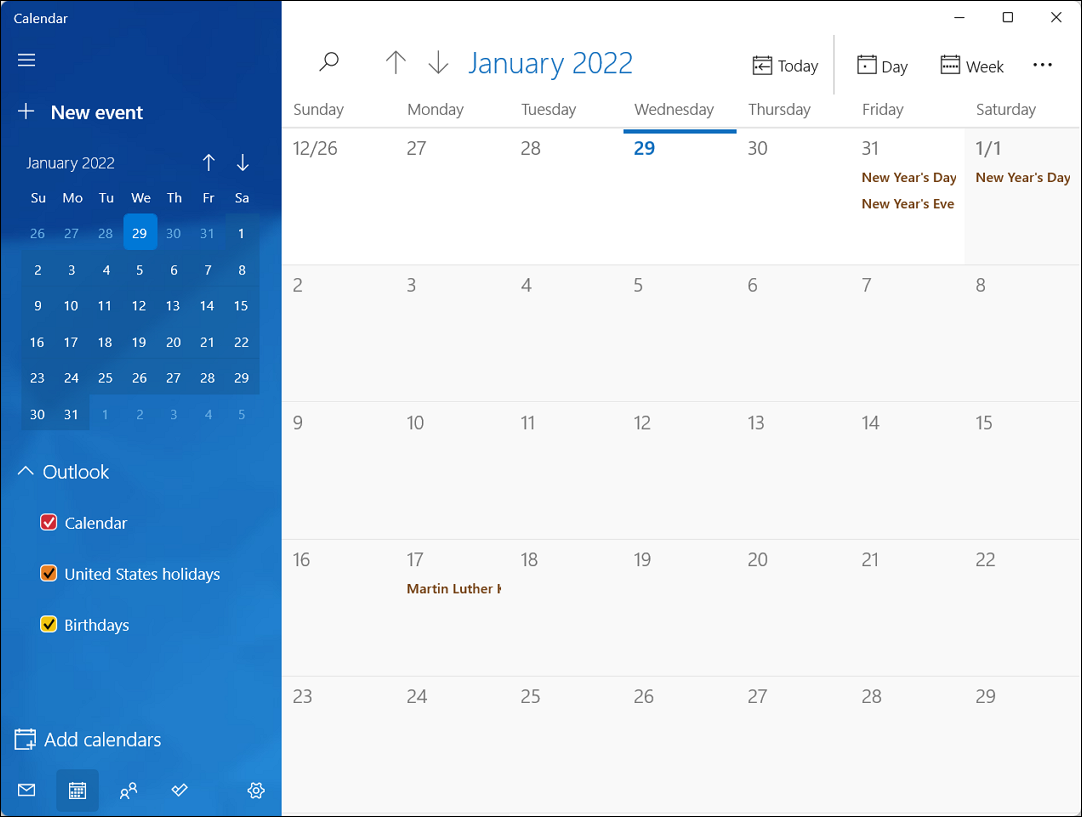
You can also quickly switch between the calendar app other related Microsoft apps such as the Mail, the People, and the To Do app with a single click.
At the bottom of the left panel in the Calendar app, use the four buttons to switch between Calendar, Mail, People, and To Do apps.
How to Add an Account on Calendar app in Windows 11
Adding an account to your calendar app will let you sync your calendar across your devices connected to the same account, manage agendas on multiple devices, and share your schedule with others. With the Calendar app, you can sync and organize events from various services such as Outlook.com, Microsoft 365, Google, Yahoo, and iCloud.If you want to add a new account to your calendar app, follow these instructions.
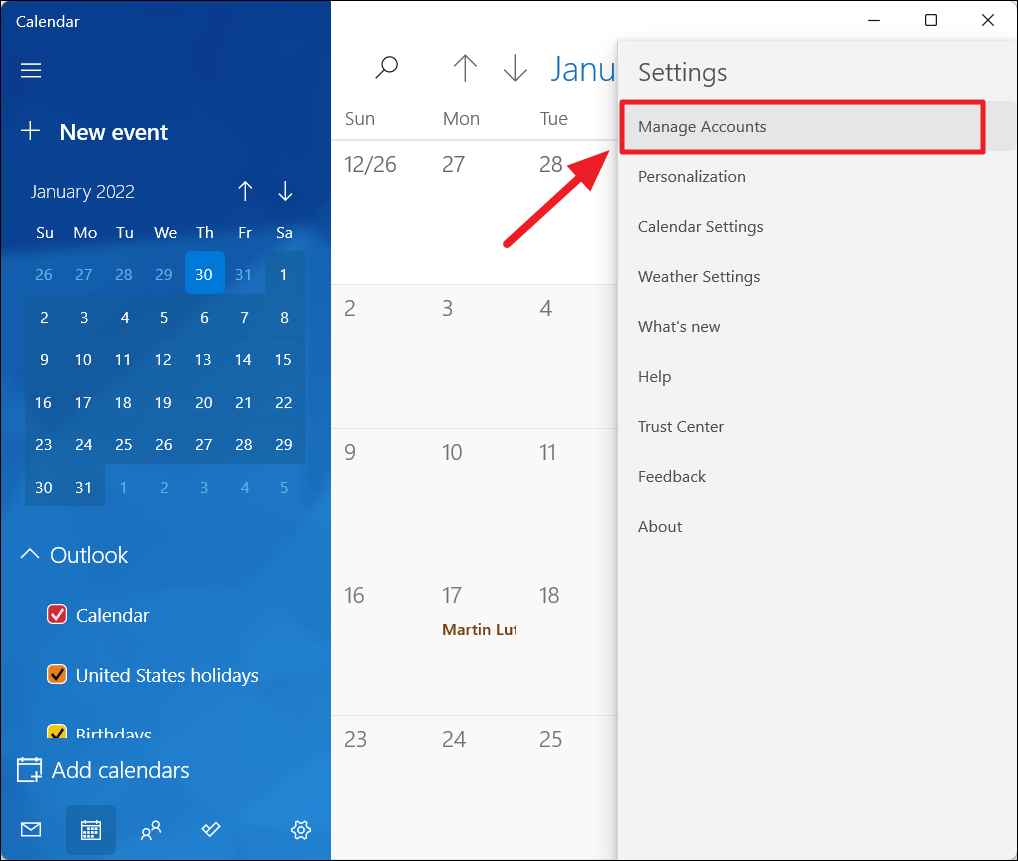
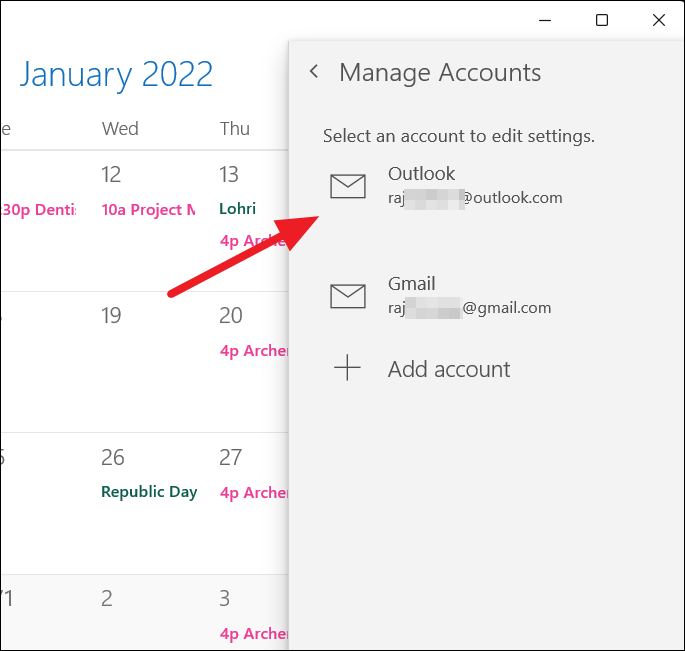
Open Calendar the app and click on the ‘Settings’ button in the bottom-left corner.

Then, click on ‘Manage Accounts’ in the menu that appears at the top-right corner of the app.
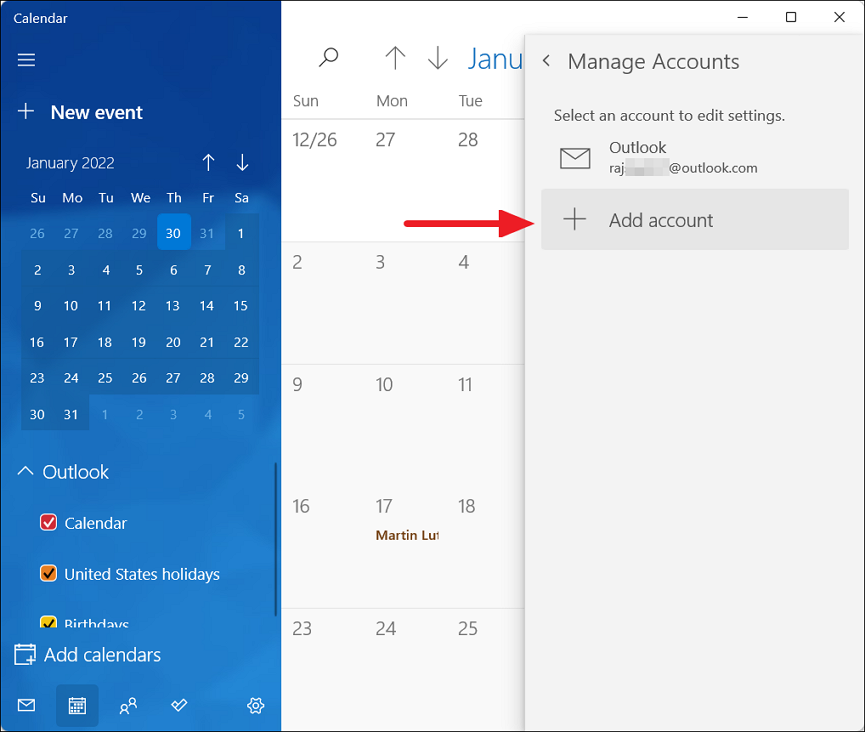
Next, click on ‘Add account’ to add a new account.
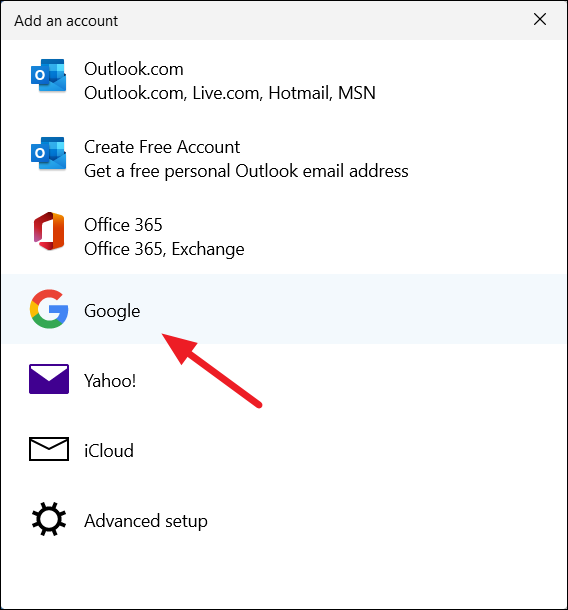
Next, the ‘Add an account’ dialog box will appear with the list of services you can add to the Calendar app. Now, click on the service account you want to add. If you haven’t added your Microsoft account already, you can add it. You can also create a new Microsoft account if you don’t have one by selecting the ‘Create Free Account’ option. Here, we are selecting ‘Google’ account.
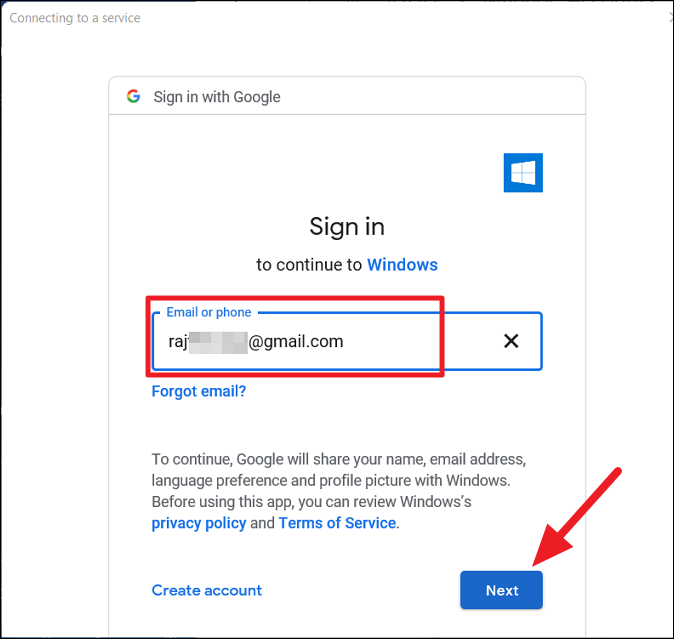
In the next window, enter your email address and click ‘Next’.
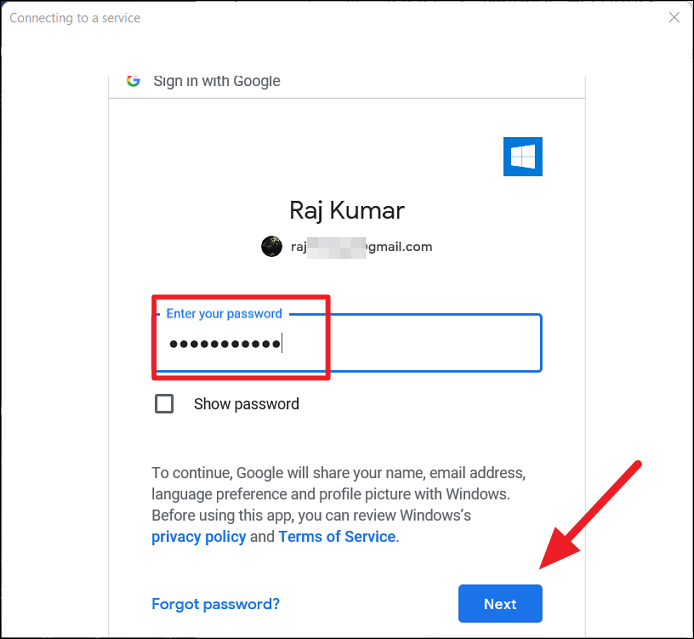
Then, enter your password and click ‘Next’.
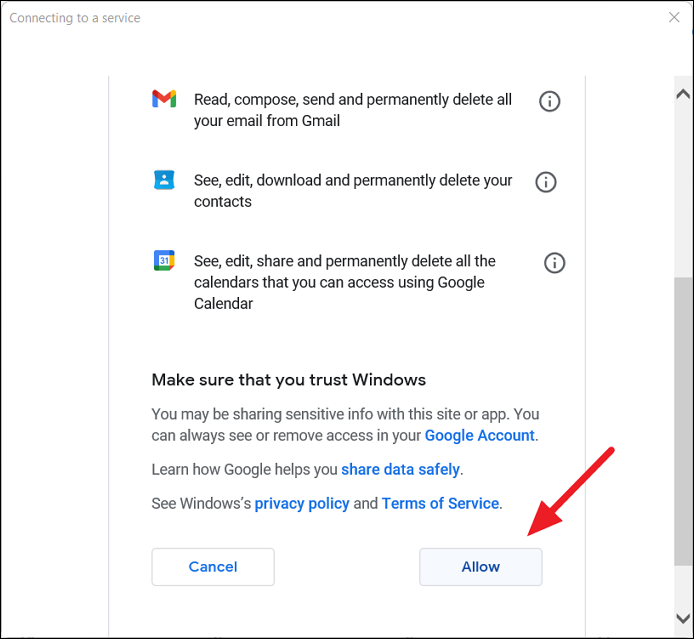
In the next screen, Windows will ask you access to your email, contacts, and calendar. Scroll down the page and click ‘Allow’ to add the account.
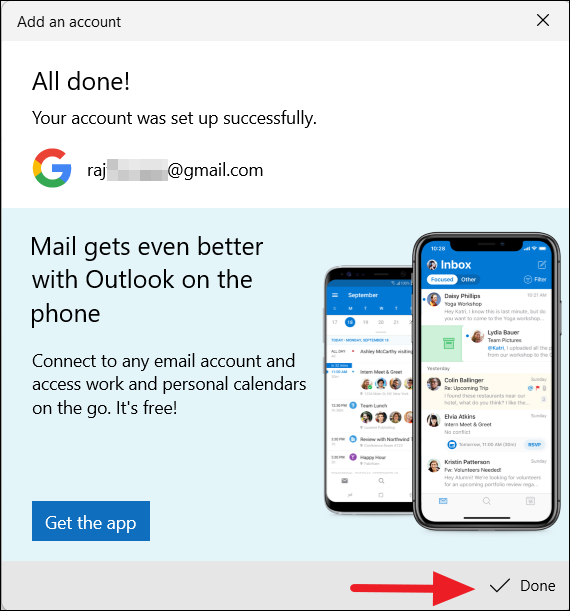
You’ll see a confirmation that your account has been linked, click ‘Done’ to complete the process.
Once the account is added to the app, the new account will appear in the list in the left pane as shown below.
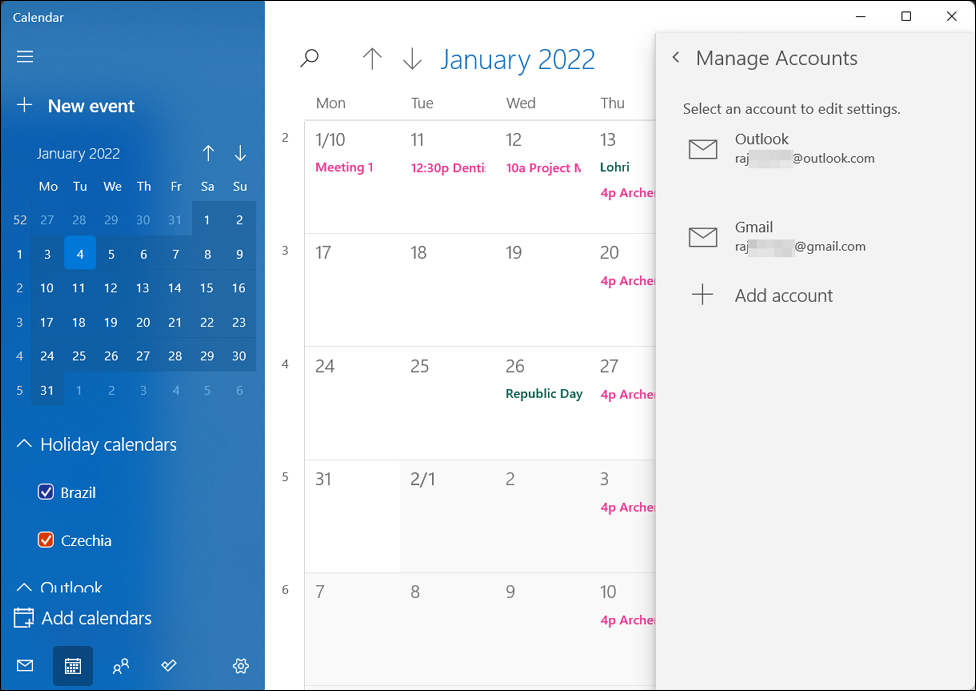
When you add multiple accounts to the Calendar app, events from all the calendars and accounts will be merged into your calendar app.
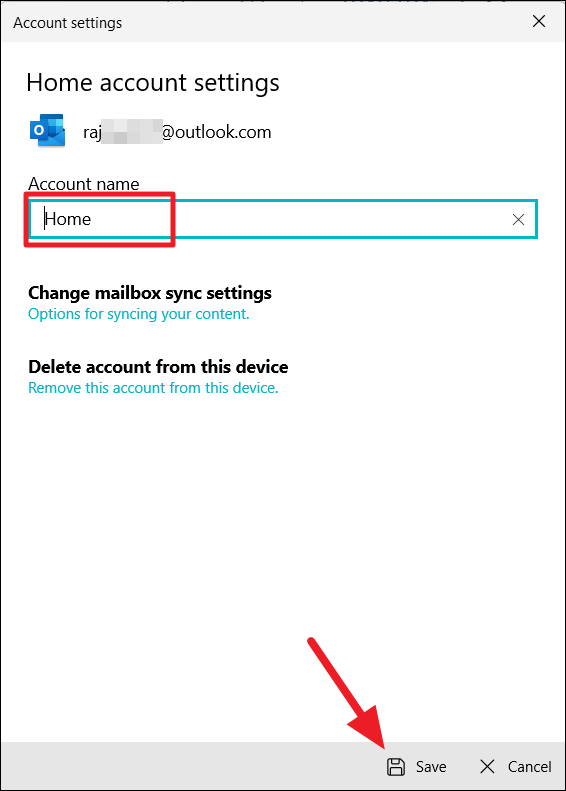
You can add a name to the account to differentiate the devices connected to the same account. For example, you have connected both the home and the work device to the same Microsoft account on the Calendar app. You can name the work device as ‘Work’ to know which events are from the work.
To add a name (or rename) to the account, click on the account you want to add a name for.
Add the desired name to the account in the ‘Account name’ field and click the ‘Save’ button.
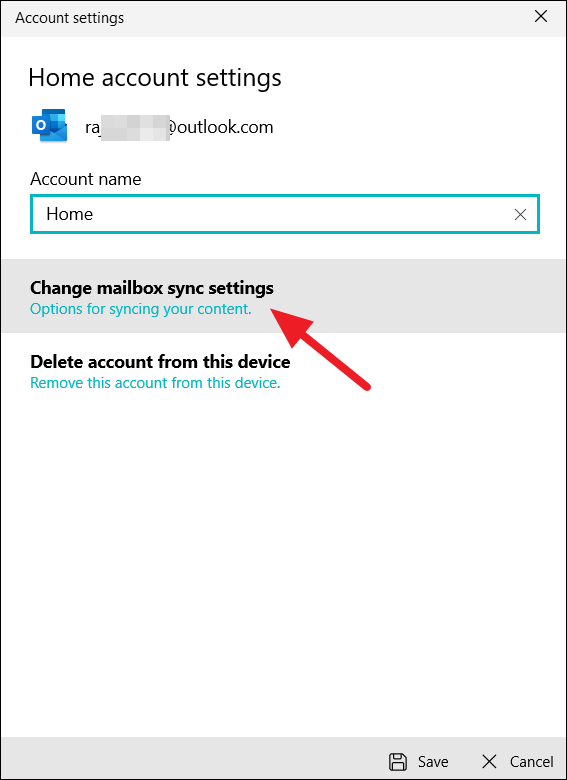
To change the sync settings of the account, click the ‘Change mailbox sync settings’.
Here, you can change various sync settings for the account. From the ‘Download new content’ drop-down, you can change how often you want to download new content such as messages and images to the app.
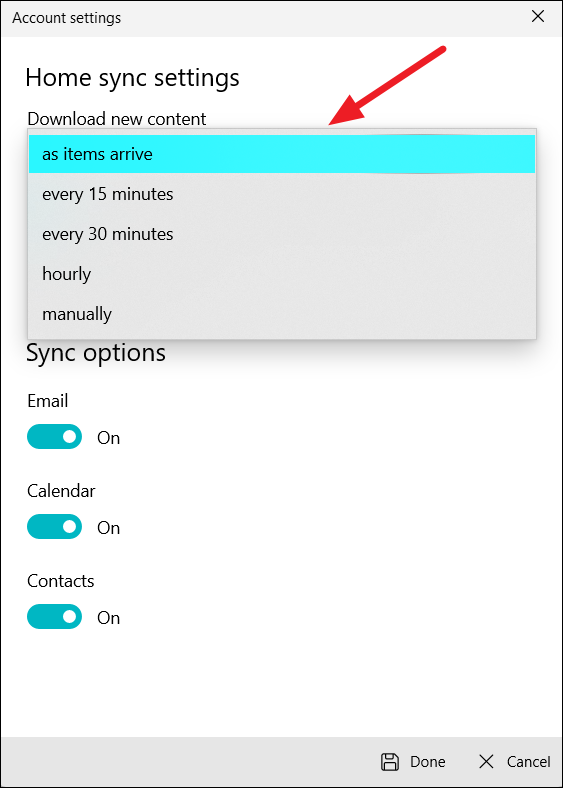
You can choose how far back do you want to download the email from using the ‘Download email from’ drop-down. Under Sync options, you can turn on and off sync for email, calendar, and contacts.
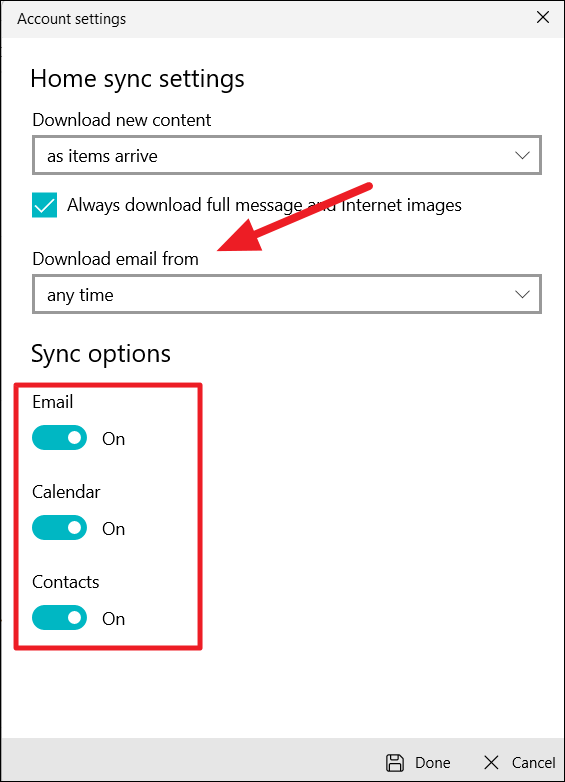
Once you made changes to the options, click the ‘Done’ button at the bottom.
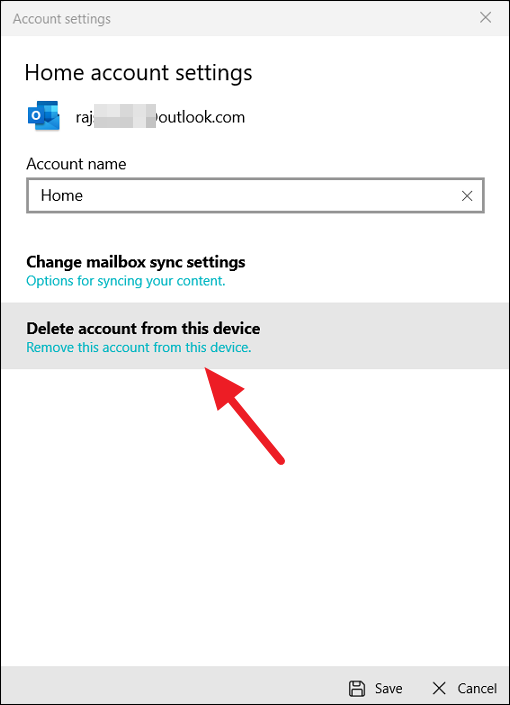
If you added a wrong account or you no longer want an account linked to the Calendar app, click the ‘Delete account from this device’ option under the account settings.
Manage Calendars
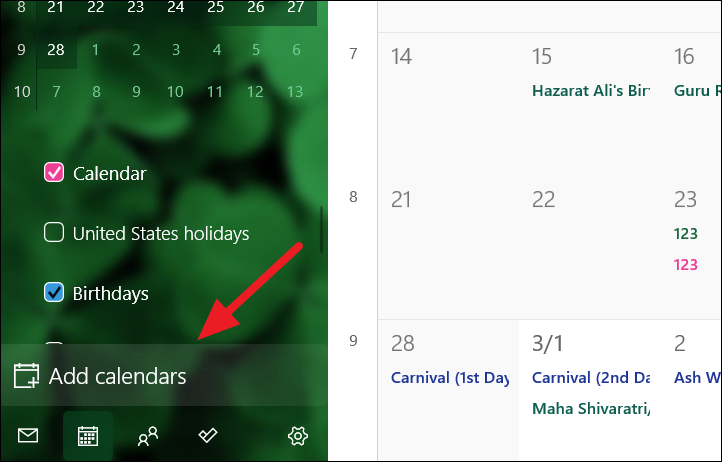
By default, each account has few calendars under it such as Calendar, Holidays, Birthdays, Contacts, etc. You can also add additional calendars under each account.
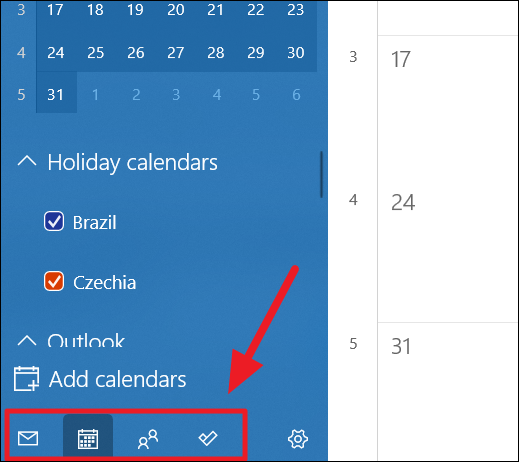
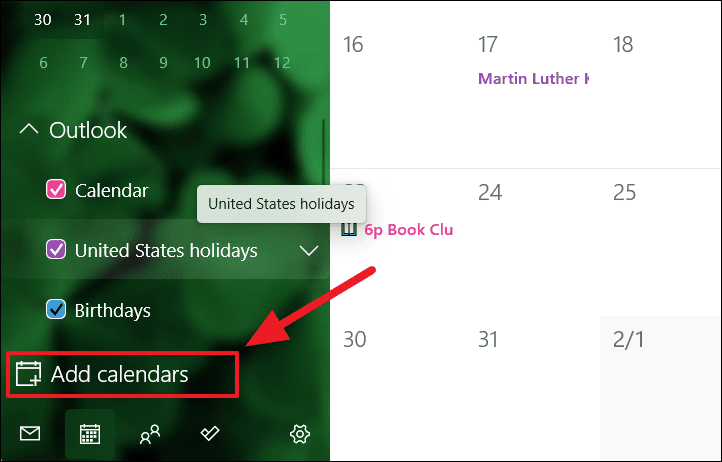
To add a calendar, click the ‘Add calendars’ button at the bottom right corner.
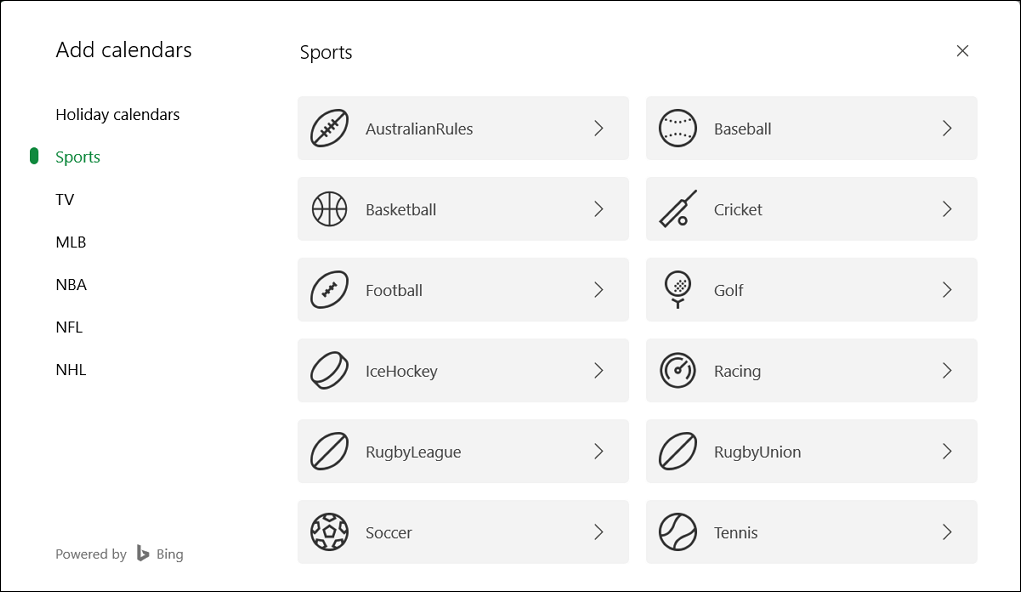
Then, add a calendar from the list of available calendars such as Holidays, TV, Sports, etc.
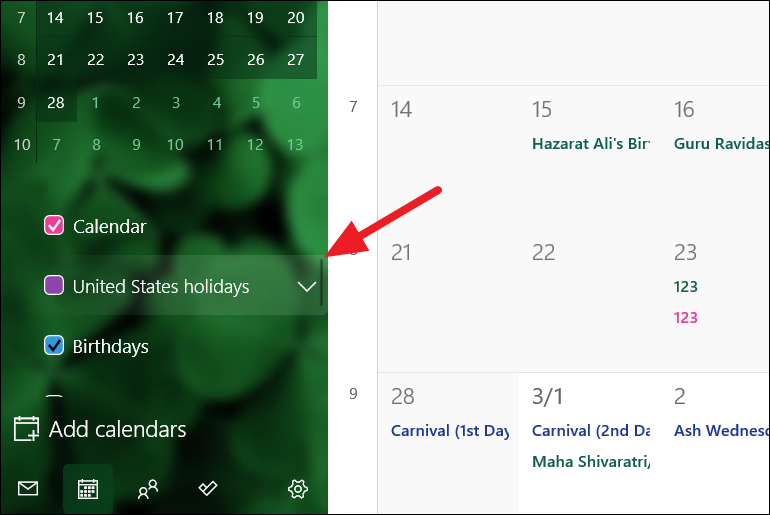
If you think your calendar view is cluttered with too many agendas, you can uncheck a calendar from the left pane to hide its events. For instance, we can hide holidays from the calendar app by deselecting the ‘United States holidays’ option.
To remove a calendar, click the down arrow next to a calendar and select ‘Remove celendar’.

How to Customize the Look of Calendar in Windows 11
You can customize the background image and theme color, as well as change the light and dark mode in the Calendar app. To personalize your Calendar app, follow these steps:
Open the Calendar app and click the Settings (gear) button at the bottom left corner. Then, select ‘Personalization’ in the Settings menu.

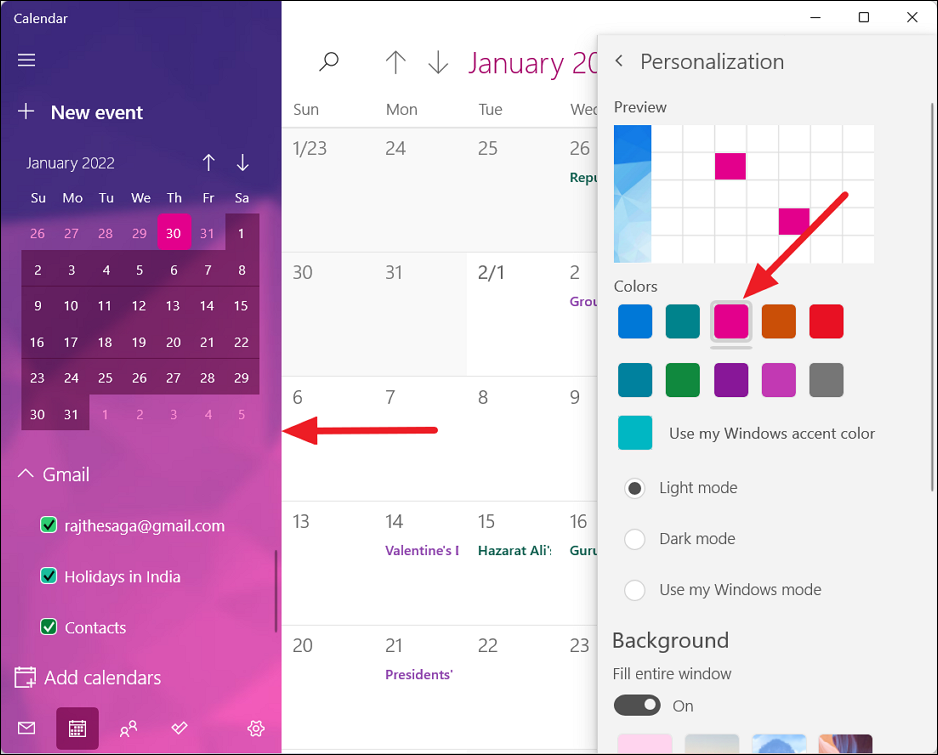
In the Personalization pane, you can change the color theme of the left calendar panel by choosing one of the colors under the ‘Colors’ section. You can also your Windows accent color by selecting the ‘Use my Windows accent color’.
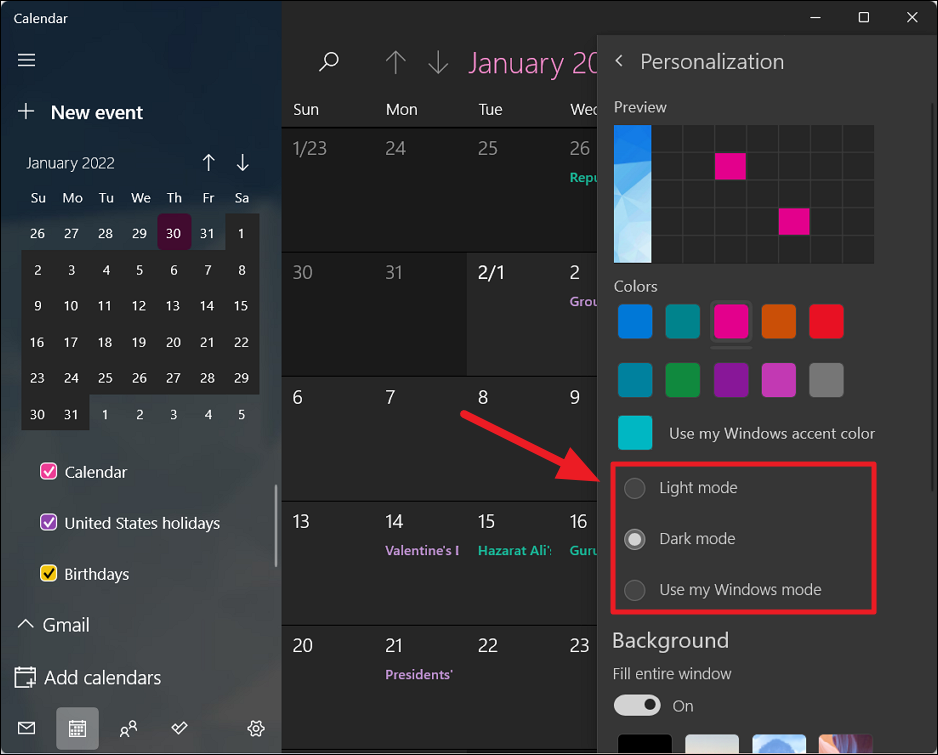
If you want to change the lighting mode of the entire calendar app, use the three modes that are available:
- Light Mode
- Dark Mode
- Use my Windows Mode
The ‘Use my Windows mode’ option uses whatever mode that your computer is currently using, whether it’s light, dark, or custom mode. In the below screenshot, we’re using the ‘Dark mode’.
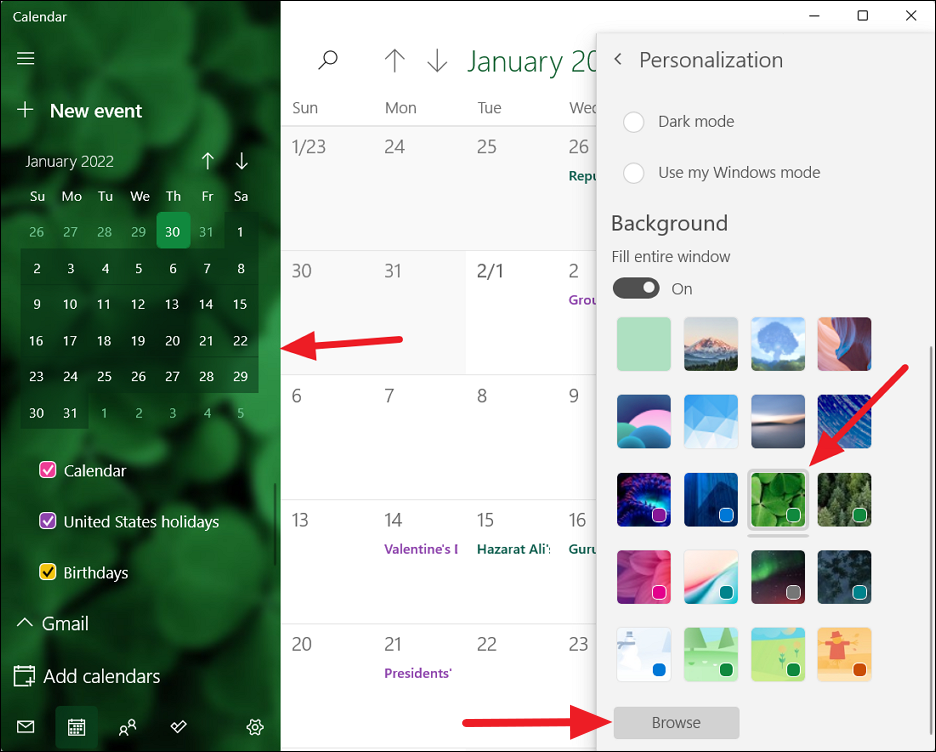
If you want to change the background of the Calendar, choose one of the preset backgrounds from the ‘Background’ section. If you want to use your own background for the calendar, click the ‘Browse’ button and select a picture from your drive.
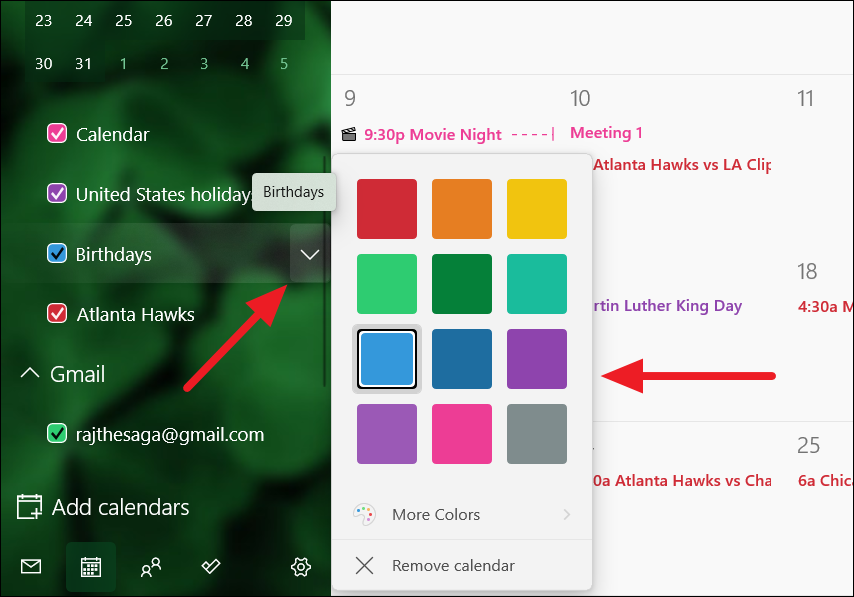
You can change the color of different calendars under each account in the Calendar app. For instance, you can set differnt colors for each type of calendar such as birthday calendar, holidays calendar, sports calendar, and events calendar, etc.
Click the downward arrow next to a calendar and choose one of the preset colors or click the ‘More Colors’ option to pick your own color.
Change the Color of the Calendar Flyout
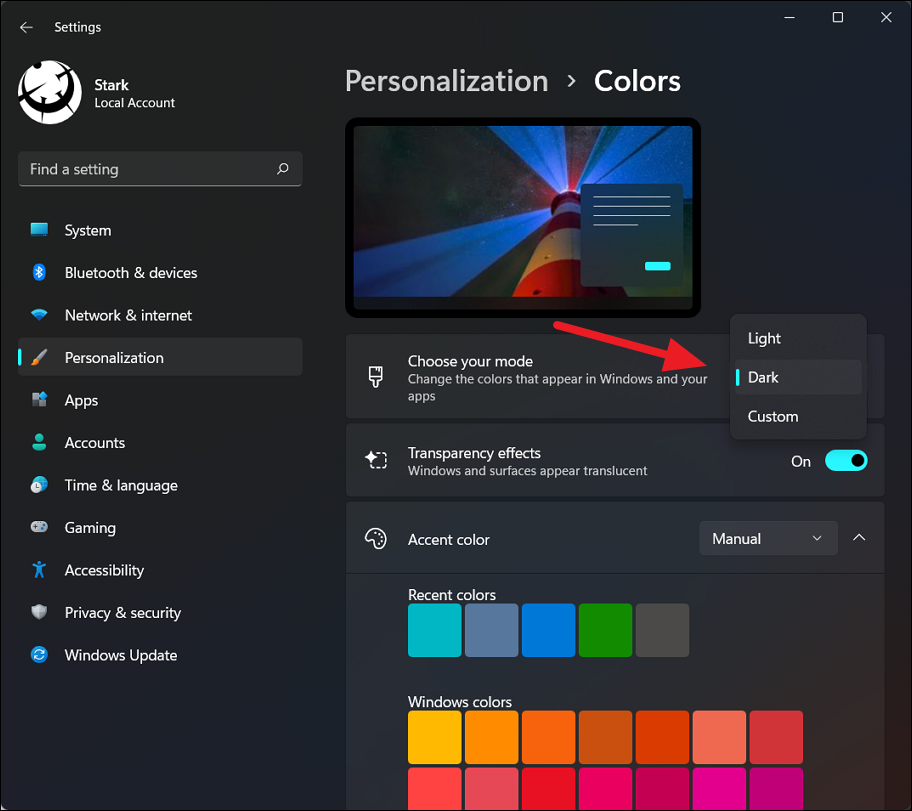
If you want to change the color of the calendar flyout from the taskbar, you have to change the accent color of the Windows. Here’s how you do that:
Open the Settings app and click on ‘Personalization’ on the left pane. Then, select ‘Colors’ on the right pane.
To change color accent, either set the ‘Choose you mode’ setting to ‘Dark’ or ‘Custom’. If you selected ‘Custom’, change the ‘Choose your default Windows mode’ option to ‘Dark’.
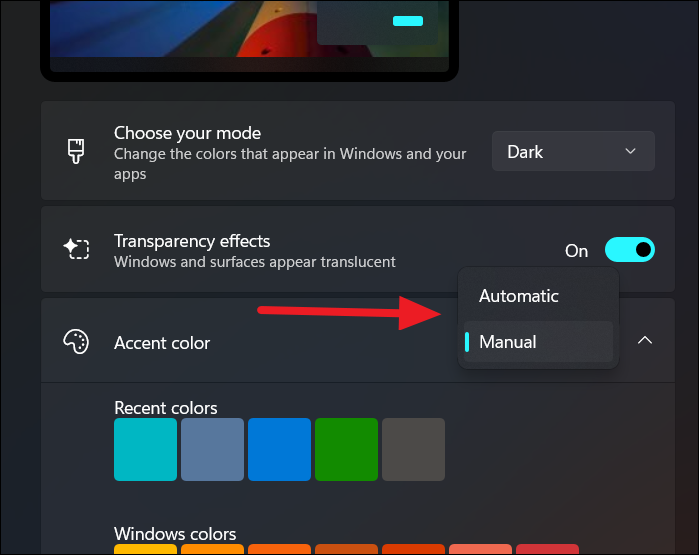
Then, you can choose your own custom accent color or let Windows automatically select one that matches your wallpaper.
From, ‘Accent color’ dropdown menu, select ‘Automatic’ if you want to let Windows choose the accent color or select ‘Manual’ to choose your favorite accent color.
If you select ‘Manual’, you will be able to choose your favorite color from the color palette of 48 predefined colors. Or, you can set your custom color using the ‘View colors’ button. Here, we picked the ‘Seafoam’ color.
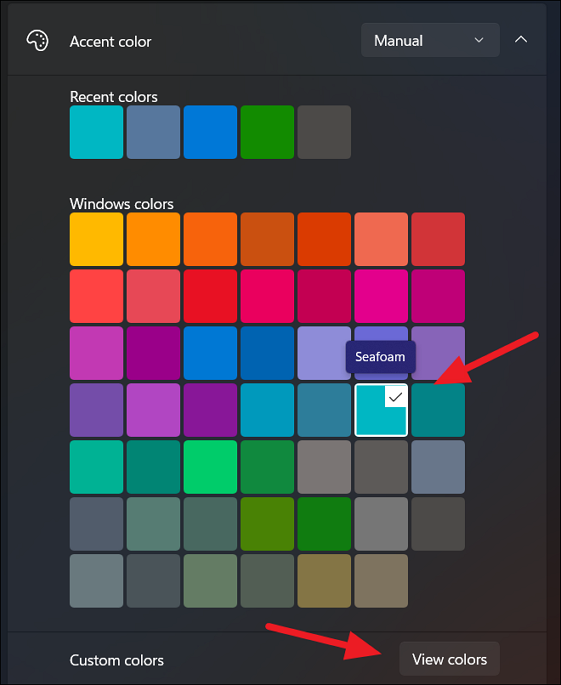
To show accent color on Calendar flyout, you need to turn on the toggle for ‘Show accent color on Start and taskbar’.
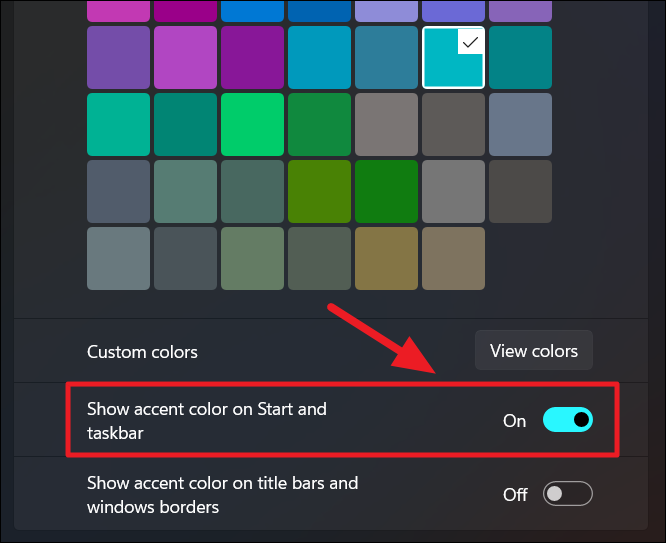
As you can see below, the calendar flyout appears in the Seafoam color which is the selected accent color.
Change Calendar Views
By default, when you open the Calendar app, it shows the current month of events. But you can set different views for the app based on your choice and schedule. For example, you can set to view events of today, days, week, month, or year.
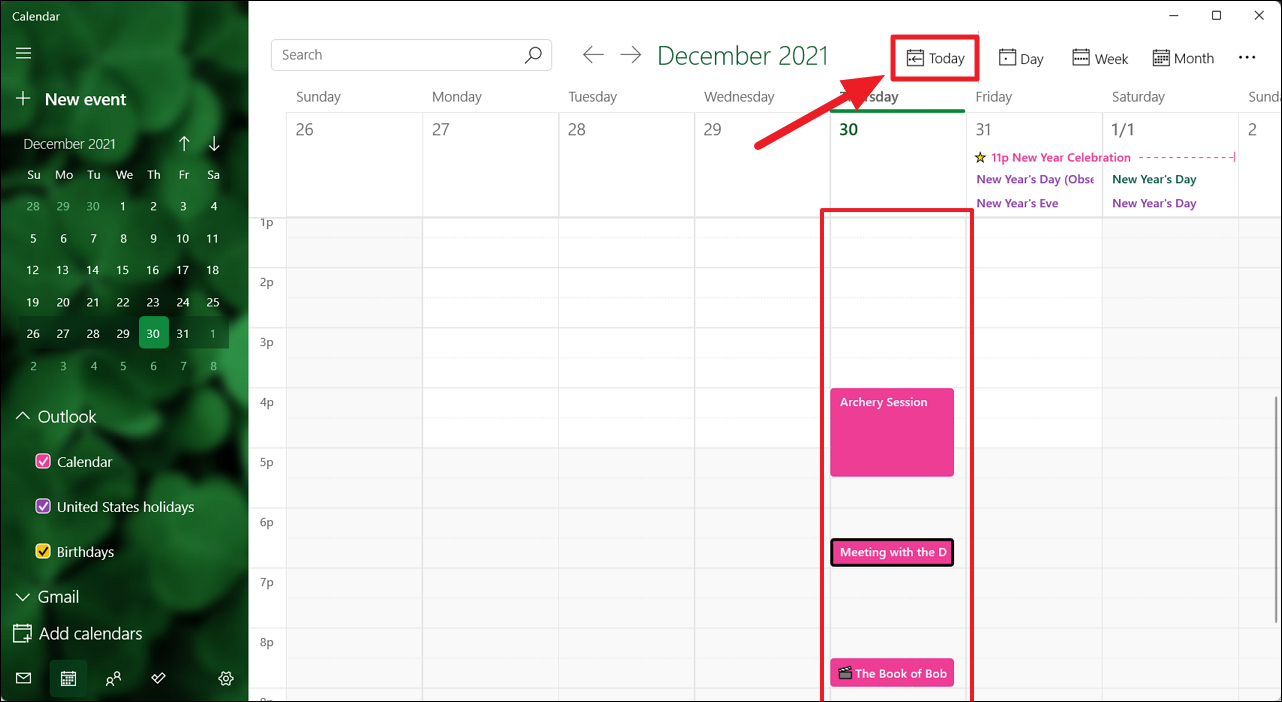
If you want to view the events or agenda of today, click the ‘Today’ button in the toolbar at the top. It will show you all of today’s events from 12 A.M to 12 P.M as shown below.
If you want to view your calendar by day, click the drop-down next to the ‘Day’ button and choose a multi-day view.
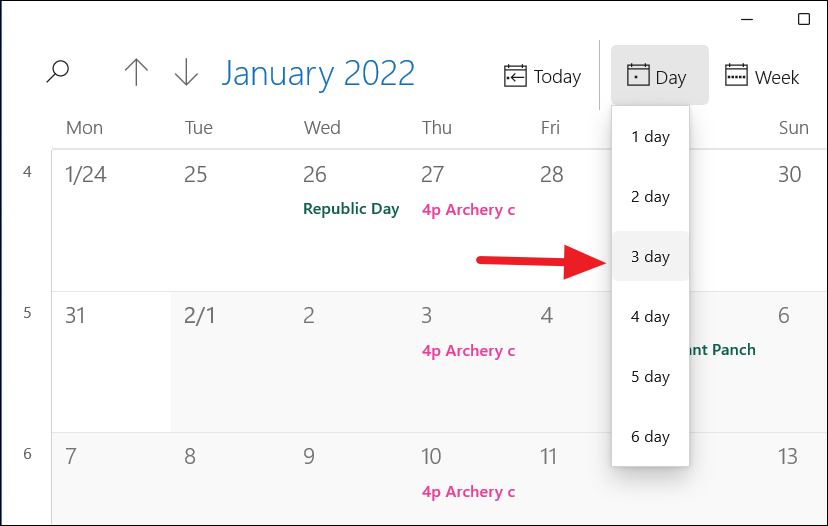
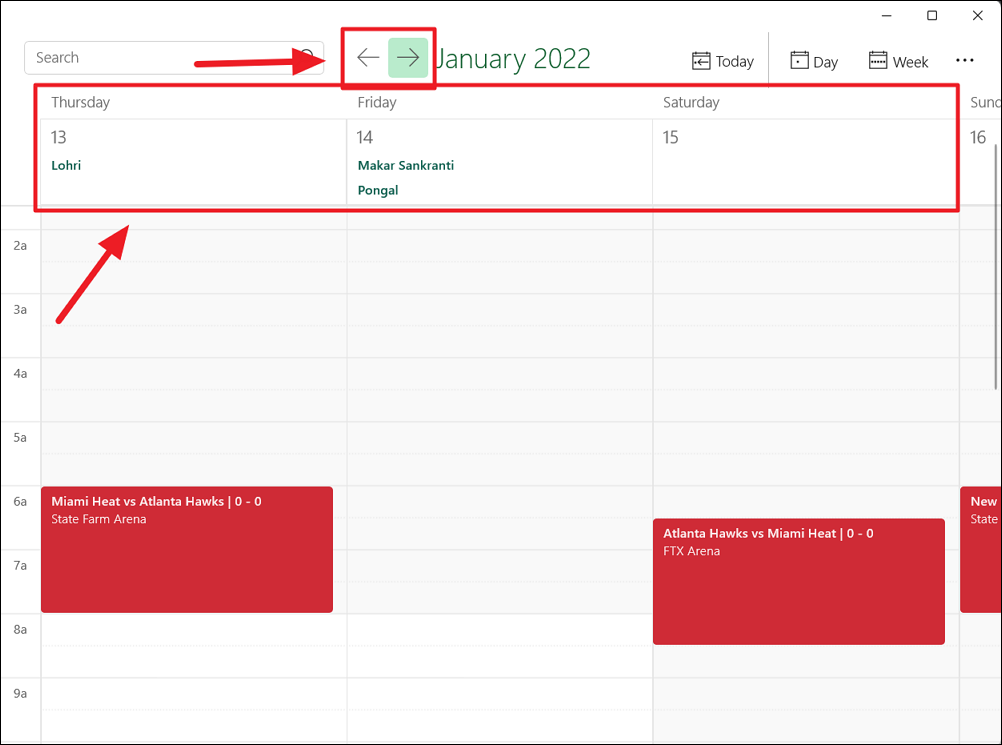
For instance, if you choose the ‘3-day’ view, the calendar will only show you three days of events. To see the next or previous 3 days, click the arrow buttons next to the search button at the top.
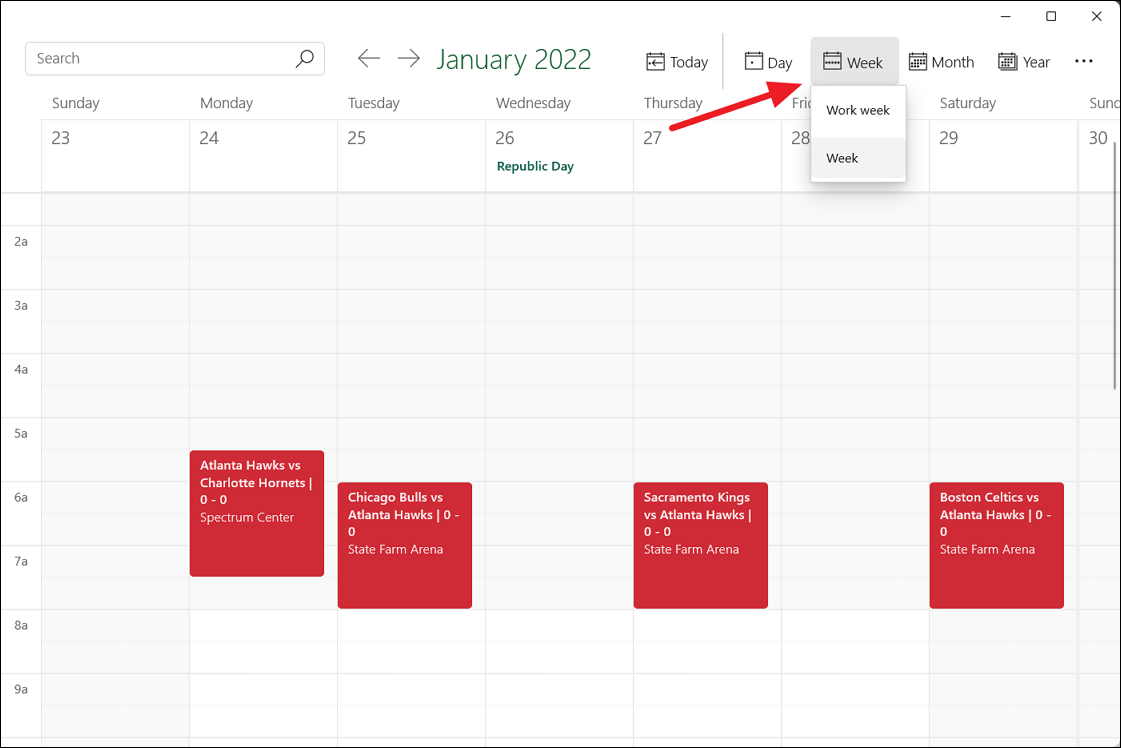
In the ‘Week’ view, you can choose to view either your workweek or the whole week calendar.
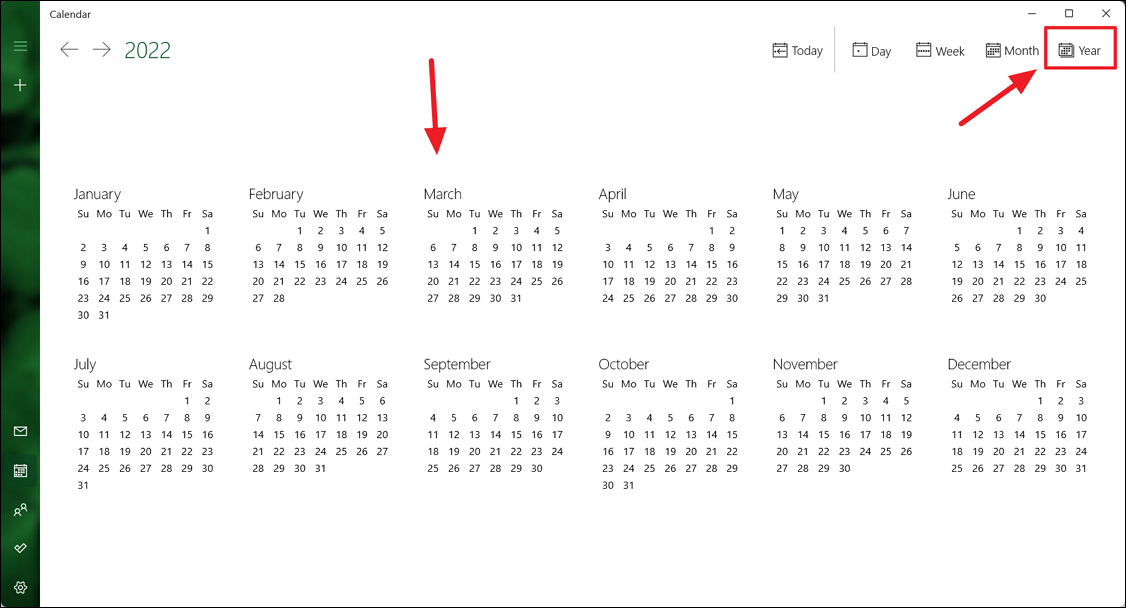
In case, you want to quickly jump to a specific day, week, or month, the Year view works better. Simply, click on the ‘Year’ button in the toolbar to see the year view.
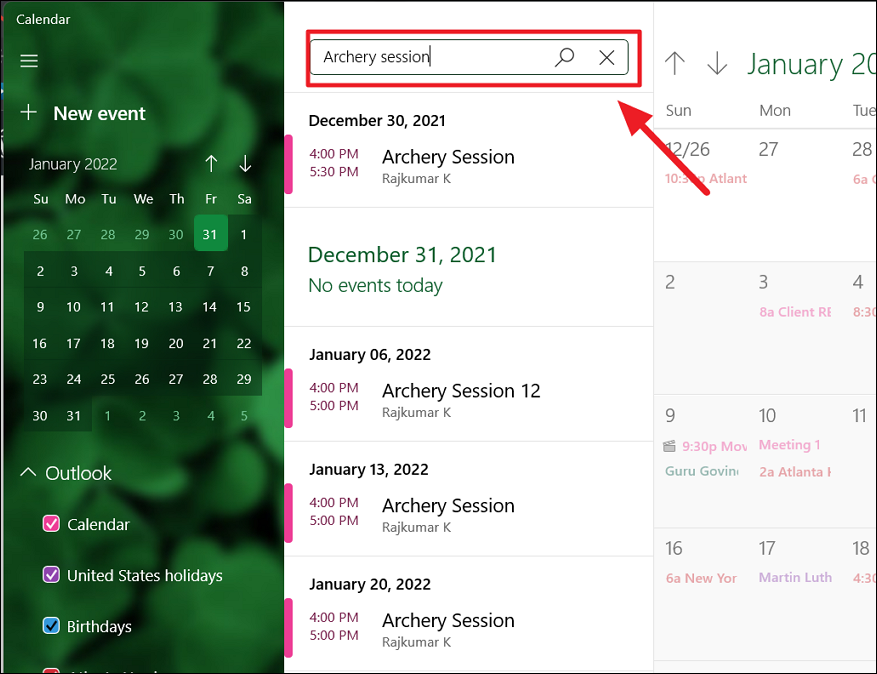
If you have difficulty finding an event, you can use the ‘Search’ field at the top to find events in your calendars easily.
How to Add Events on the Calendar in Windows 11
The Calendar app allows you to create new quick events, detailed events, group events, and repeating events to the calendars. To create new events, manage, edit, delete events on the app, follow these steps:
Create a Quick Event in the Calendar
You can quickly create new events in the Calendar app with minimal information by simply clicking anywhere on the calendar view. Open the Calendar app and click on a date in the calendar view on which you want your event to occur. This will show you an event creator popup window.
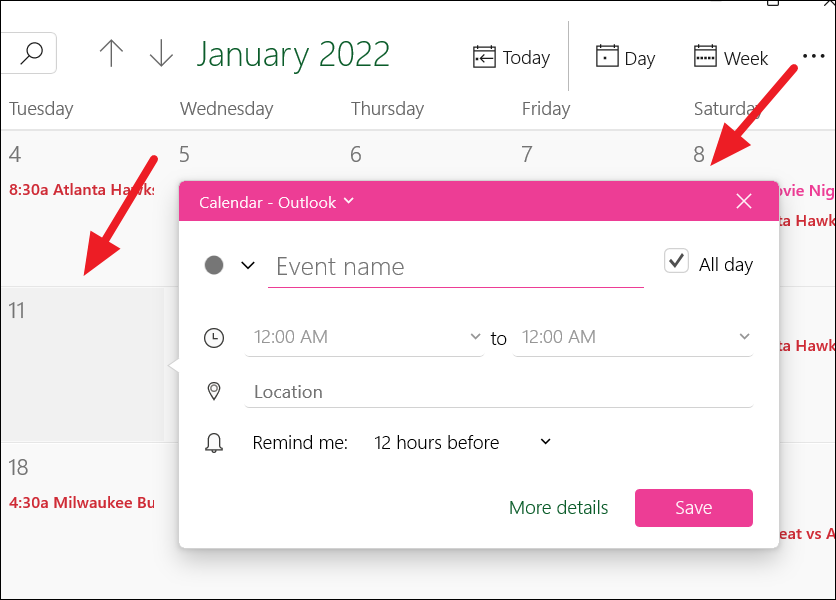
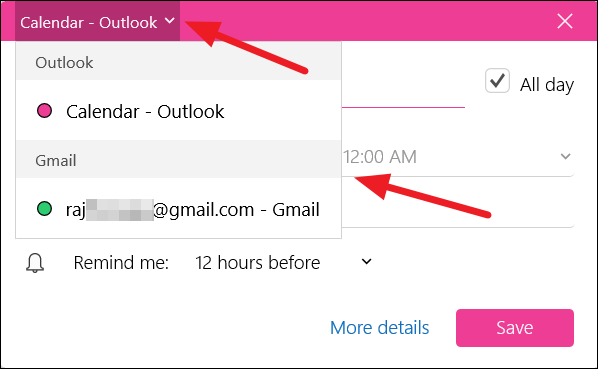
If you have multiple accounts, click the drop-down on the title bar and select the calendar to which you want to add the event.
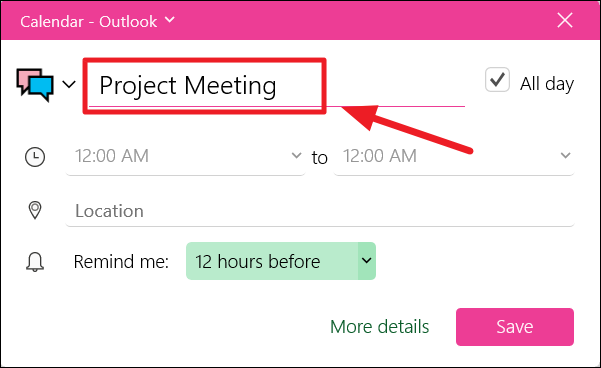
Next, specify a name or description for the event.
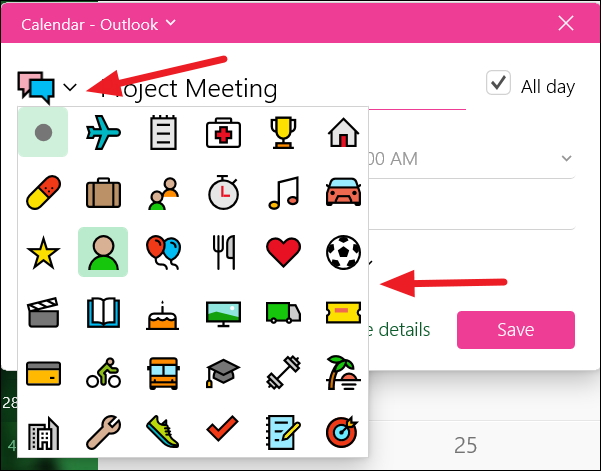
Based on the event name or description, the event creator will automatically show an emoji for the event. If the emoji is incorrect or you want to use a differnt emoji, click the drop menu left of the event name, select the emoji you want for this event.
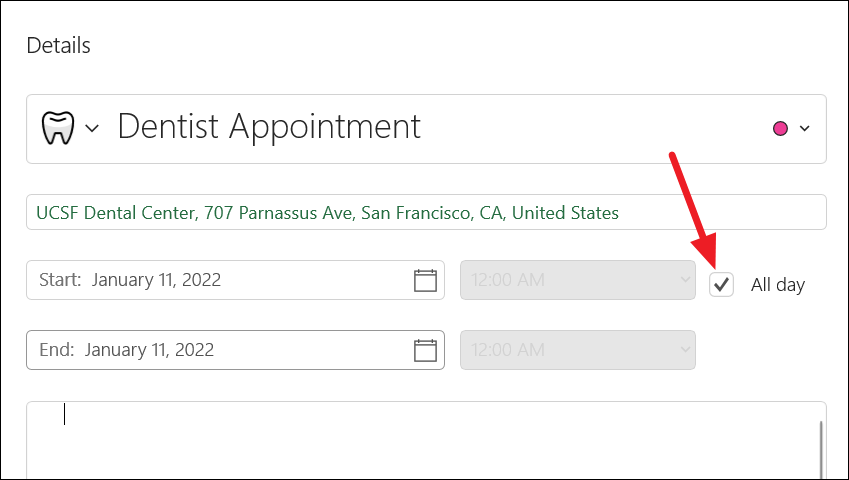
By default, the event is set as an all-day event, but if you want to set a start and end time for the event, first, uncheck the ‘All day’ box. Then, select the start and end times from the below drop-down menus.
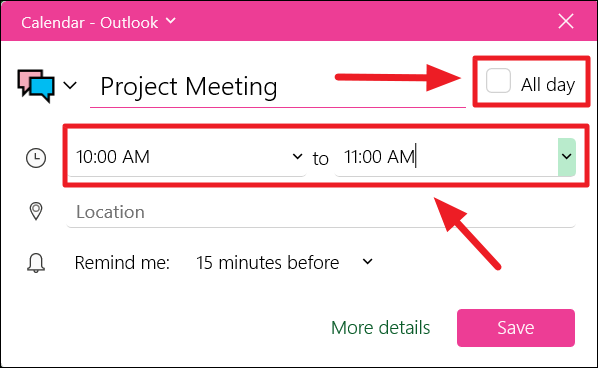
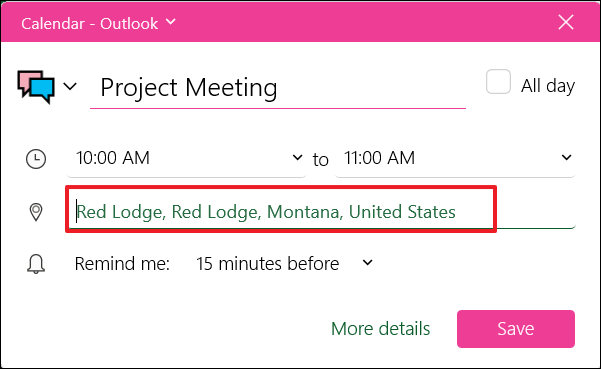
Then, if you want to specify the location for the event, enter it in the ‘Location’ field.
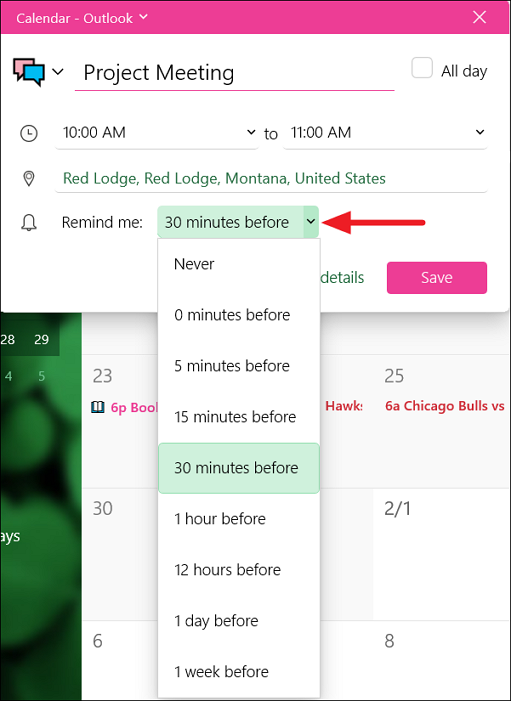
If you want to be reminded before the event, you can use the ‘Remind me’ drop-down menu to select how long before you should get a notification for this event. In case, you don’t need a reminder notification, select ‘Never’.
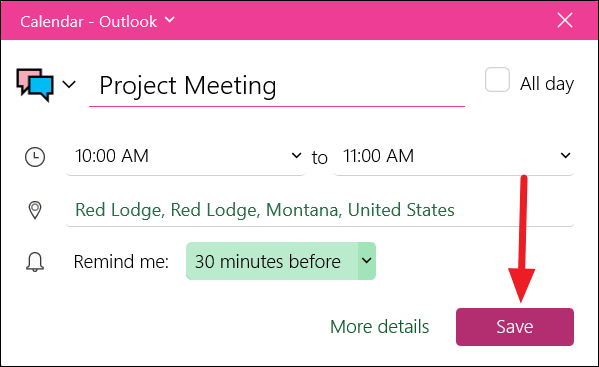
Finally, click the ‘Save’ button to add the event to the Calendar.
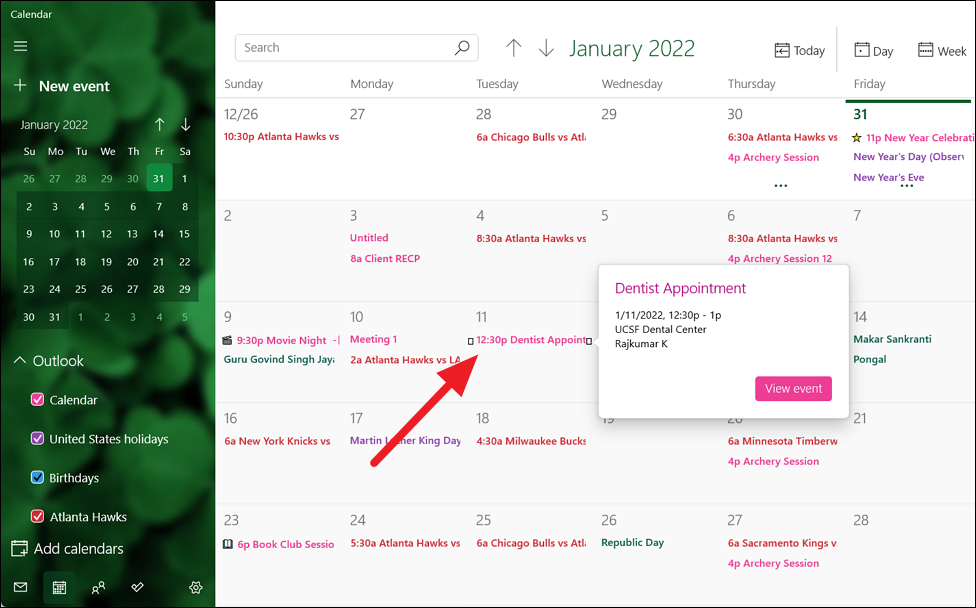
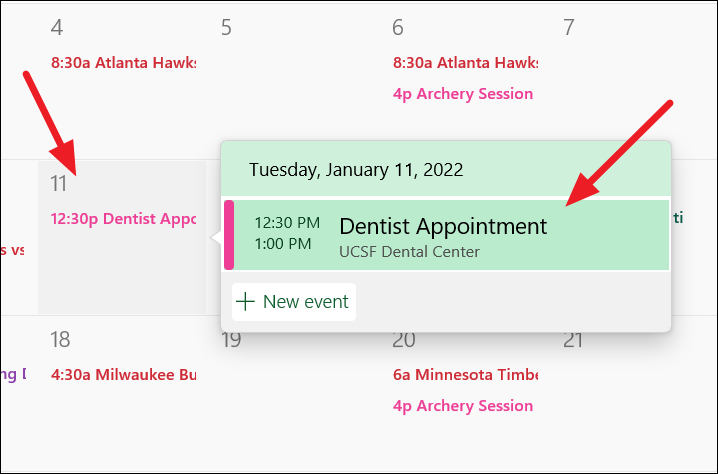
After you save the event, the new event will show up on the Calendar. When you hover over an event, you can see the details about the event, including the name of the event, date and time of the event, location, and owner of the calendar.
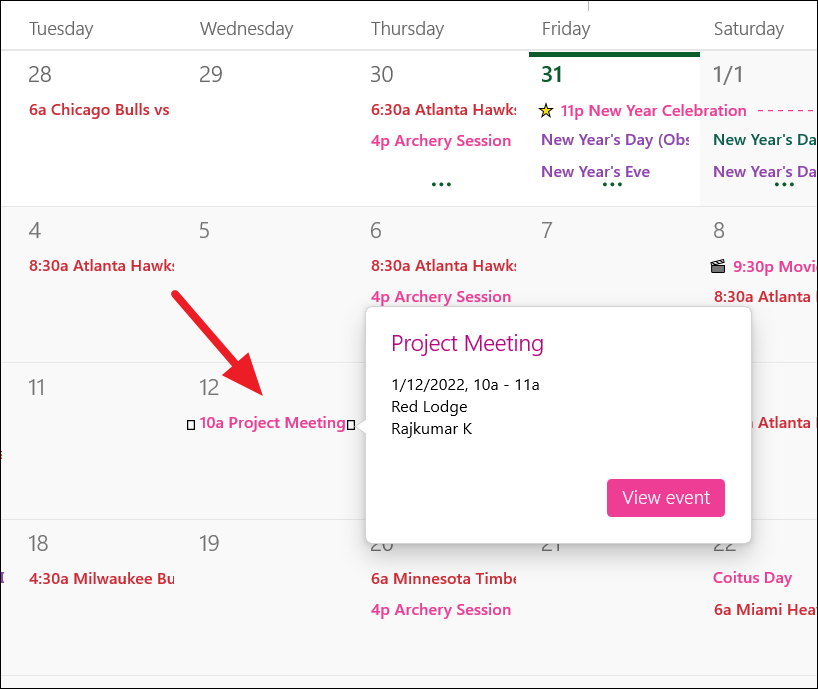
You can also edit, cancel, or delete any added event in the Calendar by selecting the day and clicking on the event.
Create a Detailed Event in the Calendar
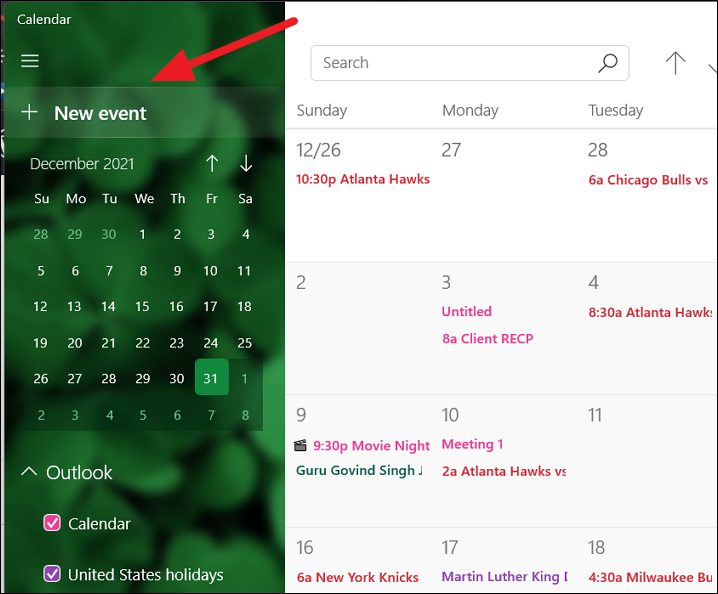
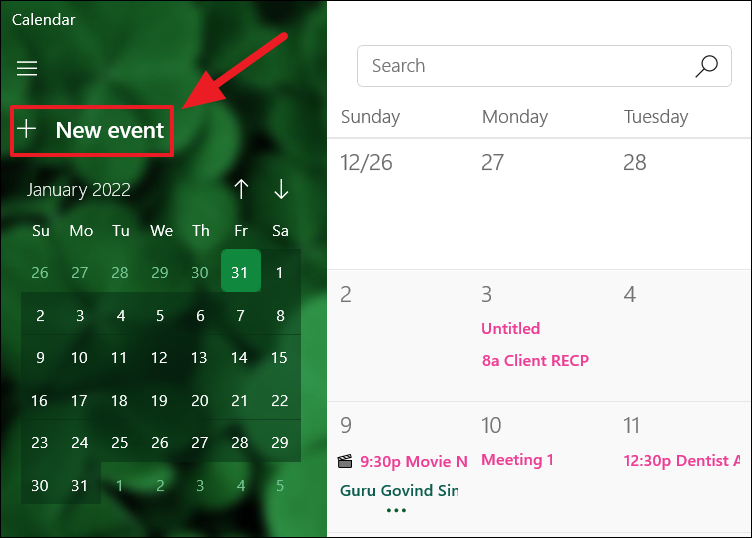
Open the Calendar app and click the ‘New event’ button in the top-left corner or press the Ctrl+N keyboard shortcut to create a new event.
Or you can also select a date and click the ‘More details’ button on the small event creator window.
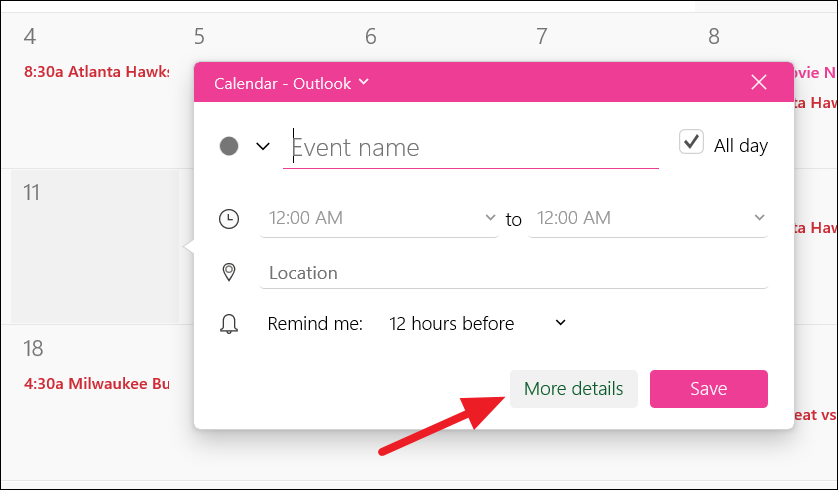
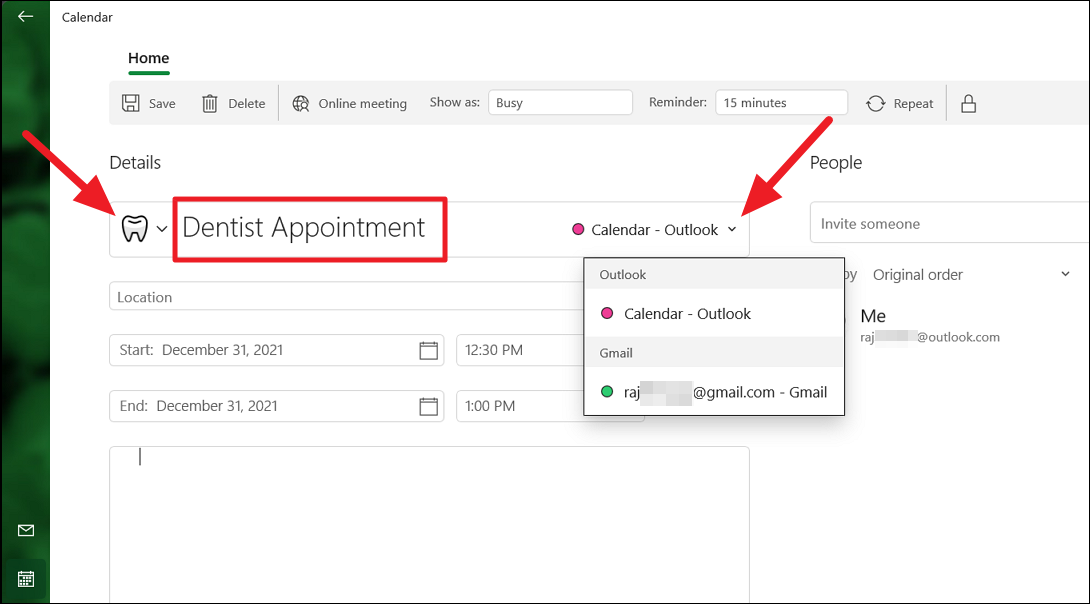
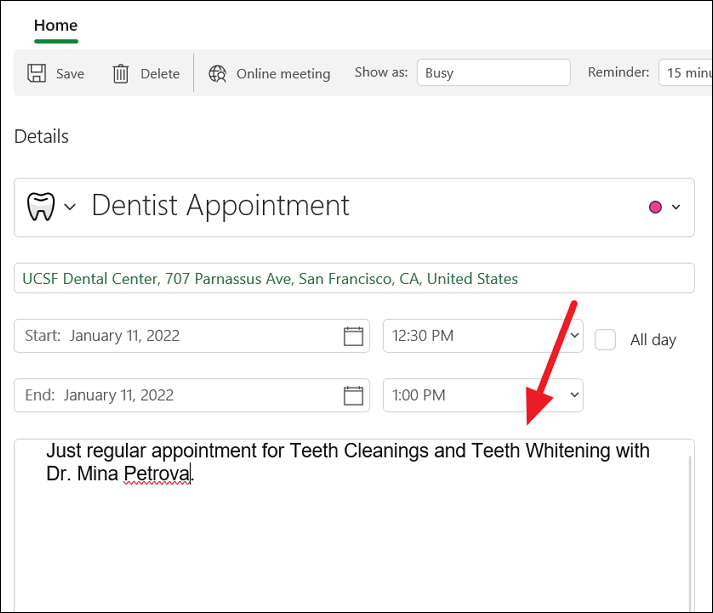
This will open a full event creator on the Calendar app. Under the ‘Details’ section, you can specify details for the event such as title, event date and time, and description.
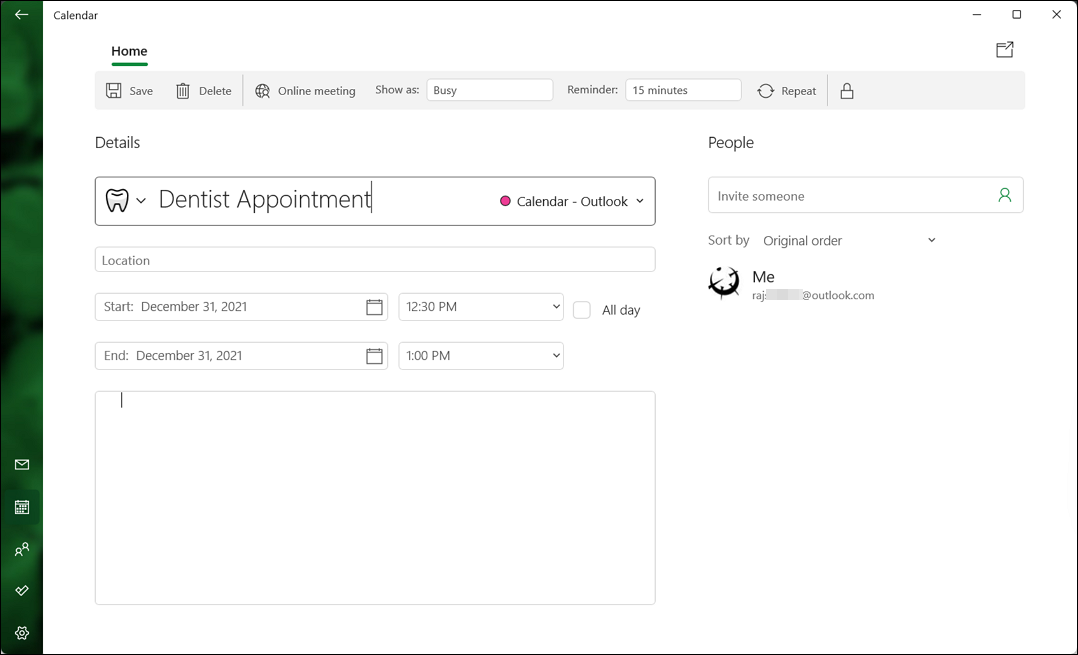
First, specify the name for the event and choose an emoji from the drop-down to the left of the event name. Then, use the Calendar drop-down menu next to the event name to select the account to which you want to add the event.
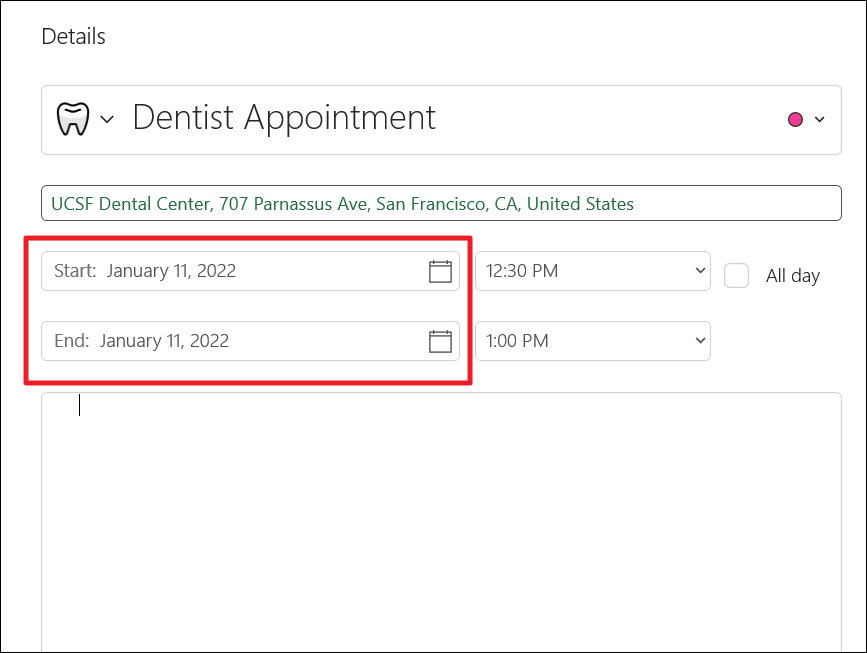
Next, specify the physical location where the event will take place. When you start typing in the location field, you will see suggestions for the location. You can type the location or select it from the suggestions (if available).

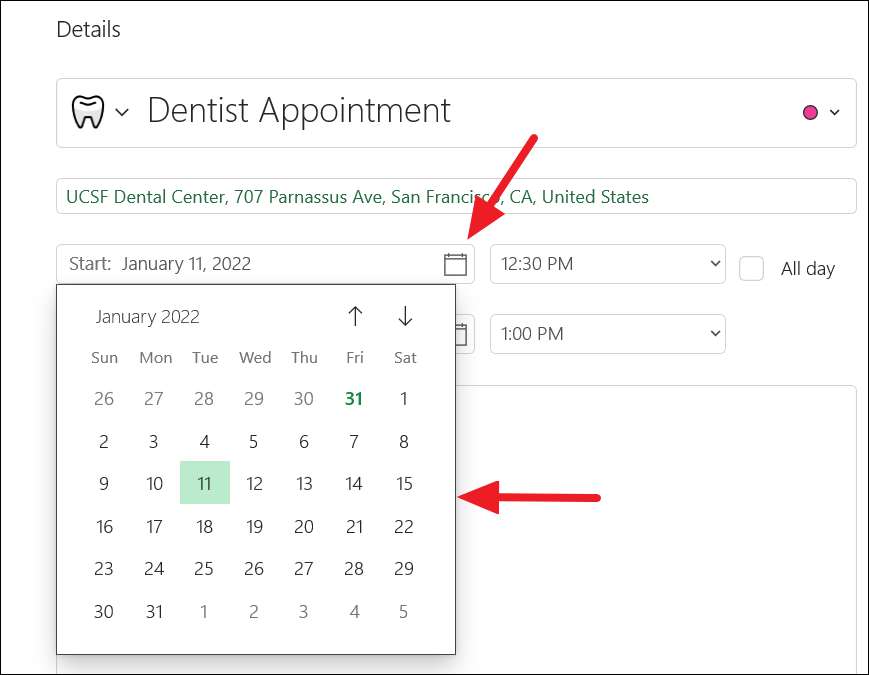
Next, specify the start and end date of the event in the ‘Start’ and ‘End’ options.
You can click on the calendar icon inside the ‘Start’ and ‘End’ fields to choose the dates.
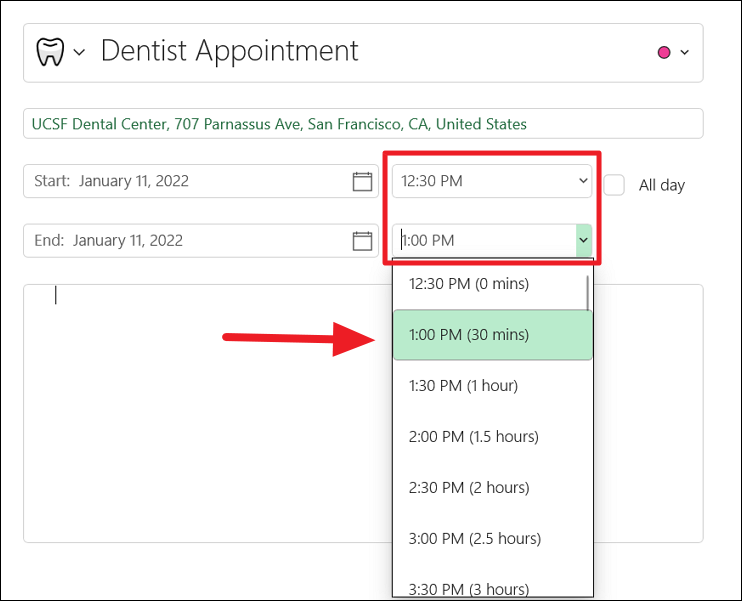
Next, use the drop-down menu on the right of the ‘Start’ option to select a start time for the event. Then, use the drop-down menu on the right of the ‘End’ option to choose an end time.
If it’s an all-day event check the ‘All day’ option to the right which will grey out the time selections.
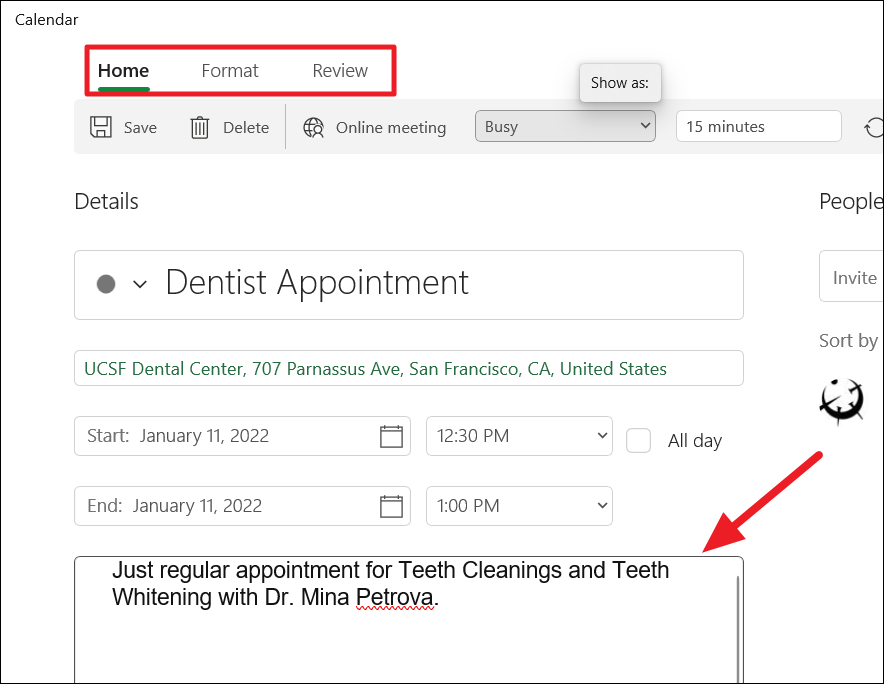
At the bottom, you can add a description or other details about the event.
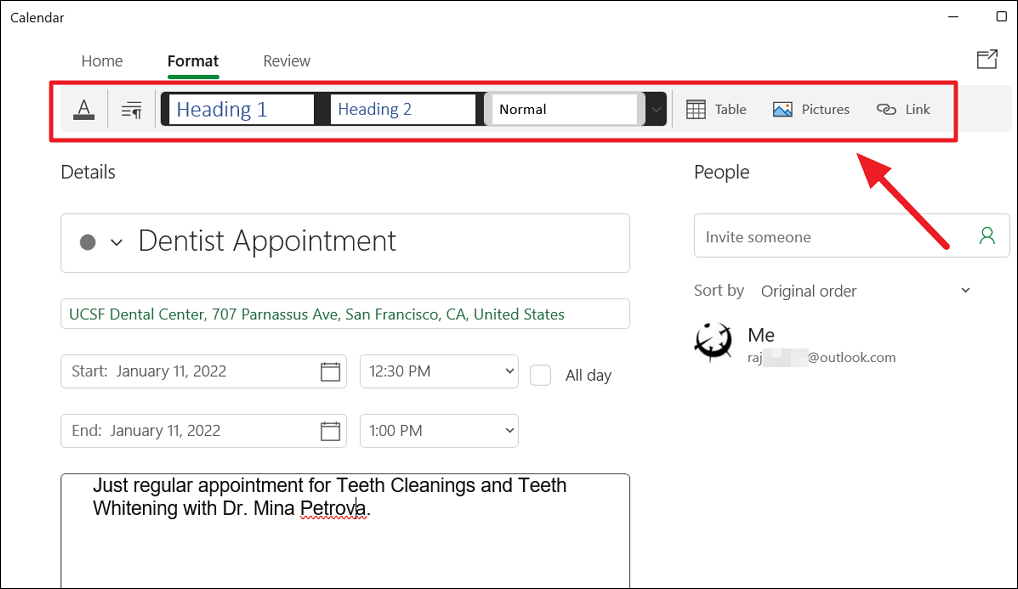
When you click on the Description box, two new tabs – ‘Format’ and ‘Review’ will appear next to Home tab at the top.
Click on the ‘Format’ tab and use the new toolbar to format your text. Besides formatting, you can also insert tables, pictures, links to the description using buttons in the toolbar.
Then, from the ‘Show as’ drop-down menu at the top, you can select a visual cue for the event.
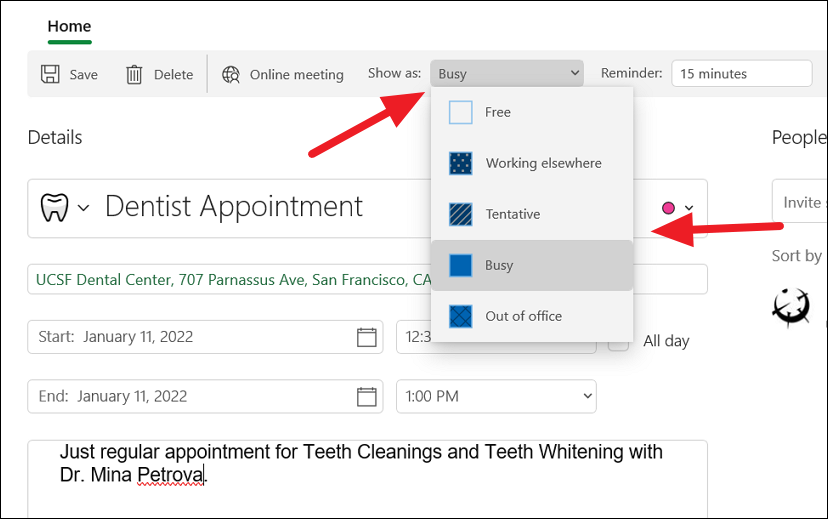
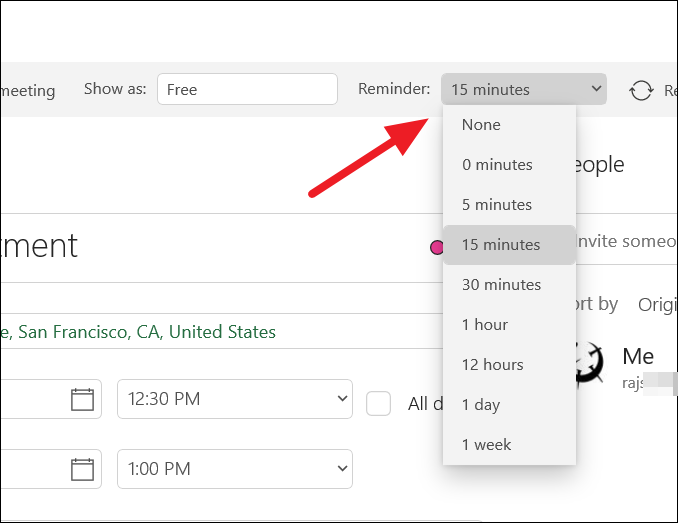
You can use the ‘Reminder’ drop-down menu to select how long before you should get a notification or alert about the event. You can select any time between ‘0’ minutes to ‘1’ week before the event or ‘None’ if you don’t need a reminder.
In case you want the event to be private, click the ‘padlock’ icon at the top right corner (icon highlighted means Enabled). When this option is enabled, the event details will not be visible to anyone besides you which is useful if you are sharing your calendar.
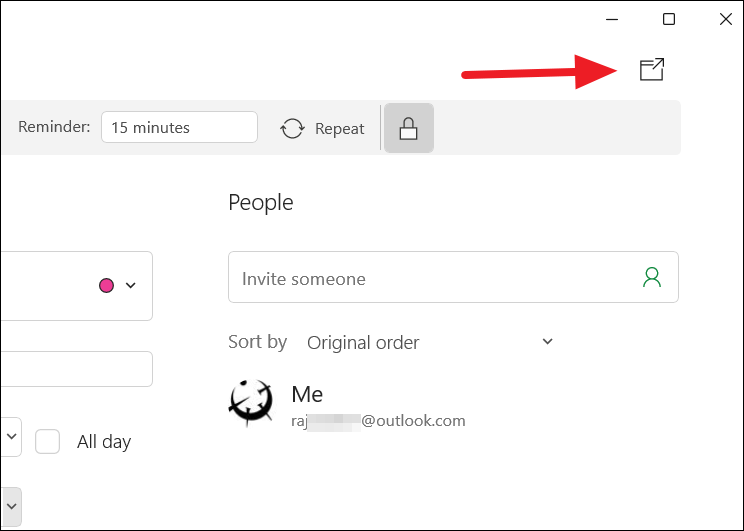
If you want to open the event in a new separate window, click the icon at the top right corner below the minimize and maximize buttons.
Once you are done, click the ‘Save’ button in the top-left to add the event to the calendar.
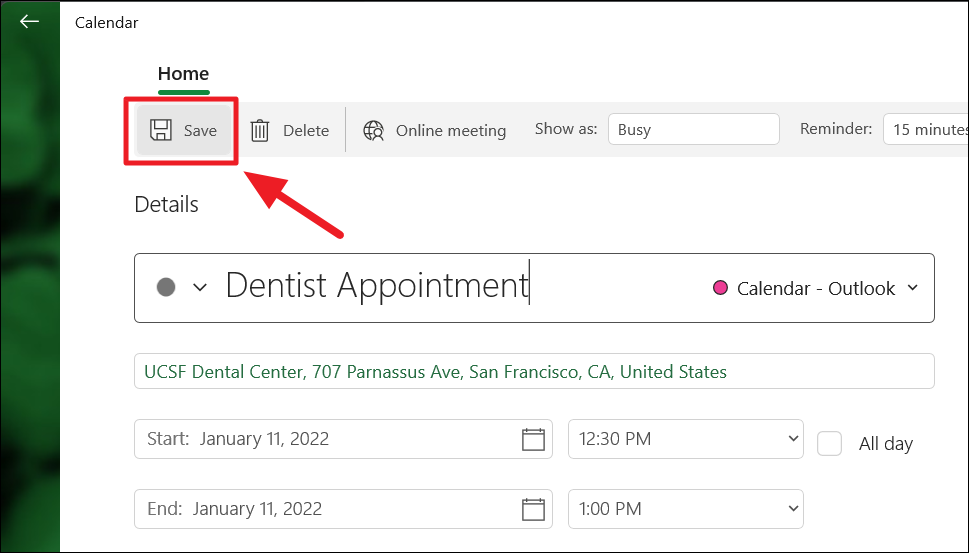
The event has now been added to the calendar as shown below.
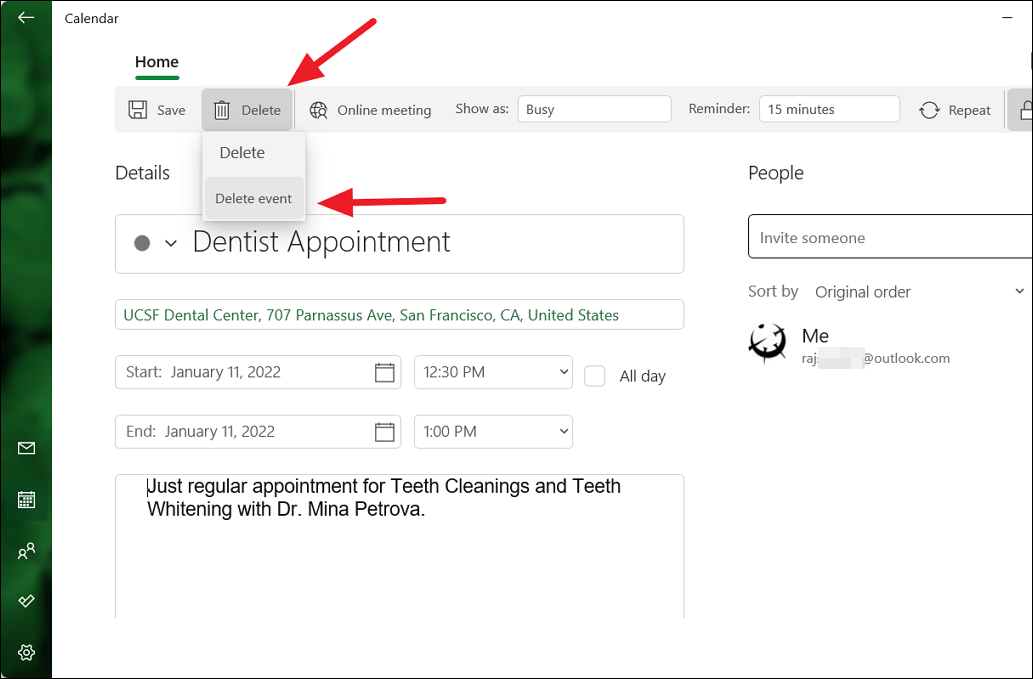
To edit or delete an event from the calendar, select the date with the event and click on the event. If you want to create more than one event in a day, click the ‘New event’ button below the events.
Now, you can either edit the event and save it or click the ‘Delete’ button in the top left and select ‘Delete event’ to remove the event from the calendar.
Create a Repeating Event in the Calendar
Sometimes, you may want to create schedules for repeating events such as daily workout schedules, weekly classes, monthly doctors appointments, etc. If you want to create a repeating calendar event, follow these steps:
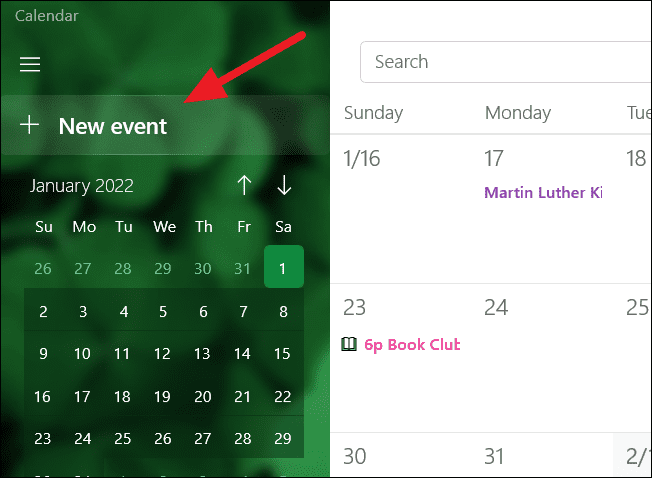
Open the calendar app, click the ‘New event’ button in the top-left corner or click an already created event from the calendar view.
Next, fill in the details for the event, such as event title, location, start and end time. Then, click the ‘Repeat’ button on the top right corner.
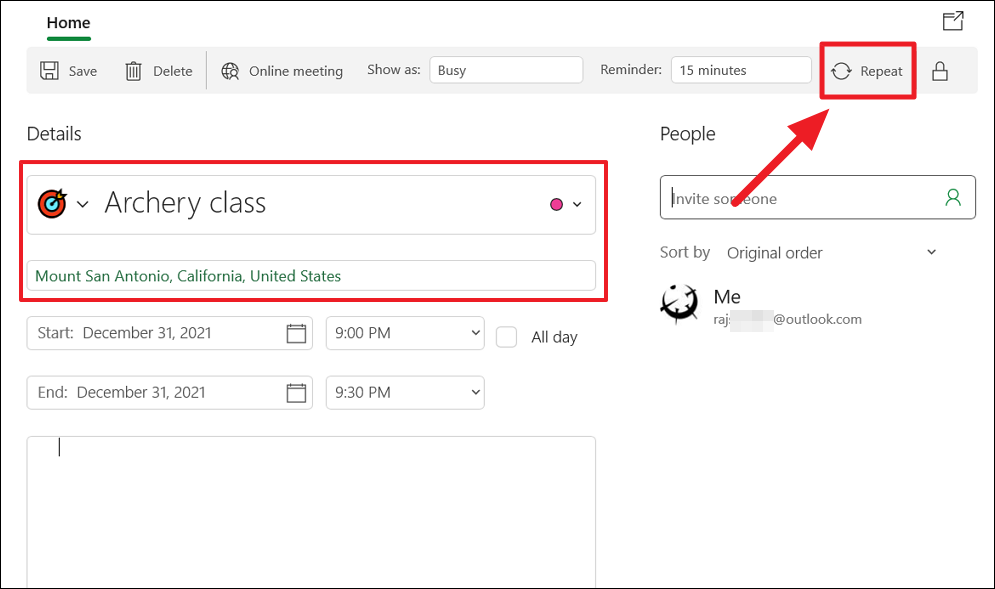
When you click the Repeat button, a set of new options will appear to configure the repeat cycle.
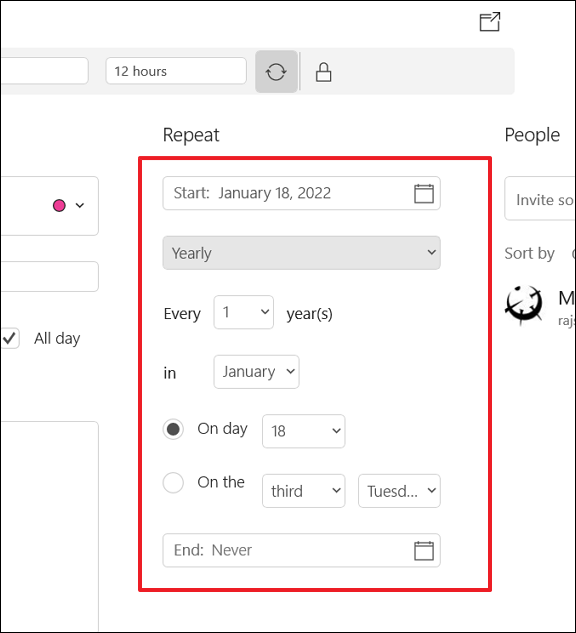
First, specify the starting date of the event in the ‘Start’ option. Next, use the drop-down menu below the Start option to select how you want to often to repeat the event, such as:
- Daily
- Weekly
- Monthly
- Yearly
For example, we are selecting the starting date of the repeat event as ‘January 06, 2022’ and we want to repeat the event ‘Weekly’. If you select a differnt option than ‘Weekly’, you will get differnt settings.
Then, we need to set how many weeks, on what week, and on what day of the week the event should take place.
From the ‘Every’ drop-down, you can specify whether you want to repeat the event every week, every 2 weeks, every 3 weeks, and so on. Choose ‘1’ if you want to repeat every week.
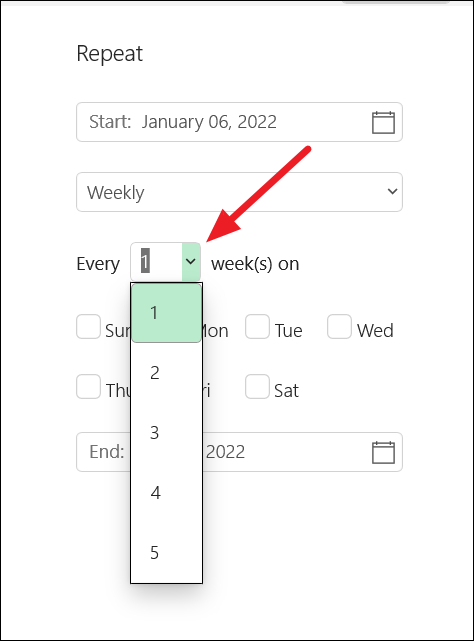
After that, specify what day of the week the event should take place.
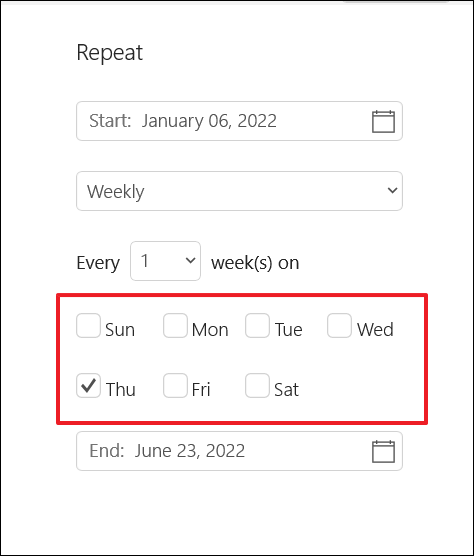
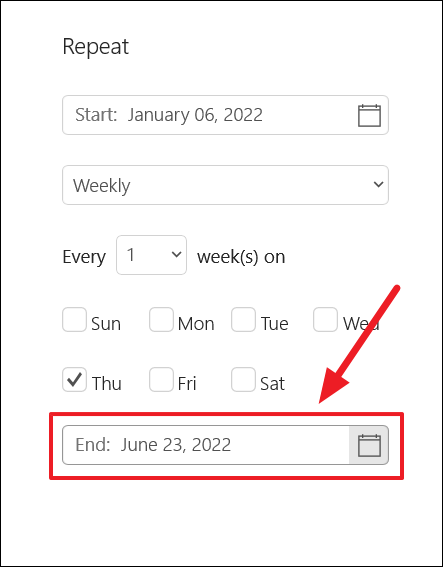
Finally, you can use the ‘End’ option to specify the end date for when the event should stop repeating.
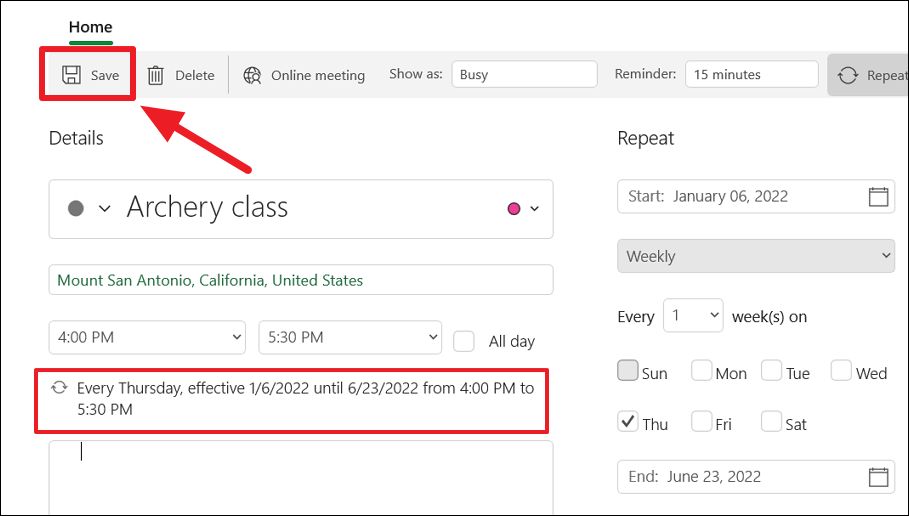
After selecting repeat options, you will see a summary of when the event will repeat. Then, enter details or descriptions about the event in the bottom box (if you want). Once you enter all the details, click the ‘Save’ button to save the repeating event to the calendar.
Create a Group Event in the Calendar
If you want to schedule a group meeting or an event, you can create a group calendar event and invite people via their email addresses. Here’s how you create a group calendar event in the Calendar app:
In the Calendar app, click the ‘New event’ button in the top-left corner.
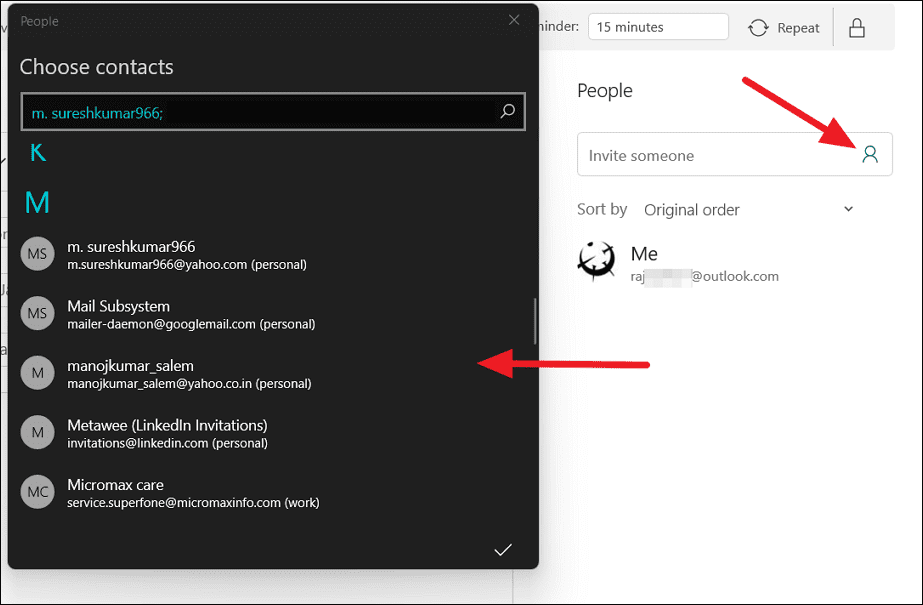
In the event creator window, enter the email address of the person you want to invite to the calendar event under the ‘People’ section and press Enter.
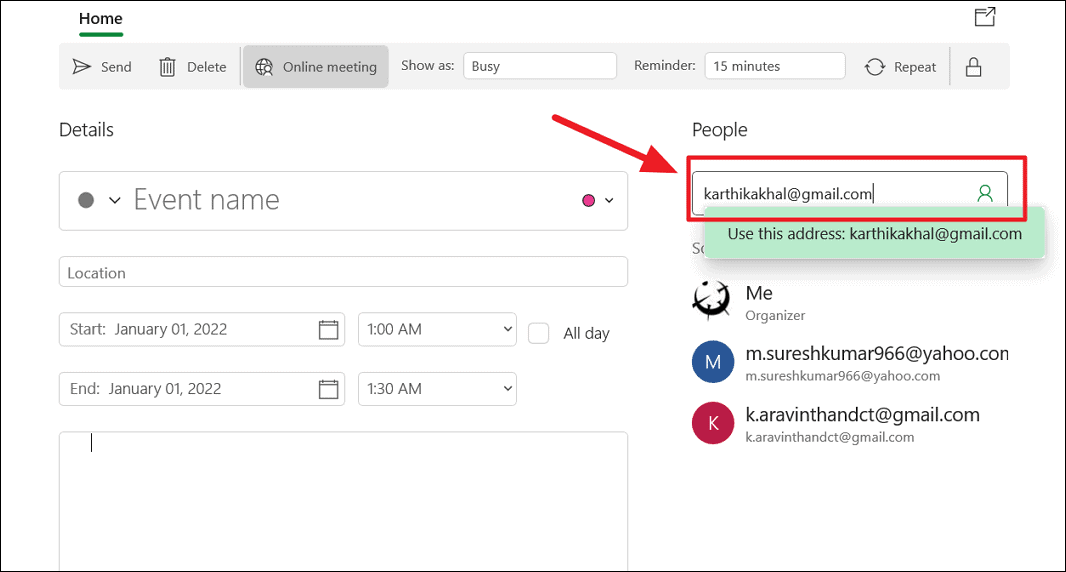
Or you can also click the contact icon in the ‘Invite someone’ field to choose a person(s) from your contact. You can add as many as you want to the group calendar event.
Then, under the ‘Details’ section, you will need to fill in the usual details of the event such as event title, physical location, date, time, and description of the event. At last, click the ‘Send’ button to send invites to the selected people.

From the ‘Reminder’ drop-down menu, you can select how long before you should receive an alert about the event.
Once the invitations are sent, you will see the event in your calendar. The email recipients will receive an email invite which they can accept or decline. Should they accept the invite the event will also appear in the recipient’s calendar. If they RSVPed, you will also receive a reply to your mail.
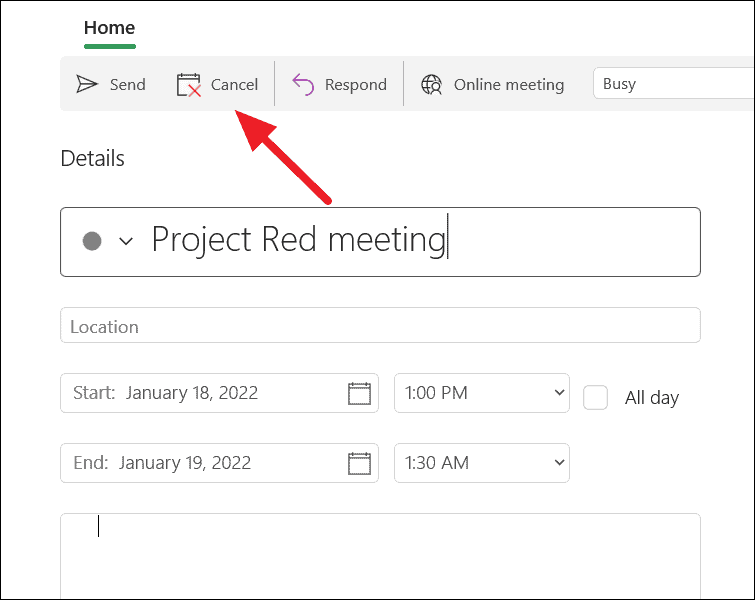
If you decided to cancel the event, click on the event in the Calendar view to open it. Then, click the ‘Cancel’ button to cancel the group event.
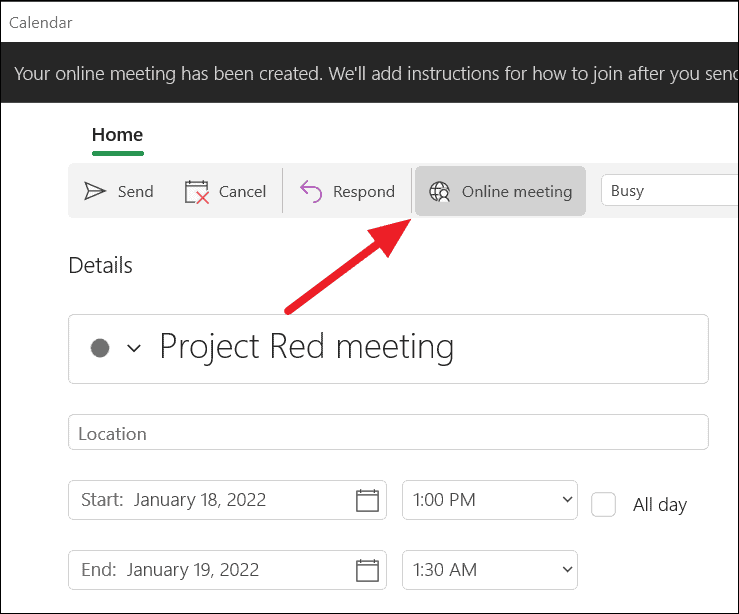
You can also create and join an online meeting via skype in the calendar app. First, add the people you want to invite to the meeting, and then, click the ‘Online meeting’ button at the top.
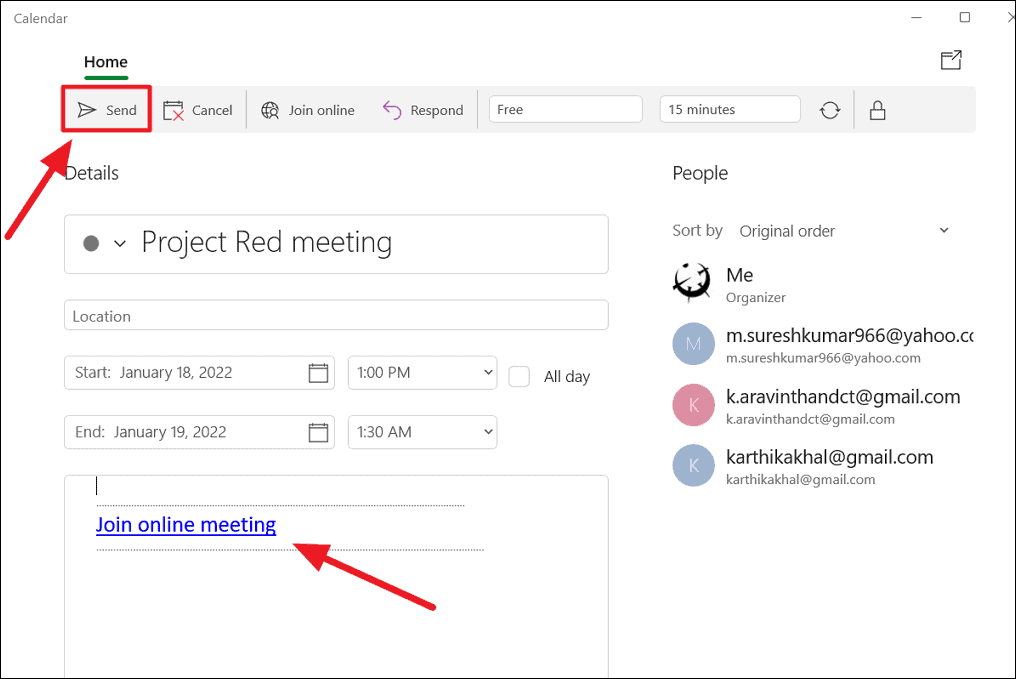
Once you do that, your online meeting will be created and a ‘Join online meeting’ link will be added to the description as shown below. Then, you can click the ‘Send’ button to send invites along with the link to join the meeting. You can join the meeting by selecting the ‘Join online’ button.
Create Calendar Events or Reminders using Your Voice
You can also effortlessly create an event or set up reminders through your digital assistant, Cortana using just your voice. Here’s how:
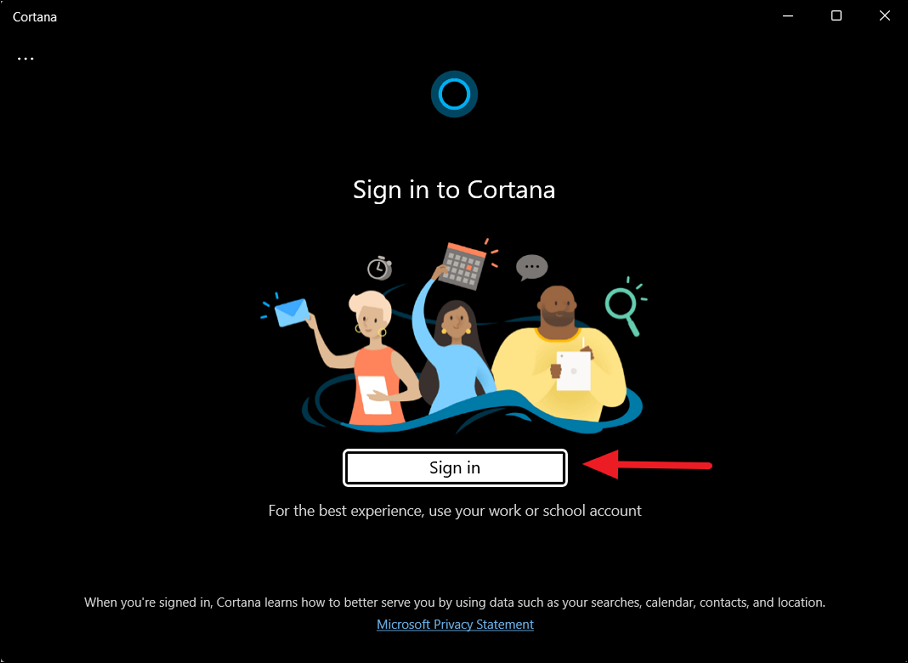
First, open Cortana and sign in using your Microsoft account.
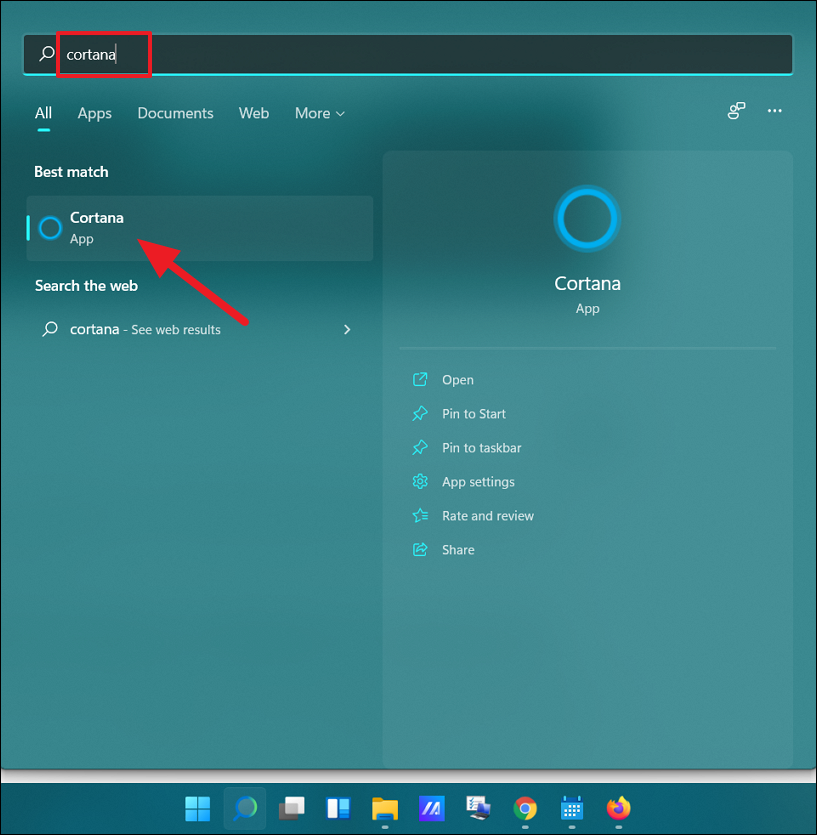
Then, you can launch Cortana by calling “Hey Cortana” or by searching for ‘Cortana’ in the Windows search and opening the top result.
Then, just say something similar, “Hey Cortana. Add Natalie’s soccer match to my calendar for Friday at 5 p.m”. or “Hey Cortana. Add Budget meeting to the calendar for tomorrow at Nirvana cafe Downtown at 3. p.m”.
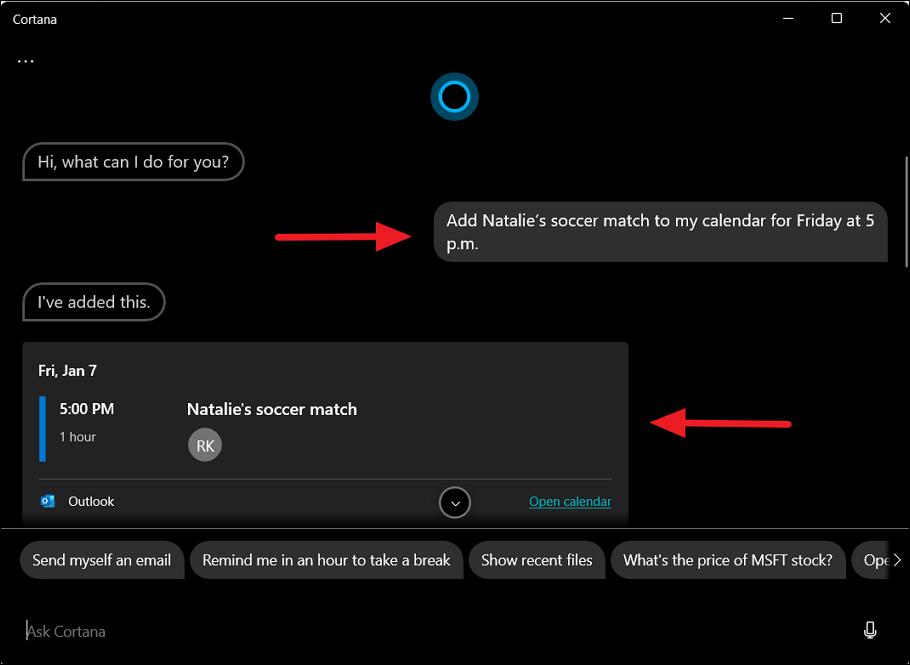
Cortana will confirm with you the events or agendas you want to add before adding them to the calendar. If there’s any conflict, it will ask you whether you want to add the appointment or event anyway or schedule it some other time.
You can also type the command directly in Cortana without saying it, it will add the event to your calendar. With Cortana you don’t have to navigate to the calendar and add an event through several steps, you can quickly add an event to the calendar with a single voice command.
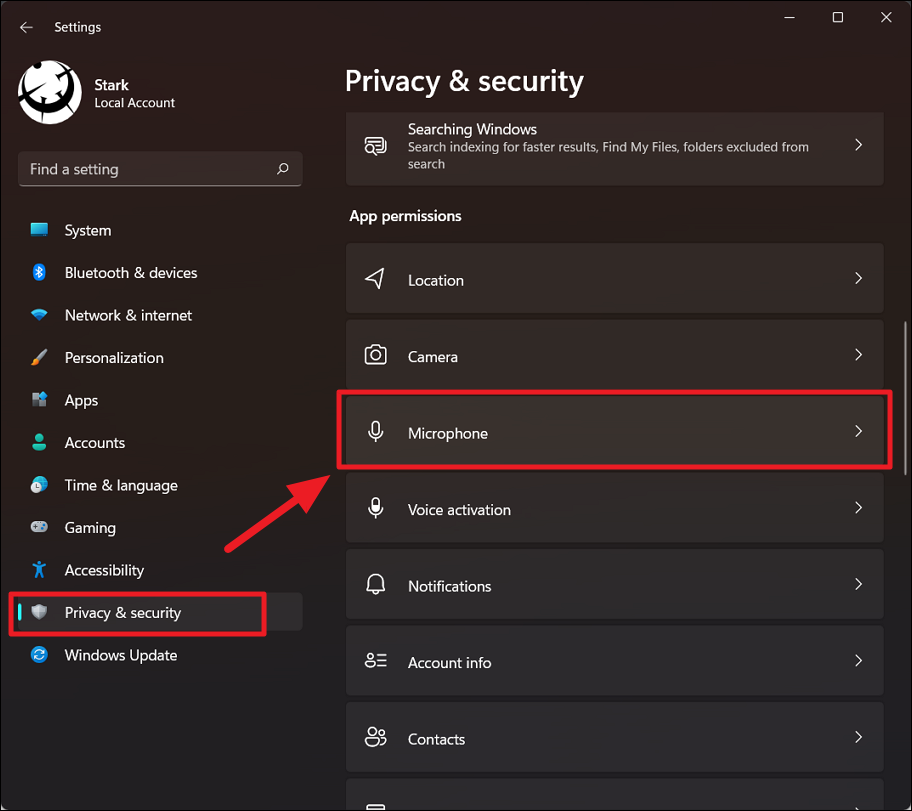
Make sure the Cortana app is given Microphone access, otherwise the voice wouldn’t work. To permit Cortana to use Microphone, use these steps:
Open Windows Settings, click Privacy and security on the left and then scroll down and select ‘Microphone’ under App permissions.
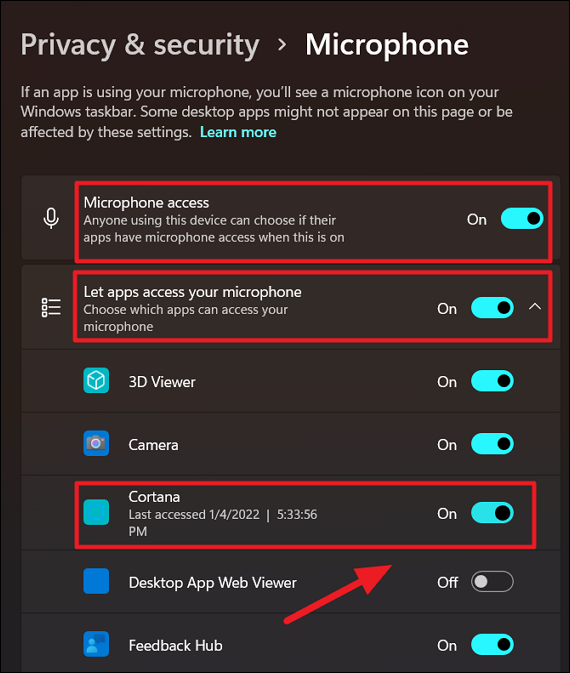
In the MIcrophone settings page, make sure to enable ‘Microphone access’ and ‘Let apps access your microphone’ options. After that, turn on the ‘Cortana’ toggle from the list.
How to Share Calendars with Others from the Calendar app
If you wish to share calendars with friends, colleagues, and others, follow these steps:
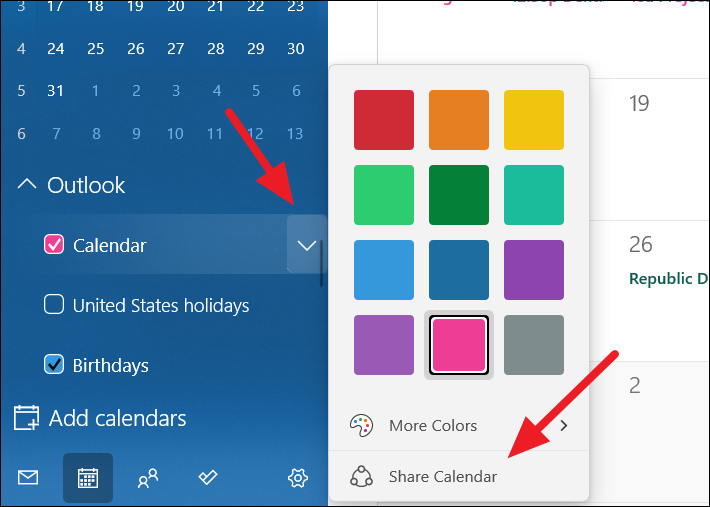
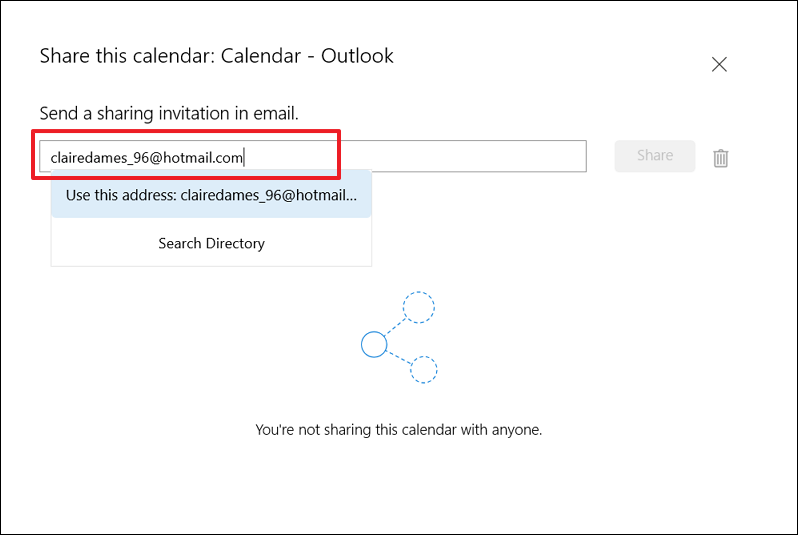
Right-click the calendar or click the down arrow next to the calendar and select the ‘Share Calendar’ option under any account.
Next, type the email address of the person you want to share the calendar with and press Enter.
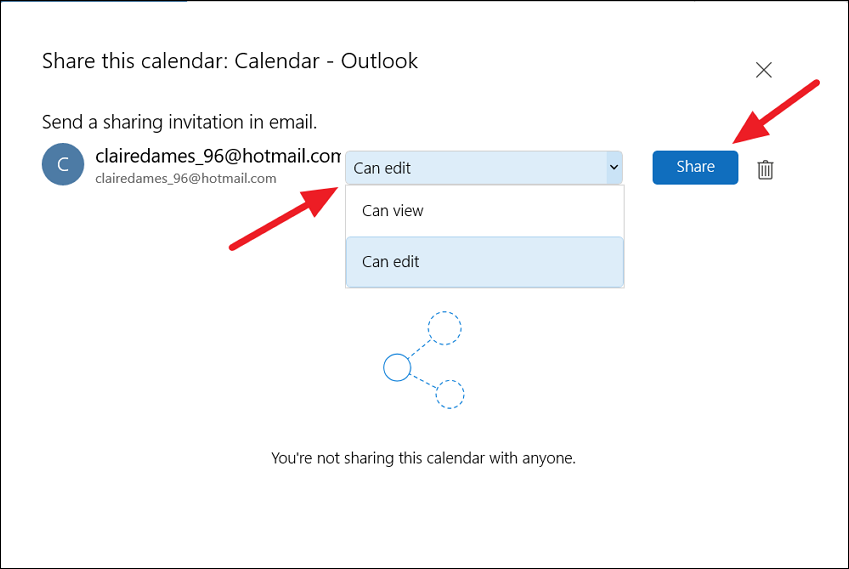
From the drop-down menu, you can select the ‘view’ or ‘edit’ permission the person will have over the calendar. Then, click the ‘Share’ button to share the calendar.
If you want to stop sharing a calendar, you can click the ‘trash’ icon next to the calendar you’re currently sharing from the Share this calendar page.
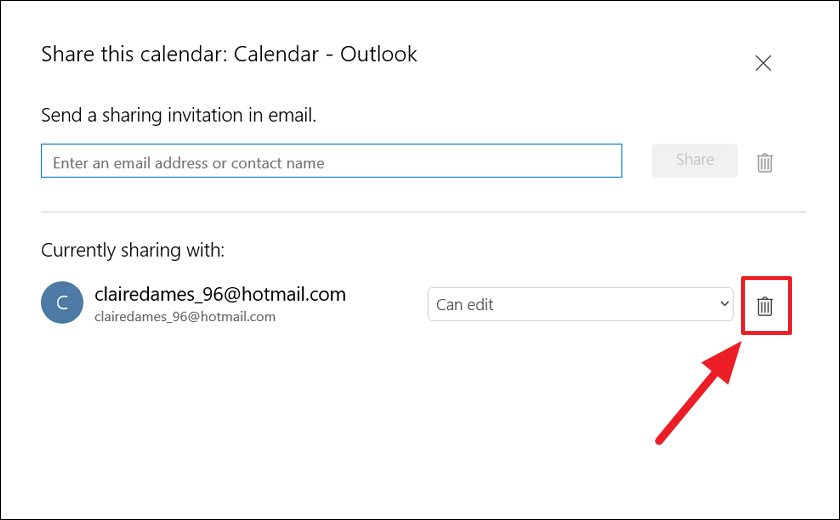
You can also change the view or edit permissions of the calendar anytime from the drop-down after sharing it.
How to Add Holidays to Windows 11 Calendar App
If you work with people from a different country, it’s good to know when their holidays are coming so you can plan your events accordingly. In Windows 11’s calendar app, you can add holidays of multiple countries around the world to your calendar. If you want to add holidays calendar of your country or other countries, follow these steps:
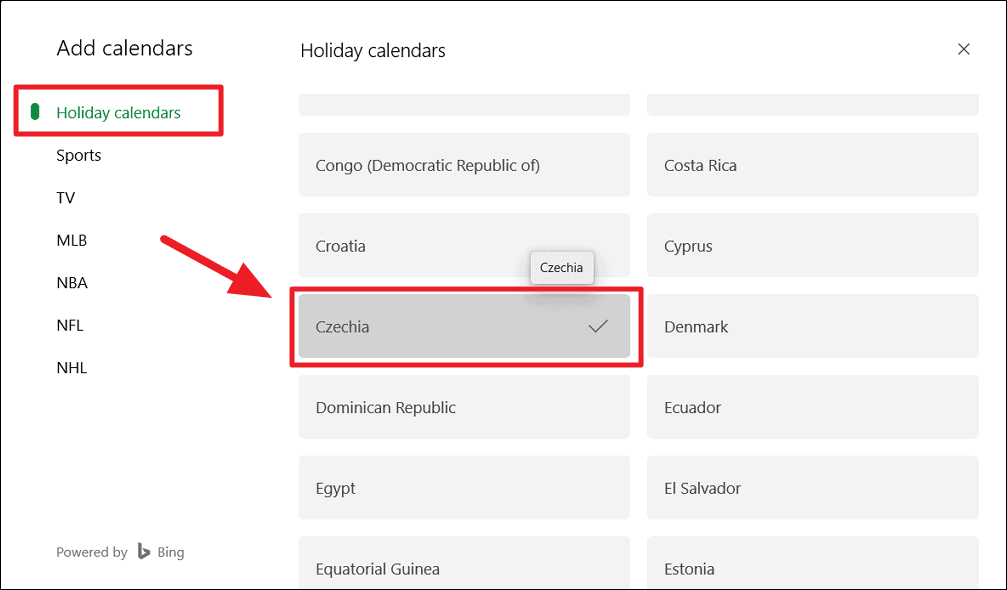
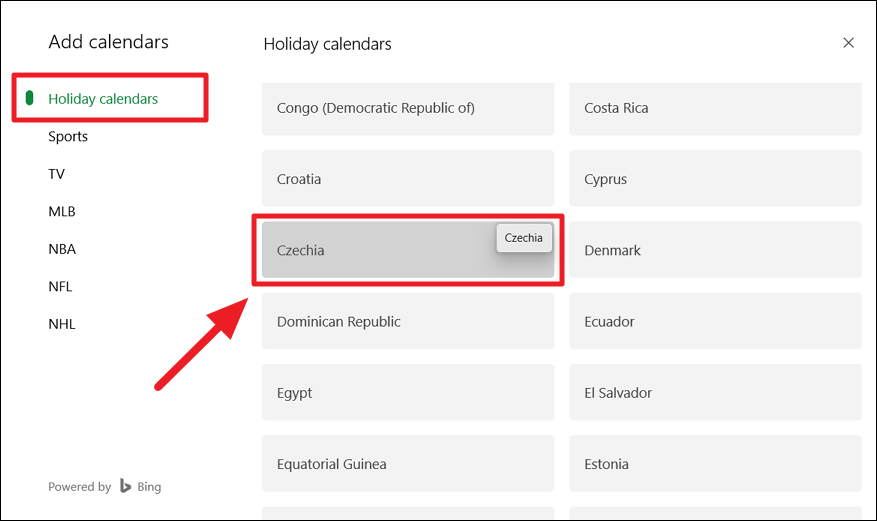
Open the calendar app and click the ‘Add calendars’ button at the bottom left corner of the app.
In the Add calendar window, click the ‘Holiday calendars’ on the left panel and select choose a country for which you want the national holidays added to your calendar.
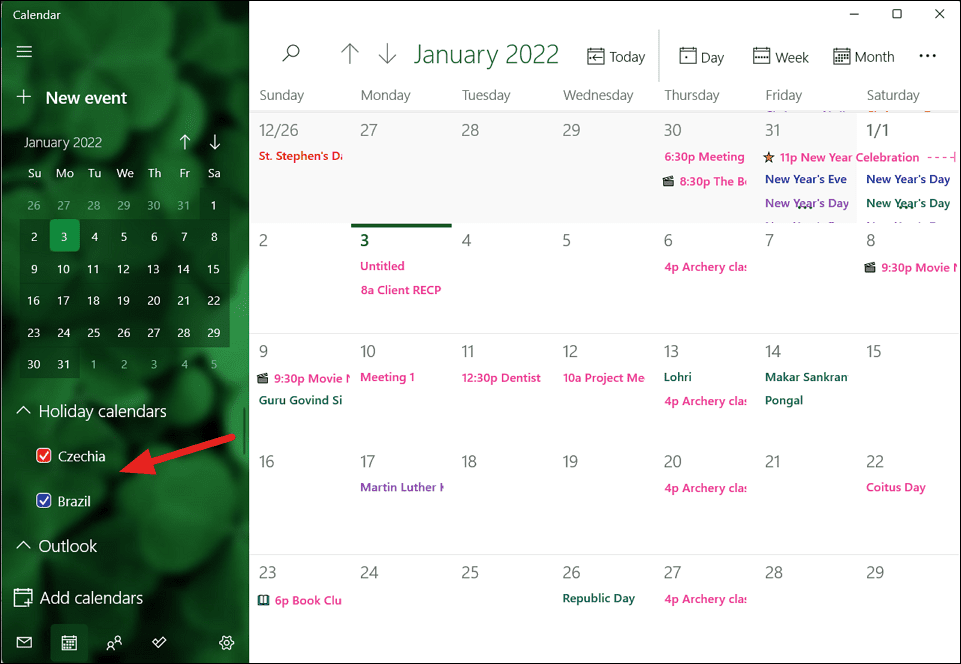
Now, all the national holidays of the countries you selected are added to the calendar as shown below (each in a different color).
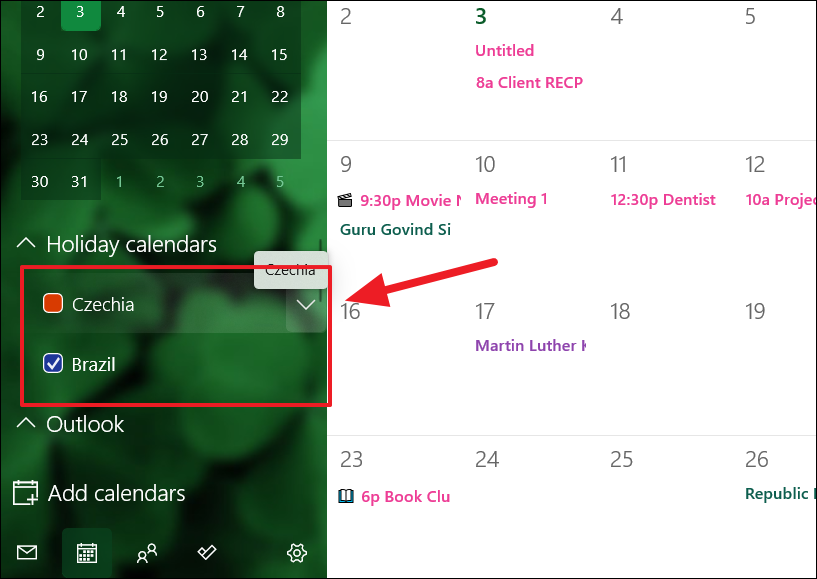
If you want to hide a holiday calendar, go to the ‘Holiday calendars’ section on the left pane and uncheck the ones you want to hide.
If you need to remove a holiday calendar from your calendar app, click the ‘Add calendars’ option on the bottom left again.
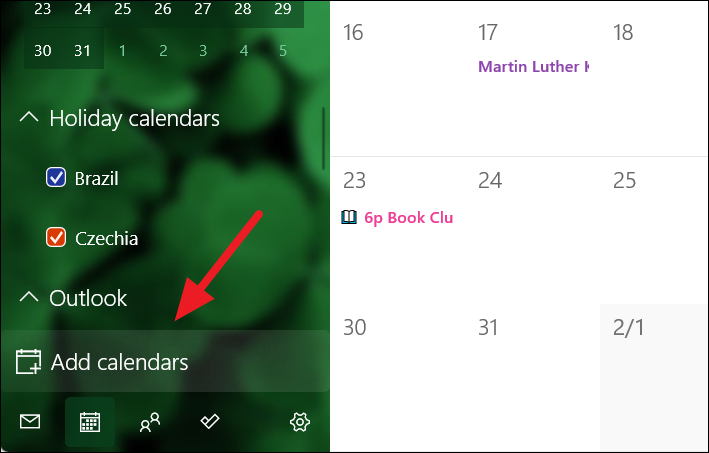
Then, go to the ‘Holidays’ section and deselect the ones you want to remove.
In the same way, you can add Sports, TV, and other calendars to your calendar.
How to Show Weather on the Calendar app
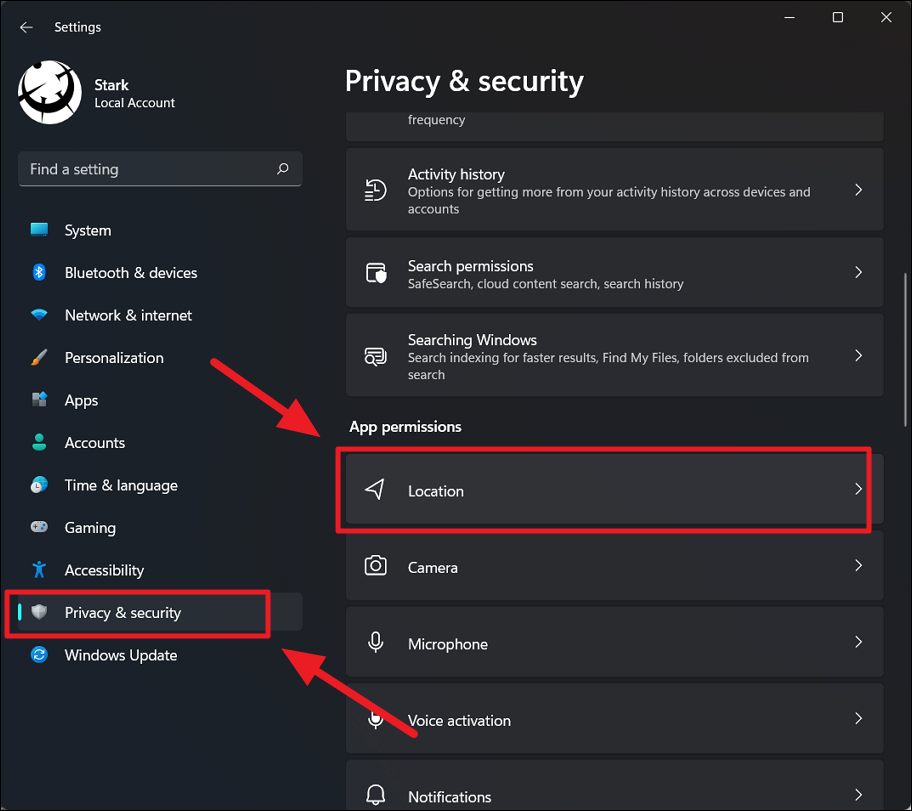
The Calendar app can also display weather forecasts on the calendars which can help you plan your schedules. To make the weather show up, first, you will need to give the Mail and Calendar app permission to access your location. Here’s how you do that:
First, open Windows 11 settings by pressing Windows+I. In the Settings app, click ‘Privacy & security’ on the left pane and select ‘Location’ under the App permissions section on the right.
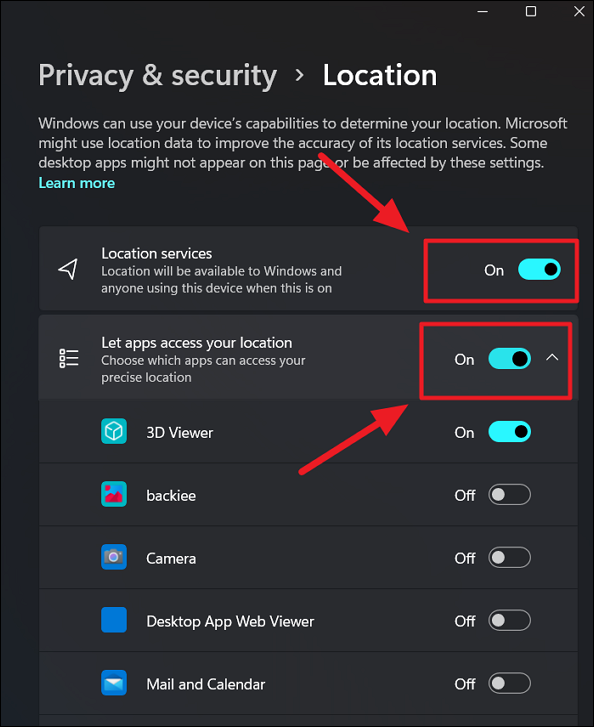
On the Location settings page, turn on the ‘Location services’ toggle (if it’s not already On). Next, turn on the ‘Let apps access your location’ toggle below.
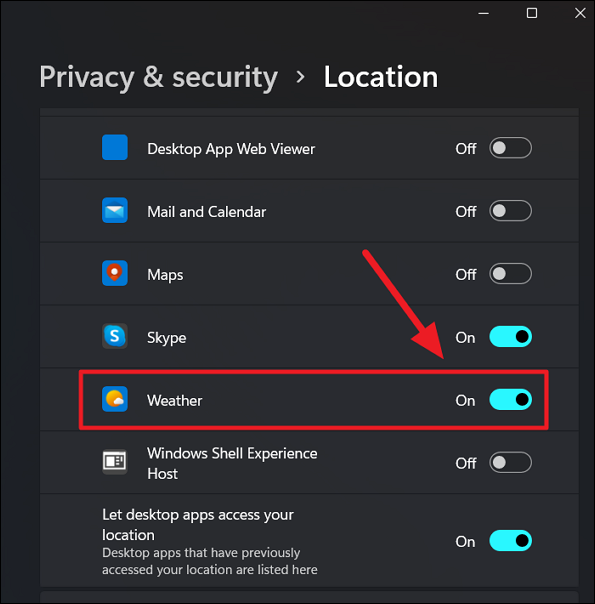
Then, scroll down the list of apps and turn the ‘Weather’ toggle. Then, restart your PC to apply the changes.
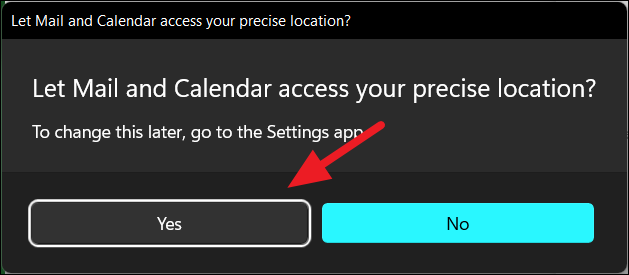
Once the system starts, open the Calendar app. The Mail and Calendar app might ask you to give permission to access your precise location to show your local weather. Click ‘Yes’ to Let Mail and Calendar access your precise location? dialog box.
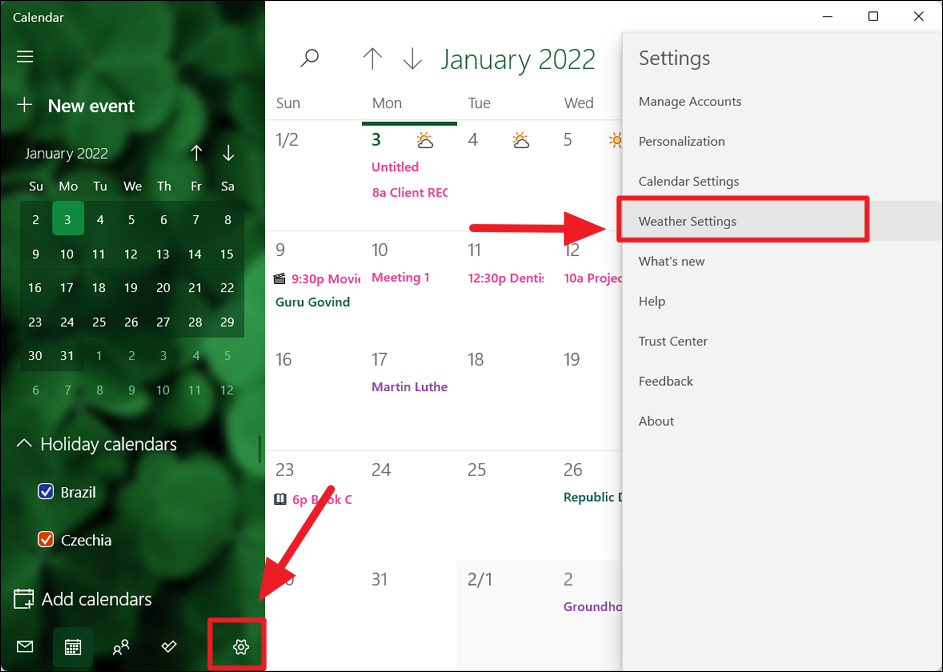
You can also change the scale unit for temperature in the weather settings. To do that click the ‘Settings (gear)’ button on the bottom-left side and select ‘Weather Settings’ in the settings menu (on the right).
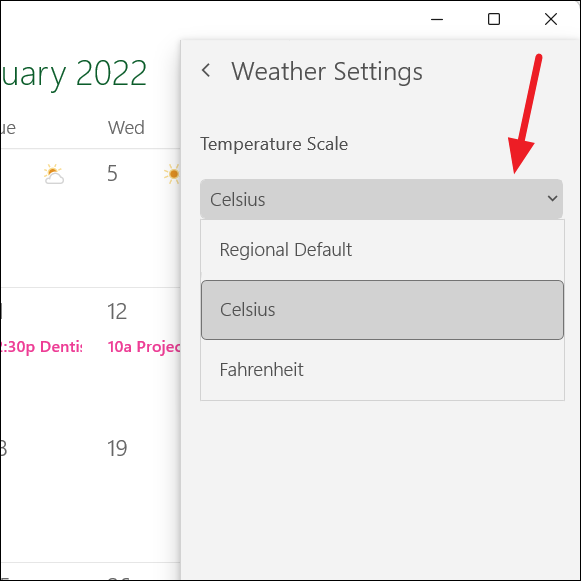
Then, click the ‘Temperature Scale’ drop-down menu and choose between ‘Celsius’, ‘Fahrenheit’, or ‘Reginal Default’ as the scale unit.
Once you enabled the Weather permission for the calendar and the system is restarted, you will see weather icons on each day of your calendar (for the current week) as shown below. They give will give you an overview of what the forecast is. It can be sunny, thunderstorms, showers, cloudy, clear sky, snow, etc.
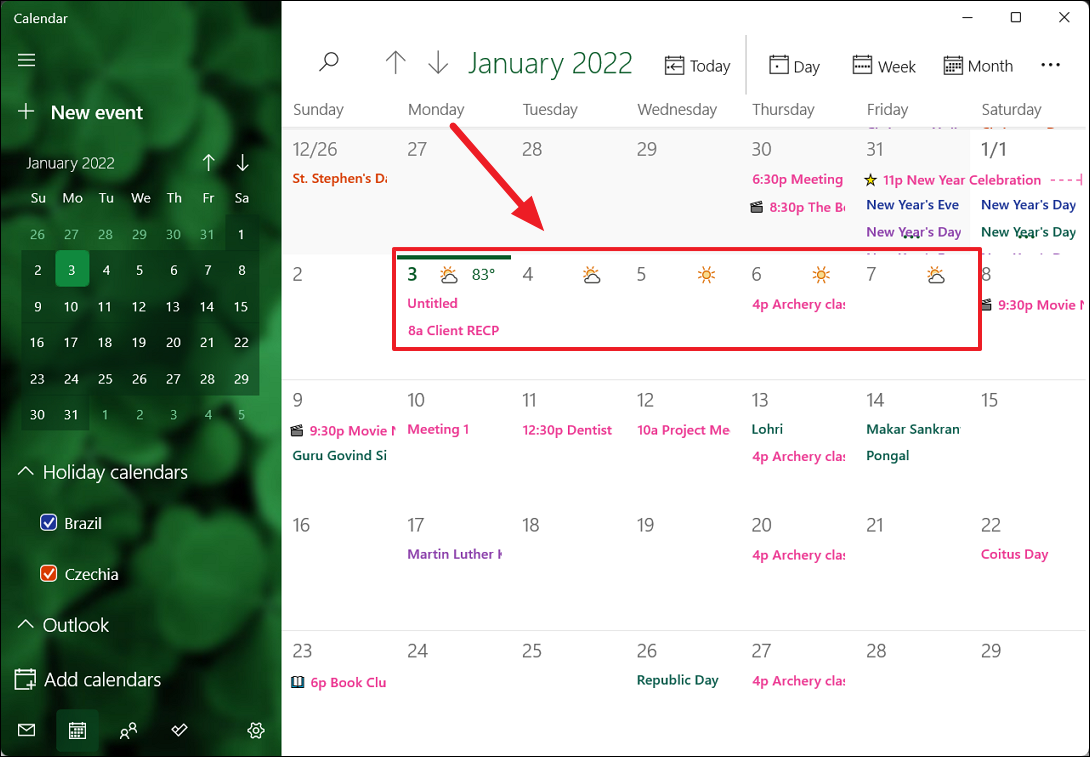
If you want more info about the weather, you can click on a weather icon on the calendar, and it will open the MSN weather website in your default browser.
How to Customize Calendar Widget in Windows 11
As we mentioned earlier, Windows 11 removed the integration of the agenda from the Calendar flyout. It is one of the controversial changes from Windows 11 to the calendar which makes it difficult to quickly create and view events on your calendar.
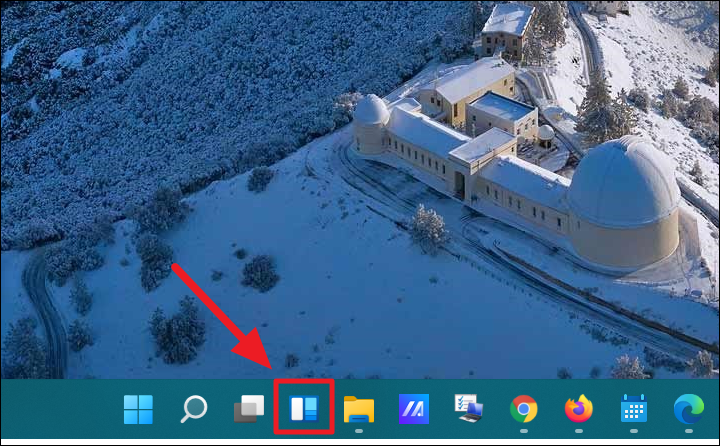
To open Windows 11 Widgets, click the ‘Widgets’ icon, the third icon to the right of the Start menu on the taskbar as shown below.
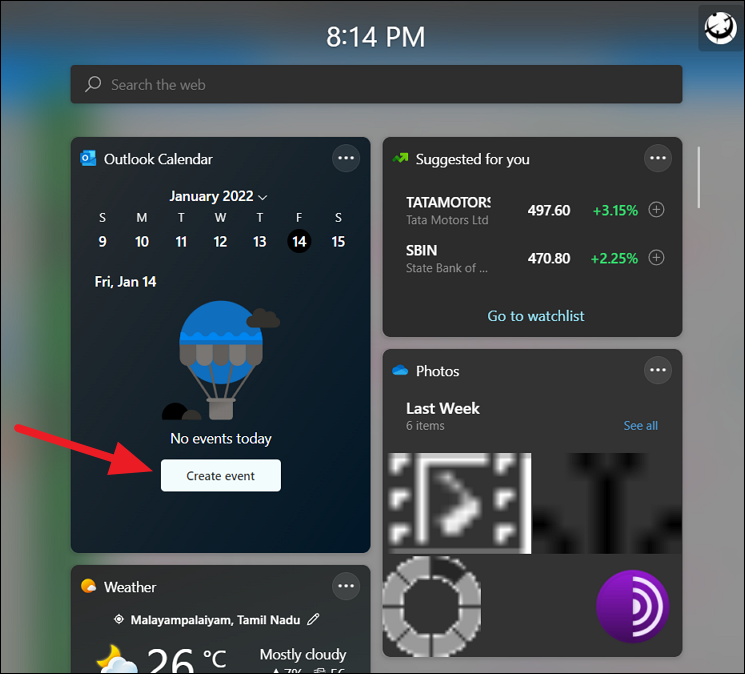
Here, you can see the Outlook Calendar widget where you can create and view events. However, you will need to have an Outlook.com account to create and view your agenda items from an Outlook calendar.
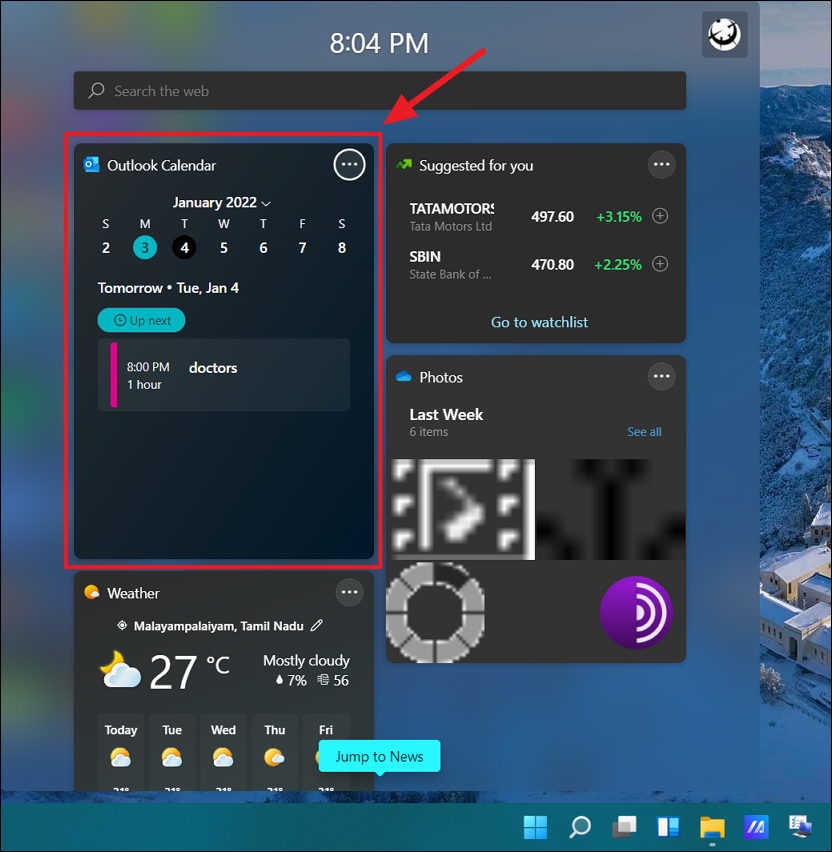
To see calendar events in the widget, first, login into your outlook account in the calendar app. If you don’t have an account, you will need to create one.
By clicking on a date in the calendar widget, you can view that day’s events.
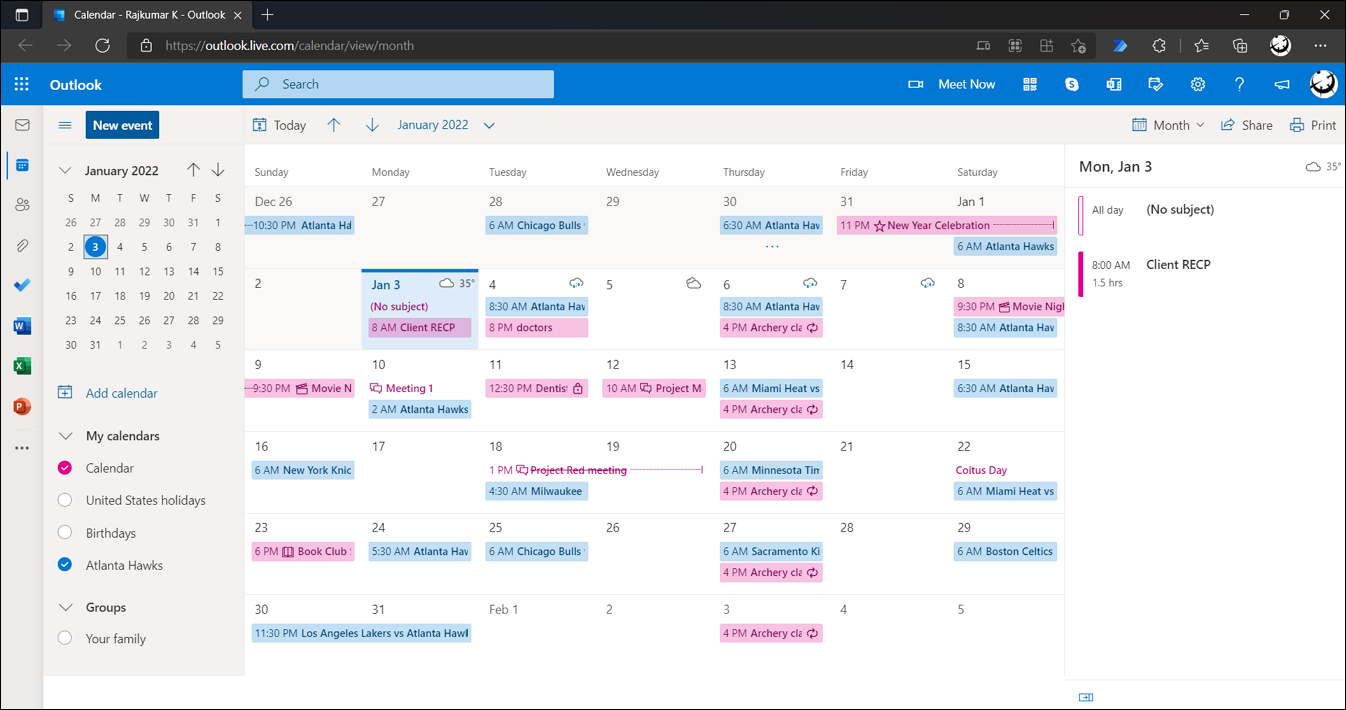
If you click on an event in the calendar widget, it will open Outlook Calendar in your default browser where you can create, edit, and manage events in your calendar.
You can also create an event by selecting a date and clicking the ‘Create event’ button.
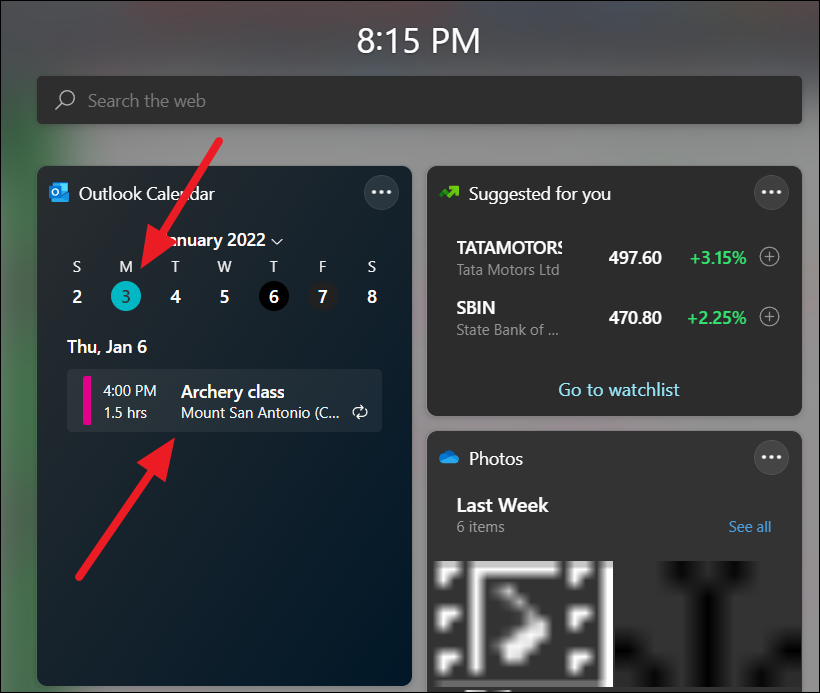
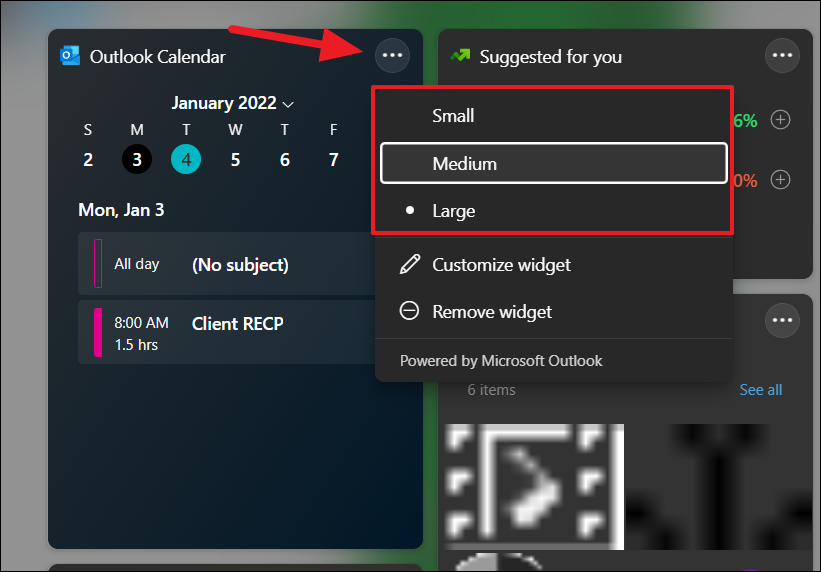
If you want to change the calendar widget panel size, click the three-dotted menu (More options) and choose one of the three sizes – ‘Small’, ‘Medium’, ‘Large’.
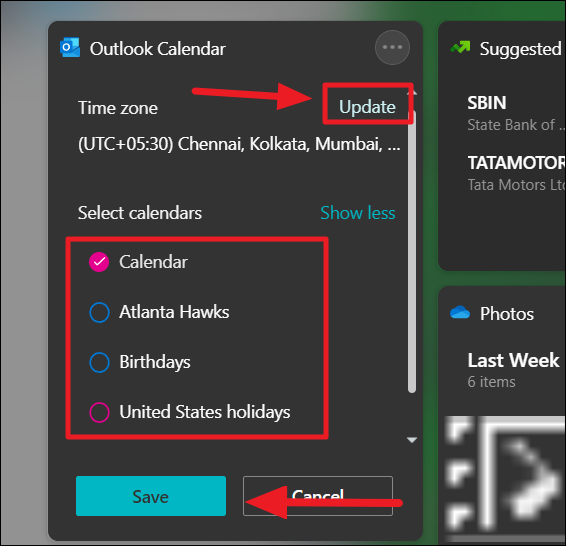
To customize the calendar widget, click the ‘More options’ button and select the ‘Customize widget’ option.

If you want to change the time zone, click the ‘Update’ option and change the time zone on the outlook website. To change what calendar events appear on the widget, click the ‘Show more’ option and select the calendars. After that, click the ‘Save’ button.
How to Sync Events on the Calendar app
Whether you added a new event through your outlook website or on a different system, the calendar app must be synced with the same Microsoft account so that the new events can appear in your calendar. If you want to sync events to the Calendar app, follow these instructions:
First, open the Calendar app and click the three-dotted menu button on the top-right corner. Then, select the ‘Sync’ option.
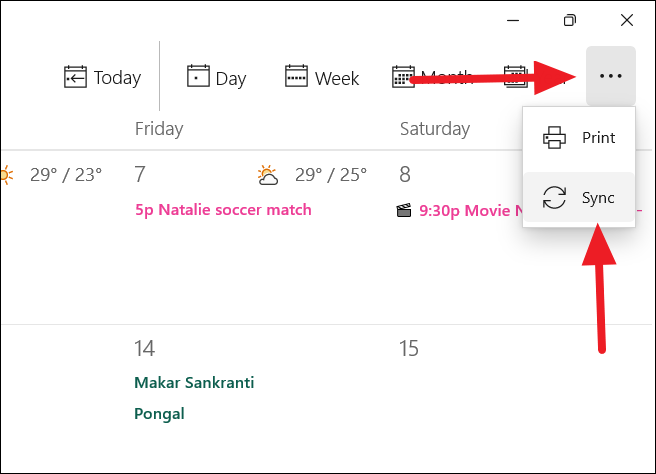
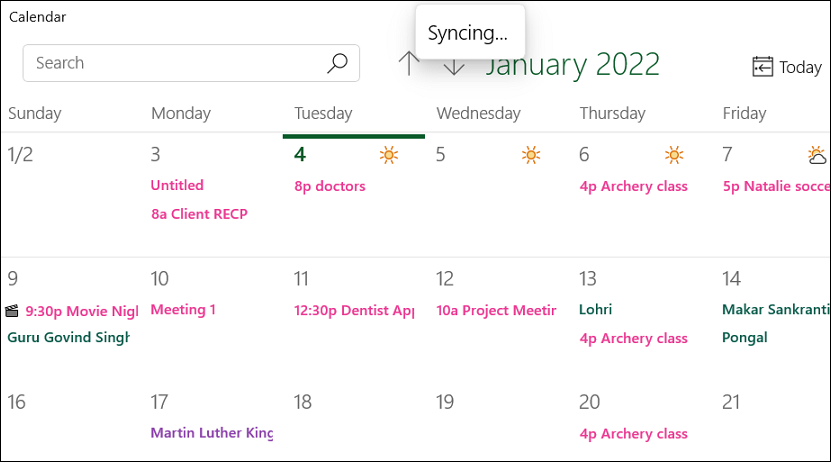
This will synchronize the events from all your devices and the cloud.
How to Configure Calendar Settings on Windows 11
Windows 11’s Calendar app allows you to change various settings in the app such as the first day of the week, days in the workweek, working hours, week numbers, and alternate calendars. Here’s how you change Calendar settings in Windows 11:
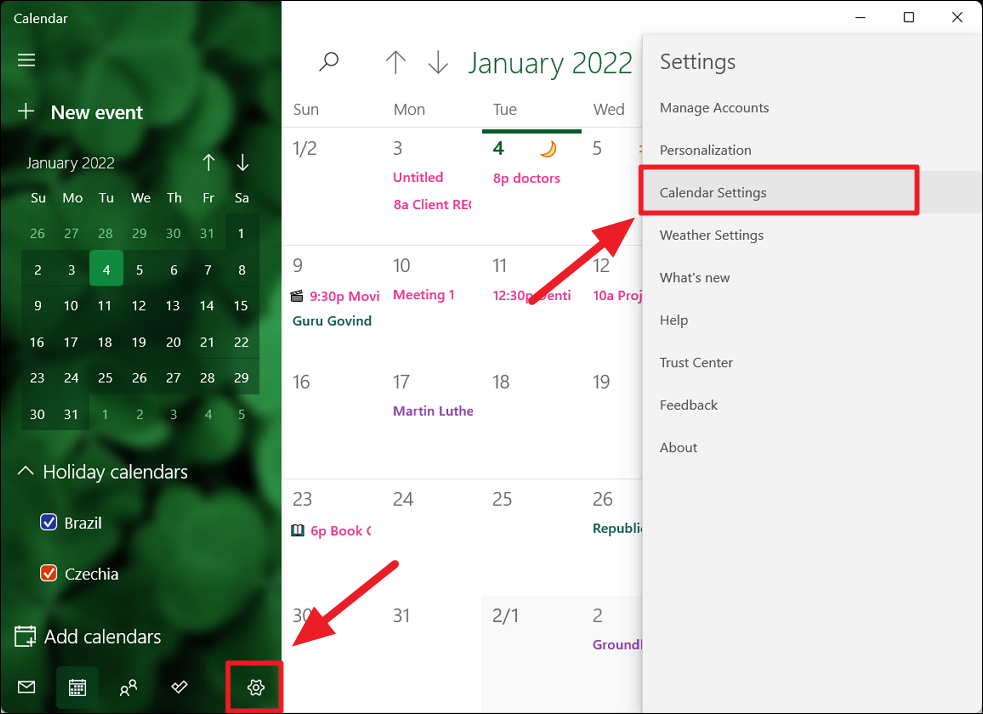
In the Calendar app, click the ‘Settings’ button on the bottom-left side and select ‘Calendar Settings’.
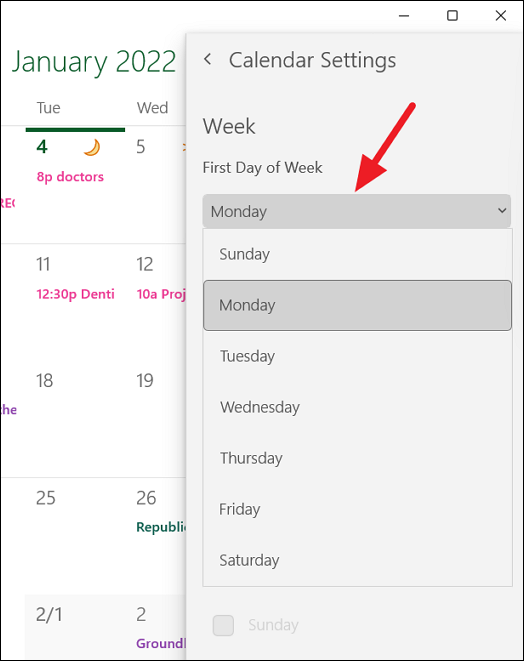
In the Calendar settings, you can use the drop-down menu under the ‘Week’ section to choose your first day of the week.
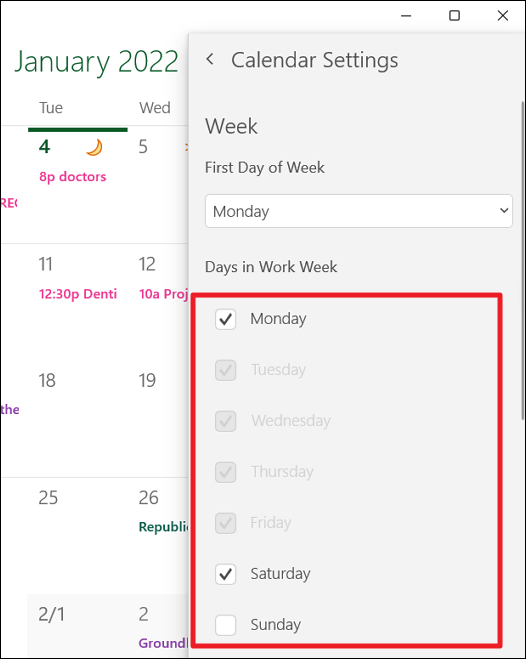
Under the ‘Days in Work Week’ section, you can select the days in your workweek.
You can specify the start and end of your working hours from the drop-down menus under the ‘Working hours’ section.
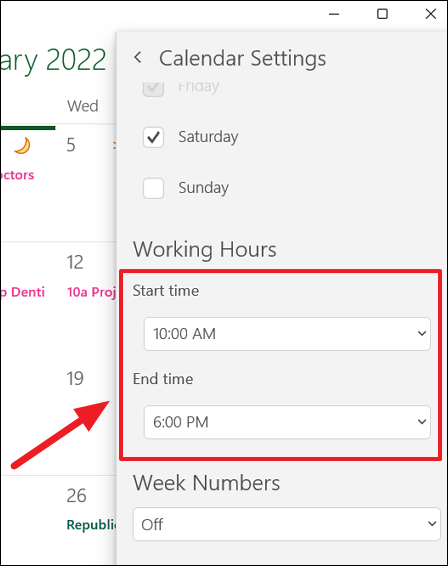
Then, use the ‘Week Numbers’ drop-down to choose how you want to show the week numbers in your calendar. After selecting an option, the week numbers will appear on the left side of your calendar.

In Windows 11, you add alternate calendars from around the world to your calendar. To add an alternate calendar, first, check the ‘Enable’ option under the ‘Alternate Calendars’ section.
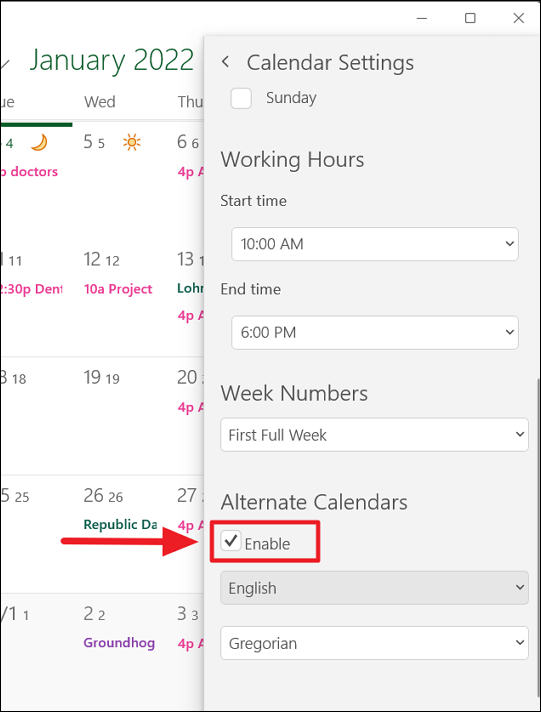
Then, choose one of the alternate calendars from the first drop-down:
- English
- Japanese
- Chinese (Simplified)
- Chinese (Traditional)
- Arabic
- Persian
- Thai
- Korean
- Hebrew
- Hindi
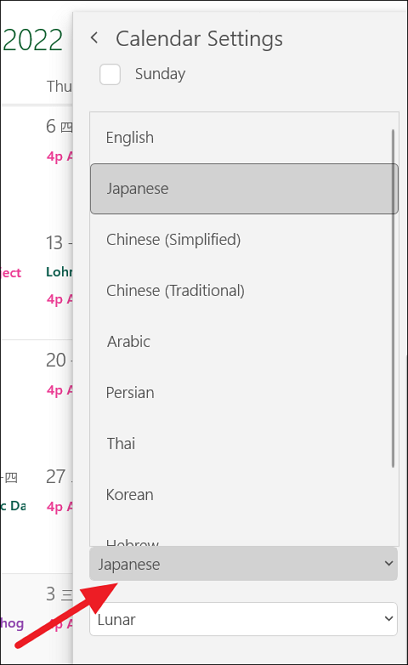
From the second drop-down, choose the calendar type based on the alternate calendar you chose above. For instance, if you select ‘Japanese’, you will get:
- Lunar
- Rokuyou
- Zodiac

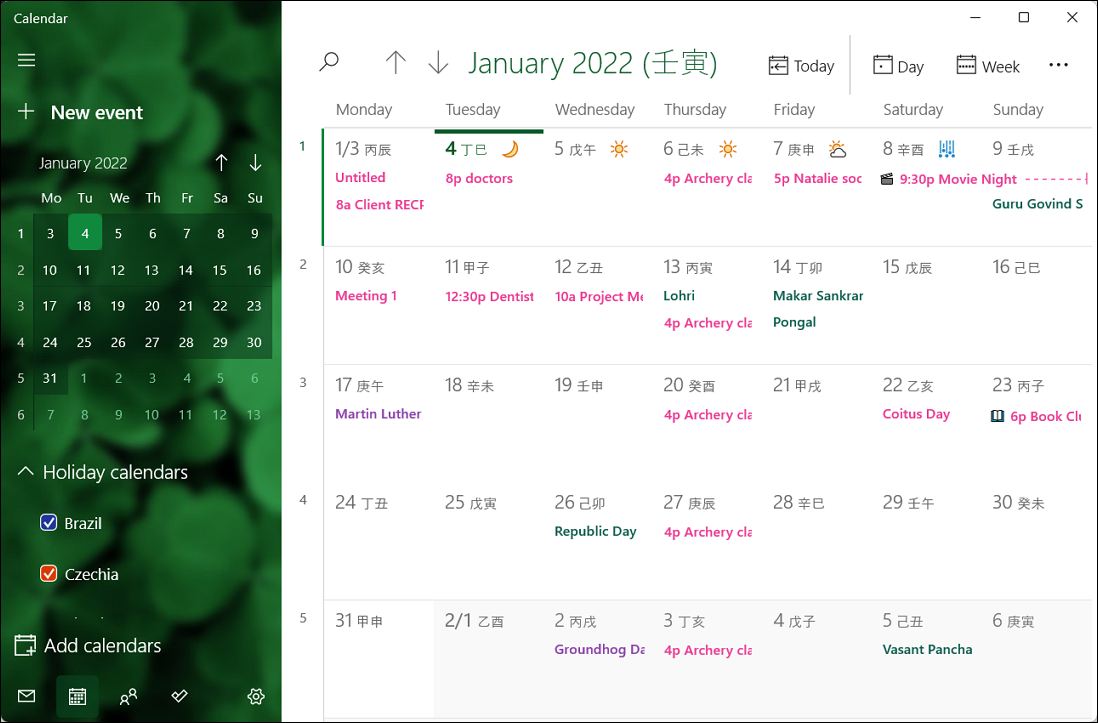
As you can see below the alternate calendar (Japanese, Zodiac) is shown in the calendar view along with the Gregorian calendar (default).
That’s it.


Member discussion