
Tor, short for The Onion Router, is a free and open-source browser that helps you browse the internet anonymously using the Tor network. It is specifically designed to protect your online privacy and anonymity from governments, corporations, and cyber attackers. It is widely popular among journalists, activists, researchers, professionals, whistleblowers, businesses, etc.
Tor browser is a freeware that is available for Windows, macOS, Linux, and Android, and it can be downloaded from the official Tor Project website. The Tor Browser protects you from tracing, tracking, surveillance, and censorship.
The TOR browser is similar to the VPN service; they both protect your anonymity and privacy online. But where the TOR emphasizes anonymity, the VPN emphasizes privacy. It helps you access the websites that are blocked and stop websites from knowing your identity and location.
In this article, we will see how Tor works, how to install, configure, and use Tor Browser on Windows 11 as well as how to access Dark Web using Tor.
How Tor Browser Works
Tor browser is developed by a non-profit organization called ‘Tor Project’ to make communications safer and anonymous and to fight surveillance and censorship.
The Onion Router (TOR) works by using onion routing to bounce internet traffic around a free, worldwide overlay network called Tor network. This overlay network is run by volunteers all around the world. Each volunteer runs a node or a router called ‘relay’ and the Tor network is made up of more than six thousand relays. Relay’s job is to receive traffic and pass it along to the next node.
The Tor sends traffic through at least three relays (nodes) to reach its destination. These nodes can be an entry node, a relay node (or middle relay), or an exit node. Each time you click a link or load a webpage, the nodes are reset.
The onion router wraps your data in various levels of encryption and sends it to the entry node. Each node reveals a layer of encryption to reveal the next relay in the network and sends the data to it. As the data moves from each node, it wipes its tracks each step of the way. When the data reaches the final node (exit), it reveals the final layers of encryption and sends it to the website you want.
Only the entry node knows who you are but not what you sent (or requested), the middle node knows nothing, and the exit knows only you who you are sending it to (if the data is TLS encrypted) but not who you are or what you are sending. And the website will only know the exit node’s IP instead of yours. This is how Tor protects your identity and makes you anonymous when browsing the internet.
How to Install Tor Browser on Windows 11
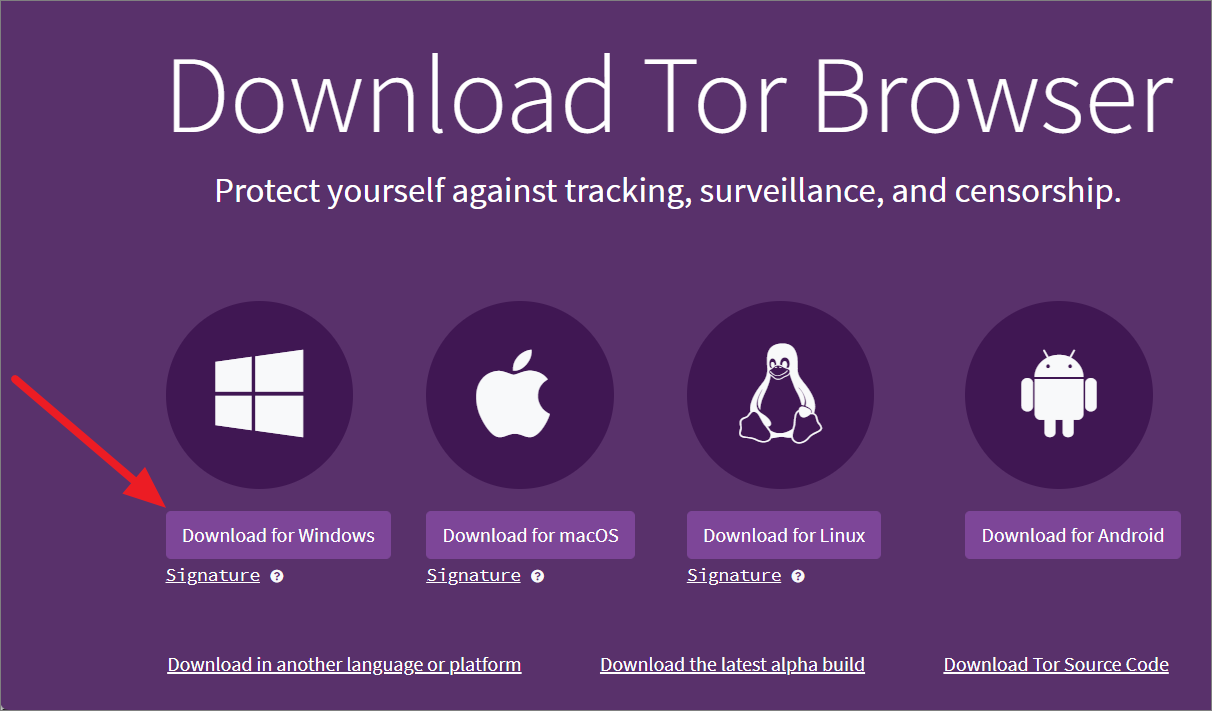
Follow these step by step instructions to install Tor Browser on Windows 11:
Let’s start with downloading the Tor browser for Windows from the official website.
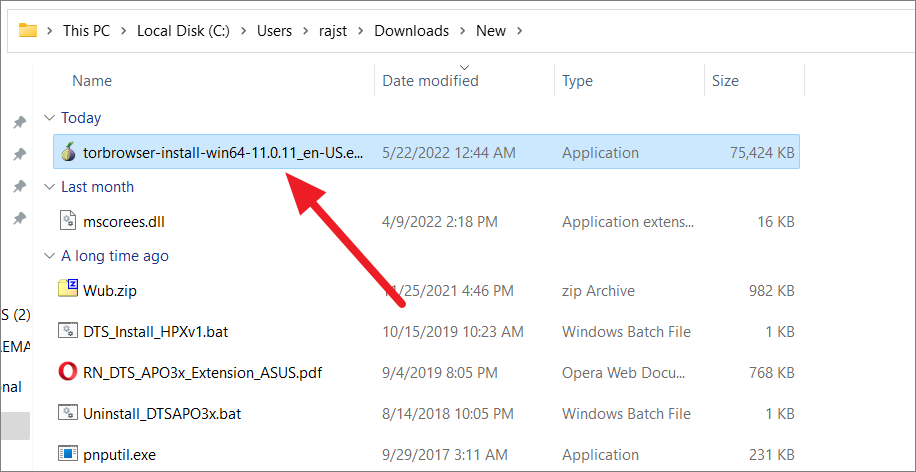
After the installer is downloaded, double-click on the file to install the Tor Browser.
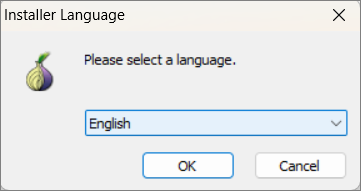
A small window (Installer Language) will appear asking you to choose the language you want to use for the browser. Select the language from the drop-down menu and click ‘Next’.
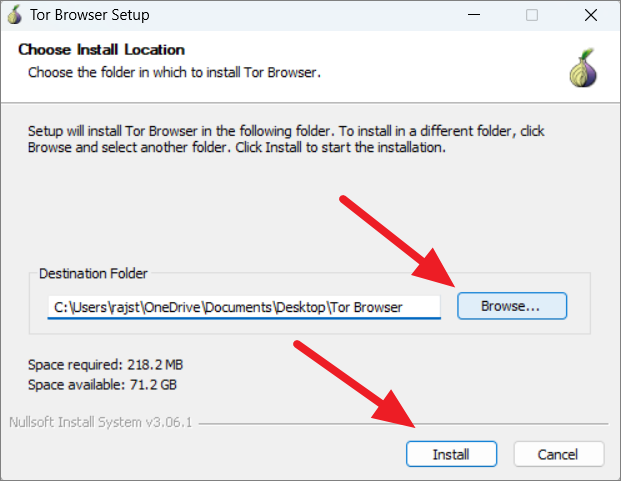
In the Tor Browser Setup window, select the location where you want to install the Tor Browser. By default, the setup chooses your desktop location which is more convenient to use. But, if you want to choose a different install location, click the ‘Browse’ button and select another location.
Then, click on ‘Next’ to start the installation.
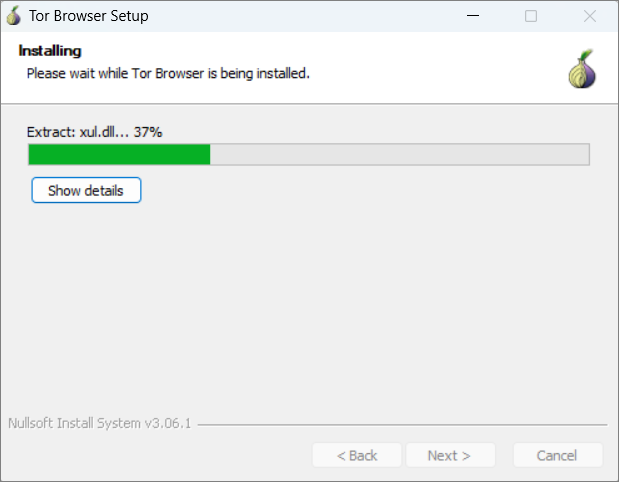
Once the installation process starts, it will take a minute or two complete.
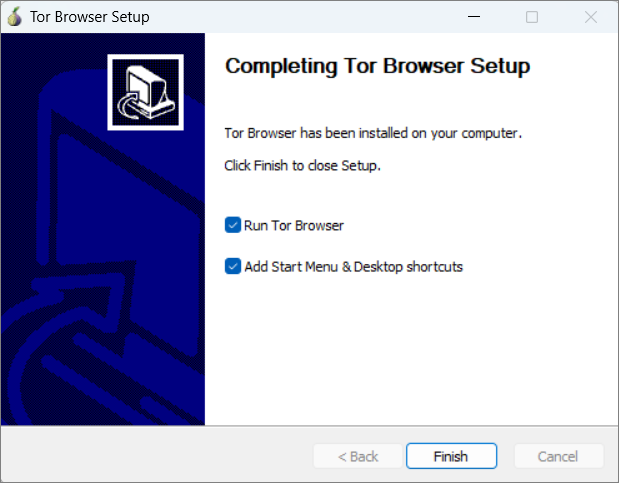
After the installation is over, you will get two options. You can choose to ‘Run Tor Browser’ immediately and ‘Add Start Menu & Desktop shortcuts’ using these options. Then, click on ‘Finish’.
When Tor Browser starts for the first time, you’ll get a screen that allows you to connect to the Tor network. Here, select the ‘Always connect automatically’ option if you want the browser to automatically connect to the Tor network every time you start the browser. Then, click on the ‘Connect’ button to connect to the Tor Network.
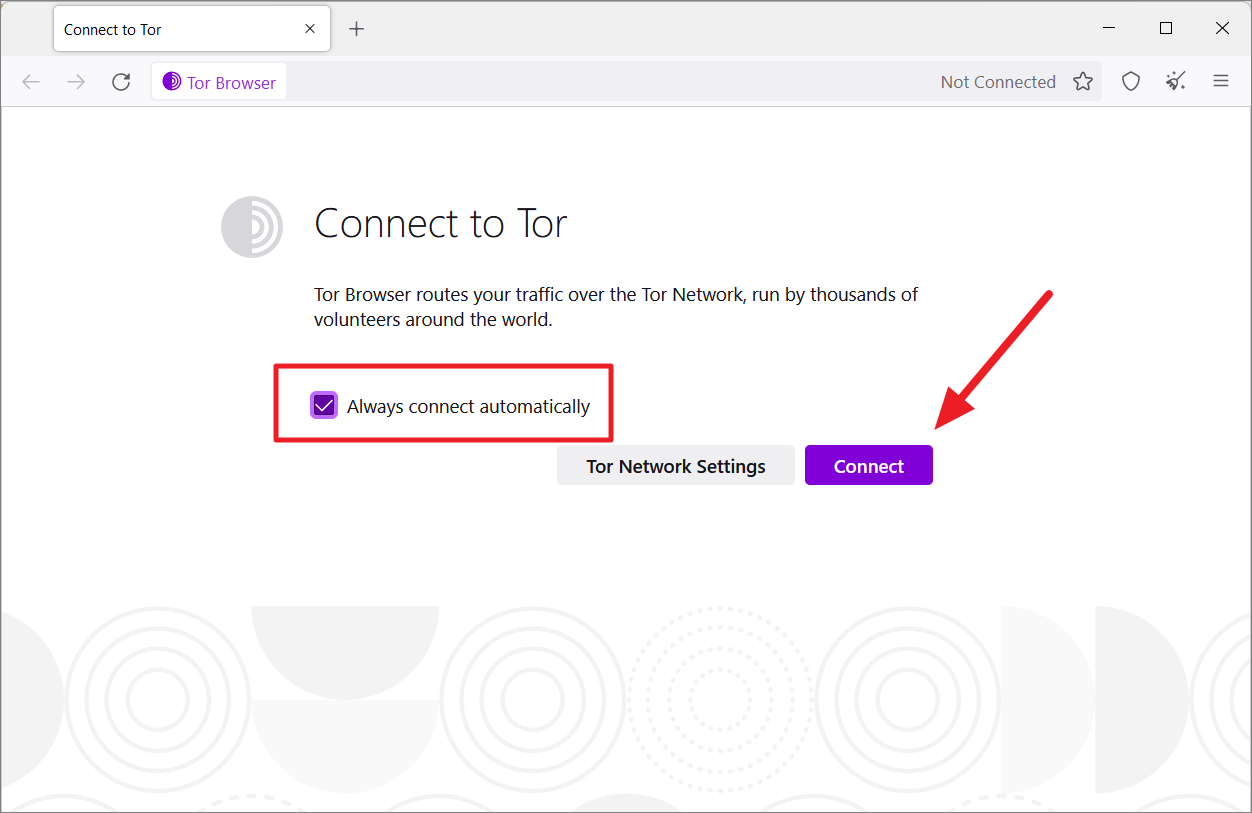
Changes to the Tor browser will only take effect after connecting to the Tor network, so don’t click the ‘Tor Network Settings’ option.
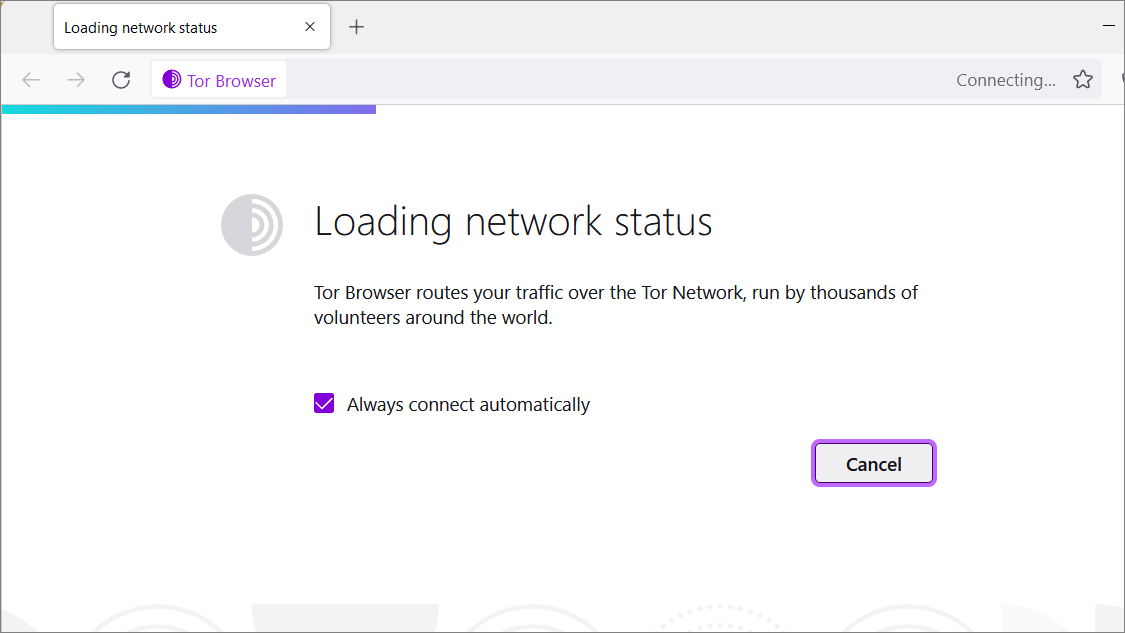
Now, it will take a few seconds or minutes to establish the connection.
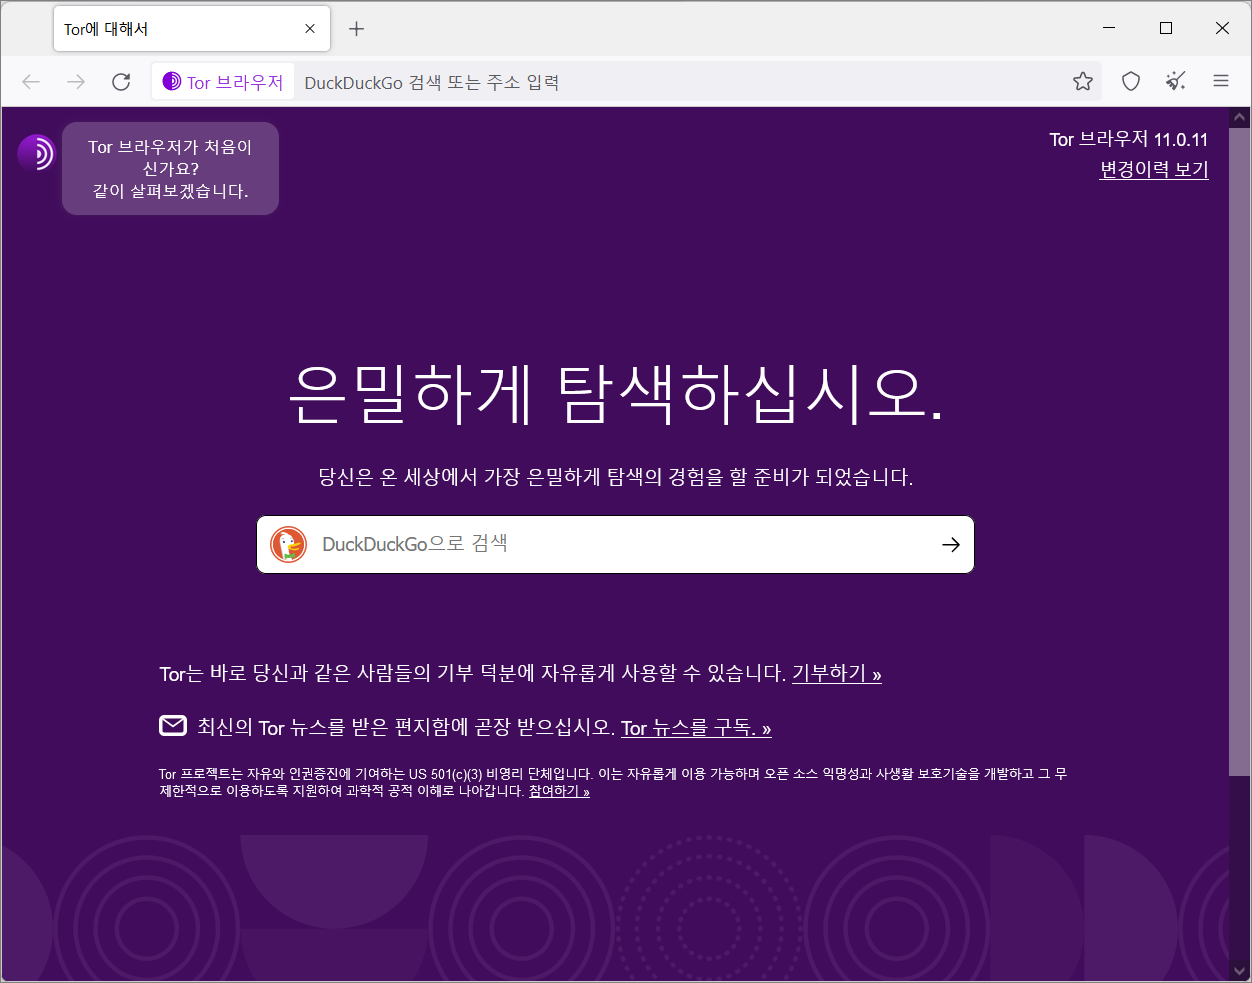
After the connection is established, you will see a purple-colored welcome screen as shown below.

This means the connection to the guard node is established and you are free to use the browser.
How to Use Tor Browser on Windows 11
Tor browser is basically a modified version of Firefox, so the settings and options are similar to Firefox with some additional settings to enhance privacy and security. If you have experience with firefox, you can easily navigate and change settings in the Tor Browser.
Change the Tor Browser’s Language
If you don’t like the default language of the browser, you can easily change it to a different language available in the browser. Here’s how you can switch between languages in the Tor browser:
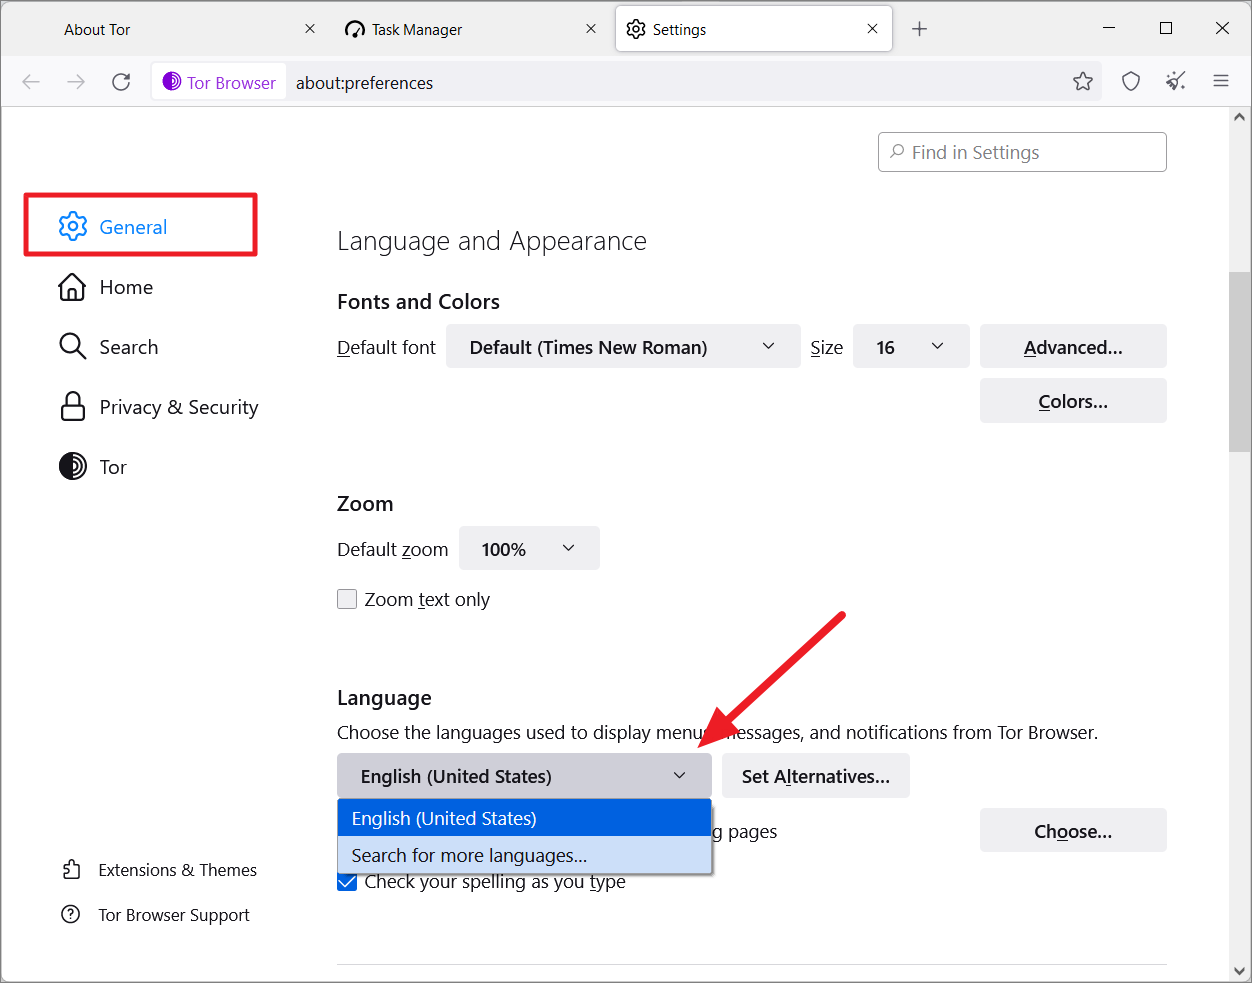
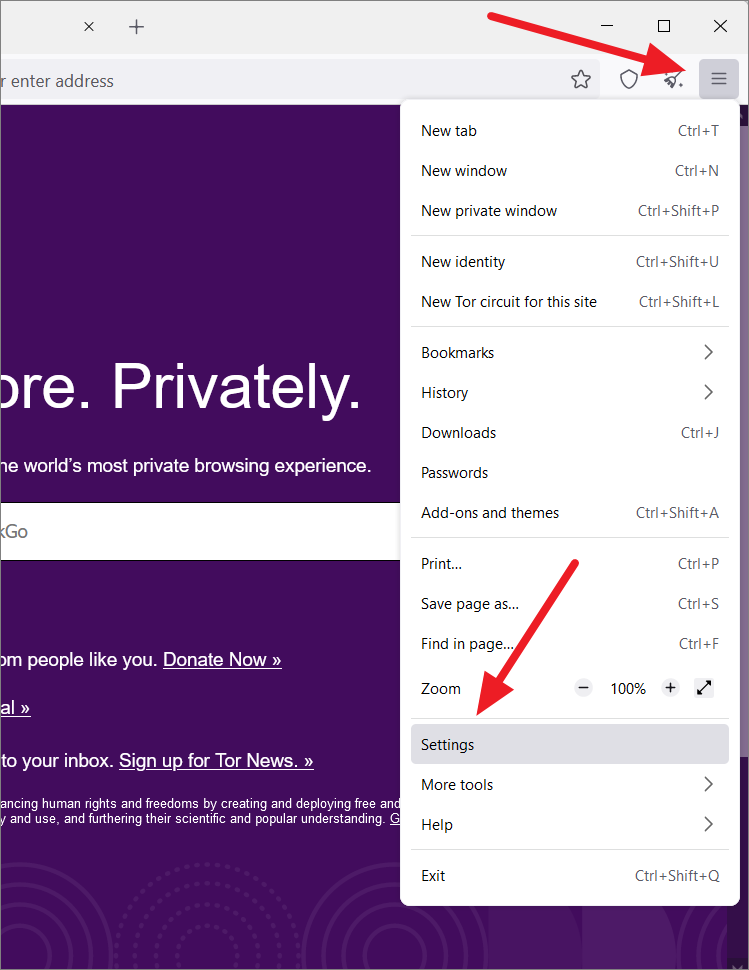
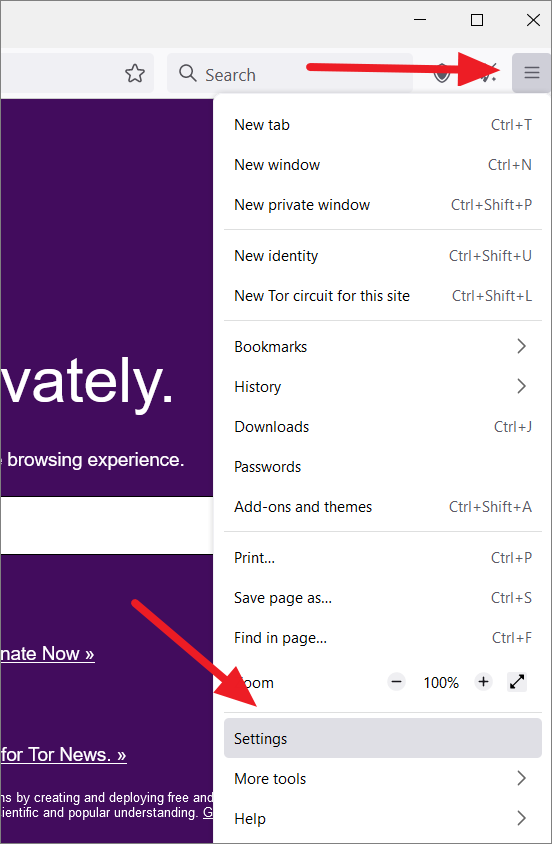
Launch the Tor browser, and click the hamburger icon (three horizontal lines) at the top right corner. Then, select ‘Settings’ from the menu that appears.

On the Settings page, scroll down to the ‘Language’ section in the General settings. Then, click the drop-down menu that shows your current language and choose ‘Search For More Languages…’
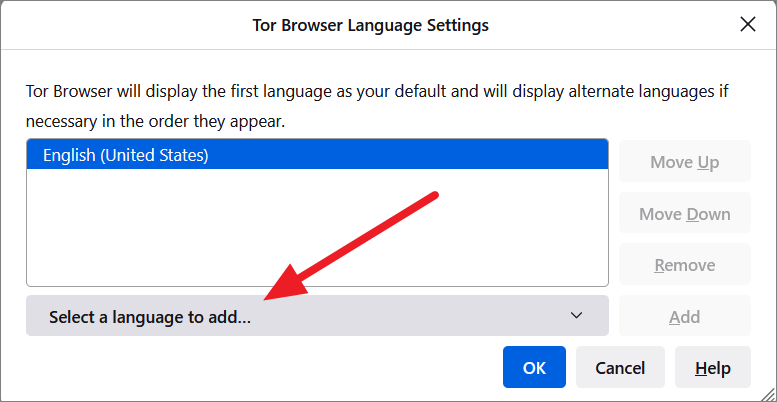
In the Tor Browser Language Settings dialog box, click the ‘Select a Language to add…’ drop-down menu at the bottom.
Then, select the language you want to use for the Tor browser from the list and click the ‘Add’ button.
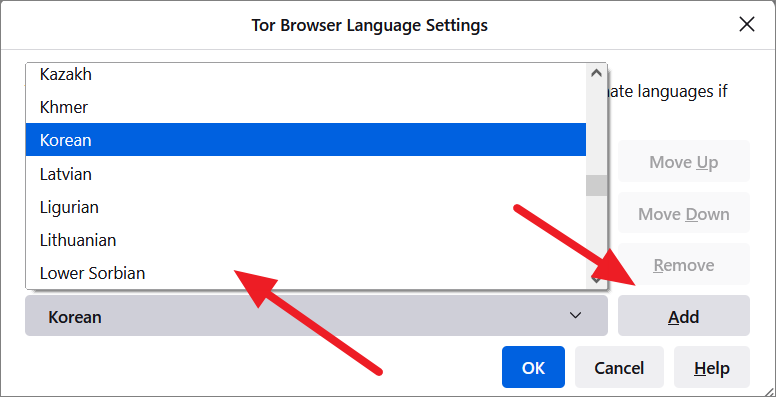
Tor will download the language and add it to the box if this is the first time you are adding it. Then, click ‘OK’.
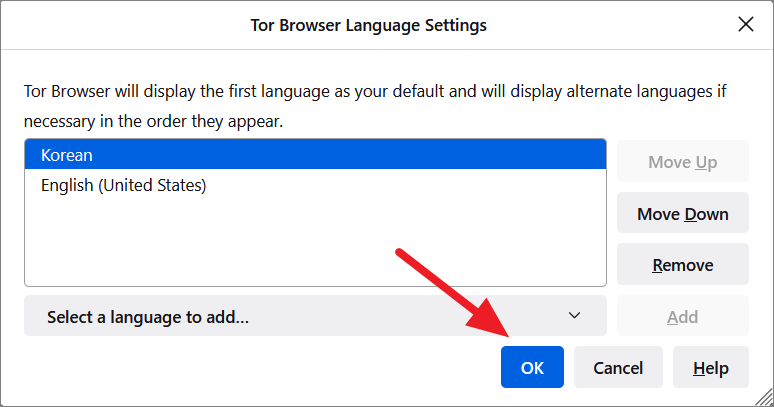
The browser will use the first language in the box as the default display language. You can use the ‘Move Up’ and ‘Move Down’ buttons to arrange the languages.
You will now return to the General Settings page. Here, click the ‘Apply and Restart’ button to apply the language change.
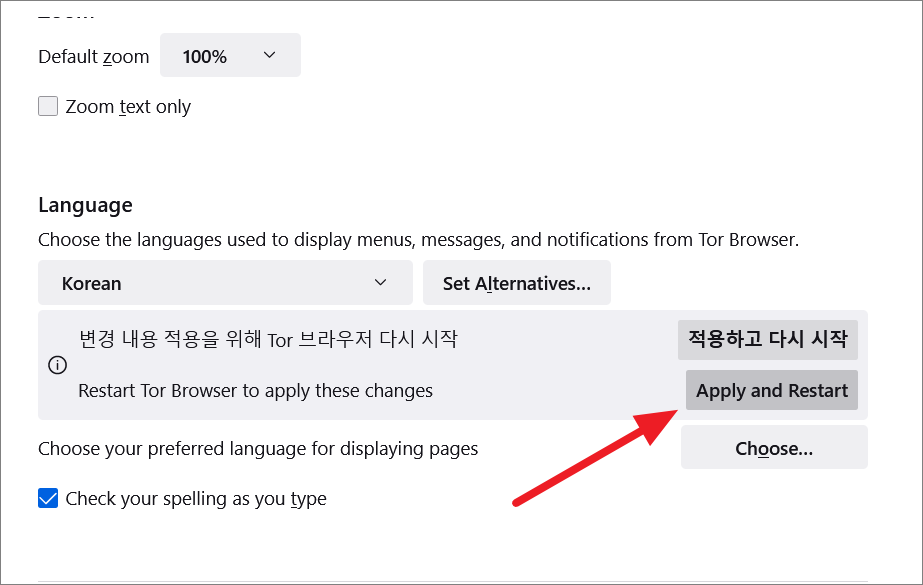
Once Tor restarts, you will see the new language on menus, messages, and notifications.
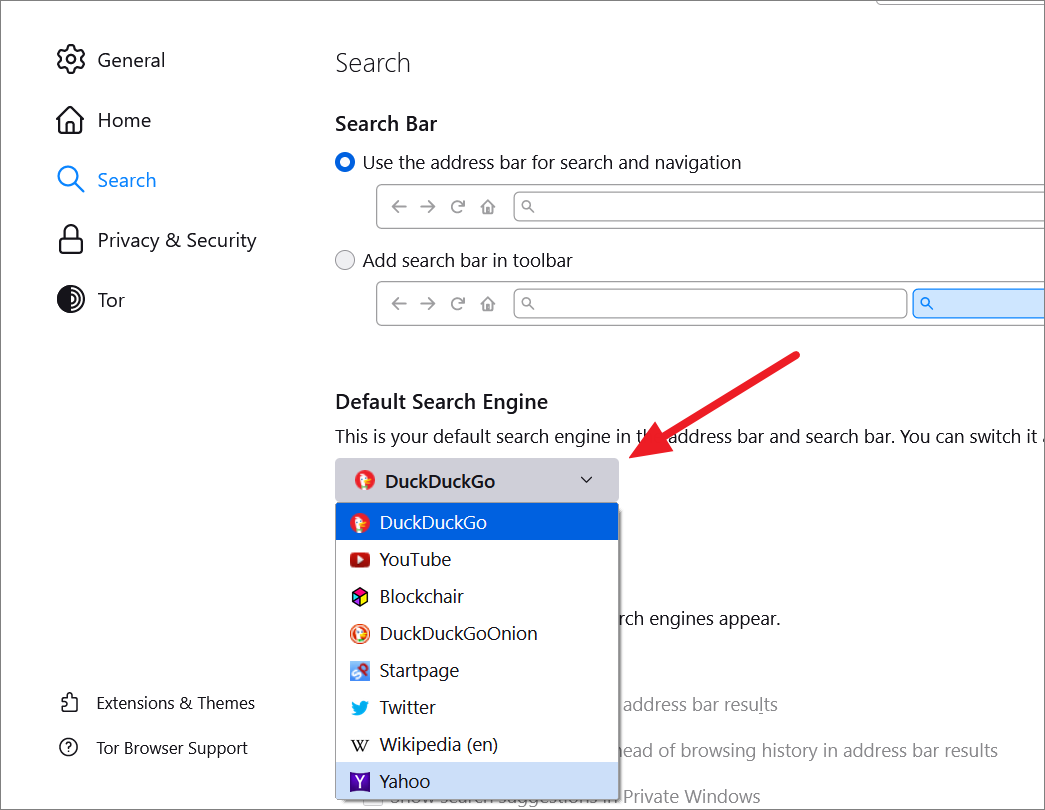
Change Default Search Engine
By default, the Tor browser uses the DuckDuckGo search engine because it doesn’t log or save your search history and it is untrackable. Moreover, it does not store your IP address or your personal information. However, DuckDuckGo doesn’t provide in-depth and quality search results. If you want to change the default search engine to Google or Yahoo in the Tor browser, follow these instructions:
Open Tor settings by clicking the hamburger icon (three horizontal lines) at the top right corner and selecting ‘Settings’ from the menu that appears.
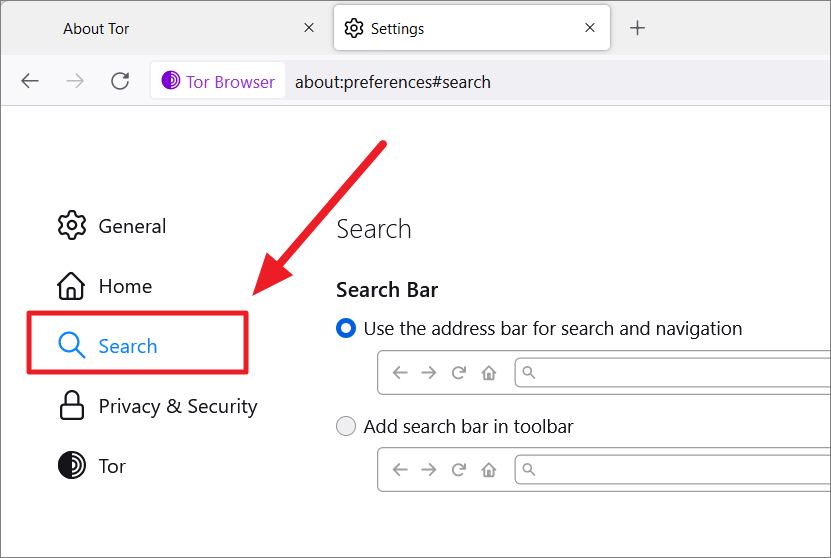
On the Settings page, click on ‘Search’ from the left-side panel.
From the drop-down menu below Default Search Engine, choose a search engine you want to set as default in the address bar and search bar.
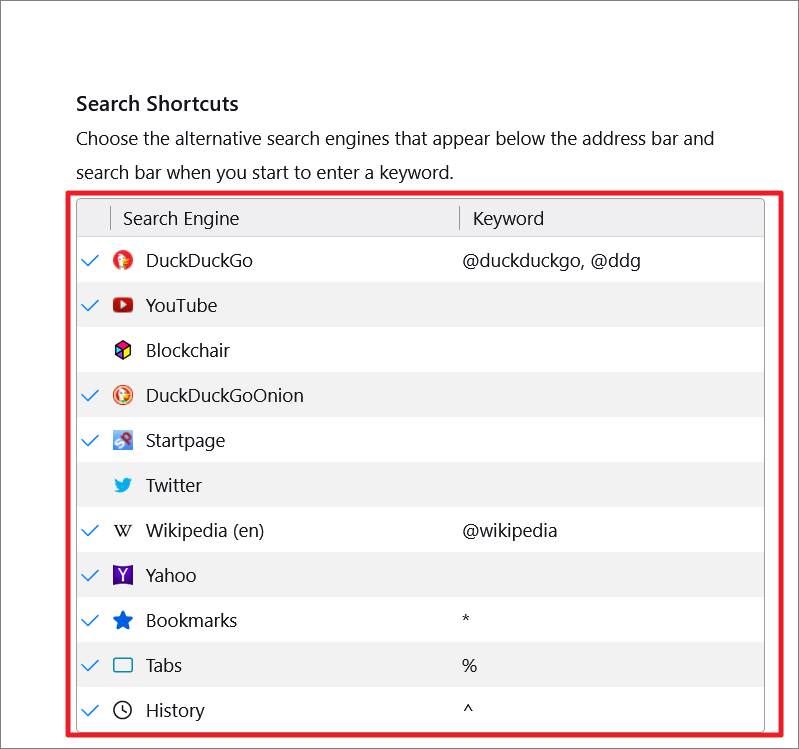
You can also choose which alternative search engines you want to appear below the address bar and search bar when you start typing. To do that, scroll down to the Search Shortcuts section and select the shortcuts you want to appear below the address bar.
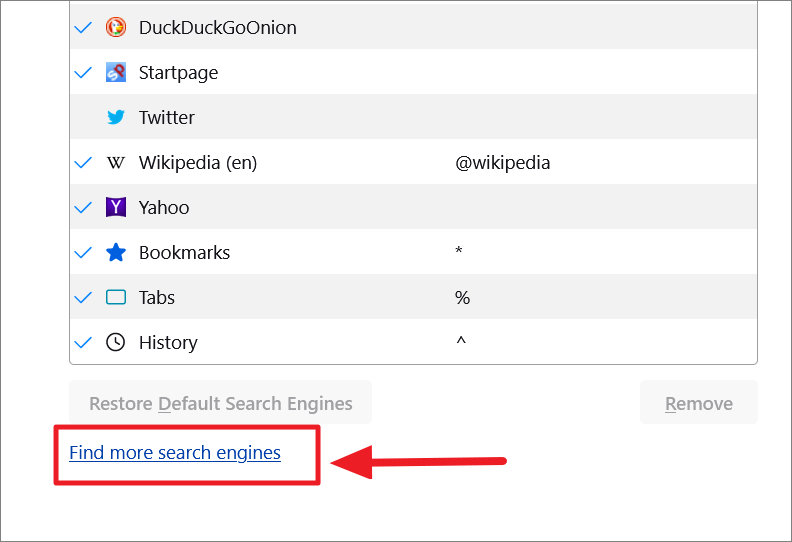
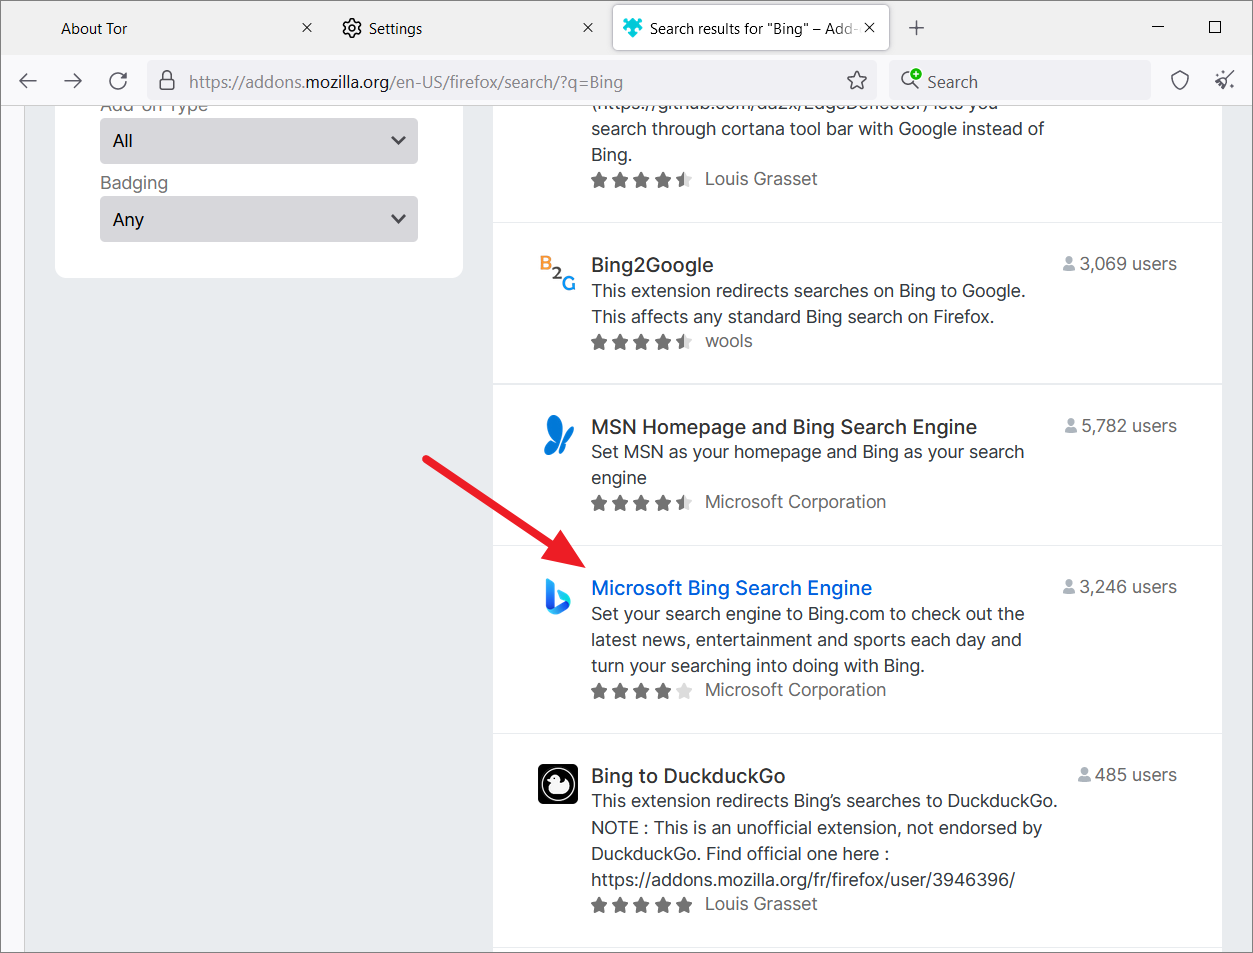
If the default engine is not available in the list of search engines, you can add it by clicking the ‘Find more search engines’ option.
You can then look for search engine extensions using the search bar. Here we are searching for ‘Bing’. Since Tor is designed from firefox, you will actually be searching for addons in the Firefox Browser ADD-ONS webpage.
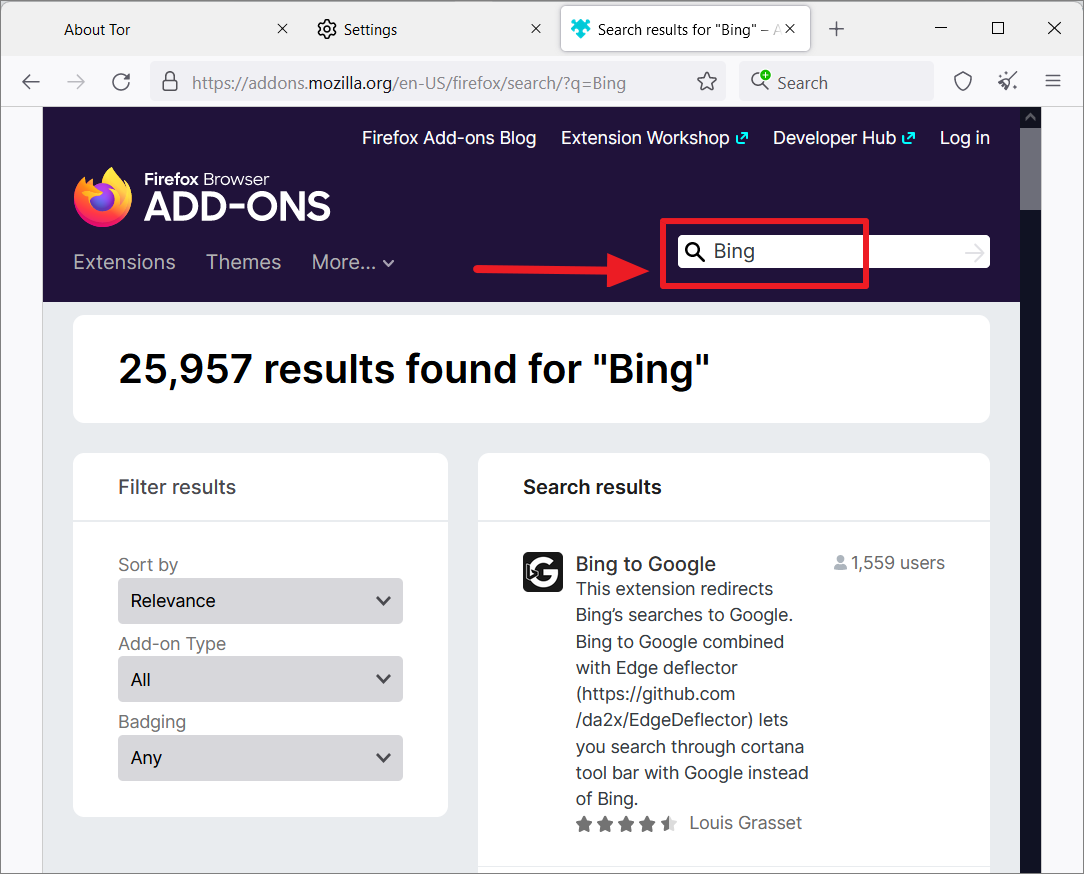
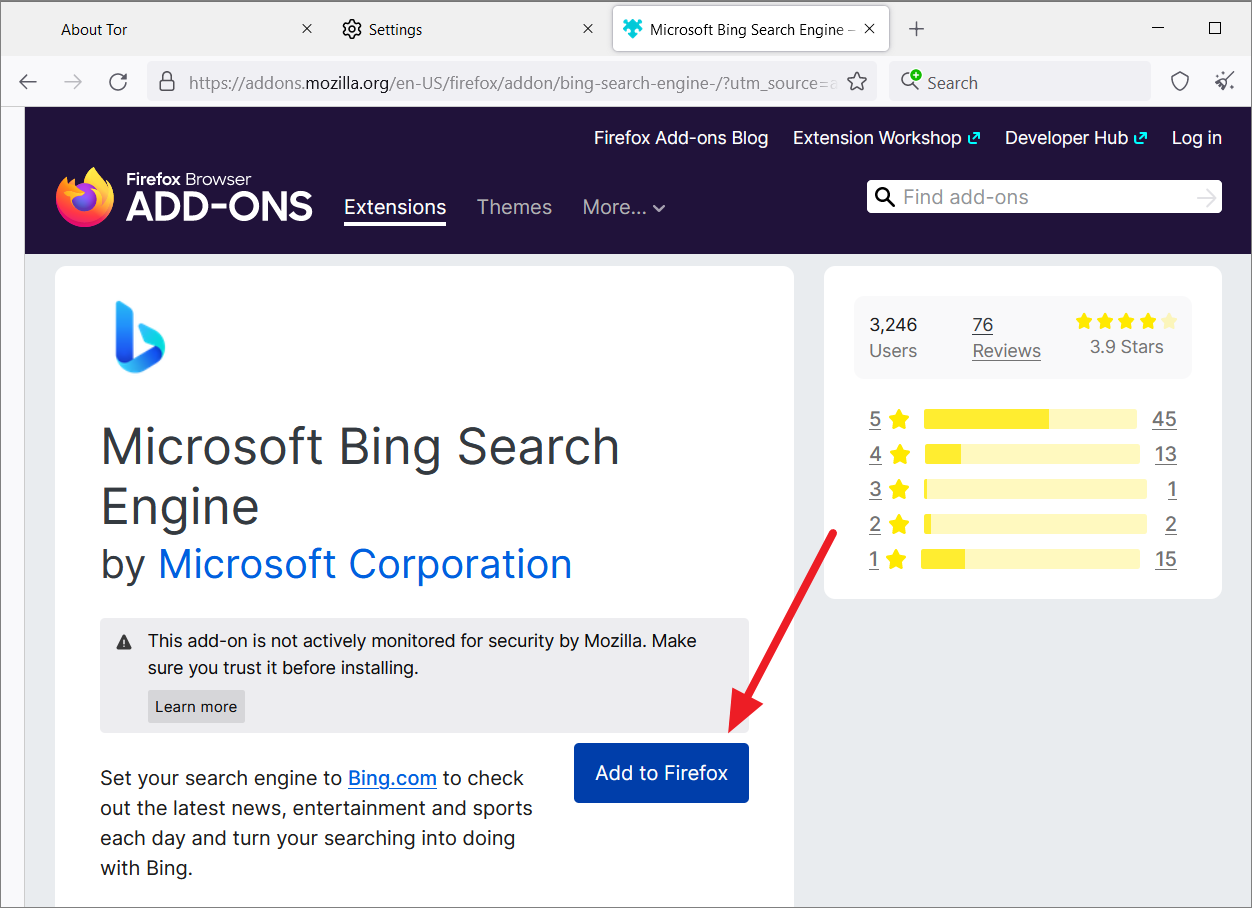
From the results, select the search engine you want to add (Microsoft Bing Search Engine).
Then, click the ‘Add to Firefox’ button to add the search engine to the Tor browser.
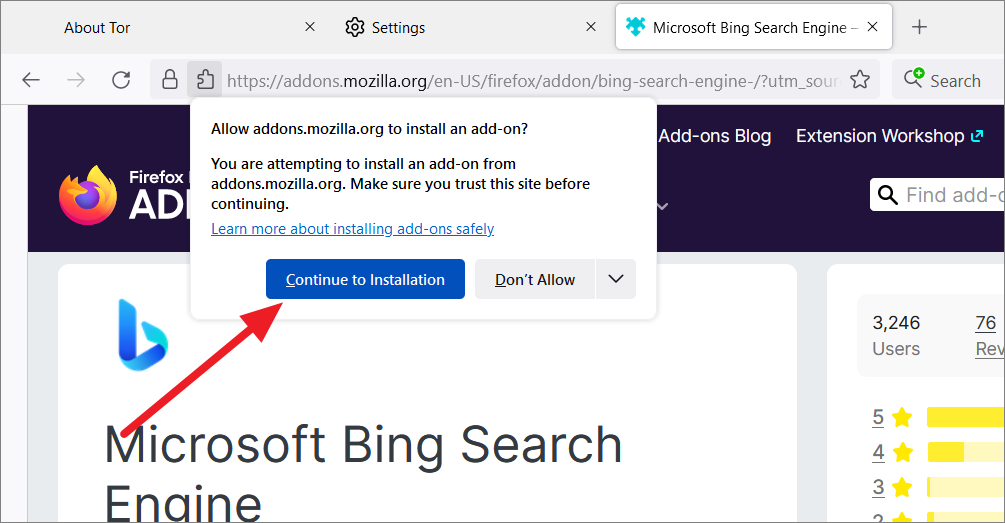
After that, click on the ‘Continue to Installation’ button at the top.
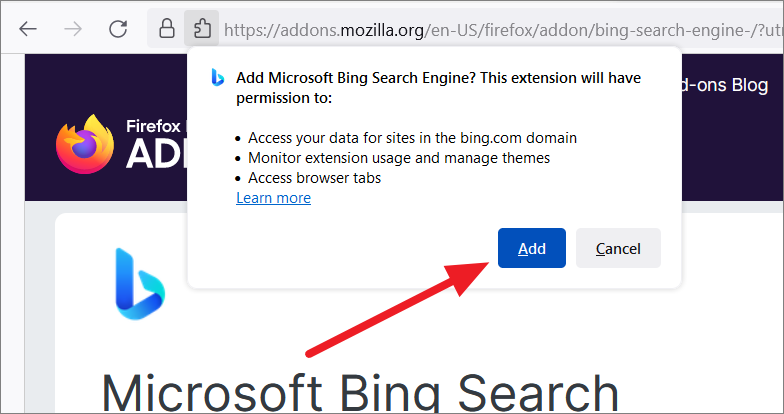
Then, click on ‘Add’.
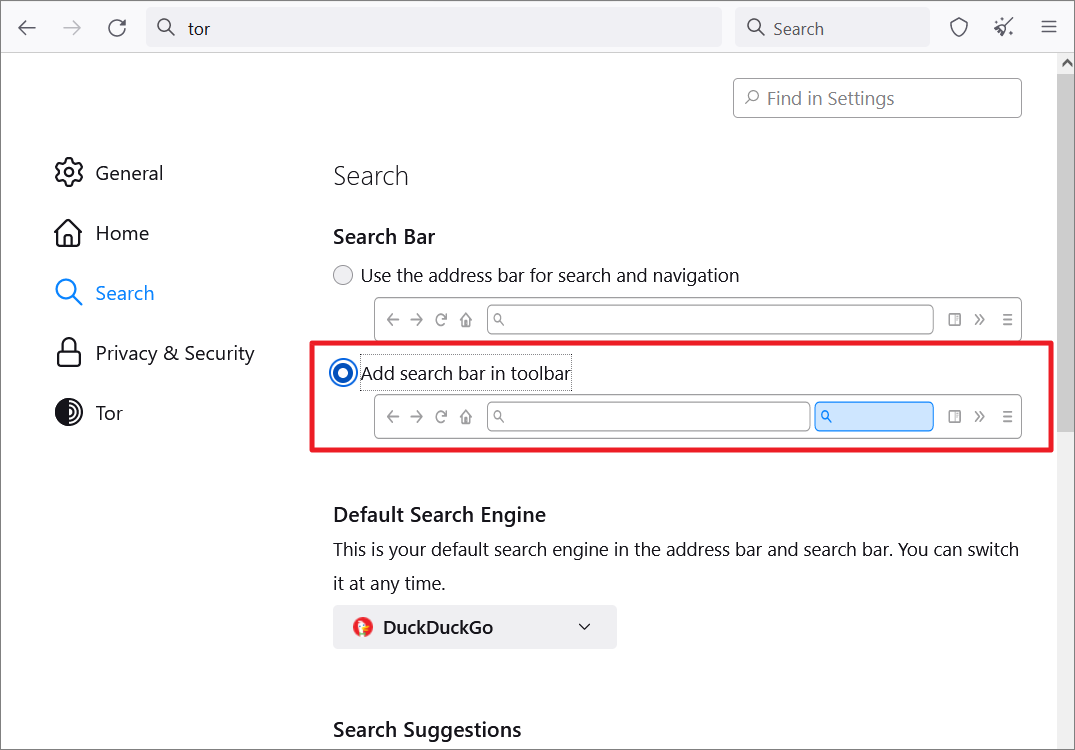
By default, the address bar is used for both searching the web and navigating the browser. However, if you want a separate search bar, select the ‘Add search bar in toolbar’ option.
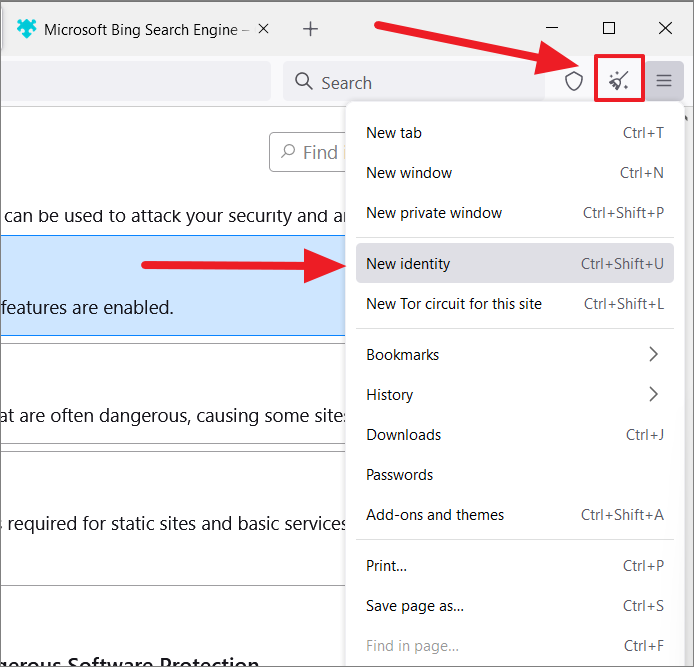
Create New Identity on Tor
New Identity is a feature in the Tor browser that closes all open tabs and windows, and then clears all caches and other saved information. By doing this, the browser resets your online identity. Here’s how you can do that:
In Tor Browser, click the broom icon (New Identity) at the top right corner. You can also click the hamburger icon and select ‘New identity’.
Then, click ‘Yes’ in the warning box.
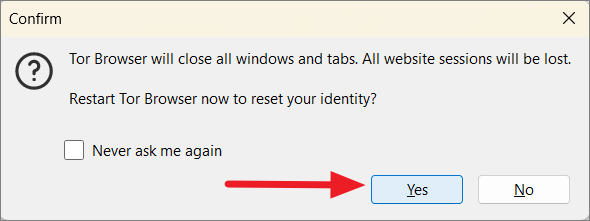
The browser will be restarted and all web sessions will be lost.
Set up a New Circuit on Tor
When you establish a connection on the Tor network and send a request, the traffic is routed through multiple nodes before it reaches the destination. The browser randomly picks these nodes. Setting up a new circuit will reset these nodes except the Entry node (Guard node) and choose new nodes for the connection. You can also set up different circuits for every tab or website in Tor.
Whenever a webpage is loaded, the Tor automatically sets up a new circuit. However, you can also manually create a new circuit on Tor.
To do that, click the hamburger icon and select the ‘New Tor circuit for this site’ option from the menu that appears.

Set up Proxy Bridges
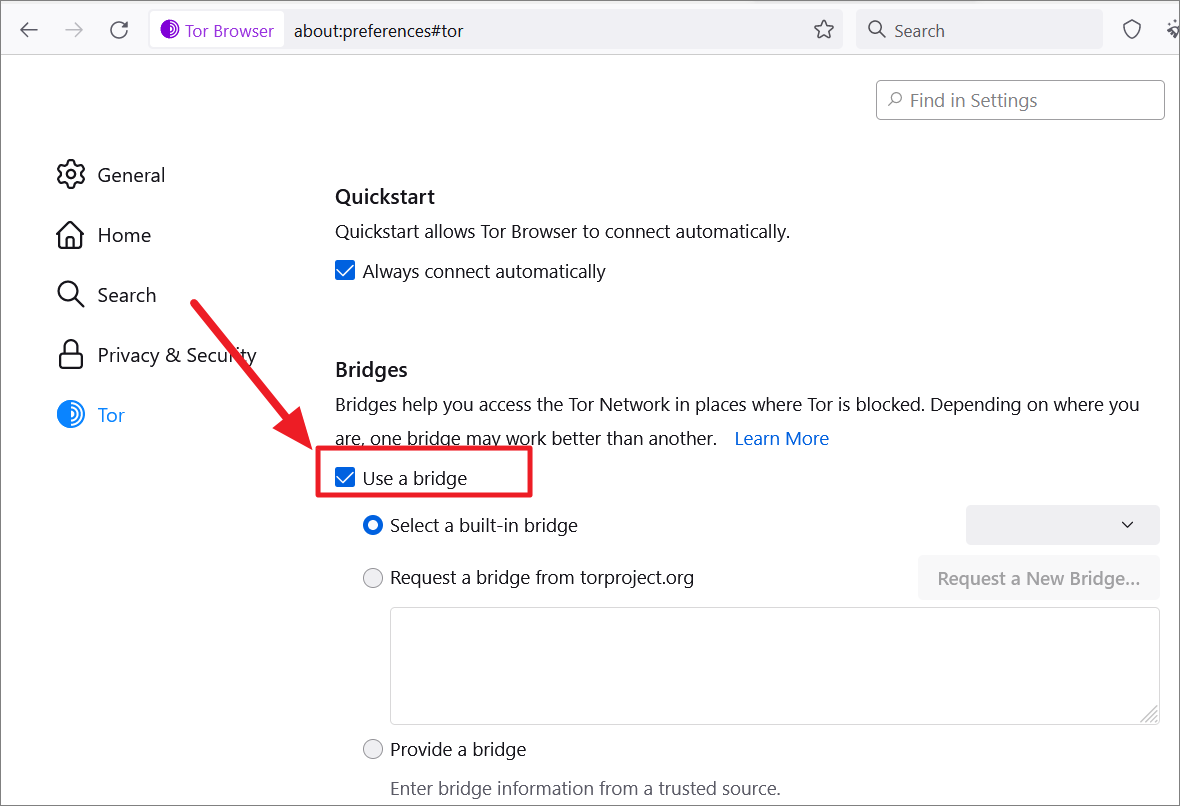
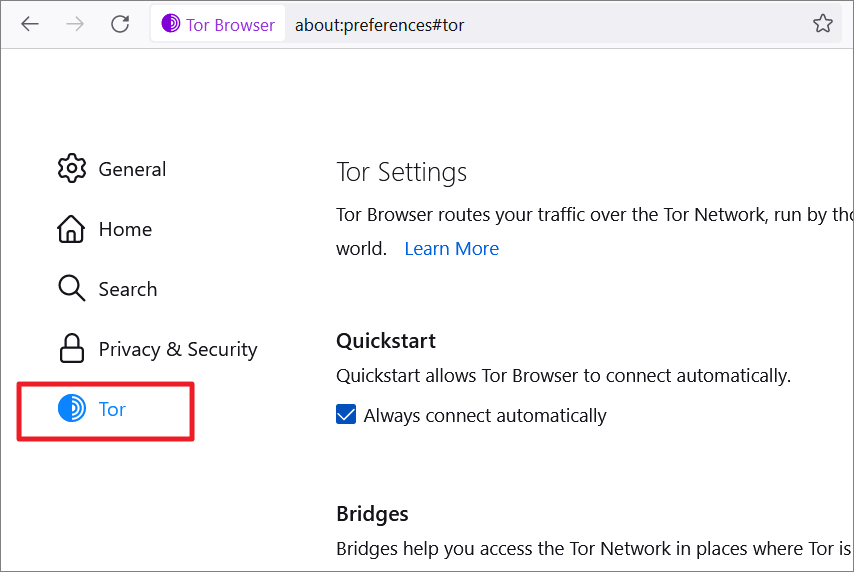
If Tor is blocked in your region or network, you can configure Proxy Bridges to access the Tor network. Bridges are relay nodes that are not publically listed, which means ISPs or governments cannot block them, at least not all of them. You can use built-in bridges or alternative bridges from the Tor official directory or you can also use custom bridges. Here’s how you can do this:
Open Tor browser settings and go to the ‘Tor’ section on the left sidebar.
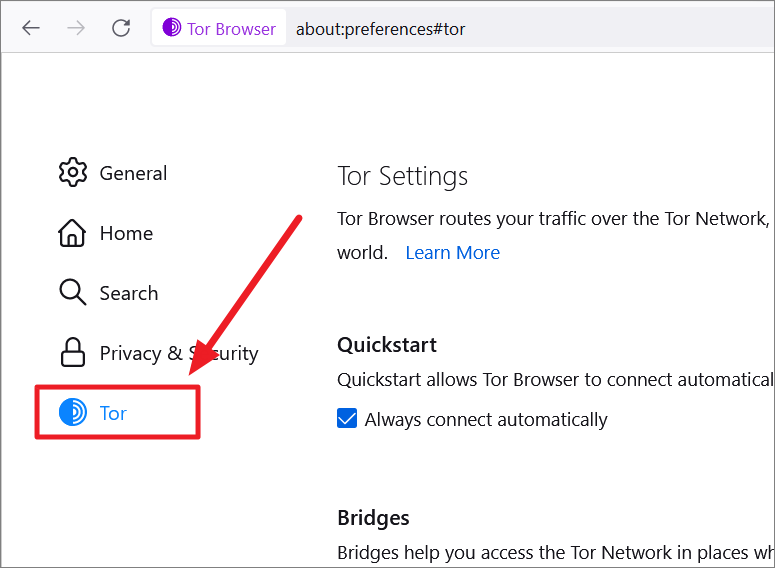
Then, check the ‘Use a bridge’ option.
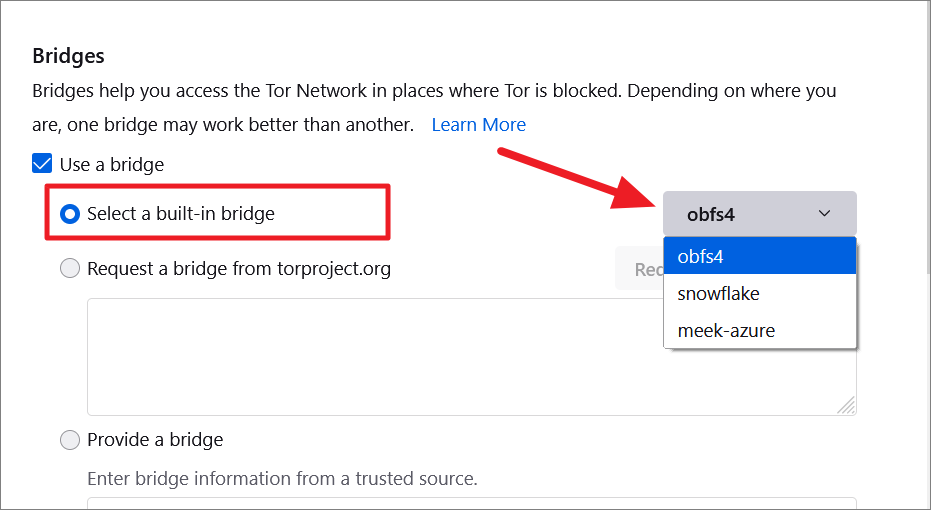
To use a built-in bridge, choose the Select a built-in bridge option and select one of the available bridges from the drop-down menu next to it.
If the built-in bridge doesn’t work or you want to use a new bridge, you can choose the ‘Request a bridge from torproject.org’ option and click on the ‘Request a New Bridge’ button.
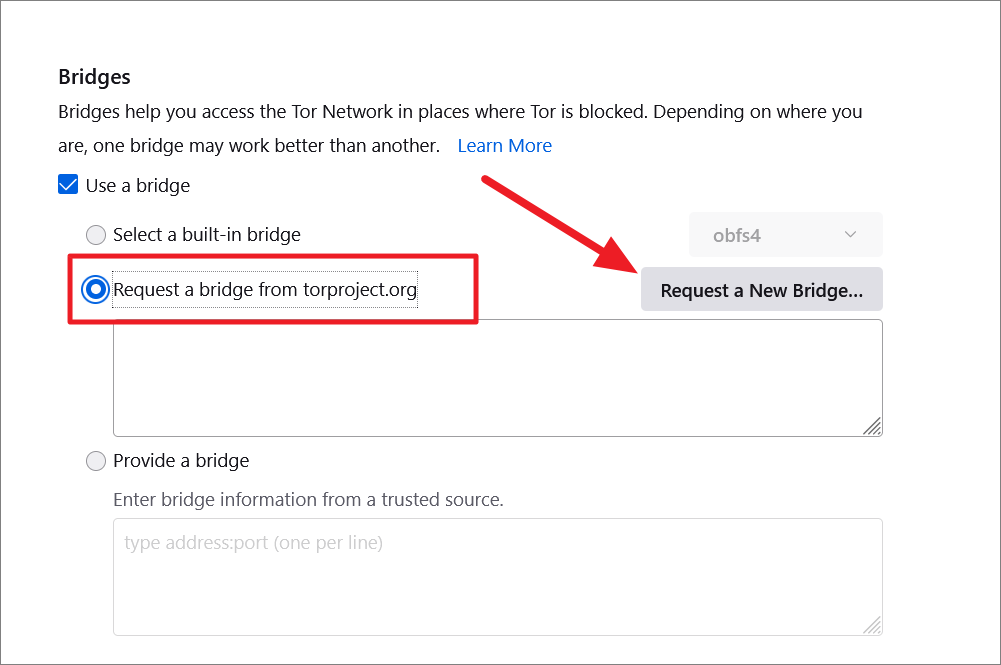
Tor will automatically fetch a new bridge from its directory and fill up the box below.

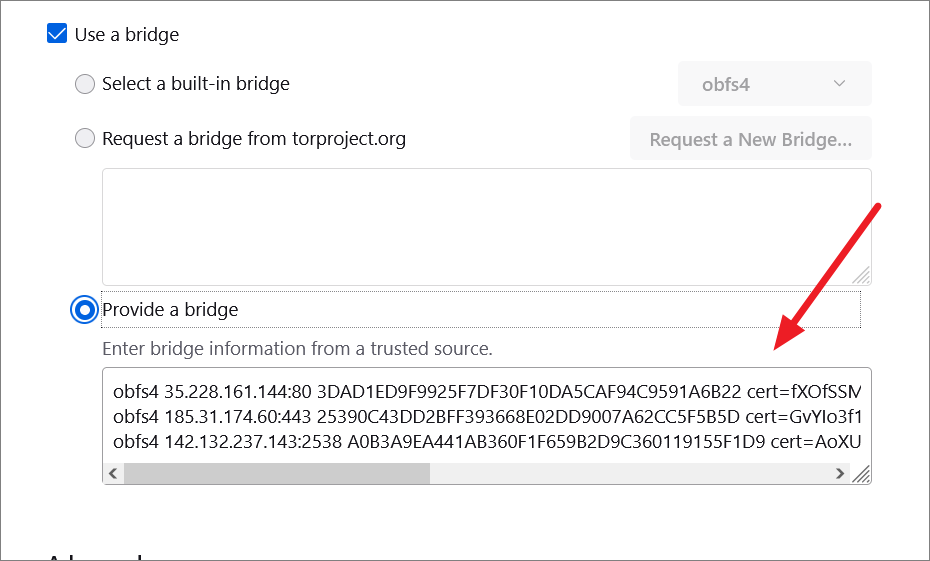
In case, you want to use a custom bridge, select the ‘Provide a bridge’ option and enter the bridge address and port (one per line) in the text field below.
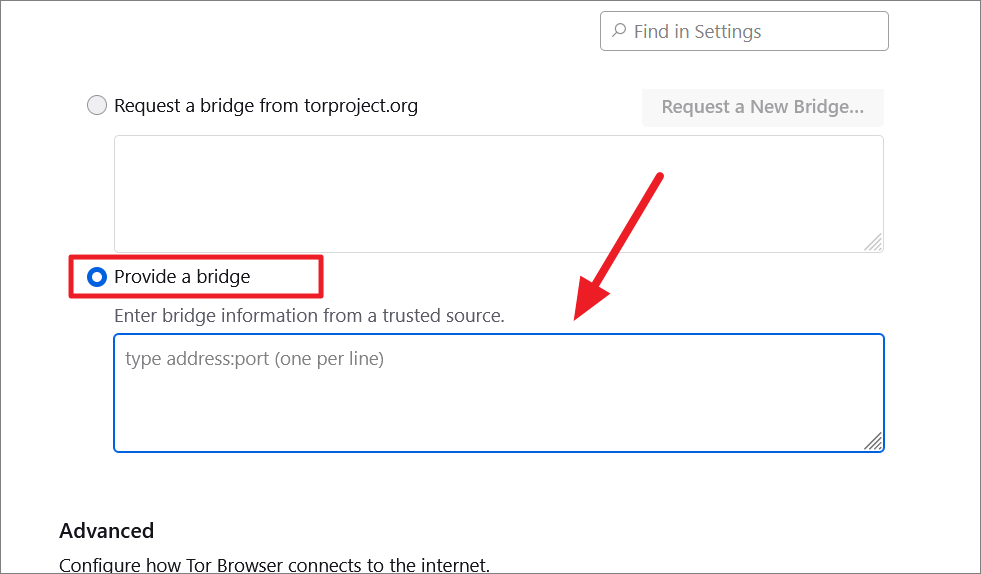
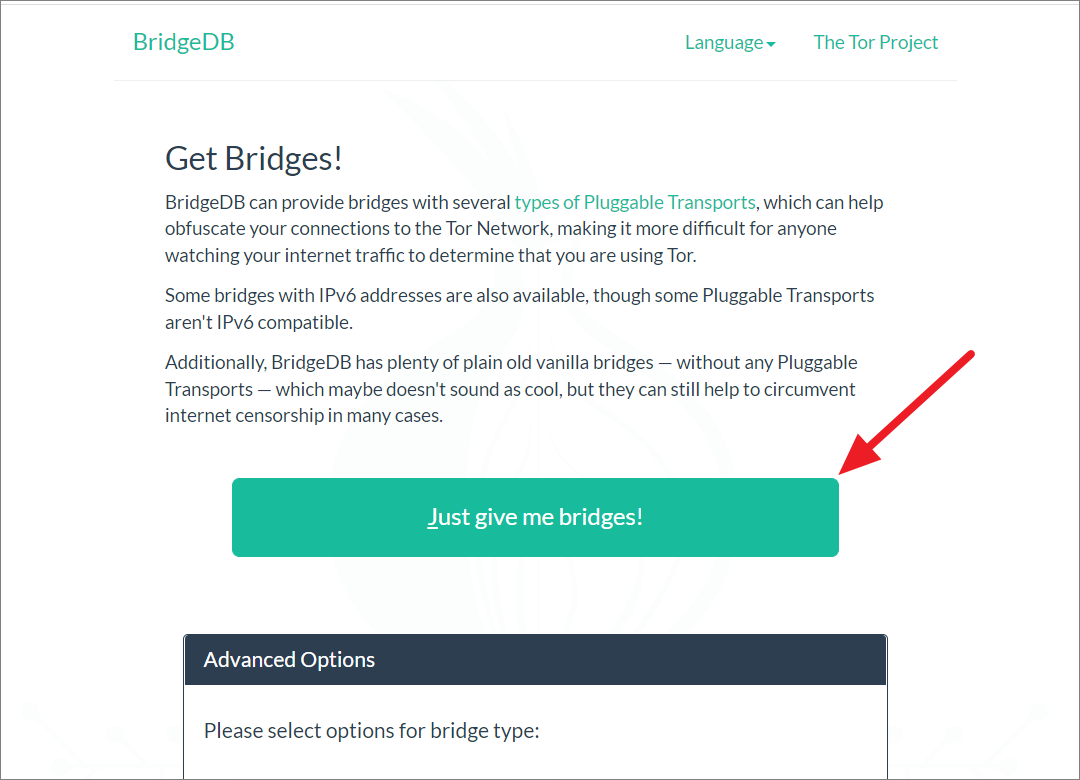
You can manually get bridges from Tor’s official bridge database by clicking the ‘Just give me bridges!’ button.
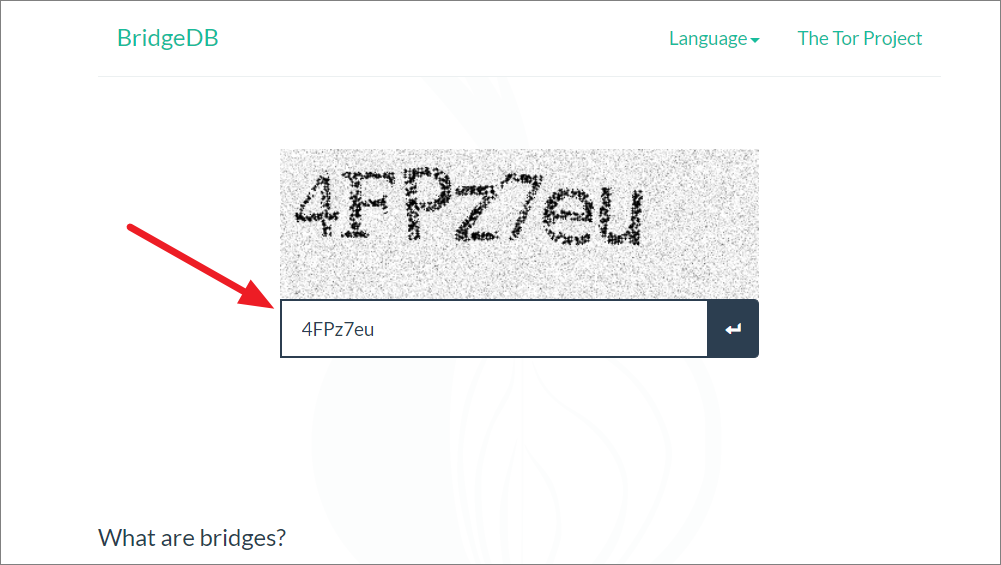
Then, type the captcha and press Enter.
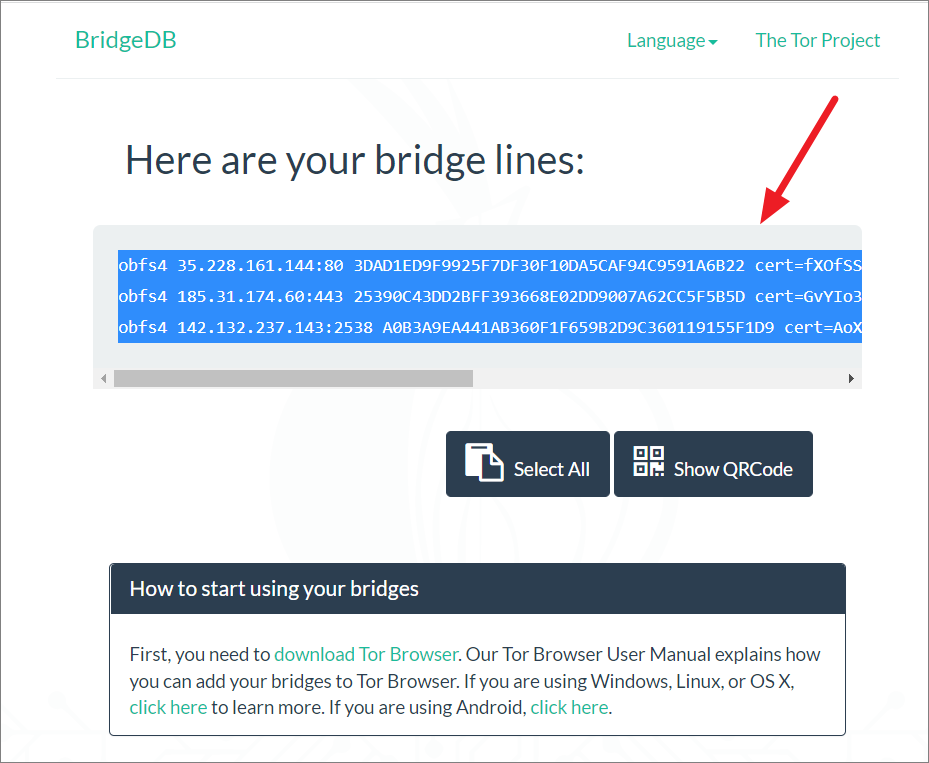
After that, copy the bridge lines from the box below.
Then, paste the bridge lines in the ‘Provide a bridge’ box.
The settings you apply will be saved automatically once you close the Settings tab.
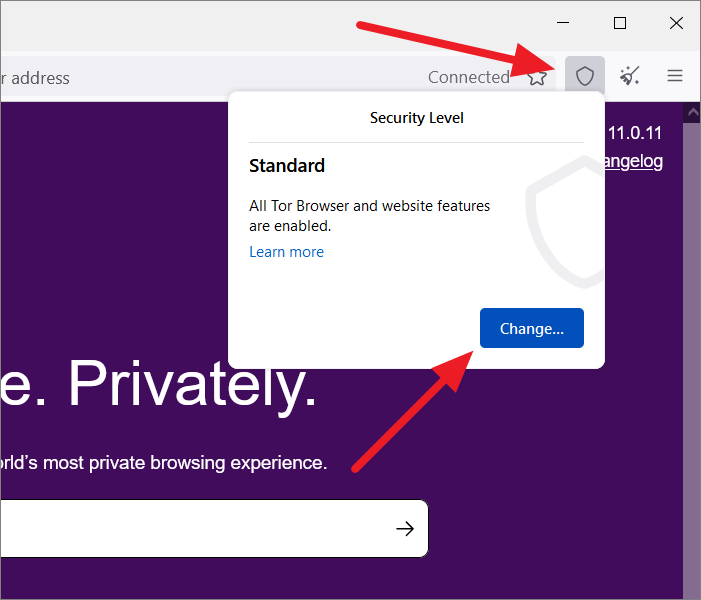
Set up Proper Security levels within Tor
Tor browser has three levels of security with each having a different level of privacy, security, and usability – Standard, Safer, and Safest. By default, the Security level is set to ‘Standard’. But if you want to change it, follow these steps:
Open Tor Settings, go to the ‘Privacy & Security’ section, and scroll down to the ‘Security’ section on the right. Alternatively, you can click the shield icon next to the broom icon at the top left corner and select ‘Change…’
Now, select the radio button next to the security level option you want to choose as your preferred level of protection.
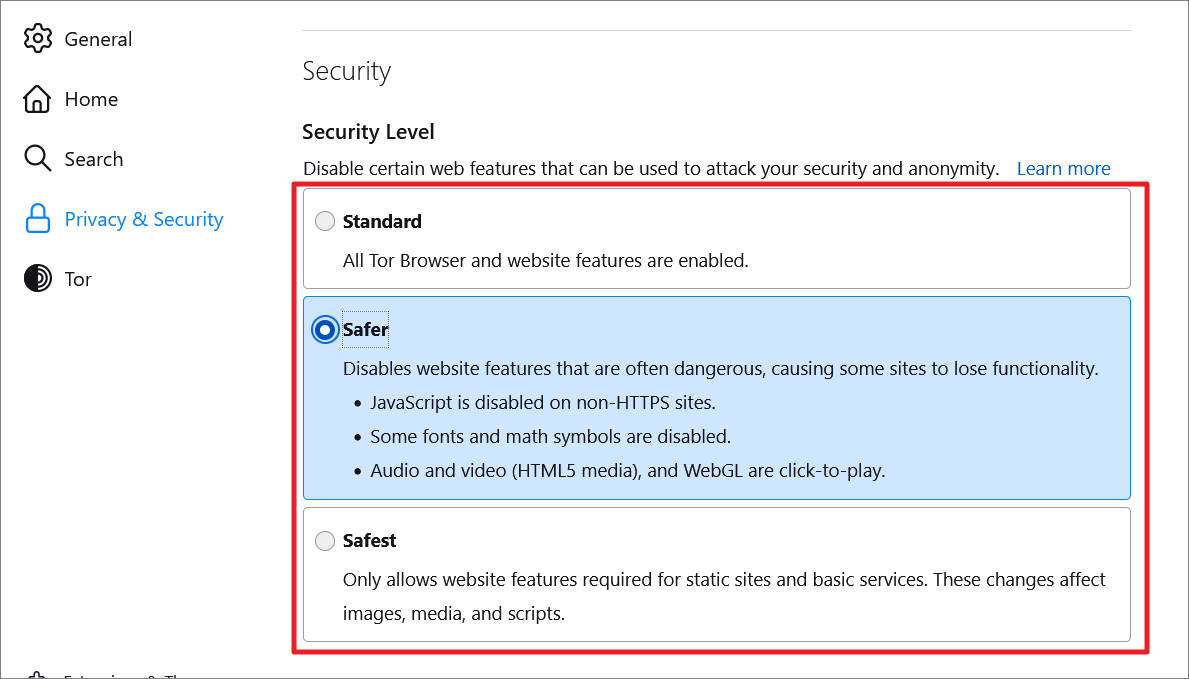
Here’s what each security level is for:
- Standard (Low) – This is the default and lowest security level in the Tor browser. However, it is still far more secure than any other browser out there. At this security level, all your browser and website features will be enabled and nothing is blocked. This is ideal for most users.
- Safer (Medium) – This option is safe than the standard level. It disables features that are often considered dangerous, and due to that, you will lose functionalities on some websites. It disables JavaScript on all non-HTTPS websites. Some fonts and math symbols are also disabled. Audio and video (HTML5 media), and WebGL can only be allowed by clicking through the NoScript plug-in.
- Safest (High) – This is by far the highest level of security the Tor browser can offer. At this level, your privacy and security are the utmost priority of the browser. So, JavaScript is not allowed on all sites. Certain fonts, math symbols, and images are disabled. This level only allows website features necessary for static sites and basic services. And Audio and video (HTML5 media) and WebGL can only be allowed by clicking through the NoScript plug-in.
Most websites use JavaScript, so if you use the ‘Safest’ level of security while visiting those websites, some content will be hidden. The Safest level provides the most security while the Standard level offers the most usability. We recommend you switch to the ‘Safer’ level, which is more secure than the Standard level but still lets you use JavaSript and other necessary features.
Use HTTPS-Only Mode on Tor
When you use websites with the HTTPS protocol (https://), you can expect a secure and private online experience. It is used to provide a secure and encrypted connection between the browser and the web. Nowadays, most websites support HTTPS.
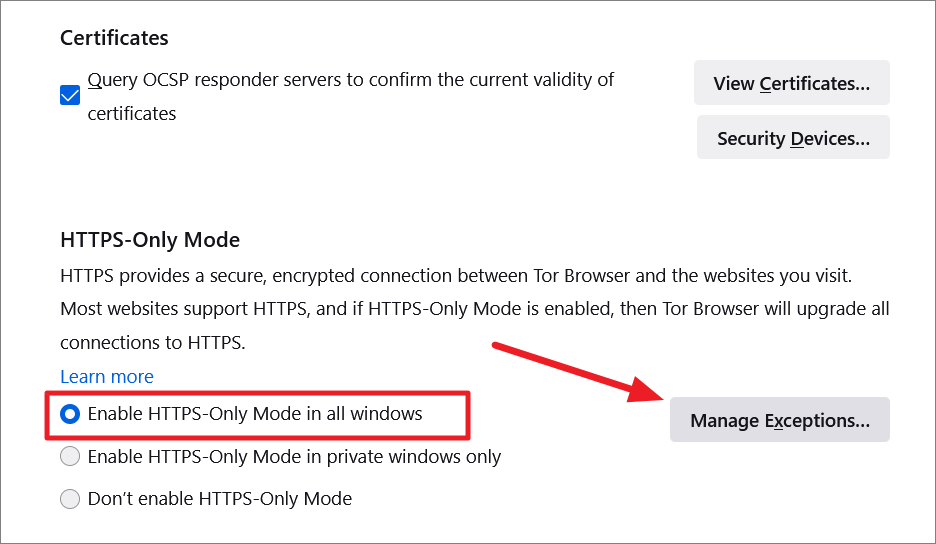
HTTPS-Only Mode is a feature in the Tor browser that allows only encrypted and secure connections between the site and the user. Unfortunately, not all sites support HTTPS, so if you try to use a site that doesn’t support it, the browser won’t load it. But if you’re certain you only want to use websites with HTTPS, here’s how to enable the HTTPS only mode:
First, open the TOR browser and click the hamburger button (three horizontal lines) at the top right corner. From the menu that appears, select ‘Settings’.
On the Settings page, go to the Privacy & Security page, and navigate to the ‘HTTPS-Only Mode’ section. Then, select one of the three options.
By default, ‘Don’t enable HTTPS-Only Mode’ is selected. If you want to establish a fully secure connection to every website you visit, choose the ‘Enable HTTPS-Only Mode in all windows’ option. If you want secure connections only in private windows, choose ‘Enable HTTPS-Only Mode in private windows only’.
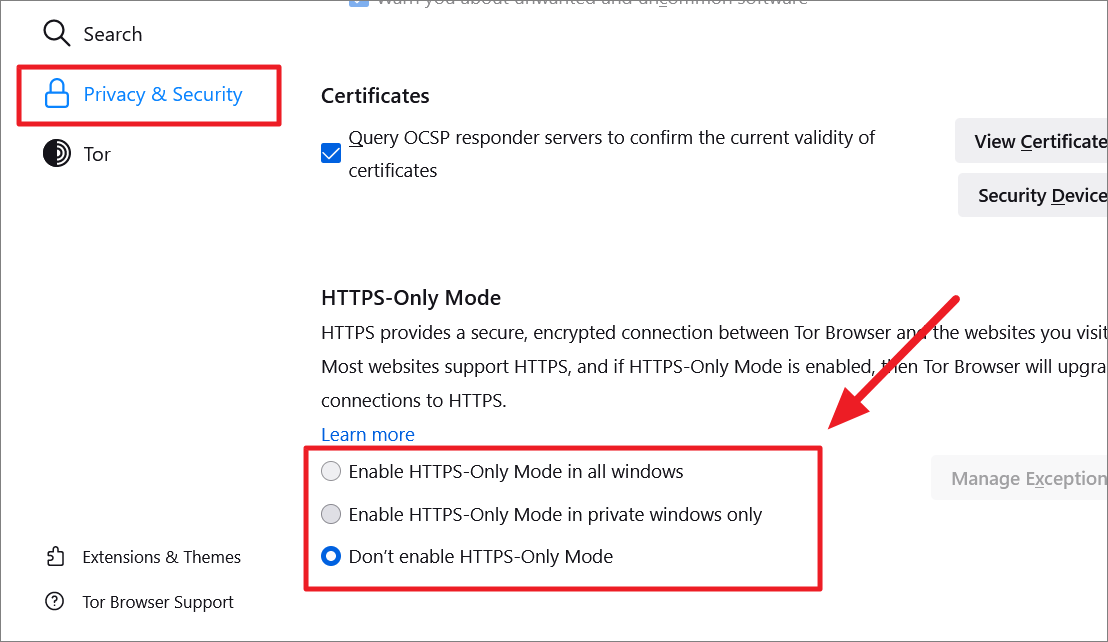
If you selected ‘Enable HTTPS-Only Mode in all windows’, you can also add exceptions by clicking ‘Manage Exceptions…’. Tor Browser won’t block these sites even if they don’t support HTTPS.
Enter the address in the ‘Address of website’ field, and click ‘Turn Off’ or ‘Turn Off Temporarily’.
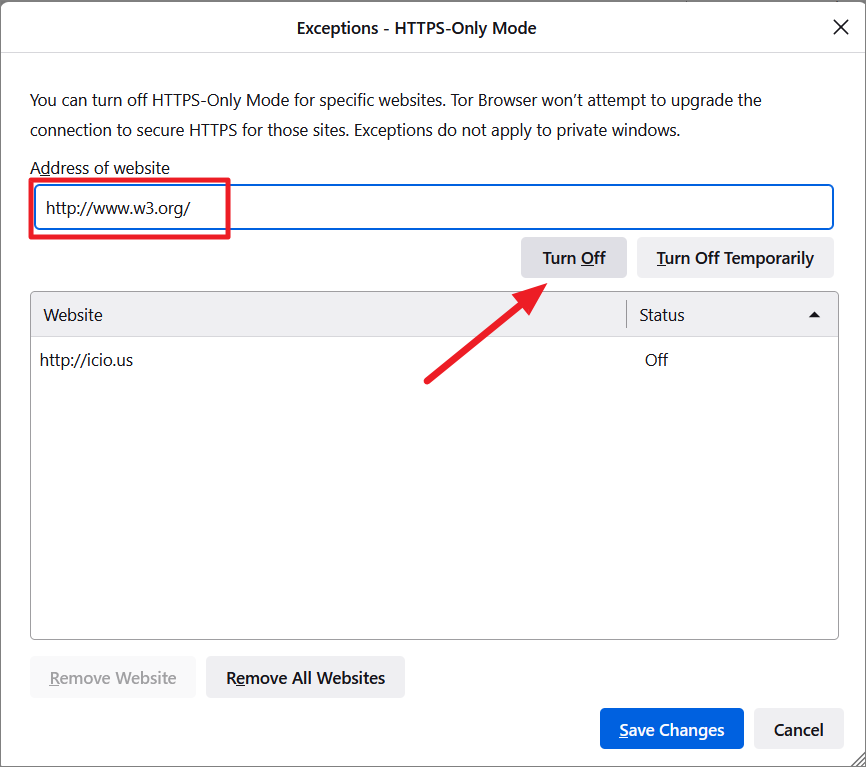
After that, click ‘Save Changes’.
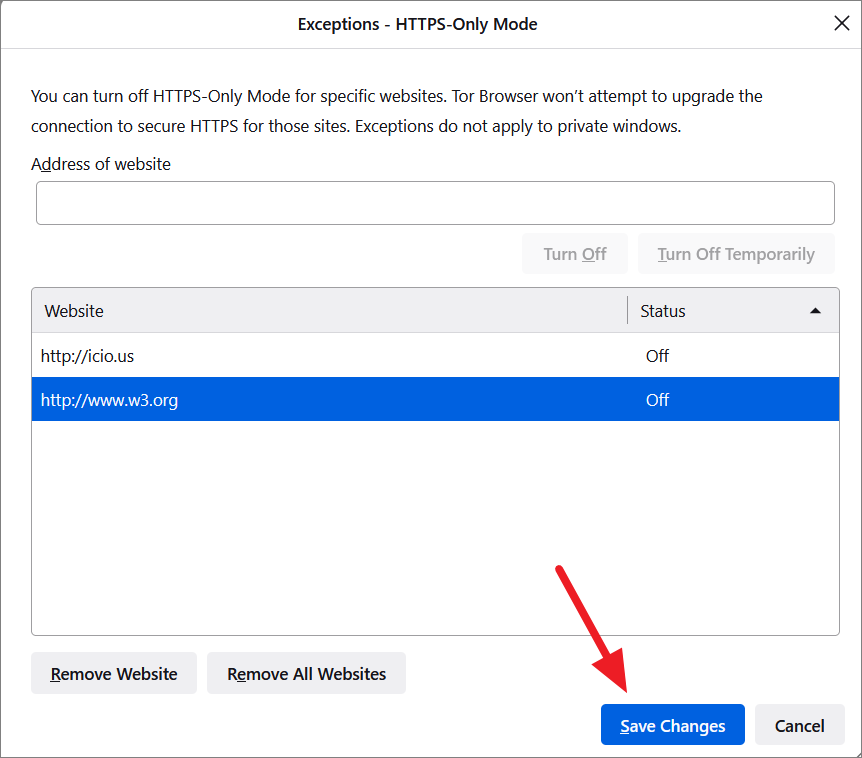
In case, you want to remove a website from the Exceptions, select the site and click ‘Remove Website’.
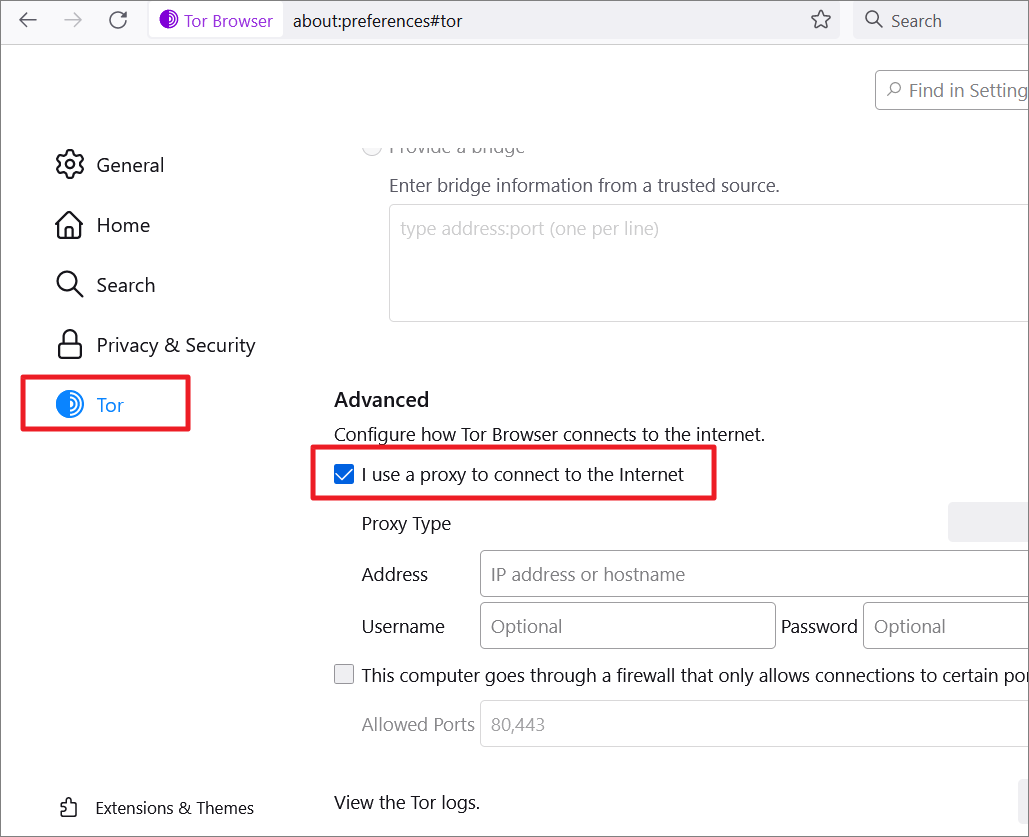
Set Up Proxies in the Tor Browser
In case you use a proxy server to connect to the internet, you can also configure the Tor browser with proxy settings to establish a connection to the internet. Let us see how to do that:
Open the browser settings menu by clicking on the hamburger icon (three horizontal lines) in the top right corner of the screen and then selecting ‘Settings’ from the menu.
On the Settings page, click on ‘Tor’ on the left side of the menu.
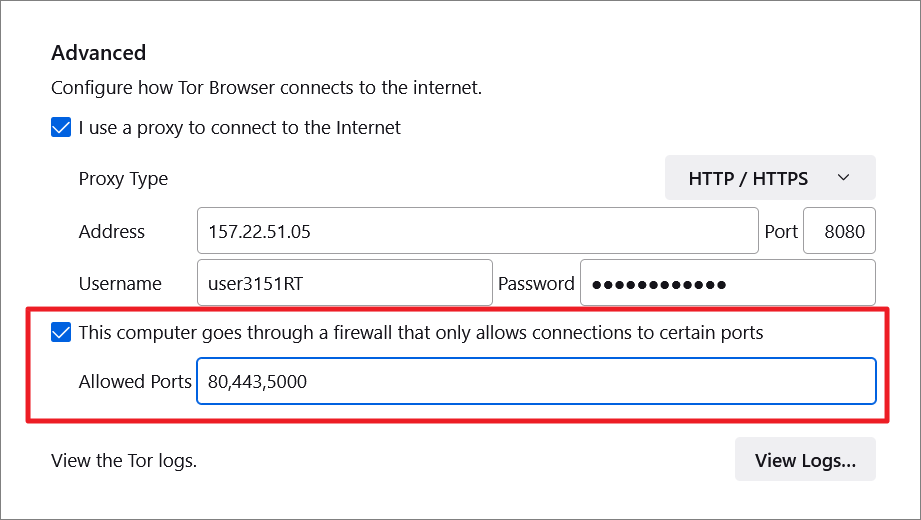
Then, scroll down to the Advanced section on the right pane, and check the ‘I use a proxy to connect to the Internet’ checkbox to configure the proxy server data entry.
After that, choose the proxy protocol you want to use for connection from the ‘Proxy Type’ drop-down menu. Usually, most services use the ‘HTTP/HTTPS’ protocol.
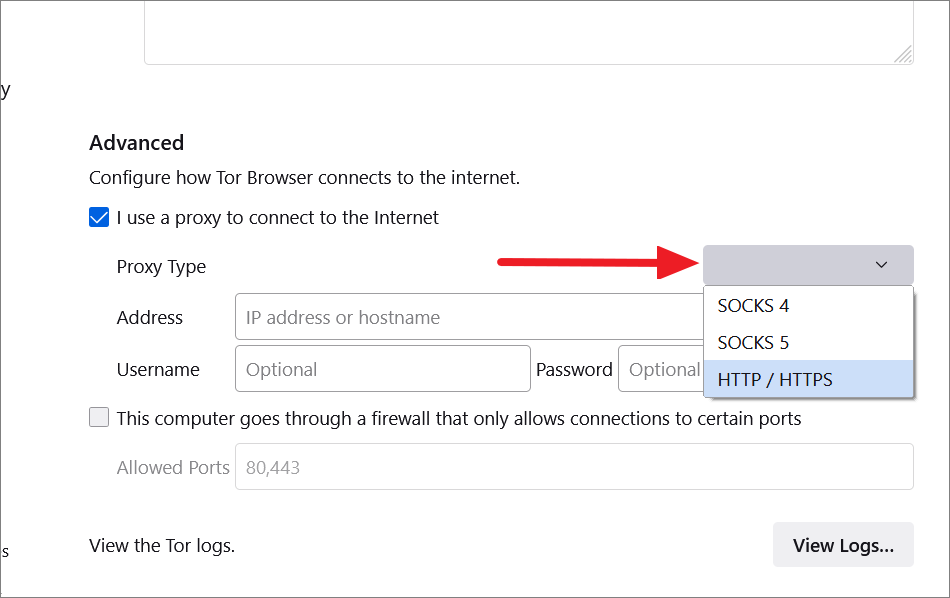
In case you want to configure the proxy server using ‘SOCKS 4’ and ‘SOCKS 5’ protocols, choose the required protocol from the drop-down menu.
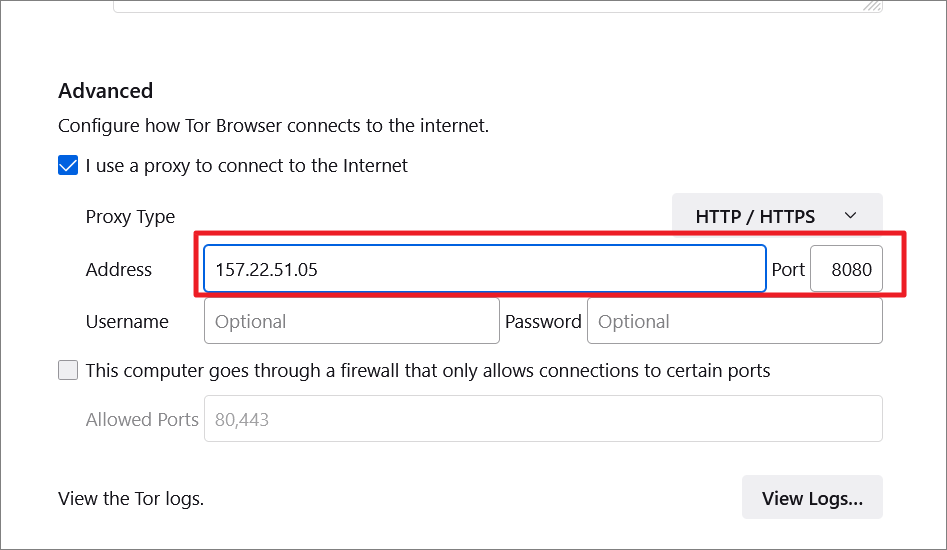
Now, type the proxy IP address and port number you got from the proxy service provider in the ‘Address’ and ‘Port’ fields.
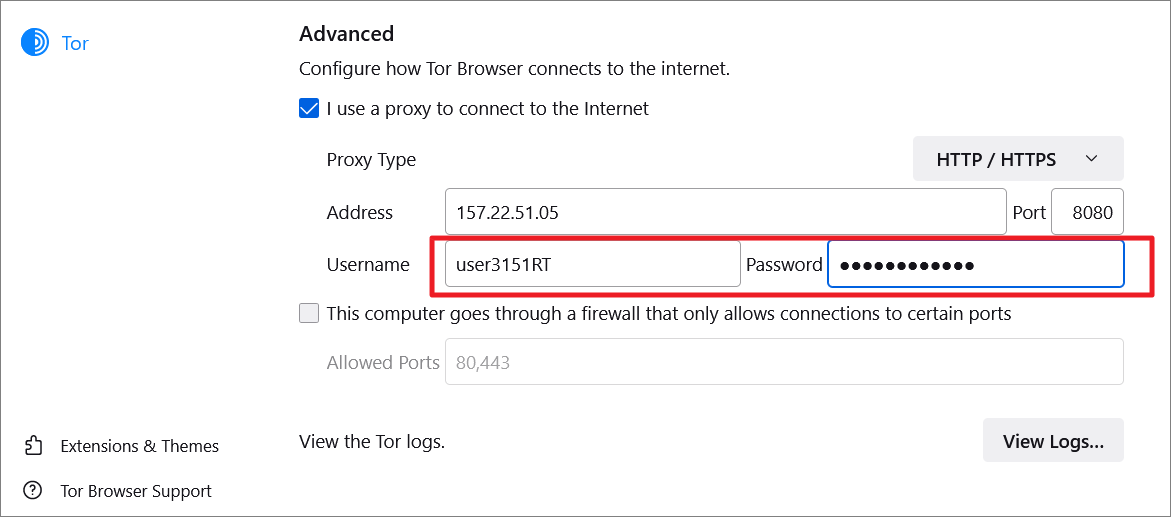
Then, enter the username and password in the respective fields.
If you want to allow connections to only specific ports through Firewall, check the box next to ‘This computer goes through a firewall that only allows connection to certain ports’. Then, enter the port numbers (separated by a comma) in the ‘Allowed Ports’ field below it.
Then, check if the IP address change has taken effect by searching ‘What’s my IP?’ in the search engine of your choice.
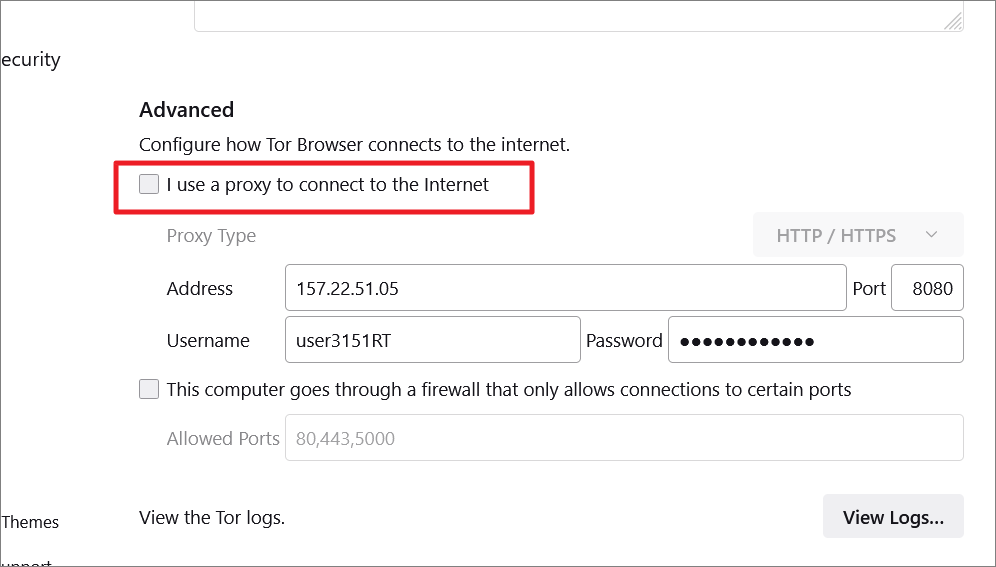
To disable proxies in your Tor browser, go back to the Advanced settings and uncheck the checkbox next to the ‘I use a proxy to connect to the Internet’ option.
How To Access Onion Sites on the Dark Web using Tor
The term Dark Web refers to a network of websites that cannot be accessed by normal means. But that’s not because they may contain dark and illegal contents. In fact, many popular news sites, email services, torrent sites, whistleblower sites, and various other institutions have mirrors (on the dark web) of their primary indexed sites to ensure citizens in countries with strict censorship can access their resources.
The Dark Web or Dark Net is essentially a collection of websites that are not indexed or not able to be indexed by regular search engines, like Google or Bing. That means you cannot find the Dark Web websites by googling them. Hence, the dark web cannot be accessed, not even by the most popular browsers, i.e., normal browsers like Google Chrome, Firefox, Opera, etc. The Dark Web websites can only be accessed by some specialized browsers that use overlay networks and alternate routing such as The Tor Browser.
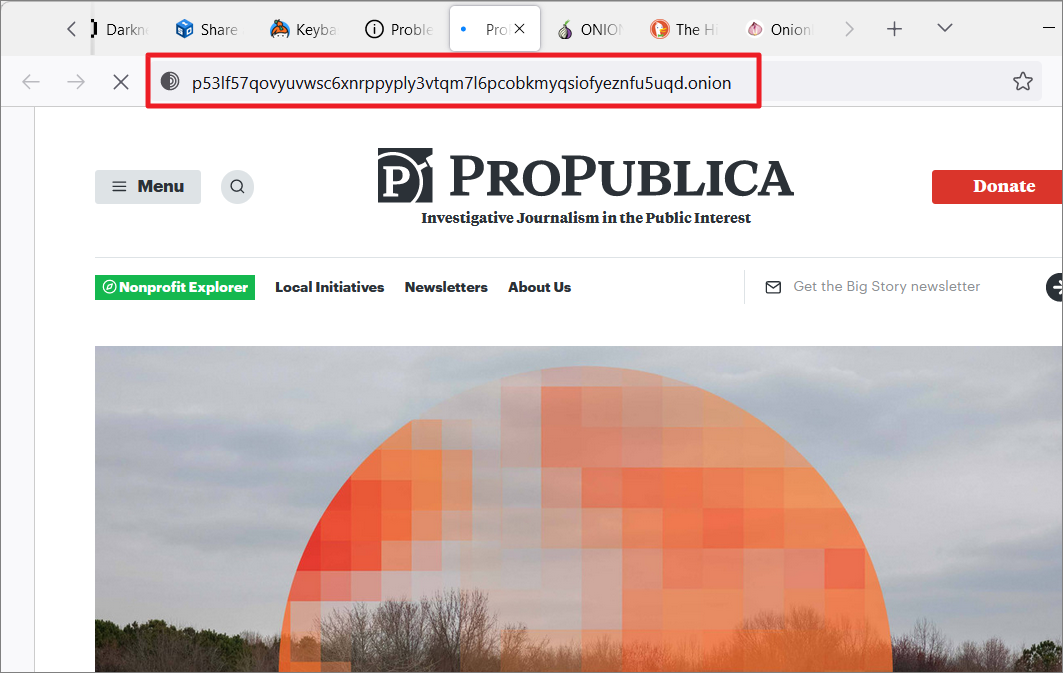
The ‘.onion’ is a popular domain suffix used by Dark Web websites that are hosted on the Tor network. And all ‘.onion’ sites can only be accessed by the Tor browser. Here’s how you can use the Tor browser to access onion sites:
There are two ways you can access .onion sites in the Tor browser – Using onion URLs/Links or using the Onion Location feature.
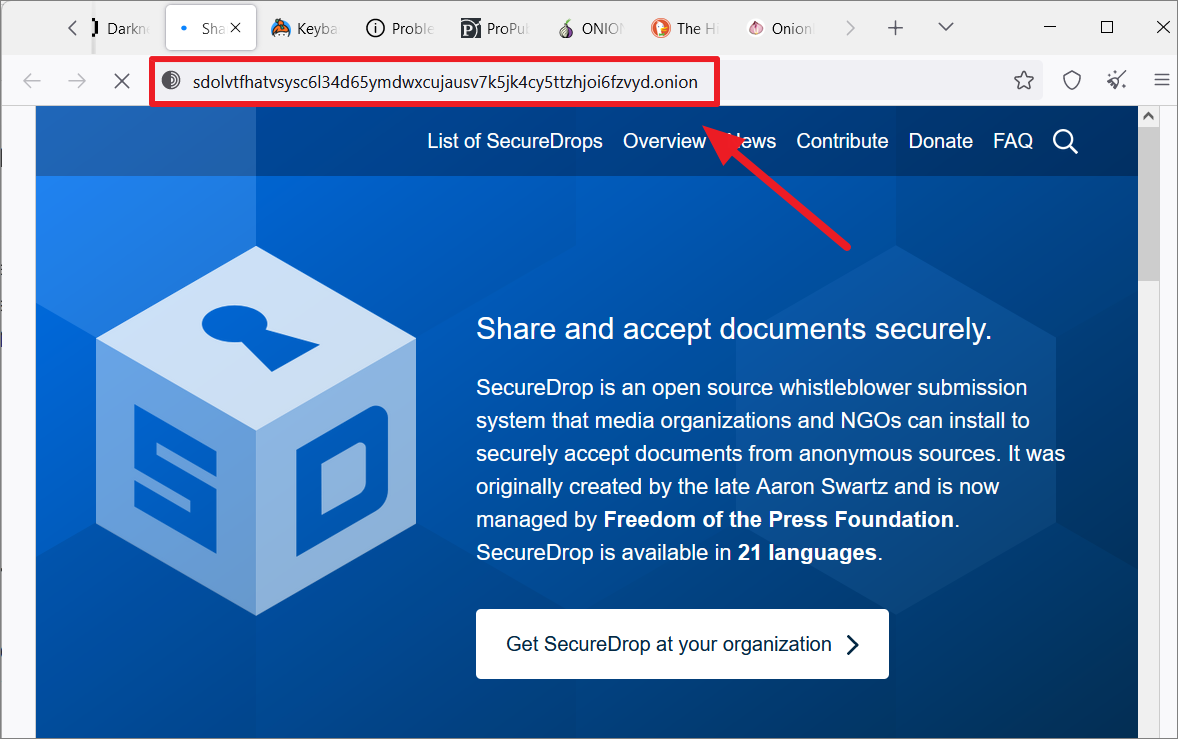
Using Onion URLs/Links
You can only access onion sites using a special URL (alphanumeric strings generated from a public cryptographic key) on the Tor browser. You can get onion URLs (for popular websites) from websites that curate lists of onion sites such as The Hidden Wiki.
Or, You can use Tor search engines, such as Tor Search, Torch, Not Evil, Haystack, etc., to search for onion sites. You can also use the Ahmia.fi website to get onion URLs from a normal browser and use those URLs to access websites on the Tor browser.
The onion URL will look something like this:
Using Onion Location feature (.Onion available)
You can also use the Onion-Location (.Onion available button) feature to access onion websites on Tor. It is a feature that websites use to advertise their onion mirror in Tor.
If a website you are visiting on the Tor browser has an onion site, you will see a purple button called (.onion available) at the right corner of the URL bar.
Simply, click the ‘.onion available’ button in the address bar.
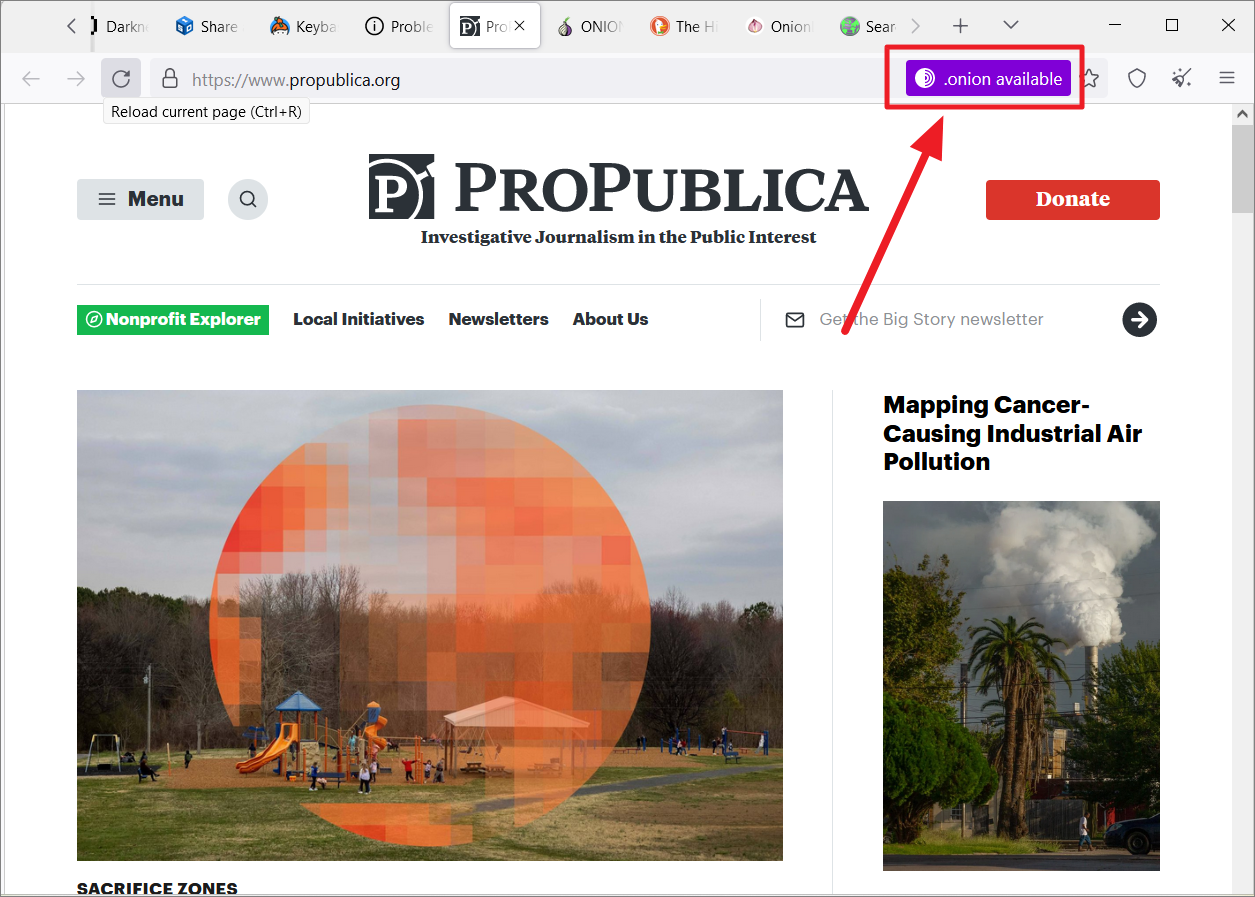
The site will reload and redirect you to its onion mirror site.
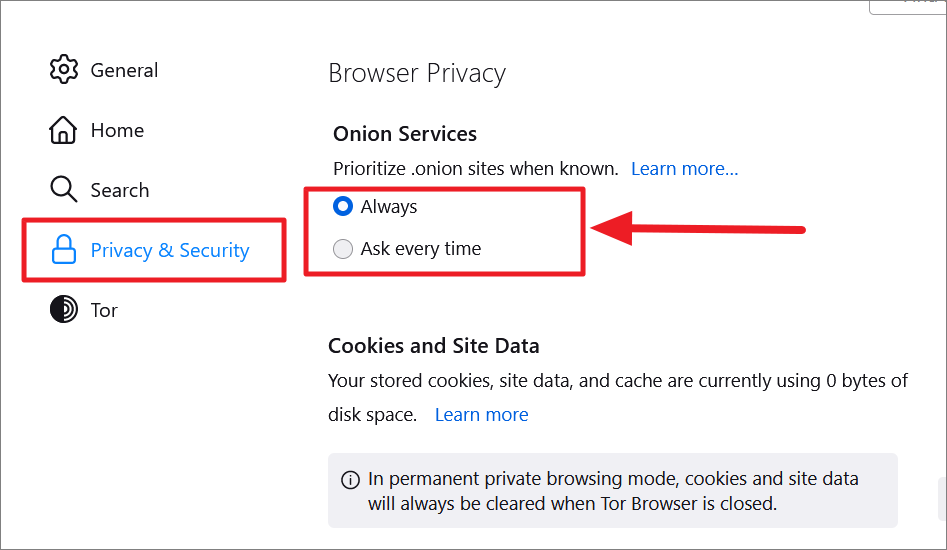
Prioritize .onion Sites
You can also prioritize onion sites when onion site is available. When you open a website that has a ‘.onion’ mirror, you can set the Tor browser to redirect to its onion counterpart automatically.
To do that, open Tor Settings, and click on ‘Privacy & Security’ on the left panel. On the right, you will see two options under Online Services: ‘Always’ and ‘Ask every time’.
The default option is ‘Ask every time’ which shows you the ‘.onion available’ button in the address bar. But, if you want to automatically redirect to the onion site version of a website, select the ‘Always’ option.
Check Tor Network Status
If the Tor Browser is not connecting to the internet, it may be due to the Tor network being down or having issues. You can check the Tor network status on the official Tor Project website using any other browser.
Visit the Tor Project Status website on any browser and see if all systems are running.
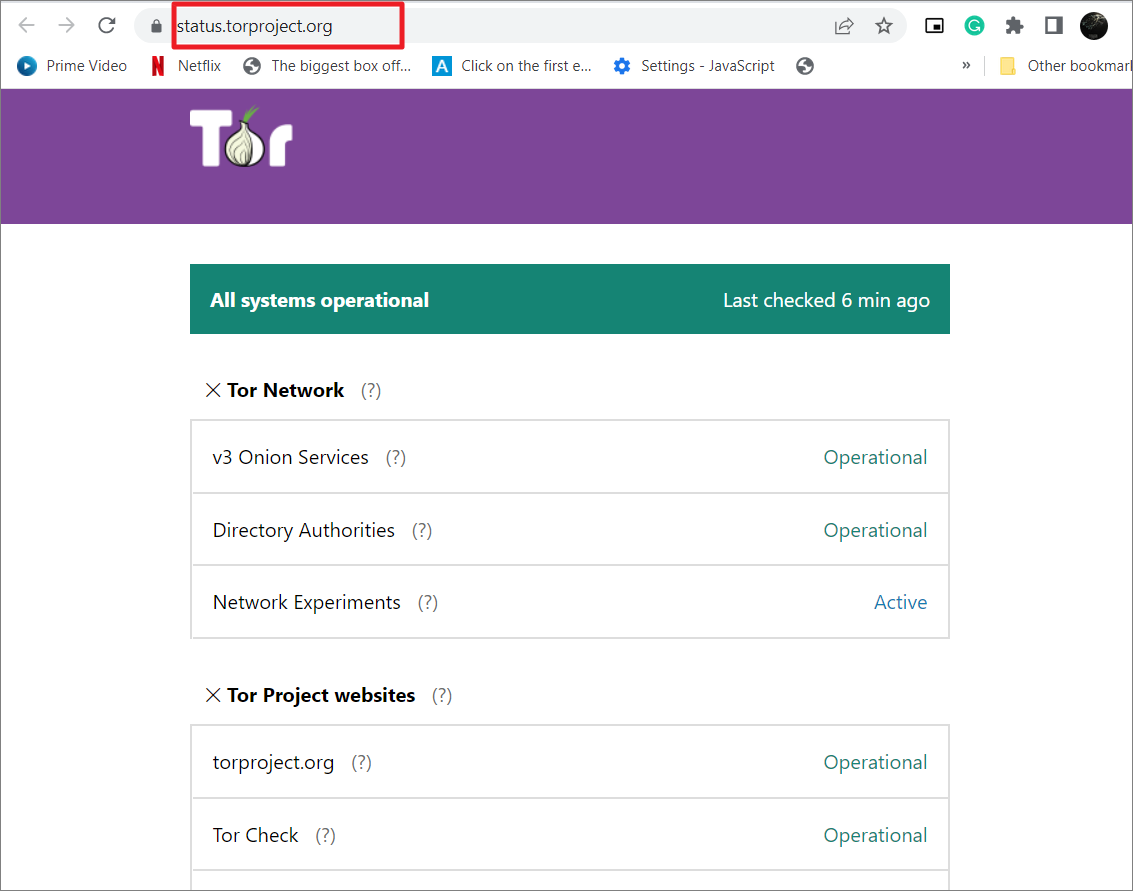
This site will provide in-depth information about the Tor network, internal system, and Tor Project websites.
Check Tor Network Connection Status
To check if the Tor network connection is working properly, launch the Tor browser and enter this address: https://check.torproject.org.
If the connection to the Tor network is intact, you will see the following message.

Running Tor on Firefox
Tor encrypts your web traffic and sends it through a network of nodes to protect your anonymity. You can access this TOR network through other browsers like Firefox by manually reconfiguring its proxy settings. Follow these steps to access the Tor network via the Firefox browser:
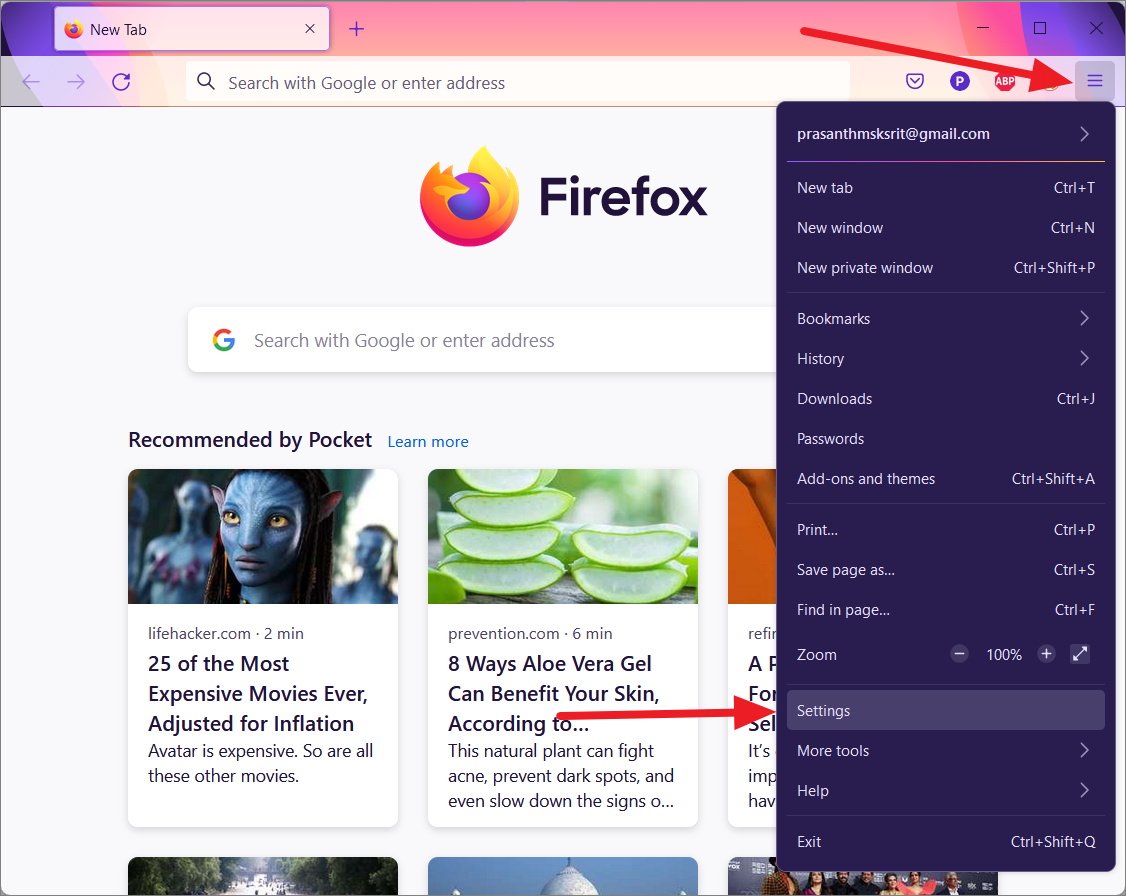
First, open the Firefox browser, and click the hamburger button (Menu) at the top right corner. Then, select the ‘Settings’ option from the menu.
On the Settings page, go to the ‘General’ section, scroll down the right pane and click the ‘Settings’ button under the Network Settings section.
Note: This may vary depending upon your Firefox version, but it will work for the latest versions of firefox.
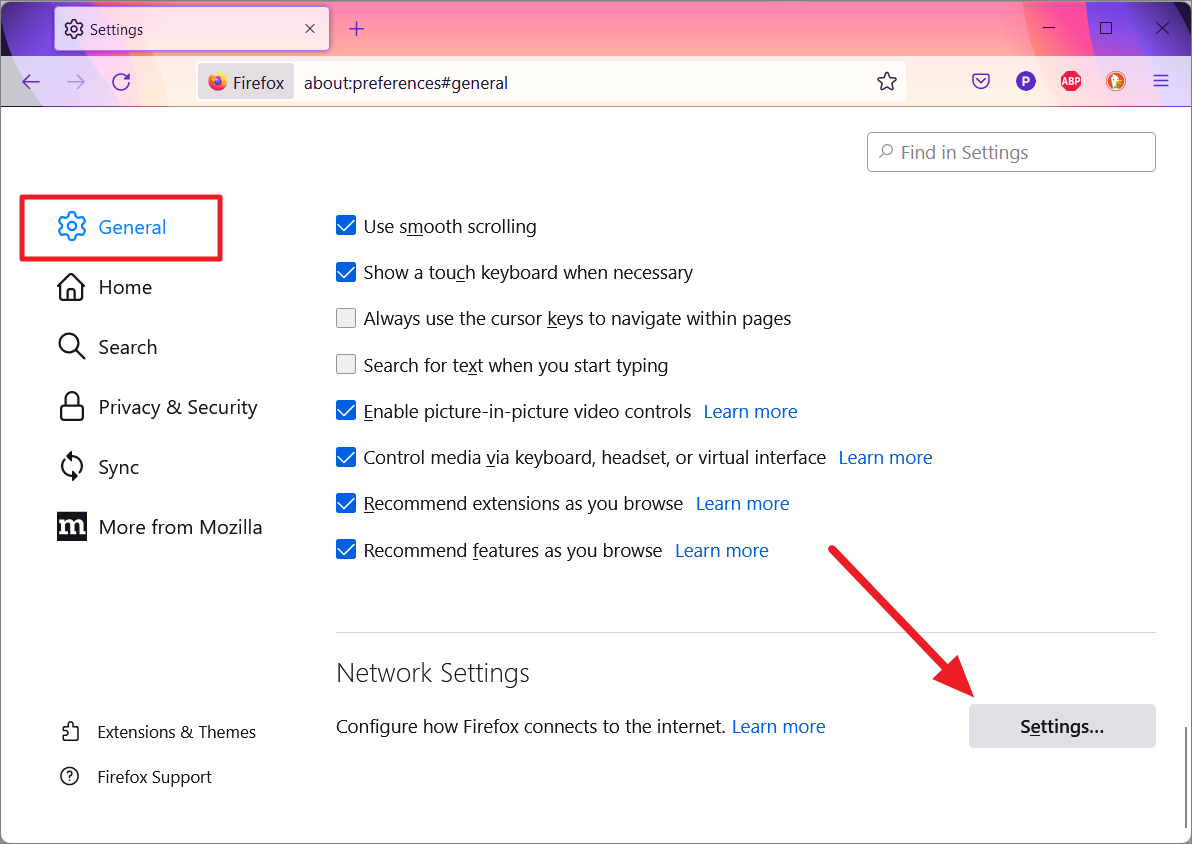
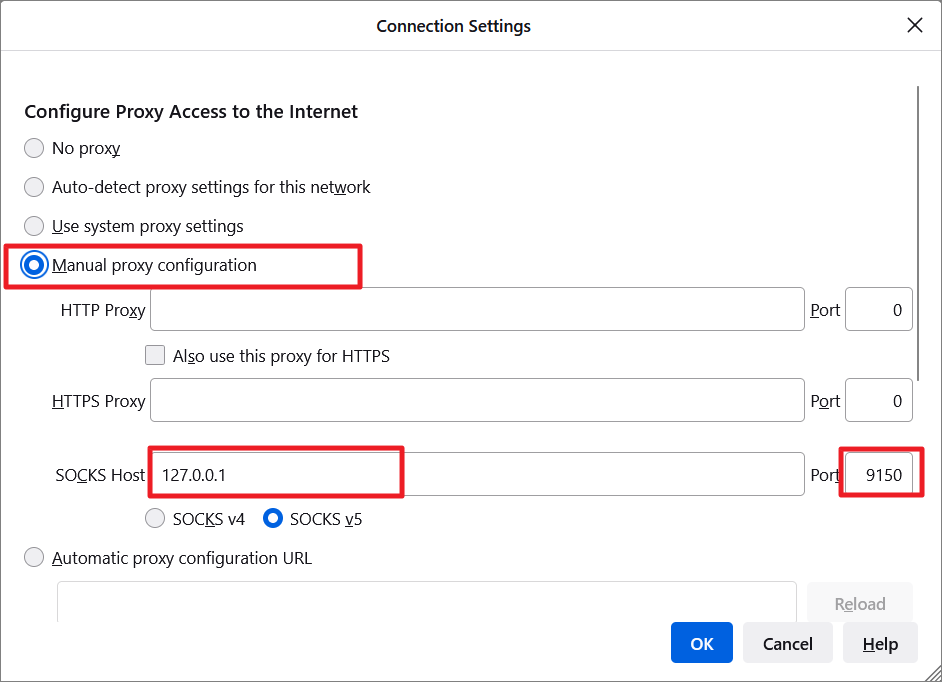
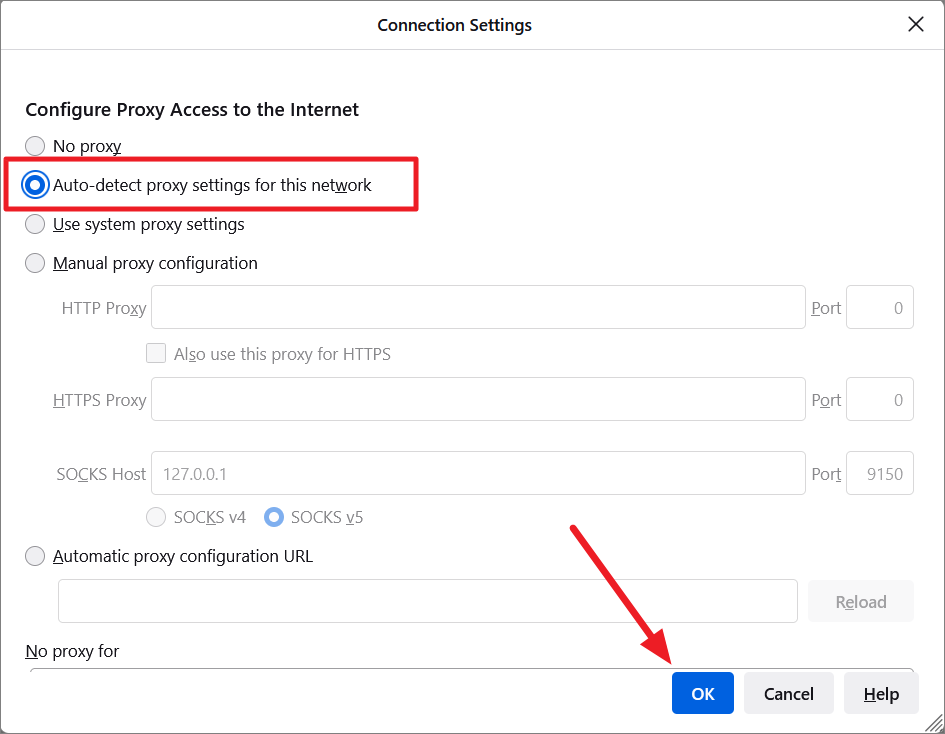
This will open the Connection Settings or Network Settings dialog window. Here, select the ‘Manual proxy configuration’ option under the Configure Proxy Access to the Internet and enter the following settings:
- In the SOCKS Host box, enter
127.0.0.1. - In the Port box, type
9150or9050. - Then, select the ‘SOCKS v5’ option below.
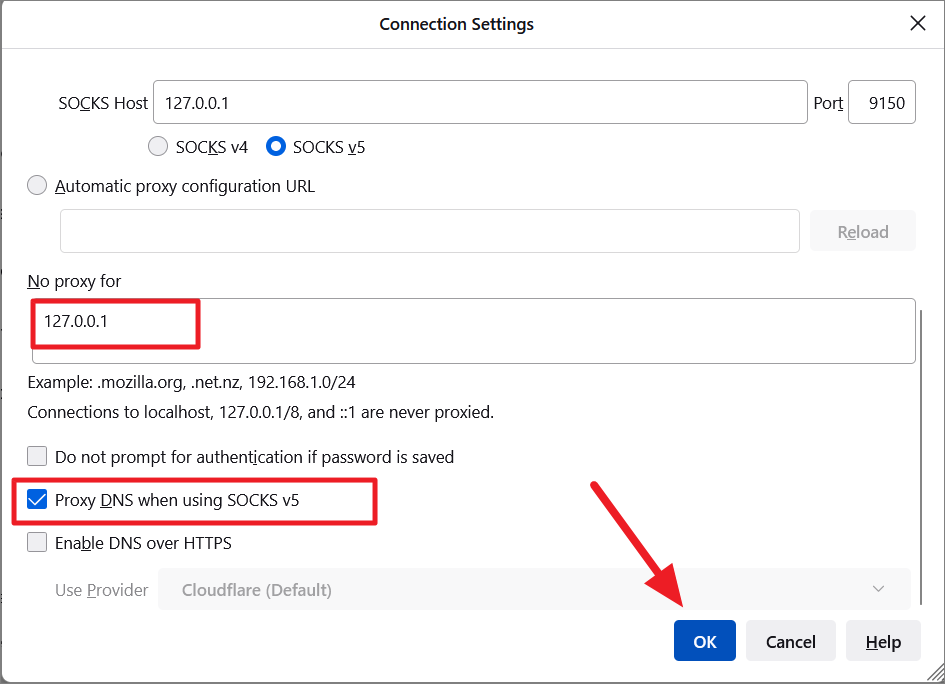
- Then, enter
127.0.0.1in the ‘No proxy for’ field. - Select the ‘Proxy DNS when using SOCKS v5’ option.
Finally, click ‘OK’ to save the changes.
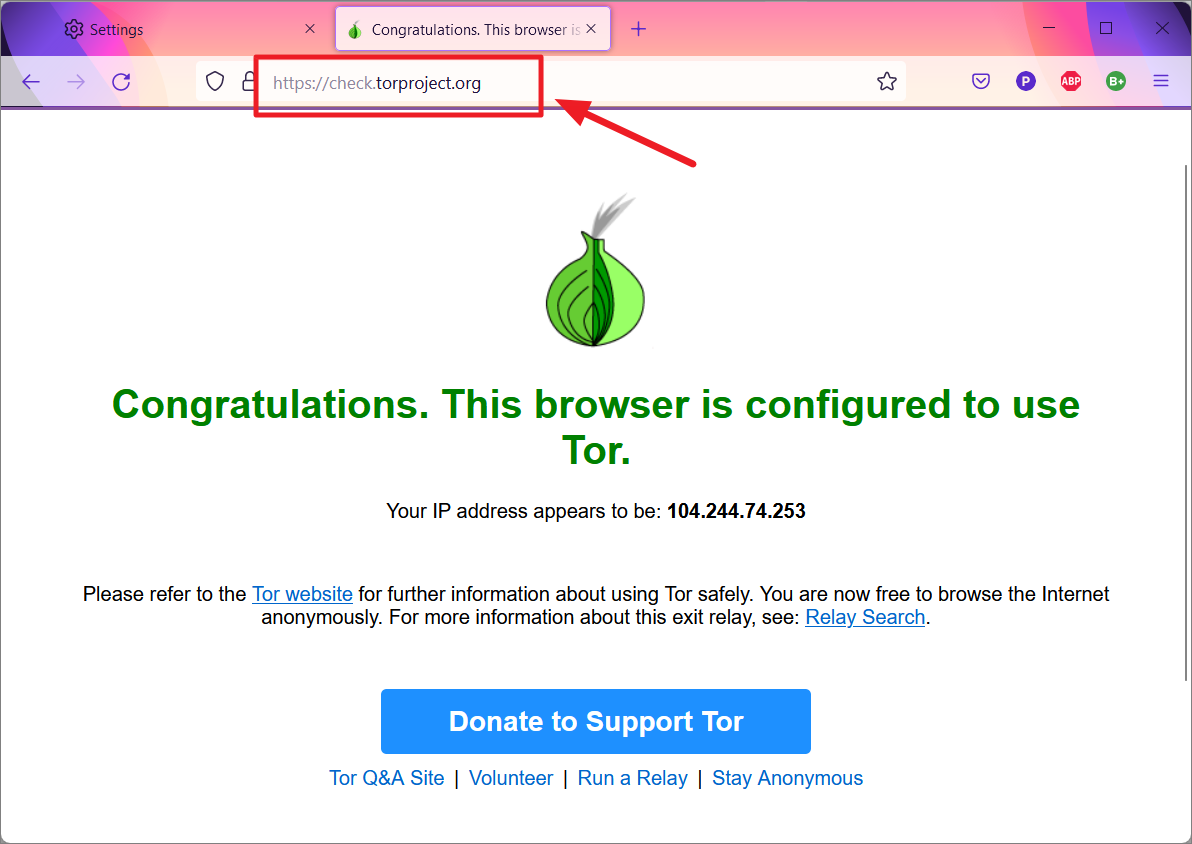
To check if the Firefox browser is connected to the Tor network, type check.torproject.org in the address bar and hit Enter.
If you are using tor, you will see the below message.
If it didn’t work, no webpage will be loaded and you will see an error screen.
To disconnect from the tor network, go back to the Connection Settings, select the ‘Auto-detect proxy settings for this network’ option, and click ‘OK’.
Do’s and Don’ts for Tor Browser
Tor Browser is the most secure browser you can use to protect your online communications, but it is not 100% foolproof. For better security and privacy, you need to follow these tips and precautions when using the Tor browser.
Update Your Device and Tor Browser
You must frequently update the Tor browser, Tor-secured applications, and the device on which you are using Tor. Tor Project often rolls out security patches and features to improve the browser’s usability and security. So, make sure the software and your system are up-to-date.
To save you the time of checking for updates often, you can enable auto-update on the Tor browser.
In the Tor settings, go to the ‘General’ section, and scroll down to the ‘Tor Browser Updates’ section on the right. Then, make sure the ‘Automatically install updates (recommended)’ option is selected.
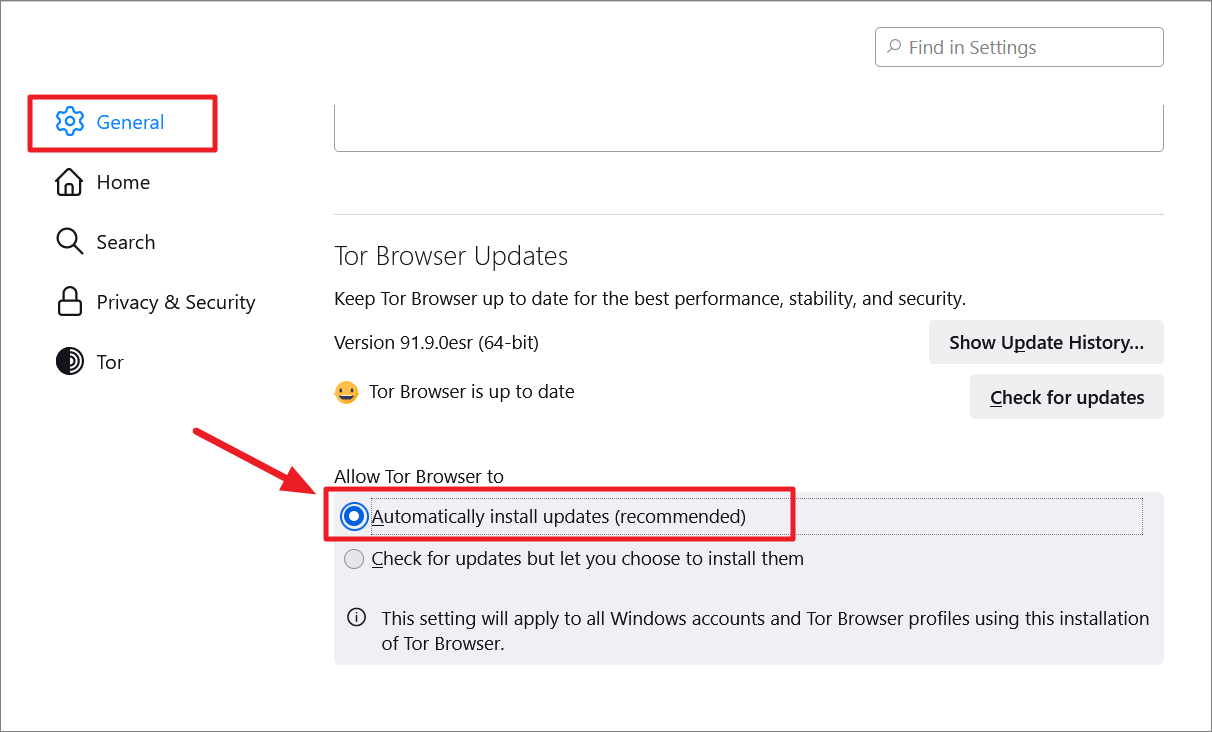
If you want to manually check for updates, click the ‘check for updates’ button.
Use HTTPS Sites
Tor encrypts your traffic and routes it through the secured Tor network, but it doesn’t protect your data when it passes between the exit node and the server. That is why you should always use the HTTPS version of websites that provide end-to-end encryption for your data. Most websites on the internet support HTTPS by default.
The Tor browser comes with the HTTPS Everywhere extension, which allows you to enable HTTPS-Only mode to force all connections to HTTPS. We have shown you how to enable HTTPS-Only Mode in one of the above sections.
Disable JavaScript, Flash, and Java
Many websites use active content or interactive tools such as JavaScript, Adobe Flash, animated GIFs, Java, streaming audio and video, ActiveX controls, weather maps, embedded objects, etc. to enhance the end-user experience.
These dynamic contents are often used as a tool or gateway for attackers to insert malicious code on a user’s computer. Moreover, they may also store the User’s session details, location, and other information.
You can block these technologies, by switching the Tor security level to ‘Safer’ or ‘Safest’ in the settings. You can also use the NoScript extension to allow or block active content for specific websites.
Avoid Add-ons and Plug-ins
Don’t install or use Extensions and plugins in the Tor browser except for the pre-installed HTTPS Everywhere and NoScript. Using add-ons and plugins can put your privacy and anonymity at risk by bypassing the browser’s protection.
Don’t Sign into Websites
When you sign in to your email account, website account, or bank account on Tor you are sharing data with an outside source. By doing so, you make it possible for them to track you or steal your data. So, don’t log in to any website over Tor. If you need to send emails over Tor, you can easily get an account on encrypted email services (specifically for Tor) such as ProtonMail, PreVeil, Tutanota, etc.
Don’t Open Ads, Pop-ups, and Files through Tor
This one is obvious. You should never open ads, pop-ups, or accept unknown requests even when browsing on Tor. This will destroy your online privacy and make it easy to hack you.
If you download a file through the Tor browser, either from a dark web website or a normal website, close the browser and disconnect the internet before opening it. If you open the file while you’re still connected, the file could access the internet and leak your real IP address and location.
Don’t use P2P File Sharing (Torrents)
Don’t use Tor with Peer-to-Peer file-sharing clients such as BitTorrent, because they can share your IP address and location with other trackers and peers, endangering your anonymity. The Tor network depends on a limited number of volunteer relay nodes, so using P2P file sharing over the Tor network will slow down the internet not just for you but for others too.
Use Cryptocurrency
If you want to pay for something over the Tor network, use cryptocurrency instead of your credit or debit card to keep your financial information from being stolen. When you use cryptocurrency to pay for the purchase, you divulge no information to the vendor. Using cryptocurrency such as Bitcoin, Ethereum, Dash, etc. protects you from identity theft and fraud.
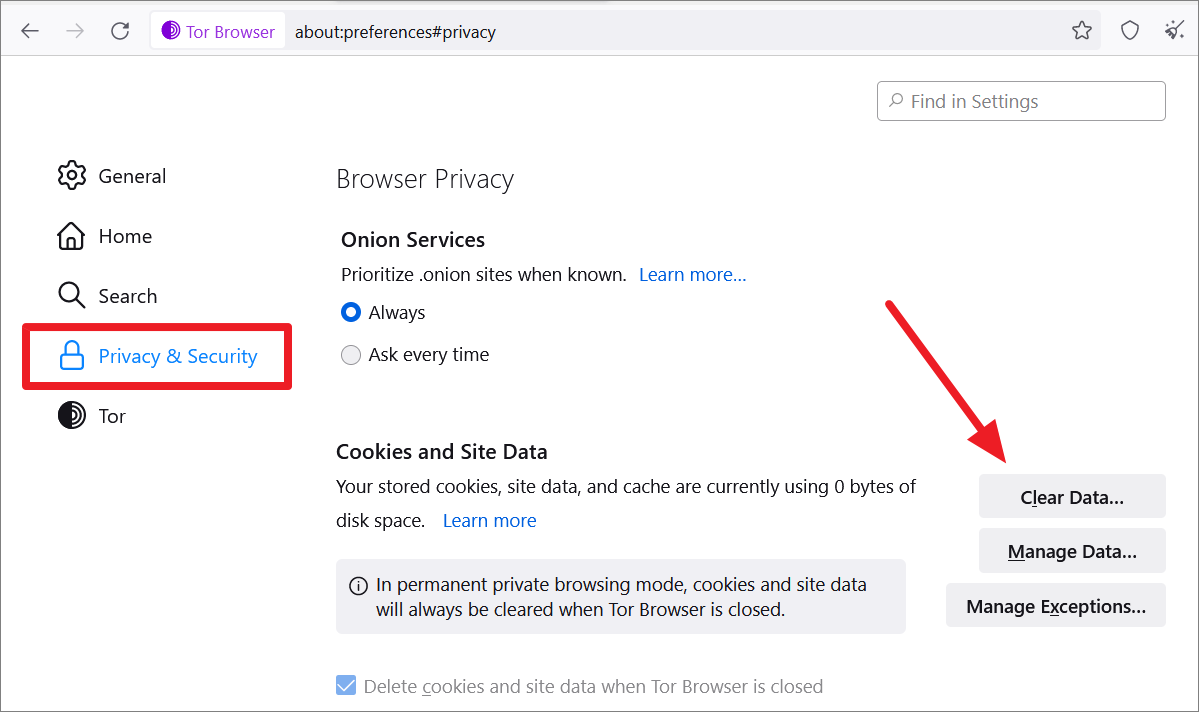
Clear Cookies and Site Data
Most websites store cookies, location data, and other information to monitor your online activity, analyze the use of the website, recognize your device, and personalize the website for you.
Although Tor hides your identity and prevents websites from storing cookies and site data, some websites still find a way to store data about you and your activities. So, it’s best to clear your cookies and site data after every session.
You can open Settings, move to ‘Privacy & Security’, and navigate to the ‘Cookies and Site Data’ section. Then, click the ‘Clear Data..’ button.
Don’t Resize Your Tor Window
When you resize or maximize your Tor windows, websites can track and identify your computer with a technique called fingerprinting. Fingerprinting attackers can recognize your computer based on screen resolution, font, language of the browser, and size of your browser window. That is why you should always keep your Tor browser window at the default size.
Use Trusted Websites
You should always visit trusted and reputable websites, especially when you are shopping online. And make sure you are using a genuine URL or domain address, not a fake one. Unlike normal website URLs, you cannot easily remember or recognize dark web site URLs, hence you can’t know if you are using an actual URL or a fake website URL. So, make a note of trusted and researched website URLs using encrypted notes apps such as Turtl, Laverna, Protected Text, etc.
You should use a reputable dark web search engine or trusted websites that curate dark web sites to research and find links (Ahmia, The HiddenWiki, etc). Try not to use surface web search engines such as Google or Bing to find onion site links.
Don’t Use Your Real Email
As we mentioned before, you should never use your real/official email address on websites. Instead, use a disposable email or an encrypted email service.
Use TAILS OS
TAILS is a portable Linux operating system designed to run every internet connection exclusively through the Tor network. You don’t need a hard drive to install and boot this OS, you can easily run it on almost any computer from a DVD or a USB stick and it leaves no digital footprint on the device.
Keep Your Personal Information to Yourself
Don’t share your photos, phone number, name, email address, social network accounts, and any other personal information on Tor. Mostly, you use Tor to stay anonymous, so giving away your information to any sites defeats the whole purpose. If you want, you can create a virtual identity to browse the dark web.
Close All Apps
When you are browsing on the Tor browser, make sure there are no important apps (such as banking apps or financial apps) running in the background to protect your personal information from being stolen.
FAQs about Tor Browser
Is it Safe to Use Tor?
Yes, it is safe but not completely. Tor is not regulated by any government or agencies, it is a completely decentralized network. Tor simply directs your encrypted traffic through the tor network around the world to reduce the risk of losing personal information, but there is still a chance of relay nodes intercepting your data.
In the Tor circuit, although the exit node doesn’t know where the data is originated or where it is sending it back, it can still read the unencrypted data as plain text (if it is not using TLS, end-to-end encryption) before it hands it over to the destination server. Plus, you are vulnerable especially when you are visiting malicious dark web websites or compromised websites.
To fully protect your privacy and anonymity, you can use Tor with VPN (Virtual Private Network) or run Tor on a secure operating system like Tails alongside VPN.
Is Tor Legal?
Technically, yes. Although using the Tor browser and Tor network is legal in most countries, some countries such as China, Russia, Venezuela, Saudi Arabia, and Iran outlawed Tor and block all tor traffic from coming in.
In some places, using Tor can put you under surveillance because your ISP can see you are accessing Tor traffic and think you are doing something suspicious. In such places, as long you don’t use it for any illegal purposes, you should be fine. So, it is worth checking the laws in your area before your use the tor browser.
Moreover, the dark web is crawling with cybercriminals, viruses, malicious content, and illegal activities, such as the black market, illegal firearms, and extreme pornography. Visting dark web websites are not illegal but using websites that harbor illegal activities may get you in trouble.
Is Tor Free?
Yes, the Tor browser and accessing the Tor network are completely free. Tor is funded by the U.S. State Department, the Broadcasting Board of Governors, the National Science Foundation, Google, private foundations, and donors. And Tor servers are operated by a volunteer base. All you have to do is download the Tor browser from the official TorProject website.
Can You be Traced/Tracked on Tor?
You cannot be traced on Tor. If the attacker is able to gain control over a portion of the tor network (relays), then the attacker could find out who is viewing what content but it is highly unlikely. You can easily prevent this by using Tor over VPN.
Can Anyone See My IP Address?
Only the Entry node knows your IP address and the Guard (entry) node can stay the same for months. You can also stop this by using Tor over VPN because VPN hides your address from all nodes by encrypting your traffic from end to end. Not even your ISP can know that you are using Tor, all they will see is encrypted traffic going in and out.
Why is Tor So slow?
Tor is slower than other browsers because your traffic is directed through multiple global servers (nodes) and therefore causes unavoidable delays. When you launch the browser, it will take anywhere from a few seconds to minutes to fully establish a connection to the Guard node. Then, when you request a site, the browser builds a circuit with three nodes. The negotiation and connection between each node can take some time. Then, each node decrypts a layer of encryption before passing the data to the next node.
Moreover, not all servers (nodes) are of the same quality and there’s only a limited number of nodes available. Some people misuse the network with peer-to-peer downloads. When all of these add up, you get a slow Tor sometimes.
To fix this, update the browser, use Bridge relays to bypass throttling, or create a new circuit for the website.
We hope this article helps you better understand how Tor works and how to use Tor safely on Windows 11.