Every Shell in Mortal Shell 2 carries its own set of passive skills, and none of them are handed to you complete. You build a Shell by feeding it two separate currencies that come from two separate places. Shell Points fill in the individual perks, and Glimpses open up the higher tiers those perks live in.
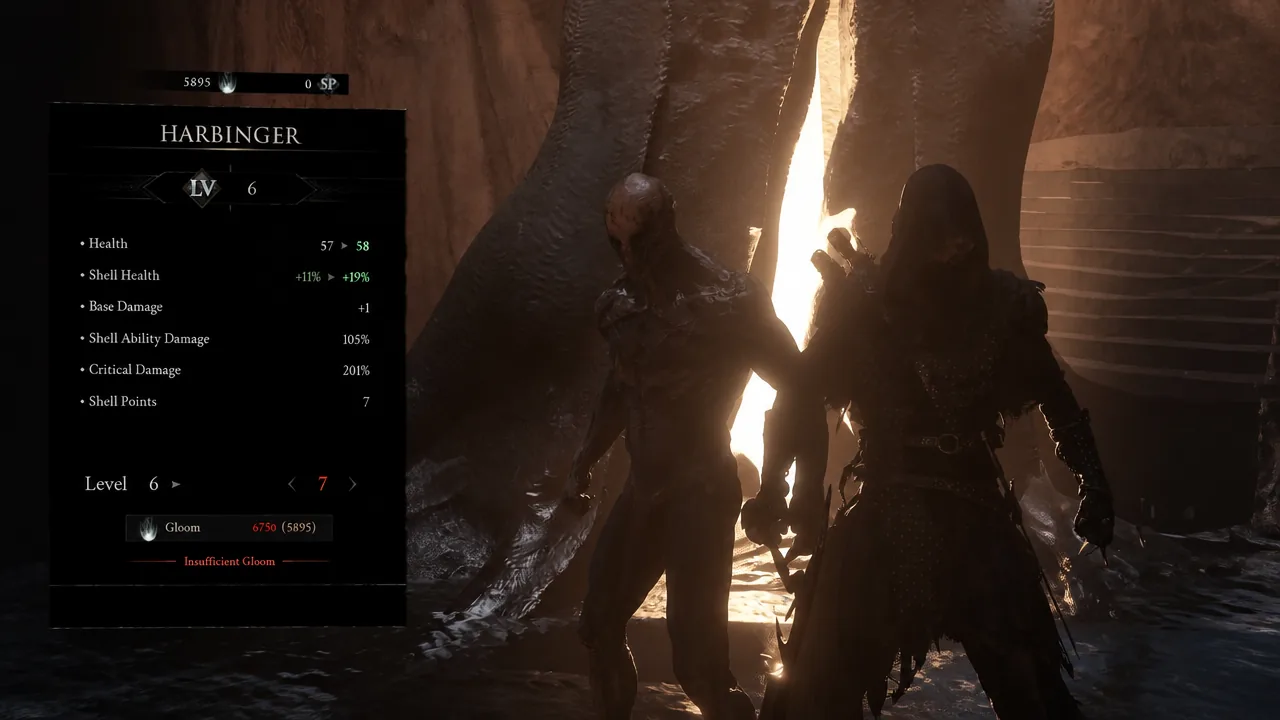
Quick answer: Level up your Harbinger with Gloom to earn Shell Points, then visit any Beacon or the Shellkeeper in Marrow Keep and spend those points on your inhabited Shell’s passives. To reach the locked upper tiers, spend Glimpses to raise that Shell’s Bond Tier first.
Shell Points vs Glimpses: what each currency does
The two systems are easy to mix up because they both feed a Shell’s passive tree. They are not interchangeable. Shell Points buy and level the perks themselves. Glimpses raise Bond Tier, which decides which perks are even available to buy.
| Currency | How you earn it | What it unlocks |
|---|---|---|
| Shell Points | Level up your Harbinger using Gloom | Buys and upgrades individual passive skills on your current Shell |
| Glimpses | Chests, cleansing Corrupted Beacons, certain NPC interactions | Raises Bond Tier, which reveals higher perk tiers and Memories |
Shell Points come from a single shared pool used across every Shell, not a separate stash for each one. Each Shell also has its own Shell Points Capacity, which caps how many passives can stay active on it at the same time.
Earn Shell Points by leveling with Gloom
Shell Points are tied directly to your Harbinger’s level. You do not collect them on their own. You collect Gloom, level up, and receive Shell Points as one of the rewards when you cross certain level milestones.
Note: One easy early farm, the giant mantis near the Mushroom Village beacon, was patched out. It no longer hands over thousands of Gloom, so plan around another spot.
Spend Shell Points at a Beacon or the Shellkeeper
You allocate Shell Points in one of two places. Sit at any Beacon, or speak with the Shellkeeper, Zhirelle, in the Marrow Keep hub. Both open the same passive tree for the Shell you are currently inhabiting.
Unlock higher perk tiers with Glimpses and Bond Tier
Shell Points alone only reach the perks that are currently available. To open the locked upper tiers, you raise a Shell’s Bond Tier, which runs from I to IV. This is where Glimpses come in.
Raise Bond Tier by spending Glimpses with the Shellkeeper in Marrow Keep, or through the Level Up option at any Beacon if you would rather not travel back. Each tier does three things at once. It improves the Shell’s health on revive and its revive efficiency, unlocks a new band of abilities you can then buy with Shell Points, and reveals more of that Shell’s Memories.

Glimpses are a limited resource and cannot be refunded once spent, so be deliberate. You gather them by opening specific chests, cleansing Corrupted Beacons, and finishing certain NPC interactions, such as the one involving the Grisha Pup in Mushroom Village. A single playthrough does not hand out enough Glimpses to max every Shell, so you will either concentrate on a couple of Shells or carry progress into a second run to complete the full set.
The Genessa exception
Sester Genessa does not follow the same route. Instead of spending Glimpses at Zhirelle, you raise her Bond Tier by speaking with Genessa herself, the Stray Sester, in Marrow Keep. She is treated as a separate character rather than a Shell that inhabits your Harbinger, and you can only level her up at a Beacon.
How to confirm a skill unlocked
You know a perk has been applied when it appears as active in the Shell’s tree after you commit Shell Points, and the ability becomes usable while that Shell is inhabited. A raised Bond Tier shows the next band of abilities as newly available to buy, and previously hidden Memories become selectable for that Shell.
If a perk stays locked, the usual reasons are that its tier is above your current Bond Tier, or that you have hit the Shell’s Shell Points Capacity and need to free up points before adding more. Raise the Bond Tier or refund an active passive, and the option opens up.