Palworld’s 1.0 update rewired how bases run. Work Suitability now climbs to Level 10 instead of Level 4, a wave of new Pals arrives with Level 8 in a single skill, and the condensing rework means a focused worker scales far better than a Pal that dabbles in everything. The practical takeaway is simple. A Pal that does one job at a high level beats one that does five jobs at a low level, so build around specialists.
Quick answer: Staff each station with a single-skill specialist and condense it to four stars. For the most-used jobs, that means Solenne or Selyne for Handiwork, Renjishi for Kindling, Aegidron or Astegon for Mining, and Orserk for Generating Electricity.
What changed for base Pals in 1.0
Every Pal has a Work Suitability rating for the tasks it can perform, and the higher the level, the faster it works. Two changes reshaped the meta. The cap rose from Level 4 to Level 10, so the distance between a casual crew and an optimized one is now much wider. And condensing works differently. At the Pal Essence Condenser, each star adds +1 to a Pal’s suitabilities working down from its highest, and the fourth star adds +1 to everything.
That math is why single-skill Pals win. A Pal already sitting at Level 8 or 9 in one skill, with little else on its sheet, gains that skill at every star and reaches Level 10 without any Applied Technique Books. A spread-out Pal just patches its weak spots one at a time. Max condensing rank is now 48 copies instead of 116, so star-ranking a worker is a realistic project rather than a lifetime grind.
Best worker for every job
There are twelve jobs a Pal can be assigned. Handiwork and Mining are the two you lean on hardest, since Handiwork runs every crafting bench and Mining feeds all your ingots, so fill those first, then Kindling and Electricity for refining and power. Here is the top pick for each suitability, with strong alternatives if the best pick is out of reach.
| Job | Best pick | Alternatives |
|---|---|---|
| Kindling | Jormuntide Ignis, Blazamut Ryu (Lv4); Renjishi (Lv8) tops it | Ragnahawk, Blazehowl, Suzaku, Faleris |
| Watering | Jormuntide, Faleris Aqua (Lv4); Suzaku Aqua (Lv8) | Azurobe, Broncherry Aqua |
| Planting | Lyleen (Lv4); Ophidia (Lv7) | Broncherry, Petallia, Prunelia |
| Generating Electricity | Orserk, Azurmane (Lv4) | Relaxaurus Lux, Grizzbolt |
| Handiwork | Selyne, Anubis (Lv4); Solenne (Lv8) | Lunaris, Verdash, Lyleen, Dogen |
| Gathering | Frostallion Noct, Jetragon (Lv4/8) | Verdash, Knocklem |
| Lumbering | Celesdir, Hartalis (Lv4) | Bushi, Prixter, Warsect, Silvegis |
| Mining | Blazamut, Astegon (Lv4); Aegidron (Lv8) | Digtoise, Anubis, Menasting |
| Medicine Production | Bellanoir, Bellanoir Libero (Lv4) | Vaelet, Felbat, Lyleen, Selyne |
| Cooling | Frostallion, Whalaska (Lv4) | Bastigor, Pengullet (early) |
| Transporting | Wumpo, Knocklem (Lv4) | Mossanda, Beakon, Ragnahawk |
| Farming (Ranch) | Vixy | Chikipi, Mozzarina, Beegarde |
Astegon doubles ore drops while mounted, Splatterina barely eats and makes a good night-shift Handiwork worker, and weak Transporting quietly bottlenecks the whole base. Lock single-job Pals onto a fixed station with the Monitoring Stand so they never wander between tasks.
The new 1.0 specialists worth chasing
The 1.0 roster broke the old Level 4 ceiling with Pals that come in at Level 8 in a single production skill. These are your endgame workforce for the three jobs you use most.
| Pal | Standout skill | Why it matters |
|---|---|---|
| Solenne | Handiwork Lv8 | Crafts high-end gear noticeably faster once assembly lines fill up |
| Renjishi | Kindling Lv8 | Keeps furnaces and refining chains running at full speed |
| Aegidron | Mining Lv8 | The top new dedicated miner for a mining-pit base |
| Dandy Lord | Planting, Medicine, Handiwork | Versatile worker that also grants gas immunity in the World Tree |
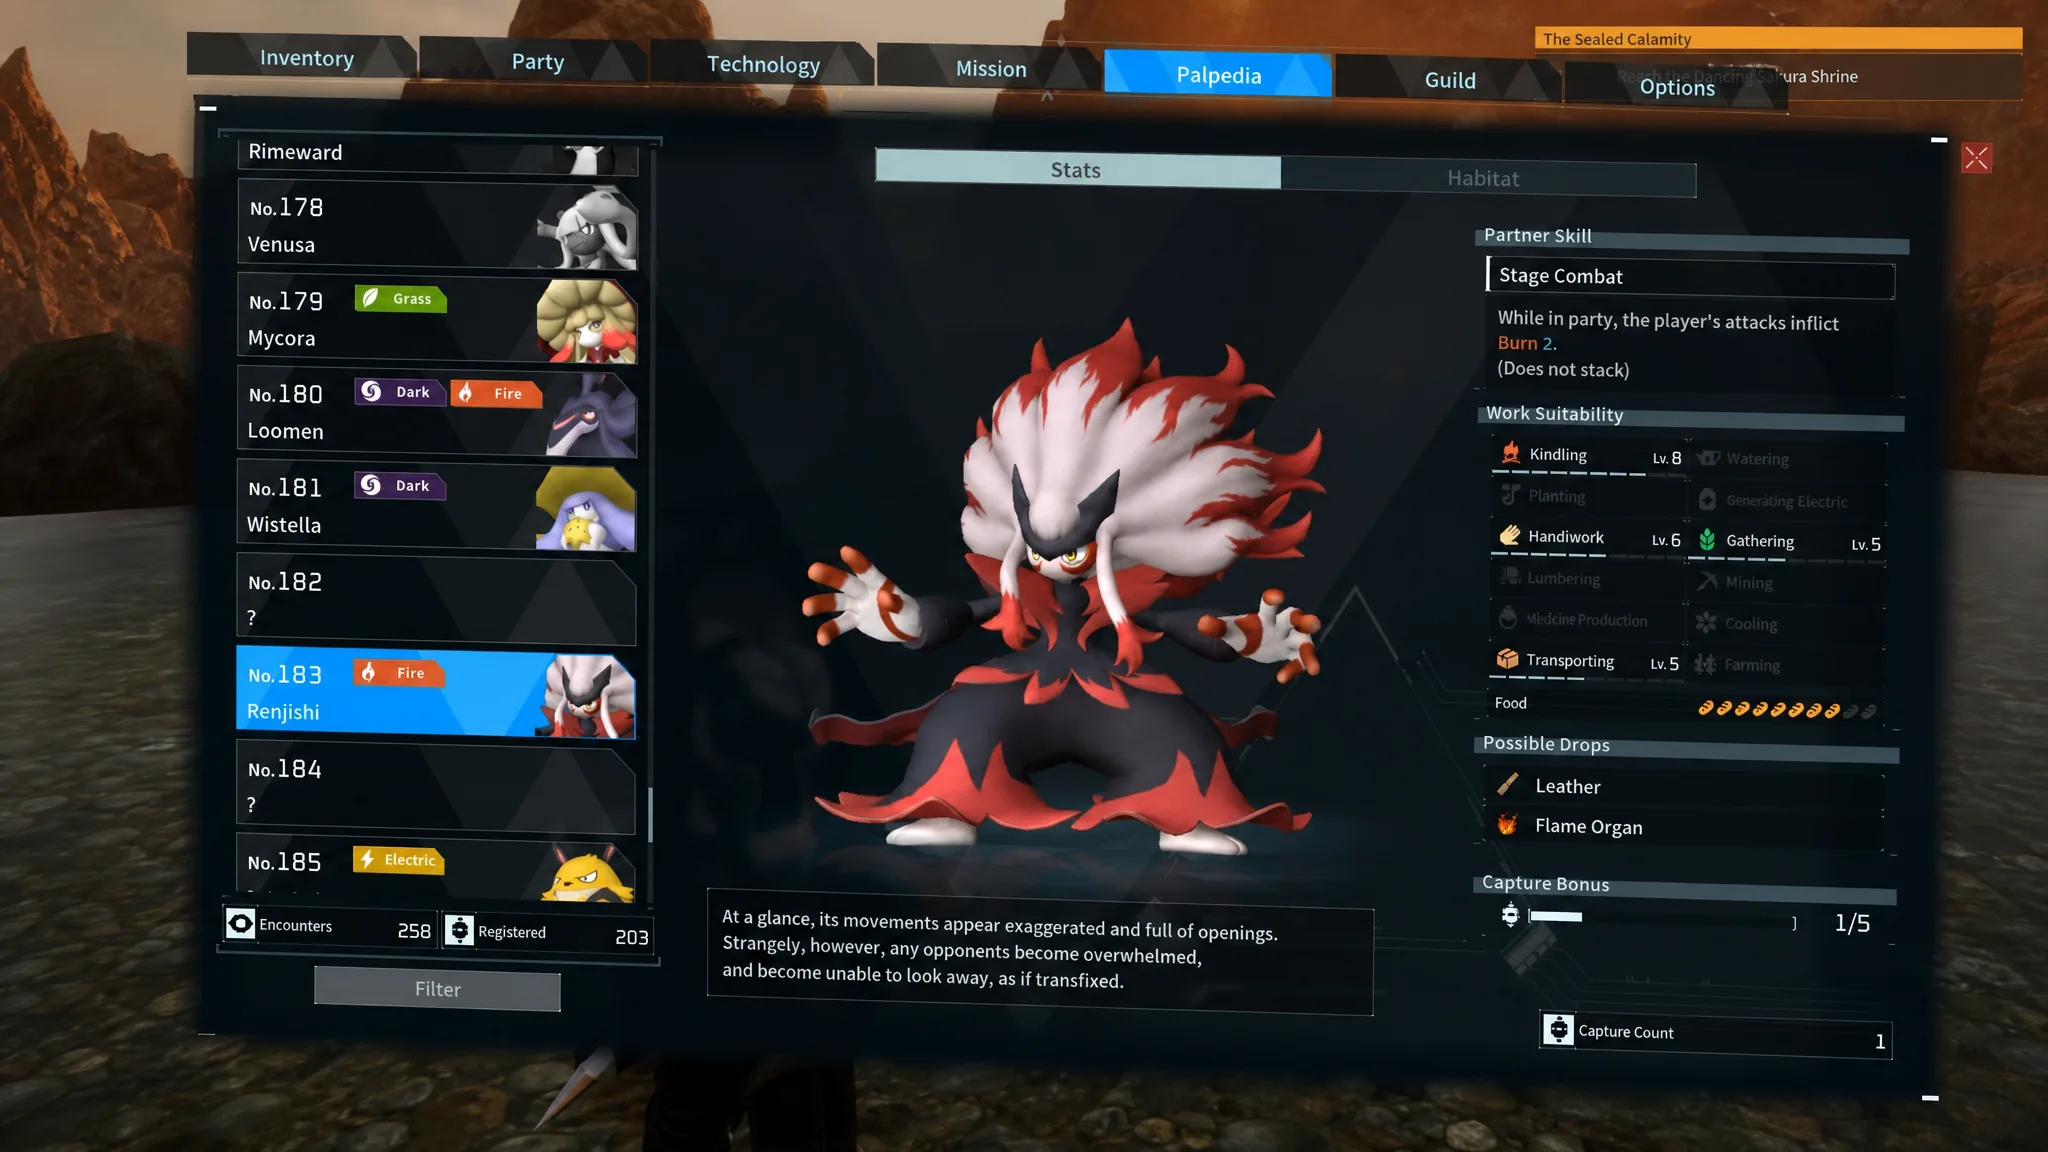
Renjishi is the standout example of why 1.0 favors specialists. It baseline sits at Kindling 8, Handiwork 6, Gathering 5, and Transporting 5, so four stars at the condenser plus a couple of Applied Technique Books push it to four skills at Level 10. Kindling and Handiwork are the two you actually want it for.
Other clean single-skill picks reach Level 10 on condensing alone. Suzaku Aqua caps Watering at 10, Ophidia hits Planting 10 with Watering 9 behind it, Orserk is effectively the only Pal that reaches Generating Electricity 10, and Jetragon reaches Gathering 10 at four stars while still being your fastest flying mount.
+1 Work Suitability boosters
A second class of Pal never touches the job itself. Instead, its Partner Skill adds +1 to a specific work suitability for every other Pal at the base. These bonuses do not stack with themselves, but a few of them push your whole crew a level higher while you are still building toward Level 10 specialists.
| Pal | Base-wide +1 to |
|---|---|
| Puffolt | Generating Electricity |
| Wumpo | Transporting |
| Tetroise | Mining |
| Petallia | Planting |
| Ribbuny | Handiwork |
| Katress Ignis | Kindling |
| Cinnamoth | Farming |
| Eikthyrdeer Terra | Lumbering |
| Smokie Cryst | Cooling |
These are strongest early and become a rounding error once your dedicated workers reach Level 10 on their own. Puffolt is the exception worth keeping around, since a whole-base electricity boost helps any power-hungry setup.

Best Ranch Pals and what they drop
Farming is the odd job out, with no levels at all. Each Ranch Pal drops a specific item while it sits in the ranch, so you pick by the resource you need. Most drops can also be bought from Wandering Merchants, which makes the handful you cannot buy the most valuable to park.
| Pal | Drop | Notes |
|---|---|---|
| Vixy | Pal Spheres, Arrows, Gold Coins | Best early ranch Pal, drops constant essentials |
| Beegarde | Honey | The one drop you cannot buy from a merchant |
| Chikipi | Eggs | Steady food and baking ingredient |
| Mozzarina | Milk | Key cooking ingredient for high-nutrition meals |
| Lamball / Cremis | Wool | Early cloth for armor and beds |
| Flambelle | Flame Organ | Feeds the Multiclimate Undershirt recipe |
| Foxcicle | Ice Organ | Also needed for the Multiclimate Undershirt |
| Caprity | Red Berries | Also restores hunger, useful while leveling |
Vixy is the highest-value early pick because Spheres, Arrows, and Gold are constant drains no matter your stage. Beegarde earns a permanent slot on Honey alone, and a Flambelle plus Foxcicle pairing keeps you stocked on the organs the Multiclimate Undershirt schematic needs.
Early-game workers before you get specialists
Before you can catch or breed the big single-skill Pals, you need versatile bodies that cover several tasks so a first base can function.
- Cattiva is a day-one all-rounder covering Handiwork, Mining, Gathering, and Transporting, and its Cat Helper skill adds +100 carry weight while it is in your party.
- Lifmunk is the broadest early multi-tasker, covering Planting, Handiwork, Lumbering, Medicine Production, and Gathering.
- Tanzee mirrors Lifmunk with Planting, Handiwork, Lumbering, Transporting, and Gathering, so pairing the two keeps an early base moving.
- Pengullet is the best early Cooling and Watering option, and also covers Handiwork and Transporting.
Anubis remains the key early breeding target. It brings Handiwork Level 4 plus Mining Level 3, making it the best single worker before the endgame Pals, and it hatches from Vanwyrm plus Cinnamoth or Relaxaurus plus Celaray long before you could catch the Level 47 desert Alpha.
Where to catch the key Level 4 workers
| Pal | Job | Where to get it |
|---|---|---|
| Anubis | Handiwork | Level 47 desert Alpha, or breed Vanwyrm + Cinnamoth |
| Celesdir | Lumbering | Level 50 Alpha on Feybreak Island |
| Jormuntide | Watering | Level 45 boss in a central lake on the Anubis island |
| Wumpo | Transporting | Level 40+ in the Astral Mountains, far north |
| Orserk | Electricity | High level on the No. 3 Nature Sanctuary, far northeast |
| Bellanoir | Medicine | Defeat the Bellanoir raid boss and hatch the dark egg reward |
Breeding is often faster than hunting a high-level boss, so check a combo before trekking across the map. That is why Anubis stays the priority target even though it also spawns as an Alpha.
Push a worker past its base numbers
How to know it worked: Open the Pal’s status screen and check the Work Suitability row. A condensed and book-fed specialist should read Level 10 on its main skill, and the assigned station will complete jobs visibly faster.
A great worker is not automatically a great fighter or mount, and the reverse holds too. Selyne and Anubis pull double duty, but Celesdir, Wumpo, and Bellanoir are poor in combat, while a combat monster like Jetragon still earns its base slot purely as a Gathering 10 specialist. Once your specialists are hatched, condensed, and locked to their stations with the Monitoring Stand, the base runs itself, and you can slot in whichever Pals you actually enjoy looking at.