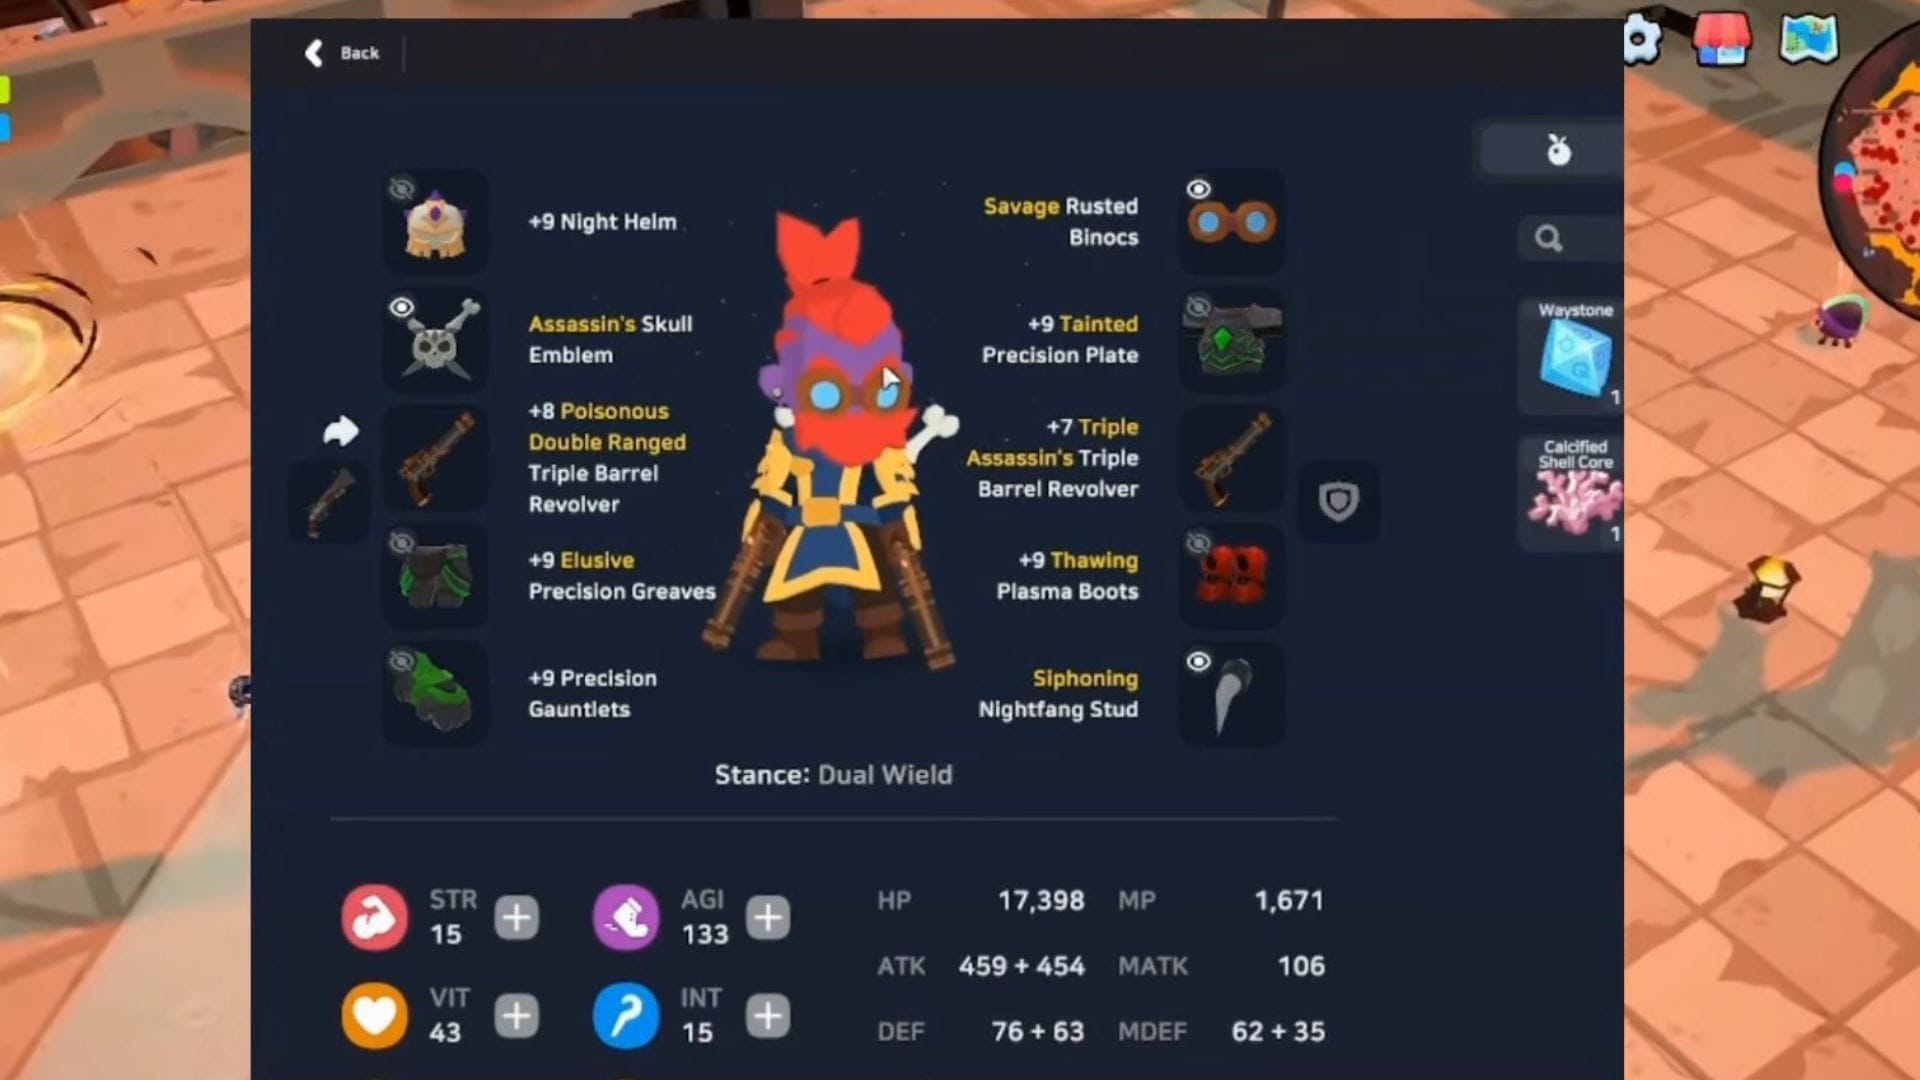
The Gunslinger is SpiritVale’s ranged physical damage specialist, advancing from the Scout base class and scaling almost entirely off Dexterity. Built correctly, it clears packs of enemies from a safe distance while spamming a single high-value area skill. The setup below focuses on that core loop and the exact gear, cards, skills, and stats that make it work.
Quick answer: Dual-wield two Triple Barrel Revolvers with House Fly Nom cards for Critical Rate, wear the Precision Set with Plasma Boots and Rusted Binocs, run the Eternis Artifact Set, max Gun Mastery and Panic Burst first, and prioritize DEX, then AGI, then LUK.

Weapons: Dual Triple Barrel Revolvers plus a shotgun
The weapon core is two Triple Barrel Revolvers. Each one directly raises Panic Burst DMG and Panic Burst Area, and the effect stacks when you dual-wield them. That stacking is what turns Panic Burst into a wide, high-damage area attack capable of wiping enemy waves in a few casts.
For sockets, favor House Fly Nom cards on both revolvers. They push your Critical Rate, which is the most valuable substat here because your revolver damage scales with your class level and benefits heavily from consistent crits. Any other card that raises Critical Rate is a reasonable alternative.
Keep a shotgun as your secondary weapon. It unlocks Point Blank and Shrapnel, two close-range burst skills that add damage when enemies close the gap on you.
Armor and gear
Gear priorities revolve around three things: stacking DEX, staying mobile under fire, and lifting your Critical Rate. The Precision Set forms the body, while individual slot pieces fill in survivability and range.
| Slot | Item | Why it matters |
|---|---|---|
| Headgear | Night Helm | Grants an All Stat boost |
| Face | Rusted Binocs | Increases ranged damage and range |
| Chest, Legwear, Accessory | Precision Set | Boosts overall DEX, your main damage stat |
| Accessory | Nightfang Stud | Adds health leech for self-sustain |
| Shoes | Plasma Boots | Flinch resistance so mobs can’t pin you |
| Utility | Skull Emblem | Raises Critical Rate |
Plasma Boots carry more weight than they look. The flinch resistance stops incoming hits from interrupting your rotation, which is the difference between kiting a pack safely and getting stun-locked in the middle of it. The Nightfang Stud’s health drain also scales in value as your damage climbs, since bigger hits return more health.
Note: If you can’t get the exact pieces, substitute using their roles. Any face slot that adds crit or range, and any accessory with health drain, will hold the build together while you farm upgrades.
Artifact set: Eternis for All Stat scaling
Run the Eternis Artifact Set. Its All Stat boost feeds directly into your Physical damage by lifting every attribute at once, which suits a DEX-heavy build that also wants AGI and LUK. If you want an element on your weapon instead, the Corporeal Set lets you run Hole element damage as an alternative. Where you have a choice, favor Artifacts that raise Physical attack alongside other stats.
Skills: Scout tree to level 50, then Gunslinger
You start as a Scout and advance to Gunslinger at Level 50. Spend your early points on passives that speed up leveling and set up your DEX and range foundation.
Scout tree
- Steady Hands — grants 10 DEX.
- Precise Aim — boosts your range.
- Inner Focus — adds DEX, Agility, and Mana.
- Mark Target.
- Slow Trap — crowd control.
Max these passives out. They stack DEX and range while giving you the mana and control to level efficiently to 50.
Gunslinger tree
- Gun Mastery — raises firearm attack power and attack speed.
- Panic Burst — your main area damage spender.
- Trigger Happy — slows enemies, key for mobbing.
- Aerial Shot — mobility with a brief protective window.
- Flash Bang — stuns enemies (skip if you invested in Slow Trap).
- Point Blank — close-range shotgun finisher.
- Shrapnel — close-range shotgun damage.
- Suppressive Shot — pins enemies with sustained fire.
Max Gun Mastery and Panic Burst first, since they drive nearly all of your damage output. Trigger Happy is the priority after that for its slow, which keeps packs stacked inside your Panic Burst area. Point Blank and Shrapnel are your close-range payoff for carrying a shotgun. Spend the rest to taste — pick Flash Bang for stuns only if you skipped Slow Trap.
Stat priority
Advanced classes reset every attribute to 1, so plan your spend around a clear order. Dexterity comes first because your weapons and skills scale with it. Agility is second, since Panic Burst deals more damage based on it and it raises your attack speed. Luck adds Critical Rate, and leftover points go into Vitality for survivability.
| Priority | Stat | Effect |
|---|---|---|
| 1 | DEX | Scales weapon and skill damage |
| 2 | AGI | Increases Panic Burst damage and attack speed |
| 3 | LUK | Raises Critical Rate |
| 4 | VIT | Adds health for survivability |
How it plays and how to adjust it
The rotation is simple. Slow the pack with Trigger Happy or Slow Trap, then delete it with repeated Panic Burst casts from range while Plasma Boots keep you from flinching. Suppressive Shot pins stragglers, and Point Blank plus Shrapnel handle anything that reaches melee range. You’ll know the setup is working when Panic Burst covers a wide area and drops grouped enemies in one or two casts, with the Nightfang Stud topping your health back up between hits.
SpiritVale is in Early Access, so class balance, gear values, and skill scaling can change with future patches. If a spread stops performing, you can reallocate stats and skills at the Waybinder NPC near the Waypoint in Nevaris and rebuild toward the same DEX-first core without abandoning your character.