


The Ultimate Swordmaster is a spellsword setup for The Blood of Dawnwalker that treats blocking as its main damage stat. Instead of trading swings, Coen holds a directional guard, converts perfect blocks into ripostes and counterattacks, and spends the activation charges that defense generates on Witchcraft buffs during the day and claw abilities at night. It pulls from all three trees, but Swordmastery is the spine.
Quick answer: Put the bulk of your points into Swordmastery (Perfect Block, Perfect Riposte, Counterattack, Endless Effort 3, Sustained Focus 2, Vigour 3, Second Skin I 3), add Witchcraft Mastery with Soul Stigma and Burning Blood for daytime damage, and take Crimson Feast, Razorsharp Claws and Voracious Bite in Vampirism for nights.
The perfect block loop this build runs on
Everything here feeds one repeating sequence. You hold the omniblock, match the incoming attack direction, and land a perfect block. That single input restores 30% stamina and half an activation charge, boosts your attack speed through Swiftness, and opens a riposte window that hits harder thanks to Perfect Riposte and Counterattack.
Because charges come back that fast, abilities stop being emergency buttons. During the day you can keep Soul Stigma running for the crit chance and drop Burning Blood on tougher targets. At night the same defensive rhythm pays for Voracious Bite and claw pressure. The build never really idles waiting on resources, which is the whole point of stacking stamina and charge generation this heavily.
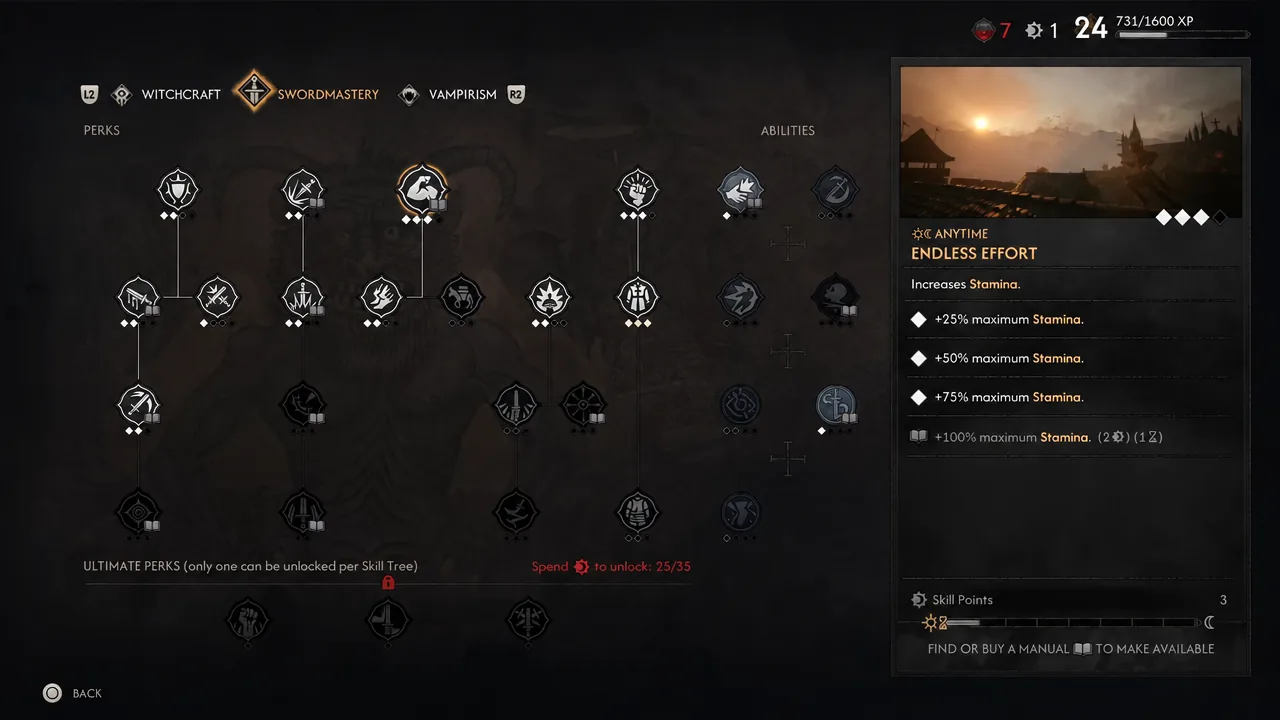
Swordmastery perks and ranks to buy first
Swordmastery works day and night, so it gets the largest share of your points. It also holds the generic survivability nodes, which is why a spellsword ends up living in a “sword” tree. Endless Effort at rank 3 is the single most noticeable early purchase, since running dry mid-fight is what kills the loop.
| Perk (rank) | Effect |
|---|---|
| Endless Effort (3) | +75% maximum stamina |
| Vigour (3) | +30% maximum health |
| Sustained Focus (2) | 2 maximum activation charges, start each fight with 1 full charge |
| Perfect Block (1) | +30% stamina restoration, +50% activation charge restoration |
| Perfect Riposte (2) | +10% damage on perfect riposte |
| Counterattack (2) | +20% damage on the attack after a perfect block |
| Swiftness (1) | Attack speed boost after a perfect block |
| Omniblock (2) | -20% stamina cost |
| Second Skin I (3) | -100% medium armour penalties |
| Fleet of Foot (1) | -20% stamina cost; last-moment dodges restore activation charge |
| Stinging Blade (2) | +10% weapon damage |
| Fate’s Favour (2) | +12% weapon critical hit chance |
| Dirty Trick (1) | 1 charge: stuns and damages a target |
Second Skin I matters more than its description suggests. Maxed, it wipes the movement and stamina penalties from medium armour entirely, so you can wear the heavier night chestpiece without losing the dodge and block economy the rest of the build depends on.
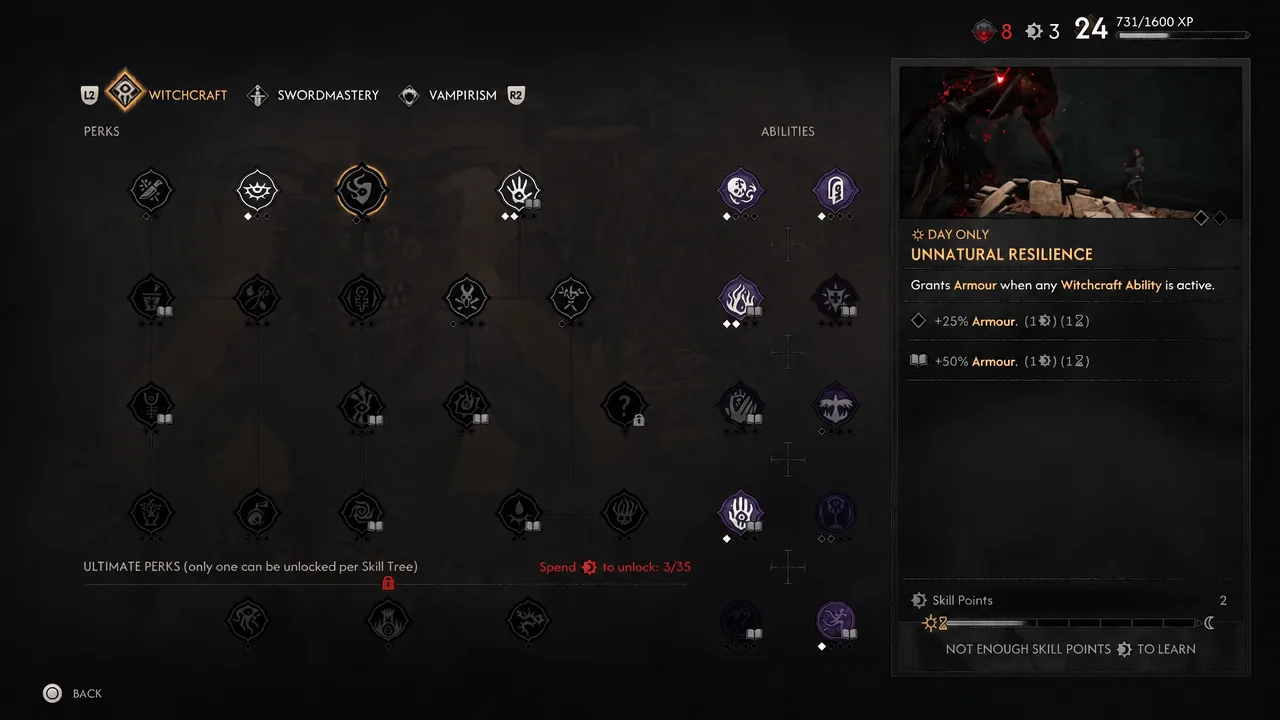
Witchcraft picks for daytime damage
Witchcraft only functions in daylight, so keep the investment tight. Soul Stigma is the star: 20 seconds of +35% crit chance and +10% critical damage, which turns every counterattack into a spike. Burning Blood covers the damage-over-time you would otherwise be missing while you sit in a guard. Both cost one activation charge and 15% of your health, so do not stack them back to back while you are already low.
| Perk or ability (rank) | Effect |
|---|---|
| Witchcraft Mastery (2) | +15% damage, 50% chance to deal an extra 308 damage when using a Witchcraft ability |
| Soul Stigma (1) | +35% crit hit chance, +10% critical damage for 20s. Cost: 1 charge, 15% health |
| Burning Blood (2) | 236 damage per second for 12s. Cost: 1 charge, 15% health |
| Mercurial Fervour (1) | Grants Haste |
| Bewitching Influence (1) | -15% buying prices, +15% selling prices |
Mercurial Fervour is not a combat pick. It is there because overland travel is slow without it, and the 30-day clock makes wasted travel time expensive. Bewitching Influence is a cheap quality-of-life node that pays for gear upgrades.
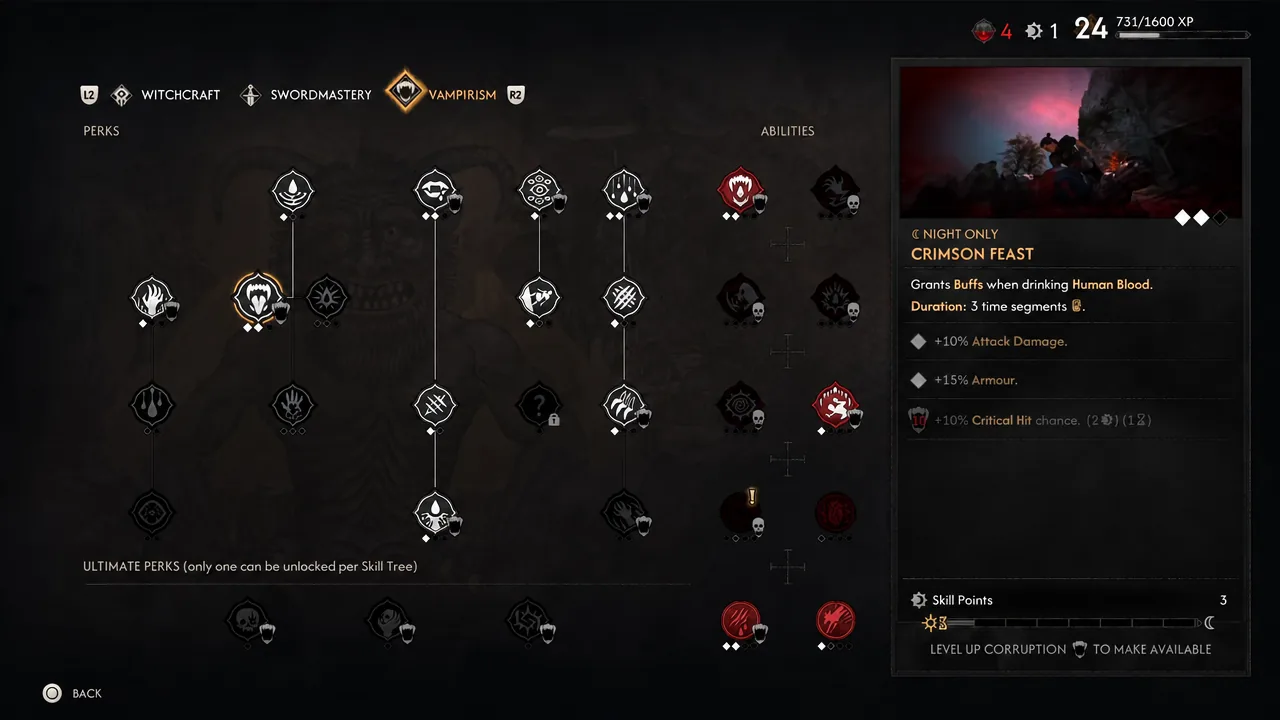
Vampirism picks for the night form
At night your claws replace the sword as the primary weapon, so the Vampirism spend goes toward claw damage, claw crits, and keeping your health segments topped up. Crimson Feast at rank 2 gives a flat +10% attack damage and +15% armour, which applies while you are still using Swordmastery defenses.
| Perk or ability (rank) | Effect |
|---|---|
| Crimson Feast (2) | +10% attack damage, +15% armour |
| Endless Hunger (2) | 4 maximum health segments |
| Closing Wounds (1) | +2% vampiric health segment regeneration per second |
| Blood Theft (1) | Attacking restores recently lost vampiric health |
| Razorsharp Claws (2) | +12% claw damage |
| Clawpierce (1) | +10% claw critical hit chance |
| Restless Claws (1) | -15% stamina cost |
| Voracious Bite (2) | Restores 80% of a health segment, 584 damage to the target |
| Shred (2) | 25% bleed chance, +25% bleed damage |
| Death From Above (1) | 2,236 damage to bosses and tough enemies |
| Nourishing Blood (1) | +10% health restoration |
| Shadow Dweller (1) | 11m Shadowstep range |
| Dimension Reach (1) | -45% stamina cost |
| Shapeshift (1) | Turn into a wolf and gain Haste |
| Yrakhiri Might (1) | 2 ability slots available |
Shapeshift is the night-side counterpart to Mercurial Fervour, and Shadow Dweller plus Dimension Reach make Shadowstep cheap enough to use as a repositioning tool rather than an escape. Death From Above is worth one point purely as an opener against bosses and tough enemies.
Day set: human form gear
The daytime loadout chases three things: human health restoration, damage against supernatural enemies, and weapon crit. Erka’s Sword and Ancient Hero’s Armour drop from the same questline, so clearing that one chain sets up most of the set at once.
| Item | Stats |
|---|---|
| Ancient Hero’s Armour (Legendary Heavy Chestpiece) | 267 armour, +16.4% human health restoration, +7.6% activation charge restoration from actions, +7.6% damage against supernatural enemies, +7.6% Witchcraft ability damage |
| Erka’s Sword (Legendary Longsword) | 351 DPS, 214-307 damage, +14.4% damage against supernatural enemies, +9% weapon crit chance, +13.5% weapon crit damage, +27% maximum human health |
| Mercenary’s Greaves (Legendary Light Trousers) | 161 armour, -16.8% attack stamina cost, -16.8% block stamina cost, +8.4% damage against supernatural enemies, +18.2% maximum human health |
| Tall Boots (Superior Light Boots) | 87 armour, +9% passive activation charge restoration |
| Adventurer’s Cuffs (Superior Medium Bracers) | 75 armour, +9% human health restoration |
| Amulet of Regeneration (Superior Amulet) | +8.4% human health restoration |
| Ring of Regeneration (Superior Ring) | +6% human health restoration |
| Ancient Hero’s Ring (Epic Ring) | -7% Swordmastery ability cooldown, +11.5% damage against supernatural enemies, +4.3% physical damage reduction |
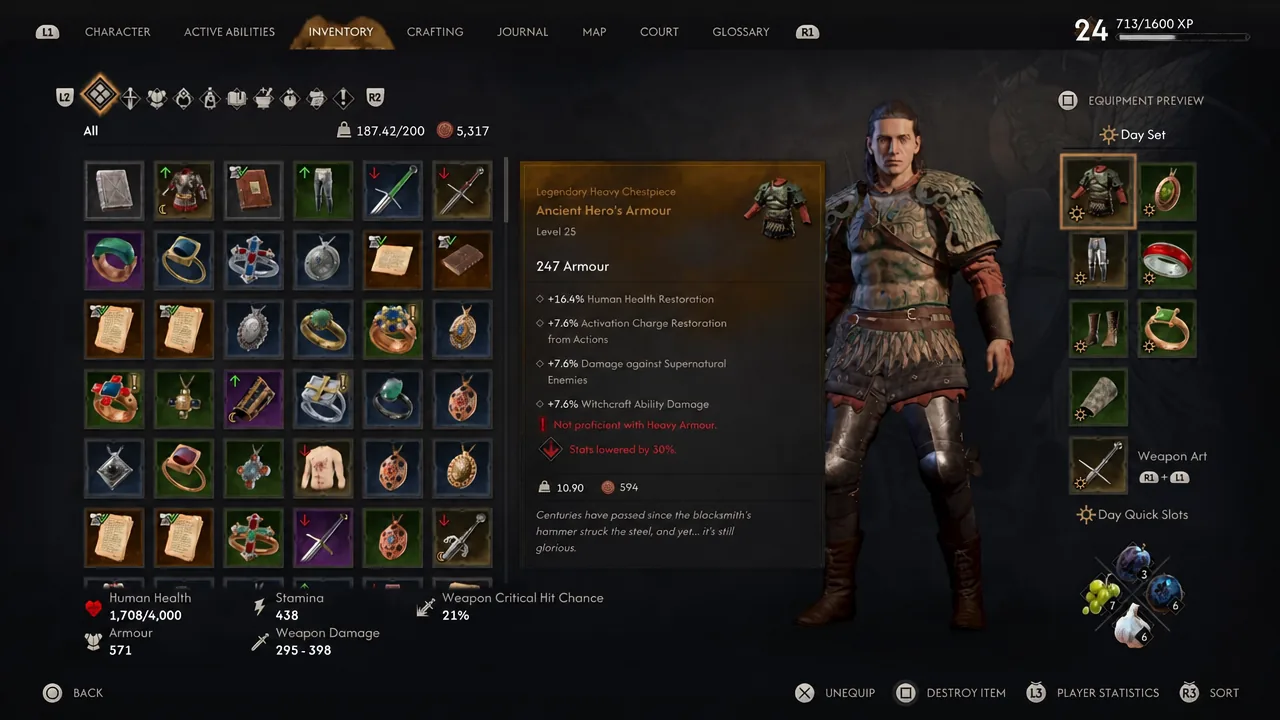
The two Regeneration accessories look unremarkable in isolation. Stacked with the chestpiece and bracers, they push human health restoration high enough that you regain a meaningful chunk of health between fights without burning consumables, which is what makes the 15% health costs on Soul Stigma and Burning Blood affordable.
Night set: vampire form gear
Swap the whole loadout after dark. The night set drops human health scaling entirely and rebuilds around vampiric health, claw crits, and charge restoration from blocking, which keeps the same defensive loop running while your claws do the damage.
| Item | Stats |
|---|---|
| Isbrand’s Plate (Legendary Medium Chestpiece) | 291 armour, +23.4% maximum vampiric health, +7.2% claw crit chance, +10.8% claw crit damage, +27% blood drinking restoration |
| Imbued Sword of St. Mihai (Legendary Greatsword) | 307 DPS, 200-289 damage, -7% Swordmastery ability cooldown, +7% weapon crit chance, +10.5% weapon crit damage, +11.2% damage against supernatural enemies |
| Blood Guard’s Greaves (Master Heavy Trousers) | 131 armour, +2.1% vampiric health segment regeneration per second, -8.8% dodge stamina cost |
| Blood Guard’s Sabatons (Master Heavy Boots) | 92 armour, +5% activation charge restoration from actions, +10.1% maximum vampiric health |
| Artisanal Cinder Bracers (Epic Medium Bracers) | 120 armour, +9% claw damage, +18% activation charge restoration from block, +18% maximum stamina |
| Slasher’s Pendant (Epic Amulet) | +5.6% claw crit chance, +8.4% claw crit damage, +9% claw damage |
| Band of Claws (Master Ring) | +4.8% claw damage, +9% activation charge restoration from block |
| Yrakhiri’s Band (Superior Ring) | +8% blood drinking restoration |
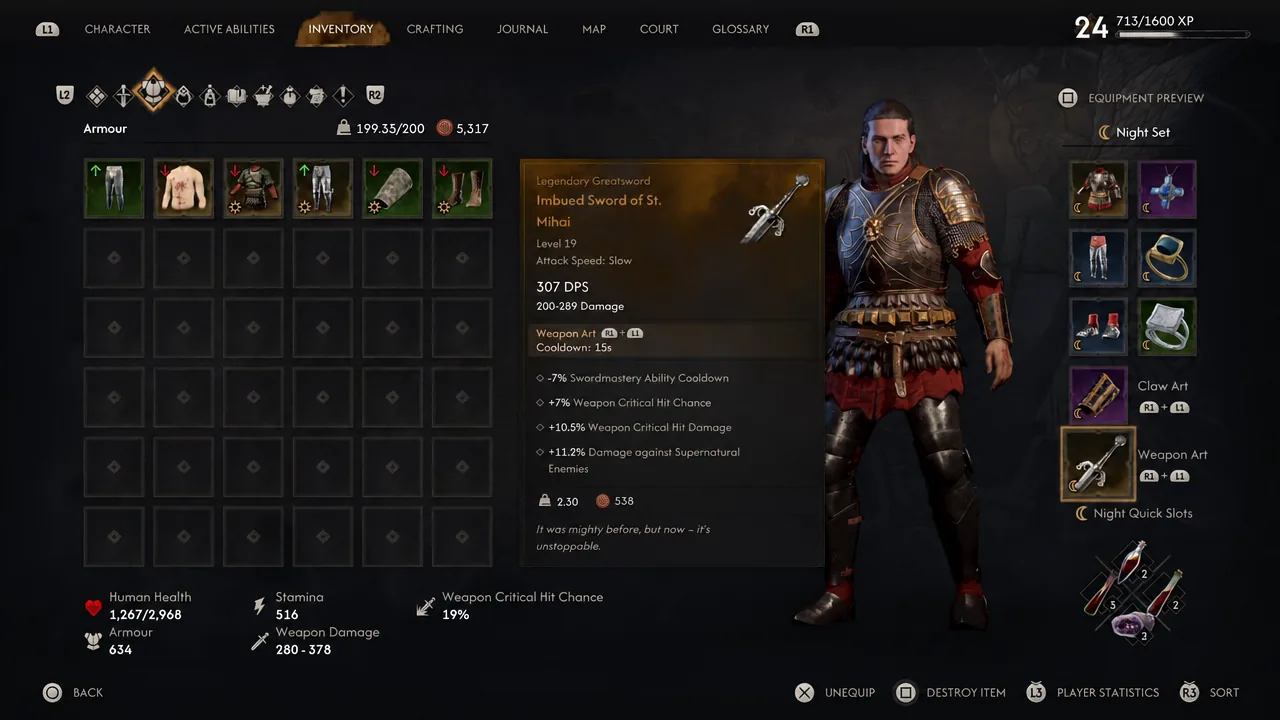
Note: Isbrand’s Plate is medium armour and the trousers, boots and bracers mix medium and heavy. Without three ranks of Second Skin I removing medium armour penalties, this set will feel sluggish and drain stamina faster than the block bonuses can refill it.
How to check the build is working
Open the character sheet and compare against these numbers. If they line up, the loop is assembled correctly and the rest is execution.
| Check | Expected result |
|---|---|
| Total health, human form | Roughly 4,000 |
| Total health, vampire form | Roughly 3,000 |
| Activation charges | 2 maximum, 1 full at the start of every fight |
| Medium armour penalty | Fully removed at Second Skin I rank 3 |
| Health segments at night | 4 |
In combat, the tell is simpler. A clean perfect block should visibly refill part of your stamina bar and part of a charge at the same time, and the follow-up hit should land noticeably harder than a normal swing. If your stamina is draining across an extended guard, you are omniblocking without matching the attack direction, and the whole resource engine stalls.
The reason this setup holds up from the early game into the mid game is that almost none of its points are wasted when the sun moves. Swordmastery pays out in both forms, Witchcraft covers daylight, and Vampirism handles nights, so a single skill spend gives you two complete kits instead of forcing a respec every time the clock turns over.





