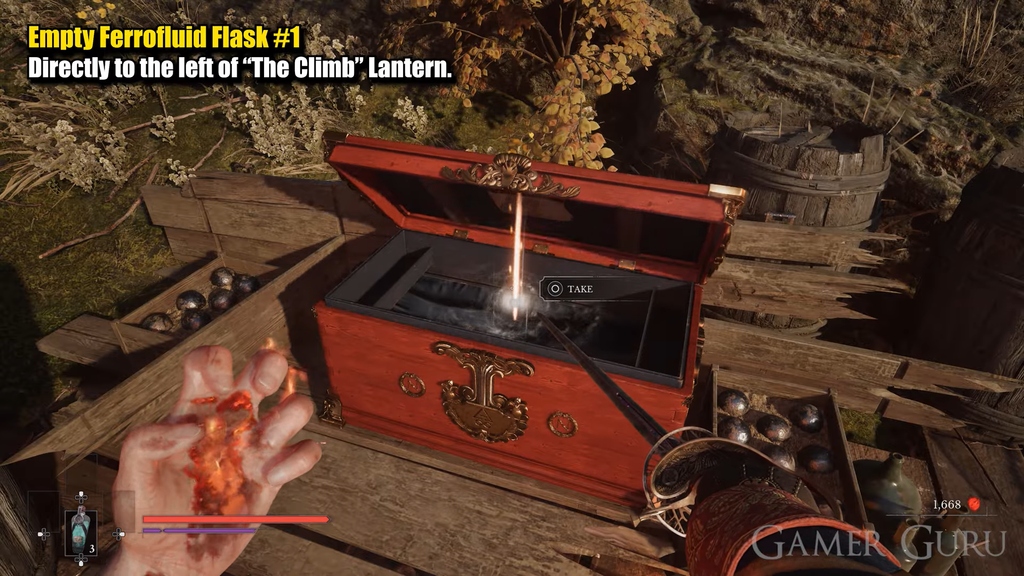
Empty Ferrofluid Flasks are the upgrade that raises how many healing charges William can carry between rests. Each one you own adds a single extra Ferrofluid Flask, and the more you hold, the longer you can survive a hostile stretch or a drawn-out boss fight without running dry. They are scattered across the world in chests, and one more is kept behind a merchant counter.
Quick answer: There are 9 Empty Ferrofluid Flasks. Eight sit in chests across eight regions, and one is sold by Louis’s Laboratoire for 5,000 Catalysts. Apply each at any Lantern through the Upgrade Ferrofluid Flasks menu.
What an Empty Ferrofluid Flask does
Ferrofluid Flasks are your main heal in combat, and they refill to full every time you rest at a Lantern. You begin the run with a small number of charges, which leaves little margin against tougher enemies. An Empty Ferrofluid Flask fixes that by granting one more charge per flask you redeem.
Rest at a Lantern, then select the Upgrade Ferrofluid Flasks menu to use one. Because the upgrade lasts permanently, collect each flask as soon as you reach its region rather than putting it off.
All Empty Ferrofluid Flask locations
| # | Region | Nearest Lantern / source |
|---|---|---|
| 1 |  Valley of Ashes Valley of Ashes | The Climb |
| 2 |  Fallen Village Fallen Village | Marketplace |
| 3 |  Caverns Caverns | Old Mine |
| 4 |  Vale of Wrath Vale of Wrath | Ship Graveyard |
| 5 |  Cursed Hollow Cursed Hollow | Village Church |
| 6 |  The Outskirts The Outskirts | Market Square |
| 7 |  University University | Main Hall |
| 8 |  Fortress Fortress | Courtyard |
| 9 |  Abandoned Church Abandoned Church | Louis’s Laboratoire (5,000 Catalysts) |
The eight chest locations
Valley of Ashes (The Climb)
Rest at the The Climb Lantern and look to the left. A red chest sits right beside the Lantern and holds the flask, so there is nothing hidden to work for here.

Fallen Village (Marketplace)
From the Marketplace Lantern, use the Grapple ability on the blue hooks to swing across the river toward the burning houses. Follow the path until you reach a house beside a wooden wagon. The chest is out front by the wagon, guarded by an enemy.

Caverns (Old Mine)
Vale of Wrath (Ship Graveyard)
At the Ship Graveyard Lantern, turn back and retrace your route to the small camp you cleared just before the checkpoint. You’ll find the chest at the camp’s center.

Cursed Hollow (Village Church)
Near the end of this area, this chest is on the far side of the shortcut that leads back to the Village Church Lantern. Reach it just before you open that shortcut, up the path toward the end of the level.
The Outskirts (Market Square)
Head into the building near the Market Square Lantern, the one you opened by blowing up the barrels for the shortcut. Go up the stairs on the left toward the tall enemy at the window, then turn 180 degrees at the top and jump across to the upper floor. The chest is on the left.

This chest explodes when opened, so be ready to step back the moment you loot it.
University (Main Hall)

Fortress (Courtyard)
Leave the Courtyard Lantern and enter the long-hall main building on the left. At the far-right wall, find the Eternal Guards symbol beside a hidden door.

To interact with it you need the Stone Slab, which forms once you collect every Stone Pyramid piece dropped by the Eternal Guards mini-bosses. With the Slab in hand, use the symbol to open the secret room. The chest is on the left inside.
Buying the ninth flask from Louis
The final Empty Ferrofluid Flask is stocked by Louis’s Laboratoire in the Abandoned Church hub, priced at 5,000 Catalysts. He carries one in stock from the start of the run, so check his Assortment under the Trade menu and buy it whenever you can spare the currency.
Louis refreshes his inventory as the story advances, so revisit his counter between chapters to pick up other upgrade materials as they appear.
Confirming the upgrade worked
After picking up or buying a flask, rest at a Lantern and open the Upgrade Ferrofluid Flasks menu. Redeem the Empty Ferrofluid Flask there and your carried charge count rises by one, which you can verify by the updated flask total shown when you leave the Lantern. Repeat this for every flask you collect to keep your healing pool growing as you push into harder regions.