Spotify introduced its own social networking platform in October of 2020. Greenroom follows a similar algorithm as Clubhouse and has therefore become a popular competitor of the March 2020-release social audio app.
Greenroom, like Clubhouse, is a live audio social application that allows users to engage in and initiate rooms in any genre of interest. The field of interest is widely divided into music, sports, and culture in Greenroom. The app also offers a range of other topics and sub-topics that may interest users and gravitate them towards associated rooms.
Users on Greenroom can have conversations, discussions, or even DJ for an audience. The application has a chat/texting section called a ‘Discussion’ room as well. It is distinct from the ‘Stage’ or the audience room where you can view the active and the incoming members.
Spotify Greenroom is limited to mobile devices at the moment and is hence unavailable for desktop or any other device.
Setting Up Greenroom on Your Phone
First, download Spotify Greenroom from Google Playstore on your phone. Then, tap the app to launch it. You will see a screen with moving bubbles containing photos of different people. This is the whole message of the app – to connect across the world.
Since it’s your first time using Greenroom, you cannot ‘Login’. You can either select the ‘Sign in for free’ or the ‘Continue with Spotify’ options. Both eventually lead to the same ‘Create your account’ screen.
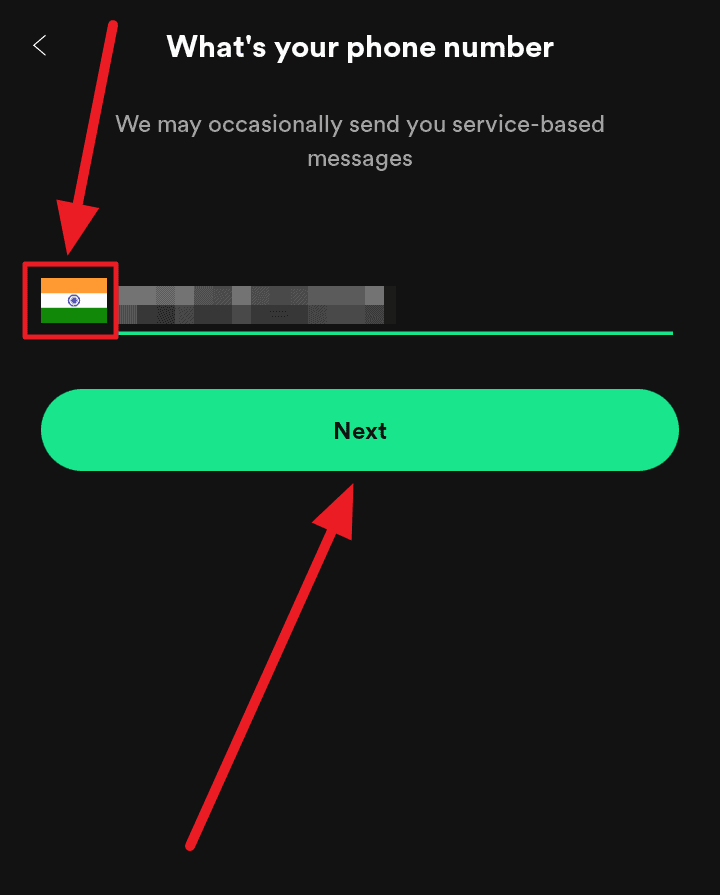
Sign in for Free – When you select this option, first create a username and a password for yourself. Then, choose your nationality by tapping the default flag (USA) to open a list of nationalities (flags). Choose your flag here. Now, enter your valid phone number, and hit ‘Next’.
Enter the ‘Verification Code’ received on the phone number you just entered to verify your account. Then, tap ‘Next’. Now, you need to add some details – your username, date of birth, and a profile picture.
This is the stage that’s the same for both options – ‘Continue with Spotify’ and ‘Sign in for Free’. In both cases, you must enter these credentials.
All three credentials are mandatory. Spotify urges you to use your real name.
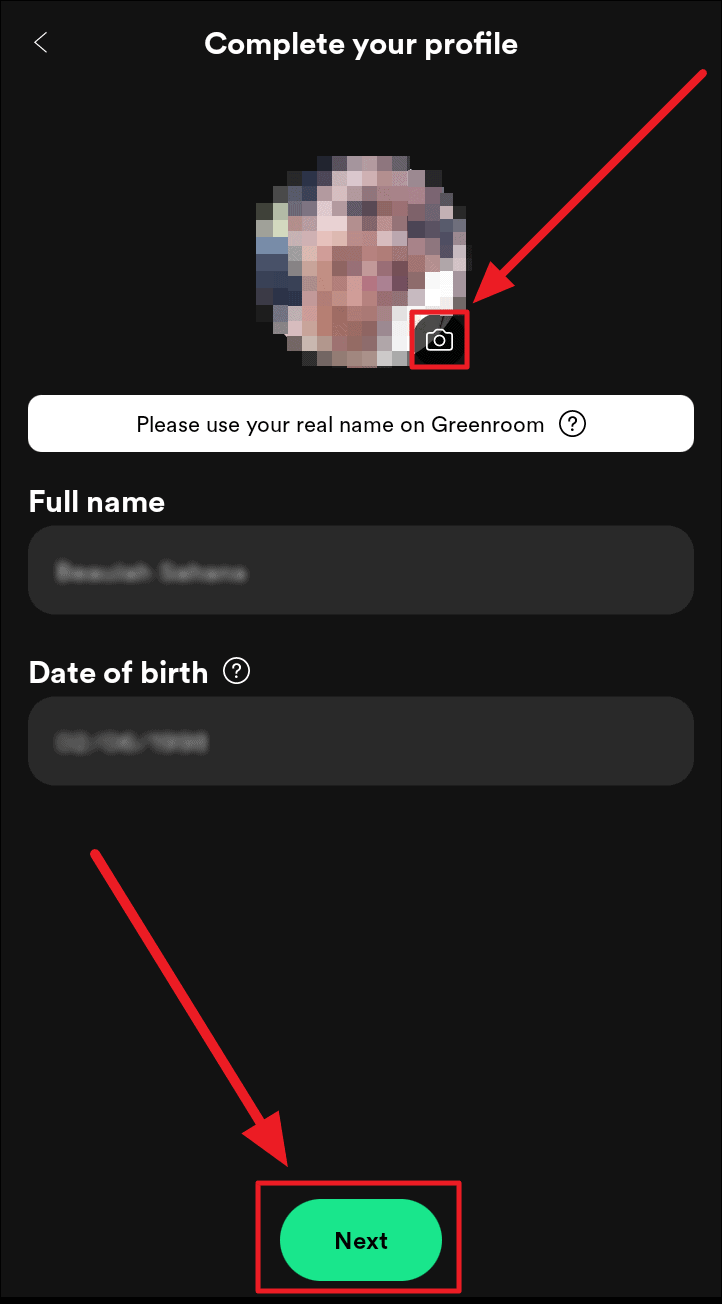
Tap the empty circular display image space or the camera icon at its lower edge, on the ‘Complete your profile’ page to choose and add a profile picture from your phone.
Tap the ‘Full name’ and ‘Date of birth’ text fields to type in your name and choose your birthday from a quick calendar respectively. Once done, tap ‘Next’ at the bottom of the screen.
You are now partially signed into Spotify Greenroom. Select your interests to proceed.
Selecting Your Interests
The interests you choose in the following steps will reflect in the rooms that will appear on your Grenroom home screen. You can always browse through the interests you don’t select and choose to follow them later as well.
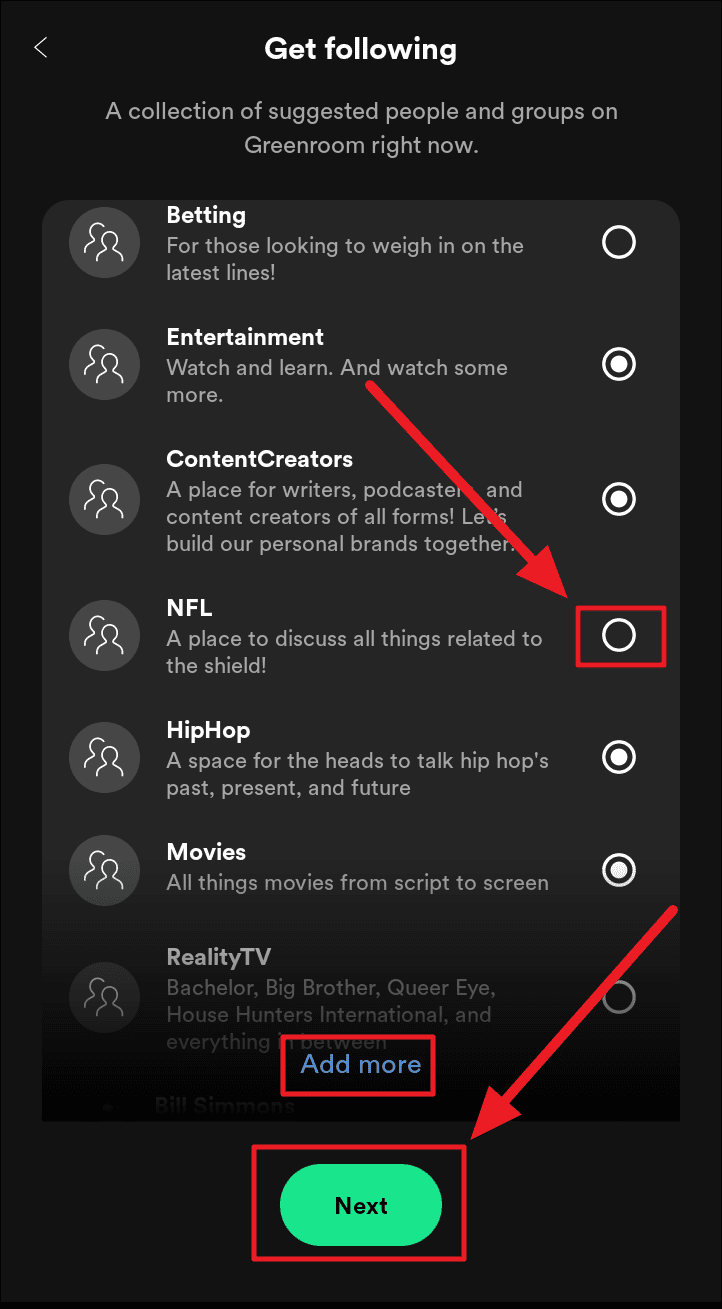
Tap the empty circle next to the interest(s) of your choice on the ‘Get Following’ screen to select it. If all your interests aren’t in here, tap ‘Add more’. Otherwise, tap ‘Next’.
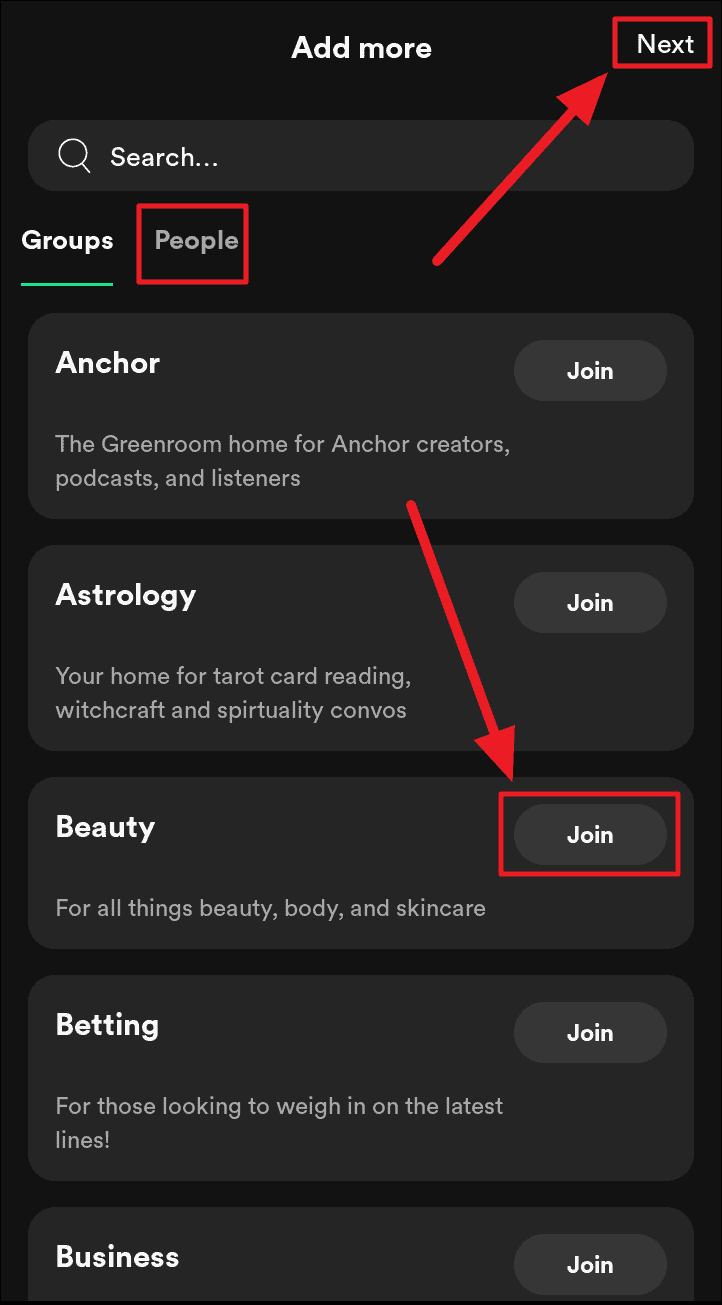
You will redirect to a diverse list of interests if you chose ‘Add more’. Here, you can directly join the respective groups by tapping the ‘Join’ button next to it. Select ‘People’ to shift to the people side of the screen where you can follow individual users.
Tap ‘Follow’ next to the people you wish to follow. To undo, tap the same button, which will now be ‘Following. Hit ‘Next’ once you’re done.

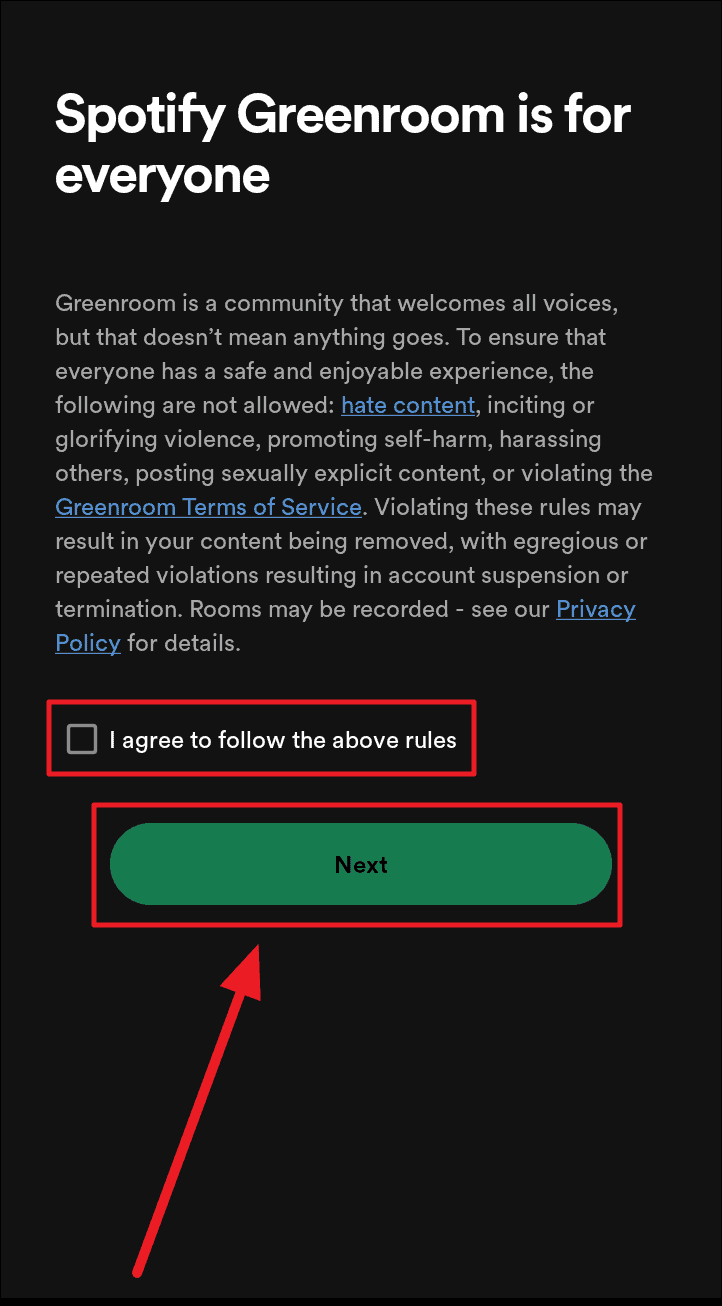
The last step to finalizing your Spotify Greenroom account is abiding by the rules of the app. You will now reach a rules and regulations screen for Spotify Greenroom. Read all rules carefully and tap the tickbox in front of ‘I agree to follow the above rules’ – thus vowing to abide by Greenroom’s rulebook. Then, tap the ‘Next’ button to proceed.
Your Spotify Greenroom account is successfully set up!
Editing Your Spotify Greenroom Profile
Before joining rooms or starting your own room, we recommend writing more about yourself on your profile. This way, you can create positive and informative impressions on your followers and following. Thus evading the blank-slate unsurety.
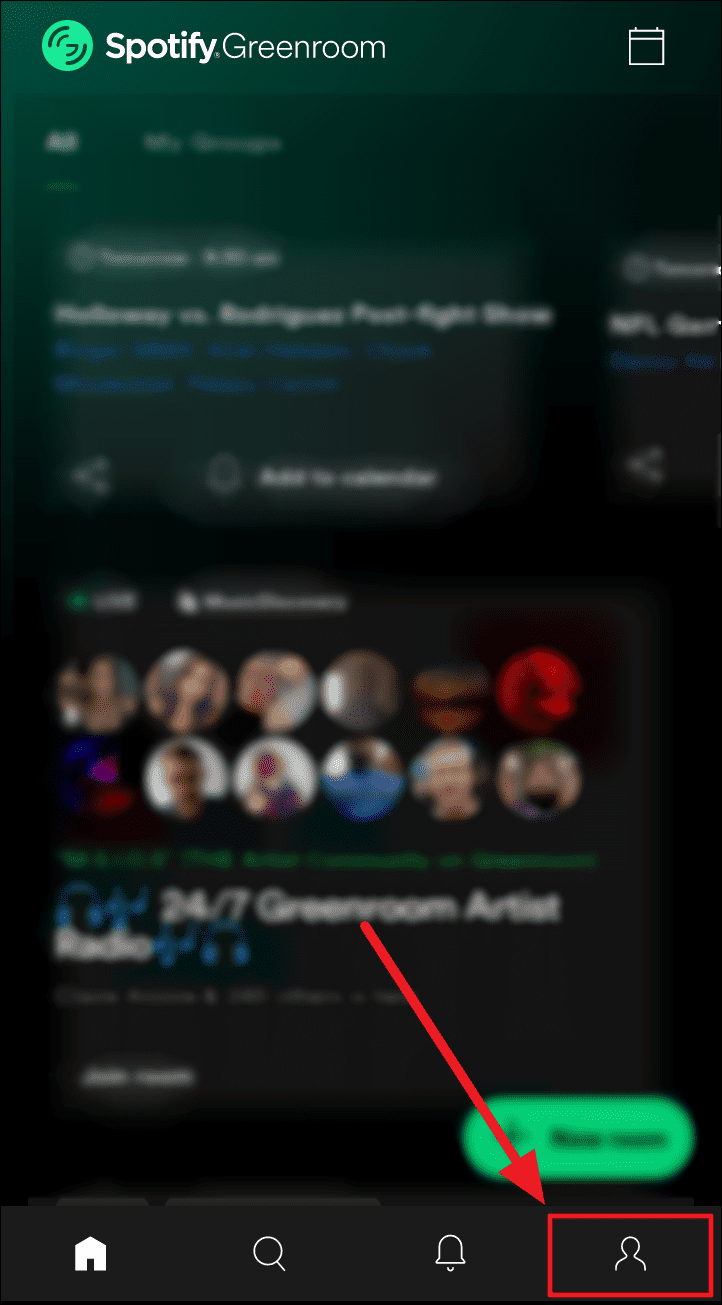
Tap the user account icon at the bottom right corner of the home screen to head to your profile.
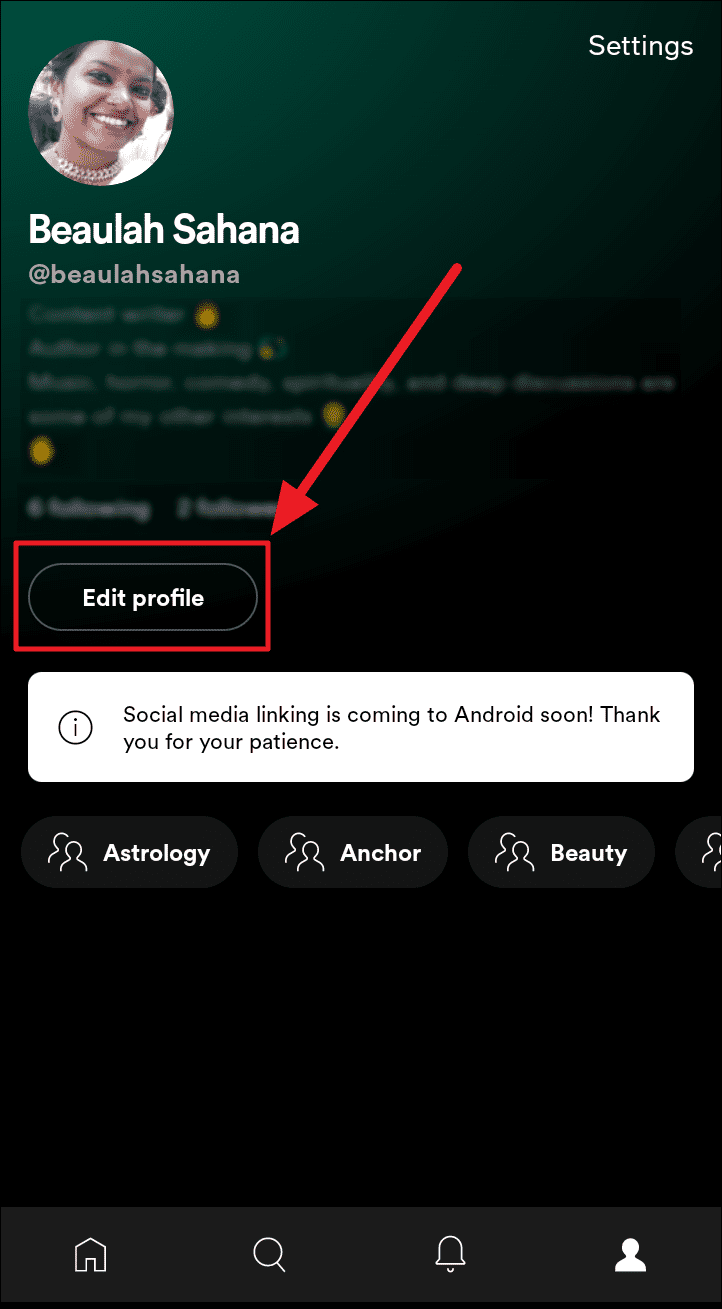
Tap the ‘Edit Profile’ button below your profile picture, name, and username.
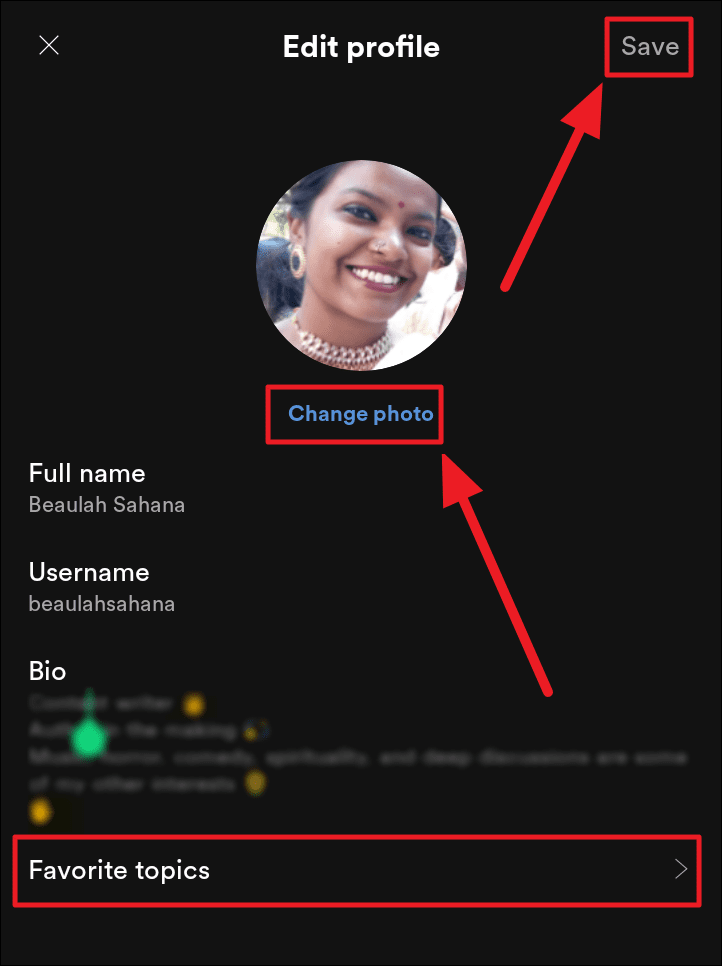
On the ‘Edit Profile’ page, you can change your public profile’s info. Tap the fields below Full Name and Username if you wish to change these names. But, importantly, tap the ‘Bio’ region to add a little more about yourself – restricting to 140 characters only.
You can also change your profile photo by tapping the ‘Change Photo’ button below your previous picture. To add more favorite topics that will attract related rooms, tap the ‘Favorite topics’ option at the bottom of the profile editing space. Else, hit ‘Save’.
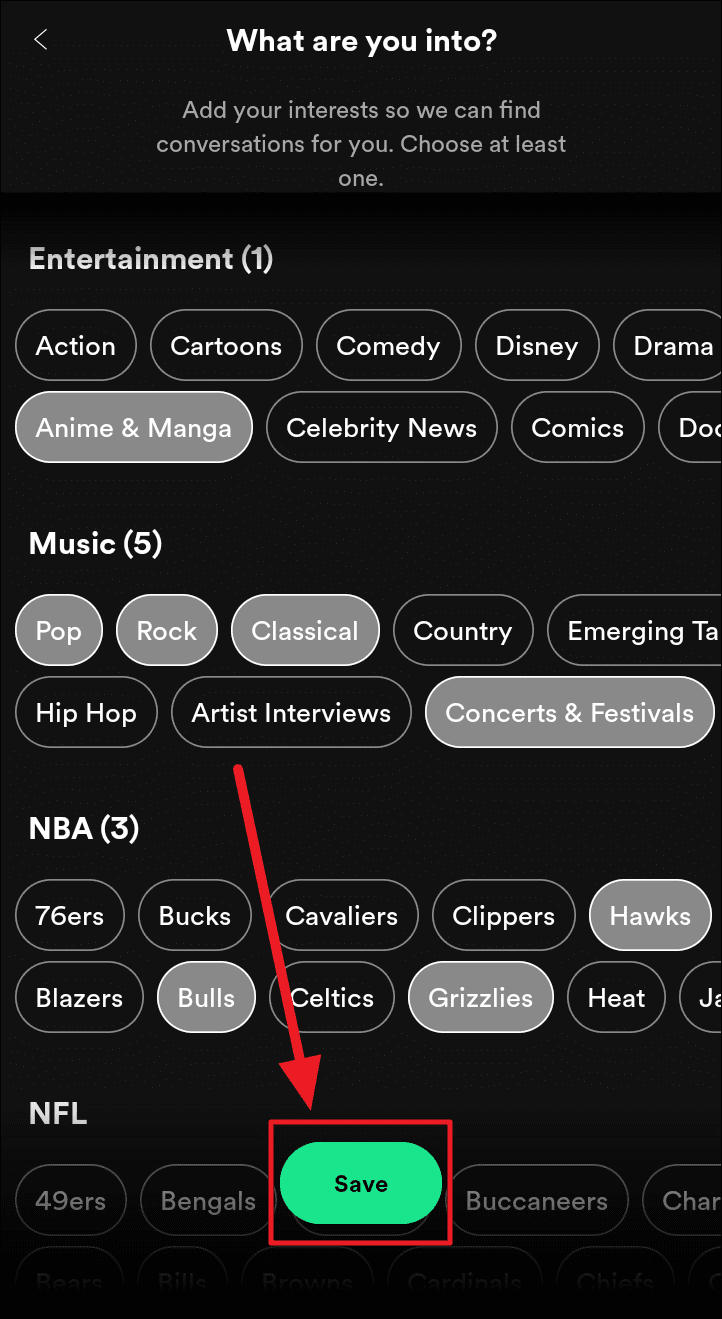
You will reach the ‘What are you into’ page if you tapped ‘Favorite topics’. This page is an extension of the previous ‘Interests’ pages. Here, you can include additional interests to your profile by scrolling through all interests and scrolling sideways on single interests.
Tap to choose the buttons that interest you, and hit ‘Save’ when you’re done.
Tap the ‘Save’ button on the redirected previous ‘Edit Profile’ page, and you’re all set to explore rooms and create your own!
Exploring Rooms
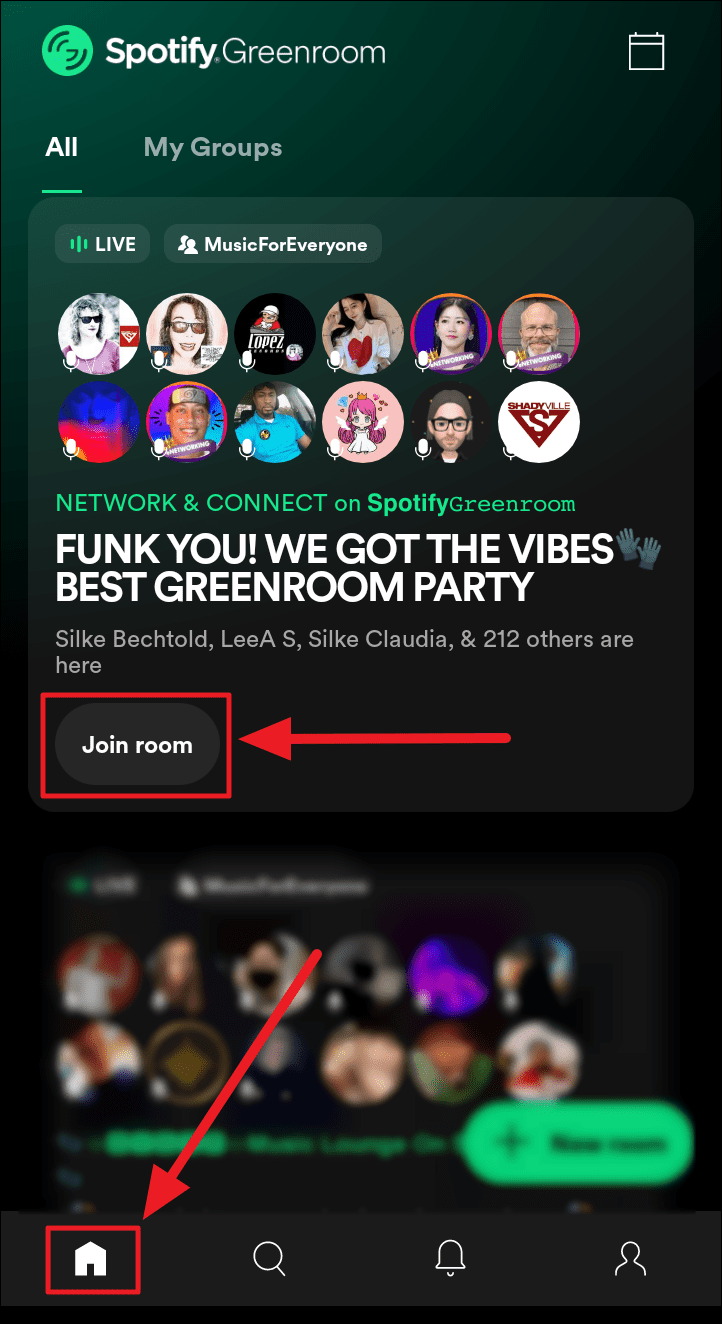
Head back to the homepage by tapping the ‘Home’ icon at the bottom left corner of the screen to start exploring rooms and joining them. Scroll through your ‘All’ list to find rooms that interest you. Chances are, you will find more music and sports rooms than any other. Tap the ‘Join’ button below the room you want to join.
Rooms are generally listed in the order of their strength. Rooms with the most number of people top the list and the order follows a decreasingly.
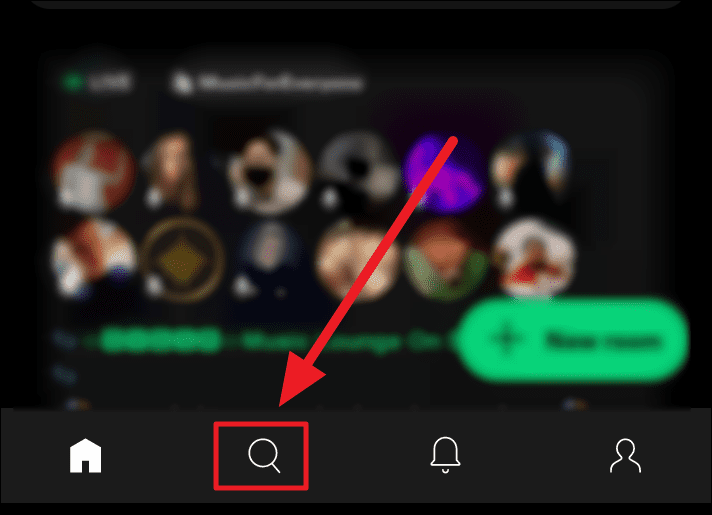
To find more groups that you can join – and thereby be available to related rooms, tap the ‘Search’ button (magnifying glass icon) at the bottom of the screen.
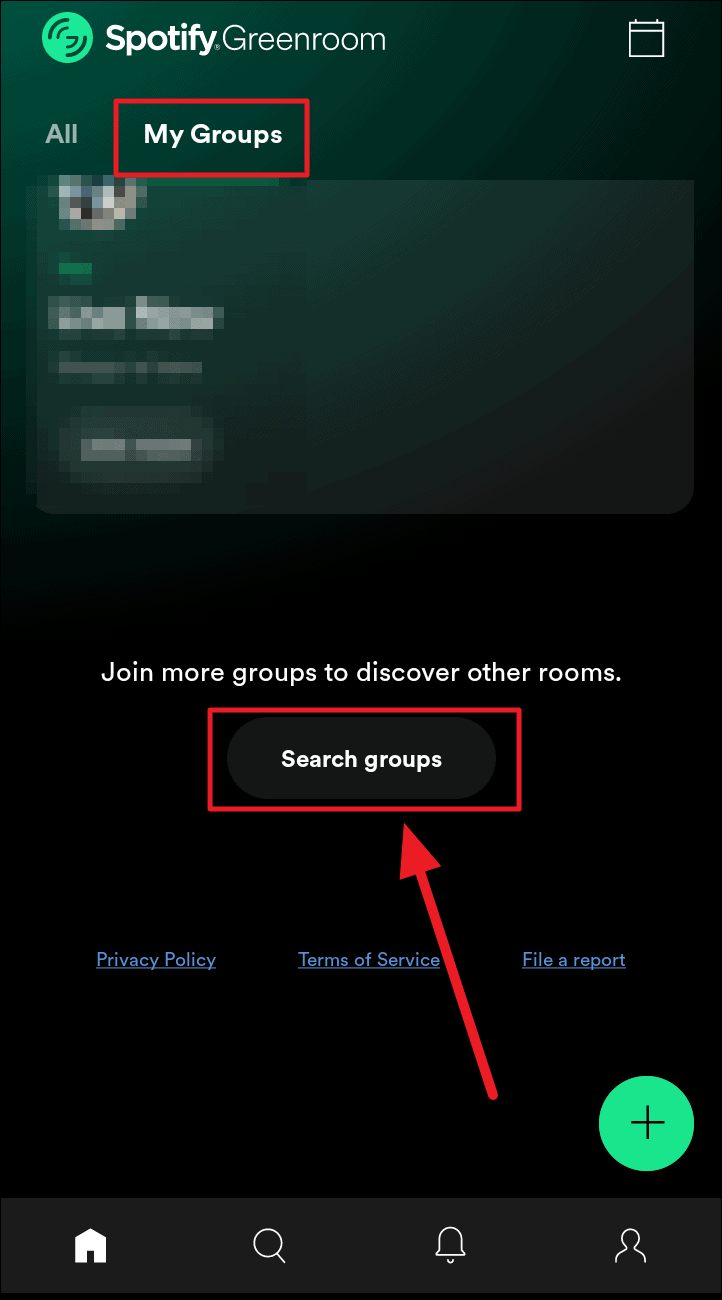
Or you can head onto the ‘My groups’ section next to the ‘All’ button at the top of the list of rooms. This space is for all the rooms you interact with in any way. Scroll through to the end of the ‘My Groups’ list to find and tap the ‘Search Groups’ button.
Both will land you on the same ‘Add more’ page as discussed previously. This screen features more groups that you can explore and join. But, in this step, you will be tapping the name of the group to find if there are any active rooms pertaining to it.
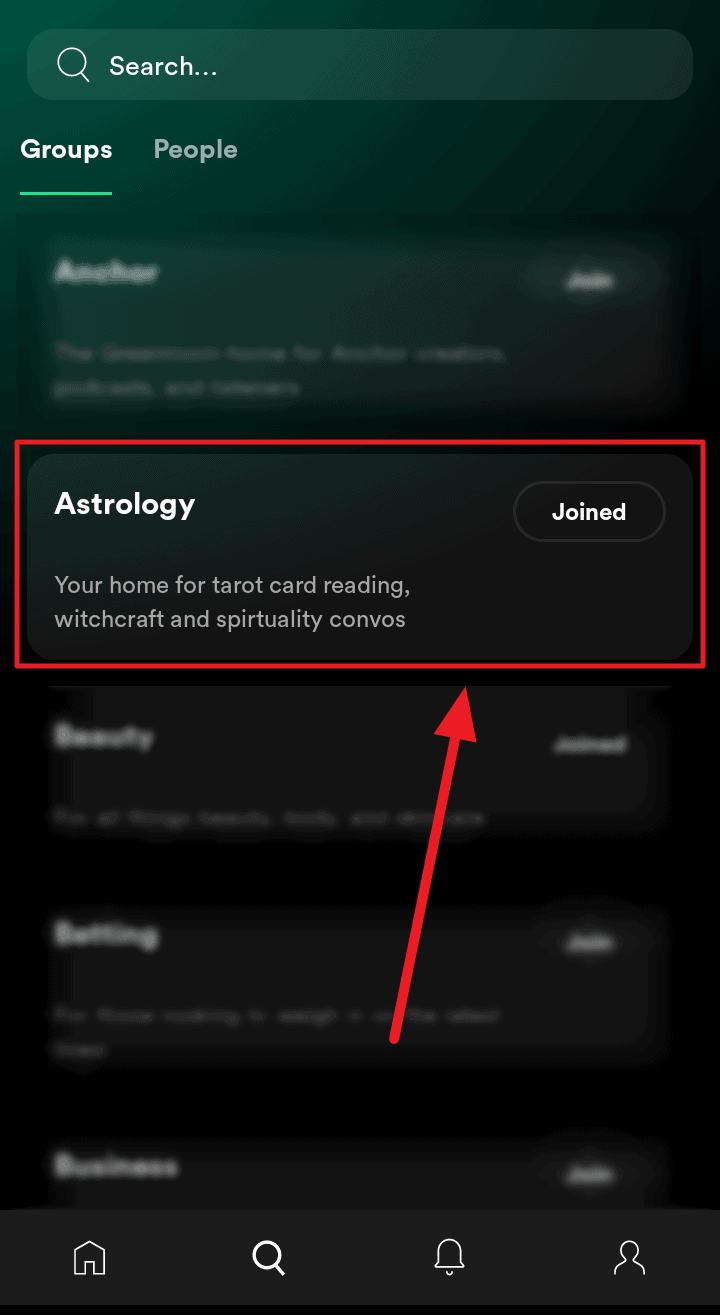
If there are any active rooms in the chosen group, you will see them here. You can directly join individual groups from this screen.
Joining Rooms
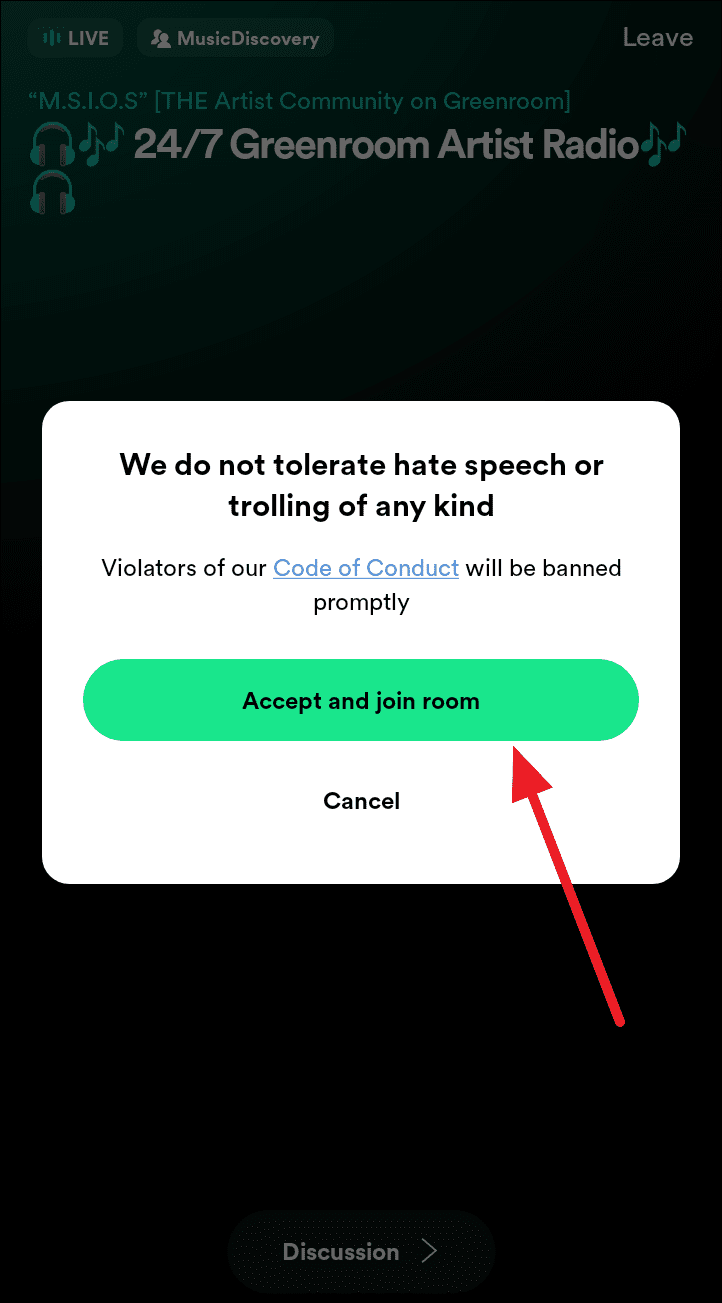
Greenrooms will have a statement of intolerance towards misconduct when you choose to newly join any of them. Ensure to read the message, even the Code of Conduct link if need be. Then, tap the ‘Accept and join room’ button.
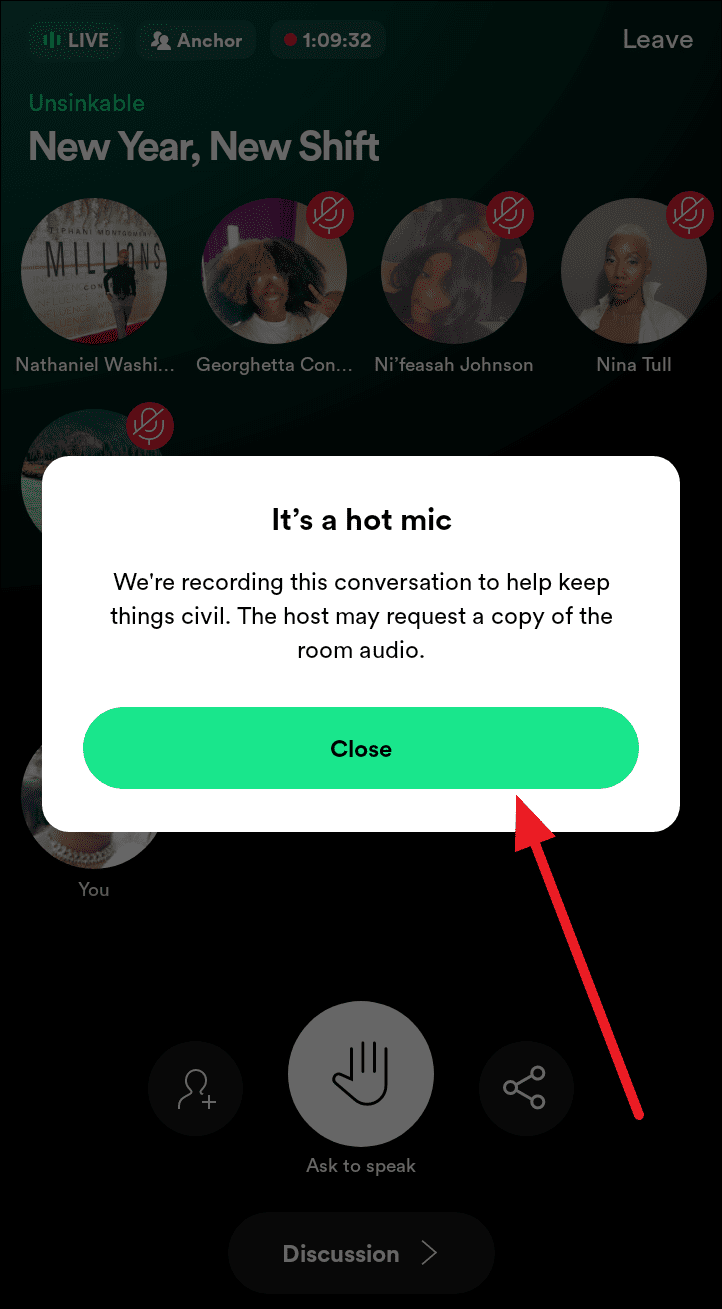
When you newly join hot mic rooms, you will receive a different message reiterating the rule to record the conversation. Every host is entitled to a copy of this recorded audio.
Engaging in the Room
Music Greenrooms generally have just one active speaker, and the rest of the speakers are on mute (this is signified with the mute button on their profile circles). However, discussion Greenrooms typically have more than a single active speaker.
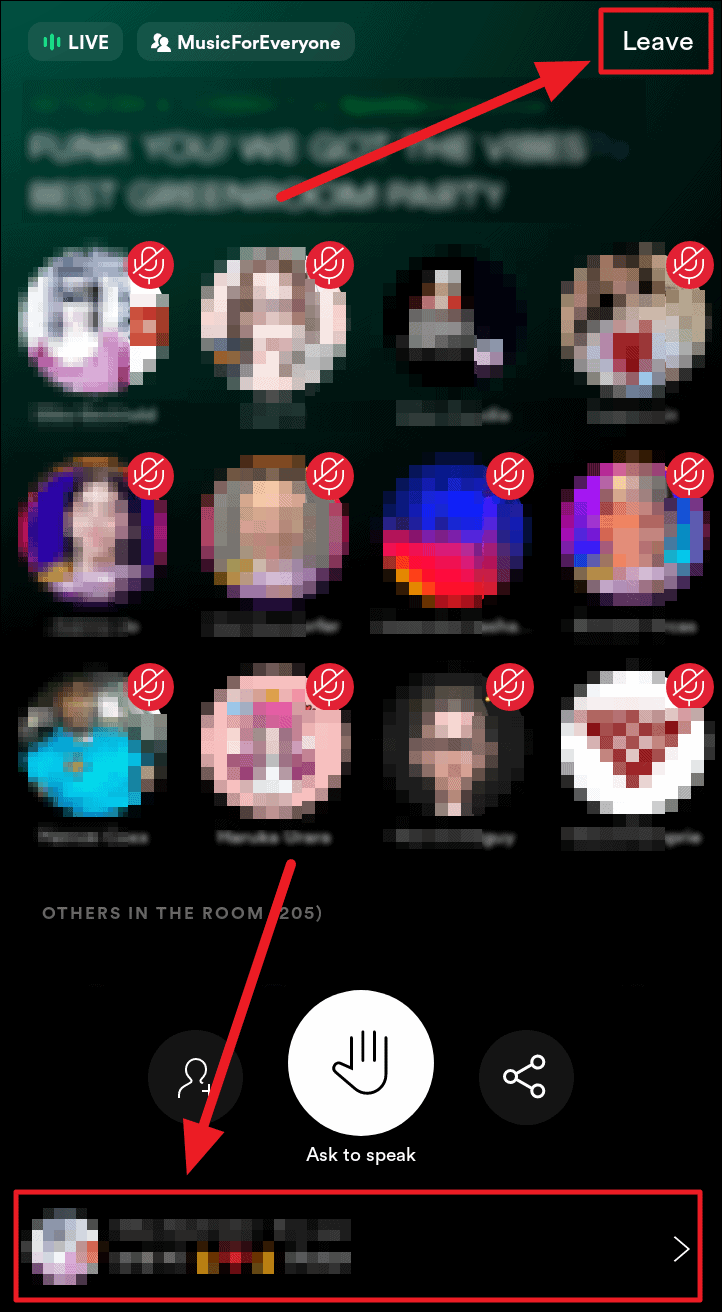
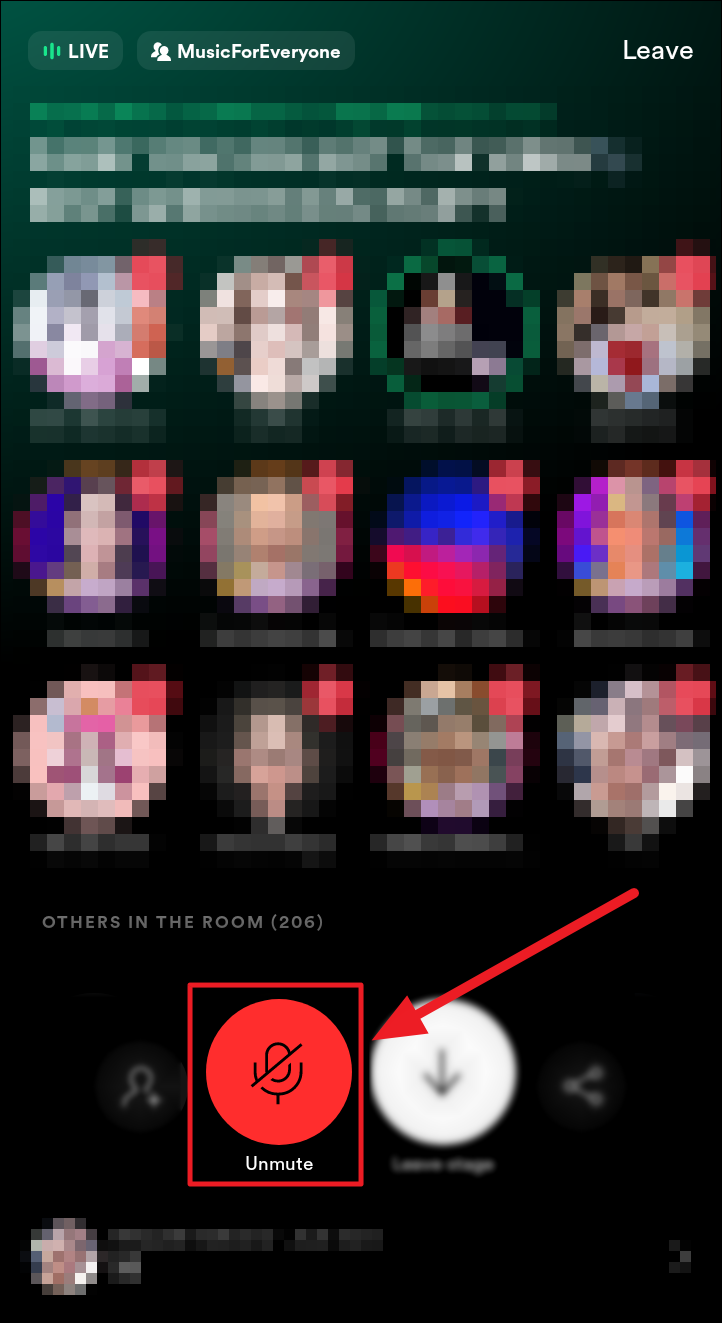
The speakers (12, if it’s a full house) would be visible in the upper half of the screen. To find yourself, a recently joined newbie, scroll a little and you’ll find ‘Others in the room’ – along with a number. You can view anyone’s profile including your own on this screen by tapping the respective profile picture.

To head to the chat section, tap the ‘Discussion’ button at the bottom of the screen. This button can also be a recent text if there is an ongoing conversation.
To leave the room, tap the ‘Leave’ button at the top right corner of the room. You could also hit the ‘Back’ button on your phone and you will automatically leave the room.
The ‘Discussion’ side of the room is similar to any texting platform. In fact, it’s an even simplified texting space. Tap the ‘Send a message’ field to type and send your message. To add a GIF, tap the ‘GIF’ icon, then search and send your favorite GIF.
You can also leave the room from the ‘Discussion’ space too by tapping the same ‘Leave’ button that is visible here as well.
Old texts delete on their own. The longer you stay in a room, the more chat history you can visit. Each time you leave and return to a room, older texts will erase from the conversation, and you cannot view much of the chat history.
To head back to the Stage where you can see all the speakers and listeners, tap the ‘Back to Stage’ button at the bottom of the screen.
Each room would invite people from a particular group. That interest or group would be tabbed at the top of the screen. Tap this button to read more about the group, and if you wish, you can also follow the group.
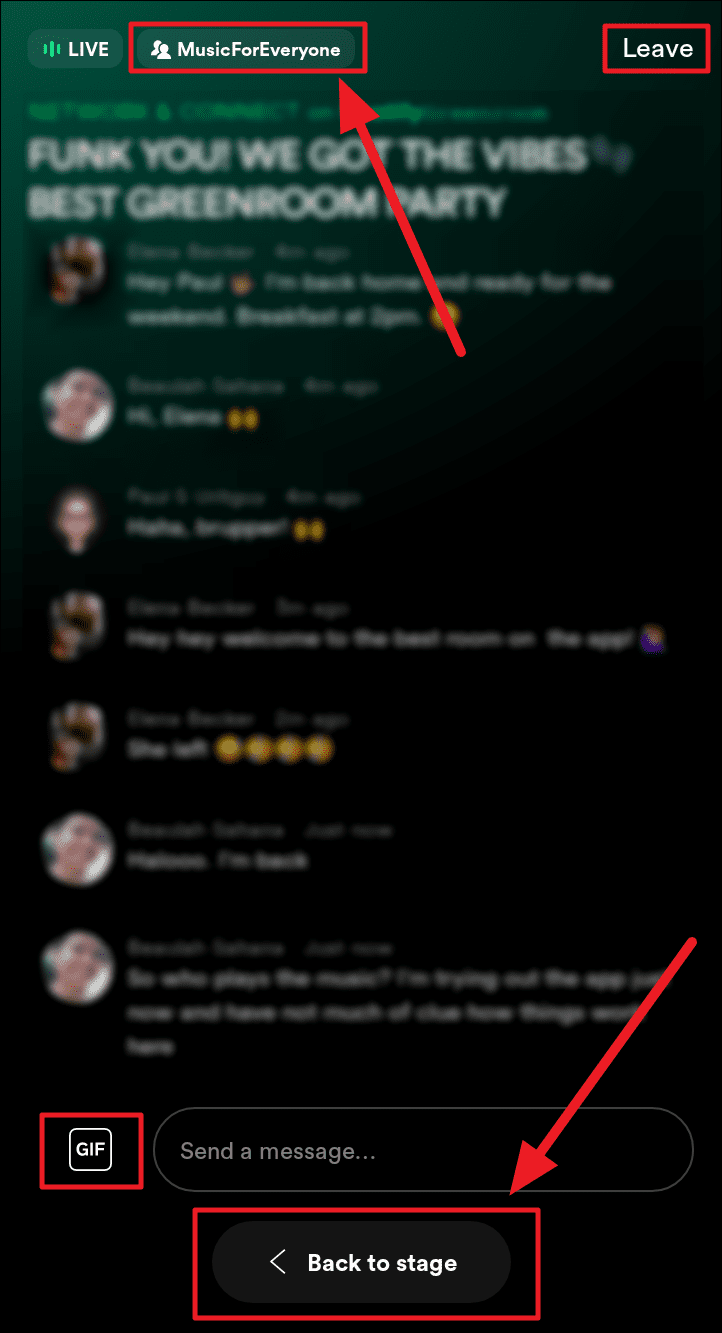
Info about the group will appear at the bottom of the screen. Tap the ‘Join’ button to join the group if it interests you.
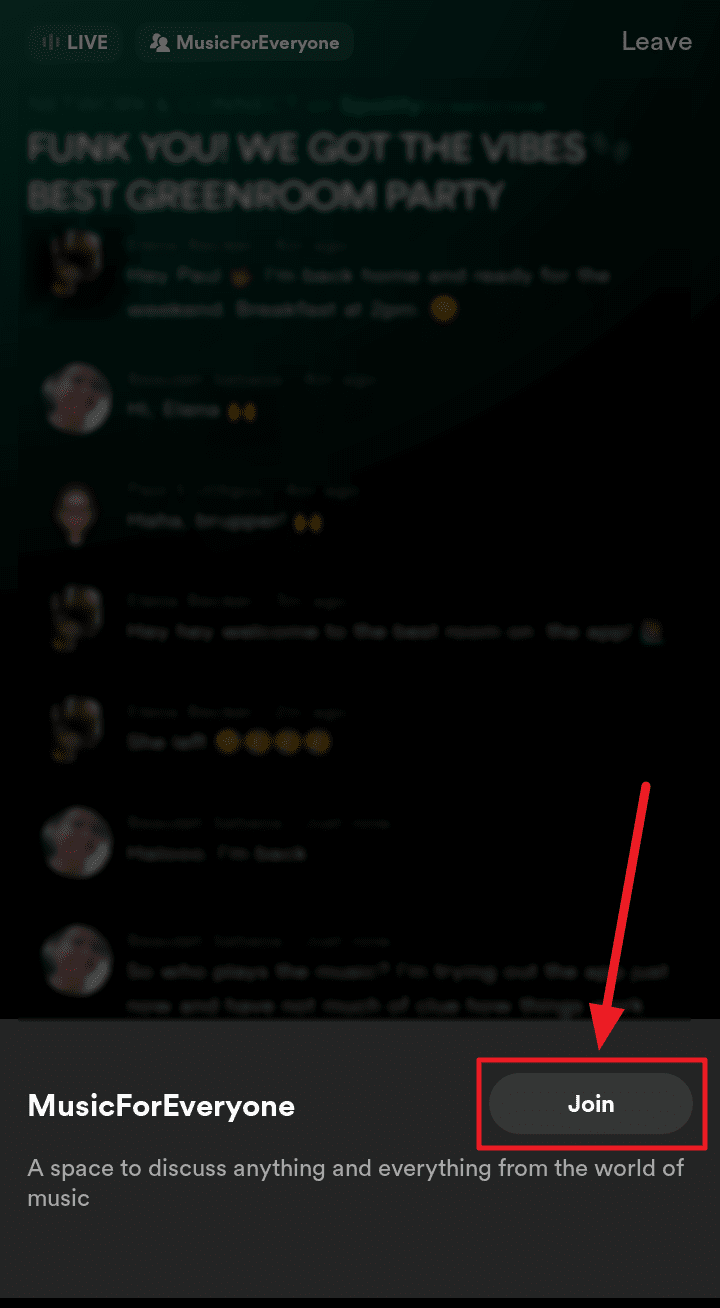
You will now be part of the group (if you chose to join) and receive updates if and when there are rooms in this group.
Asking to Speak in a Room
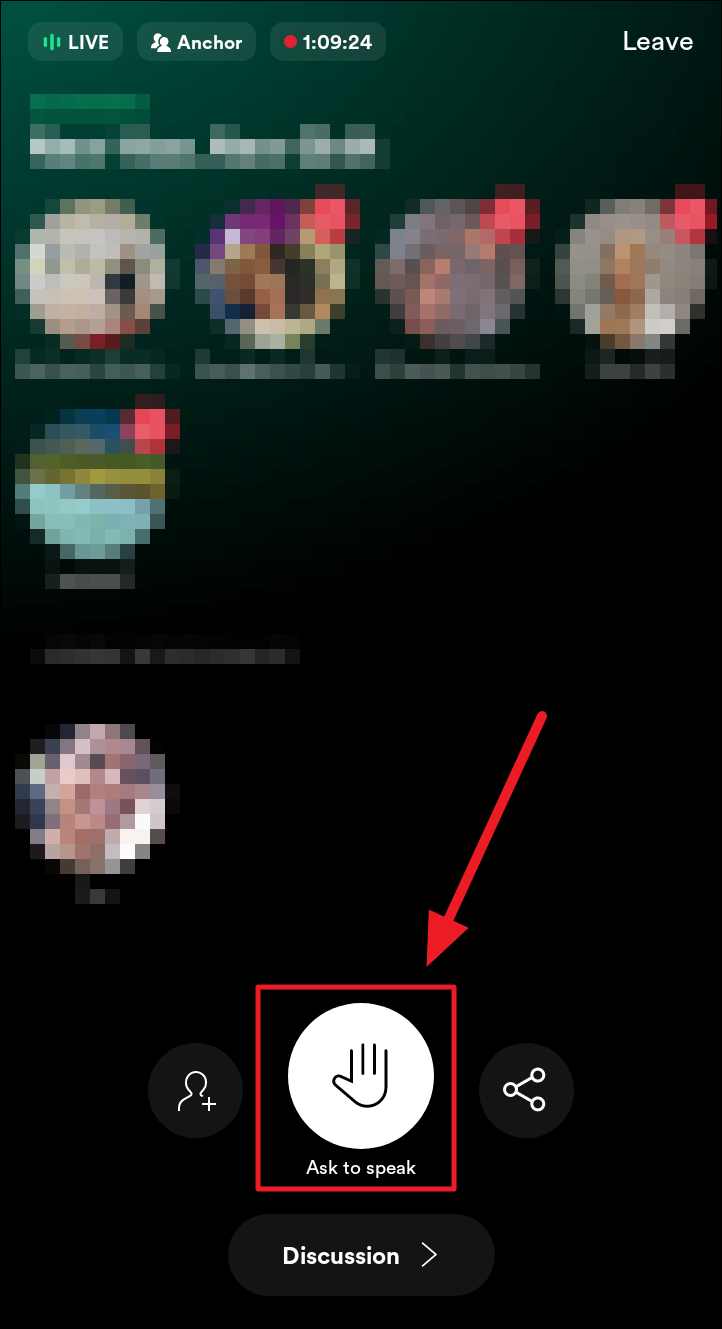
To speak in a room, you must first request to speak. Tap the ‘Ask to Speak’ button on the bottom half of the room’s screen. The host would then accept or reject your request.
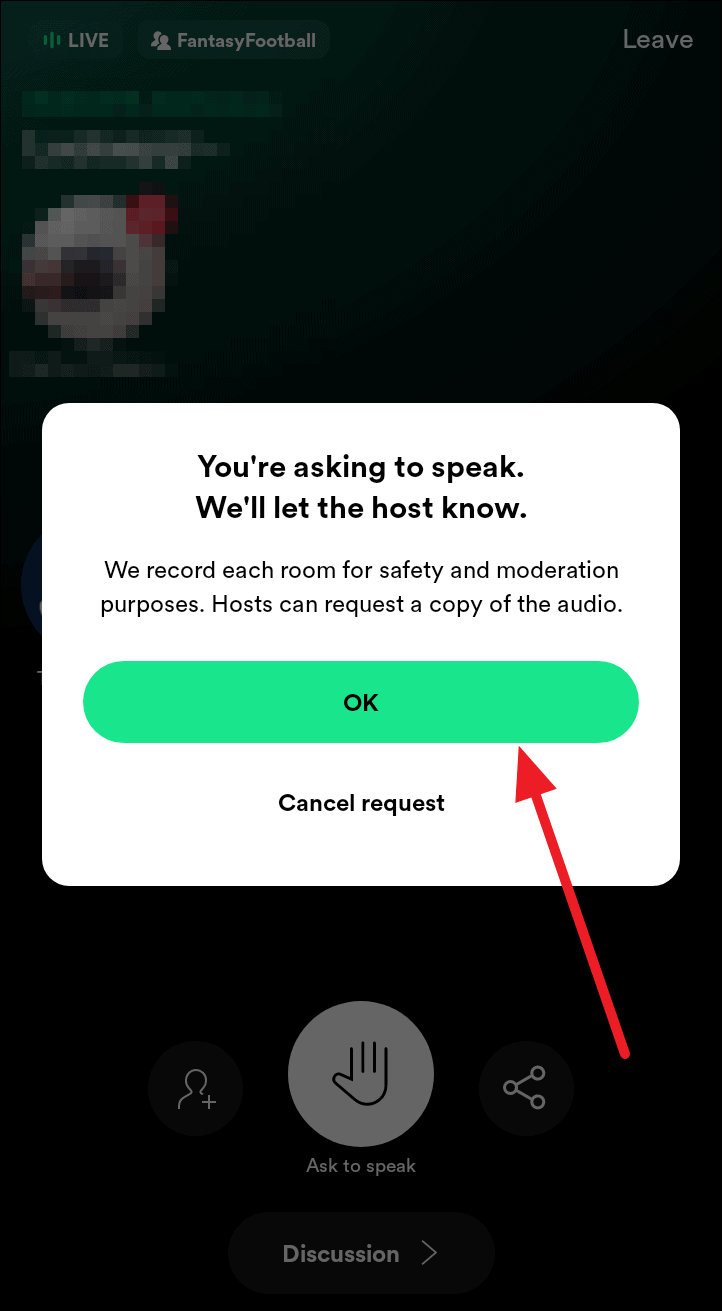
If you receive a prompt before sending your request to the host, read the message and hit ‘OK’. You stand a chance to cancel your request if you receive a prompt. After this, the host receives your request. In case there’s no prompt, your request directly reaches the host.
Remember, every room will be recorded irrespective of whether the host asks for a copy of the recording. This is to keep the safety and integrity of the room in check.
The host will soon reciprocate your request.
The host can also invite a listener to become a speaker. In such cases, the listener will move to the top and take one of the 12 speaker seats (if it’s a full house). Depending on the rules of the house, you will either be muted or not when you become a speaker. Tap the ‘Unmute’ button to speak.
Generally, all speakers except one are muted by default in music rooms. So, chances are that you may be muted when you join as a speaker in such rooms.
Speak into your phone’s speaker to be heard. If you want to play music, place your phone’s speaker close to the source of music in a quiet space. Noise would disrupt the flow of music just as it would, spoken communication.
Inviting Followers Into a Room
If you seem to dig the vibe of a particular room and you want your follower(s) to dig it that much, invite them over! Tap the button with the outline of a person and a plus sign (+) next to the ‘Ask to speak’ button to invite a follower.

You can choose any number of followers to invite into the room. Tap the empty circle next to the person’s name to select them. Then, tap the ‘Invite Followers’ button at the bottom of the screen to send your invite(s) to the selected followers(s).
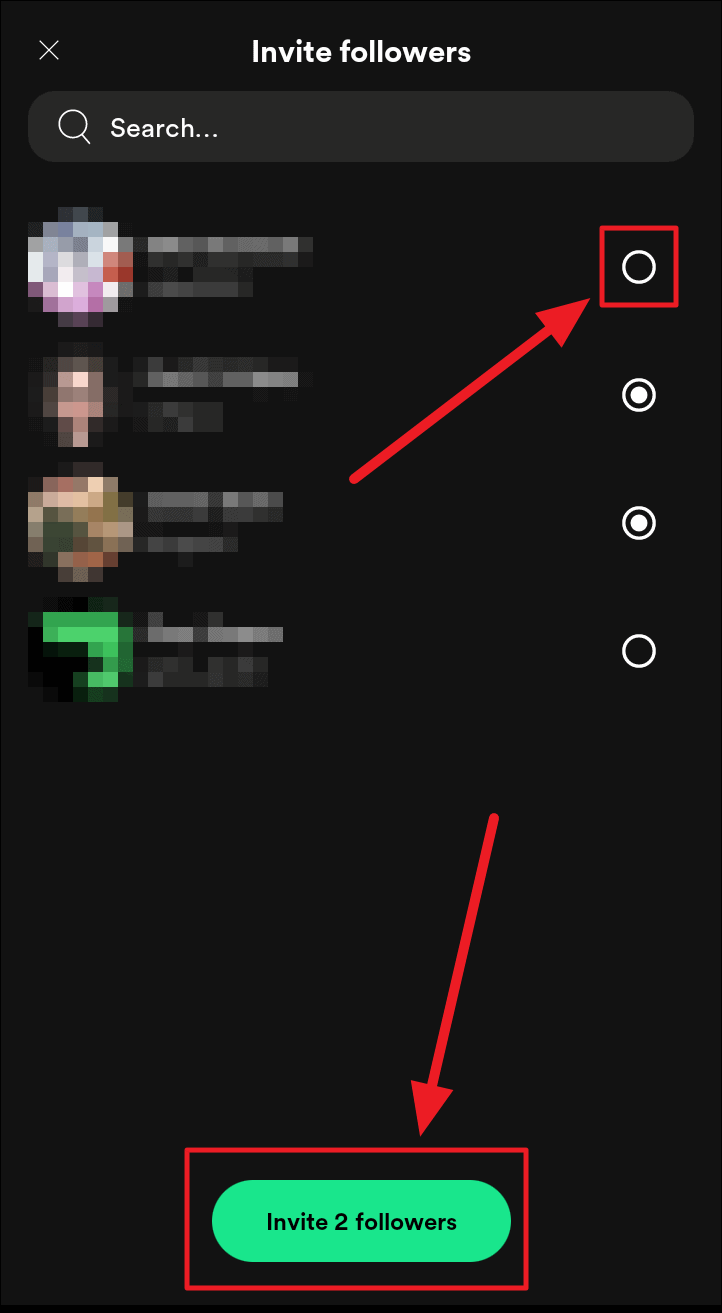
Your invites are sent. Now to await acceptance of their respective invites.
Externally Sharing Links to Rooms
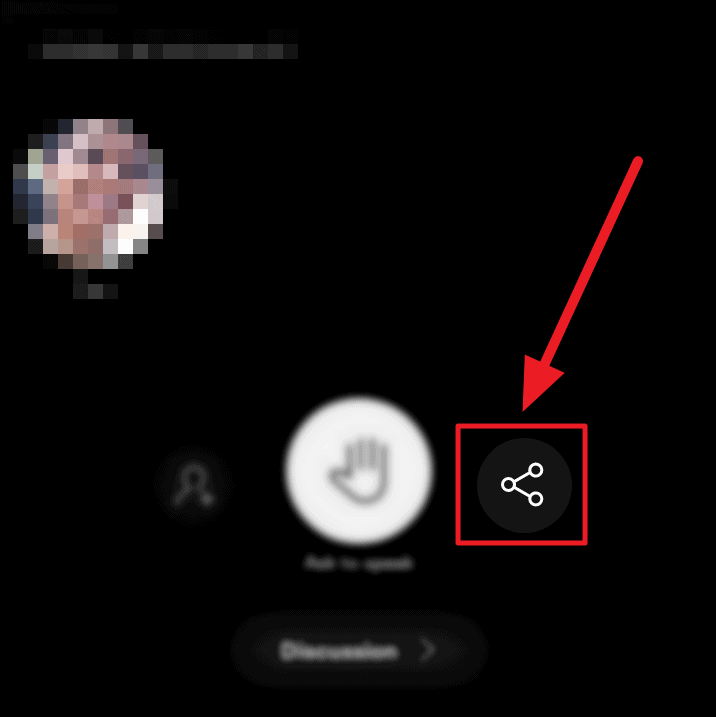
You could send a Greenroom link to someone outside the Greenroom community if you wish to invite them externally or just wish to share what a Greenroom is like.
To share a greenroom link, first, open the Greenroom you want to share. Then, tap the share icon to the right of the ‘Ask to Speak’ button.
Choose the person or app through which you’d like to share the GR (Greenroom) link.
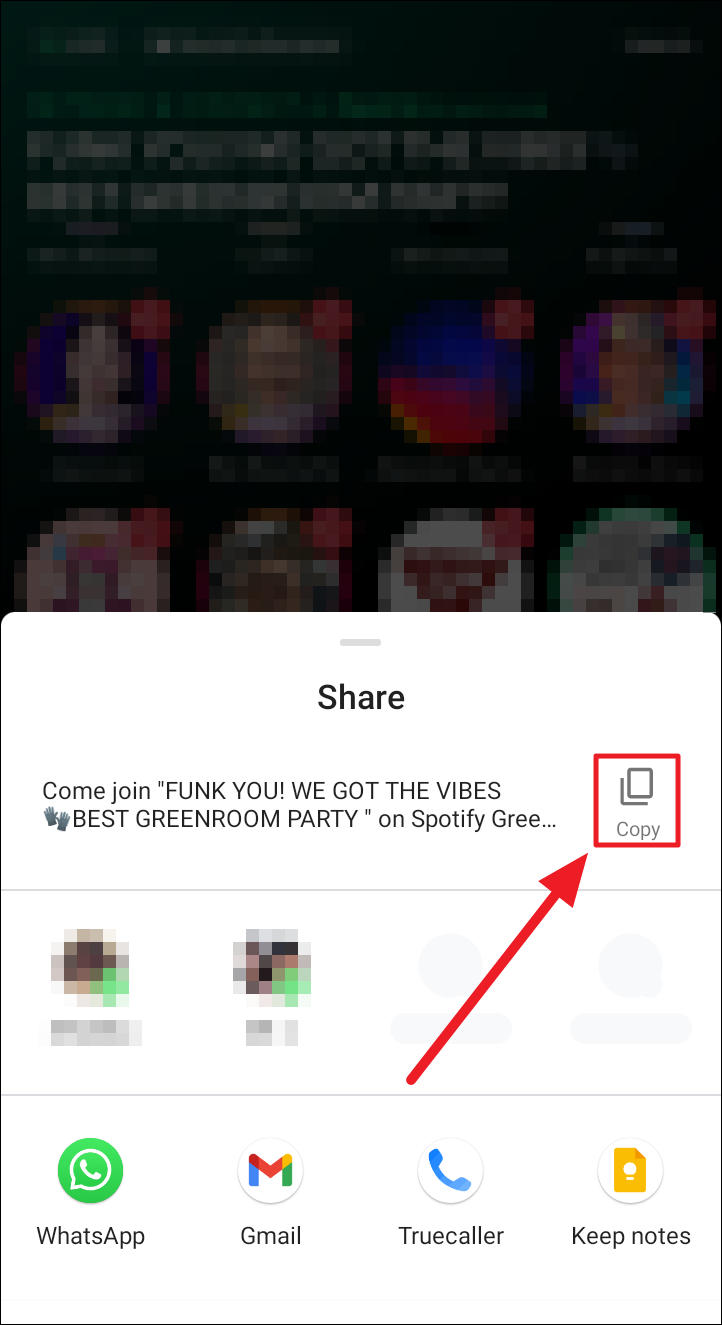
And send the link over!
Adding Reminders For Rooms
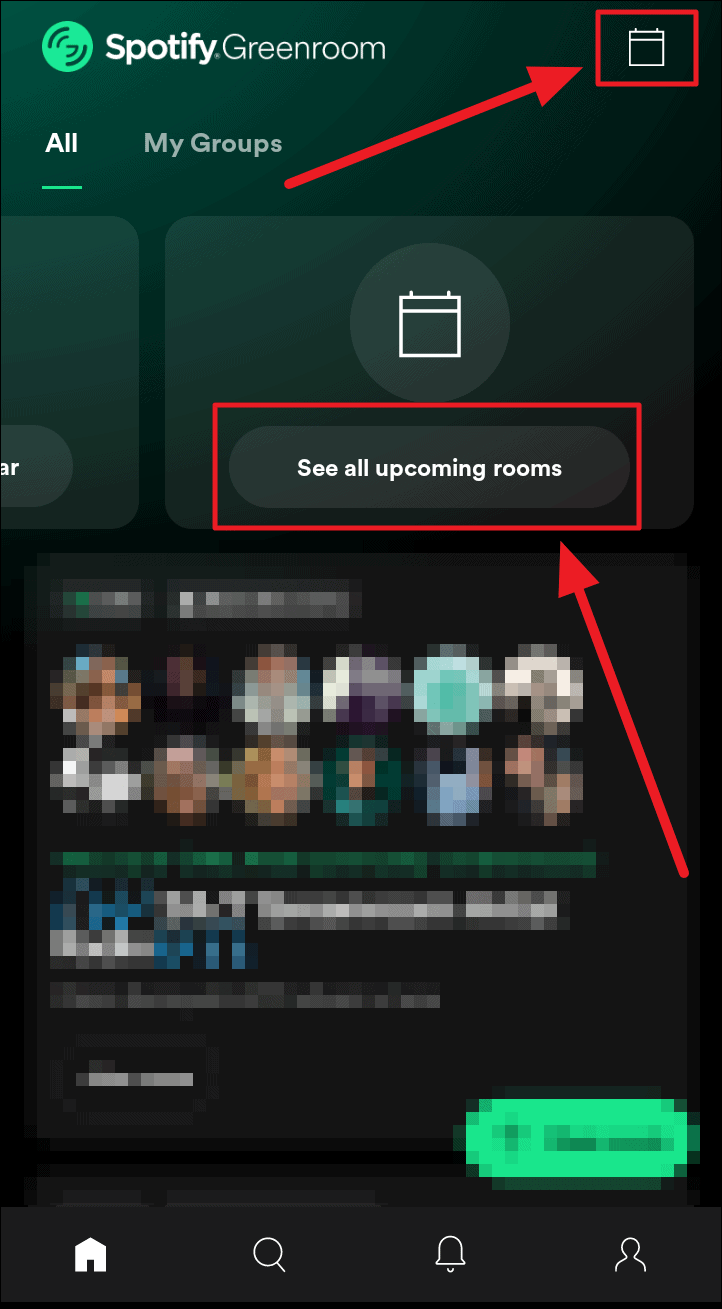
The app’s home screen (the ‘All’ section) usually has a couple of rooms horizontally lined up as events in blocks. These are the upcoming rooms. You can schedule upcoming rooms on your calendar if you come across a discussion or a session you wouldn’t want to miss.
The upcoming rooms you see on the home screen are typically not all of the upcoming rooms. To see all of them, scroll to the end of the horizontal arrangement to tap the ‘See all upcoming rooms’ button. You can also tap the ‘Calendar’ icon at the top right corner of the screen to see all upcoming rooms.
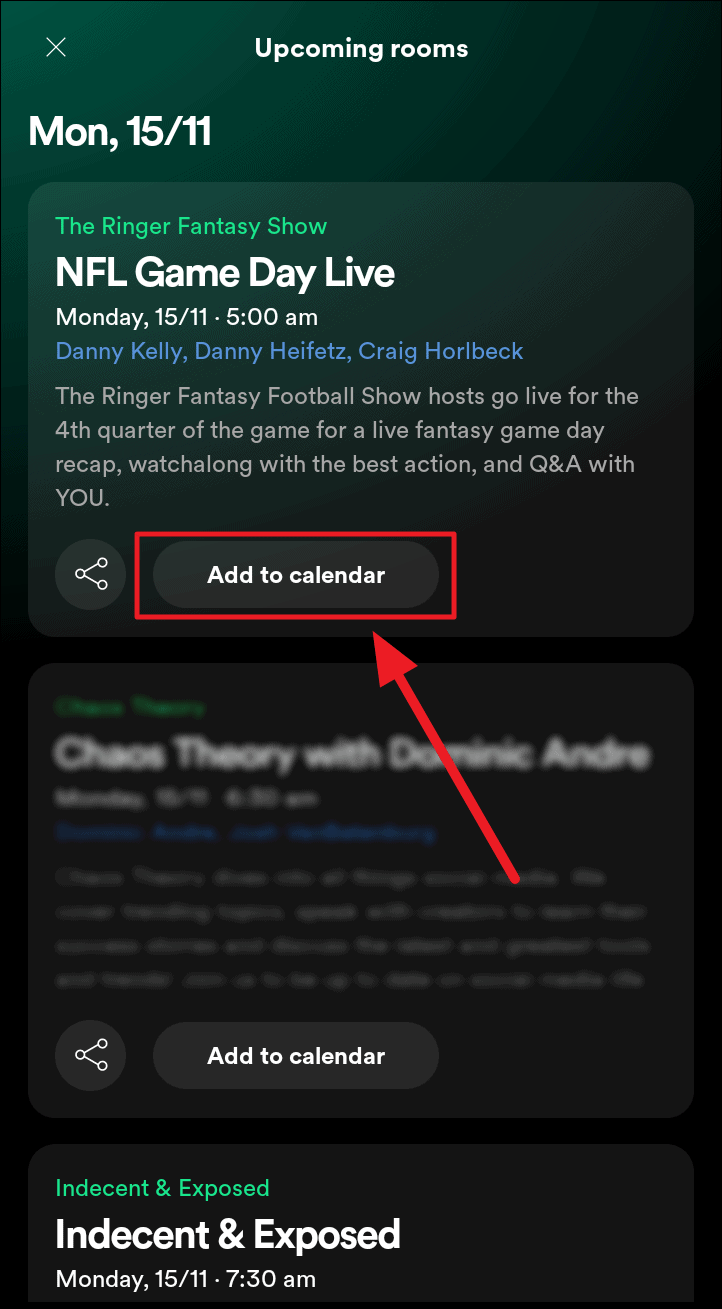
Irrespective of whether you chose to see all the upcoming rooms via the calendar icon or the button at the end of the horizontal list of events, you will land on the ‘Upcoming rooms’ screen. Scroll through all the upcoming events to find the one that interests you and tap the ‘Add to Calendar’ button below the event’s information.
Any upcoming room info will include the name of the room, the name of a podcast/show if the creator(s) has one, the name of the creator(s)/host(s), and the date and time of the room.
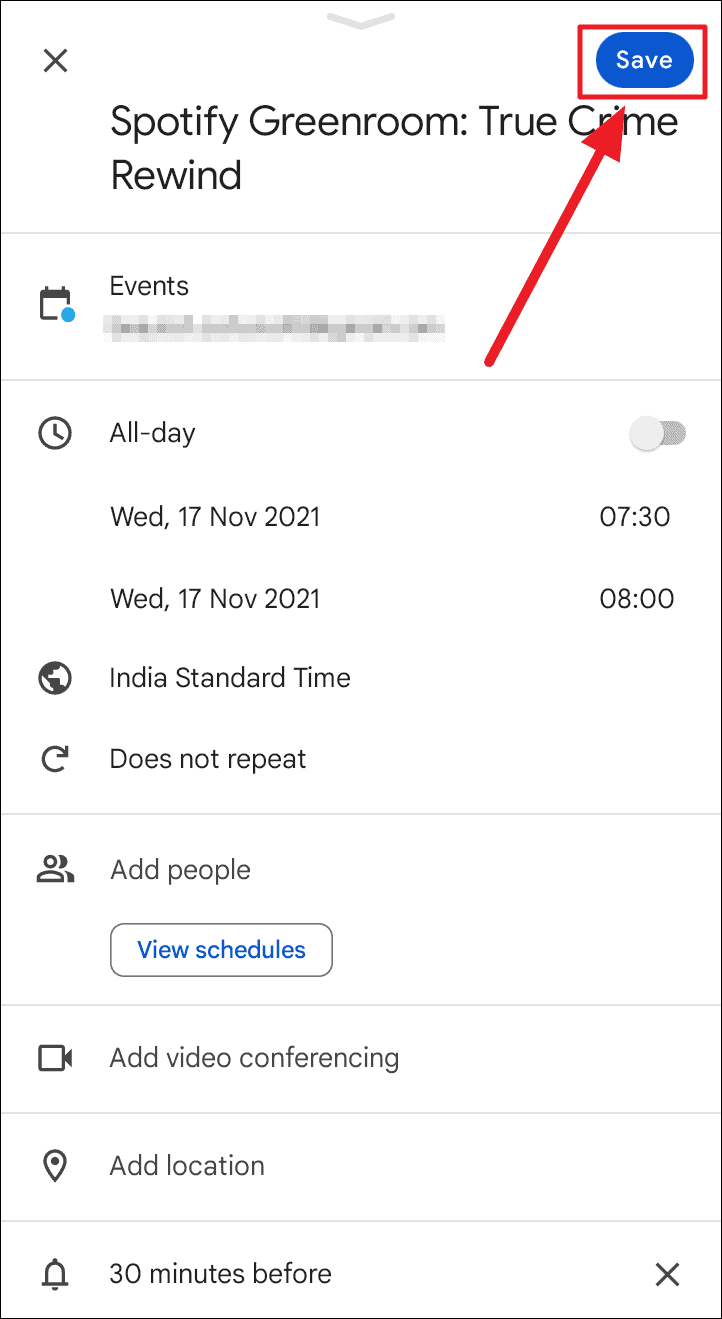
You will redirect to your Google Calendar. All details regarding the upcoming room will auto-fill on your calendar page – including a reminder 30 minutes in advance. Scroll through the calendar page to know more about the event you’re about to block your calendar for. Now, all you need to do is, hit the ‘Save’ button.
You have officially set a reminder for a room now. If you wish to delete the reminder, tap the ellipsis icon (three vertical dots) at the top right corner of the screen.
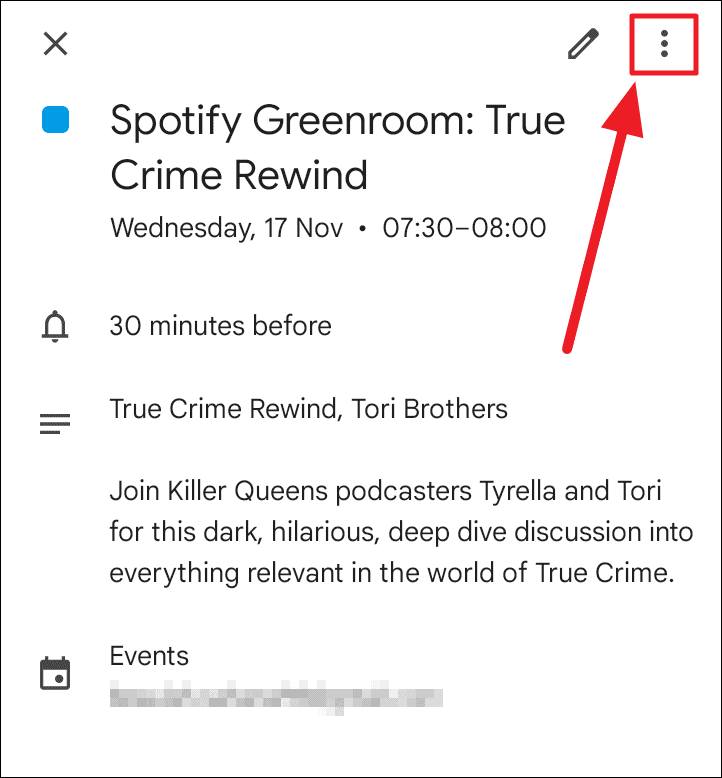
Now, tap ‘Delete’ from the context menu.
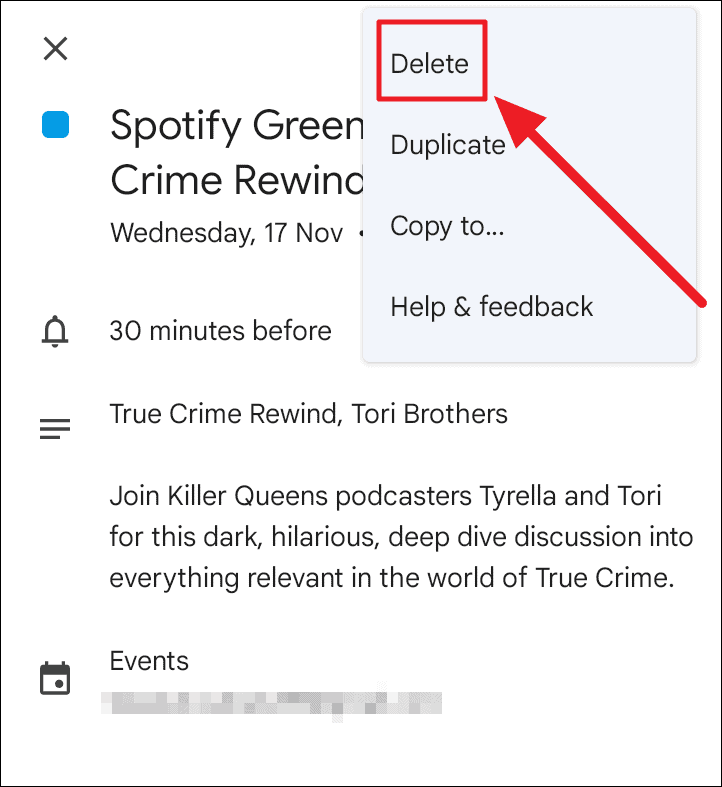
Then, hit ‘Delete’ in the UAC (User Account Control) that appears next. The event is now out of your calendar.
You can also schedule the event on the home screen by tapping the ‘Add to calendar’ button on the event/room block in the horizontal arrangement at the top of the screen.
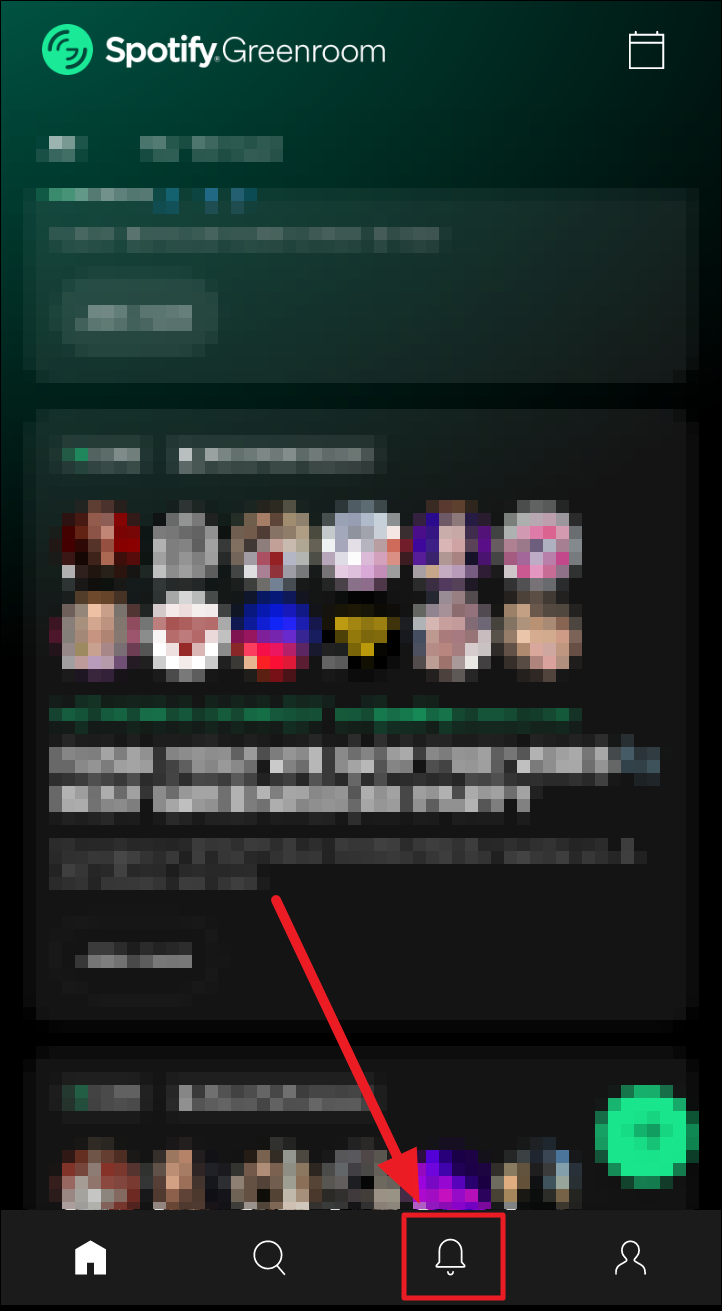
Checking Your Greenroom Activity
Much like Instagram’s ancient activity column, Spotify Greenroom too has an activity section – which also works as a notifications center. This section covers only your activity – your followers, your invites, etc.
To reach the activity area, tap the ‘Bell’ icon at the bottom of the screen.
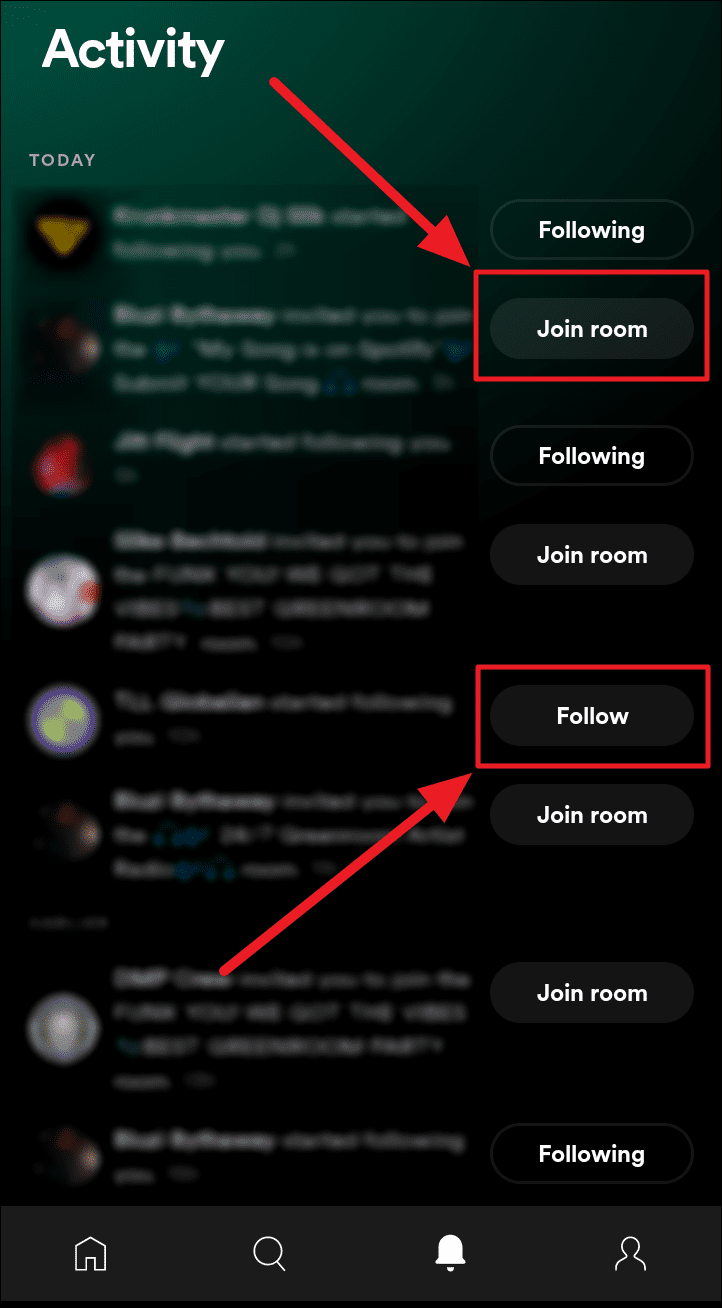
You’ll now see your followers, invites to join rooms and other notifications. You can follow people back and join rooms from this screen. Just tap the ‘Follow’ or the ‘Join’ button next to the respective notifications.
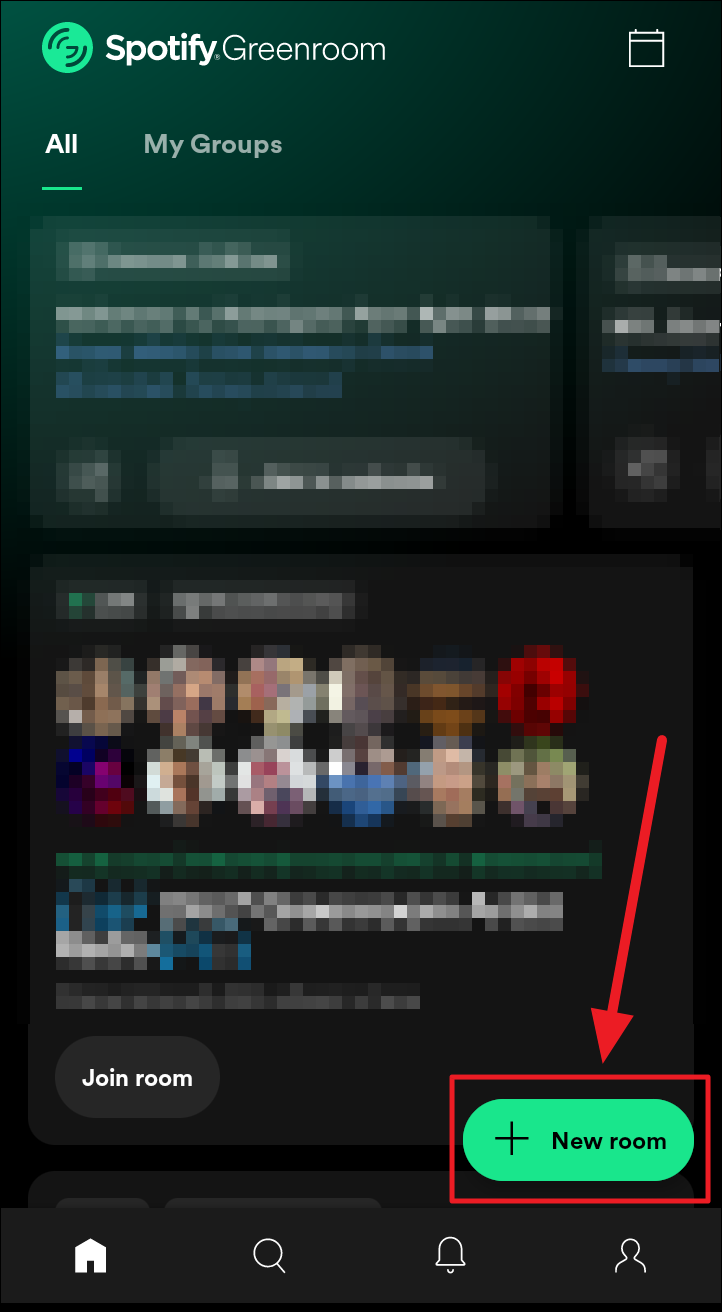
Creating Your Own Spotify Greenroom
Creating a Greenroom for yourself is super simple, easy, and quick. Tap the ‘New room’ button in green (or a plus (+) button if you scroll through the rooms) towards the lower half of the screen to the right. This will lead you to the room creation screen.
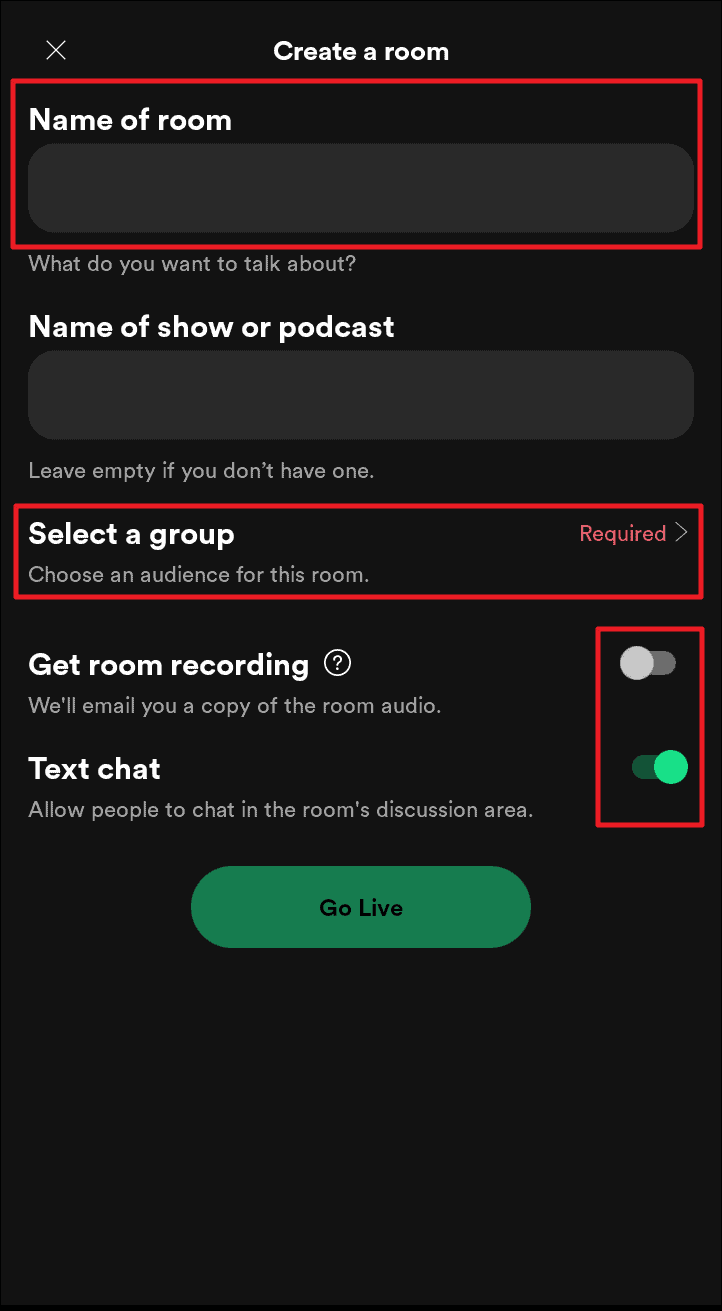
The ‘Create a room’ screen will have the following fields to fill.
Name of the room – Give your room a name based on the topic of discussion or the activity (playing music/DJ-ing, reading poetry, etc, for instance) of the room.
Name of Podcast/Show – This is an optional field. If you already have an audio show or a podcast, you could mention the name of that show/podcast.
Get room recording – Room recording is always enabled for all greenrooms. If you want a copy of the recorded audio via, tap the toggle next to ‘Get room recording’ to turn it green. Now, provide the correct email address in the space below this option’s title
Text Chat – This option pertains to the ‘Discussion’ section of the room. You could enable or disable it depending on the type of room you’re creating. If you want people to talk more and text less, then disable this provision. But, if it’s a music group, where one person plays and the rest just listen, then having a texting space is great to interact.
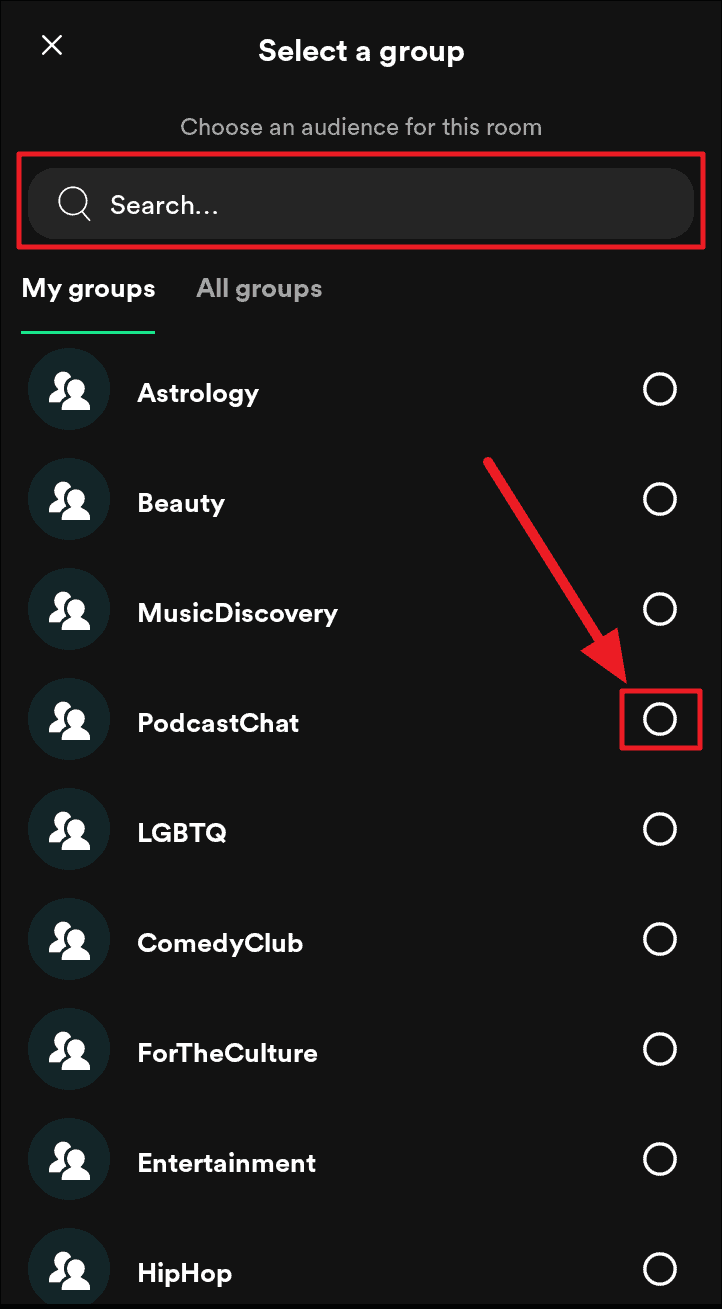
Select a group – This is the most important part while creating your room – knowing your audience. It’s in fact, a highlighted and ‘Required’ field in red. Tap this option to choose your audience depending on the type of room you’re making. This will notify members of that particular to check out and join your group.
Tap the empty circle next to the group you want to choose. You can select only one group. Choose your room correctly.
The ‘My groups’ section is the list of all the groups you follow or have shown prior interest in (while setting up your Greenroom account). The ‘All groups’ section opens to a wider selection as it is a compilation of all the available rooms on the app.
Once you fill in the mandatory fields and enable necessary provisions, you can now go live. Tap the ‘Go Live’ button to push your new room into the Greenroom network.
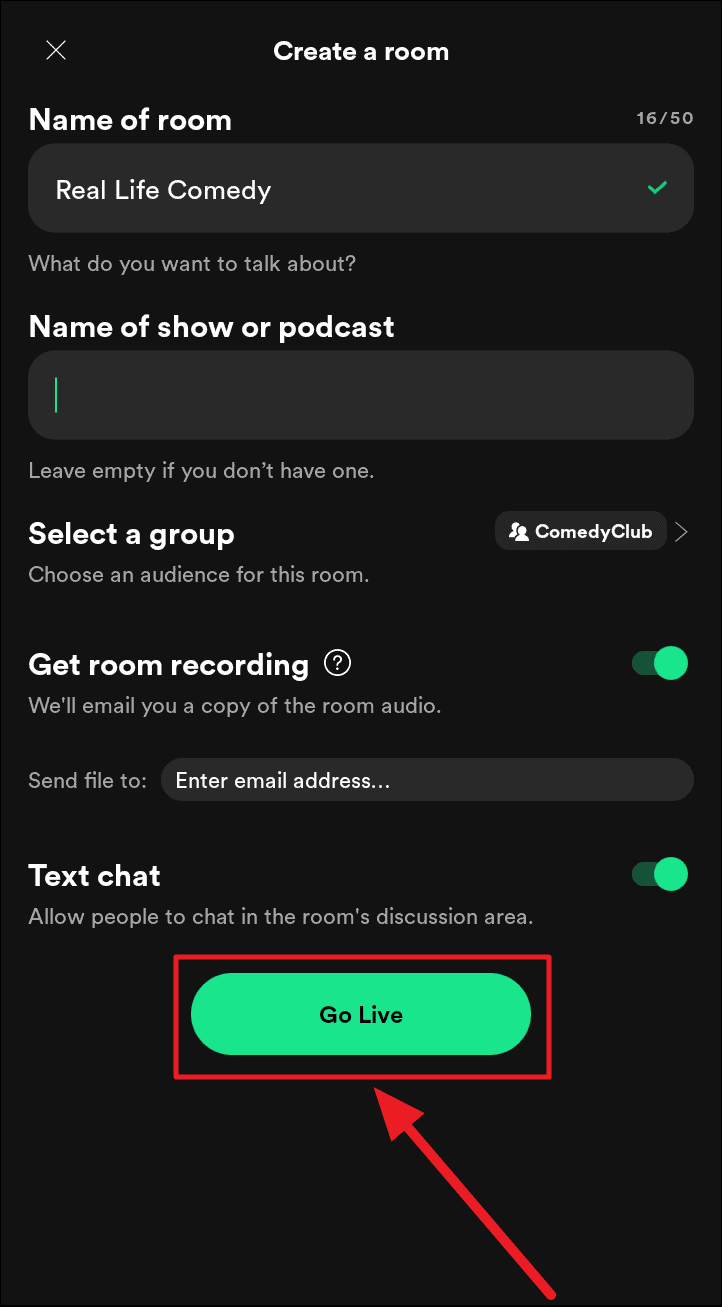
Your room is now live and members of your chosen group can easily find and join your group. Even people outside of it could find your group depending on how big it is.
When you host a room, you cannot leave it. Leaving the room will end the session and the room for everyone.
Each listener that joins your room will be visible in the ‘Others in the room’ section of the stage. Basically, in the ‘Listeners’ section and not the ‘Speakers’ section.
The ‘Listeners’ section is for those who join the room and need to ask to speak. The ‘Speakers’ section is for the listeners who are either invited to speak by the host or one of the speakers. It also houses all the accepted invites.
Inviting Listeners to Speak and Requests to Speak
To invite a listener to become a speaker, tap the listener’s profile picture and select ‘Invite to speak’ from the menu. Once the listener accepts the invite, they will be in the ‘Speakers’ section of the stage.
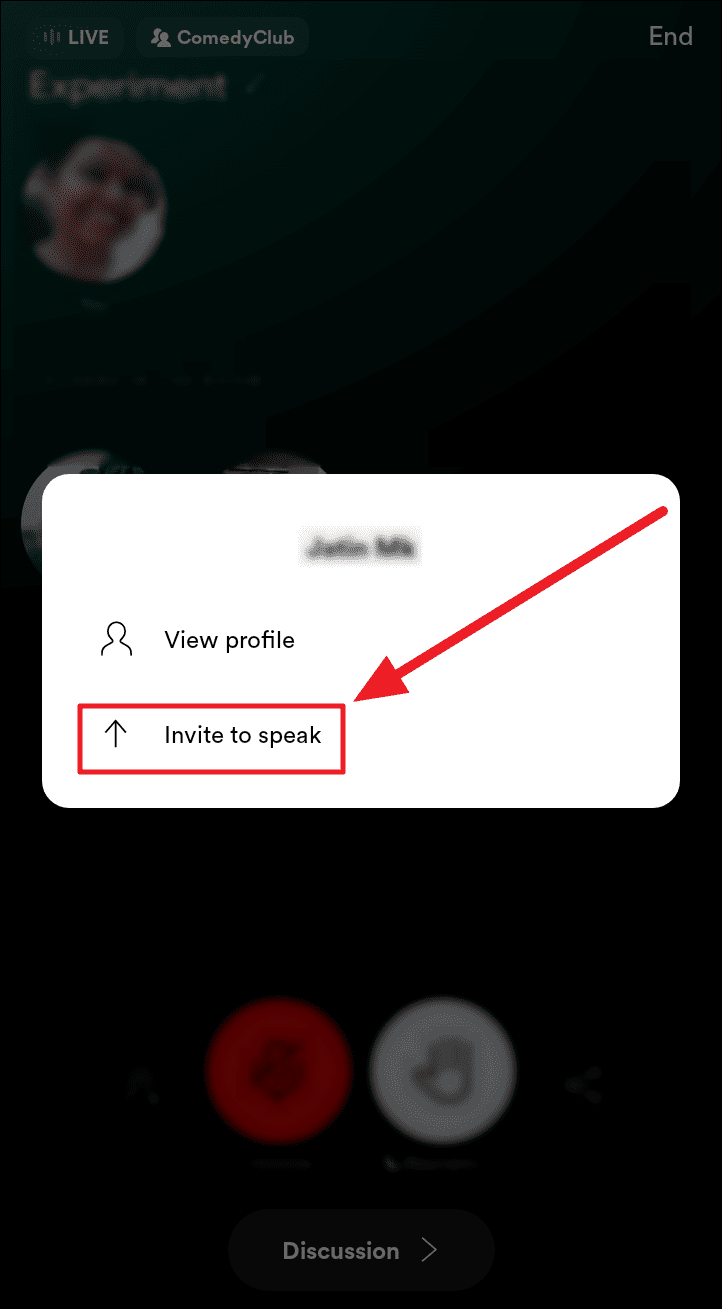
When you’re a listener, you can easily check out the profiles of the people in the room by tapping their profile pictures. But, when you’re the host, you will need to select ‘View profile’ from the same menu to view the person’s profile.
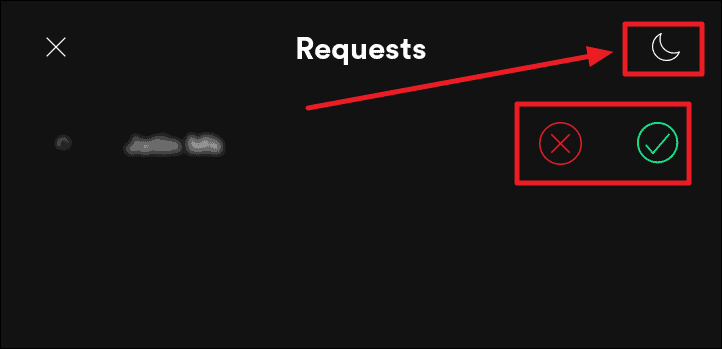
In the situation when you don’t invite listeners to speak, but rather receive requests to speak, you have the power to accept or reject the request. Tap the ‘Requests’ button next to the ‘Ask to Speak’ button (available only when you host a room) to view all requests. You’ll see the number of requests in a small blue circle to the top right of this button.

Tap the ‘X’ mark in red or the tick mark in green to reject or accept a listener’s request to speak, respectively. If you want all speakers to be muted by default when they enter the room, tap the crescent moon icon at the top right corner of the screen. This will mute every speaker in the room. They can individually unmute to speak/play music.
When you tap the crescent moon icon, the same icon will appear next to the ‘Requests’ button on the stage as well.
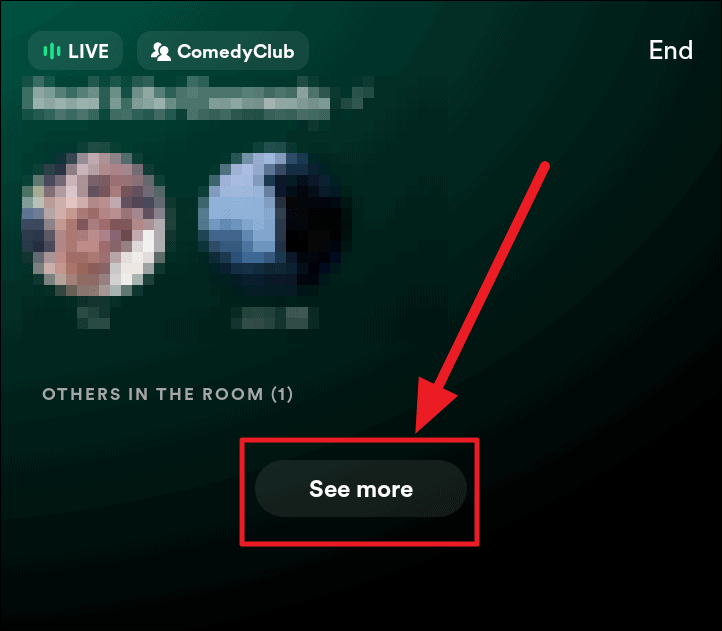
If you are inviting multiple people to speak, scroll through the list of listeners in your room to find and tap the ‘See more’ button.
Now, tap the ‘+Speaker’ button next to the listener(s) you want to invite as speakers.
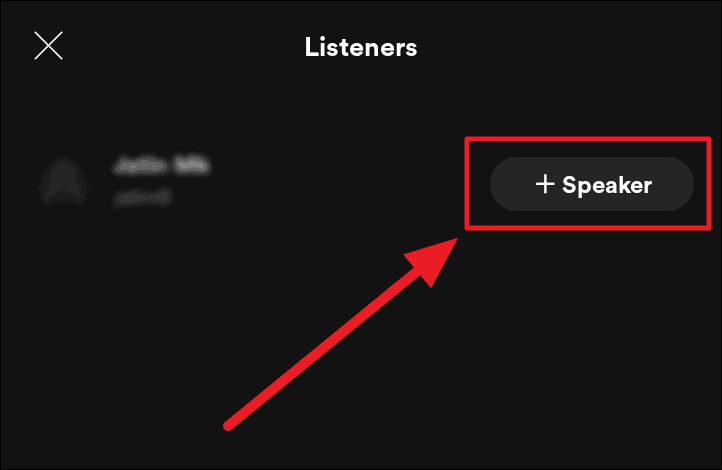
All the chosen listeners will receive ‘Speaker’ invites.
Logging Out of Spotify Greenroom
Logging in and out of Spotify Greenroom is super easy. If it’s via Spotify, it’s even easier – you wouldn’t have to remember your username and password either. To log out of your account, tap the user profile icon at the bottom right corner of the screen
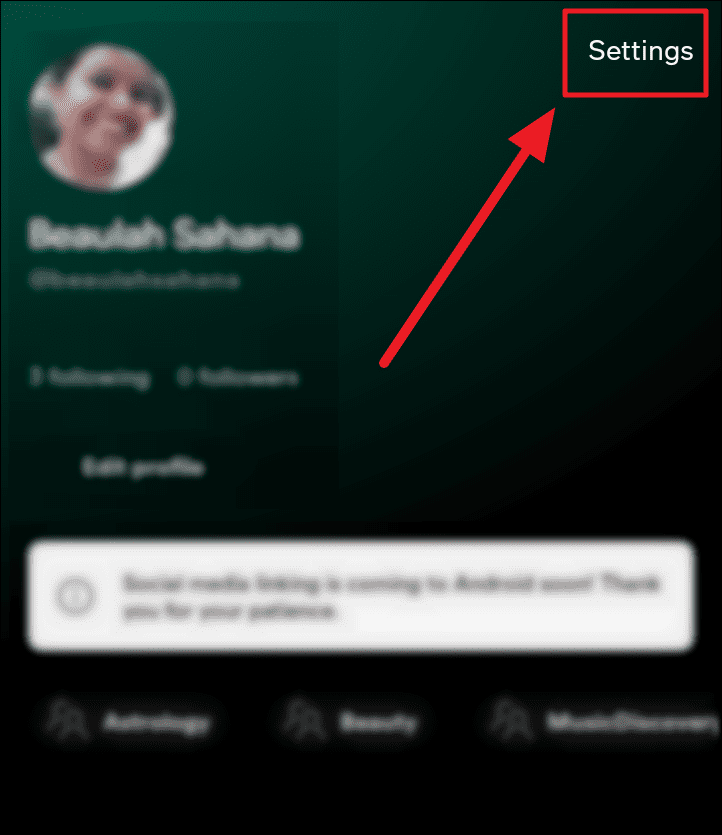
Then, head onto the settings screen by tapping the ‘Settings’ button to the top right corner of the user profile screen.
Next, tap the ‘Logout’ button on the ‘Settings’ screen.
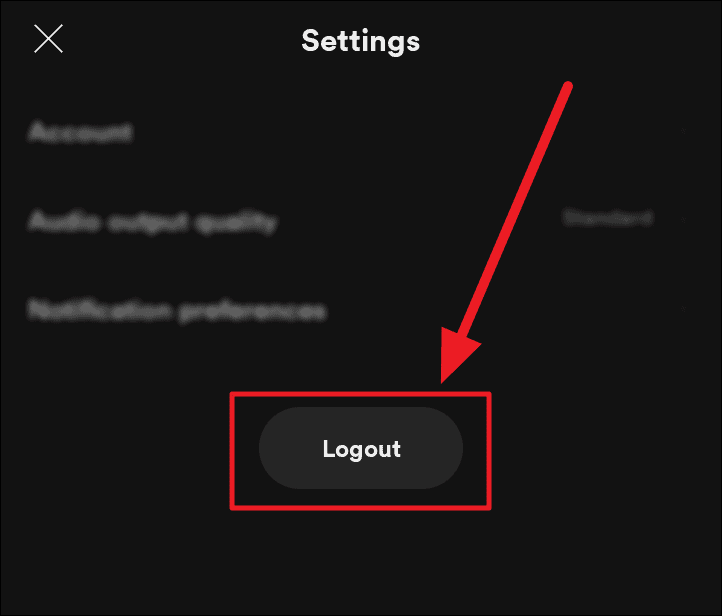
You will instantly log out of your Spotify Greenroom account.
Deleting Your Spotify Greenroom Account
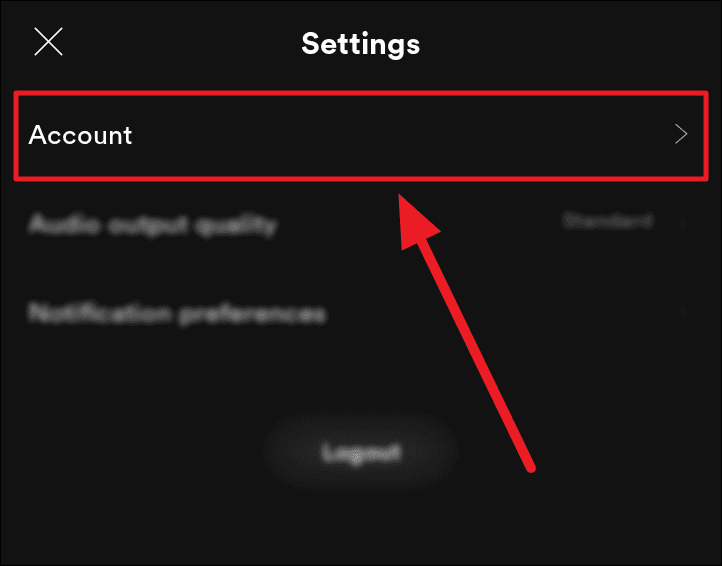
To delete your Spotify Greenroom account, first, tap the profile icon to the bottom right corner of the screen.
Tap the ‘Settings’ button to the top right corner of the profile page.
Select the ‘Account’ option on the ‘Settings’ page. It will be the first option here.
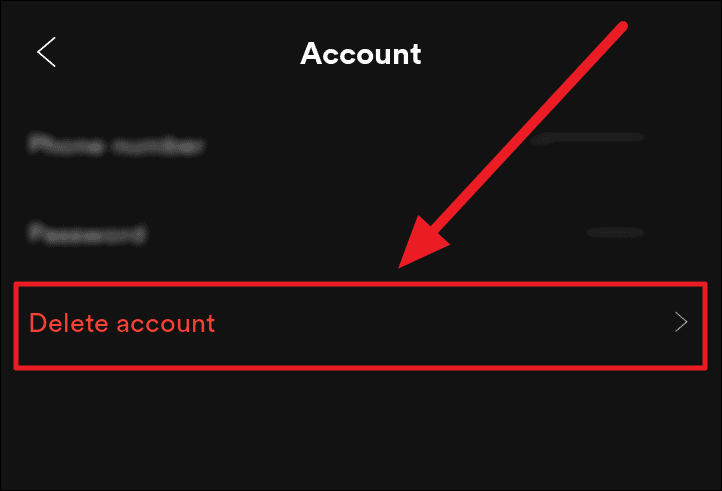
Now, tap the ‘Delete account’ option in red on the ‘Settings’ page.
You will now receive a UAC prompt. Type in your username and then hit the ‘Delete my account’ button to confirm the deletion.
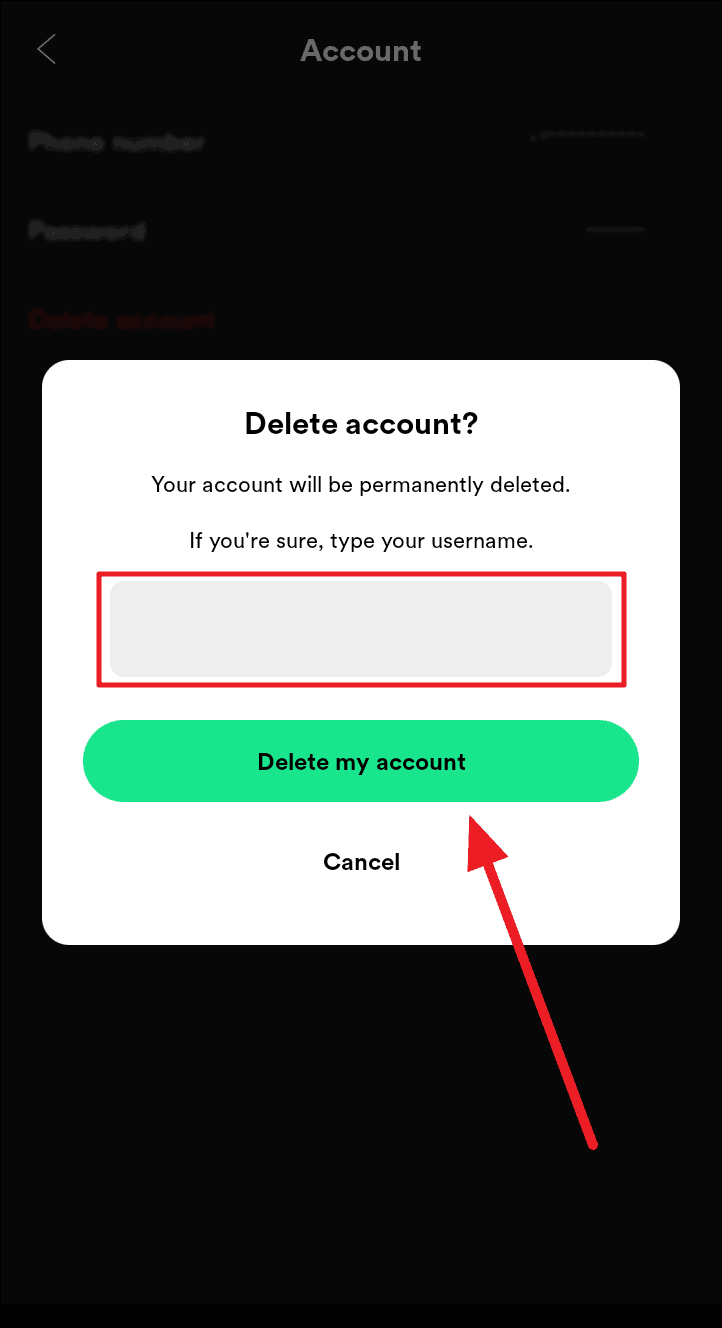
Your account is now deleted.
And that’s about the basics of Spotify Greenroom and using the application. This is a wonderful space for music, to talk about sports, and anything you fancy – all within the parameters of conduct and safety of the app. Hope you found our guide useful and hope you make and engage in some wonderful greenrooms. Happy networking!


