100 Days at Sea drops you on a bare raft in the middle of the ocean with a harpoon, a fishing rod, and a clock counting toward Day 100. The run gets harder every day as enemies grow stronger and raid nights start pounding your base, so the first few days are all about locking in the right build order before those threats arrive.
Quick answer: Feed wood into the Bonfire until it hits Level 3, craft two Sawmills for unlimited wood, then add a Crab Trap for passive food and a Map Radar to find islands. Keep the Bonfire lit at night so the Angler Fish cannot reach you.
First build order for a stable raft
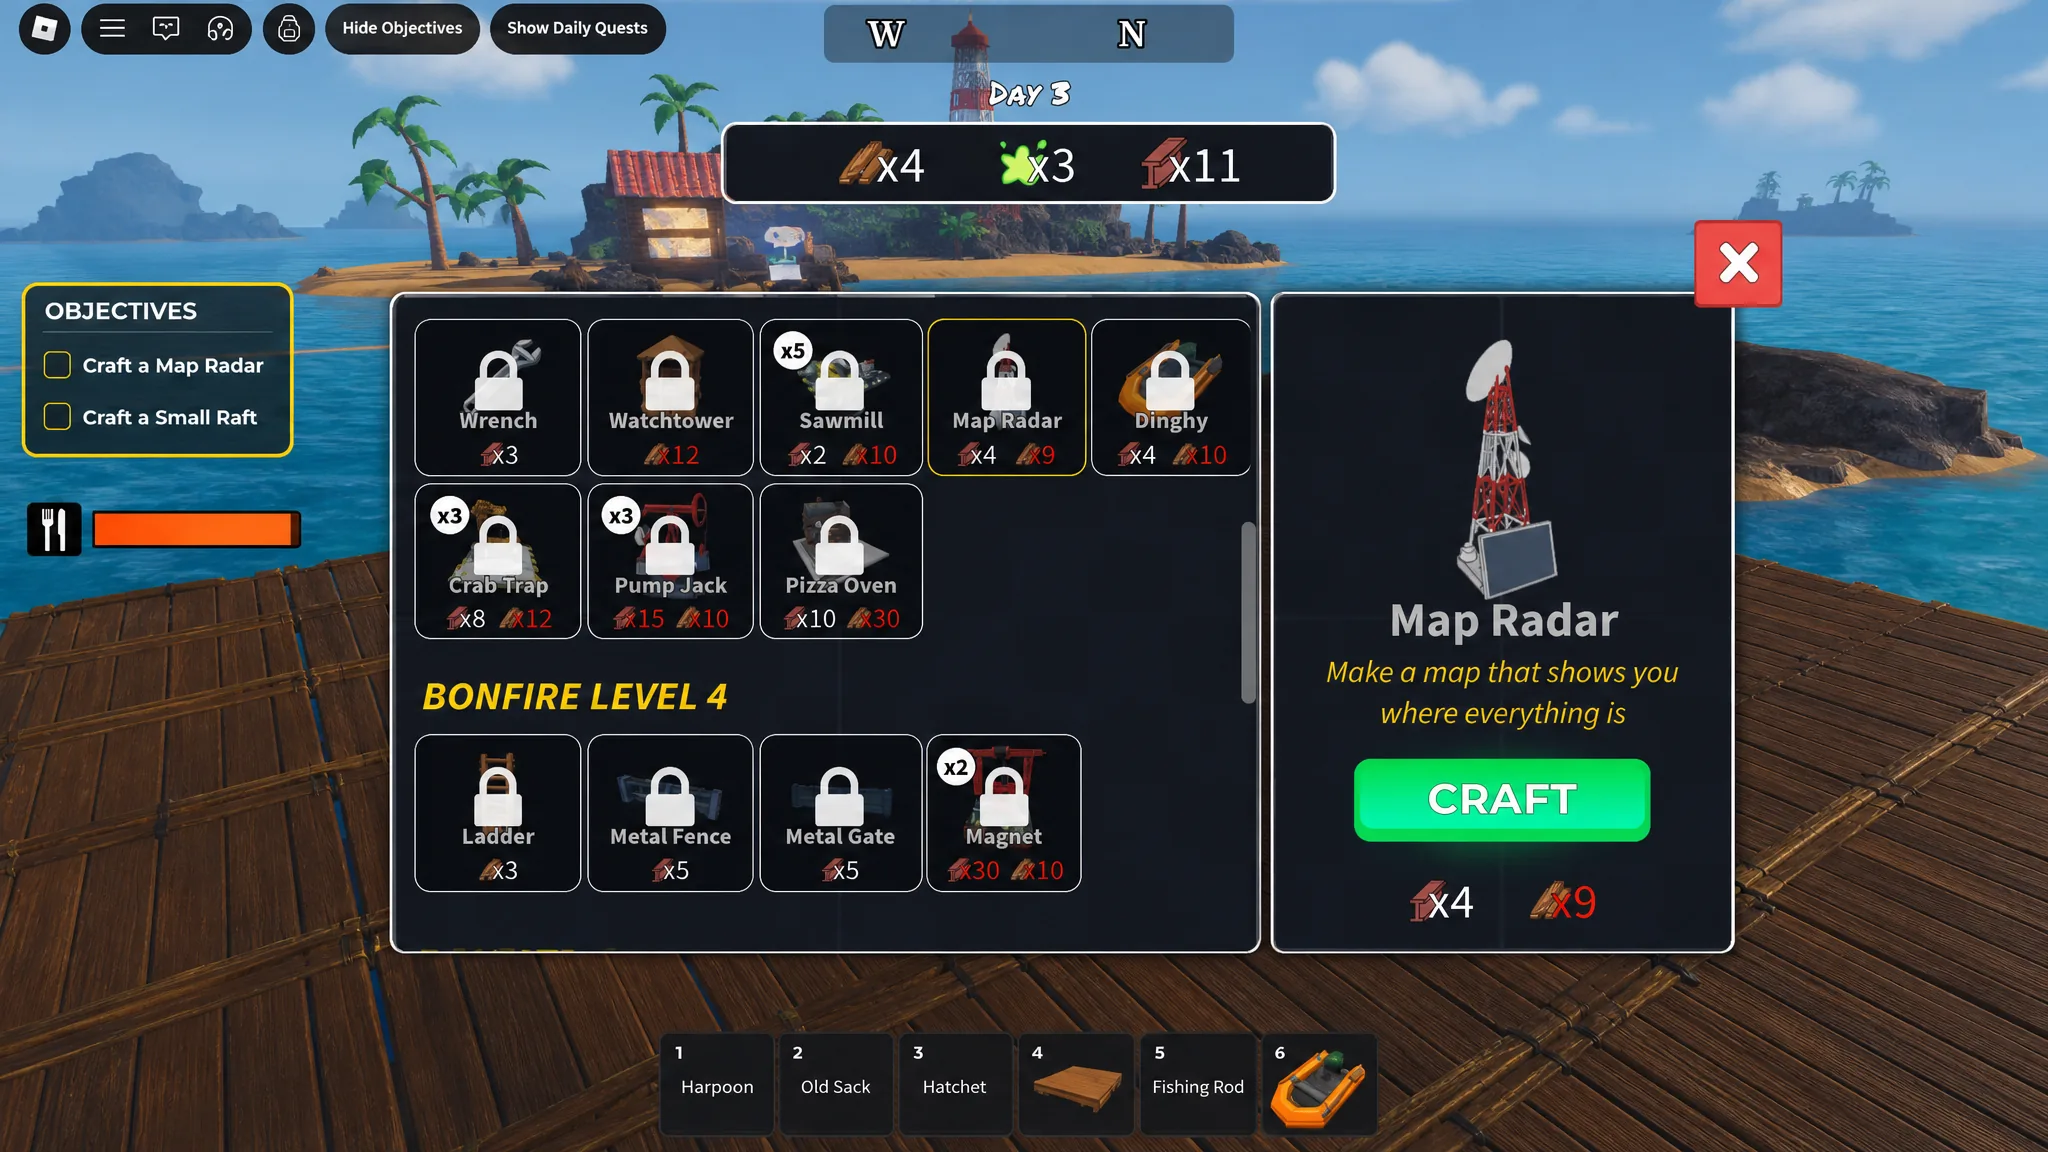
Buildings carry your entire run, and the order you unlock them decides whether Day 10 feels safe or desperate. Everything hinges on your Bonfire level, so leveling the fire is the real first task. Deposit wooden planks and furniture straight into it to push toward Level 3, which opens the crafts that fix your resource problems for good.
| Priority | Building | What it does |
|---|---|---|
| 1 | Sawmill | Infinite wood source; each use gives 3 planks. Build two, more for co-op. Costs 10 Wood + 2 Metal. |
| 2 | Crab Trap | Drops fish and food on a short cooldown with no effort. The Pizza Oven fills the same role. |
| 3 | Map Radar | Unlocks the full map and lets you mark islands so you stop sailing blind. |
| 4 | Auto Turret | Bought from the Travelling Merchant for 150 Doubloons. Handles night raids automatically, ideal solo. |
| 5 | Magnet | Passive infinite metal at Bonfire Level 4. Costs 30 Metal + 10 Wood. |
| 6 | Radio | Marks Survivor locations on your map so you can rescue passive teammates. |
Farming wood, metal, and green gum
Wood and metal drive every craft in the game, so a reliable supply of both matters more than anything else early on. Everything else stays secondary until those two are handled.
Wood
Use the harpoon to pull wooden planks and furniture out of the sea. You can drop them into the crafting machine for building or into the Bonfire to level it up. Once you reach Bonfire Level 3, the Sawmill becomes your permanent answer. Placed on the raft, it produces 3 planks per use in a few seconds and never runs dry. Two Sawmills is the minimum, and you want more if friends are on the raft.
Metal
Metal is scarce at the start. Fish it from the sea with the harpoon or collect it from islands and carry it back in your sack. At Bonfire Level 4 the Magnet unlocks, giving you a passive metal source on the raft. It is slower than the Sawmill but endless, which matters once crafting demand climbs.
Green gum
A green gum-like substance shows up in some recipes, and there is one way to get it. Place Ghost Pirate corpses into the crafting machine. Make a habit of collecting their bodies after each kill instead of leaving them on the ground.
Keeping your food bar full
Starvation shuts off your health regeneration and eventually kills you, so a food supply deserves the same urgency as wood. You have three ways to eat, and they scale differently.
| Method | How it works |
|---|---|
| Fishing rod | You start with one. Cast the chip and click when prompted. Free and fine for the first few days, weak later. |
| Harpoon | Scoop up floating potatoes, and hit the birds that fly over the raft in daytime for Cooked Bird, which restores a big chunk of satiety. |
| Crab Trap | Passive food building that drops fish and items on a short cooldown. The best long-term food source. |
Tip: Always carry spare food. The Fisherman NPC on nearby Fisherman Island trades food for high-tier loot like buildings and weapons, so extra rations double as currency.
Which islands to visit first
Several islands sit near your spawn, but they range from free loot to instant death. Head to the safe ones early and leave the guarded ones until you have real gear.
- Fisherman Island: Your first stop. It is closest and almost always holds two chests, one of which usually contains a Dinghy that speeds up all later exploration. The Fisherman NPC here trades loot for food.
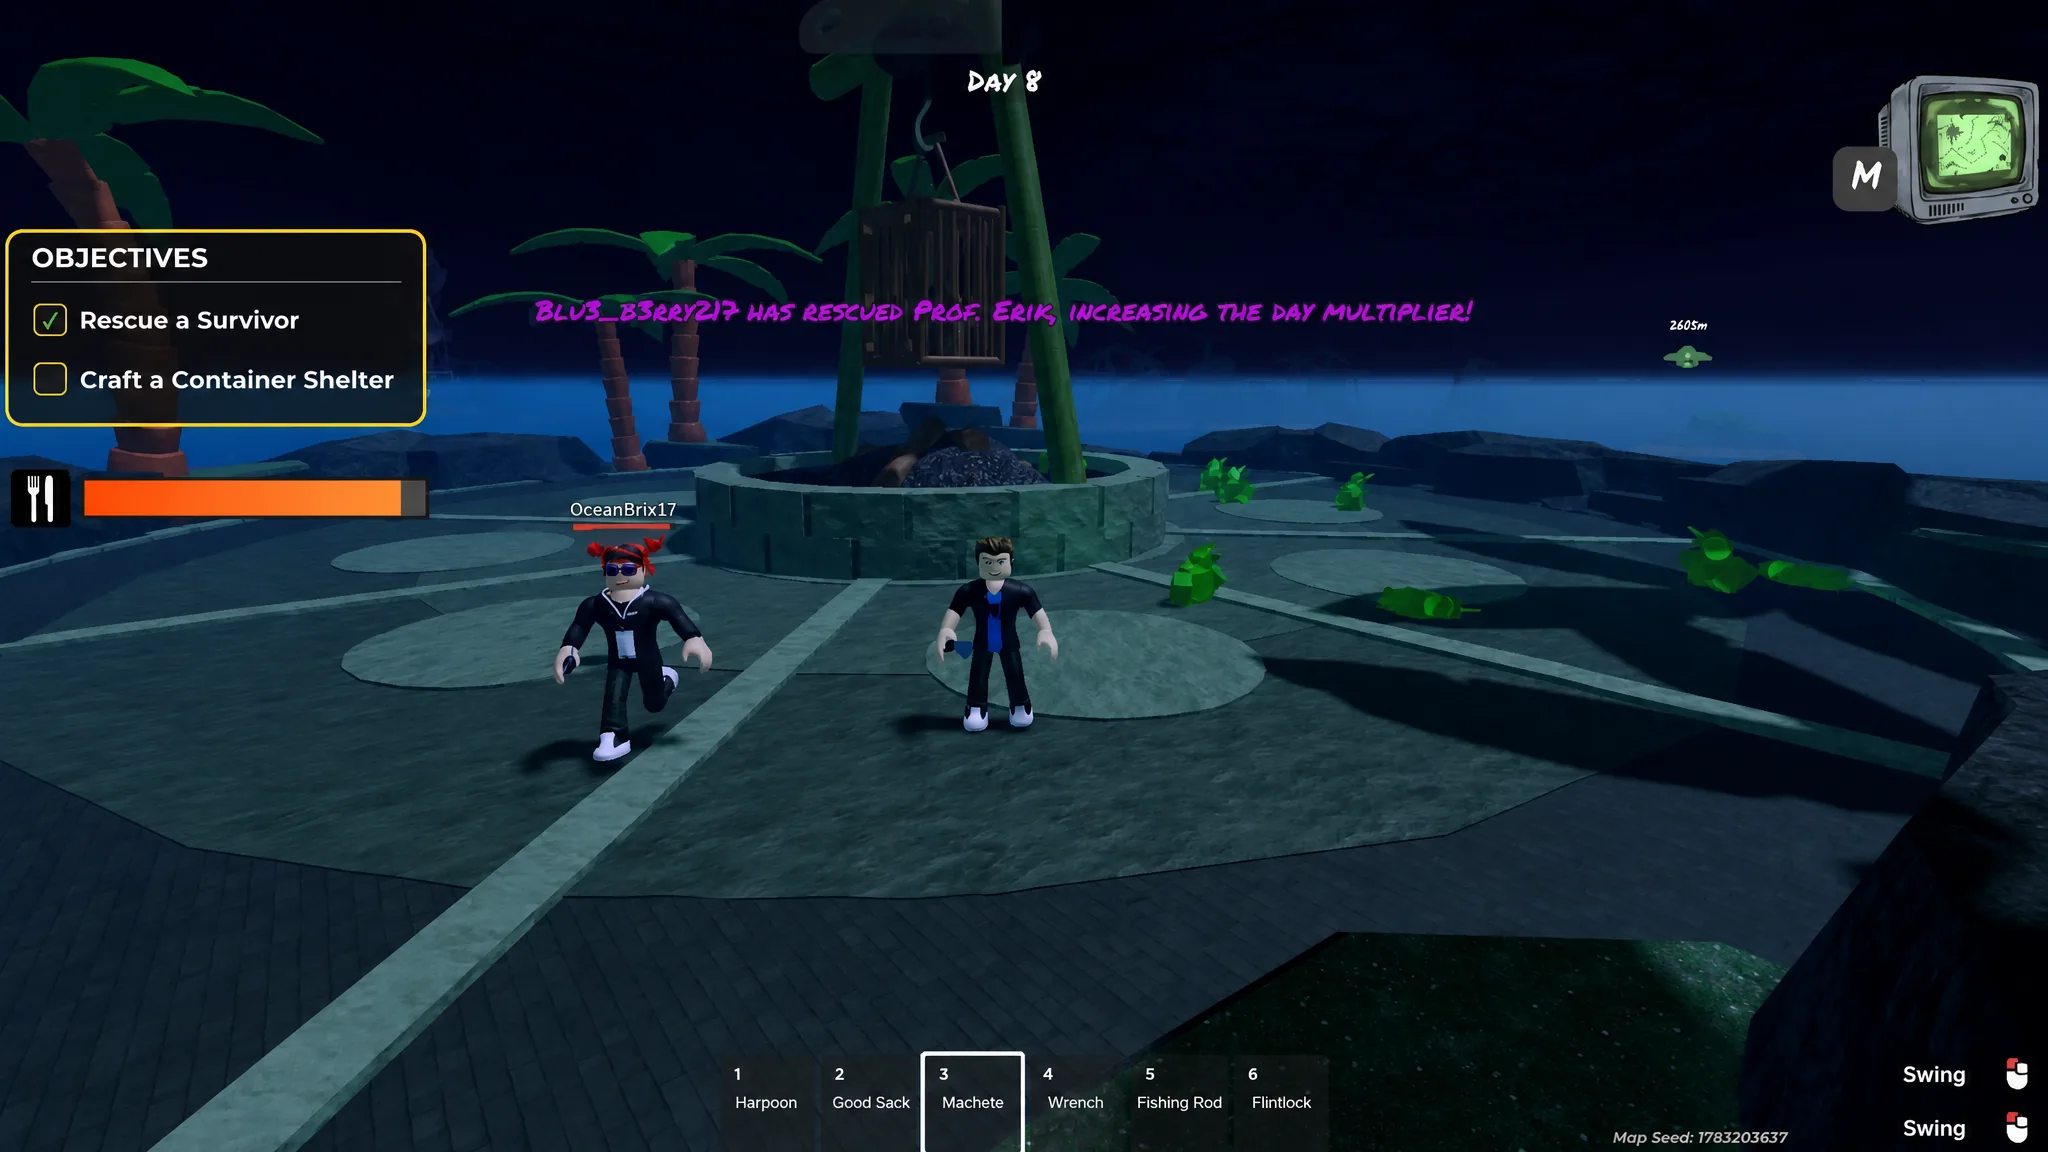
- Survivor Islands: Guarded by waves of Ghost Pirates. Skip until you have decent weapons, but rescued Survivors act as passive teammates, so they are worth the effort.
- Alien Island: The alien invasion lands around Night 6-7 and is easy to repel once prepared. Clear it, then use the Transponder to reveal the Alien Island location and its high-tier loot.
- Mini Islands: Small, scattered, and risk-free. They usually hold a chest or two plus loose loot, so grab them while sailing.
Note: Solo players should avoid the Tower Island and Fortress islands (the ones tied to keys). They are heavily guarded and will likely kill you without high-tier equipment. Save them for co-op or a later run.
Every threat and how to survive it
Four regular enemy types plus one event enemy appear across a run. Knowing each one’s trigger keeps you from losing hours of progress to a single bad night.
| Enemy | How to handle it |
|---|---|
| Angler Fish | The biggest danger. Appears at night when you leave the raft or the Bonfire goes out, then chases until you die. Keep the fire lit and stay near it, or use a Flare Gun to redirect it. |
| Sharks | Patrol islands and hit hard fast. Get out of their range instead of fighting in the water. |
| Tribal Mobs | Standard enemies on some islands and raid nights. Melee or ranged weapons clear them. |
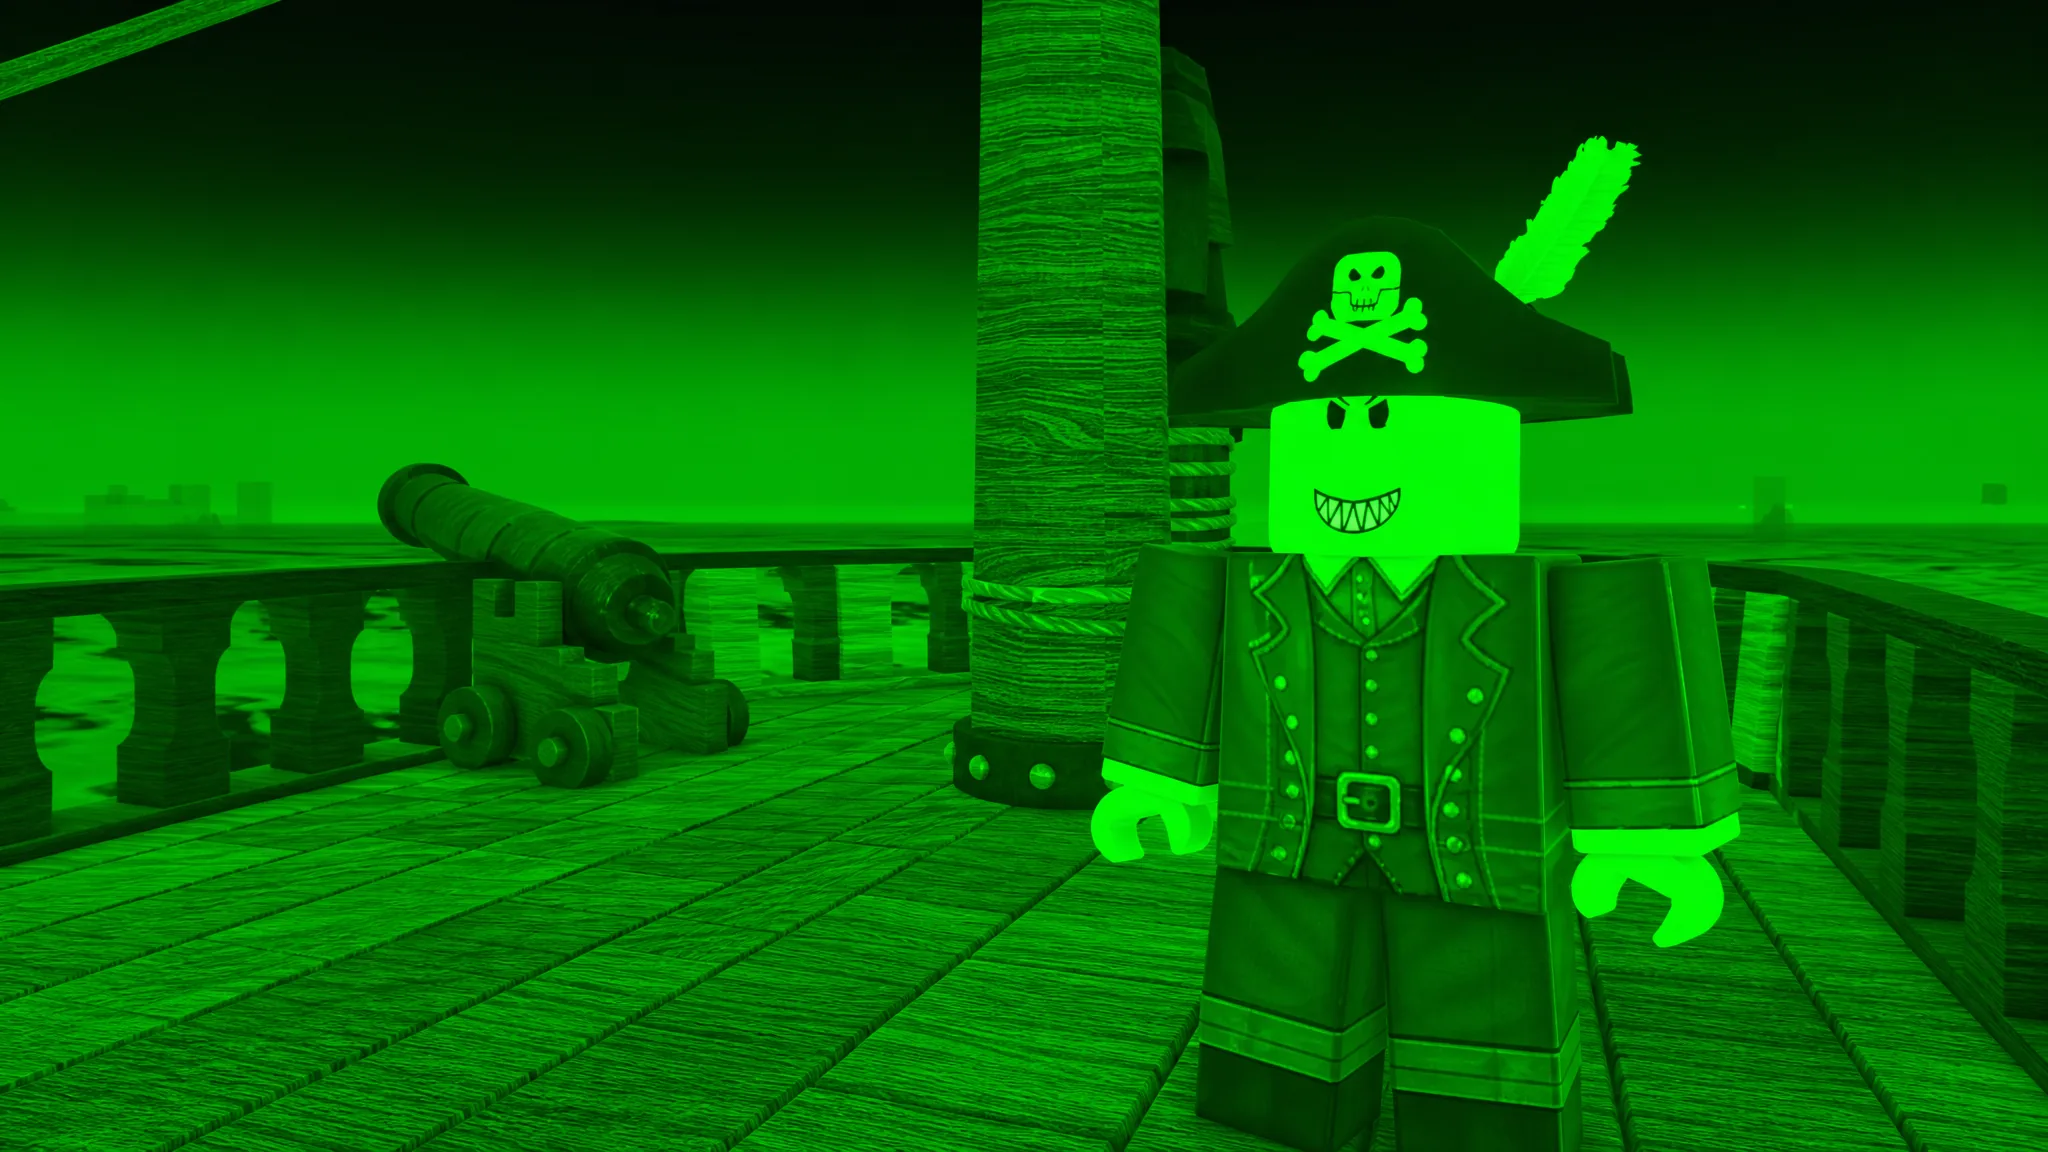
| Ghost Pirates | Come as melee and gunner types. Both fall to weapons; collect their bodies for the crafting machine. |
| Aliens (event) | Small enemies from the Alien Invasion around Night 6-7. A few melee hits each. |
Best classes and how to earn Pearls
Classes are bought in the lobby with Pearls and shape your entire run. They use a one-to-six star rating, and the five and six-star options change how fast and how safely a run goes.
| Class | Stars / Cost | Why it’s worth it |
|---|---|---|
| Alien Overlord | 6★ / 750 Pearls | Starts with the Raygun and a UFO ship. At max level the ship moves faster and the weapon gains 50% cooldown reduction. |
| Raider | 6★ / 750 Pearls | Dual Pistols and extra speed. Ammo regenerates from kills and magazine grows every 5 kills. The strongest offensive class. |
| Ancient Squid | 6★ / 750 Pearls | Squid Laser Gun plus +15% sprint, +10% HP, +20% laser damage and no overheat at max level. |
| Treasure Hunter | 5★ / 500 Pearls | Up to 6 extra sack slots, 150 Doubloons, and a permanent +25% Doubloon bonus that snowballs. |
Pearls are the premium currency, and every method to earn them is free. Achievements and badges pay out on milestones, daily quests give steady income, redeeming active codes is the fastest early boost, and crafting Pearls unlocks at max Bonfire level as the slowest option. Codes are entered in-game, and you can grab the current ones from the 100 Days at Sea codes list.
Companions worth chasing early
Companions work as passive pets with ongoing perks. You buy them from the Companion Shop by opening chests, and each chest has a drop chance based on its rarity tier, so higher tiers give better odds at stronger pets. A few stand out.
| Companion | Bonus |
|---|---|
| Salamander | Auto-grabs nearby loot so you never have to collect it. |
| Penguin | Spawns a Bandage every 220 seconds for steady healing. |
| Crow / Seagull | Drops food every 120 seconds, solving your food search. |
| Swordfish / Magma Golem | Increases melee damage by +10%. |
Get the Sawmill and Crab Trap running, keep the Bonfire lit through every night, and mark your route with the Map Radar before pushing out. Once those basics hold, the early raid nights stop being a threat and you can start sailing toward the harder islands and the Bermuda Triangle at the heart of the run.