Many users encounter the error “Some settings are managed by your Organization” even when they are not a part of any organization. Mostly, it shows on the Windows Update screen, but it appears when trying to make changes such as changing the privacy settings or the background. If you too are facing the error, here’s everything you need to know.
What is the ‘Some Settings are Managed by your Organization’ Error?
The first question that arises in one’s mind when encountering an error on Windows 10 is ‘What’s the error?’ and ‘What’s leading to the error?’. Therefore, before we move to the fixes, you must understand what the error is and the factors/issues that lead to it.
This error is generally encountered after upgrading to Windows 10. There are certain settings in Windows 10 which empower the organization to limit certain actions and settings by the user.
If Windows 10 settings weren’t configured properly at the time of setup, you could get a “Some settings are managed by your organization” notice on your system. Even when you are the only person using the system and it’s not connected to any domain or organization, it will still show that the ‘Organization’ has limited some settings like the “Your organization has turned off automatic updates” error on the Windows Update screen.
Let’s see how you can fix this error. Execute the fixes below in the order they are mentioned for a quick resolution.
Fix 1: Make Changes to Windows Update in Local Group Policy Editor
Making changes to the Local Group Policy Editor is one of the most effective fixes. In this fix, we will reset the settings by enabling and disabling them, and fix the bug that’s leading to the error.
To make changes to Group Policy Editor, press WINDOWS + R to launch the ‘Run’ command. Next, enter ‘gpedit.msc’ in the text box and then either click on ‘OK’ or press ENTER to open the Local Group Policy Editor.

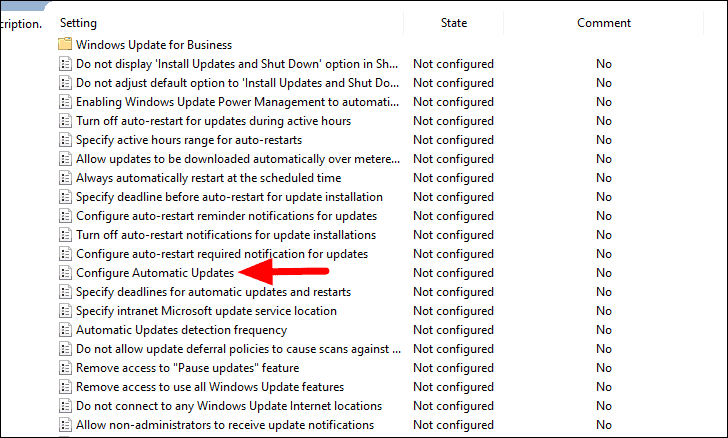
In the Group Policy Editor, navigate to the following address.
Computer Configuration/Administrative Templates/Windows Components/Windows UpdateCheck if all the options on the right are set to ‘Not Configured’, if not set them to ‘Not Configured’. Now look for the ‘Configure Automatic Updates’ option and double-click on it to change its settings.
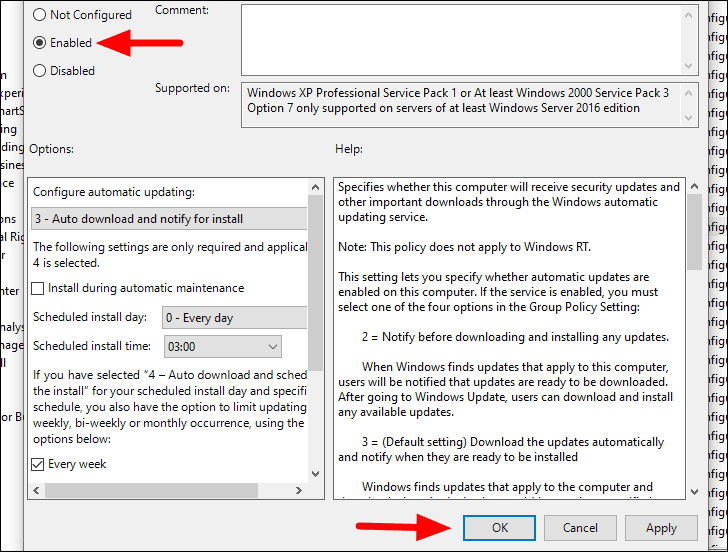
Next, click on the checkbox before ‘Enabled’ to enable the option and then click on ‘OK’ to save the changes and close the window.
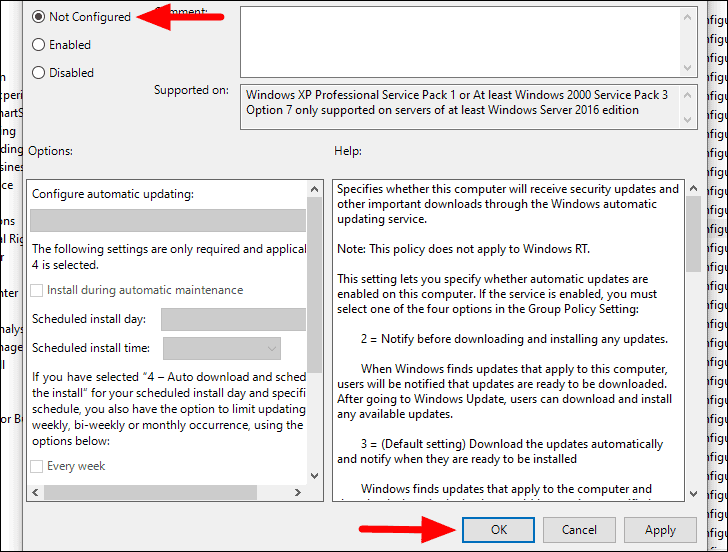
After you saved the changes, reopen the same option and then select ‘Not Configured’ near the top-left corner. Finally, click on ‘OK’ at the bottom to save the changes.
After you have enabled and disabled the option, check if the error is fixed. If not, try the same process with a couple of other similar options.
Fix 2: Disable the Always-Update Settings in MSI Dragon Center
If you are using an MSI motherboard and have installed their control center (MSI Dragon Center), its ‘Always-Update’ settings could be preventing Windows 10 from updating.
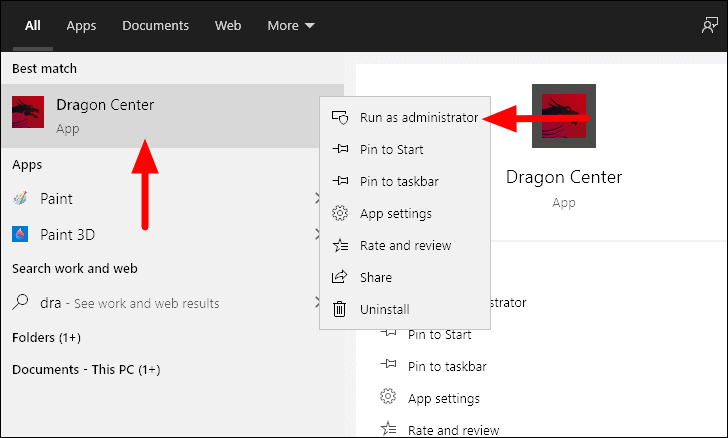
To disable the ‘Always Update’ setting, search for ‘Dragon Center’ in the ‘Start Menu’, right-click on the search result, and then select ‘Run as administrator from the menu.
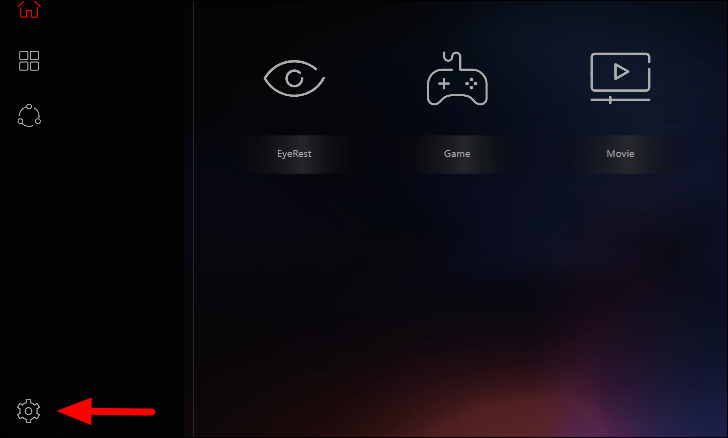
Next, click on the ‘Settings’ option at the bottom left corner of the control center.
You will now find multiple options on the screen. Next, check if the ‘Always Update’ setting is turned on. If it is, click on the toggle next to it to disable the setting.
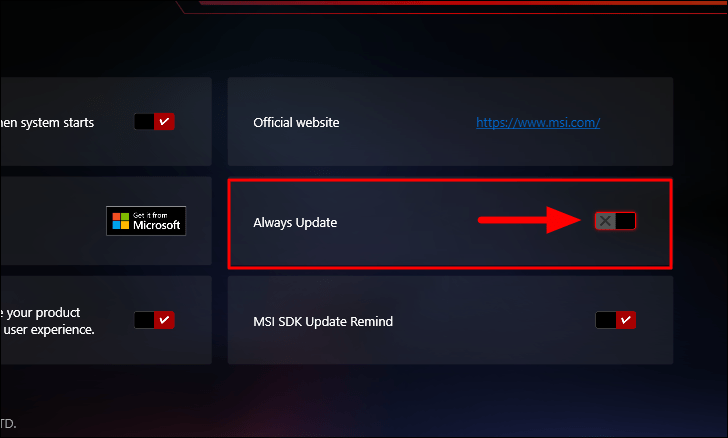
After you have made the changes, reboot the Windows and check if you can now update the Windows.
Fix 3: Change Privacy Settings in Local Group Policy Editor
If the error has not been fixed yet, you can try changing the telemetry settings from the Local Group Policy Editor.
First, launch the editor as discussed in the previous sections and then head to the following path.
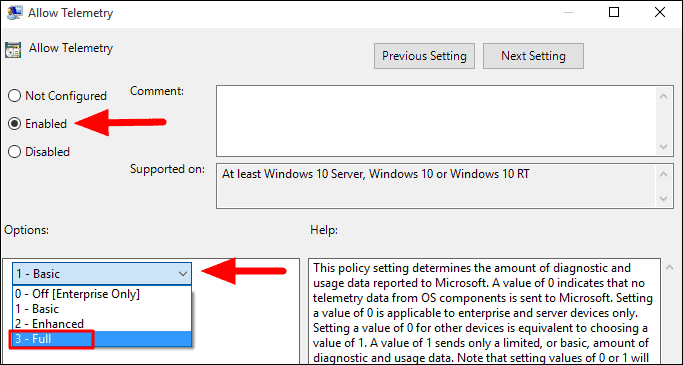
Computer Configuration/Administrative Templates / Windows Components / Data Collection and Preview BuildsOnce you are there, locate the ‘Allow Telemetry’ option on the right and double-click on it to change the settings.
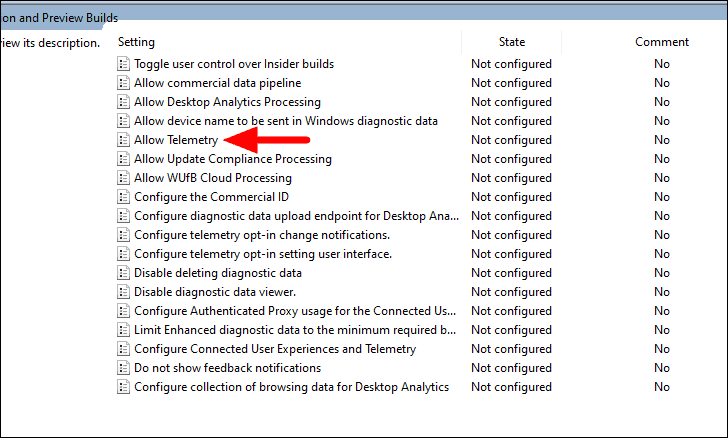
Next, tick the checkbox for ‘Enabled’ and then click on the box to check the various options. Select ‘Full’ from the drop-down menu and then click on ‘OK’ at the bottom to save the changes.
Reboot the Windows and see if the error is now fixed. If it persists, move to the next fix.
Fix 4: Make Changes to System Property
There’s an option on Windows where you can select whether your’s is a home computer or part of a network. If the above fixes have not worked for you, give this a try as well.
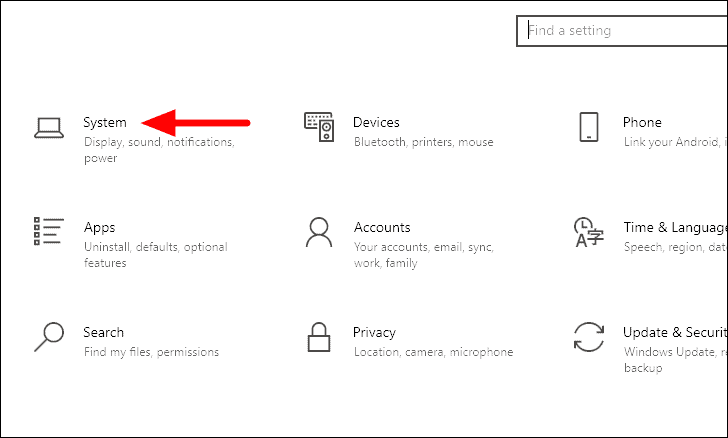
To change the system properties, press WINDOWS + I to launch the system ‘Settings’ and then click on ‘System’.
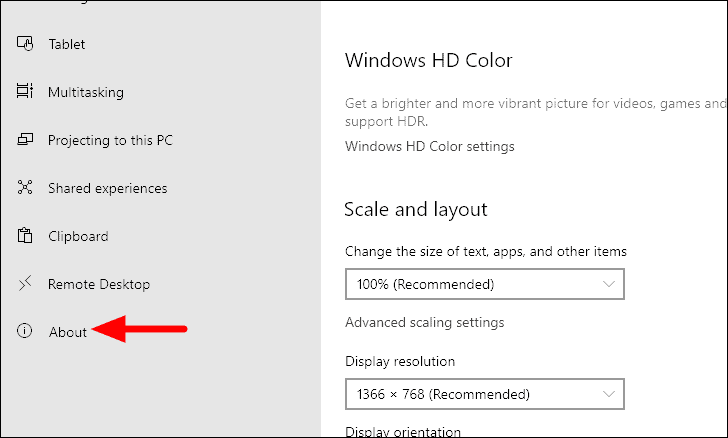
You will now find various tabs on the left. Scroll down and select ‘About’ from the list of options.
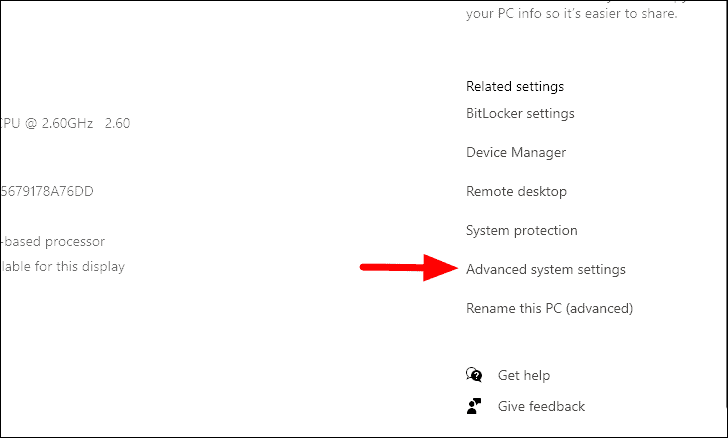
Next, click on ‘Advanced system settings’ on the right under ‘Related settings’.
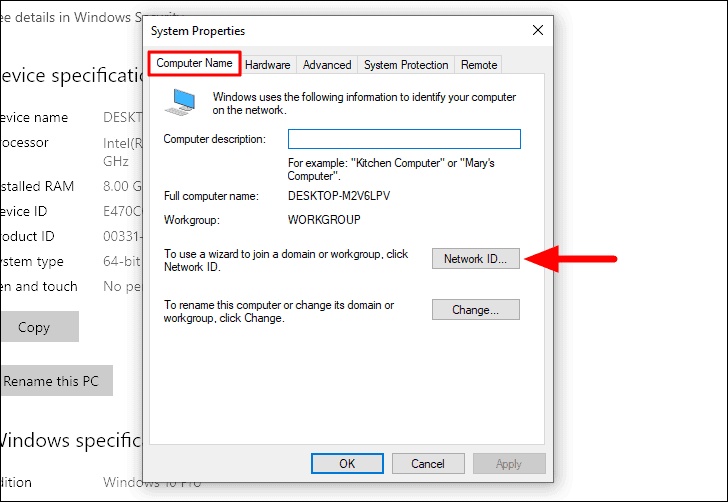
The ‘System Properties’ window will now open. Navigate to the ‘Computer Name’ tab on the top and then click on the ‘Network ID’ option.
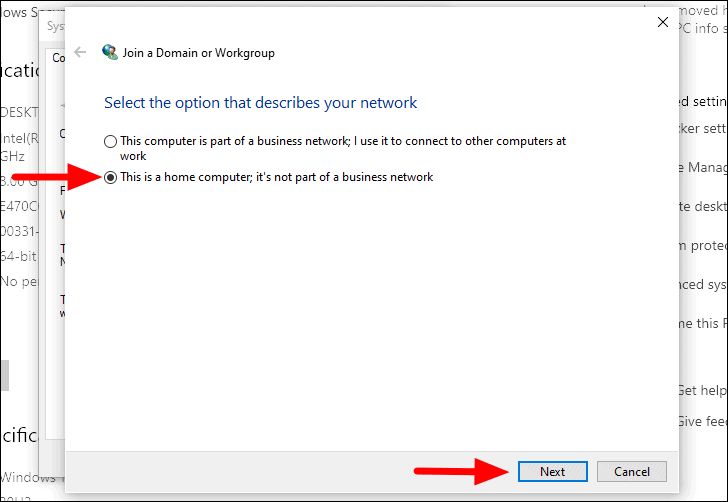
You will now be asked to select an option that describes your network. Select the second one that reads ‘This is a home computer; it’s not part of a business network’. After selecting the option, click on ‘Next’ at the bottom.
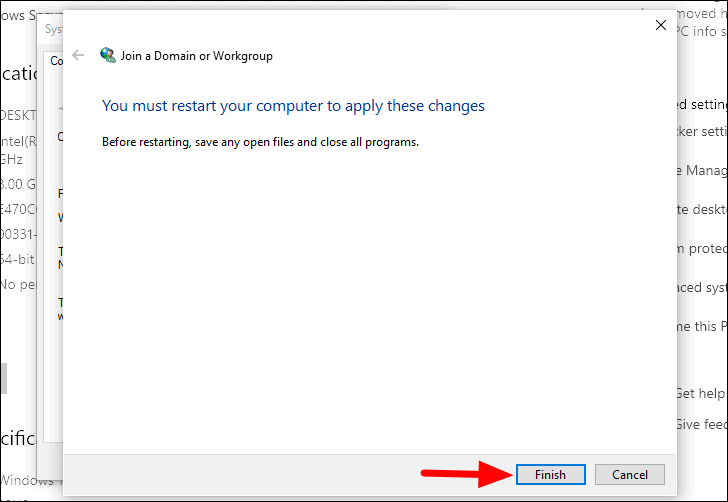
You will now be asked to restart the computer. Click on ‘Finish’ at the bottom to close the window and then restart the computer.
Once the computer restarts, check if the error is fixed and you are able to update the Windows. If not, move to the next fix.
Fix 5: Make Changes to Registry Editor
Another fix that might help you fix the ‘Some settings are managed by your Organization’ error when updating Windows 10 is making changes to the Registry. Since making changes to the Registry is a risky affair, it’s recommended that you follow the steps as it is and not make any other changes whatsoever. Any lapse while editing the Registry can lead to severe issues with the system.
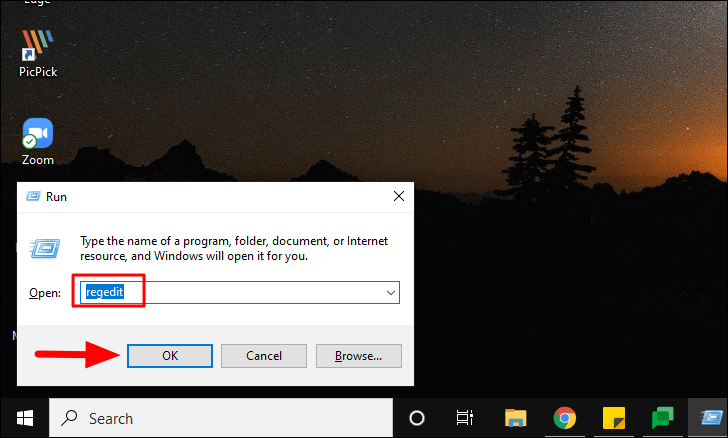
To make changes to the Registry, you first have to launch it from the ‘Run’ command. Press WINDOWS + R to launch ‘Run’, and then enter ‘regedit’ in the provided section. Now, either press ENTER or click on ‘OK’ at the bottom to open the Registry Editor.
In the Registry Editor, navigate to the following path.
HKEY_LOCAL_MACHINE\SOFTWARE\Policies\Microsoft\Windows\WindowsUpdateNow, look for ‘Wuserver’ on the right, right-click on it and then select ‘Delete’ from the context menu. Click ‘Yes’ on the confirmation box that pops up to complete the process.
Restart your system and check if you can now update the Windows 10.
Fix 6: Check the Antivirus
If you have installed any third-party antivirus on your system, it could be leading to the error in updating Windows 10. To fix, disable the antivirus and check if the error has been fixed. If you still encounter it, try uninstalling the antivirus altogether and then see if you are able to update the windows.
Fix 7: Reset Windows
If none of the above fixes have worked for you, resetting the Windows is the last option but it will definitely fix the error. However, always go for this fix when none of the other ones have been able to resolve the error. While going for reset, the apps and settings are removed but you have the option to either save the files or delete them as well.
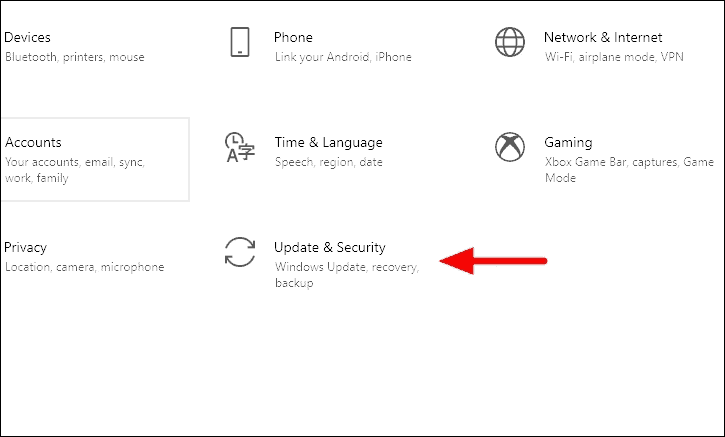
To reset the Windows, press WINDOWS + I to launch system ‘Settings’ and then click on ‘Update & Security’.
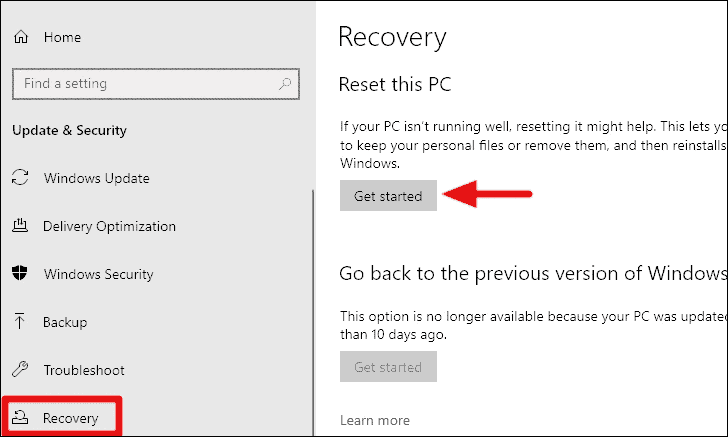
Now, select the ‘Recovery’ tab from the left and then click on ‘Get started’ under ‘Reset this PC’ at the top.
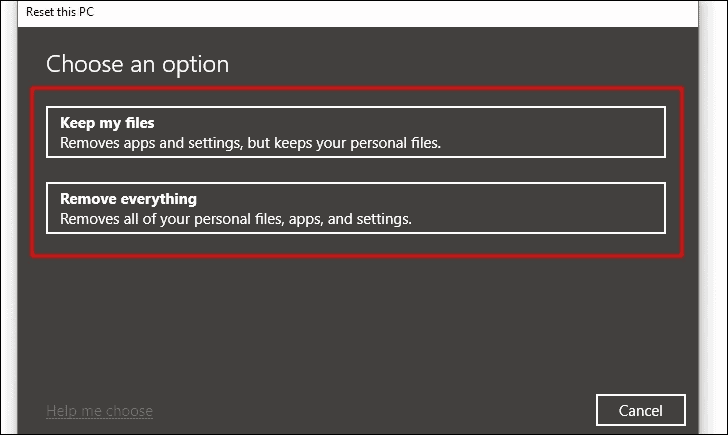
The ‘Reset this PC’ window will open. You are now asked to select an option, whether to keep the files or remove them. If you select the ‘Remove everything’ option, your system will be as good as new after the reset. Select the appropriate option to proceed.
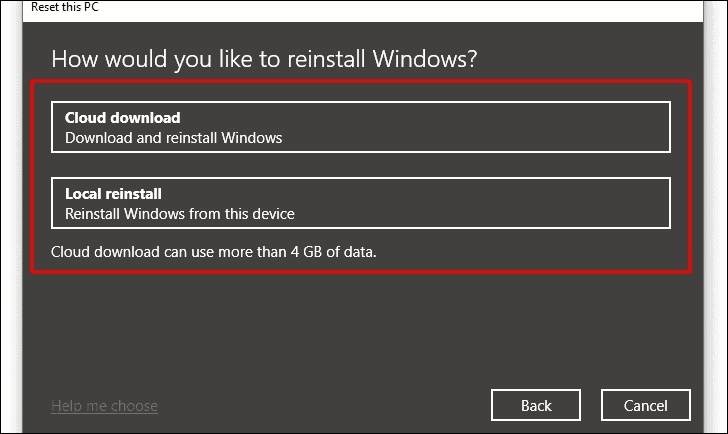
Next, select whether you would download and install the Windows from the Cloud or from this device itself.
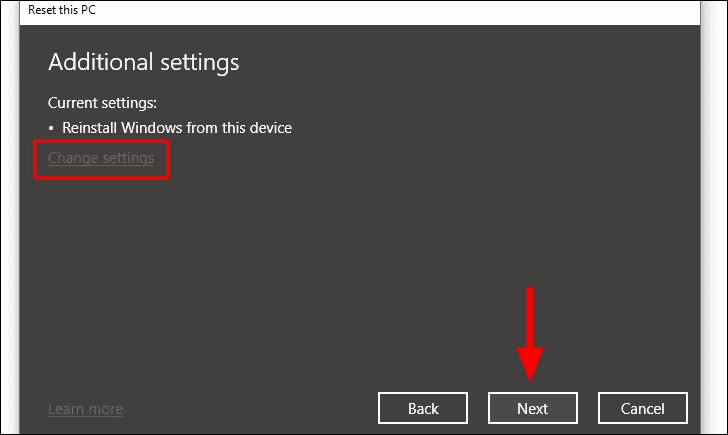
The current reset setting will now be displayed. You can also change them by clicking on the ‘Change settings’ icon. Click on ‘Next’ to proceed to the next step.
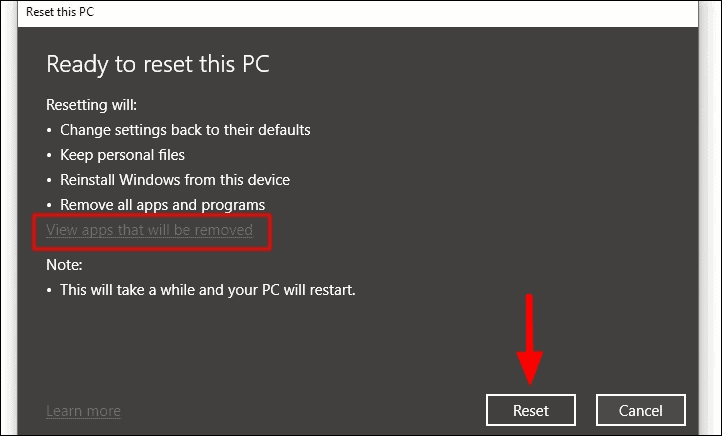
You will now see how resetting will affect your device. To check the apps that will be removed, select the option that goes by the same name. Once you have verified everything, click on the ‘Reset’ option at the bottom.
The reset process will take some time and the PC will restart during it. Also, there’s nothing you can do while reset is in progress, therefore sit back and relax.
After executing the fixes mentioned in the article, you will now be able to update Windows 10 and the ‘Some settings are managed by your Organization’ error will be fixed.


