This Enshrouded 1.0 mage setup centers on Intelligence and critical hits. Put early skill points into mana sustain to keep casting, then build a midgame critical-hit engine that can handle groups and heal without constant input. In the final stage, boost fire damage and damage triggered by healing. Use a staff to cast and a wand to set up critical-hit combos; choose gear and gems that improve mana, staff damage, and critical hits. It’s a viable 1.0 mage approach, rather than the sole build or an exhaustive list of mage choices.
The skill tree was reset on saves created before 1.0, so existing characters must allocate their skill points again before using this build.
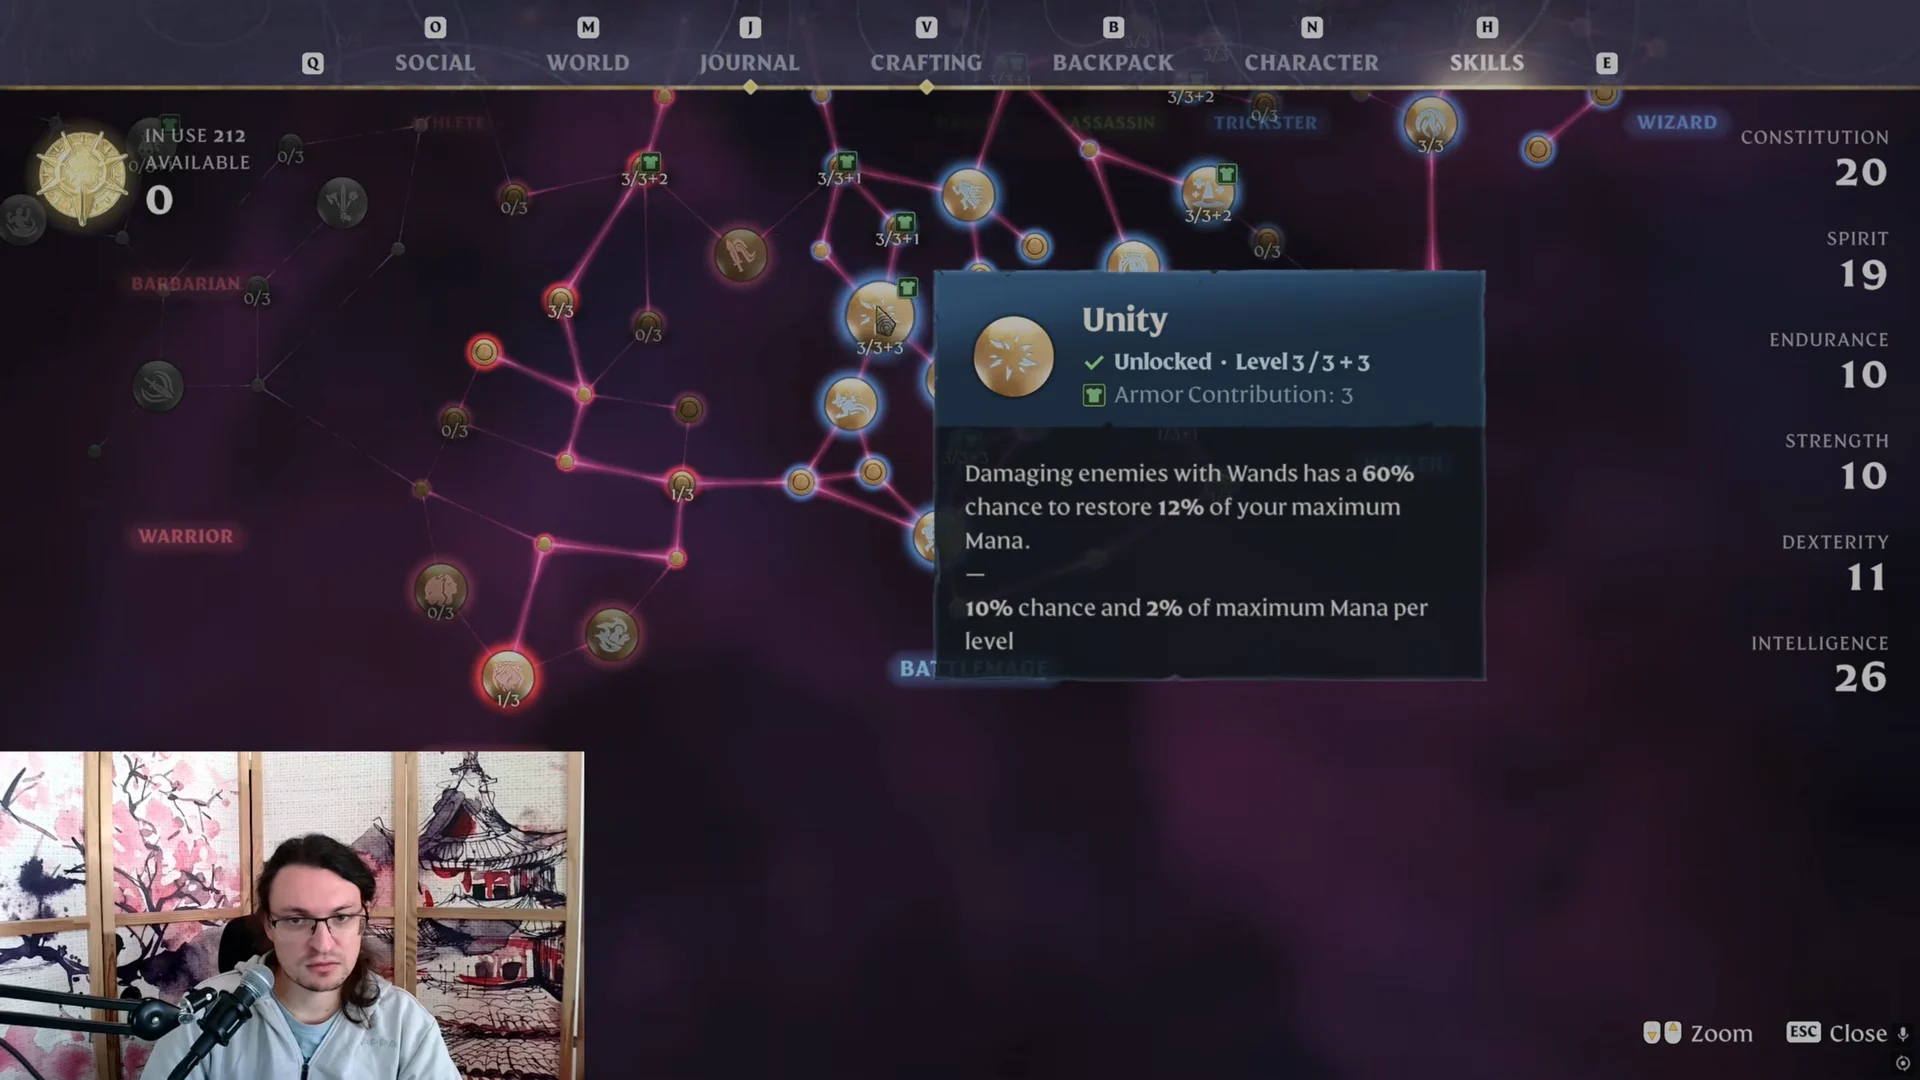
Skill screen and attribute spread (level 50 example)
Your attributes appear beside the tree in the Skills tab. The attribute line for this setup reads as follows; the tree uses 212 points, with 0 left to spend. Its mage picks come from Wizard, Battlemage, Healer, Trickster, and Assassin, with several Guardian nodes added for toughness.
| Attribute | Value |
|---|---|
| Intelligence | 26 |
| Constitution | 20 |
| Spirit | 19 |
| Dexterity | 11 |
| Endurance | 10 |
| Strength | 10 |
Early game skills: mana and movement
First, address Mana shortages and improve your mobility. Start with Constitution nodes, then invest in regeneration and charge speed.
- Constitution nodes grant the effect: “Increases your Constitution attribute by 1.” Each attribute point also adds Health.
- Double jump: spend stamina to jump again in midair, making exploration easier.
- Mana Currents: adds 15 to base Mana Regeneration, with 5 gained at each level.
- Quick Charge gives spells 40% less Charge Time, with each level providing 10%. Staff spells charge slowly without this skill.
- Unity: “Damaging enemies with Wands has a 60% chance to restore 12% of your maximum Mana.” Per level, 10% chance and 2% of maximum Mana.
- Arcane Deflection: “Successfully parrying an enemy’s attack restores 40 Mana.” Pair it with a ward shield while mana is scarce, and respend the points later if you drop it.
- Wand Mastery: “Wand damage is increased by 30%.” Arcane Proliferation, Sting, and Life Burst sit around it.
- If you want extra toughness, invest in Heavy Plates and Earth Aura on the Guardian side.
For spells at this stage, carry Fireball for general use, Blizzard for groups, Pillar of Flames, and Entangle. A ward shield such as Prismatic Ward (Block 18, Parry Power 299) pairs well with Arcane Deflection to top up mana on parries.
Wand moves in 1.0
Wands now do more than the basic shot. They have a charge (heavy) attack, a dodge attack, a jump attack, and a special. The nodes that unlock the evasive moves are Wand Evasion Attack and Aerial Wand Attack, the second done by holding the attack button while jumping. Blink swaps your dodge roll for a short teleport. Take all three early.
Mid game skills: crit engine and self-running healing
The mid game adds crowd control and healing that takes care of itself. The crit nodes work together, so build them as a set rather than one at a time.
- Updraft: “Jumping … while gliding lifts you upwards. Can be used once per flight.” Costs 100 Mana.
- Wizard: “Critical Strike chance with Wands and Staves is increased by 8%.” (2% per level.)
- Terror: “Critical Strikes with spells have a 100% chance to stun the target for 2 seconds.” (20% chance per level.)
- Bloodletting: “Critical Strikes with spells have a 80% chance to spawn two Health, Mana, and/or Stamina Orbs.” Gathering an orb restores 10% of that resource; 20% chance per level.
- Spellslinger: “Staff damage is increased by 25%.” Each level provides 5%.
- Arsonist grants: “All Fire damage is increased by 40%.” Each level adds 10%. Iceman provides the equivalent ice bonus, while Frost slows melee attackers who hit you.

Terror and Bloodletting belong together because a fast-ticking spell like Blizzard crits often once your crit chance is high. Groups stay stunned while the floor fills with Health, Mana, and Stamina orbs.
For healing, Water Aura is the primary tool on the Healer side: “You emit a healing aura that heals you and all injured allies within 5 meters. The healing scales with your Intelligence attribute and restores 1 Health per 2 points of Intelligence.” Its radius increases by 5 meters per level, and Waters of Life is next to it. Healer boosts health restored through spells and Water Aura by 60% (15% per level). Use Eternal Heal Cascade II for healing until Water Aura is filled out.

End game skills: fire and healing-triggered damage
In the end game, healing and close range become damage sources. Radiant Aura burns nearby Fell enemies with Fire damage that scales with Intelligence, while Arsonist increases that damage.
- Righteous Fire: “Healing any target with a spell triggers a burst of fire that deals 60% of the heal amount as Fire damage to nearby Fell enemies.” (20% Fire damage per level.) Water Aura’s healing triggers it.
- Blast and Cast: “After a Critical Strike with a Wand, the base damage of your next Staff attack within 10 seconds is increased by 50%.” Hit with the wand, then cast from the staff.
- Fatal Precision grants: “Critical Strike chance is increased by 3%. Critical Strike damage is increased by 15%.” Each level adds 1% chance and 5% damage. The bonus affects spells.
Fatal Precision lies in the Assassin/Trickster section of the tree. Reach it by spending a few points on the route, including Vitality Surge and Dexterity, making it a useful destination for your final points. Backstab Mastery is an optional pickup: “Backstab damage is increased by 20%.” Each level adds 20%. You can reach it by taking points from Arcane Deflection, but keeping the wand-to-staff combo and mana from parries is a reasonable trade-off.

Spells to slot
- Eternal Pillar of Flames I: creates a stationary fire column that continues burning anything inside it. Place it beneath a large enemy and attack from a distance.
- Eternal Blizzard II: deals damage across groups, and its rapid ticks build Terror and Bloodletting.
- Eternal Shroud Meteor: use this area spell against clusters of Shroud enemies.
- Eternal Protective Barrier: keep it on the bar beside the others.
- Totems (Ice Totem II, Shock Totem II, and the fire one): they draw enemy attention and slow or drain stamina.
- Hollow Skeleton summon: calls up a minion to pull attackers away from you.
- Fire Bolt VIII (made at Manual Crafting): deals 109 Fire damage for 142 Mana and ignites a bolt at one target. The charges are finite, so save them for burst damage.
- Mana Drain VIII: “+28 Mana per second”; this beam steals Mana but inflicts no damage on enemies. It’s a poor choice once your Mana regeneration is already strong.
Gear that feeds mana, staff damage, and crit
The example loadout leans into Intelligence, mana regeneration, and staff and wand damage, with one heavy chest for survivability.
- Oracle’s Everblue (staff, legendary, level 53): one enhancement gives +5% Mana Leech.
- Commander’s Ring (ring, epic): +40 Health, +5% Health Leech.
- Ring of Thundersnow (ring, legendary, level 45/45): +5% All Magic Shock Damage, +14 Mana Regeneration, +5% Shock Resistance, 2min Wet Duration Reduction. Enhancements: +35 Mana, +24 Mana Regeneration, +1 Bloodletting, +1 Wizard, +1 Thunder.
- Vorgoth’s Soulbound Crown and Pants (legendary, level 50): the crown carries +10% Staff Damage and critical-strike bonuses; the pants +10% Wand Damage and +65 Mana. Both have Wet Duration Reduction.
- Crestflame Chest (rare, level 48): has 267 Physical Armor and 149 Magical Armor, plus +210 Health, +21 Health Regeneration, and 3min Wet Duration Reduction. This heavy chest supplies Health and physical armor.
- Flame Arcanist Gloves (epic, level 49): +21% Staff Damage, +16% Damage against Magical enemies.
- Lifelock Boots (rare, level 48): +28 Mana Regeneration, 1m 30 Wet Duration Reduction, a Healing bonus, and +1 Healer. Swap to stamina boots when you travel a lot.
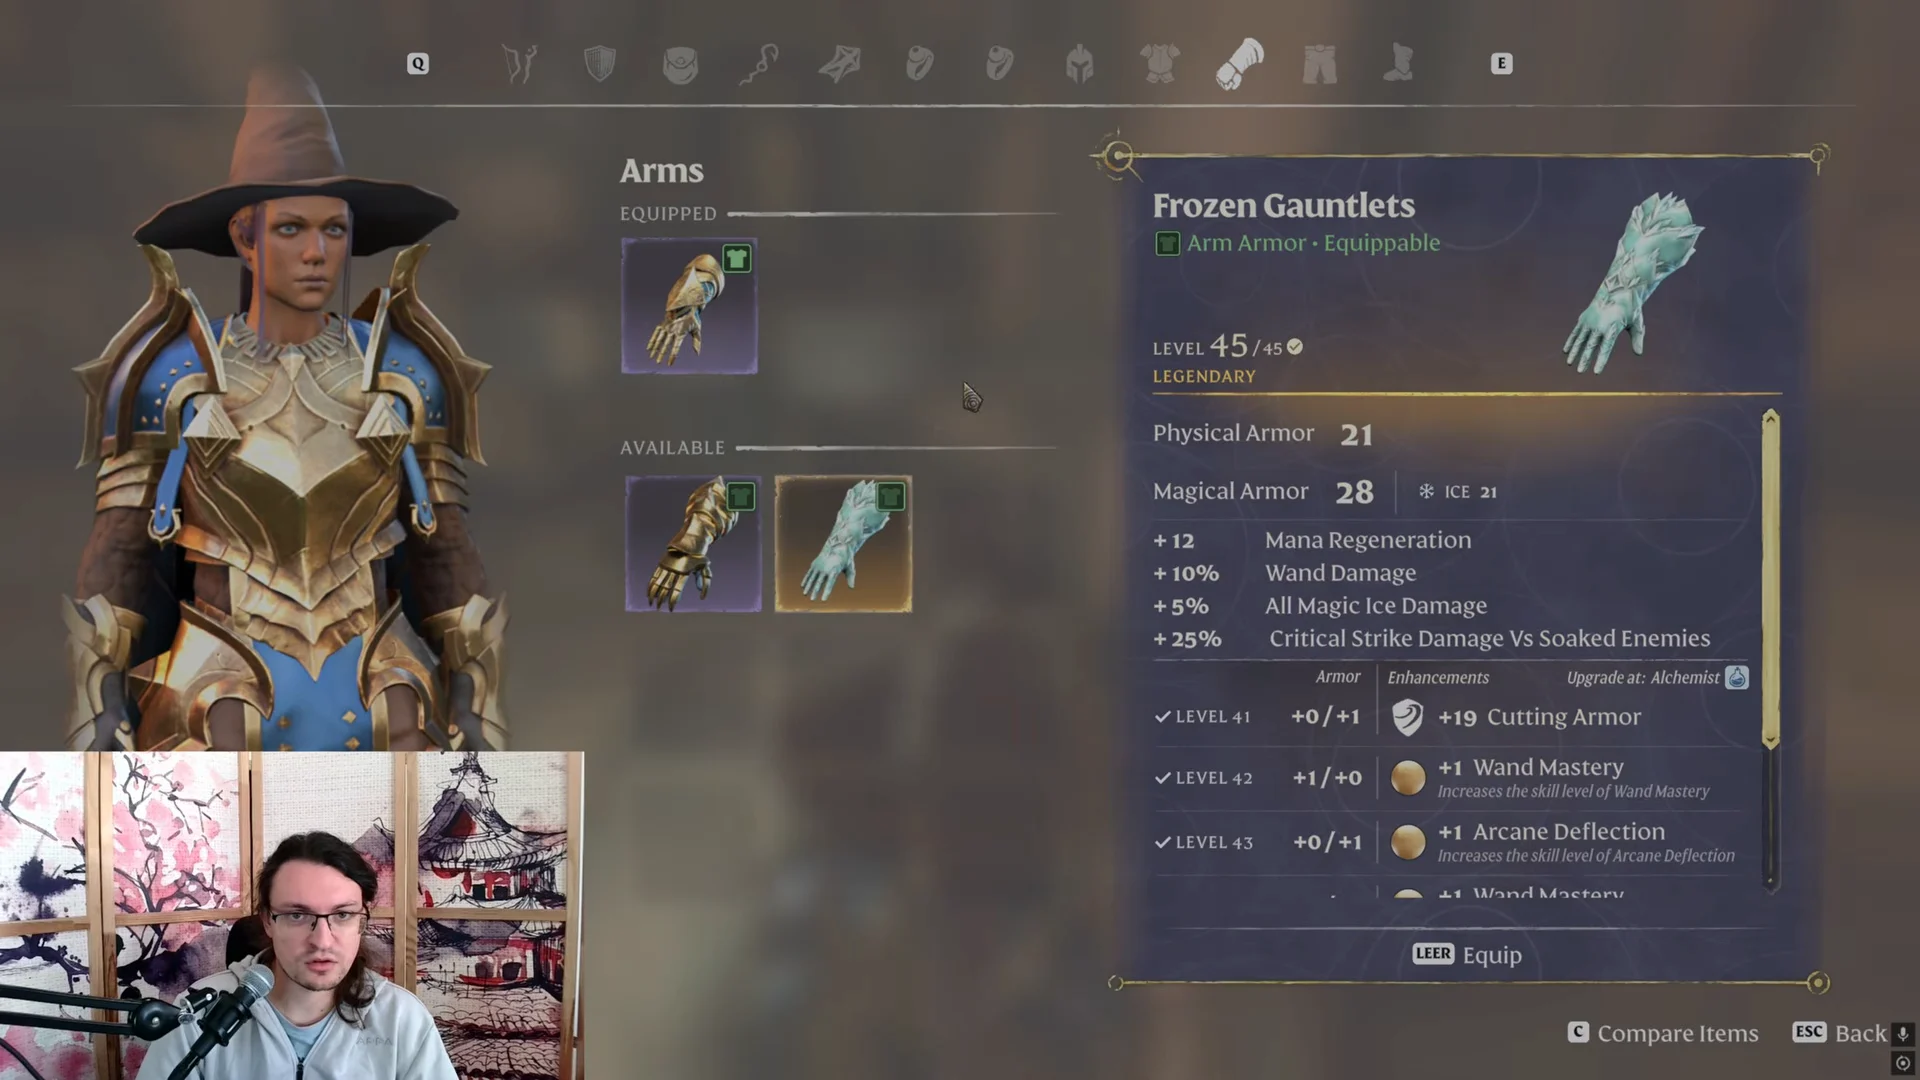
Frozen Gauntlets (legendary, level 45/45) give Physical Armor 21, Magical Armor 28, +12 Mana Regeneration, +10% Wand Damage, +5% All Magic Ice Damage, and +25% Critical Strike Damage Vs Soaked Enemies, which makes them a strong fit when you keep targets Soaked. You find them around Lacemaker Pond in the Veilwater Basin (map label: LACEMAKER POND).
Bring wands of different elements to exploit enemy weaknesses: fire, ice, and shock options include Candlelight Wand, Androme’s Wand, and Electric Initialiser. Keep Prismatic Ward at the highest level available for Mana from parries.
Gems and the Soaked setup
- Gem of Armoring: “Killing an enemy spawns an orb at the enemy’s location. Collecting the orb allows you to resist all damage for 5.8s.” Strong for staying alive in swarms.
- Gem of Currents: “While Wet or Soaked, damaging enemies will apply Soaked to them for 9.3s.” Damaging soaked enemies can deal bonus Shock Damage (+18).
To activate Gem of Currents ahead of a fight, add a Water Balloon to your hotbar, stand close to a wall, then throw the balloon against it. This gives you Soaked for roughly half a minute and activates the gem. The trick is less useful if your gear already reduces Wet Duration by a lot.
Consumables
An Ultimate Mana Potion provides +350 Mana and restores a large amount immediately. Mana regenerates quickly on its own with this setup, so save these potions for boss fights that demand constant casting. Summoning vessels and Eternal spells are also useful items to place on your hotbar.