The final wave of Vanguards‘ limited-time mode LTM Trail of the Saint – Six Seconds Back on Normal is a single boss fight. Wave 15 of 15 sends Ringo, a mounted gunslinger with a health pool in the millions, down the dirt track of a Western canyon town. Surviving it comes down to three things. You need a deck that can actually hurt him, enough Yen to put that deck on the field, and your Stocks intact until his health bar empties.
Quick answer: On Wave 15/15, place and upgrade your units along Ringo’s path using your passive +80¥ income. Ringo’s bar sits at 5.77M HP and won’t drop unless units are in range.
Ringo on Wave 15: what the screen shows
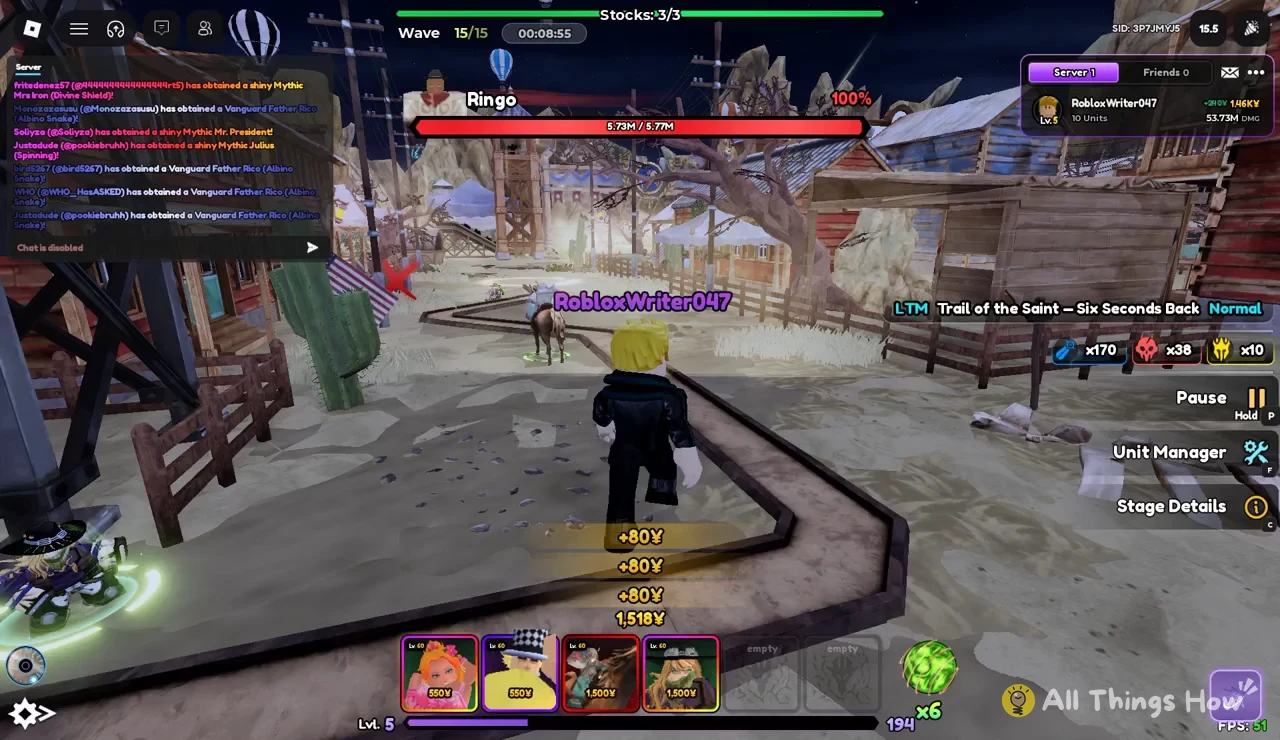
When the last wave starts, Ringo appears on horseback on the track ahead of the town’s wooden gate. His name and health bar sit at the top center of the screen. The top bar shows the wave count, a running wave timer, and your Stocks. Before you spend anything, check these readouts so you know where you stand.
| Readout | Where it sits | What it showed |
|---|---|---|
| Wave counter | Top bar | Wave 15/15 |
| Wave timer | Top bar | Keeps counting up |
| Stocks | Top bar | Stocks: 3/3 |
| Boss bar | Top center | Ringo, 5.73M / 5.77M |
| Mode label | Right side | Trail of the Saint – Six Seconds Back, Normal |
| Yen balance | Bottom center | Rises in +80¥ ticks |
The right side of the HUD holds four buttons: Pause ||, Hold P, Unit Manager, and Stage Details. Stage Details is the quickest way to confirm which mode and difficulty you’re in. That matters because this is a limited-time stage, not one of the regular story maps. The player panel in the top right lists your level, how many units you own, and a running damage total. Watch that damage number while Ringo is on the field to see whether your setup is working.
What to bring: hotbar units and deploy costs
Your hotbar has six unit slots along the bottom of the screen. Each card shows the unit’s level and the Yen it costs to place. A working Normal-difficulty loadout for this stage uses four Lv. 60 units in two price brackets.
| Slot | Unit card | Level | Deploy cost |
|---|---|---|---|
| 1 | Blonde woman, orange trim | Lv. 60 | 550¥ |
| 2 | Checkered top hat | Lv. 60 | 550¥ |
| 3 | Armored shield-and-sword warrior | Lv. 60 | 1,500¥ |
| 4 | Blonde knight | Lv. 60 | 1,500¥ |
| 5 | Empty | — | — |
| 6 | Empty | — | — |
The split is useful. The two 550¥ units are what you can afford early in a wave, and the two 1,500¥ units are where your money goes once it piles up. Two empty slots are two fewer options when Ringo arrives. If your collection has more units, fill slots 5 and 6 before you queue. Ringo’s health runs into the millions, and every extra source of damage shortens the fight.
Plan for the total cost of your full deck, not just the cheapest card. Putting all four of these units down once costs 4,100¥, before any upgrades.
How to survive Ringo on the final wave
Yen income and Stocks during the boss wave
Yen keeps coming in during Ringo’s wave even if you do nothing. The bottom display shows a +80¥ tick each time income lands. Over about eight and a half minutes on Wave 15, a balance of 1,518¥ climbs to 3,278¥. That’s 1,760¥ from passive income alone, enough for one 1,500¥ unit and a little left over.
The catch is that waiting doesn’t win anything. With no units placed, Ringo’s bar stays at 5.73M of 5.77M for that whole stretch while the wave timer keeps running. The boss doesn’t time out, and the wave won’t move on without you. Every minute you hold Yen back is a minute of damage you didn’t deal. Put income into units as soon as you can afford the next one.
- Passive income arrives in fixed +80¥ ticks during the boss wave.
- Ringo’s health doesn’t regenerate or drop on its own while the field is empty.
- The wave timer keeps counting up as long as Ringo is alive.
- Stocks stay at 3/3 until enemies reach your base.
Stocks are your base’s lives. The top bar shows them as a fraction, and every stage gives you three. If they run out, the match is lost on the spot. On the final wave, that makes Ringo the only real threat to your Stocks. Keeping him under fire before he reaches the end of the track is what survival means here.
How to tell the stage is cleared
Ringo is the boss of the last of the stage’s 15 waves, so beating him ends the run. You’ll see it working on screen. His bar at the top center falls from 5.77M toward zero, and the damage total in your player panel climbs as your units connect. If your Stocks counter still reads above zero when his bar empties, you’ve survived Trail of the Saint – Six Seconds Back on Normal.