
The Spell Totem Oracle in Path of Exile 2 leans on a single mechanic that changes how you pay for totems. Normally, each totem costs charges to deploy, but a Spirit-based setup removes that cost entirely and lets you focus on placing pillars of damage and dodging instead of juggling resources. The trade-off is that Spirit becomes the resource you have to manage and scale.
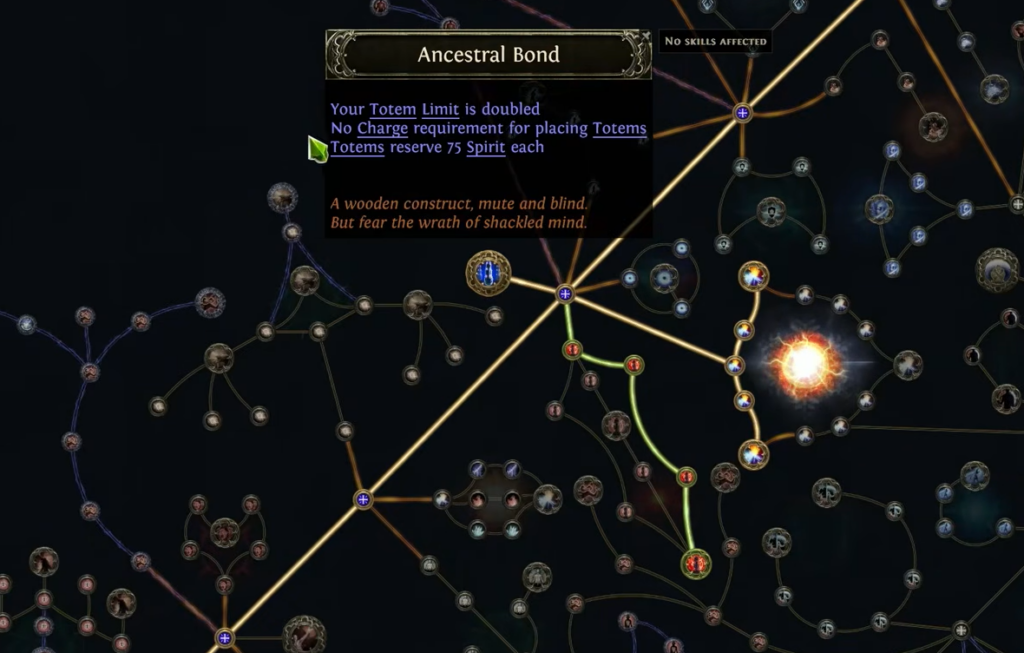
Quick answer: Take the Ancestral Bond keystone to remove all totem costs and requirements. Each Spell Totem then reserves 75 Spirit, so stack enough Spirit on your gear and a Sceptre to summon four totems, rising to five once your gem levels and a Desecrated Focus modifier are in place.

How the Spirit trick replaces charge costs
Spell Totem is a remote skill. It casts whatever spell you link to it, and you only pay the low mana cost of summoning the totem itself. Totems cannot consume Infusions, so they sit on the field and repeat their linked spell while you reposition.
By default, creating a totem spends 3 Endurance or Power Charges. That forces you into charge-generation combos, such as spending Rage as a Bear to produce Endurance Charges. The Spirit route skips all of that. Ancestral Bond strips away the costs and requirements of summoning, and in exchange it reserves 75 Spirit for each totem you maintain.
That makes Spirit the gatekeeper for your totem count. Wield any Sceptre and add a bit of Spirit across your gear, and you reach four totems, which is your ceiling until your gem levels climb to at least 23. The starting version is cheap, while pushing higher totem counts in the endgame demands heavy investment in Spirit and Reservation Efficiency.
Why Oracle is the ascendancy for this
The Oracle ascendancy fits the totem archetype directly. It grants one extra maximum totem and strengthens your critical strikes. Pair that bonus totem with a Desecrated modifier on your Focus that adds another to the cap, and you can field up to five totems at once.
For ascendancy points, the recommended order is Unnamed Heartwood, then The Lesser Harm, then Forced Outcome, and finally Harmony Within. Harmony Within is where the defensive and offensive layers meet.
Harmony Within and Archmage for over 100% extra lightning damage
Harmony Within turns your Mana into a damage buffer, similar to Mind over Matter, but without halving your regeneration. It only applies when you have more Mana than Life, lowers both pools by 15%, and does not protect against damage over time. The reason to run it is the synergy with Archmage.
Archmage adds extra lightning damage based on your maximum Mana, and with a large enough Mana pool, that bonus pushes past 100% extra damage as lightning. The Eldritch Battery keystone supports this by converting the Energy Shield on your items into Mana, which feeds both your buffer and your Archmage scaling. Energy Shield alone is not enough to carry your damage, so it works best alongside flat Mana and heavy Mana Regeneration.
The charge alternative with Redflare Conduit
If you would rather not reserve Spirit, the Redflare Conduit body armour generates the charges your totems need. With a Vaal Cultivated modifier, it gains a Power Charge every second, but it dumps all Power Charges when you hit the maximum and shocks you in the process. Convert that generation with the Resonance keystone, and you get a steady supply of Endurance Charges instead, removing the downside.
This is the route to start with at level 33, once you acquire the Cultivated Redflare Conduit. Pair it with any spell for your level, skip critical strikes early, and slot in the Controlled Destruction support gem.
| Totem cost method | What it does | Drawback |
|---|---|---|
| Ancestral Bond (Spirit trick) | Removes all summon costs and requirements | Reserves 75 Spirit per totem |
| Redflare Conduit + Resonance | Generates Endurance Charges for free | Requires the Vaal Cultivated modifier |
Which spell to link to your totems
Totems can cast almost any spell in the game. Comet hits the hardest, and its wide area keeps clear speed respectable even though it has a long cast time and a delay before it lands. The DPS totem setup links Comet with Urgent Totems, Zenith, Concentrated Area, and Cold Mastery.
If you want faster clear instead of slow, heavy hits, swap Comet for Frostbolt, Spark, or Arc. The totem framework stays the same; only the linked spell changes.
Boss rotation and resistance stripping
The playstyle is to drop totems and stay out of incoming damage. Against bosses, layer your debuffs before the totems do their work.
Gear and stat priorities for Spirit and Mana
The Redflare Conduit with its specific modifier is the only mandatory unique; everything else is rare gear plus powerful jewels. For damage, you chase gem levels, increased Cold Spell Damage, critical strikes, and cast speed. For defense, you stack as much Mana and Life as you can, plus plenty of Mana Regeneration to recover quickly after taking a hit.
| Priority | Stat |
|---|---|
| 1 | Cap Elemental Resistance |
| 2 | Attribute Requirements |
| 3 | Life, Energy Shield, and Mana |
| 4 | Gem Levels |
| 5 | Cast Speed |
| 6 | Critical Strike Chance and Damage |
| 7 | Mana Regeneration Rate |
| 8 | Item Rarity |
On the Focus, look for a Desecrated modifier granting +1 to the maximum number of summoned totems, with +2 to all Spell Skills and supporting offense. Your Wand carries the bulk of your power through +5 to Cold Spell levels, increased Spell Damage, and cast speed. A rare amulet is your last source of extra spell levels, and extra Spirit there is helpful but not required. Belts with all three Charm slots matter, since Ignite and Bleed bypass your Mana buffer unless you run Mind over Matter.
Note: For more Spirit at the high end, Alpha’s Howl gives a large boost, and Absent Amulets grant free persistent skills, though both are expensive. The simpler endgame option is to drop the Ancestral Bond keystone entirely and lean on the Oracle ascendancy for your totem count.
How to confirm the setup is working
You know the Spirit trick is active when totems deploy without consuming charges and your Spirit pool drops by 75 for each one you place. If you cannot summon the fourth totem, your gem levels are likely below 23 or your Spirit total is too low, so add Spirit on gear or wield a Sceptre. To reach five totems, confirm both the Oracle ascendancy bonus and the Desecrated +1 totem modifier on your Focus are in place.
The build is simple to pilot and strong against bosses thanks to its resistance stripping and freeze coverage. Its weaknesses are the delay on Comet’s impact and middling defenses, so the debuff rotation and Mana buffer are what keep it stable in tougher content.