
Sandrone is a 5-star Cryo Claymore character who plays as an on-field main DPS. Her whole kit is built around the new Stellar-Conduct reaction, and she leans heavily on Charged Attacks to pump out damage. The good news is that she is forgiving to build. She wants a lot of ATK, some Elemental Mastery, and enough Energy Recharge to fire her Burst, and she has strong 4-star and free-to-play weapon options.
Quick answer: Run A Teaspoon of Transcendence (or Wolf’s Gravestone / Tidal Shadow if you’re free-to-play) with a 4-piece Disenchantment in Deep Shadow set, level Normal Attack first, and pair her with an Electro sub-DPS plus a Cryo healer such as Yae Miko and Qiqi.
How Sandrone deals damage
Sandrone is the Seventh of the Eleven Fatui Harbingers, and she fights alongside a mechanical companion called Fagio. Her core loop is simple once you see it in motion. Her Charged Attack sends Fagio into Decoding Mode, where it fires condensed Cryo beams that count as Stellar-Conduct damage. Those beams build up Decoding Power to 100, at which point Fagio overheats into Power Overdrive Mode and beam damage drops sharply.
Her Elemental Skill boards a hovermech for 6 seconds, fires two Prism Shots, and, crucially, rapidly drains Decoding Power. That reset lets you keep cycling Charged Attacks without getting stuck in overdrive. Her Elemental Burst then unloads a frontal bombardment followed by a beam that consumes stacks built during the rotation for a large hit. Because most of her damage flows through those Charged Attack beams, she needs high field time and works best with an Electro applier feeding the Stellar-Conduct reaction.
Talent priority for Sandrone
Level her talents in the order that matches where her damage actually comes from.
| Priority | Talent | Why |
|---|---|---|
| 1 | Normal Attack | Governs her Charged Attack beams in Decoding Mode, her main source of Stellar-Conduct hits. |
| 2 | Elemental Burst | One of her strongest single instances of damage when stacks are fully built. |
| 3 | Elemental Skill | Mostly a rotation tool for resetting Decoding Power, so it can stay at a low level. |
Best weapons for Sandrone
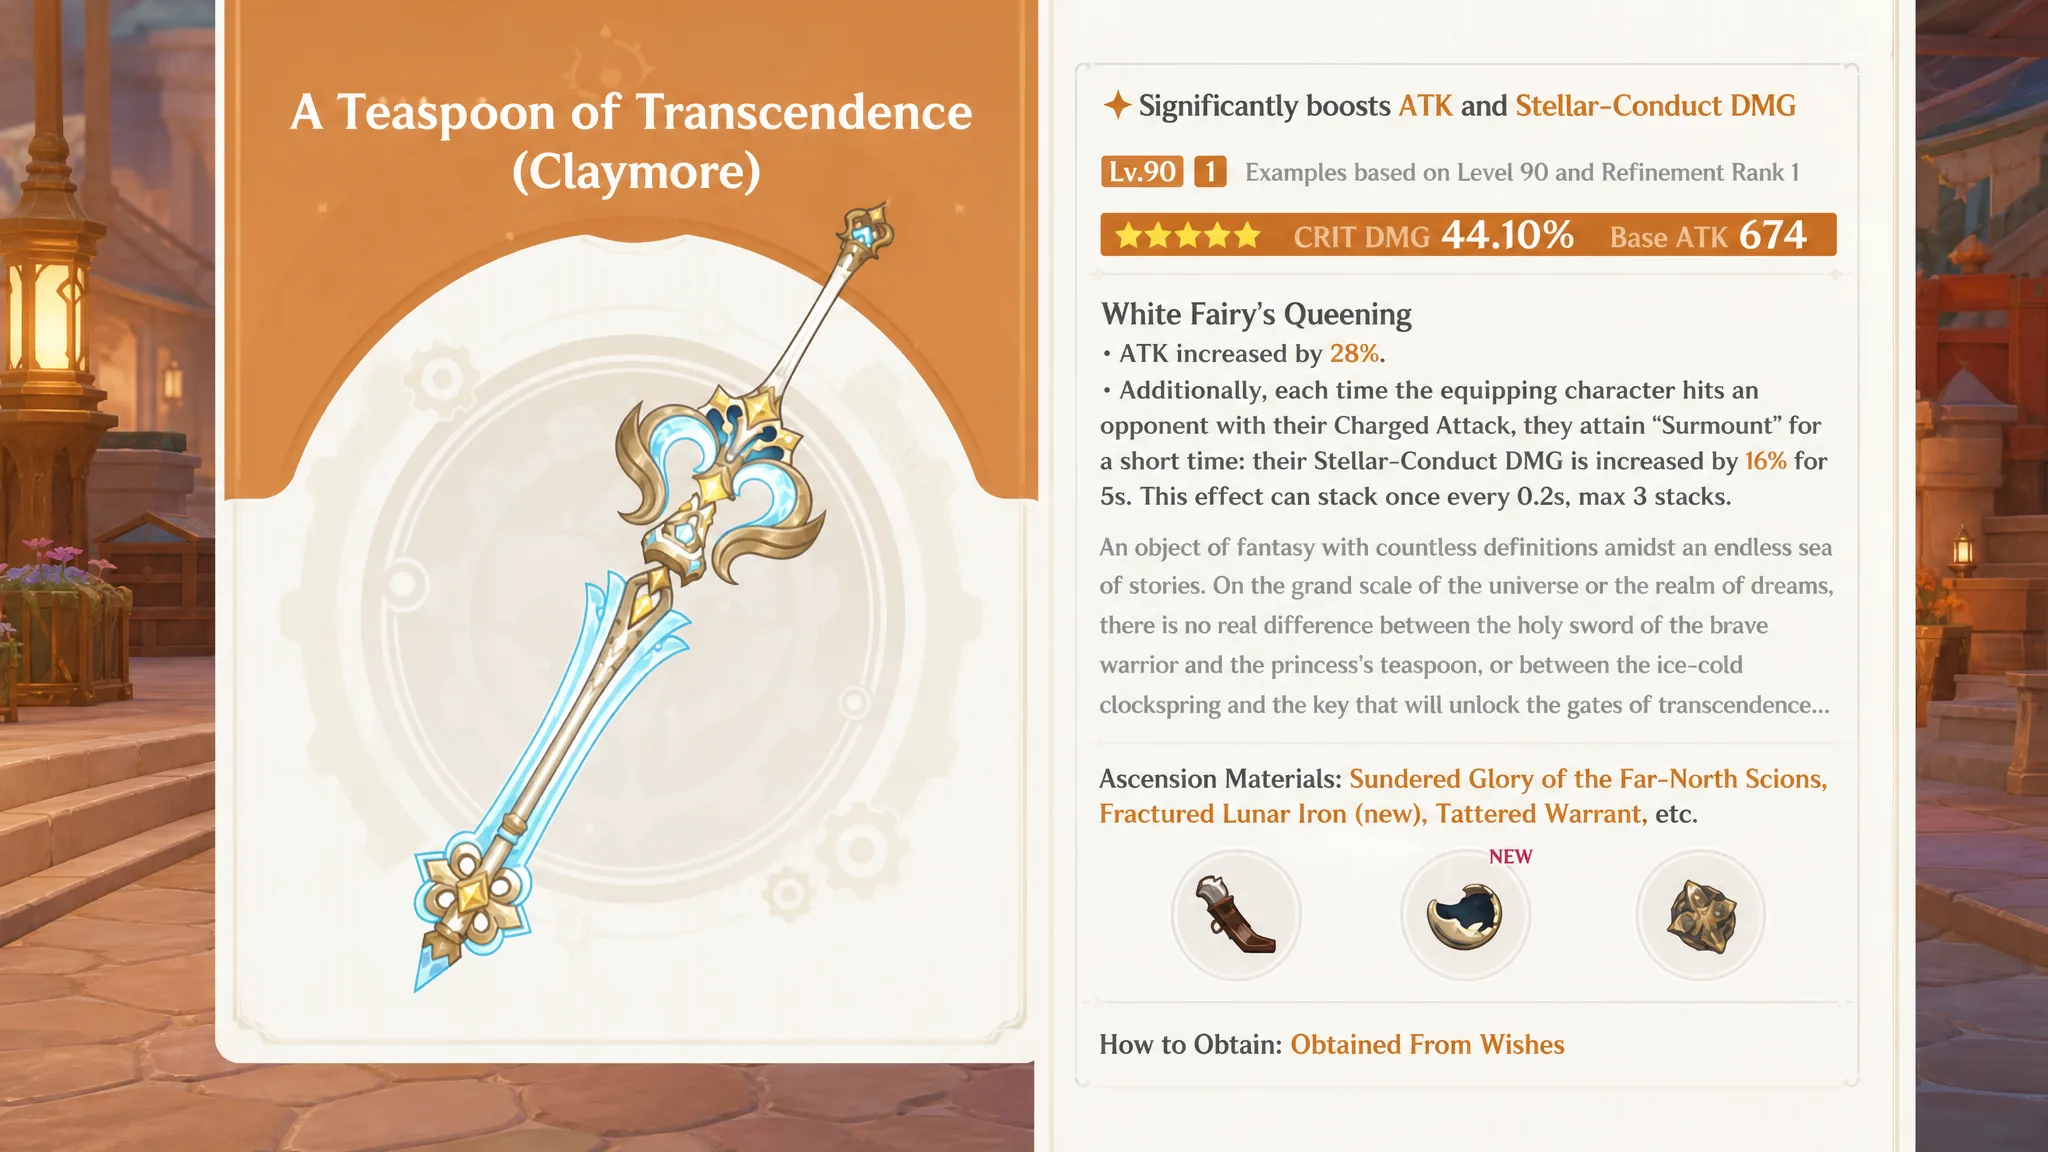
Her signature Claymore is clearly her best option, and it is not close. A Teaspoon of Transcendence carries 674 Base ATK and a 44.1% CRIT DMG substat. At R1 its passive raises ATK by 28%, and every Charged Attack hit grants a stack that increases Stellar-Conduct DMG by 16% for 5 seconds, up to three stacks refreshed as fast as once every 0.2 seconds. Her Charged Attack loop keeps this near permanent uptime, so it directly feeds her main damage.
If you don’t pull the signature, the best replacements act as pure stat sticks that boost ATK. One thing to remember: flat elemental DMG Bonus passives do not apply to Stellar-Conduct damage, which is why Serpent Spine and similar options underperform on her despite being strong on other Claymore carries.
| Weapon | Rarity | Key stats | Notes |
|---|---|---|---|
| A Teaspoon of Transcendence | 5★ | 674 ATK / 44.1% CRIT DMG | Signature and best-in-slot; stacking Stellar-Conduct DMG bonus. |
| A Thousand Blazing Suns | 5★ | 741 ATK / 11% CRIT Rate | Strong stat stick with high uptime; comfortable bridge option. |
| Wolf’s Gravestone | 5★ | 608 ATK / 49.6% ATK% | Huge ATK% that feeds her scaling, plus a team ATK buff. |
| Beacon of the Reed Sea | 5★ | 608 ATK / 33.1% CRIT Rate | Big CRIT Rate substat and unconditional ATK boosts. |
| Mailed Flower | 4★ | 565 ATK / 110 EM | Excellent ATK and EM, but no longer obtainable. |
| Tidal Shadow | 4★ | 510 ATK / 41.3% ATK% | Best free-to-play pick; craftable and needs a healer to trigger. |
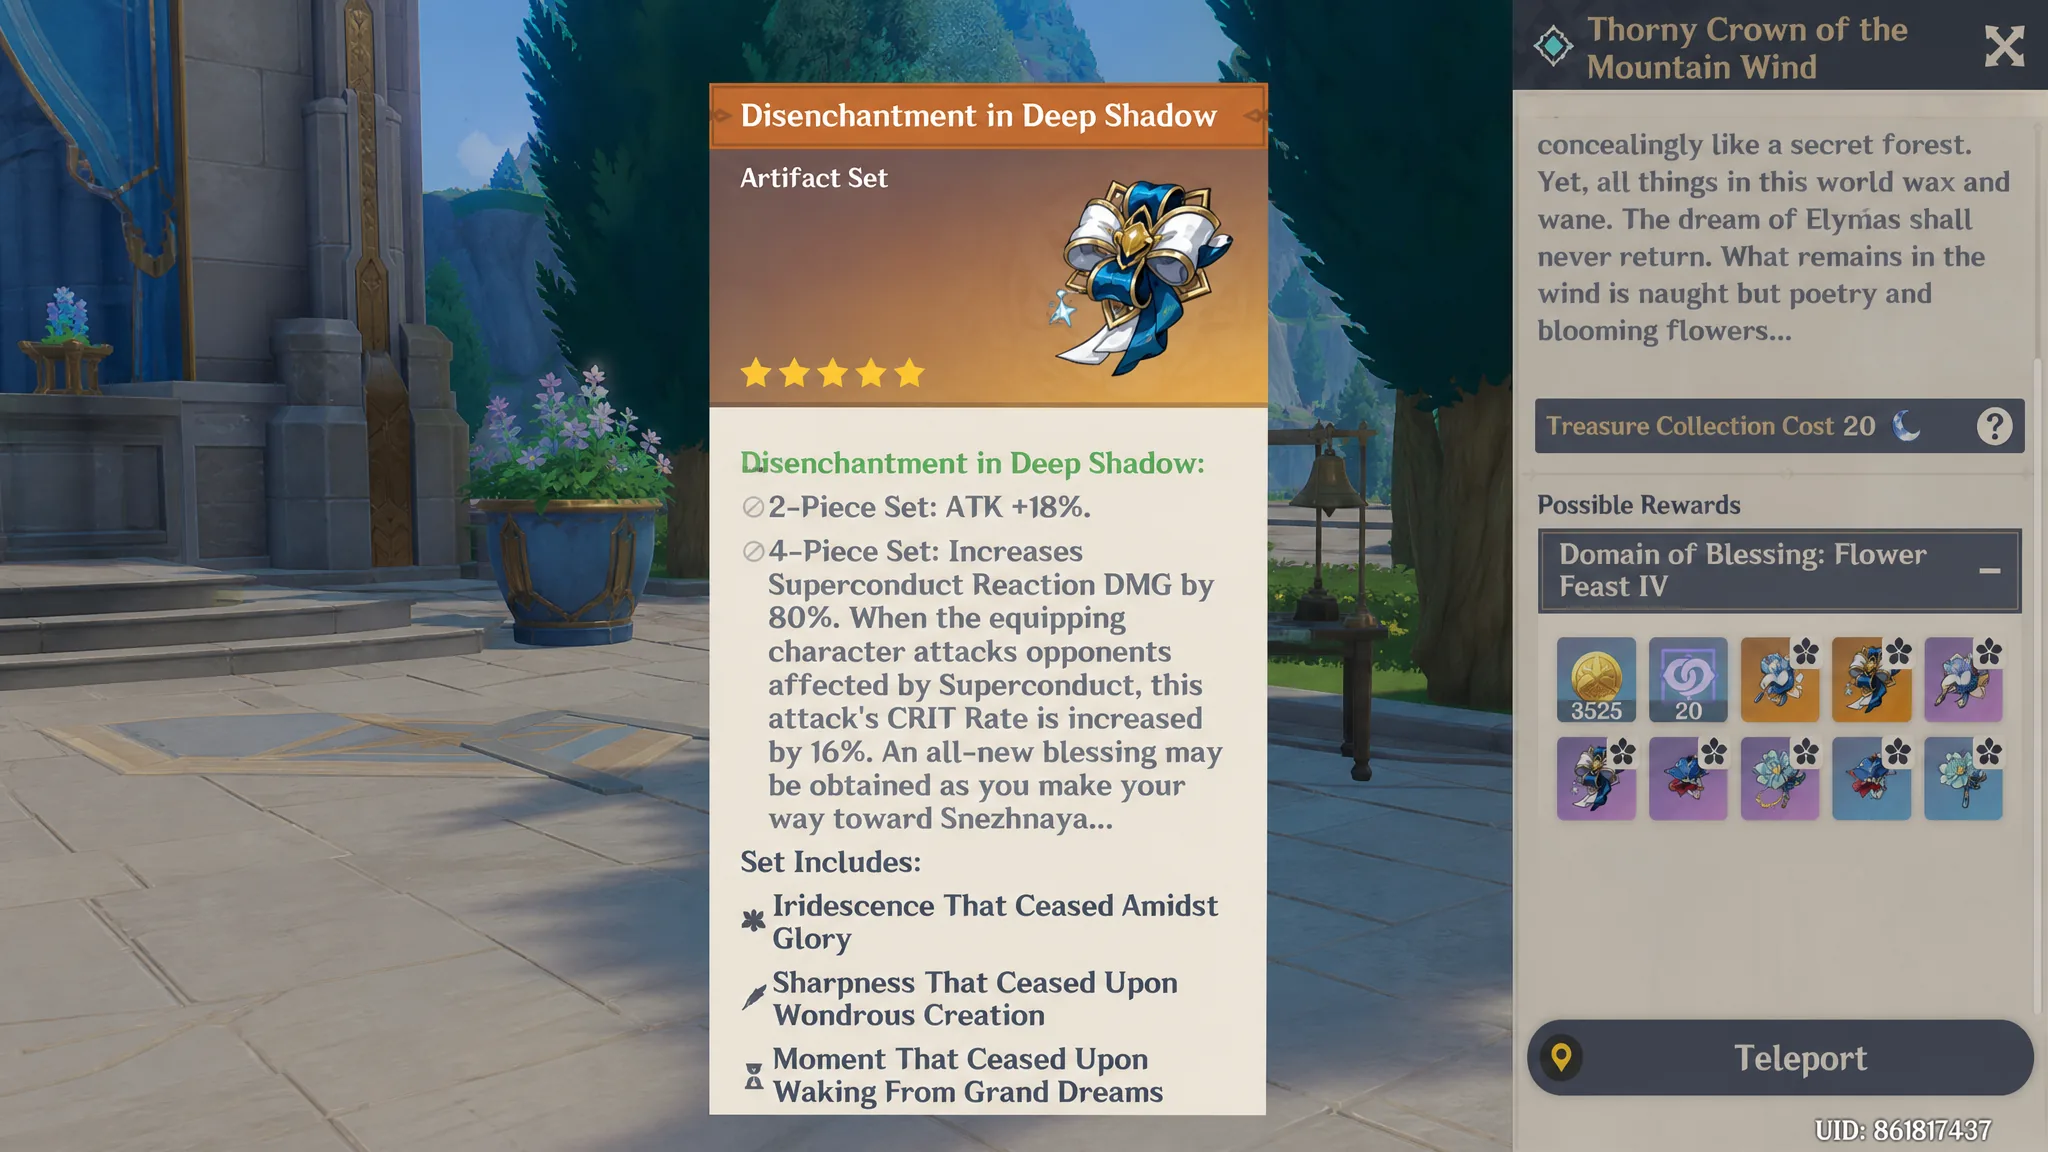
Best artifacts and stats for Sandrone
Disenchantment in Deep Shadow is her best set by a wide margin. The 2-piece gives ATK +18%, and the 4-piece increases Superconduct reaction damage by 80% while adding 16% CRIT Rate when you attack enemies affected by Superconduct. That CRIT Rate stacks neatly with Cryo Resonance’s +15% CRIT Rate against Cryo-affected enemies, so you can hit comfortable crit levels without sacrificing offensive substats.
While farming, run a 2-piece ATK plus 2-piece EM combination, or use Blizzard Strayer as a temporary bridge in freeze-adjacent teams. Neither matches the full set once your rolls come in.
Main stat and substat priority
| Slot | Main stat |
|---|---|
| Sands | ATK% (or Elemental Mastery) |
| Goblet | ATK% or Cryo DMG Bonus |
| Circlet | CRIT Rate / CRIT DMG |
| Substats | Energy Recharge (until Burst-ready) > CRIT Rate > CRIT DMG > ATK% = EM |
ATK% is usually stronger than Elemental Mastery on both the Sands and Goblet, but you can put EM on one of them if the piece rolls better. Avoid running EM on both. Build Energy Recharge in substats until you can cast her Burst every rotation, then pivot fully into CRIT. As a rough target before team buffs, aim for around 2,400 to 2,600 ATK, roughly 122 to 133% Energy Recharge, 65 to 70% CRIT Rate, and 110 to 135% CRIT DMG. Her effective CRIT Rate ends up higher in practice thanks to the set bonus and Cryo Resonance.
Recommended rotation
Best teams for Sandrone
Sandrone is a selfish carry who eats most of the field time, so she rarely fits alongside a second on-field DPS. Instead, surround her with off-field Electro application to enable Stellar-Conduct, a Cryo healer to keep her alive, and ATK or Cryo buffers. Yae Miko and Qiqi both slot in well as an Electro enabler and a healer.
| Team | Members | Role focus |
|---|---|---|
| Premium | Sandrone, Yae Miko, Qiqi, Escoffier | Cryo-Electro core with extra Cryo buffs. |
| Nicole variant | Sandrone, Yae Miko, Qiqi, Nicole | Swaps Escoffier for strong ATK buffs. |
| Free-to-play | Sandrone, Beidou, Qiqi, Sucrose | Beidou applies Electro; Sucrose adds EM, grouping, and shred. |
She works well even with 4-star weapons and 4-star supports, which keeps her accessible across account levels. Just remember she can be interrupted easily without a shield, and her damage depends on staying on the field and keeping her Charged Attack uptime high.
Constellations worth pulling
C1 and C2 are her strongest early value, while C6 is her big power spike. C3 and C5 are simple talent-level bumps, and C4 adds a periodic follow-up hit.
| Const. | Effect |
|---|---|
| C1 | In Decoding Mode, Decoding Power builds 50% slower and all party members deal 30% more Stellar-Conduct DMG. |
| C2 | Increases CRIT DMG of Charged Attack beams by 40%, plus a stacking 20% CRIT DMG per beam (max 3). |
| C3 | +3 levels to her Normal Attack talent. |
| C4 | Stellar-Conduct hits summon an extra cannon for 125% ATK Cryo DMG, once every 4s. |
| C5 | +3 levels to her Elemental Burst talent. |
| C6 | Turns the third beam into a Condensed Cluster Beam with up to 4 extra AoE Cryo instances and raises all her Stellar-Conduct DMG by 20%. |

Sandrone lands as one of the first characters built specifically around Stellar-Conduct, and she already looks like a high-ceiling carry thanks to her strong multipliers and steady beam damage. Her ceiling should climb further as more Stellar-Conduct supports arrive, but even now a signature weapon, a full 4-piece Disenchantment in Deep Shadow, and a solid Electro-Cryo core give her everything she needs to perform.