
Blood Moon Shards are the event currency in Survive Zombie Arena, and the quickest way to stockpile them is to reach a spot where zombies can hit you, farm the hardest difficulty at high waves, and clear crowds with an area-of-effect weapon. Two reliable safe spots make this possible on the Rooftop Siege and Abandoned Farm maps.
Quick answer: Equip the Bastion class and a high-damage weapon, start Rooftop Siege or Abandoned Farm on the hardest difficulty, glitch into a floating Shelter or under the map, then shoot the horde. Past wave 50, this nets around 10 Blood Moon Shards per minute.

Why difficulty and waves matter for Blood Moon Shards
Shards drop from Blood Moon zombies, and the chance one spawns rises with difficulty. Higher waves also pack more enemies into each minute, so the yield climbs the longer you survive. That is the whole reason these safe-spot methods exist. You want to sit in a spot where nothing can reach you and let the crowd grow.
| Difficulty | Credits per kill | Blood Moon zombie chance |
|---|---|---|
| Normal | 5 | 1% |
| Hardcore | 7.5 | 1.25% |
| Nightmare | 12.5 | Highest (brutal zombies) |
Hardcore requires clearing 100 Hardcore waves to unlock, and Nightmare sits above it with 100+ Hardcore waves and the toughest enemies. The higher you climb, the more Blood Moon zombies appear per wave, which is what makes long AFK-style runs worthwhile. You can confirm the current numbers inside the official Survive Zombie Arena experience before you commit to a route.
Method 1: Rooftop Siege floating Shelter
This method uses the Bastion class Shelter, placed on the edge of the helipad ramp so it hangs in mid-air. Once you are inside, zombies pile up underneath and cannot touch you, and you keep collecting the coins they drop.


E to place the Shelter. Because of the ramp edge, it lands floating in the air.F to enter the floating Shelter. Zombies crowd underneath but cannot reach you, and Blood Moon coins from defeated enemies are collected automatically.
You know it worked when your health bar stays full while the horde swarms below and your coin counter keeps ticking up. The catch is that stepping out of the Shelter drops you straight into the horde, so leaving it at a high wave usually means an instant death and a revive prompt. There is a simpler variant where you just stand on the very edge of the staircase and let ground zombies pile below, but flying zombies can still hit you there, so it is not safe for hands-off farming.
Method 2: Abandoned Farm under-map glitch
This is the stronger route because it also blocks flying zombies. You clip beneath the map terrain and shoot upward through the floor into the crowd gathered above you.

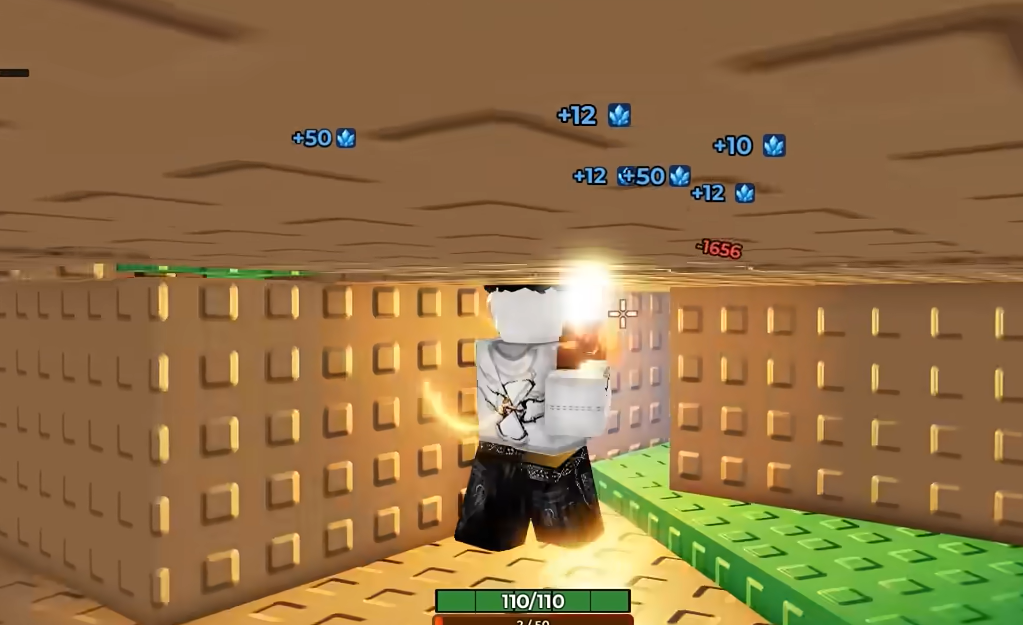
From under the map, you are safe from every ground and flying attack, and at wave 50 and above, this yields roughly 10 Blood Moon Shards per minute. Note that flying zombies can occasionally clip through the ground, so upgrade your health early to survive the rare intruder.
Loadout that maximizes Blood Moon Shard yield
The weapon carries these runs. High-area damage clears the packed crowd faster than single-target fire, which directly raises how many Blood Moon zombies you kill per minute. The right class gives you the tools to survive setup and the right artifact multiplies your income.
| Slot | Pick | Why it helps |
|---|---|---|
| Class | Bastion | Shelter, drones, and turrets protect you during the glitch setup. |
| Weapon | Plasma Gun or World Ender | Area-of-effect damage clears the horde and boosts kills per minute. |
| Artifact | Lucky Coin | 20% chance to earn event currency twice. |
Homing weapons are a good alternative when you cannot line up the crowd cleanly, since they seek targets on their own. Pair any of this with the highest difficulty you can clear and the yield scales up steadily as the waves climb.

Spending Blood Moon Shards and a caution on glitches
Once you have a pile of shards, the main sink is the Bloodmoon Crate, which costs 50 Blood Moon coins per spin. Its reward pool runs from small Credit payouts up to the legendary Bloodmaster class at a 0.25% chance per open, along with the Blood series of weapons. There is no pity system, so each spin is an independent roll.
Note: both farming routes rely on map glitches. Game updates can patch these spots out at any time, so a method that works today may stop working after a version change. If you prefer a route that will not vanish, stick to normal high-wave play on the hardest difficulty you can clear and let the higher Blood Moon spawn rate do the work.