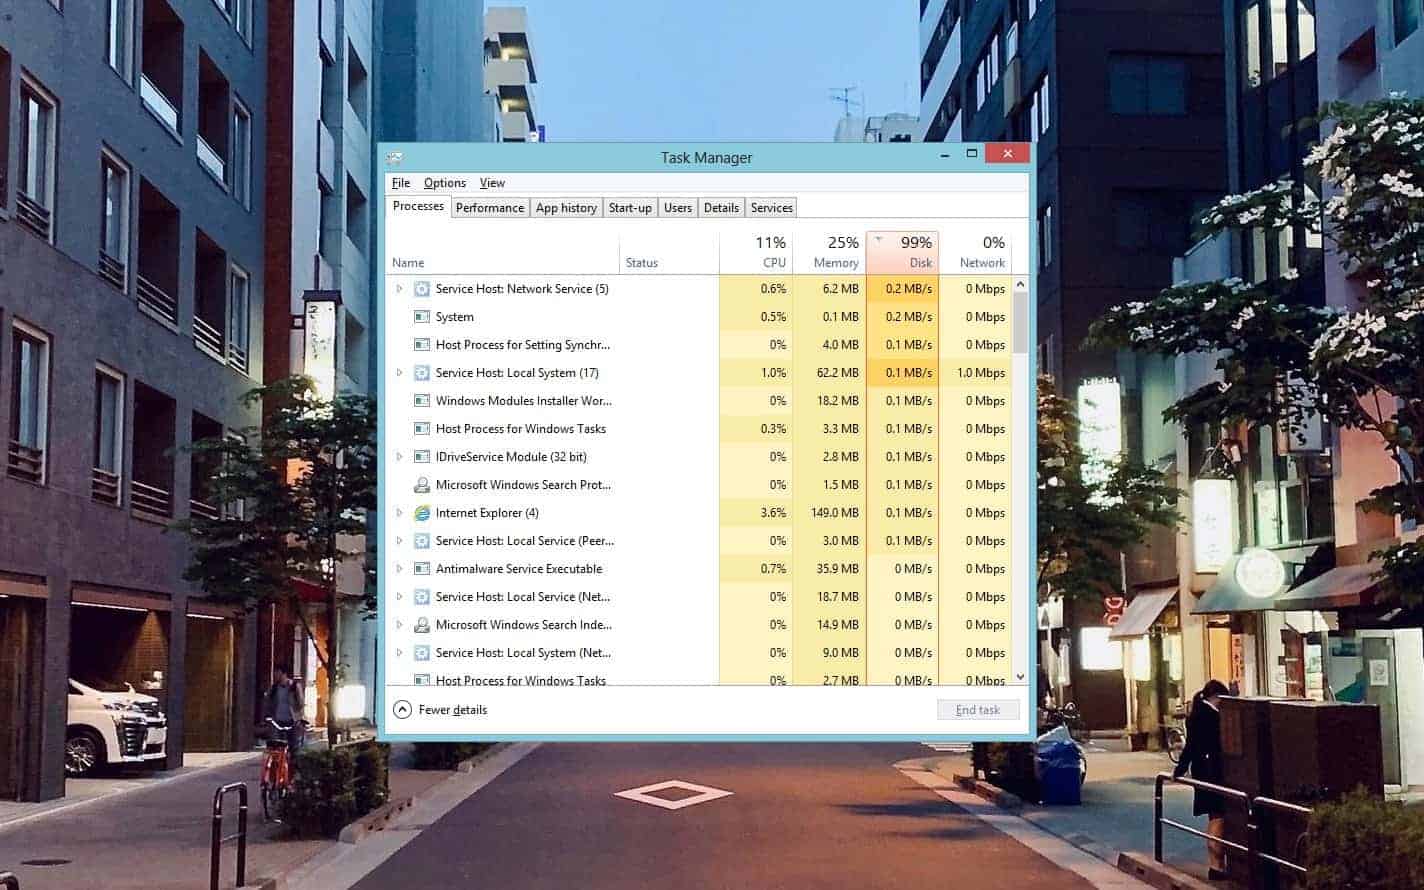
While a computer’s performance mainly depends on its CPU power and available RAM, but the hard disk drive also plays an important role. If your disk is running at 100% usage in the task manager on your Windows 10 machine, then it will greatly impact the performance of your PC.
There could be a number of reasons to why there’s a 100% disk usage on your system, we have highlighted the most common ones in the list below:
- A CPU process or activity on your PC stopped working while accessing the disk.
- A malware infecting your PC.
- SearchIndexer.exe being used aggressively. This is a Windows service which facilitates files indexing within Windows Search.
- Superfetch being used aggressively. This is also a Windows service which pre-loads programs into the RAM to load them faster.
- Antivirus software scanning files in the background.
- Corrupted disk drives.
- Files intensive programs or scripts running in the background.
Below are some of the known fixes that have helped many users resolve the high disk usage issue in Windows 10.
Restart your PC
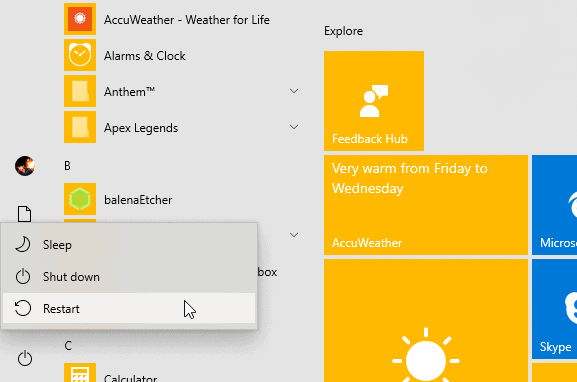
Restarting is the quickest fix for a PC running slow due to 100% disk usage. It’ll fix the problem right away. However, if you’re persistently getting 100% disk usage on your PC, even after several restarts, then you need to get to the root of the problem before it destroys your hard drive.
Check for Windows Updates
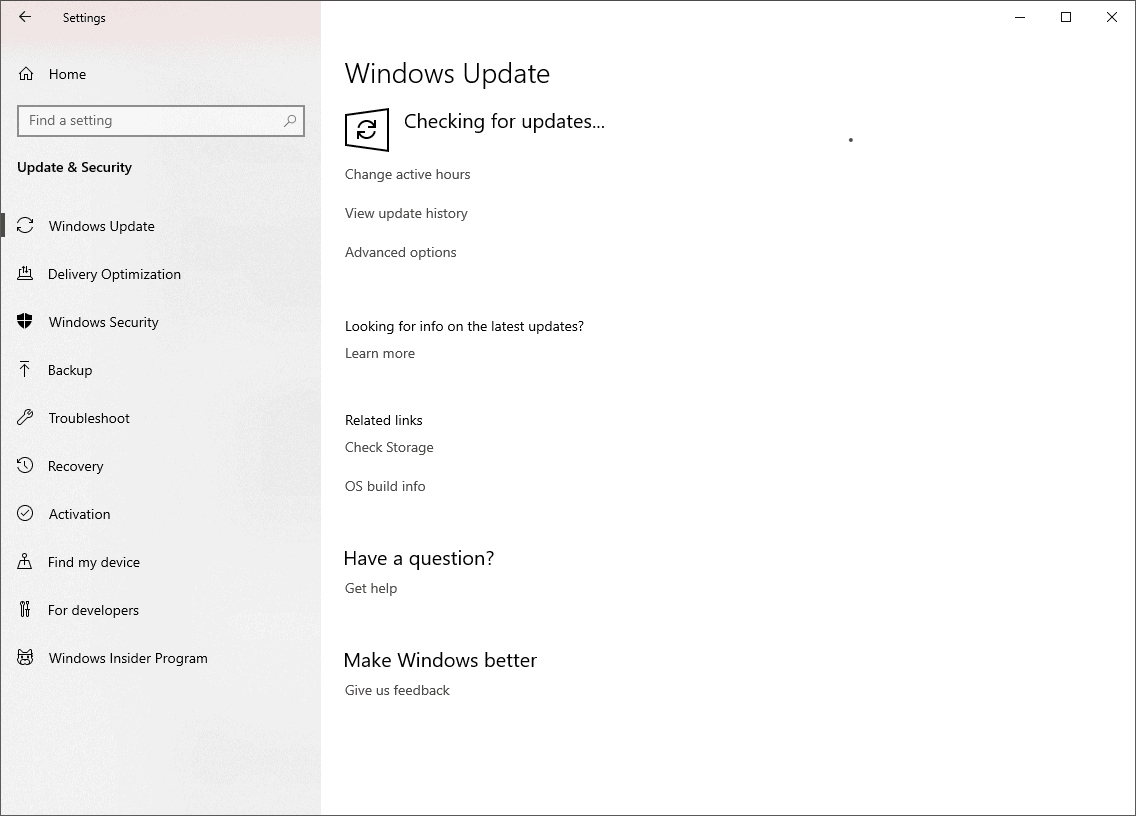
If there’s an update available for your PC, install it. It might fix the problem with high disk usage on your system.
Go to Settings » Updates & Security » and hit the Check for updates button. If there’s an update available, install it to see if it fixes the problem.
If a Windows update is failing to install, that may be the cause of the high disk usage as it’s keeping the disk busy trying to install over and over. To fix the problem, you try to reset Windows update components using the Windows Update Agent tool by Manuel F. Gil.
→ Download Reset Windows Update Agent (8 KB)
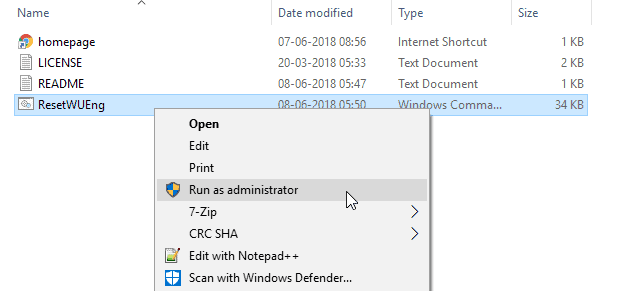
- Download the ResetWUEng.zip file from the link above and unzip it on your PC.
- From the extracted files and folders, open the Reset Windows Update Tool folder, then right-click on the ResetWUEng.cmd file and select Run as administrator from the context menu. Click Yes when you get a prompt to allow the script to use administrator privileges.
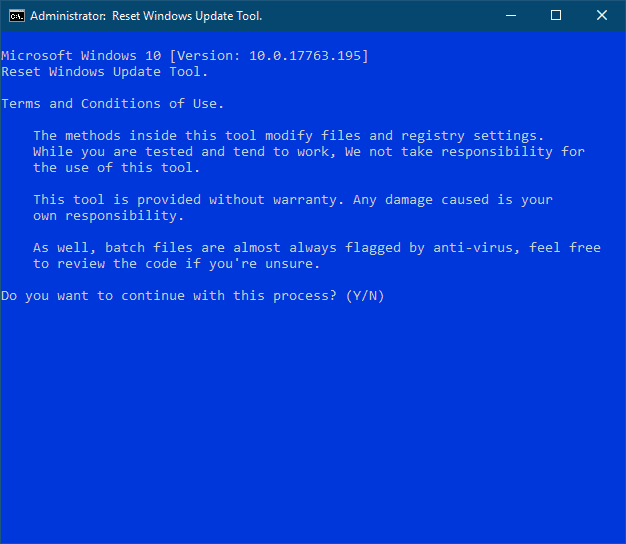
- On the Reset Windows Update Tool window, you’ll first get the Terms and Conditions screen. Accept the terms by hitting Y on your keyboard.
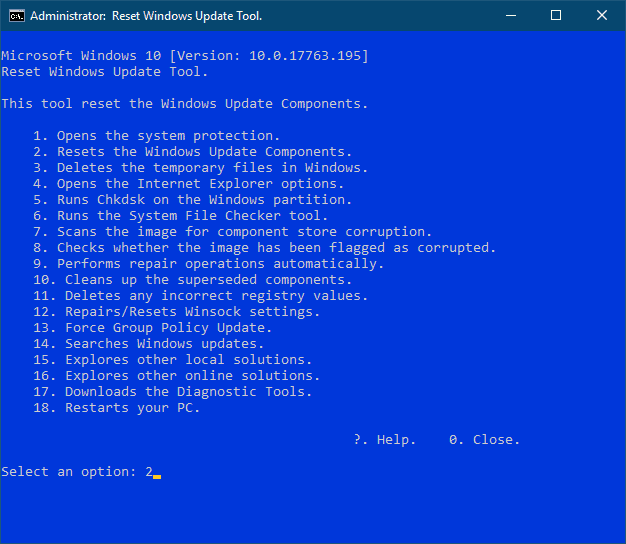
- On the next screen, select Option 2 to reset Windows Update Components. Type 2 from your keyboard and hit enter.
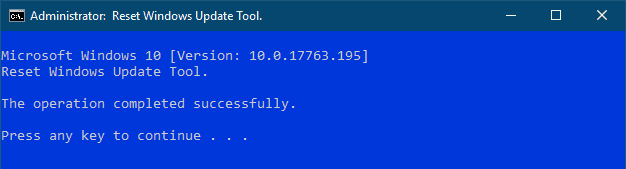
- Wait for the tool to complete the reset process. Once done, close the Reset Windows Update Tool window.
- Go to Settings » Update & Security » click the Check for updates button and install available updates.
The instructions above should help you install Windows updates without any failures. Once Windows is updated, check if 100%disk usage is still a problem in the Task Manager.
Disable Superfetch service host
Superfetch is a Windows service that helps the system pre-load apps into the Random Access Memory to reduce the load on the hard disk. Unfortunately, it sometimes backfires, and negatively affects the hard drive performance instead of helping it.
To disable Superfetch on Windows 10, follow the instructions below:
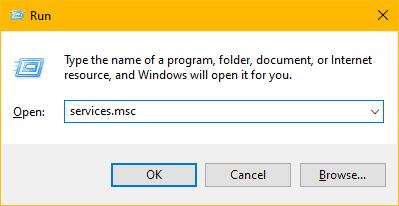
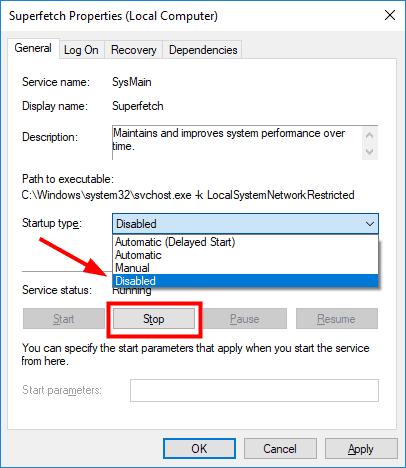
- Open the RUN dialog box using Windows + R keys, then type services.msc and press Enter.
- Find Superfetch, then right-click on it and select Properties.
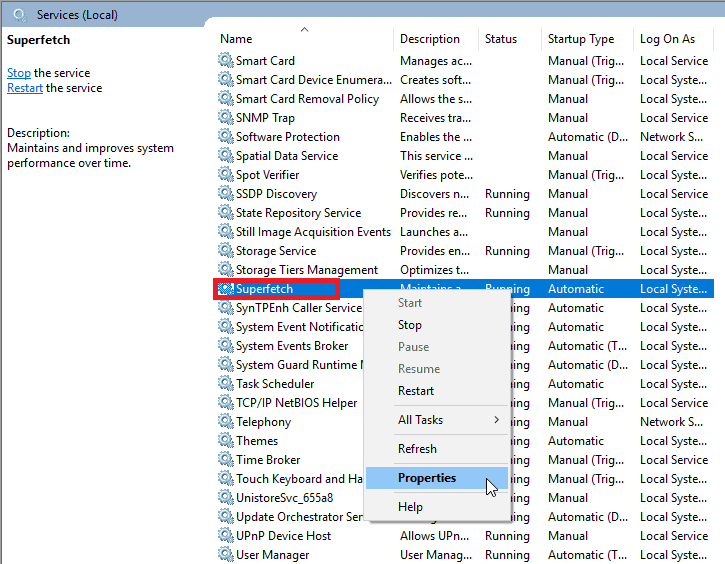
- Click on the drop-down menu next to Startup type, and select Disabled. Then, hit the Stop button and Apply the changes.
That’s it. Disabling Superfetch from running on your PC should fix the 100% disk usage issue. If not, follow the next tip.
Disable “Connected User Experiences and Telemetry” Service
The Connected User Experiences and Telemetry is a diagnostic service which Microsoft uses to get diagnostic and usage information from a users’ PC to “improve the experience and quality of the Windows platform.”
Unfortunately, it’s also known to be causing high disk usage on some machines. To see if it has affected your system as well, try disabling the service as described in the instructions below.
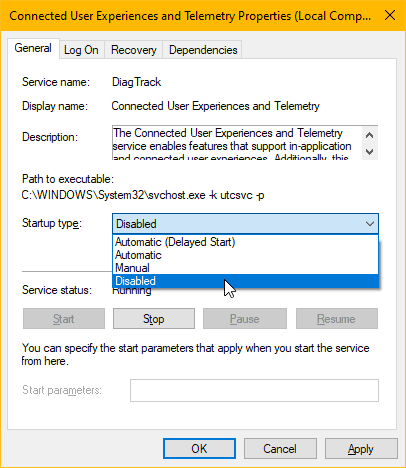
- Open the RUN dialog box using Windows + R keys, then type services.msc and press Enter.
- Look for the Connected User Experiences and Telemetry service, then right-click on it and select Properties from the context menu.
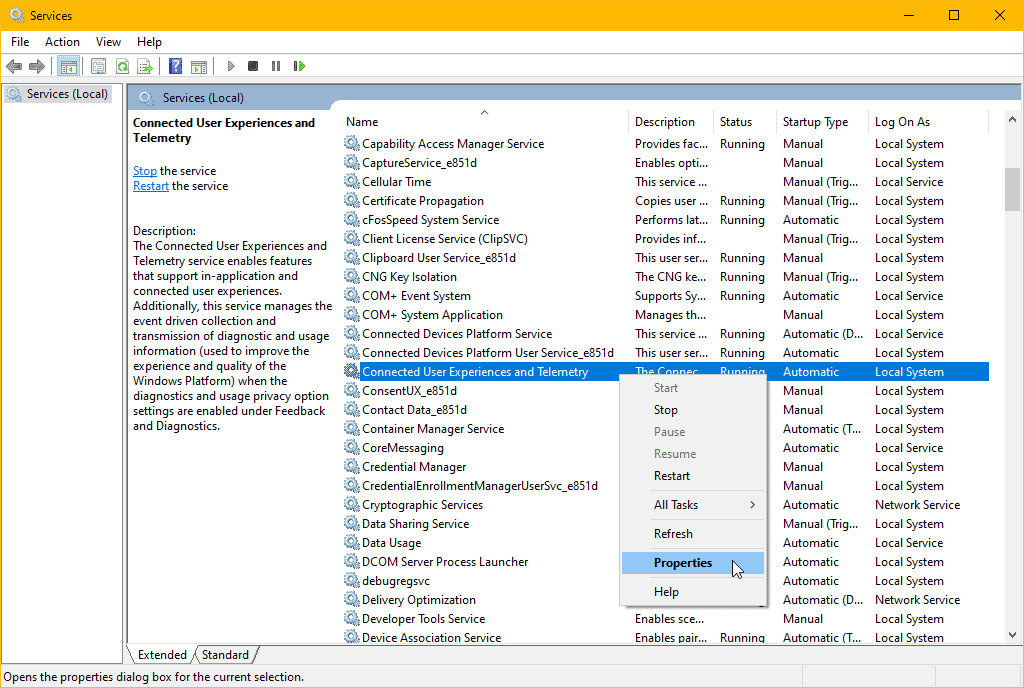
- Click on the drop-down menu next to Startup type, and select Disabled. Then, hit the Stop button and Apply the changes.
After disabling Connected User Experiences and Telemetry service, check in the Task Manager if the disk usage is back to normal. If not, follow the next tip.
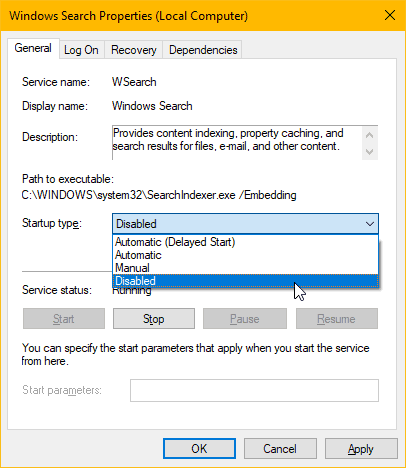
Disable Windows Search service (SearchIndexer.exe)
The SearchIndexer.exe file is often found to be the culprit behind high Disk and CPU usage on a PC. Windows uses the SearchIndexer service to keep disk files in the Windows Search index. This helps in finding files faster when searching in the Start menu or in the Files Explorer.
If the Windows Search service is aggressively using the disk drive, you may want to turn it off to resolve the issue.
- Open the RUN dialog box using Windows + R keys, then type services.msc and press Enter.
- Find Windows Search, then right-click on it and select Properties.

- Click on the drop-down menu next to Startup type, and select Disabled. Then, hit the Stop button and Apply the changes.
Check the disk usage in Task Manager after disabling Windows Search service, it should be back to normal now. If not, then Windows Search service probably wasn’t the cause of the problem, you may want to enable it back on your system.
Close Antivirus software temporarily
While scanning your PC for vulnerabilities, antivirus software can also stress the hard disk by aggressively accessing the files stored on disk. If you have enabled background file scanning in your antivirus program, then that might be the cause of the 100% disk usage in Task manager.
We suggest you temporarily close the Antivirus software installed on your PC to see if it fixes the problem. If it does, then either set the software to scan files at a time when you’re not using your PC (mid-night, maybe), or simply uninstall it and use Microsoft’s official Windows Defender antivirus software to keep your PC clean of viruses.
If you’re already using Windows Defender, you may try turning off the real-time protection feature.
- Open Start menu, search for Windows Security and click to open it from the results.
- Select Virus & threat protection from the left panel.
- Scroll down a bit on the right panel, and click the Manage settings link under the Virus & threat protection settings section.
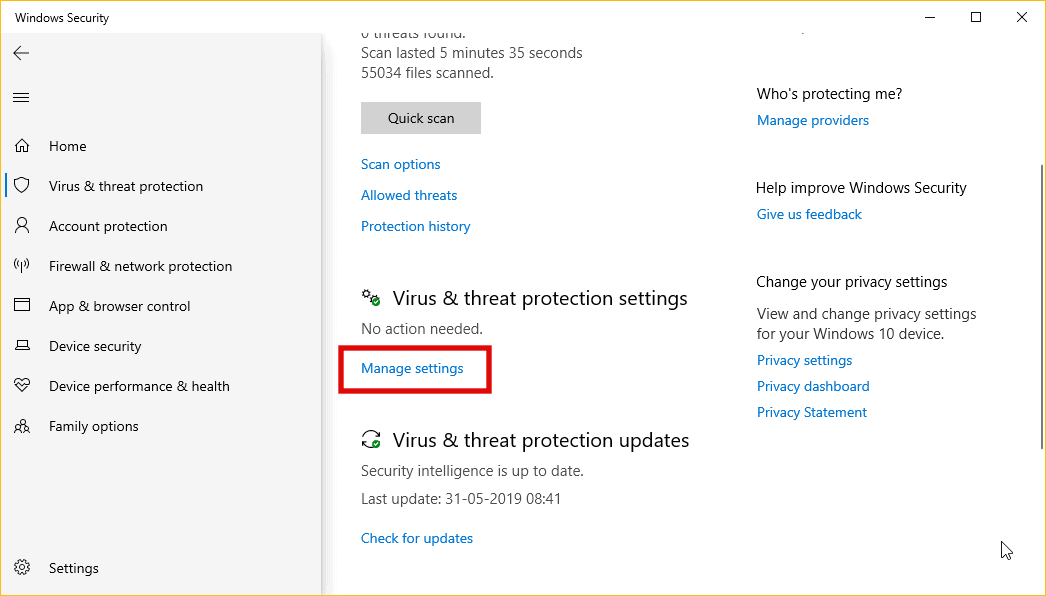
- Turn off the toggle switch for Real-time protection.

- Open Task Manager and see if turning off real-time protection has reduced disk usage on your PC. If not, turn it On again.
Close disk intensive programs running in the background
If you’ve got a program or script running in the background which reads/writes files to your disk, then turning it off might help fix the problem. It could be a game or a coding project you’re working on.
Also, minimize the number of programs running on your PC. Close the programs that you’re not actively using but are always running in the background. Even better, remove all unnecessary programs from the Startup script on your PC.
On Windows 10, it’s easier to manage Startup apps. Go to Settings » Apps » then select Startup from the left panel. Try turning off the toggle switch for all apps. Keep only the apps that are necessary to startup with the system.

Check and Repair Disk Drives
If none of the above solutions work, then maybe it’s an issue with the disk itself. Try running the chkdsk command on all your hard drive partitions to find and fix any errors in the disk.
- Open Start menu, type CMD, then select Run as administrator from the right panel.
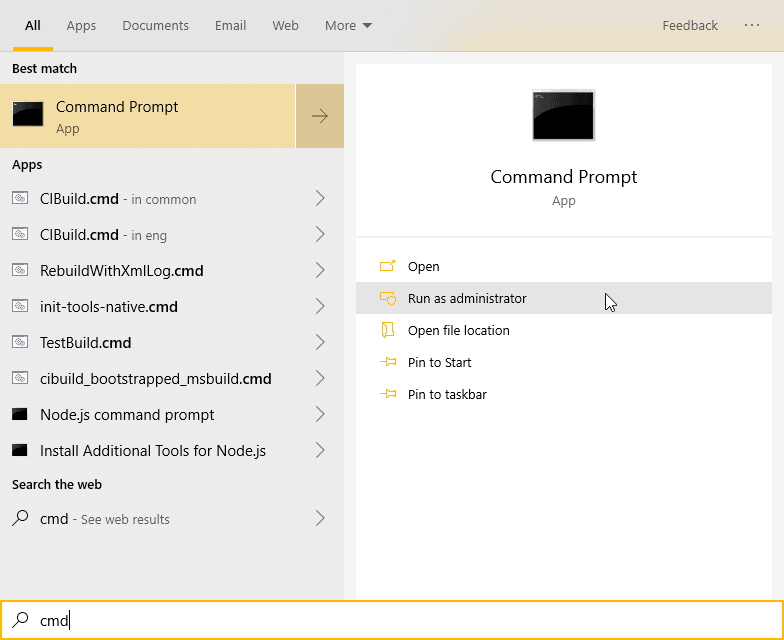
- Issue the following command to find and fix errors in the C: drive.
chkdsk C: /f /r /x - Hit Y to confirm the disk repair command.
- Similarly, run the
chkdskcommand on all drives on your PC. Change the drive letter to the drive you want to check.
Examples:chkdsk D: /f /r /xchkdsk E: /f /r /xchkdsk F: /f /r /x - Restart your PC and then see if repairing the drives have fixed the disk usage issue.
That’s all. If none of the tips above help you fix the 100% disk usage problem on your PC. Then check your hard disk specs using a third-party tool like CPU-Z. If your disk speed is 5400 RPM, then you may want to switch to an SSD, or at least a 7200 RPM disk to improve the read/write speeds and overall performance of your PC.


