Google Meet is the teleconferencing app from Google that has been the app of choice for many people to connect with colleagues, or students and conduct their day-to-day business even while staying at home. Users can seamlessly conduct video meetings with up to 250 participants on Google Meet.
The ability to have video meetings from our homes has been a huge part of survival during the COVID-19 situation. As the saying goes, “No man is an island.” We need human interaction for survival, even if it has to be virtual at this moment. But the whole concept of having video meetings gets defeated if the “video” part doesn’t work.
But there’s no need to go into total despair yet. The “camera failed” problem is a common albeit an annoying problem and you are not alone in it. And there are some simple fixes you can try on your end to resolve the issue.
Make Sure Google Meet has Access to the Camera
Sometimes the culprit can be something as simple as a neglected permission in your browser. Websites need explicit permission to be able to use your device camera and microphone. So, make sure that Google Meet has permission to access your camera.
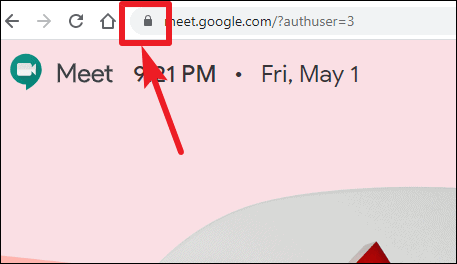
Go to meet.google.com and click on the ‘Lock’ icon on the left side of the site name on the Address Bar.

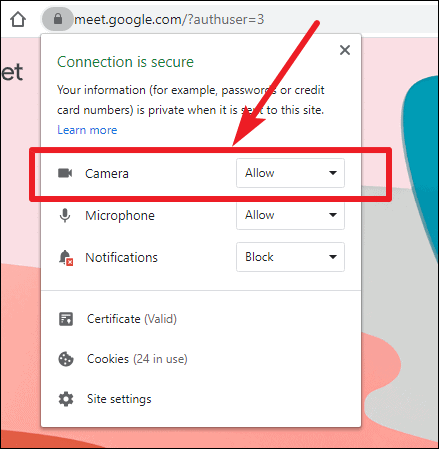
A menu will appear with options such as Camera, Microphone, Notifications, etc. Make sure that the Camera permission is on ‘Allow’. If it is on ‘Block’, click on the drop-down menu and change it to ‘Allow’. If it was already on ‘Allow’, you can also try a quick reset by changing it to Block, and then back to Allow again.

If the problem persists, try one of the other fixes.
Make Sure Apps Have Access to your Camera
It could be possible that the reason Google Meet could not access your camera despite having the permission to do so is that your browser does not have access to the camera itself. Open your Windows settings from the start menu, or by using the keyboard shortcut Windows + i. Then, open the ‘Privacy’ settings.

From the sidebar on the left, scroll down to the ‘App permissions’ section and click on ‘Camera’ to open the camera settings.

Make sure that the option ‘Allow apps to access your camera’ is on. If it isn’t, click on the toggle to turn it on.

Also, scroll down and enable the toggle for ‘Allow desktop apps to access your camera’ under the same settings.

You also need to make sure that your browser has access to the camera. Scroll down and under ‘Choose which apps can access your camera’, find your browser and make sure the toggle is on. If the browser is not on the list, then no worries. It would come under generic apps that can access the camera once both the previous options are on and do not require extra permissions.
Check Your Anti-Virus Software
The Google Meet website has permission to access your camera, and the apps have it too. But it could be that these permissions are finding themselves helpless in the face of another software running interference and blocking any sort of access to your camera. And that software could be your anti-virus software.
Many anti-virus software do provide added privacy security and that includes restricting any kind of access to your webcam sometimes. And it could be the reason behind this whole fiasco. So, make sure that your anti-virus software isn’t the one causing all this drama. And if it is, disable the webcam protection for your browser.

As every anti-virus software handles matters differently and the steps would be different for each one of them, a generic guide goes out of the window for this step.
Run the ‘Hardware and Devices’ Troubleshooter
If all the permissions are already enabled, maybe the fault lies somewhere with your camera. If there is a problem with the camera, you can pinpoint it by running the ‘Hardware and Devices’ troubleshooter.
To launch the Hardware & Devices troubleshooter, you will need to open Command Prompt on your PC and run the following command:
msdt.exe -id DeviceDiagnosticTo open the Command Prompt, type ‘cmd’ in the Search box on the taskbar or open it from your Start Menu. Then, enter the above command and press the ‘Enter’ key. The troubleshooting window for Hardware and Devices will open. Follow the steps on the screen to troubleshoot the problem. If there indeed is a problem with your camera device, the troubleshooter will find it and help you fix it.

Re-register the Camera on your Computer
You can also try to register your device again if none of the above steps work. Right-click on the Start button, and open the ‘Windows PowerShell (Admin)’ application.

A User Account Control prompt will appear on your screen, asking whether ‘you want to allow this app [Windows PowerShell] to make changes to your device?’ Click on ‘Yes’ to proceed to the next step.
The Windows PowerShell console will open. Enter the following command without any alterations to re-register your camera.
Get-AppxPackage -allusers Microsoft.WindowsCamera | Foreach {Add-AppxPackage -DisableDevelopmentMode -Register "$($_.InstallLocation)\AppXManifest.xml"}
Quit the PowerShell console and check whether this resolved the issue.
Update Your Camera Drivers
Well, you’ve tried everything but nothing seems to be working. It could be because of outdated camera drivers on your PC. Drivers are essential cogs required for the smooth working of our systems, but something that can get overlooked sometimes.
Right-click on the Start button and select ‘Device Manager’ from the menu that appears.

The Device Manager screen will open and it will list all the devices available on your system. Find ‘Cameras’ on this list, and click on the arrow next to it to view all individual devices available.
Then right-click on the Camera device you use (if there is more than one installed on your system), and select ‘Update driver’ from the context menu if the option is available.

Then select the ‘Search automatically for updated driver software’ option. If a newer update for the driver is available that Windows update missed, the Device Manager would download and install it.
Reset the Camera Hardware
If anything on the list didn’t work, there is one last thing you could try. Open the Device Manager from the menu that appears by right-clicking on the Start button. Then, find your camera device in the list of devices, right-click on it, and select the ‘Uninstall device’ option from the menu. Click ‘OK’ when prompted.

Now go to the ‘Action’ option on the Menu Bar in the Device Manager window and select the ‘Scan for Hardware Changes’ option from the pop-up menu.

After the scan is complete, restart your PC. This hard-reset should solve your problem if the problem is indeed on your end.
A video meeting app like Google Meet becomes somewhat useless without a working camera. But there are some fixes you can try to resolve this rather frustrating issue. Something or other on this list is bound to be of help to you, but if it doesn’t, then maybe the problem lies beyond the realm of your scope.

