Encountering errors on Windows 10 when in the middle of work can be infuriating. Blue Screen of Death (BSOD) errors are the most common on Windows 10 and lead to the system crashing instantly. In this article, we will explore the ‘VIDEO_TDR_FAILURE’ error and walk you through the various fixes for it.
What is VIDEO_TDR_FAILURE Error?
The ‘VIDEO_TDR_FAILURE’ error falls under the BSOD error category and is caused by the malfunctioning of the graphic card or display driver. These errors are generally encountered after you update the Windows or the graphic driver.
Also, you will be able to identify what leads to the error on the blue screen. You will find a different term next to ‘What says’ on the blue screen depending upon the graphic card installed on your computer. It will be ‘nvlddmkm.sys’ for NVIDIA card, ‘atkimpag.sys’ for AMD card, and ‘igdkmd64.sys’ for Intel card.
Now that we know what the ‘VIDEO_TDR_FAILURE’ error is all about, it’s time to understand the factors that lead to the error.
- Outdated, corrupt, or incompatible graphics driver
- A high number of apps running in the background
- Overheating of the system
- Overclocking of components
- Malfunctioning of hardware
It’s time we walk you through the various fixes. Remember to execute the fixes in the order they are mentioned for a quick resolution.
1. Update the Graphics Driver
If you haven’t manually updated the display driver in a long while, it’s time you do. Many a time, running an outdated driver can be leading to ‘VIDEO_TDR_FAILURE’.
Before you proceed to the steps to update, ensure that you have downloaded the latest version of the driver from the manufacturer’s website. It’s recommended not to download the driver from other websites as they might contain malware and viruses. To download a newer version, you will first have to identify the current version.
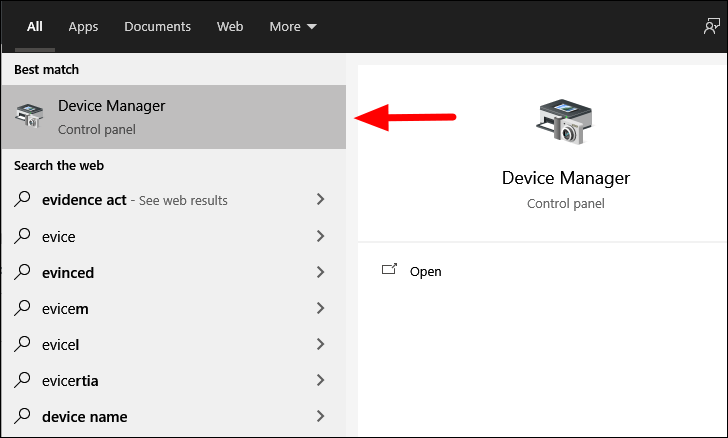
To find the current driver version, search for ‘Device Manager’ in the ‘Start Menu’ and then launch the app by clicking on the search result.
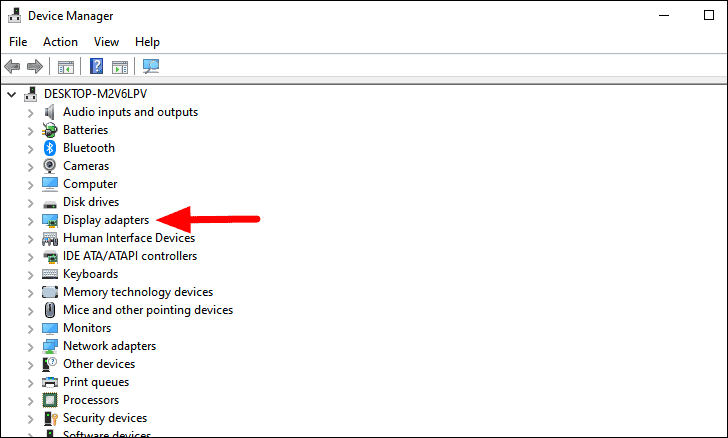
In the ‘Device Manager’ window, locate the ‘Display adapters’ option, double-click on it to expand and view the drivers.
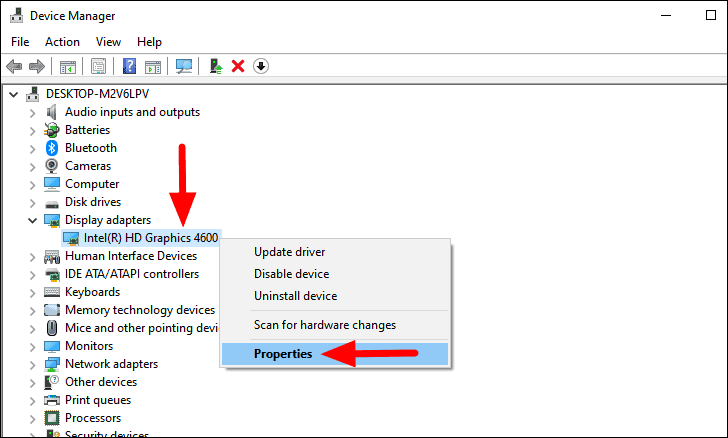
Now, right-click on the driver and select ‘Properties’ from the context menu.
The driver properties window will launch, navigate to the ‘Driver’ tab. You will now find the version of the driver next to ‘Driver Version’.
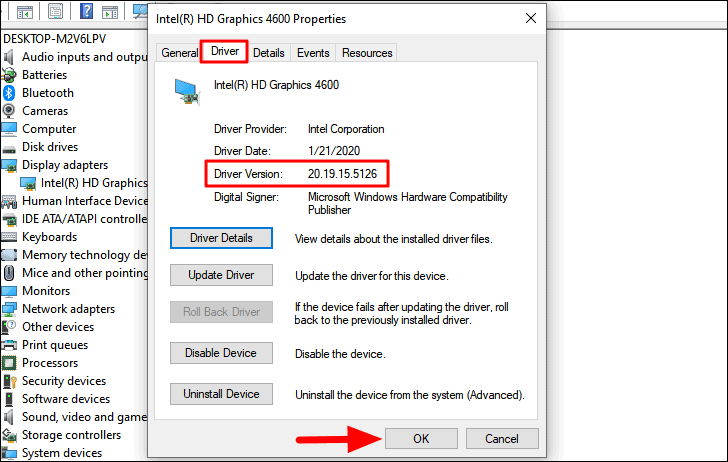
Note down the current driver version and accordingly download a newer version of it from the manufacturer’s website. To find the driver online, do a Google search with the ‘Device Model’ and the ‘Driver Name’ as the keywords and relevant results will show up. After you have downloaded the latest version, it’s time you update the driver.
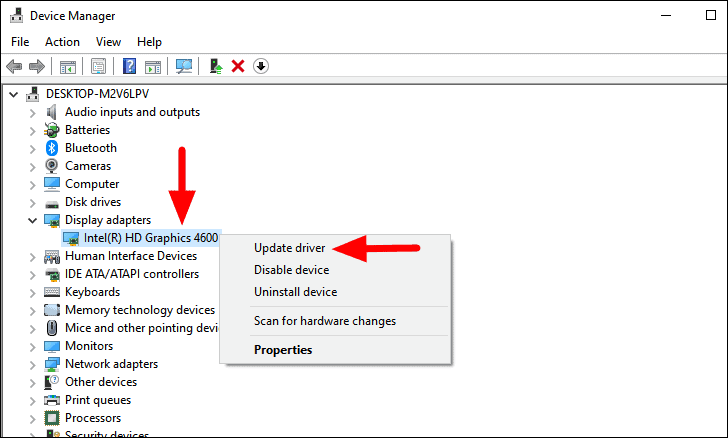
To update the driver, right-click on the driver and select ‘Update driver’ from the context menu.
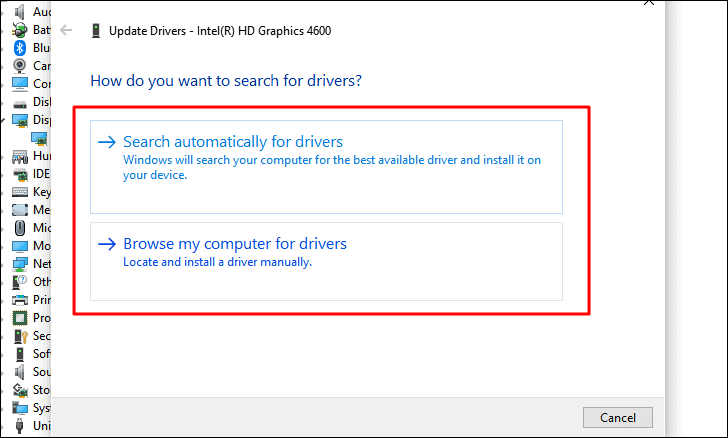
In the ‘Update Drivers’ window, you will find two options, either to let Windows search for the driver on your computer and install it or install the driver yourself manually. If you have downloaded the driver from the manufacturer’s official website, select the second option, browse and locate the driver on your computer, and then follow the on-screen instructions to install it.
After the driver has been updated, restart the computer and check if the error is fixed.
2. Return to an Older Version of the Driver
If you have been encountering the ‘VIDEO_TDR_FAILURE’ error ever since you updated the display driver, it’s time you roll back to the previous version. Many a time, the newer version may have compatibility issues and therefore, you might be running into errors.
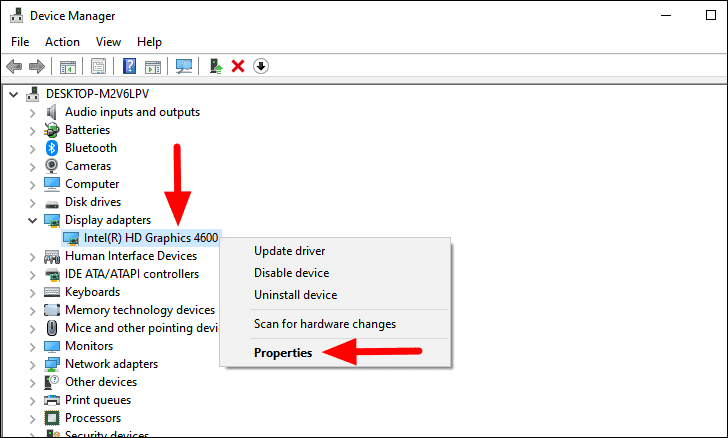
To roll back to the previous version of the driver, right-click on the ‘Graphics Driver’, and then select ‘Properties’ from the context menu.
In the properties window, navigate to the ‘Driver’ tab on the top and then click on the ‘Roll Back Driver’ option. Now, follow the on-screen instructions to complete the rolling back process.
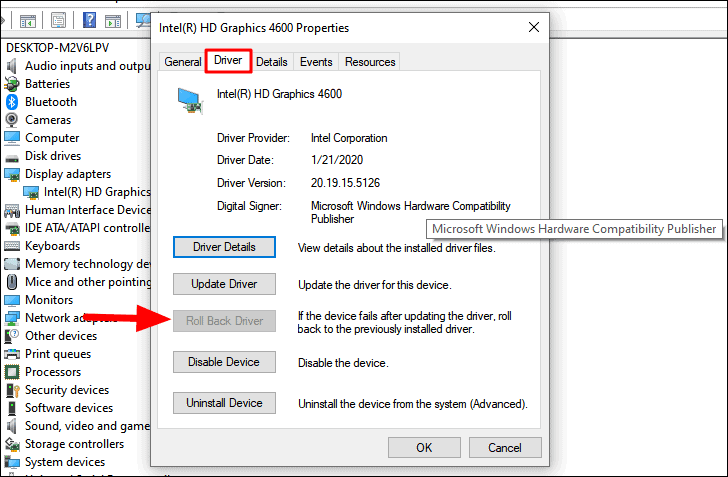
If the previous version is not stored on your system, the option will be greyed out. In that case, you will have to search the web, download the driver and then manually install it as discussed in the last fix.
3. Reinstall Graphics Driver
If the error persists, the driver might be corrupt. In this case, reinstalling it will fix the error for you. The process of reinstalling is not as intricate and time-consuming as it sounds, rather it’s actually simpler than the fixes we discussed above. However, you must follow the sequence for effective troubleshooting.
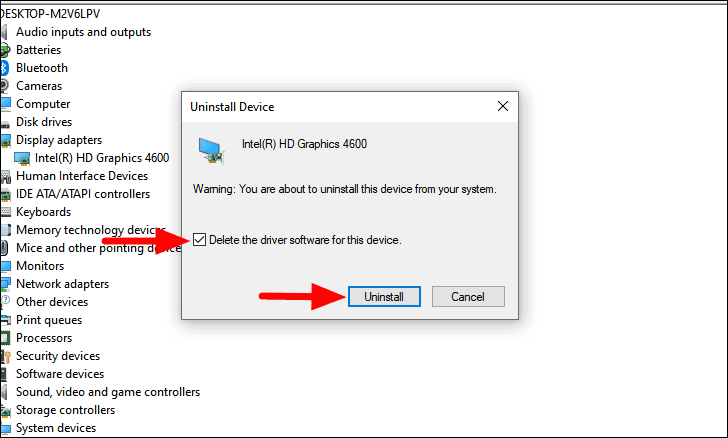
To reinstall ‘Graphics Driver’, right-click on the ‘Graphics Driver’, and then select ‘Uninstall Device’ from the context menu.

A confirmation box will now pop up. Select the checkbox for ‘Delete the driver software for this device’ and then click on ‘Uninstall’ at the bottom.
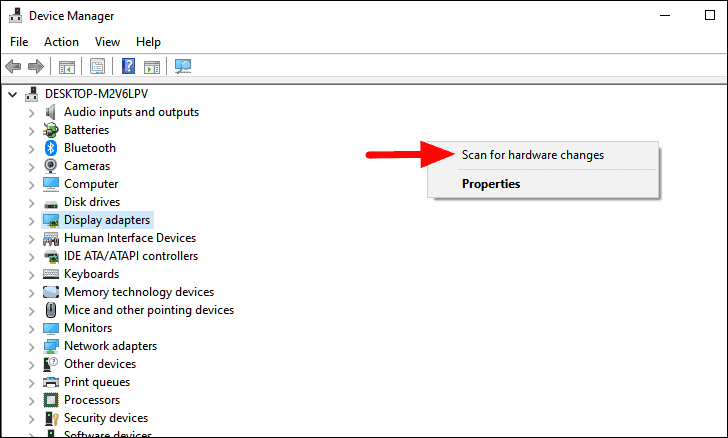
After the driver has been uninstalled, restart the computer and Windows will automatically download the driver. In case it doesn’t, open the ‘Device Manager’ as discussed above, right-click on the white portion, and select ‘Scan for hardware changes’ on the menu that appears.
The driver will now be installed and the error should be fixed. In case you still encounter the error, try the next fix.
4. Change Monitor Refresh Rate
Refresh rate is the speed at which the monitor can change the image displayed on the screen. Many monitors support a refresh rate higher than 120 Hz and if you have set it to a higher value, for instance, 140 Hz, it might affect the functioning and lead to the ‘VIDEO_TDR_FAILURE’ error. To fix this, downgrade the refresh rate to 120 Hz.
You can easily change the monitor refresh rate from the ‘Display Settings’ and set it to 120 Hz. After you have changed it, restart your computer and check if the error is fixed. If not, move to the next fix.
5. Change Power Settings
Generally, the power settings are set such that they don’t conflict with the system. However, at times, you may have to configure them in case you are encountering the ‘VIDEO_TDR_FAILURE’ error. In this case, the power settings may interfere with the way the computer handles the graphics, thus leading to the error.
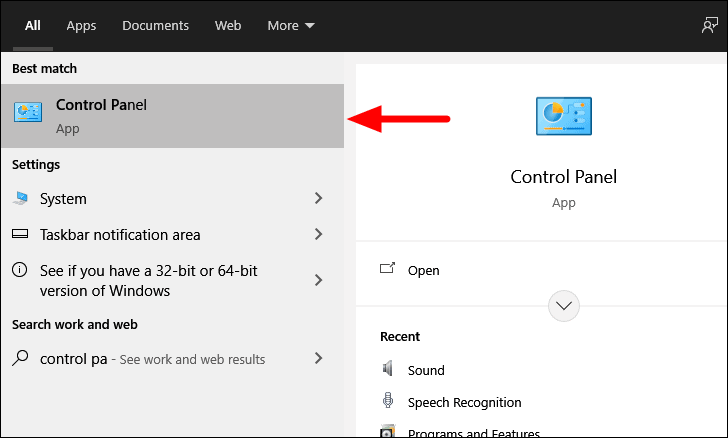
To change the power settings, search for ‘Control Panel’ in the ‘Start Menu’ and then click on the search result to launch the app.
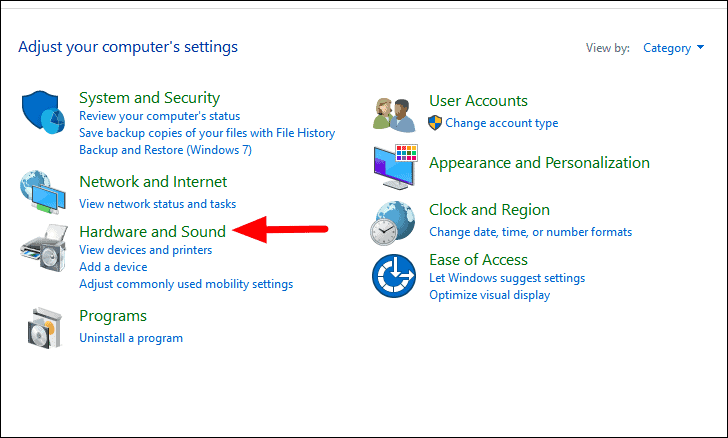
In the ‘Control Panel’, select ‘Hardware and Sound’ from the list of options.
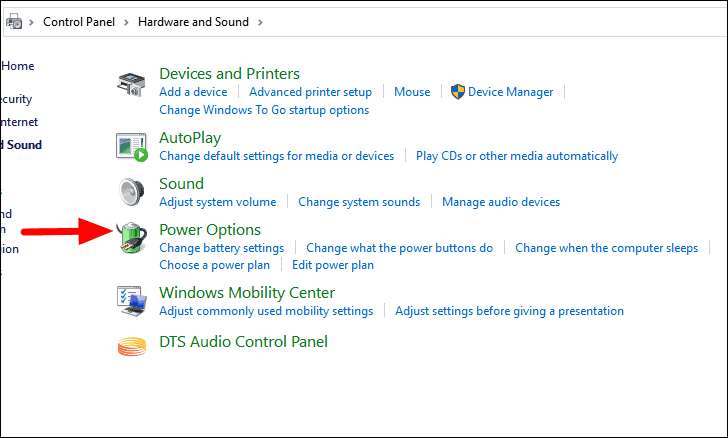
You will now find multiple hardware and sound options listed on the screen, click on ‘Power Options’ to proceed.
In the ‘Power Options’, your current power plan will be listed. Click on the ‘Change plan settings’ option next to the current plan.

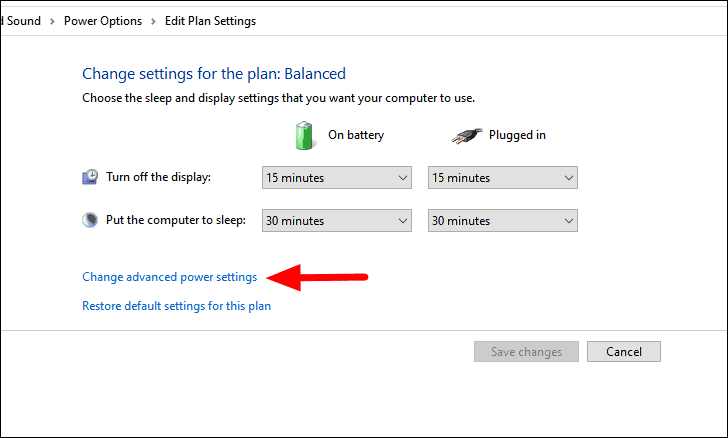
In the ‘Edit Plan Settings’ window, select the ‘Change advanced power settings’ option at the bottom.
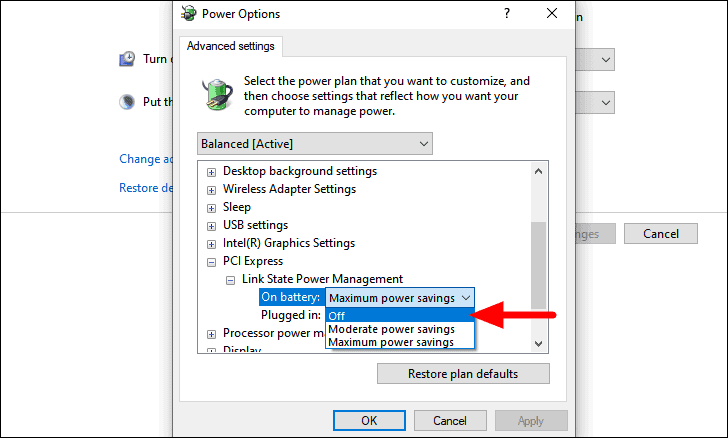
The ‘Advanced Power Settings’ box will launch. Locate the ‘PCI Express’ option, double click on it, and then double-click on the ‘Link State Power Management’ option to disable it. You will find two options, one when the system runs on battery and the other for when the system is plugged into power. Select the ‘On battery’ option and click on the box that appears.
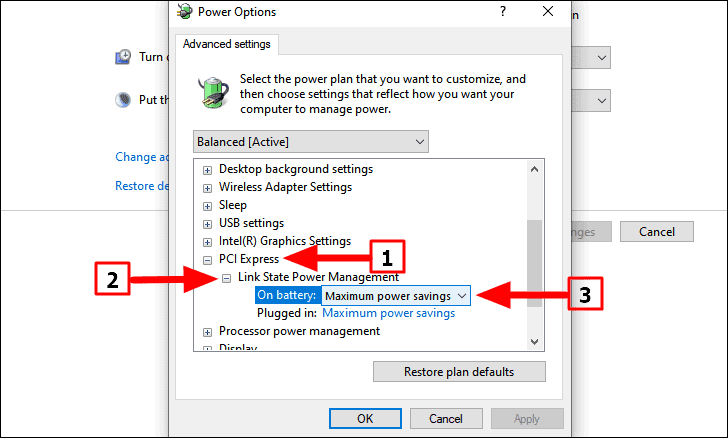
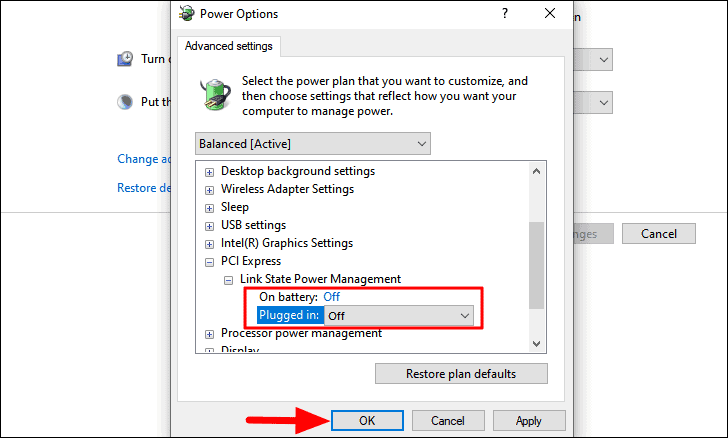
Now, select the ‘Off’ option from the drop-down menu to turn off the settings when the system runs on battery. Similarly, turn off the setting for the next option, i.e. ‘Plugged in’.
After you have turned off the ‘Link State Power Management’ settings, click on ‘OK’ at the bottom to save the changes and close the window.
After you have saved the changes, restart the system and the error should be fixed.
6. Run SFC Scan
The SFC scan helps identify and repair corrupt system files. In case none of the above fixes have worked, it’s highly likely that a corrupt system file is leading to the error.
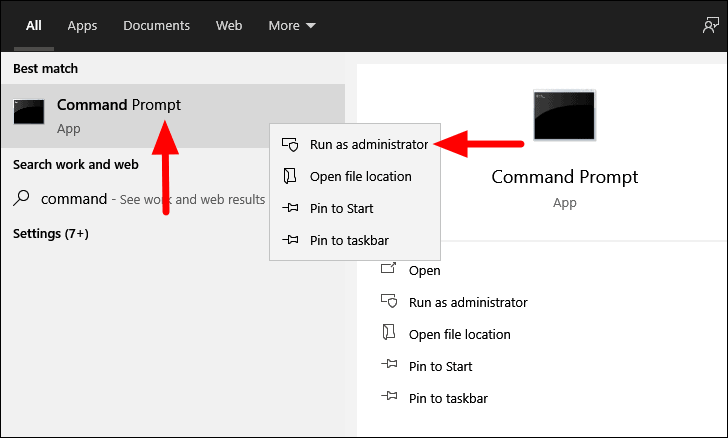
To run the SFC scan, search for ‘Command Prompt’ in the ‘Start Menu’, right-click on the search result, and then select ‘Run as administrator’ from the list of options that appear.
In the ‘Command Prompt’ window, enter the following command and then press ENTER.
sfc /scannow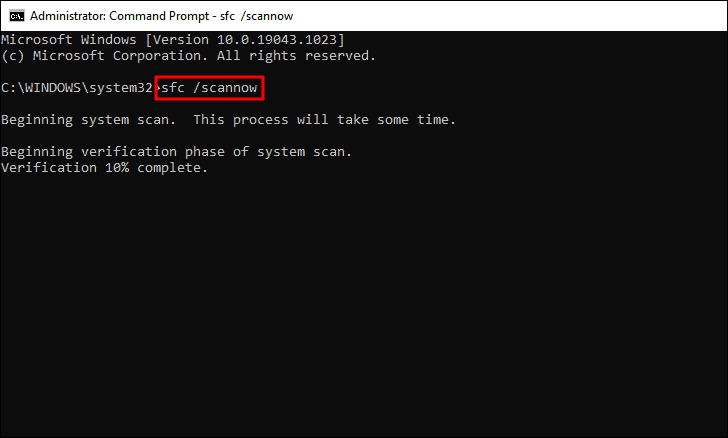
The scan will start in a few moments and will take a few minutes to complete. Once the scan is complete, check whether any fixes have been made, and then restart your computer.
7. Run Start-up Repair
If the error has not been fixed yet, it’s time you run the ‘Startup Repair’, an option found in the Windows Recovery Environment. It identifies the issues that are preventing the Windows from functioning properly and automatically fixes them.
To run ‘Start-up Repair’, press WINDOWS + I to launch system ‘Settings’, and then select ‘Update & Security’ from the list of options.
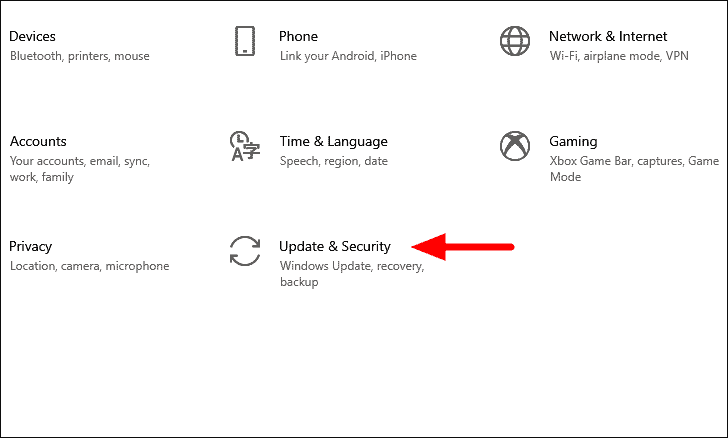
In the ‘Update & Security’ settings, the ‘Windows Update’ tab will launch the default. Select the ‘Recovery’ tab from the list of options on the left.
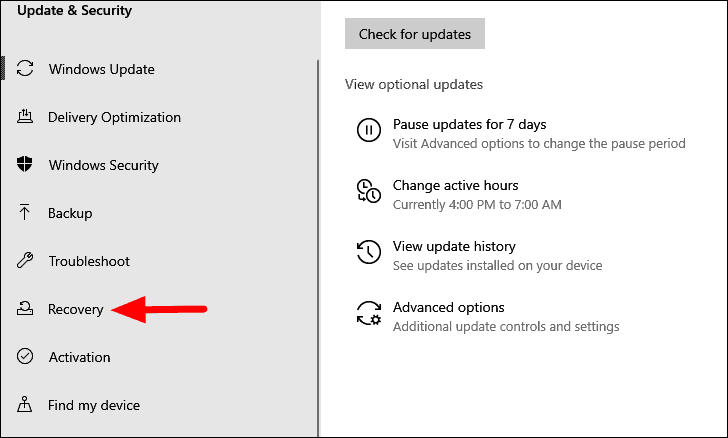
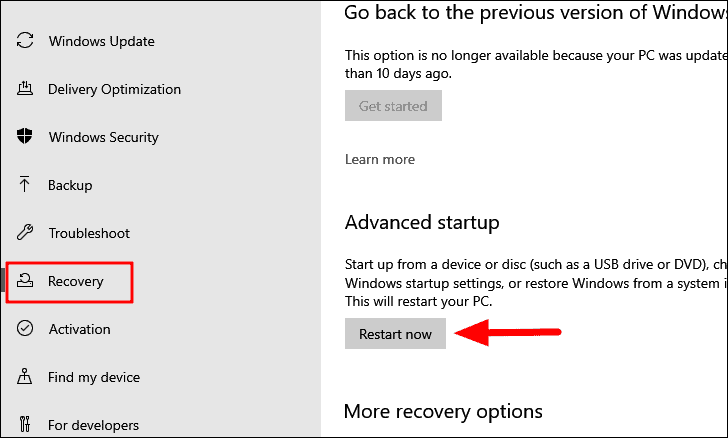
In the ‘Recovery’ tab, click on ‘Restart now’ under advanced startup to enter Windows Recovery Environment. Since your computer will restart, it’s recommended that you save any open files to avoid data loss.
After your computer restarts, you will find three options on the screen. Select the ‘Troubleshoot’ option.
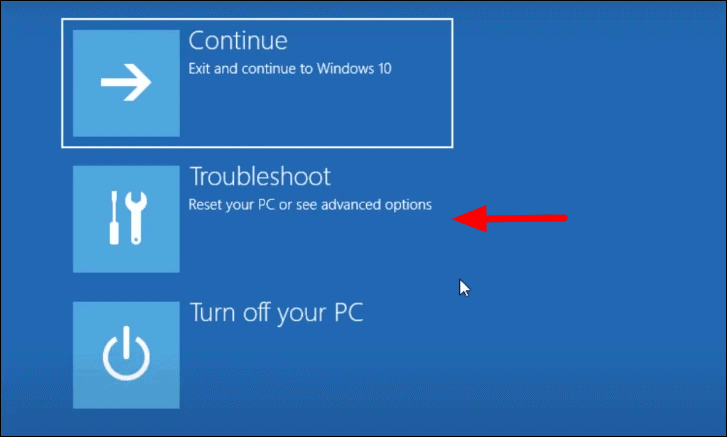
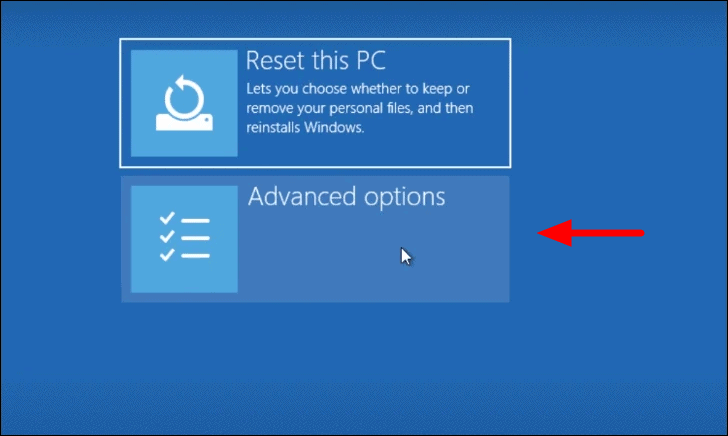
Click on ‘Advanced options’ on the next screen to proceed.
You will now find six options listed on the screen, click on the ‘Start-up Repair’ option to fix the problems that are preventing the Windows from functioning properly.
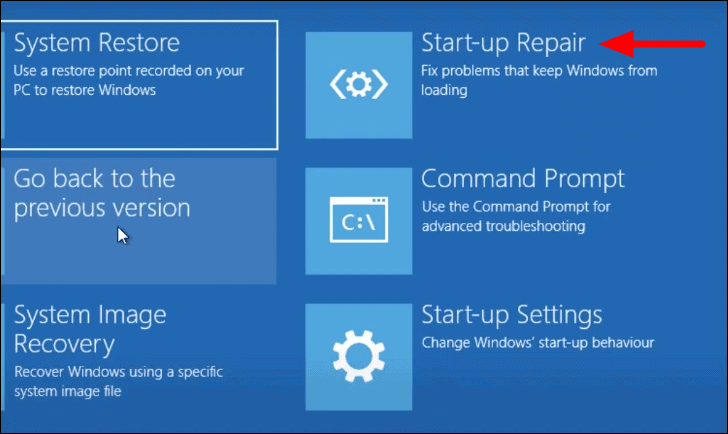
You will now be asked to choose a user account and then enter the password for it. After the authentication is complete, the repair process will start. Once it’s completed, the ‘VIDEO_TDR_FAILURE’ will be fixed.
8. Clean the Computer Components & Check Hardware
If none of the fixes above has worked for you, it’s probably either due to excessive heating of the device or malfunctioning hardware. The computer heats up due to dust buildup which can cease the functioning of the CPU fan. Therefore, it’s recommended that you get your laptop clean every month to avoid dust buildup. Along with the fan, ensure that the graphic card, power supply unit, and RAM are also cleaned for effective functioning of the system. It’s recommended that you consult a professional for cleaning the system to avoid any damage.
If cleaning the system does not fix the ‘VIDEO_TDR_FAILURE’ error, it’s probably due to malfunctioning hardware. Now, we recommend you seek professional help and get the malfunctioning component identified and repaired. Once done, the error will be fixed.
Now that you have gone through the fixes mentioned above, your computer must be running fine and the ‘VIDEO_TDR_FAILURE’ error fixed. You can now work effectively on the system without worrying about losing your progress due to errors.


