Web3 is a complicated place to navigate. But one thing everyone knows for sure is that you’re going to need a wallet. A wallet is your gateway to blockchain apps. And if we’re on the subject of a crypto wallet, MetaMask is almost always a part of that conversation.
MetaMask is one of the most popular crypto wallets right now. With MetaMask, the world of Web3 is within your grasp. Available as a mobile app and a browser extension, it makes Web3 a lot more accessible. You can buy, store, sell, and swap tokens (fungible and non-fungible) as well as explore hundreds of blockchain-based apps. There’s a reason many consider it one of the best ways to explore the decentralized web.
But MetaMask is, first and foremost, a wallet for the Ethereum blockchain. The only network it runs with its default configuration is the Ethereum Mainnet. And that poses a problem for many. While the Ethereum blockchain is one of the most popular blockchains for many decentralized activities, including being the original blockchain for NFTs, it hasn’t always been very efficient to use.
Why Not Ethereum?
To recap: Ethereum used a proof-of-work consensus algorithm for the past few years since its inception. In a proof-of-work system, miners need to solve complex algorithms to create new blocks on the blockchain as well as validate transactions and add them to the block. The entire process is extremely resource and energy-consuming. It also had issues with scalability as well as required exorbitant gas fees to perform transactions on the network.
While Ethereum has transitioned to the proof-of-stake consensus algorithm now (known as The Merge), many solutions popped up in the past few years to circumvent the various problems of the Ethereum network. Now, a lot of these solutions have become mainstream in their own right and are here to stay. And we’re not talking about different blockchain networks, though there is no shortage of that either. We’re talking about layer 2 solutions built on Ethereum, such as Polygon. Moreover, while Ethereum does not consume outrageous amounts of energy anymore after The Merge, there is still the problem of scalability which layer 2 solutions address.
What is Polygon?
Previously known as the Matic Network, Polygon is a layer 2 scaling solution (or “sidechain”) built on the Ethereum network. It is a decentralized Ethereum scaling platform that has enabled developers to build scalable user-friendly dApps (decentralized apps) with low transaction fees without compromising security.
Think of Polygon as a speedy parallel blockchain that runs alongside the main Ethereum blockchain and provides faster transactions and lower costs for users. It uses a variety of technologies to achieve this.
For a more mundane analogy, try to picture it as an express train on a subway. The express train, i.e., Polygon, travels along the same route as the regular train, i.e., Ethereum. But the express train makes fewer stops and thus moves much faster than the regular train. Who wouldn’t want to get on the express train then?
Polygon is one of the most popular layer 2 Ethereum solutions. One can glance at its increasing popularity through its recent partnerships with Meta and Nike.
You can use it by “bridging” some of your crypto over to Polygon. Bridging the said crypto hence allows you to interact with a gamut of popular crypto apps that were once exclusive to the main Ethereum blockchain. The blockchain has its own cryptocurrency – MATIC.
If the name of the cryptocurrency is confusing you, remember how we told you a little piece of Polygon’s history about it being called the Matic Network. So, the network rebranded, but changing the name of the currency isn’t easy since it means reconfiguration at the smart contract level. And hence, we have MATIC.
So, essentially, with Polygon, you get access to the same apps as Ethereum but at minimal gas fees that Polygon offers. It has more than 19,000 dApps which include DeFi protocols like Aave and Uniswap V3, NFT marketplaces OpenSea and Mark Cuban’s Lazy.com, and Web3 gaming efforts like DraftKings, Animoca Brands’ The Sandbox and Decentral Games.
The only thing you require is a compatible wallet to try the Polygon network. That’s where MetaMask comes in.
Although there are many crypto wallets out there, MetaMask easily becomes the first choice because of the features and security it offers. So, wanting to use MetaMask with Polygon is understandable. And the good news is that you can easily use it.
Is It Safe to Connect Polygon to MetaMask?
The most important question that’ll come to your mind when adding Polygon to MetaMask is about the safety of it all. If MetaMask is configured to run with Ethereum, should you be connecting it to Polygon? Yes, you should because it is completely safe.
In fact, MetaMask has added all the details for Polygon itself. This means you don’t have to manually enter all the configuration details to add the Polygon network as you had to do previously. Moreover, you can even add the Polygon network to MetaMask automatically from Polygon’s official websites.
However you might be adding the network, be extra careful and thorough when adding any network (and not just Polygon) on MetaMask. Web3 is full of scammers and getting access to your wallet by using fake URLs is one such scam. So, since you’ll be risking your assets and tokens, caution won’t hurt.
You can add the Polygon network to your MetaMask wallet on both the mobile app and the browser extension.
Set Up MetaMask
The first step in adding Polygon to MetaMask is having the MetaMask wallet set up. If you don’t already have it, follow the steps in this section. Otherwise, skip to the next section.
There is no separate MetaMask wallet for Polygon, i.e., you need to install and set up the original “Ethereum” MetaMask wallet.
MetaMask is available as both a browser extension and a mobile app. You can set it up on either device as the configuration process is the same on both.
Go to metamask.io on your preferred browser to download the MetaMask wallet. Always remember to install the wallet from the original URL as there is no shortage of scammers out there. If downloading as a browser extension, you can use it on these browsers – Chrome, Firefox, Brave, and Edge browsers. Or you can install it on iOS or Android devices. We’ll cover the steps for the browser in this guide.
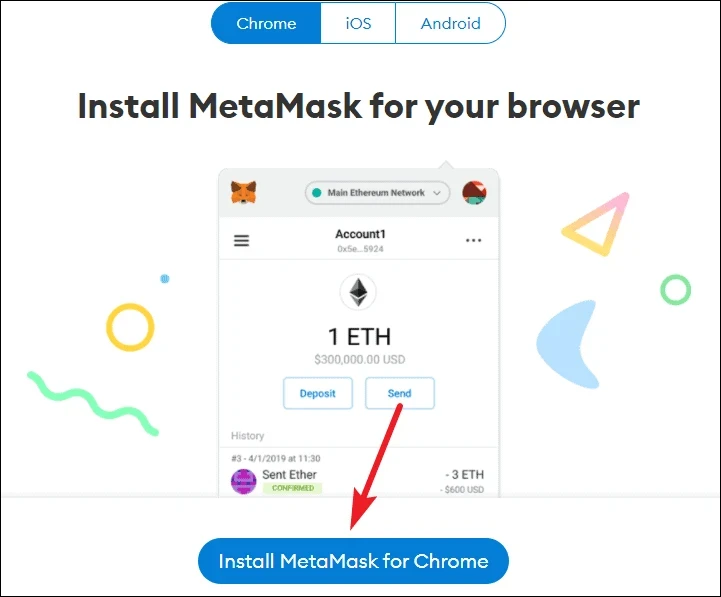
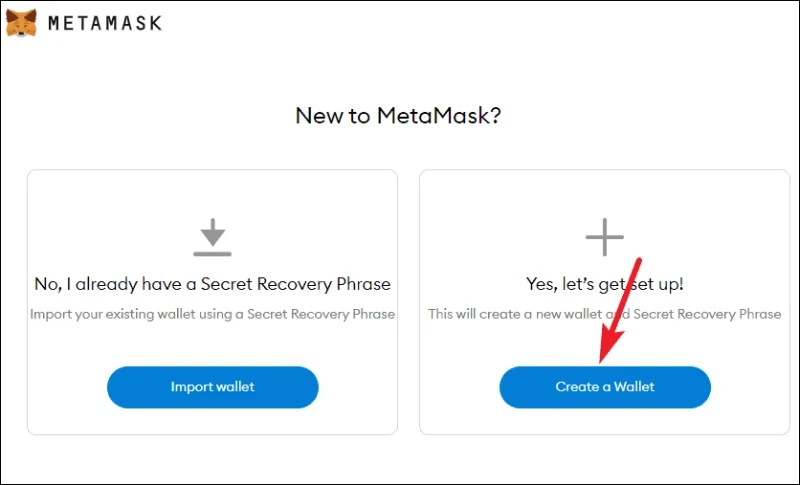
Once you install the extension, you can either import your existing wallet or create a new one. Even if you have an existing MetaMask wallet, you can create an entirely new one for Polygon to keep them separate. Additionally, you can also create a separate account for Polygon within your existing wallet.
To import an existing wallet, you’ll need your secret backup phrase. When you create your wallet, you’ll be given this secret backup phrase. You need to keep this phrase very safe, preferably on a device that’s not connected to the internet. If you lose this phrase, you cannot gain access to your wallet. Moreover, you should never share this phrase with anyone. Anyone with access to your phrase can access your wallet and transfer all your tokens; it’s the same as handing over your wallet. If someone has the seed phrase for your wallet, they don’t need any additional information. Click the option to ‘Import wallet’ or ‘Create wallet’ depending on your need.
Whether you’re creating a new wallet or importing an existing one, you’ll have to create a new password for it.
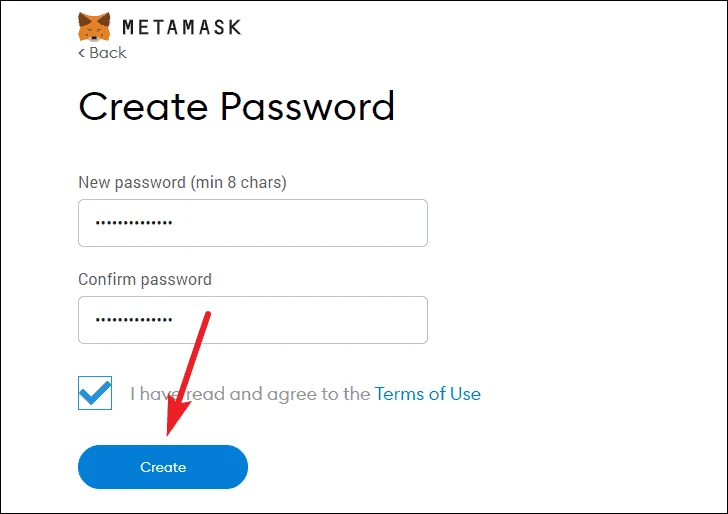
Once you set up a password and complete the steps regarding the secret backup phrase, your MetaMask wallet will be set up.
Adding Polygon to MetaMask
Now, to use MetaMask on the Polygon blockchain, you’ll need to configure it to use the Polygon network.
Manually Adding the Polygon Network
We’re explaining the steps to add the Polygon network for the browser extension, but the steps to add the network from the MetaMask mobile app are the same.
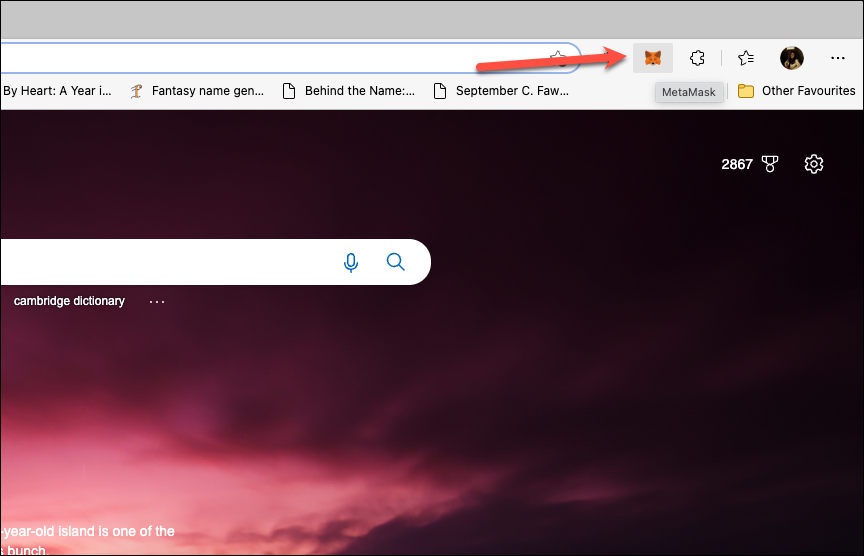
Go to your browser and click the ‘MetaMask’ extension icon from the extensions menu and log in to your account if you have to.
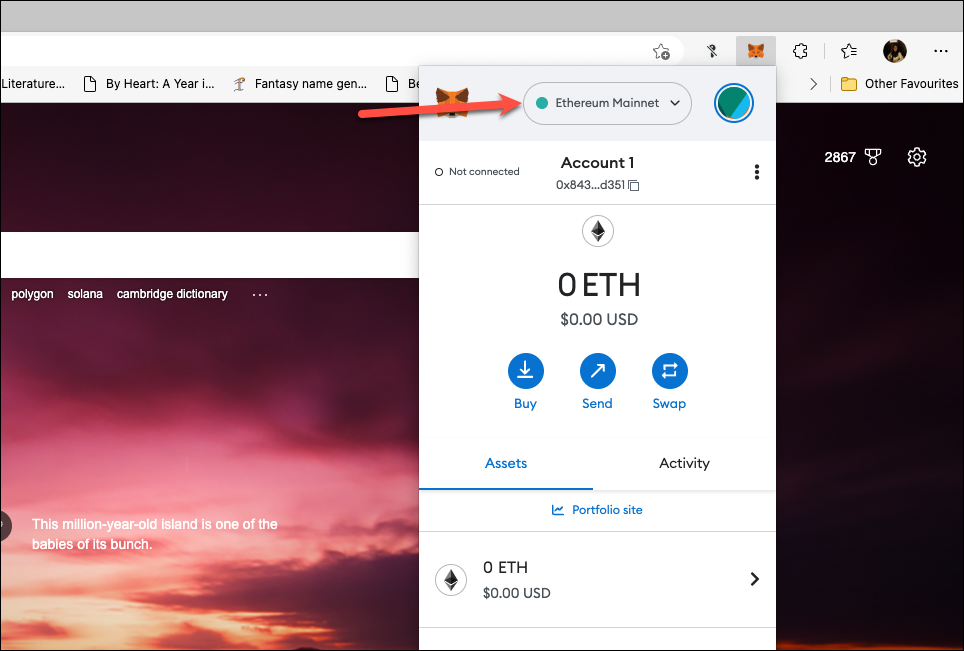
Then, click the network selection dropdown menu icon, the one that says ‘Ethereum Mainnet’ at the top right of the extension window.
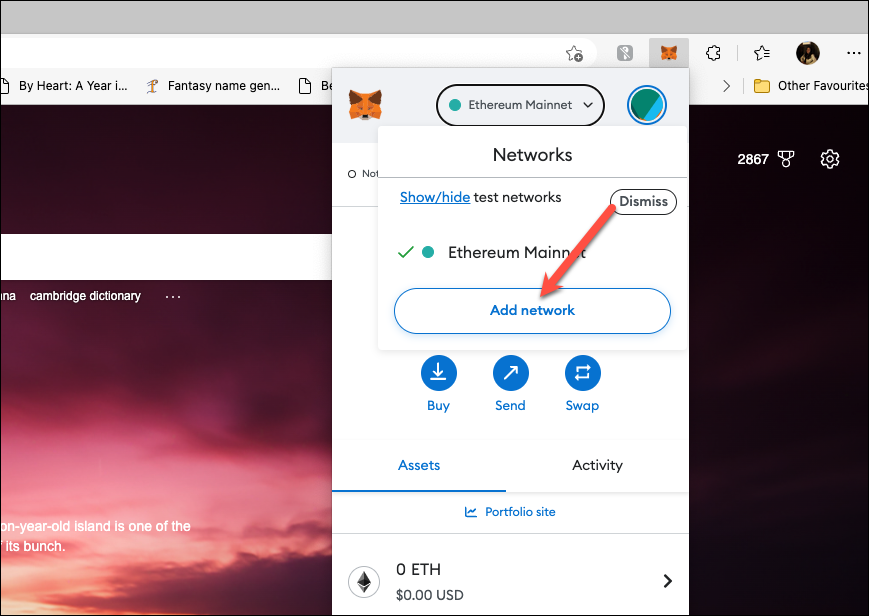
From the drop-down menu, click ‘Add network’.
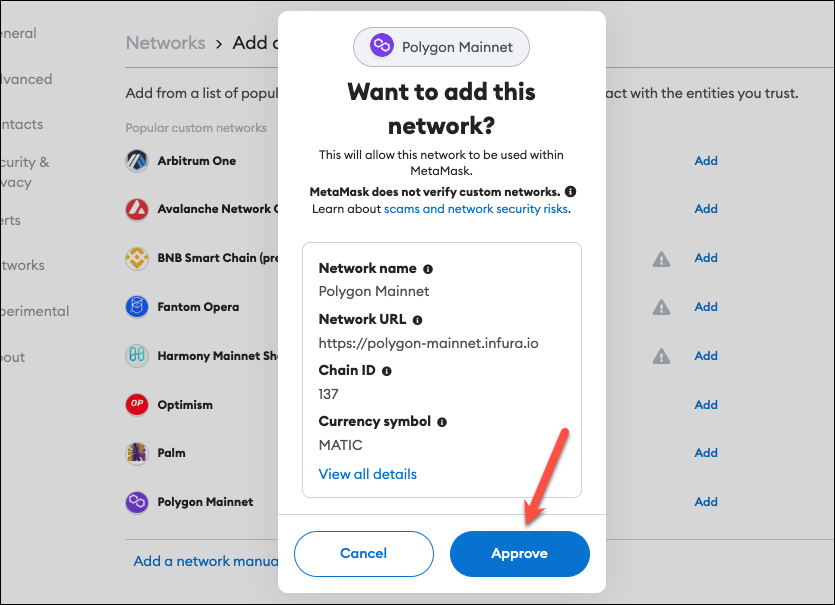
You’ll find ‘Polygon Mainnet’ in the list of popular networks; click ‘Add’ on its right.

MetaMask will fill in all the details for Polygon Mainnet on its own. Click ‘Approve’ to proceed.
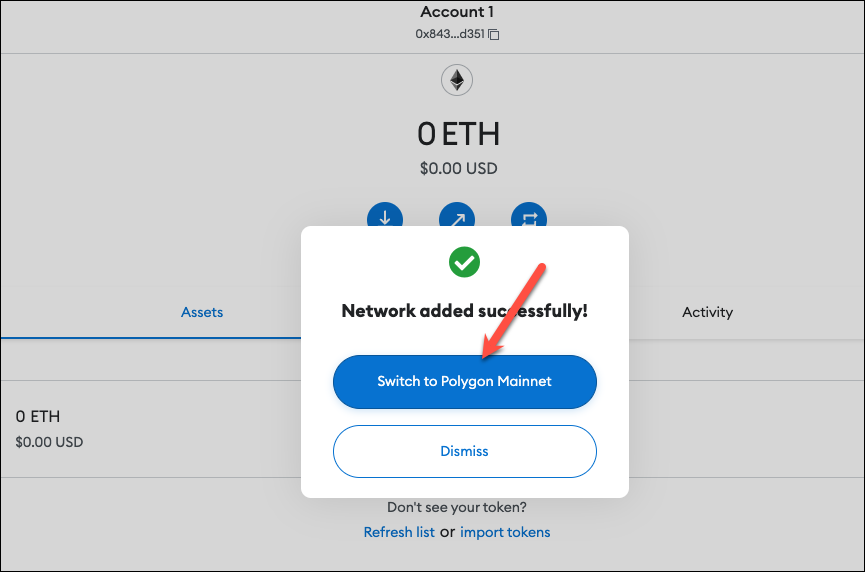
The network would be successfully added. Click ‘Switch to Network’ to switch from Ethereum to Polygon.
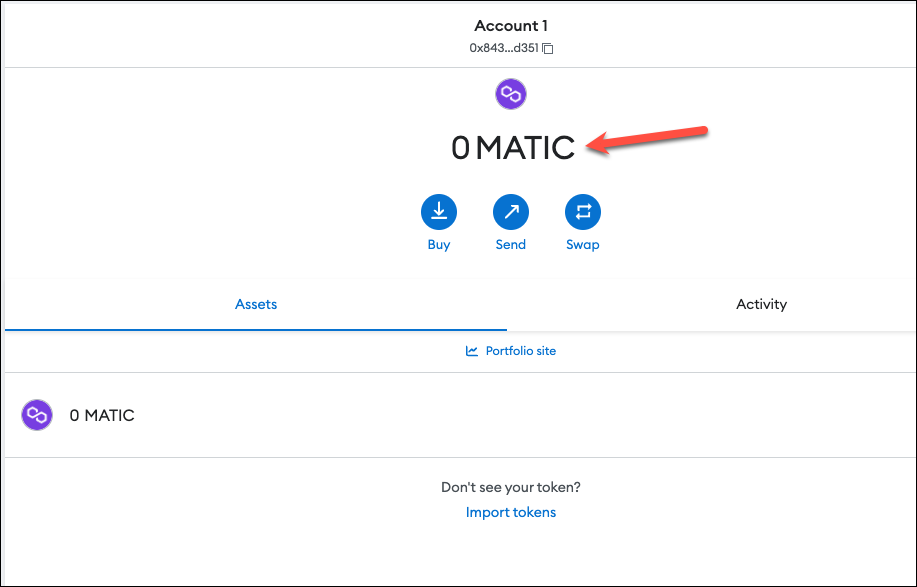
You’ll be connected to the Polygon network on your MetaMask wallet. If you have any MATIC tokens, they’ll automatically appear in the wallet UI. But any other Polygon tokens will have to be imported manually.
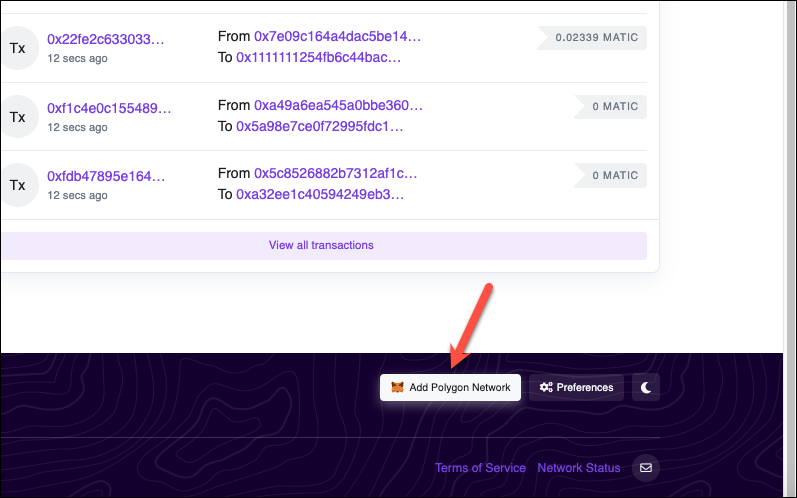
Automatically Adding the Polygon Network
You can automatically add Polygon to MetaMask from the option that appears while browsing the Polygon network. For example, if you’re on polygonscan, browse to the bottom of the page and you’ll find a ‘Add to MetaMask’ option there.
Similarly, you’ll find the option on polygon.technology in the dApps menu if you hover over the dApps option. Click the option.
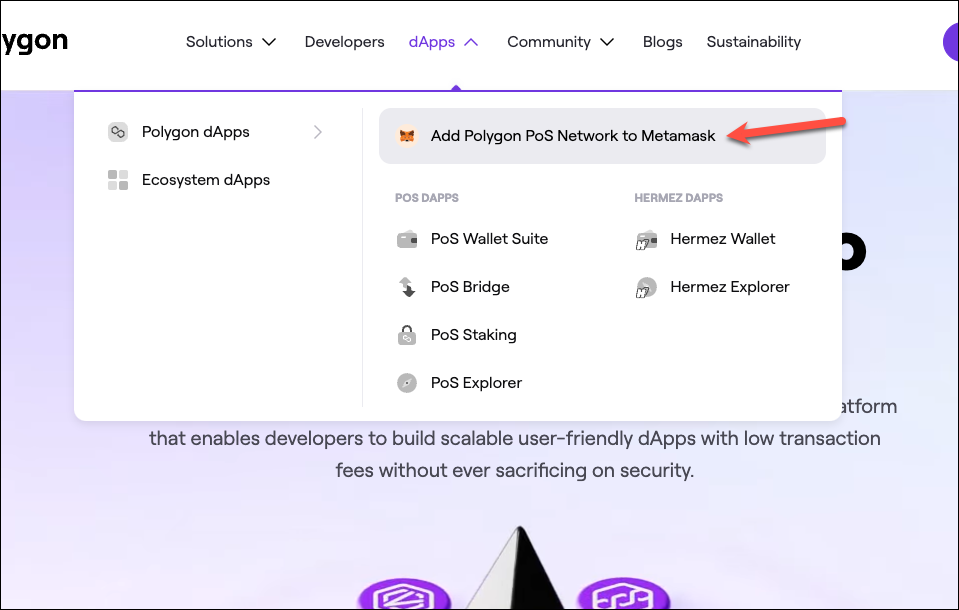
A notification from MetaMask will appear. Click ‘Approve’ on the notification window.
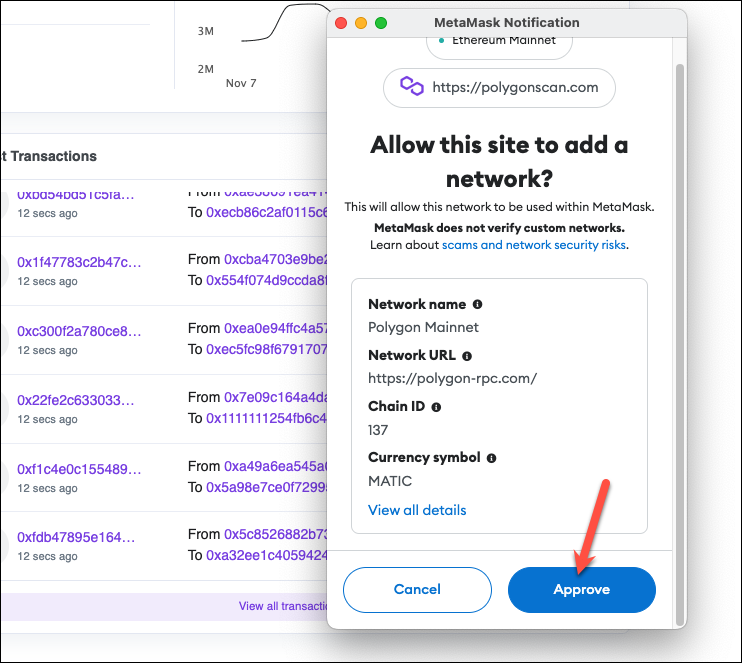
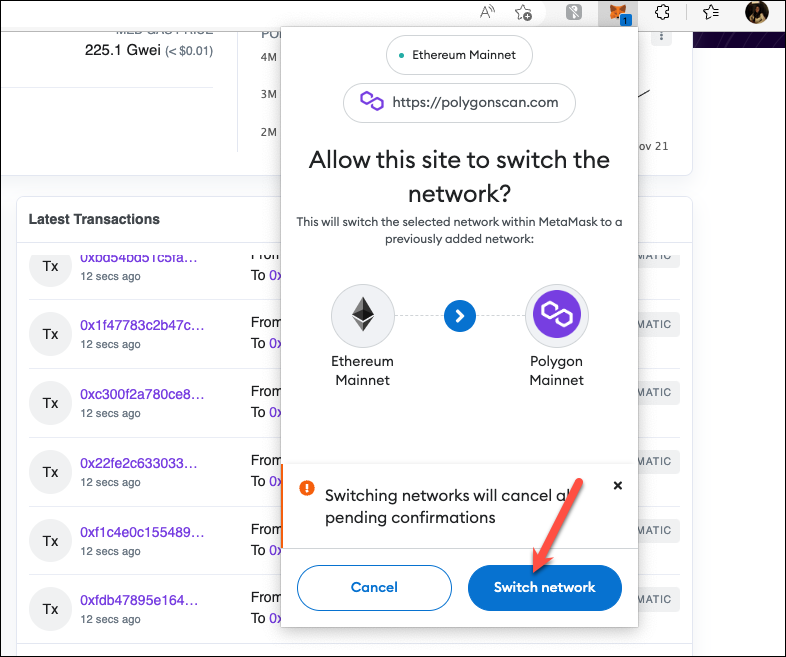
Polygon network will be added and you’ll get a message asking if you want to switch to the Polygon Mainnet. Click ‘Switch Network’.
Transfer Tokens to the Polygon Network
Now that you have a compatible wallet to try the Polygon network, you’ll also need to bridge some of your crypto to the network to use it. Remember to always use a bridge to transfer tokens from one network to the other, for instance, Ethereum to Polygon. If you transfer the tokens between networks directly, your assets will be lost.
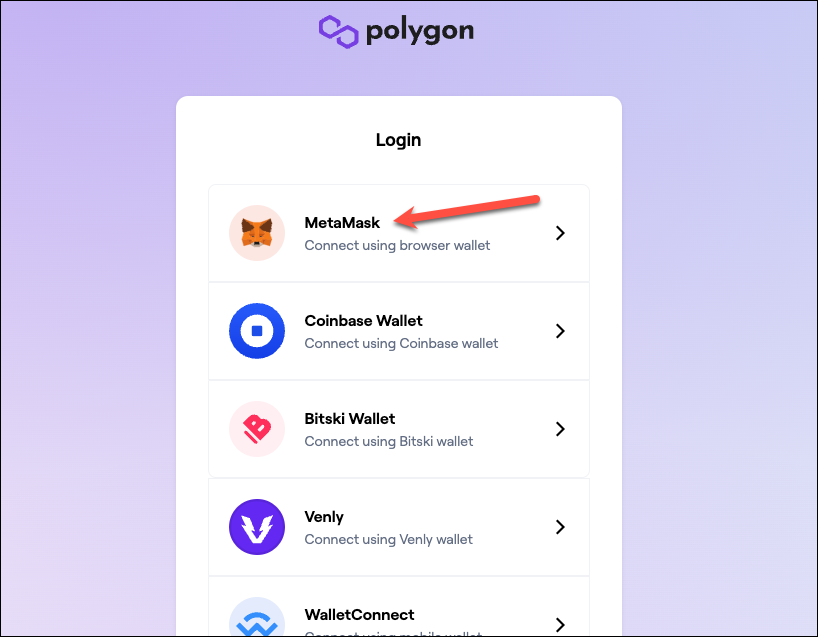
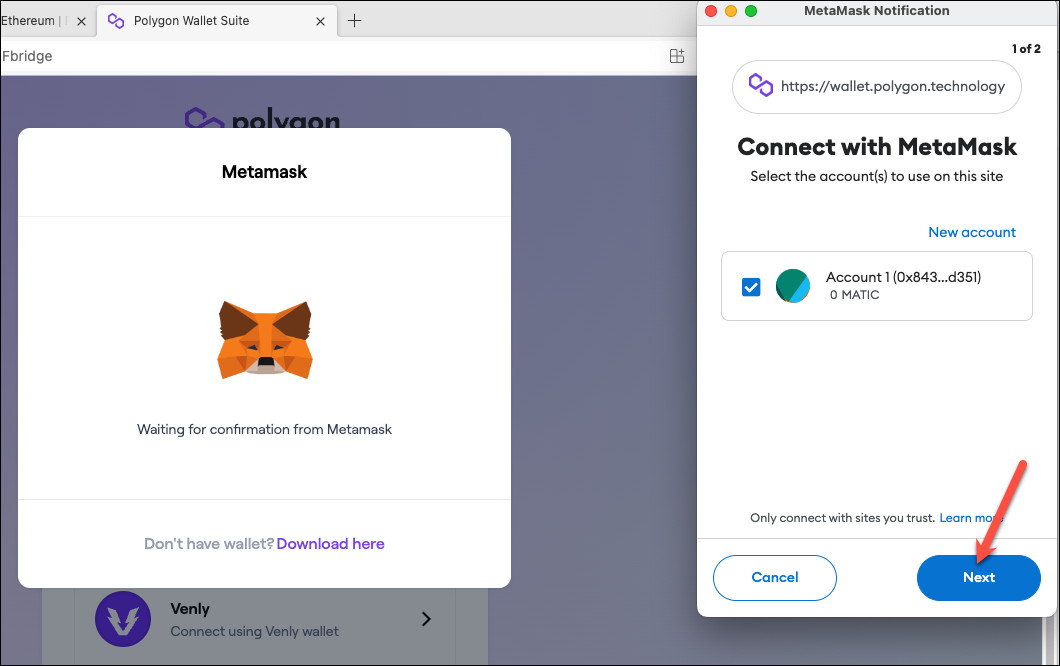
Go to wallet.polygon.technology to connect your Polygon wallet. Click on the ‘Connect to a Wallet’ option. You can also directly click the ‘Polygon Bridge’ option from the screen (if you don’t click it now, you’ll have to click it after connecting the wallet).

The option to connect your wallet will appear in both cases. Select ‘MetaMask’ from the list.
A notification from MetaMask will appear. Click ‘Next’ to connect your wallet.
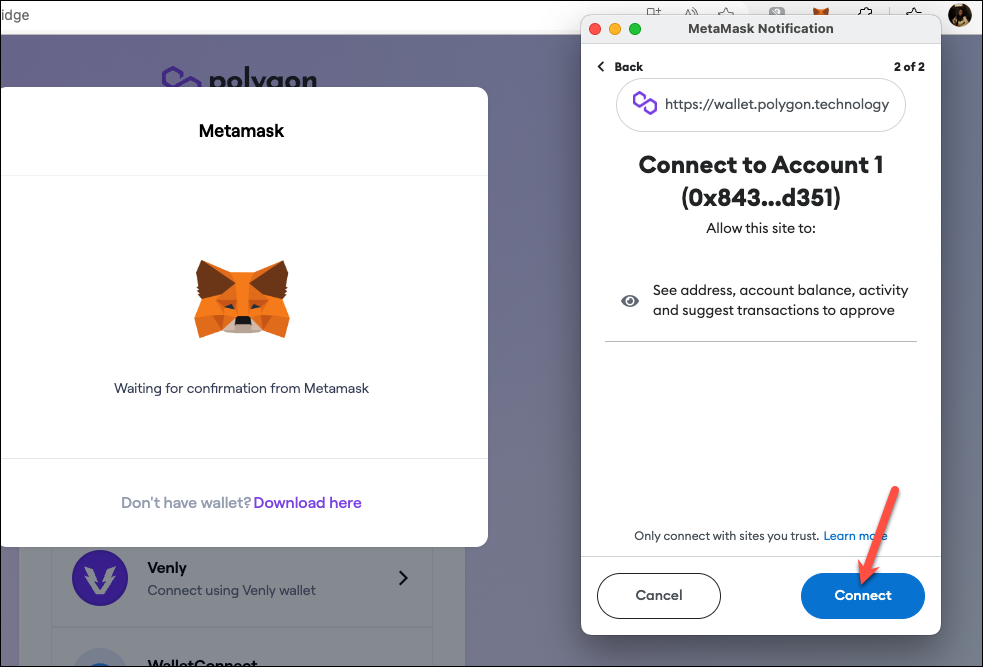
Then, click ‘Connect’.
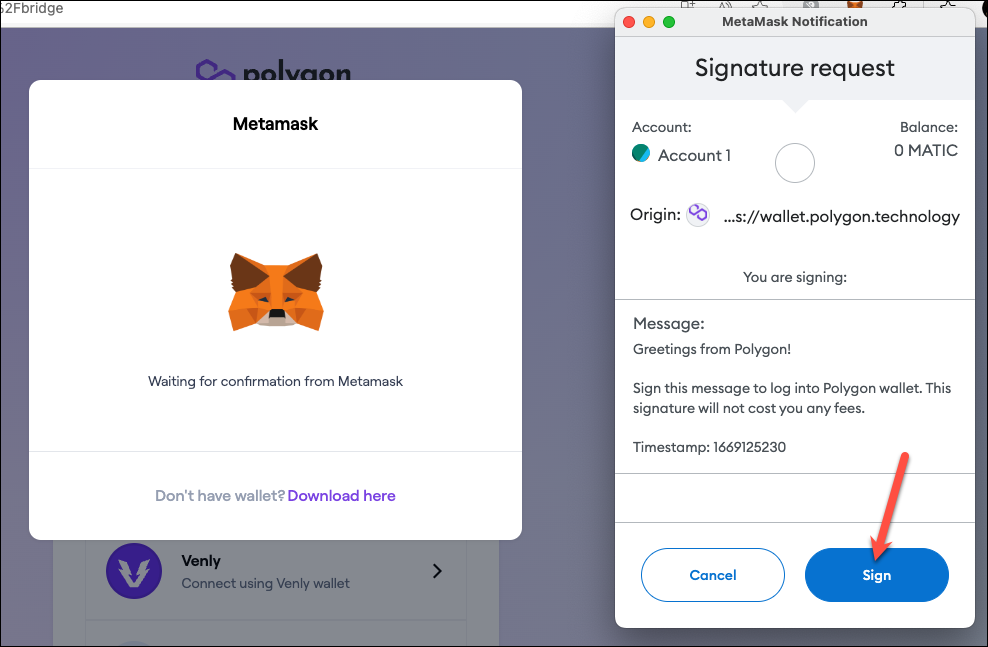
You’ll need to sign the transaction; this won’t cost you any fees.
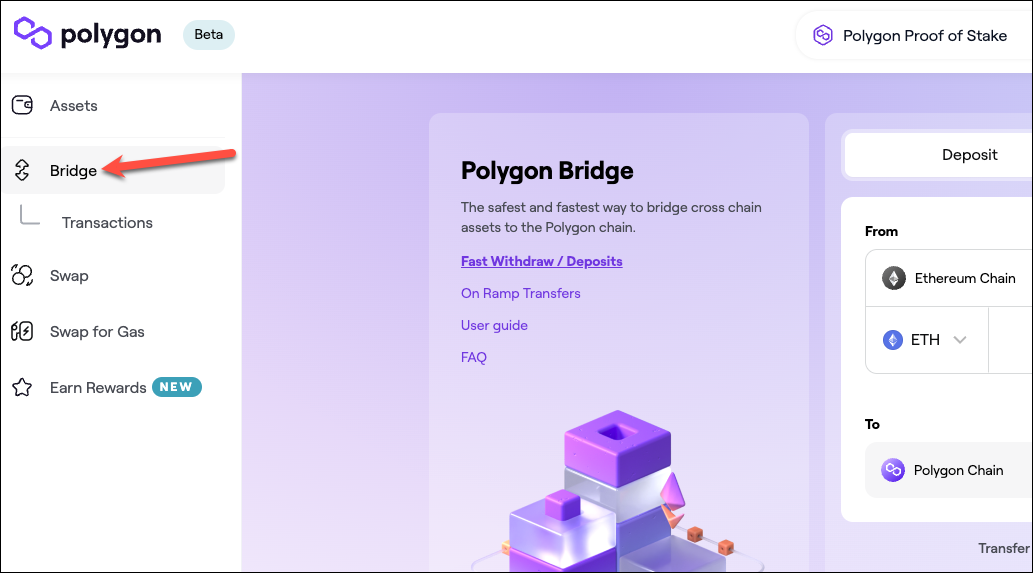
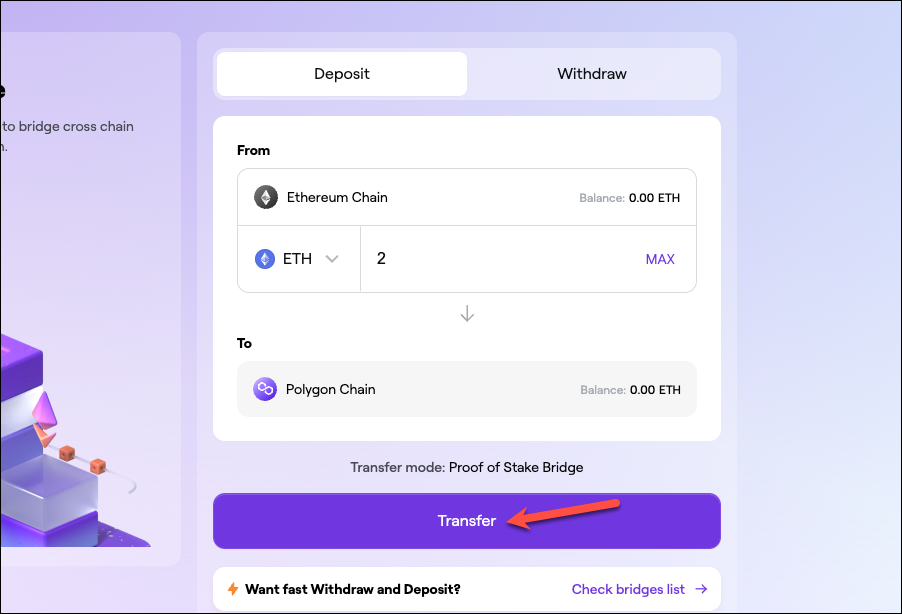
Once the wallet is connected, you might be asked to switch to the new wallet view. Whether you want to switch or not is entirely up to you. After that, click ‘Bridge’ from the navigation menu on the left of the Polygon Bridge screen.
Then, enter the number of tokens you want to transfer and click ‘Transfer’ to finish the transfer process. But do note that the process to transfer the tokens will require a transaction fee.
You can also directly buy MATIC from any trusted cryptocurrency exchange or receive them from another user in your wallet.
After adding Polygon to the MetaMask wallet, you can use it to explore the number of dApps on the Polygon network. The low fees and fast transaction speeds make it an ideal network to dip your toes in the world of Web3.