There’s a new wave of spam emails from Temu (online marketplace) that is targeting primarily users of Outlook and Hotmail accounts. These spam emails often come from scammers who pretend to be Temu.
The Temu spam emails use deceptive subject lines like “You have won a Temu pallet!” and “RE: Confirm your receipt,” mimicking legitimate emails to lure recipients. Despite users trying to block the sender, these junk emails continue to pour into the Inbox instead of being filtered to the Spam folder.
These unwanted emails not only clutter your inbox, but they also carry hidden dangers like malware and phishing scams and compromise your data and security. Here are some steps you can take to optimize your Outlook spam filter and block out these unwanted junk.
Unsubscribe from Spam Emails
Temu may send you frequent promotional and newsletter emails that can quickly fill your inbox, making it difficult to find important messages. If you’re not using the Temu website anymore, it might be a good idea to unsubscribe from all Temu emails. Here’s how:
- Launch the Outlook app on your computer or log in to your Outlook account on a browser.
- Then, open the Temu email in your inbox.
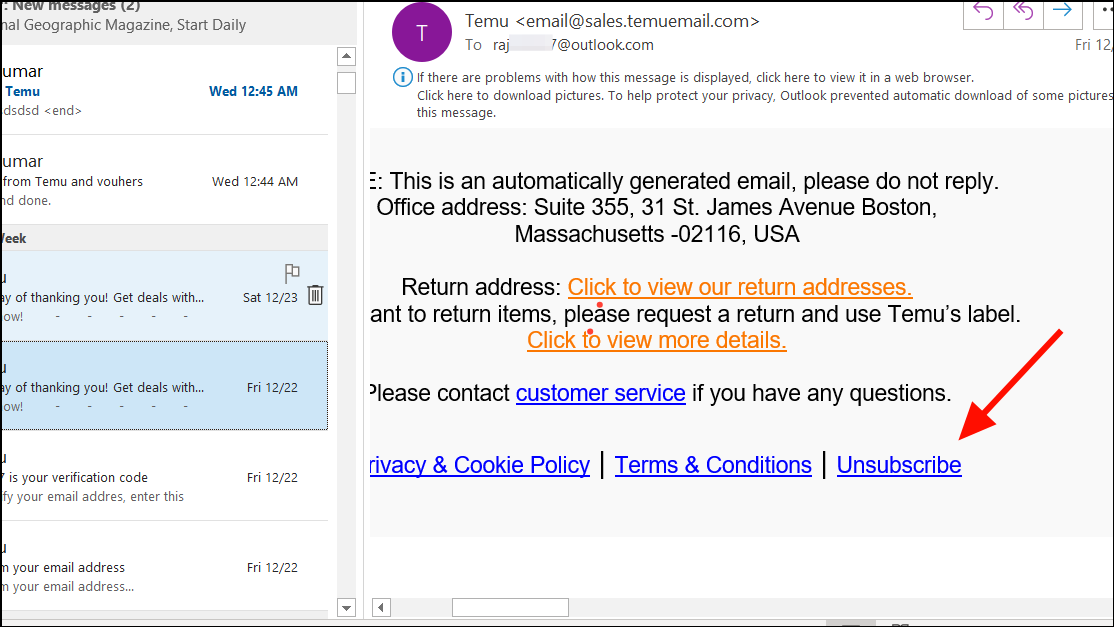
- Scroll down to the very bottom of the email content.
- Find and click the ‘Unsubscribe’ link usually displayed in small text.
- This will open the Temu website’s unsubscribe confirmation page on your default browser. There, click the ‘Unsubscribe’ again to confirm.
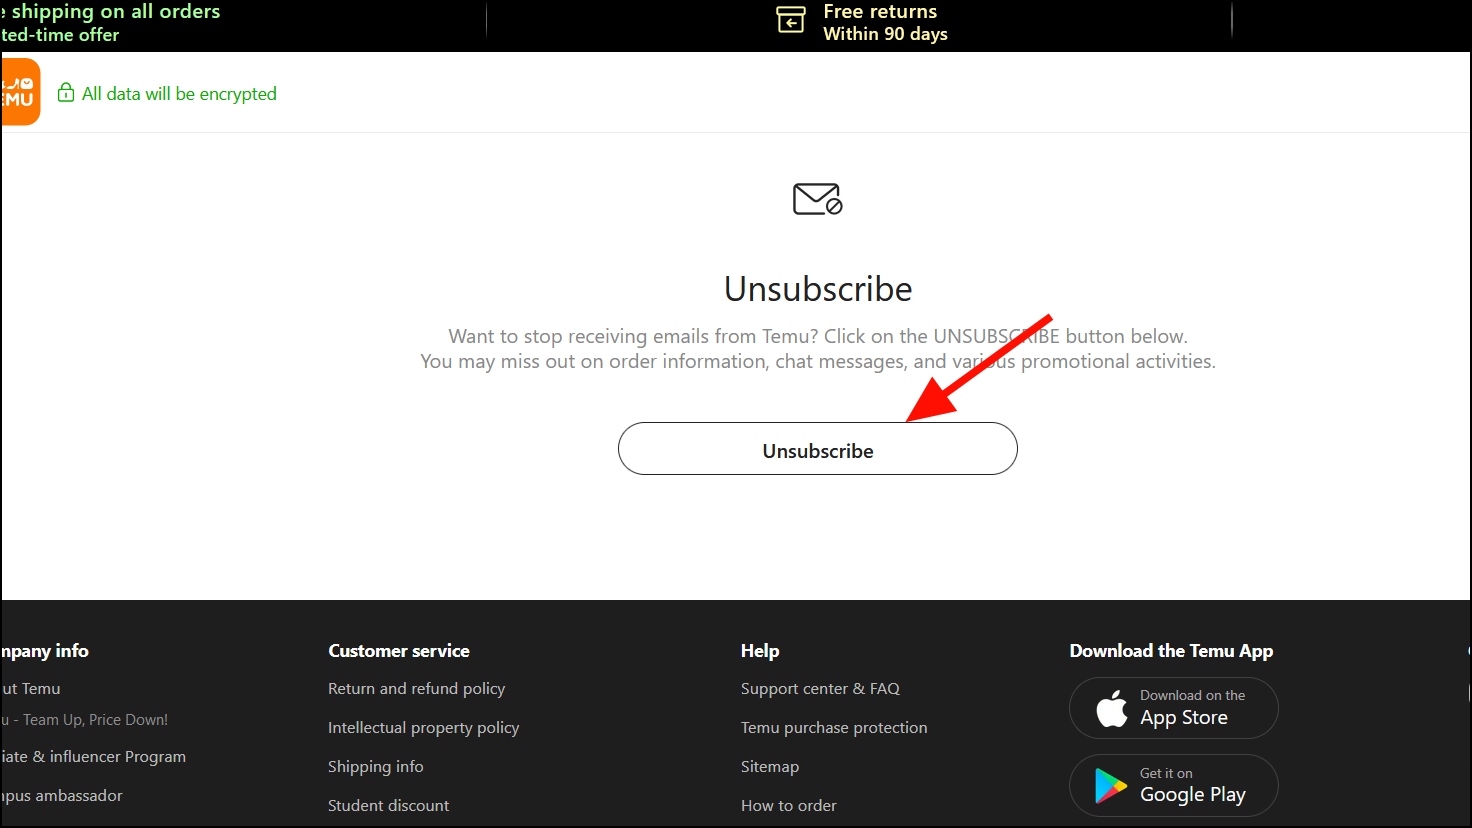
- Look for a success message indicating that you’ve been successfully unsubscribed from Temu emails.
Refresh Spam/Junk filters in Your Account
According to Microsoft, refreshing your Spam/Junk filters in Outlook might help improve your Outlook Spam and Junk filters and help you to get rid of the spam mail in your account. Here’s how:
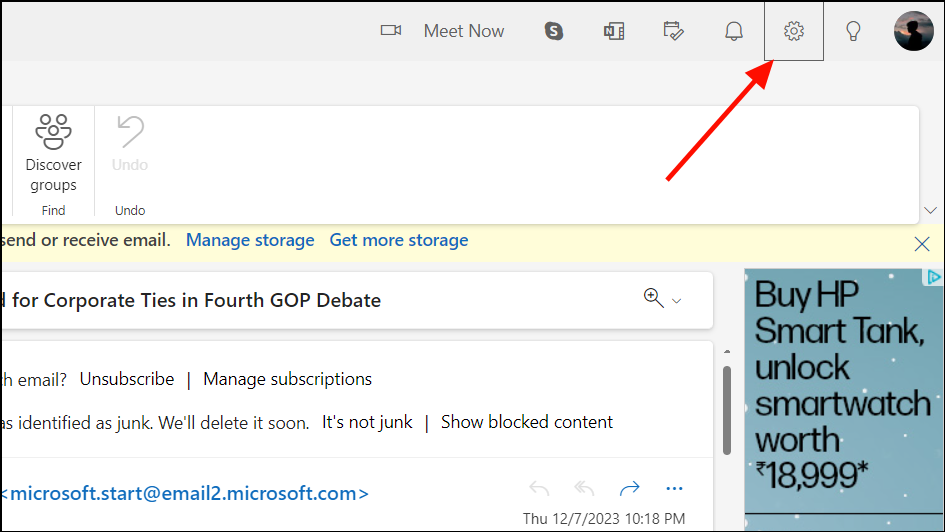
- Log in to your Outlook account on your web browser.
- Once you’re logged in, click the ‘Settings’ icon at the top right corner.
- In the Settings window, go to the ‘Mail’ section, and click the ‘Junk email’ option.
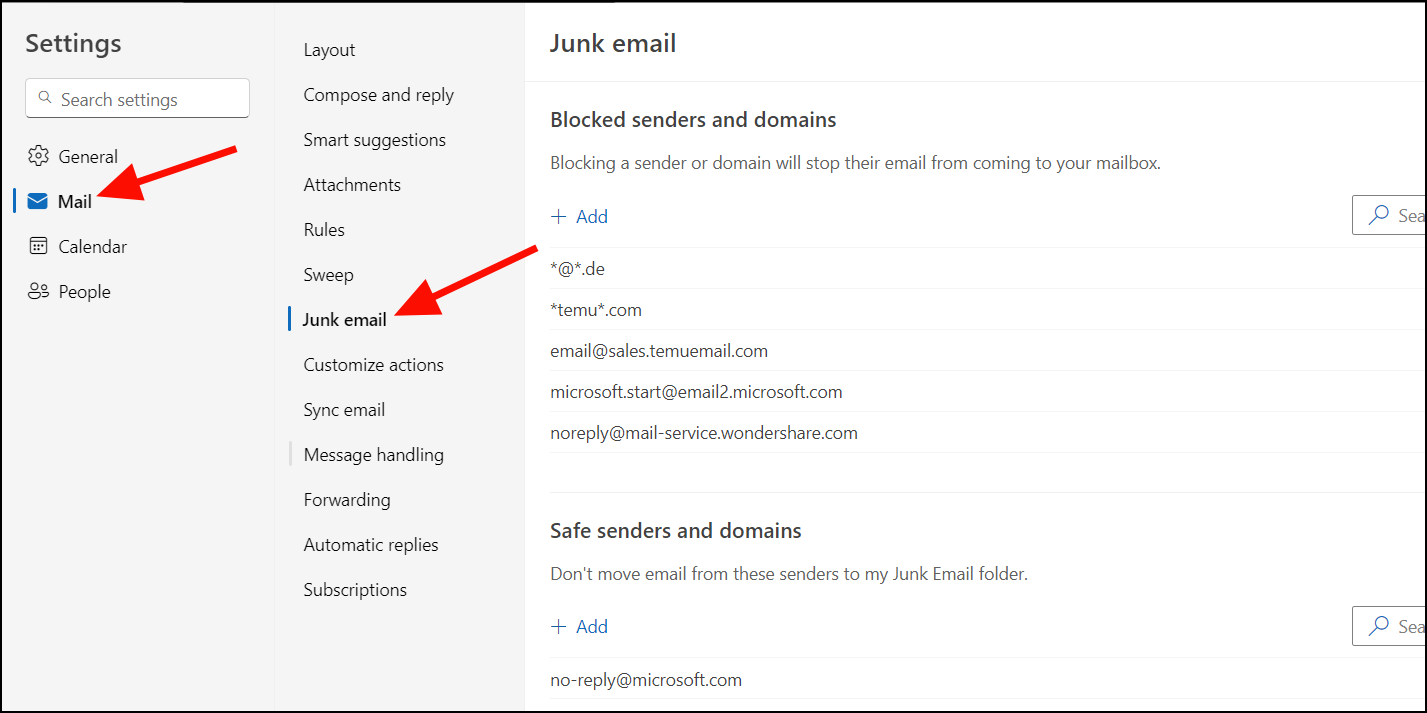
- Then scroll down to the Filters section, select both filter options, and click the ‘Save’ button.
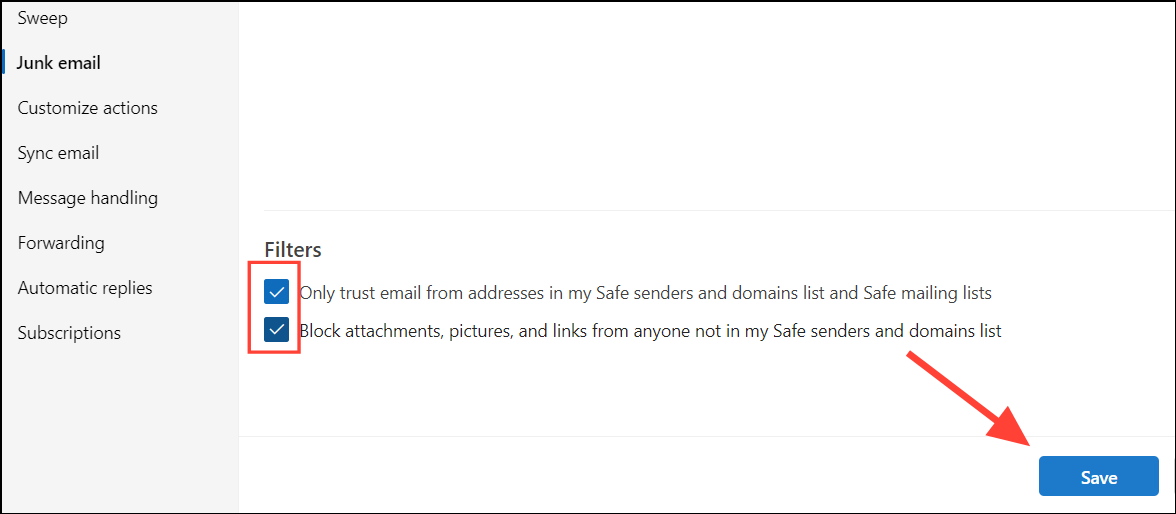
- After that, deselect both filter options, and click ‘Save’ again.
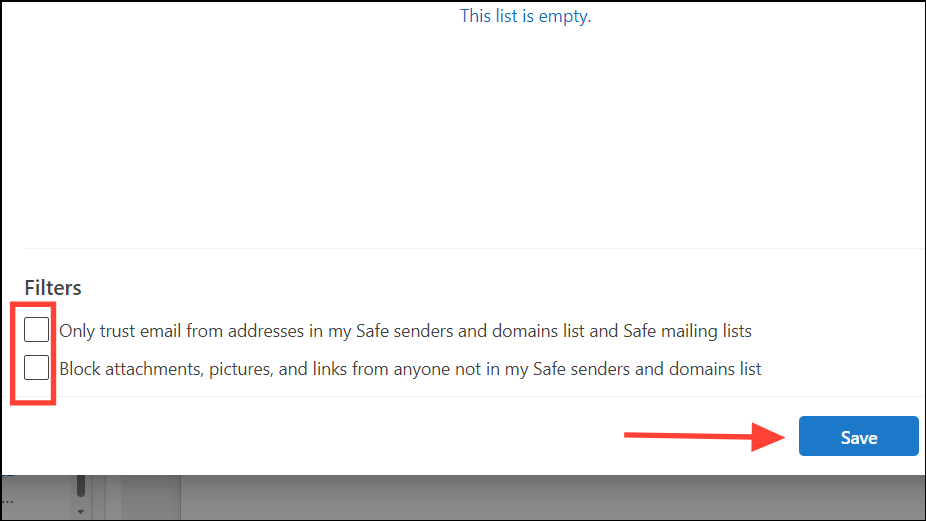
- Once it’s done, log out your account and log in again.
- Repeat this process, 3 – 4 times. This should refresh your Spam and Junk filters and improve their effectiveness.
Block the Spam Senders
Outlook provides built-in functionality for selectively blocking emails from individual senders. This feature allows you to create a customized block list of unwanted email addresses that need to be excluded from the inbox.
While you need to manually add unwanted email addresses to Outlook’s block list, this method can significantly reduce email clutter and streamline your workflow.
- Open the Outlook app and find the Temu spam email you want to block.
- Then, click on the email to select it.
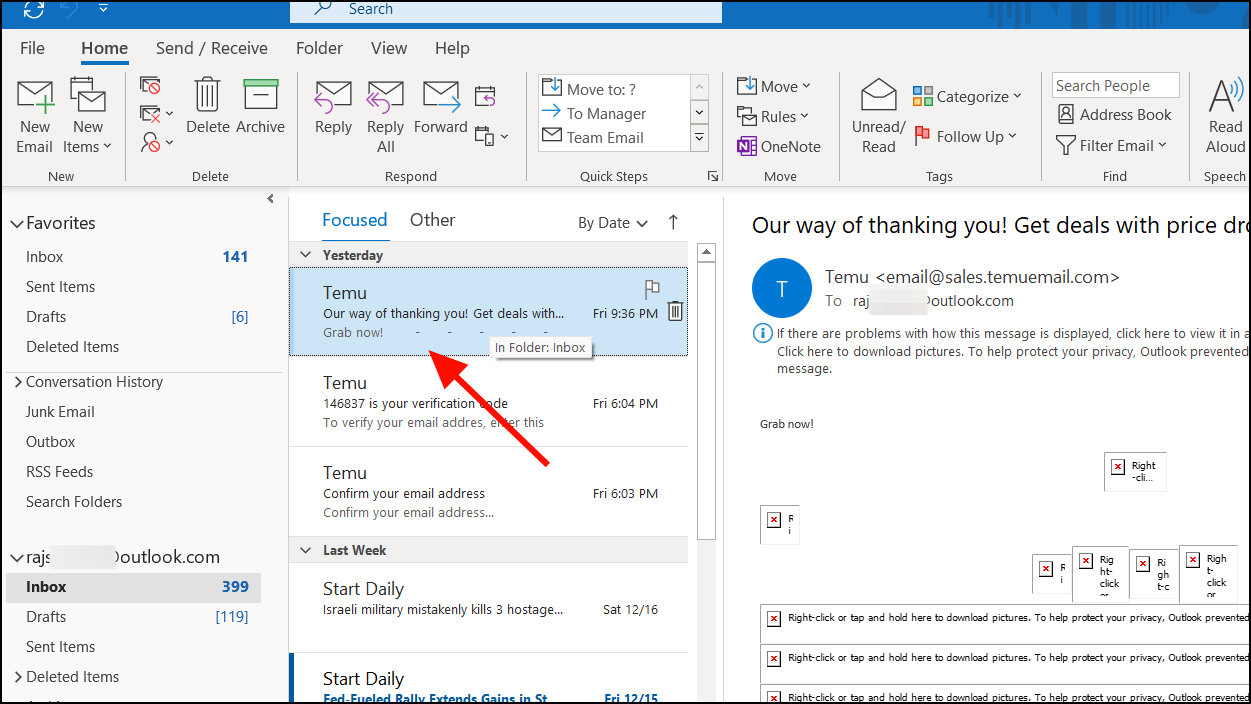
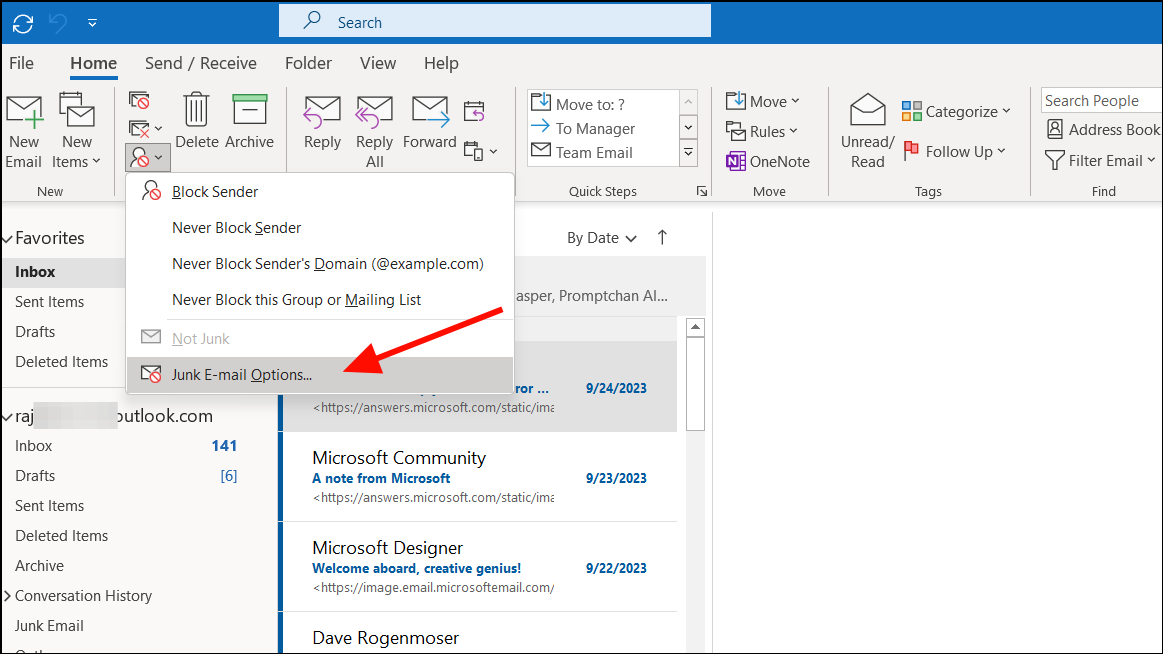
- Head over to the ‘Home’ tab in the ribbon bar. Under the Delete group, you’ll find the ‘Junk’ option. Click on it and select ‘Block Sender’.
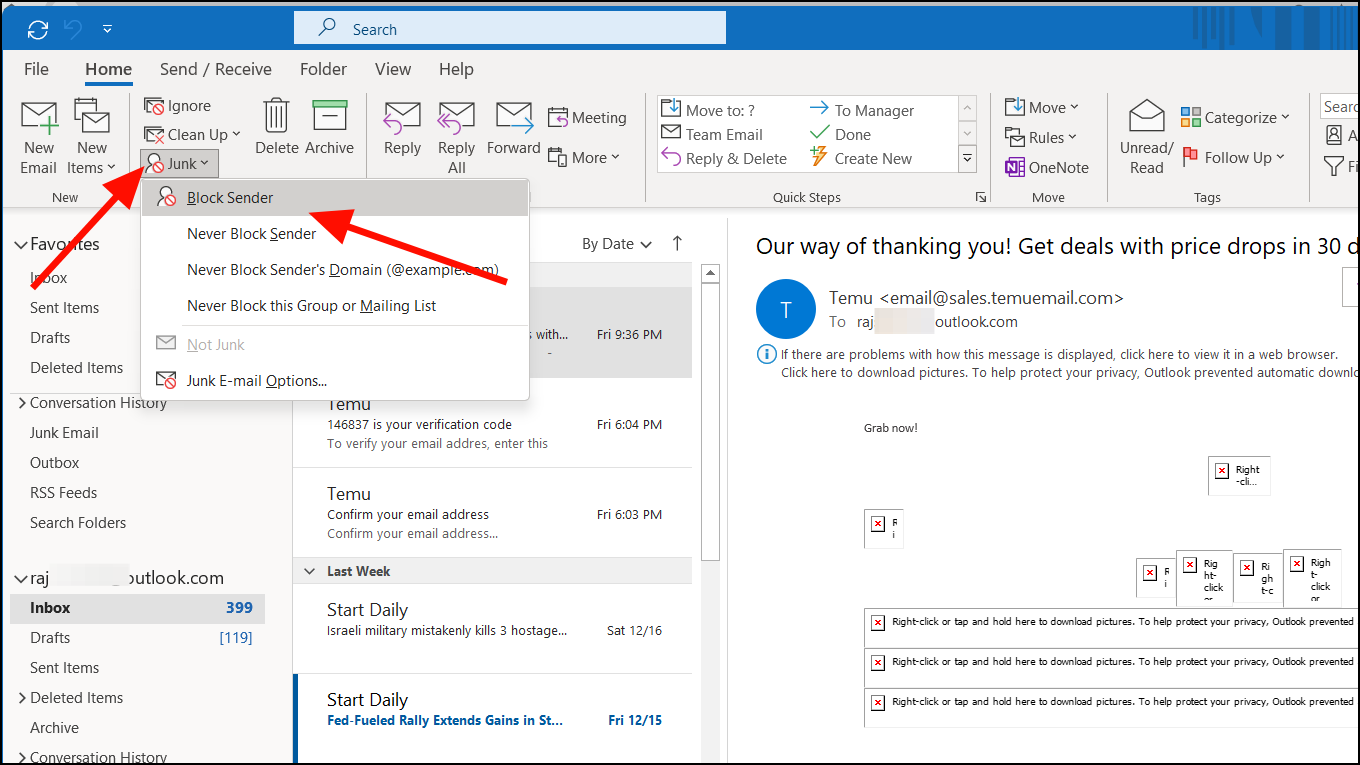
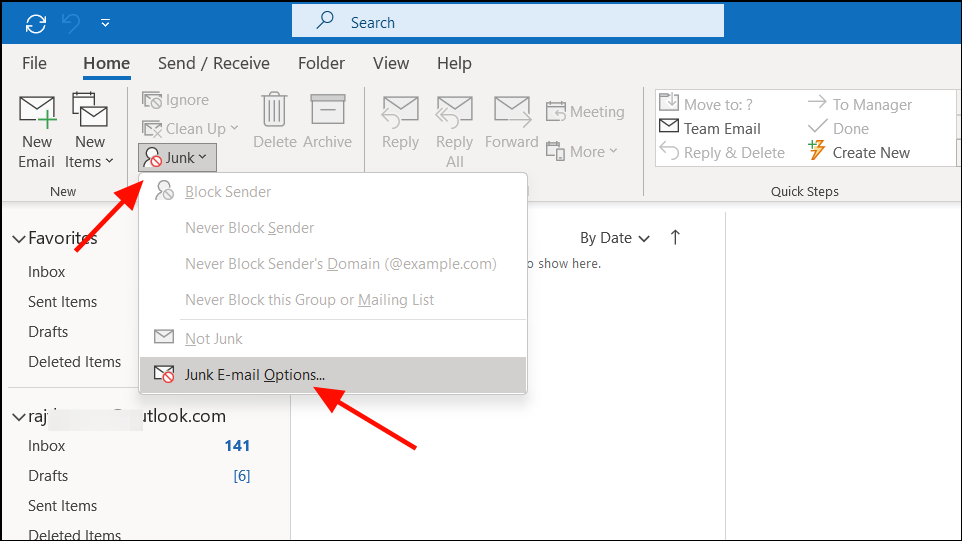
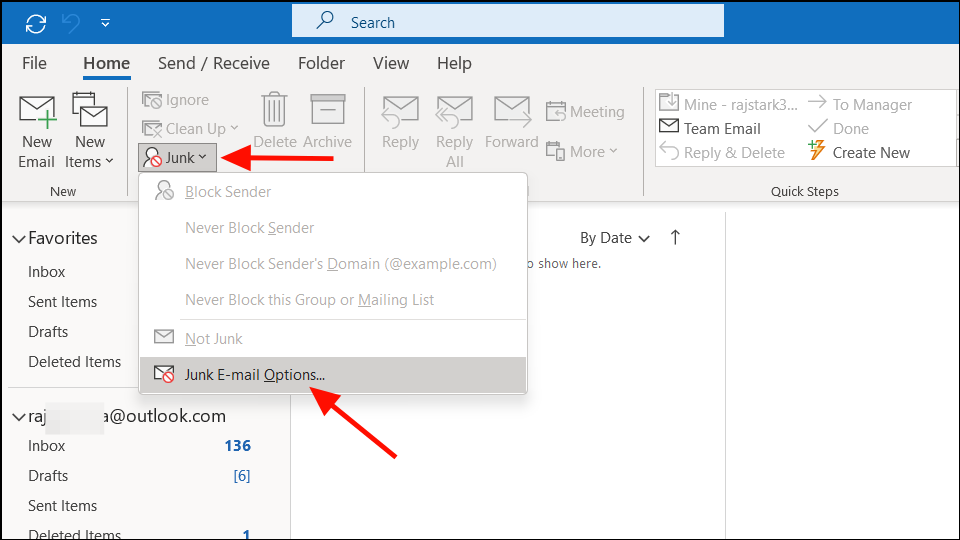
- After blocking the senders that you consider as junk, go back to the ‘Home’ tab, click the ‘Junk’ button again, and select ‘Junk E-Mail Options’.
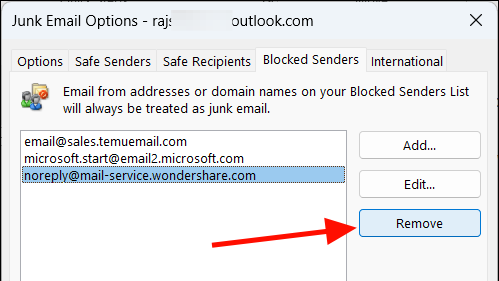
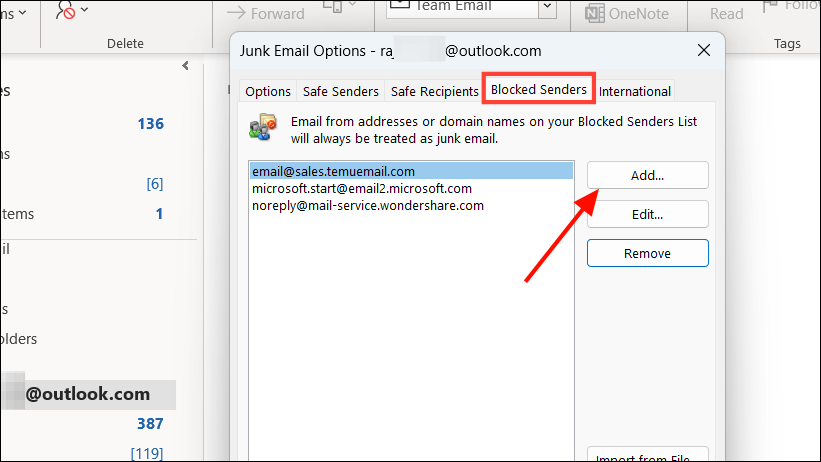
- Next, navigate to the ‘Blocked Senders’ tab. Thoroughly check the list to verify that it only contains companies and individuals you purposefully blocked. Should you see any addresses that were unintentionally added to the block list, select them and click the ‘Remove’ button to restore their emails to your inbox.
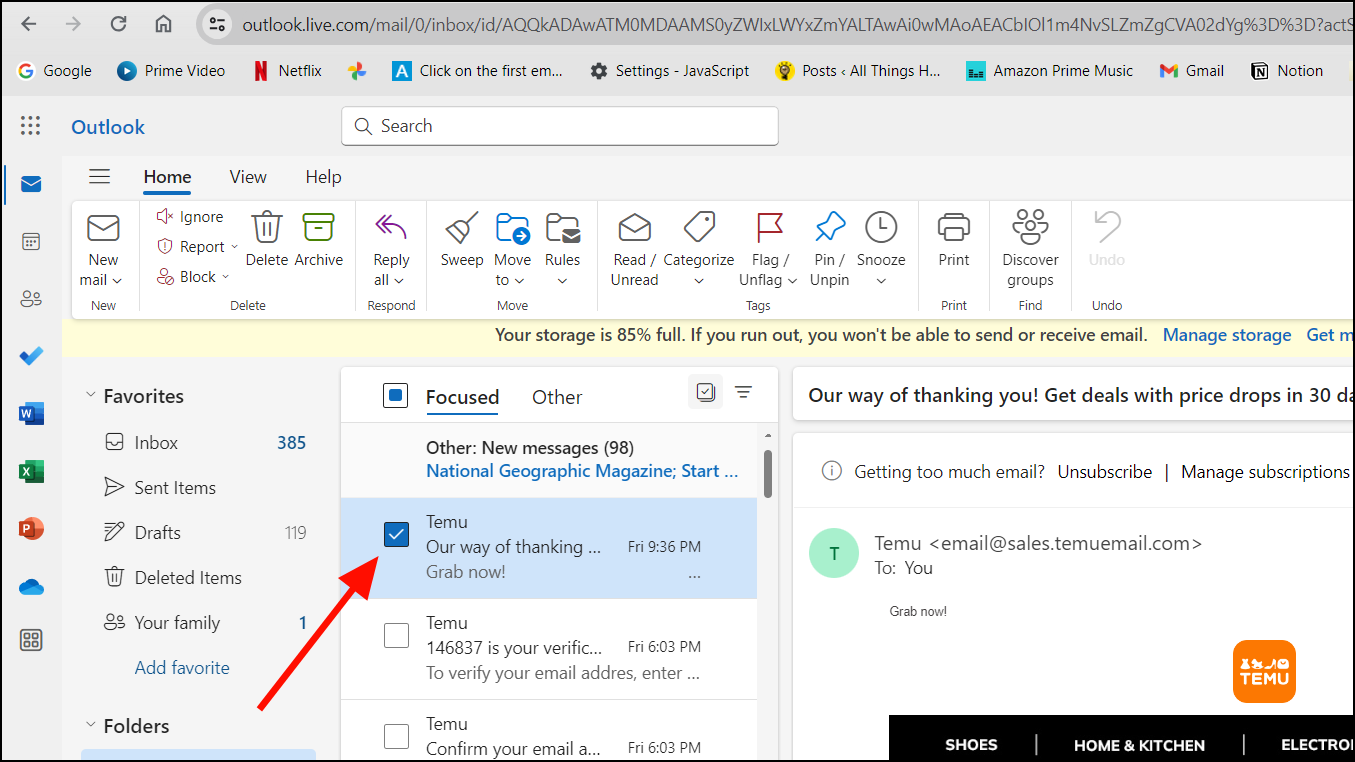
- If you’re using Outlook on the web, check the box next to the Temu mail.
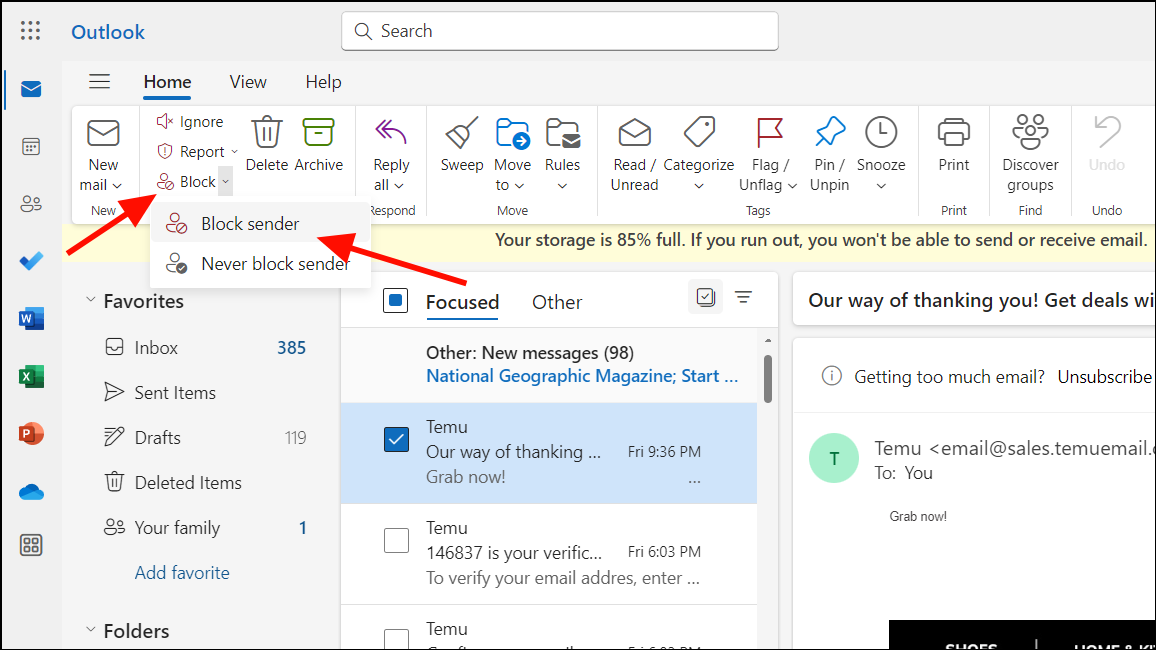
- Then, go to the ‘Home’ tab, click the arrow beside the ‘Block’ button, then select ‘Block Sender’.
Spammers often try to evade spam filters by using different email addresses or domains. To stay ahead of them, regularly check your emails and block any new senders that appear to be sending spam.
The blocked sender lists are synced between the web interface and the desktop client, so you don’t need to maintain two separate sets of Blocked senders.
Set up a Blocked Senders List
Outlook has a built-in feature that allows you to carefully block emails from specific senders, groups, domains, or even entire countries. It acts as a personalized spam filter, blocking unwanted messages from reaching your inbox. Temu spam may use a different email address each time but the domain name might remain the same like [email protected], [email protected].
So, instead of blocking individual senders, you can block specific domains. Here’s how:
- Go to the ‘Home’ tab, click the ‘Junk’ button, and select ‘Junk E-mail Options..’
- In the Junk Email Options dialog box, switch to the ‘Blocked Senders’, tab and click the ‘Add’ button.
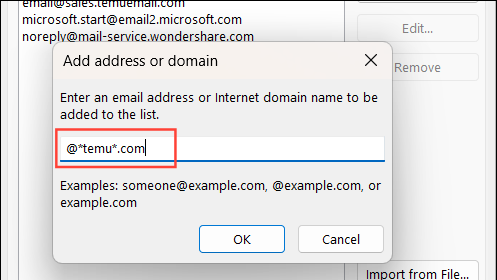
- Enter the domain all the domain names you see on the spam emails like @temu, @temu.de, etc., and click ‘OK’.

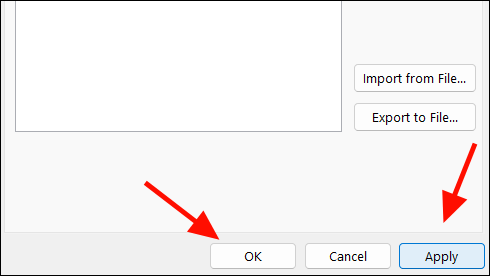
- Then, click ‘Apply’ and then ‘OK’.
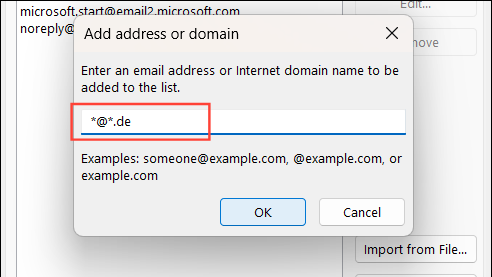
Enter the Address or Domain with Wildcards
If you’re still receiving spam from blocked senders who are creating new email addresses, use wildcards.
For example, to block all emails ending with @temu.com, enter: *@temu.com to the Blocked Sender list.
Sometimes, the domain itself can be a little different such as [email protected]. To block these variants, you can simply enter @*temu*.com.
You can block emails from a specific country which can be useful if the spam emails are from the same country. Some users have reported that most of the email addresses end with .de which is the country code top-level domain for Germany. In this case, you can use wildcards with the country code: *@*.de.
You can even block spam mail based on partial email addresses. To block emails containing ‘sales’ in the address, enter *sales*@* as a rule condition. Combine wildcards for more specific blocking, such as *sales*@*.com to block emails containing “sales” from .com domains.
Using wildcards can inadvertently block legitimate emails if not used carefully. So, make sure you’re not blocking any important contacts. Add trusted email addresses to the Safe Senders list to ensure they always reach your inbox.
Automatically Filter Junk Emails
Outlook has a feature called Junk Email Filter that helps automatically filter out junk and spam emails. This feature uses a combination of technologies and algorithms to identify and filter out potentially unwanted emails. With the automatic filter in place, Outlook automatically identifies potential spam emails and moves them to the dedicated ‘Junk Email’ folder, saving you the time and effort of manually blocking each sender individually.
- Launch the Outlook app.
- In the Home tab, click the Junk’ button in the Delete group and select ‘Junk E-mail Options’.
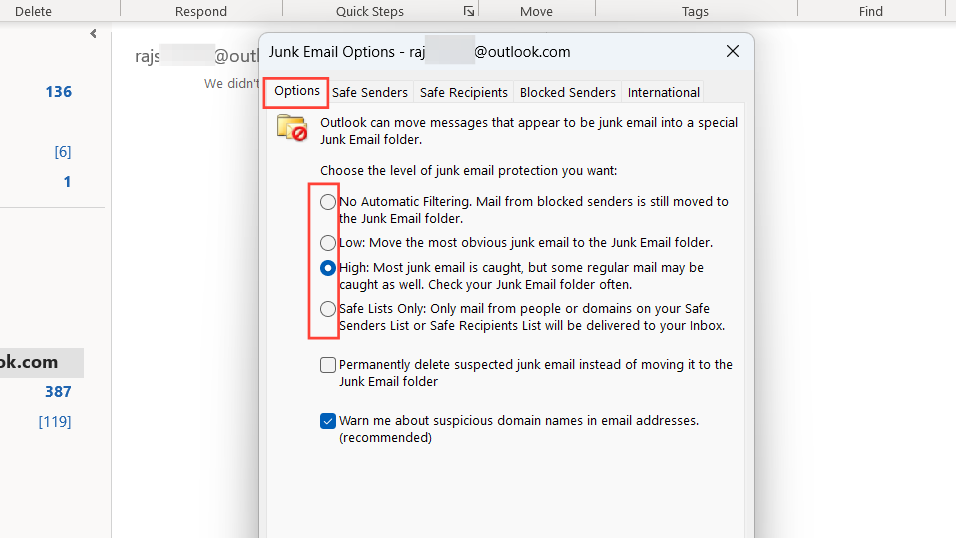
- Once the Junk E-mail Options wizard opens, in the ‘Options’ tab, you can choose the level of junk email protection from the options given below:
- No Automatic Filltering: By default, Outlook is set to ‘No Automatic Filltering’. This only blocks junk emails from the senders you added to the Blocked Senders lists. This means you may receive more spam, but all legitimate emails will reach your inbox.
- Low: This option catches only the most obvious spam emails. You may still receive some spam, but legitimate emails are less likely to be blocked.
- High: This option catches most spam emails, but there is a small chance that some legitimate emails may be mistakenly moved to the Junk folder. Be sure to check your Junk folder regularly for any missed messages.
- Safe Lists Only: This option offers the strictest spam protection. Only emails from your Safe Senders and Safe Recipients lists will reach your inbox. All other emails, including legitimate ones, will be moved to the Junk folder.
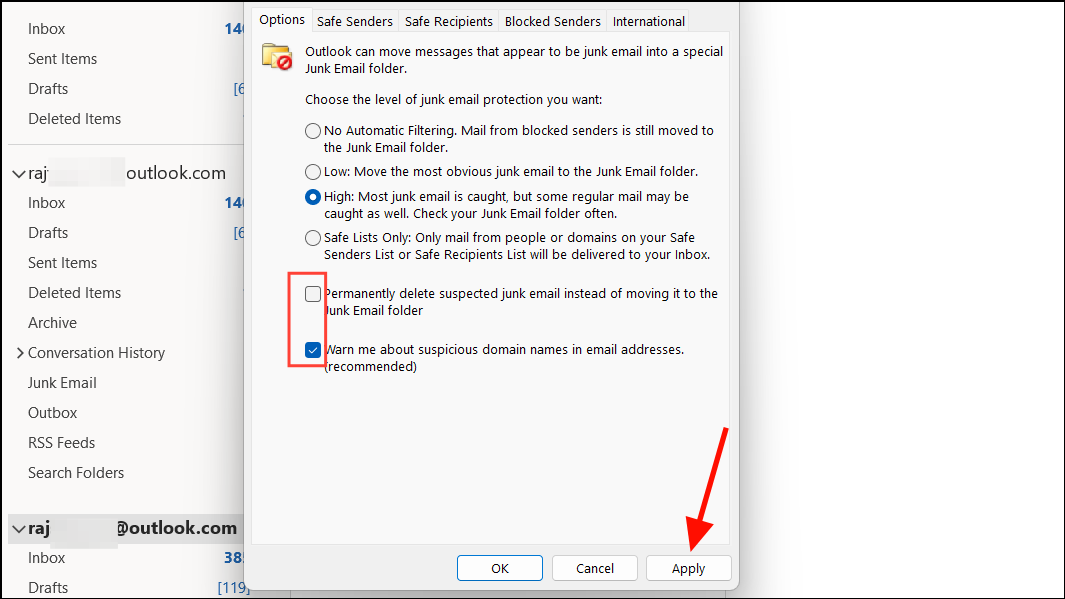
Other than protection, you also have two more options to customize the automatic filter:
- Permanently delete suspected junk email instead of moving it to the Junk Email folder: You can choose to skip the Junk folder and permanently delete suspected spam emails. Only check this option, if you feel necessary otherwise you may risk losing some legitimate emails mistaken for junk.
- Warn about suspicious domain names in e-mail addresses: Get alerted about potentially risky domain names in email addresses. This setting is available for all protection levels except the ‘No Automatic Filtering setting’.
- After selecting the settings, click ‘Apply’ to save the settings.
After setting up the automatic filter, check your inbox and the Junk Email folder over the next few days. If you’re still seeing too much spam, try the ‘High’ setting. But if legitimate emails are ending up in Junk, switch back to ‘Low’ and adjust the settings as needed. Only set the ‘Safe Lists Only’ option if you don’t need any emails other than from your Safe Senders and Safe Recipients lists.
Setup Safe Senders and Safe Recipients Lists
After setting up the automatic filter, it is necessary to set up your Safe Sender and Safe Recipients lists to prevent legitimate emails from being treated as junk. You can add individual email addresses or domain names to the Safe Sender lists.
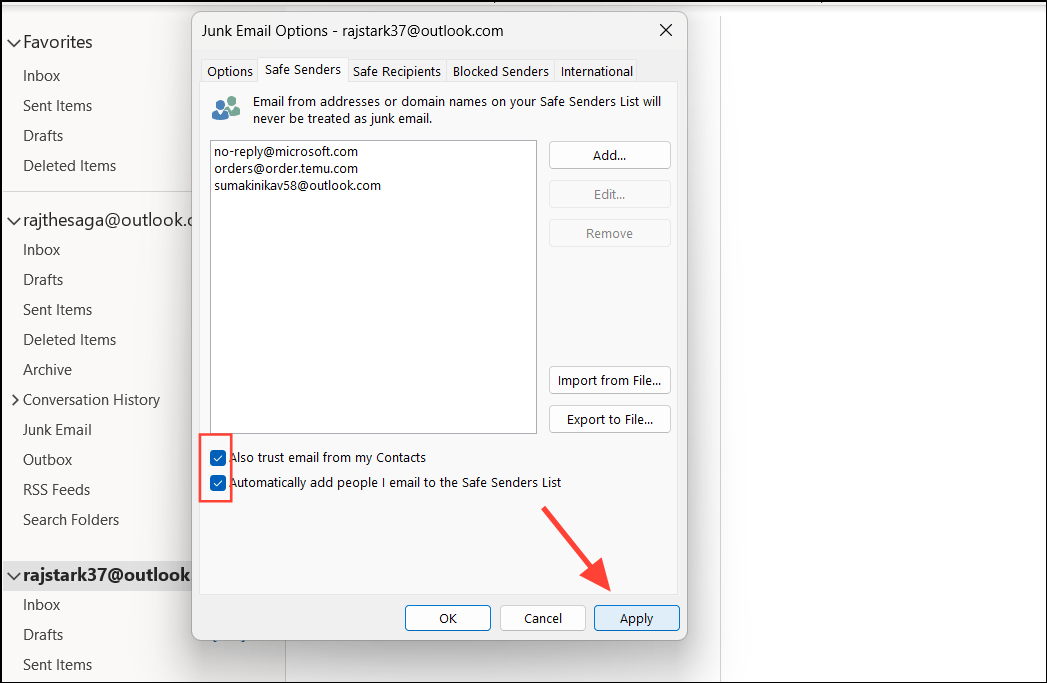
- To add people or domains to the Safe Senders lists, switch to the ‘Safe Senders’ tab in the same Junk Email Options dialog box.
- Then, click the Add button and enter the address or the domain name and click ‘OK’.
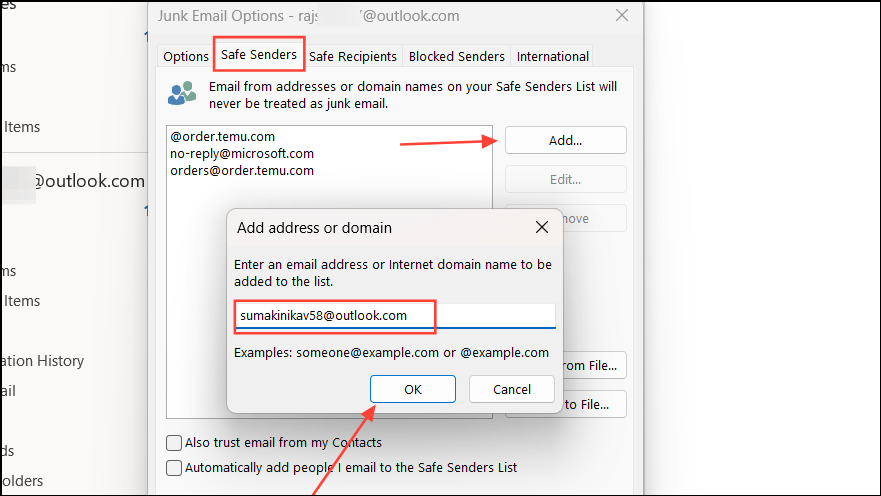
- Repeat the steps for every email address and domain names.
- You also have two more options to configure options to configure the Safe Senders lists:
- To allow all emails from your Contacts, check the box for ‘Also trust email from my Contacts’.
- To automatically add people you email to the Safe Senders list, check the box for ‘Automatically add people I email to the Safe Senders List’.
Alternatively, you can right-click any mail, hover over ‘Junk’, and select one of the options from the menu accordingly – ‘Never Block Sender’, ‘Never Block Sender’s Domain’, or ‘Never Block this Group or Mailing List’.
On Outlook web, right-click any mail, hover over ‘Block’, and select the ‘Never block sender’ option. Doing this will add the sender’s address or domain name to your Safe Senders list.
Report Spam to Microsoft
As you know Outlook automatically filters spam emails and moves them to the Junk folder, you can help Microsoft improve its filters for everyone by reporting any new spam you come across. Here’s how you can do this:
In the Home tab, look for the ‘Report Message’ menu in the Ribbon. If that menu button is unavailable, you need to add that plug-in to your Outlook.
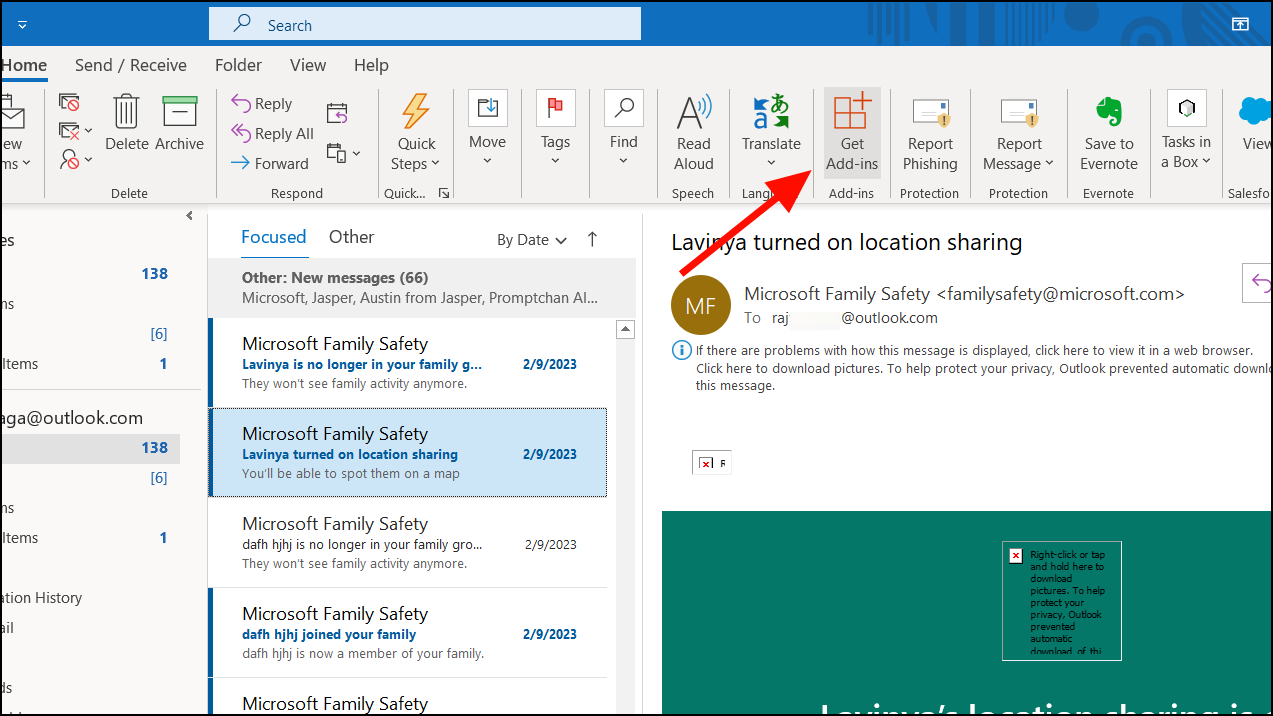
- On the ‘Home’ tab, look for the ‘Get Add-ins’ or Store’ button in the Add-ins group.
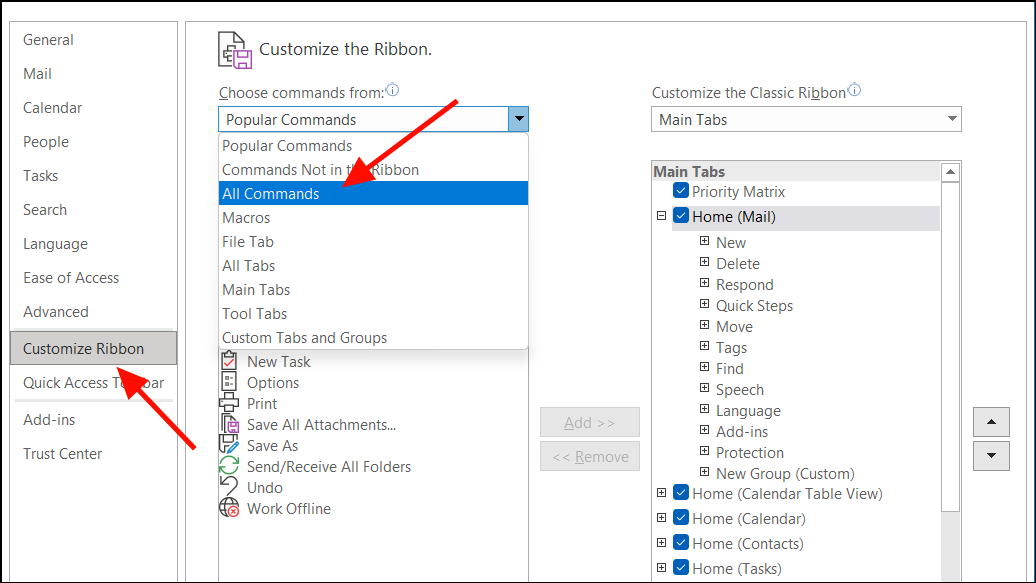
- If you don’t see the ‘Get Add-ins’ or ‘Store’ icon on the Home tab, click the ‘File’ menu and select ‘Options’.
- In the Outlook Options window, go to the ‘Customize Ribbon’. Then, select ‘All Commands’ from the Choose commands from’ drop-down menu.
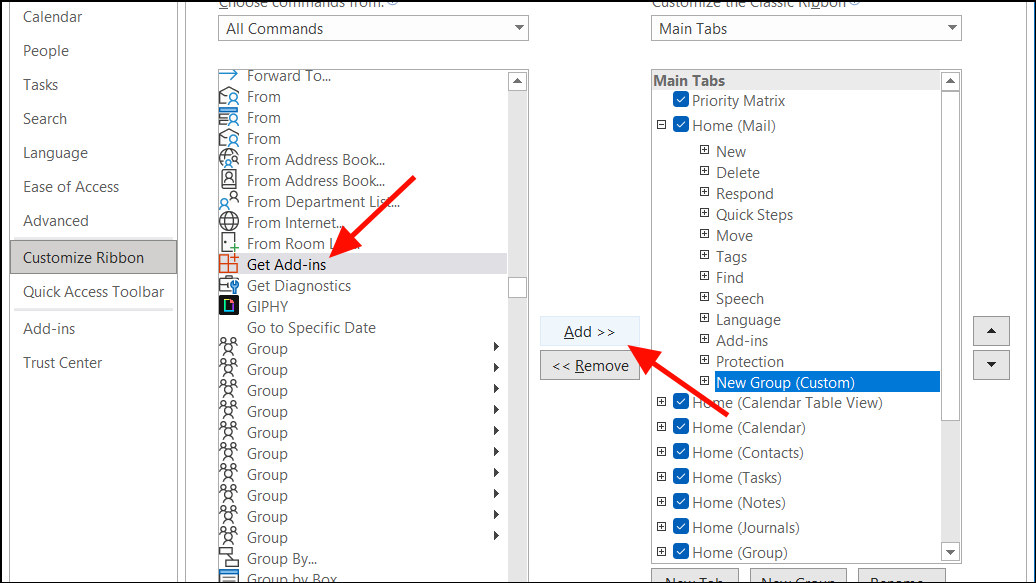
- Then, create a new group by clicking the ‘New Group’ button. Find and select the ‘Get Add-ins’ or ‘Store’ on the left, and move it to the right side. Then, click ‘OK’.
- Once you have the ‘Get Add-ins’ icon on the Ribbon, click on it.
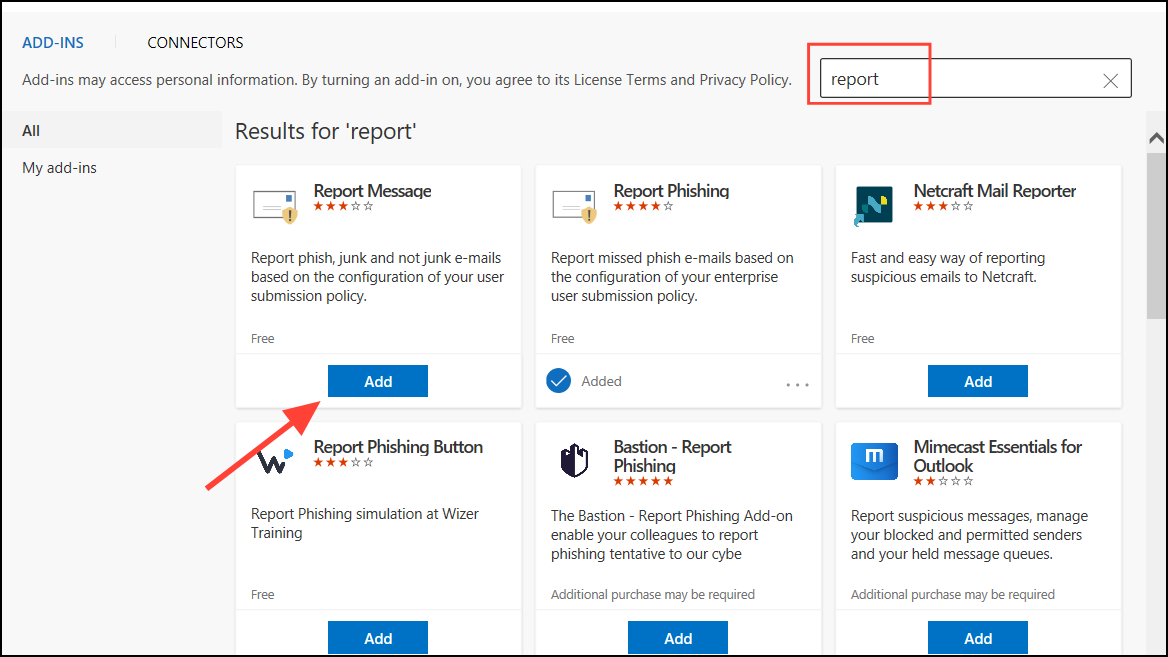
- When the dialog window appears, look for the ‘Report Message’ add-in or search for it using the Search box above. Then, click the ‘Add’ button.
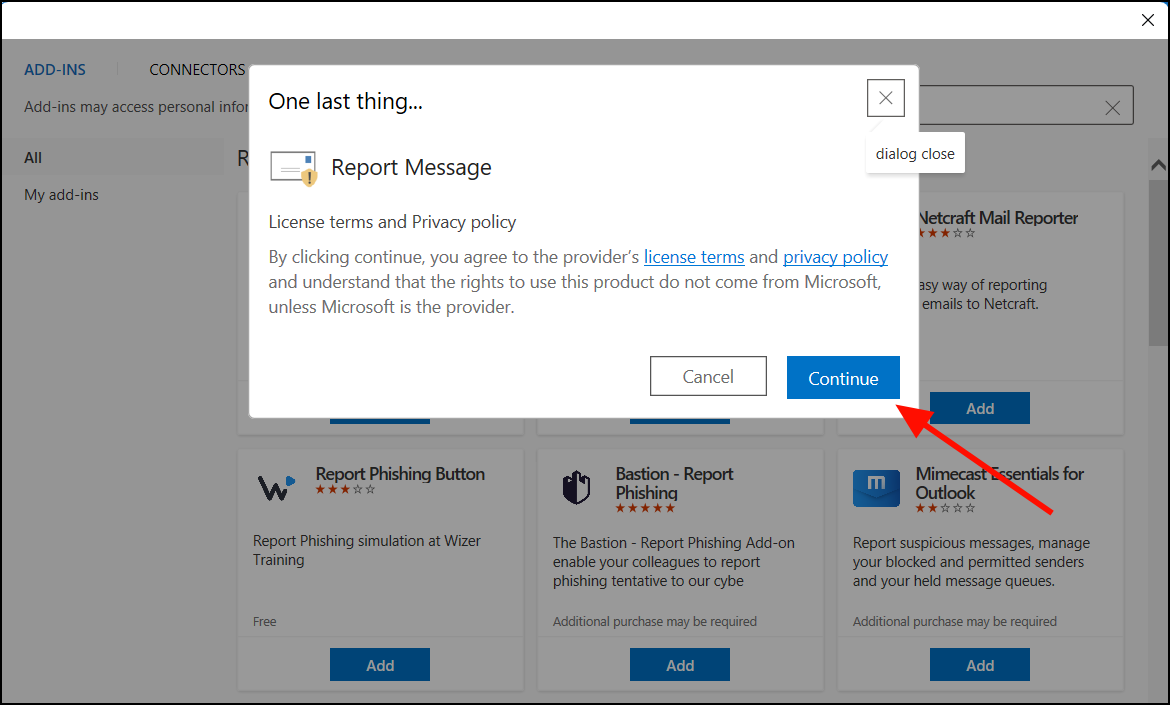
- On the prompt box, click ‘Continue’.
- Then, click ‘Get Started’ to see a brief notification about how to use the add-in. After reading the notification, you can close the page.
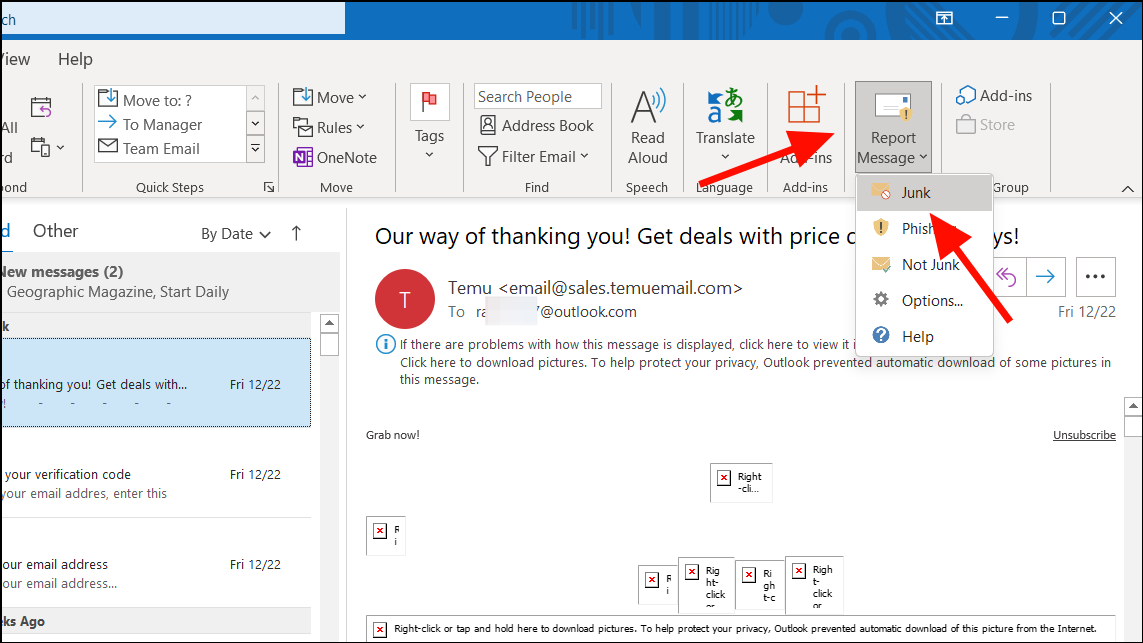
- To report a suspected junk email to Microsoft, select the email you believe to be spam, click the ‘Report Message’ icon located on the Outlook ribbon, and then choose ‘Junk’ from the resulting drop-down menu.
- On the prompt box, click ‘Report’ to send Microsoft a copy of this message and improve email protection. Otherwise, ‘Cancel’ will keep it in your inbox.
Block Emails from Certain Countries or in Foreign Languages
Spammers often register domains in lesser-known or less-regulated regions because it’s cheaper and easier to create fake accounts or hide their identities. This allows them to send spam from those domains without as much risk of being caught or blocked.
If you’re getting emails from unfamiliar countries or obscure domains, especially when you have no connections or business dealings in those countries, you can block emails from those regions or domains in Outlook. This can help filter out potential spam. Here’s how:
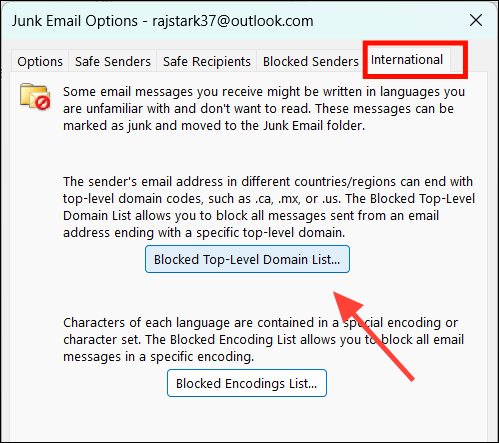
- In the Outlook app, under the ‘Home’ tab, click ‘Junk’, and select ‘Junk E-mail Options’.
- Then, switch to the ‘International’ in the Junk Email Options.
- To block emails originating from specific countries or regions, click the ‘Blocked Top-Level Domain List’ option.
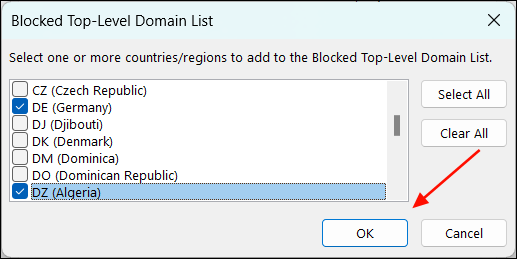
- In the pop-up window, select the countries or regions you want to email from and click ‘OK’. For instance, some users have reported that they repeatedly get spam emails that end with ‘.de’ (country code top-level domain for Germany).
- To block suspicious emails in a particular language encoding, use the ‘Blocked Encodings List’ option to select the languages.
Create Rules for Filtering Spam in Outlook
Outlook Rules allows you to automatically apply predefined actions like move, flag, and other actions to the emails that meet your specified criteria. Rules can also be used to move emails that you suspect to be spam, based on your specified conditions, to the Junk folder or delete them.
There are two ways to create rules for blocking spam in Outlook. You can select an existing junk email and Outlook helps you create rules based on its sender, subject, or keywords, letting you apply those rules to similar messages with ease. Or, you can fully create custom rules from scratch, defining exactly how you want Outlook to handle specific types of junk.
Create Rules Using the Junk Email in Outlook
If you’re receiving a few spam emails daily, whether from specific senders, with particular subjects, or based on other criteria, you can create rules based on those emails and filter them.
Creating one rule won’t be enough, you need to create multiple rules, each rule should target specific criteria, such as keywords in the subject line, senders like ‘Temu’ or ‘Keto VIP’, or other relevant conditions. Here’s how:
- Open your Outlook app and find the junk you’d like to use to create a rule.
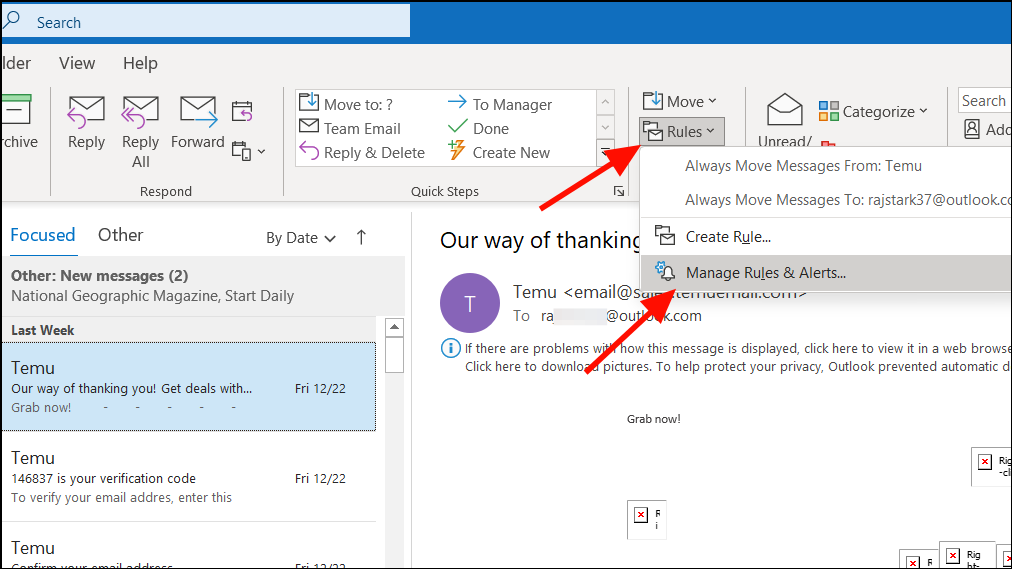
- Right-click on it, move to ‘Rules’, and select ‘Create Rule’.

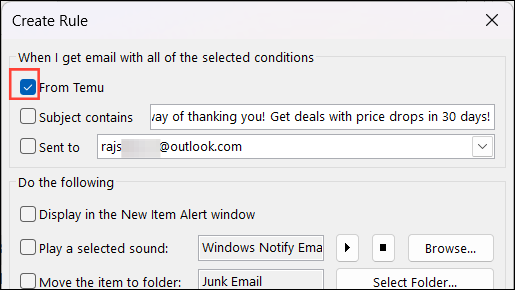
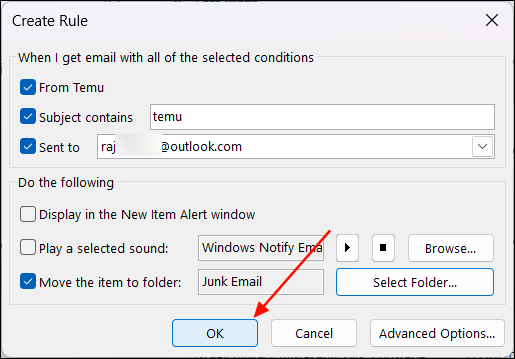
- In the Create Rule window, Outlook automatically prefills the details based on your selected email. Just tick the boxes next to the fields you want to use. You can edit any field to customize your rule.
- If you are only getting spam from a specific sender with a common name, check the first option. In our case ‘Temu’. If you’re spam from Temu each time with a different name, uncheck this option.
- Then, type the repeating keyword that appears in the subject. e.g. ‘temu’.
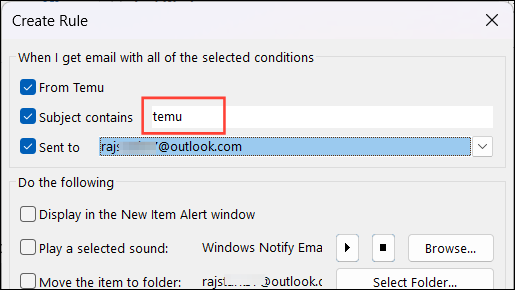
- On the same window, under the ‘Do the Following’, choose where you want to move the spam. Click the ‘Select Folder’ button.
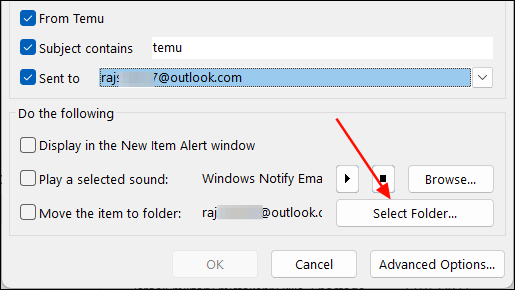
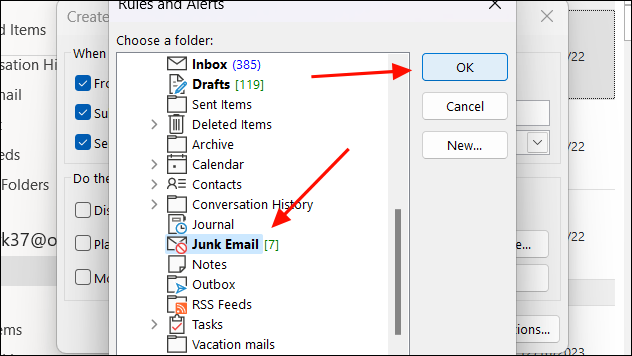
- Select the ‘Junk Email’ folder or a custom folder, and click ‘OK’.
- Leave the other two options under ‘Do the following’ unchecked and click ‘OK’ to save the rule.
- Repeat the steps and create multiple rules for different keywords that you frequently notice in the Subject of the spam. For example:
- Temu Rewards
- Black Friday Sales
- Voyageprive
- Nomad
- Temu Offers

If you include two or more words in the ‘Subject contains’ field, all those words must appear in the subject line, in the same order. However, the rule will not trigger if the words are in a different order or if one of the words is missing.
For example, if you created a rule that contains the keywords ‘Temu Rewards’ in the Subject, emails with subjects like “Rewards Temu”, “TemuRewards”, “Rewards from Temu,” or just “Rewards” will not trigger the rule.
To filter the emails containing multiple words or phrases in the subject line, regardless of their order, use the next method.
Create Advanced Rules Using the Rules Wizard in Outlook
If your inbox is flooded with a ton of spam every day, you need to create more elaborate rules with specific conditions that can help you filter more and more spam until it stops. Outlook’s Rules Wizard enables you to create advanced rules using pre-built templates or by starting from scratch.
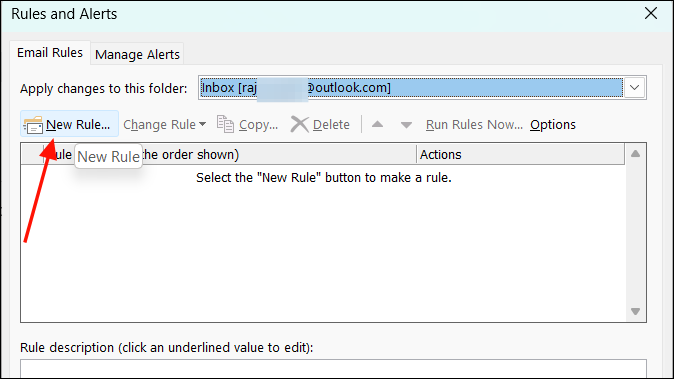
- In the Outlook app, click the ‘Rules’ menu in the Home tab and select ‘Manage Rules & Alerts’.
- In the Rules & Alerts wizard, click the ‘New Rule’ button.
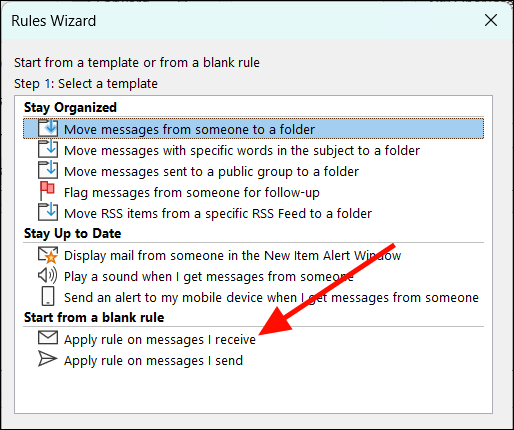
- The Rules Wizard will open and show you lists of templates and options to start from a blank rule. Click the ‘Apply rule on messages I receive’ option under Start from a blank rule and click ‘Next’.
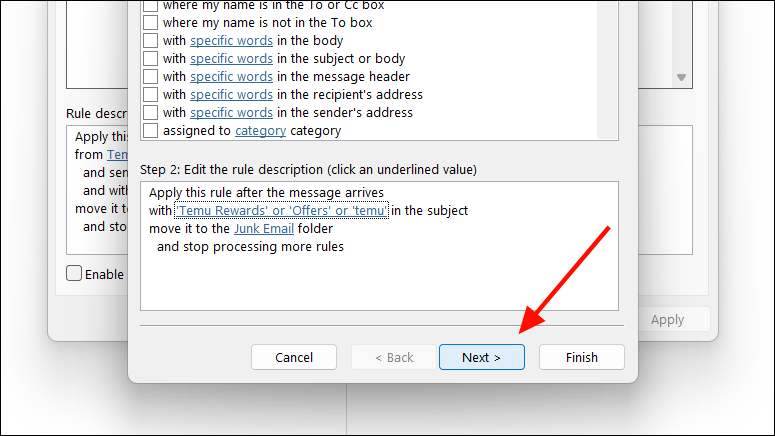
- In the Rule Wizard window, choose the condition(s) you want to apply to the rule. For example, to check mails ‘with specific words in the subject’, ‘with specific words in the message header’, etc. When you select multiple conditions, the rule will only trigger if all of those conditions are met.
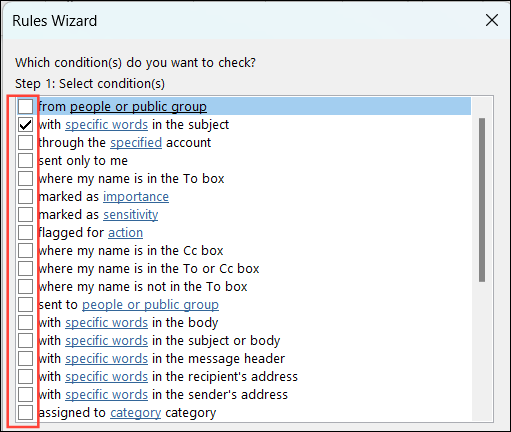
- After selecting the condition, click on the hyperlink in the below box.
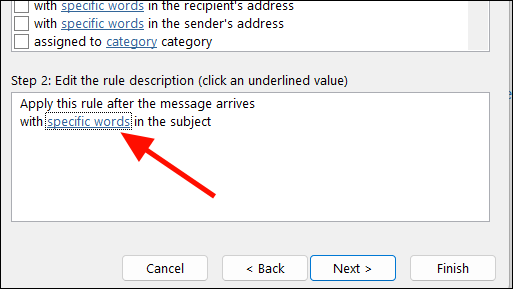
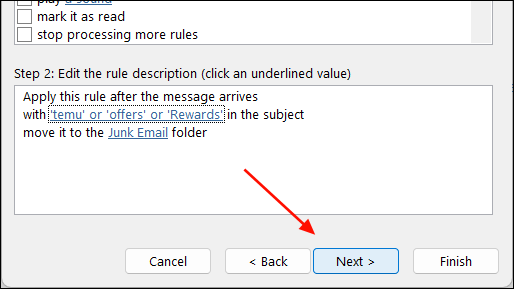
- Now, enter the keywords or phrases you want to check for in potential spam emails. Unlike the previous method, you can add as many keywords as needed. The rule will scan for any of these keywords within the subject line, and Outlook will filter the email if even one keyword is found. Enter your keywords one by one in the text field and click the ‘Add’ button. Once you’re done adding the key, click ‘OK’.
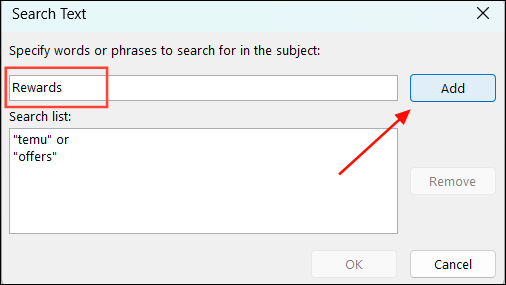
- Then, click ‘Next’ to continue.
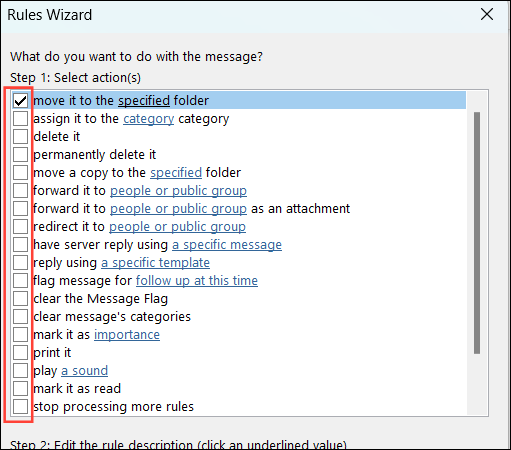
- Now, choose what you want to do with the filtered email. Moving the potential spam email to the Junk folder or a specific folder would be the safest option, so choose the ‘move it to the specified folder’ option. You can also choose to ‘delete it’ right away but you might risk losing mistakenly identified legitimate emails.
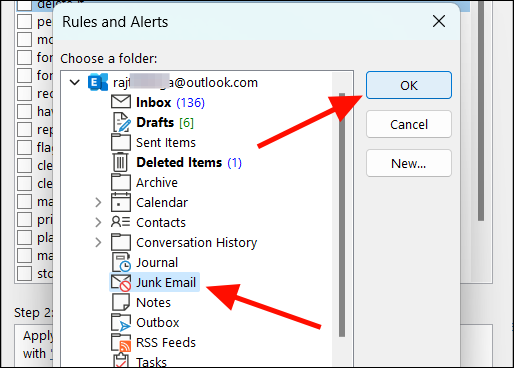
- If you choose to move the email, click on the ‘specified’ hyperlink in the below box.
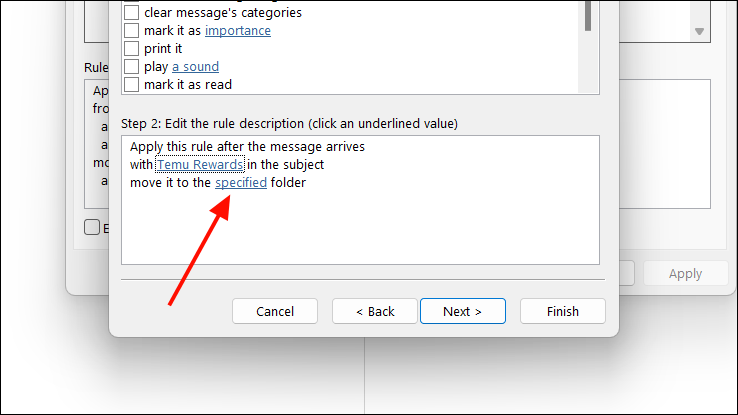
- Select the folder where you want to move the email i.e., Junk Email, and click ‘OK’.
- Then, click ‘Next’.
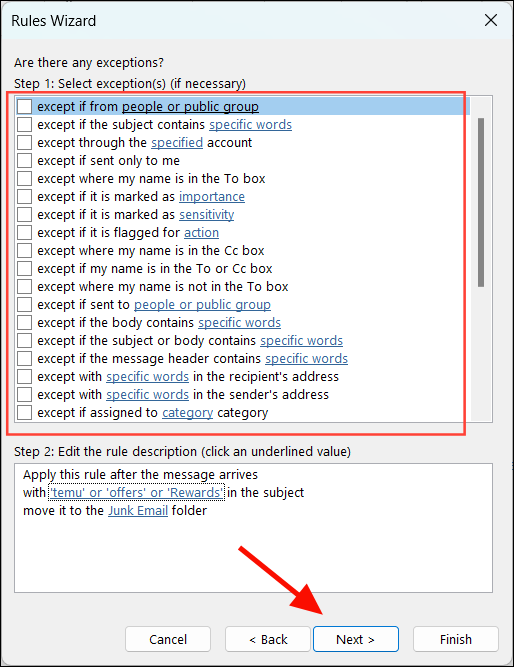
- Next, you can set an exception if required and click ‘Next’. You can set exceptions to emails from specific people in your contacts even if those emails match the conditions by selecting the ‘except if from people or public group’ option.
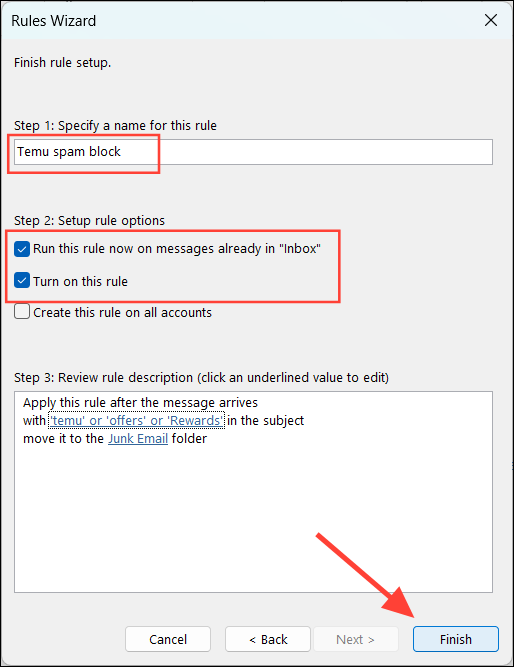
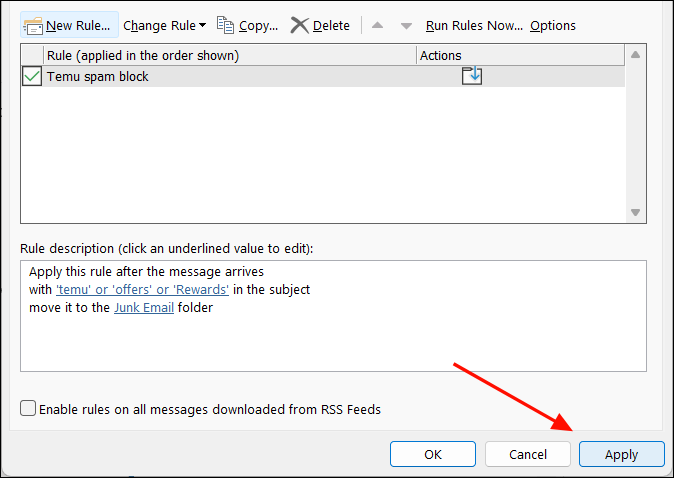
- Finally, give a name to your rule, verify the settings of the rule, and click ‘Finish’ to create the Rule. Before you do, tick the ‘Run this rule now on messages already in “inbox”‘ to check your inbox. Then, make sure the ‘Turn on this rule’ option is checked.
- Then, click ‘Apply’ in the Rules and Alerts window.
As I mentioned before, creating one rule won’t be enough, you need to create multiple rules to fight the spam. As new spam emails bypass your existing filters, create more rules to target specific keywords, senders, domains, subject lines, or other relevant conditions.
Also, look out for recurring patterns in the email headers, like the same domain. Use the ‘View All Headers’ feature to take a closer look at this info. You can make use of any consistent entries in the mail headers. Refine your spam filters by adding one rule at a time to keep your inbox secure and free of spam.
Create Rules to Block Spam in Outlook Web
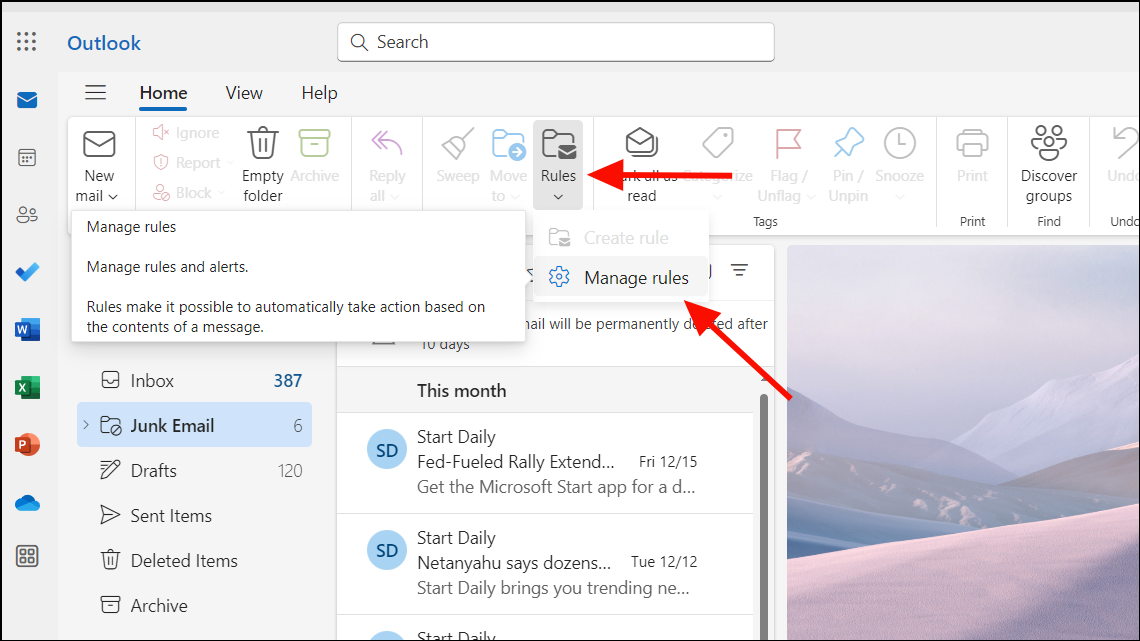
- Log in to your Outlook account on your browser.
- On the ‘Home’ tab, click the ‘Rules’ button and select ‘Manage rules’.
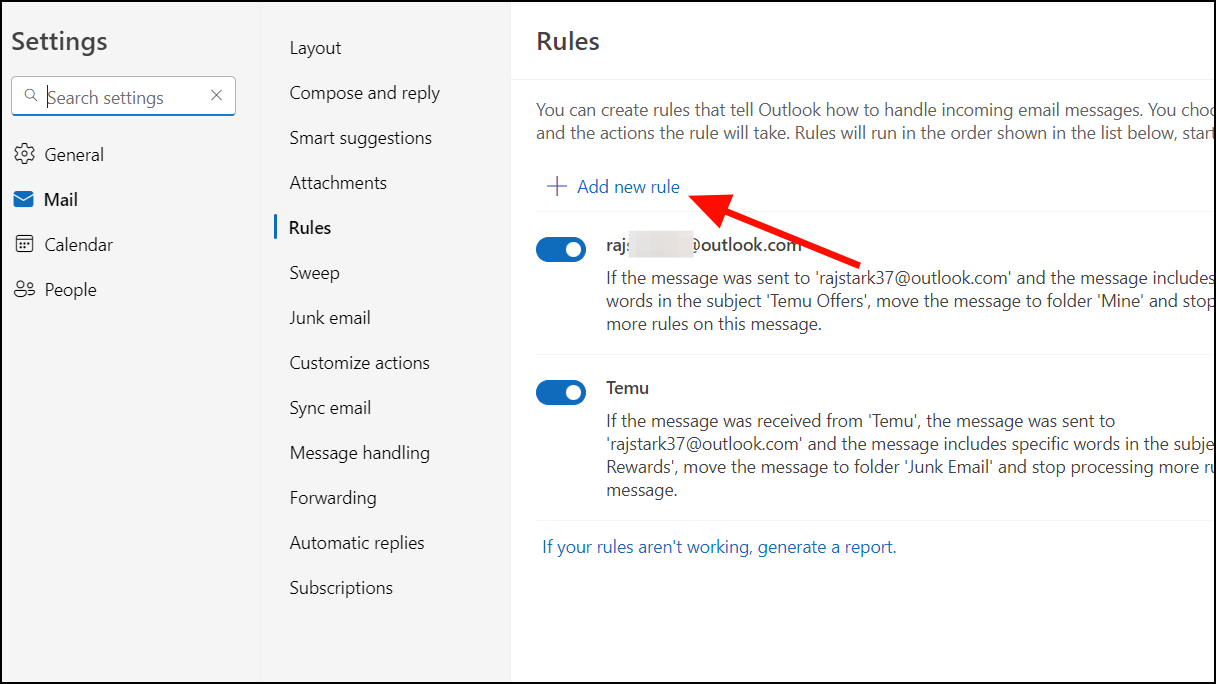
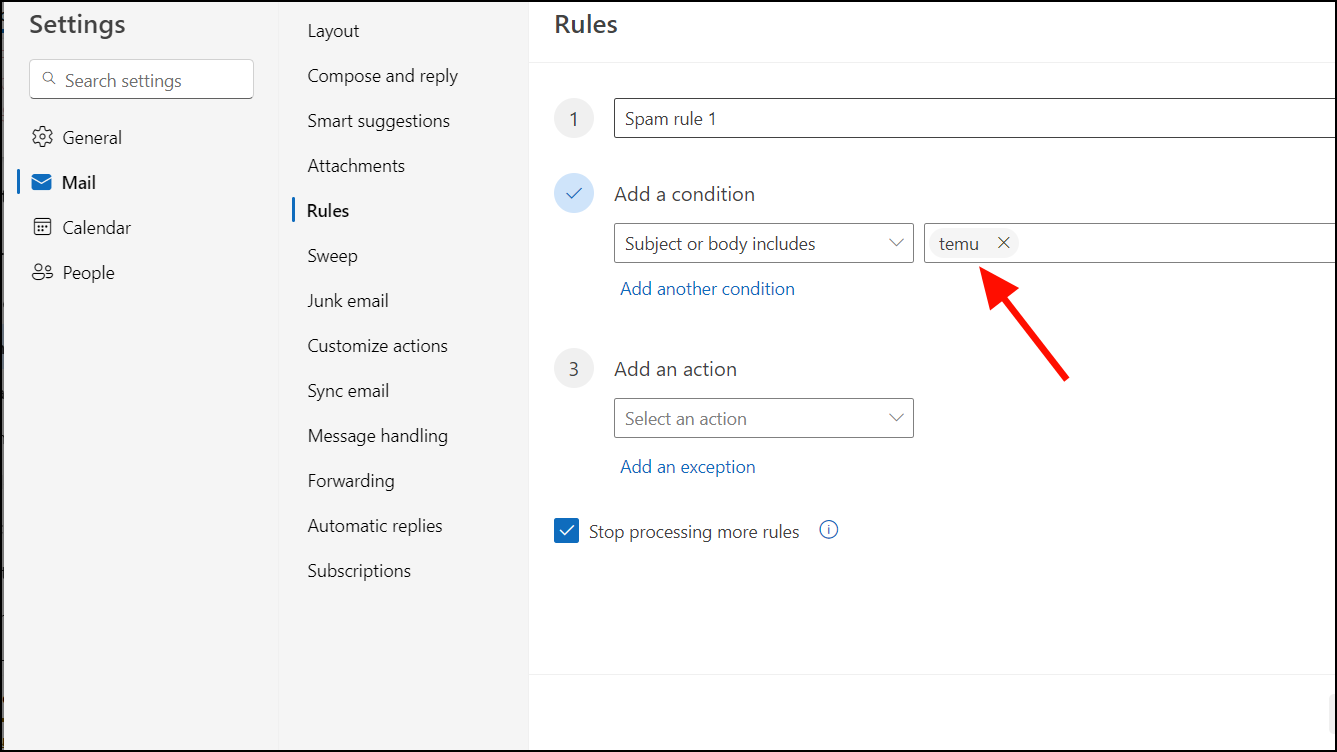
- In the Settings window, click the ‘Add new rule’ button on the Rules section.
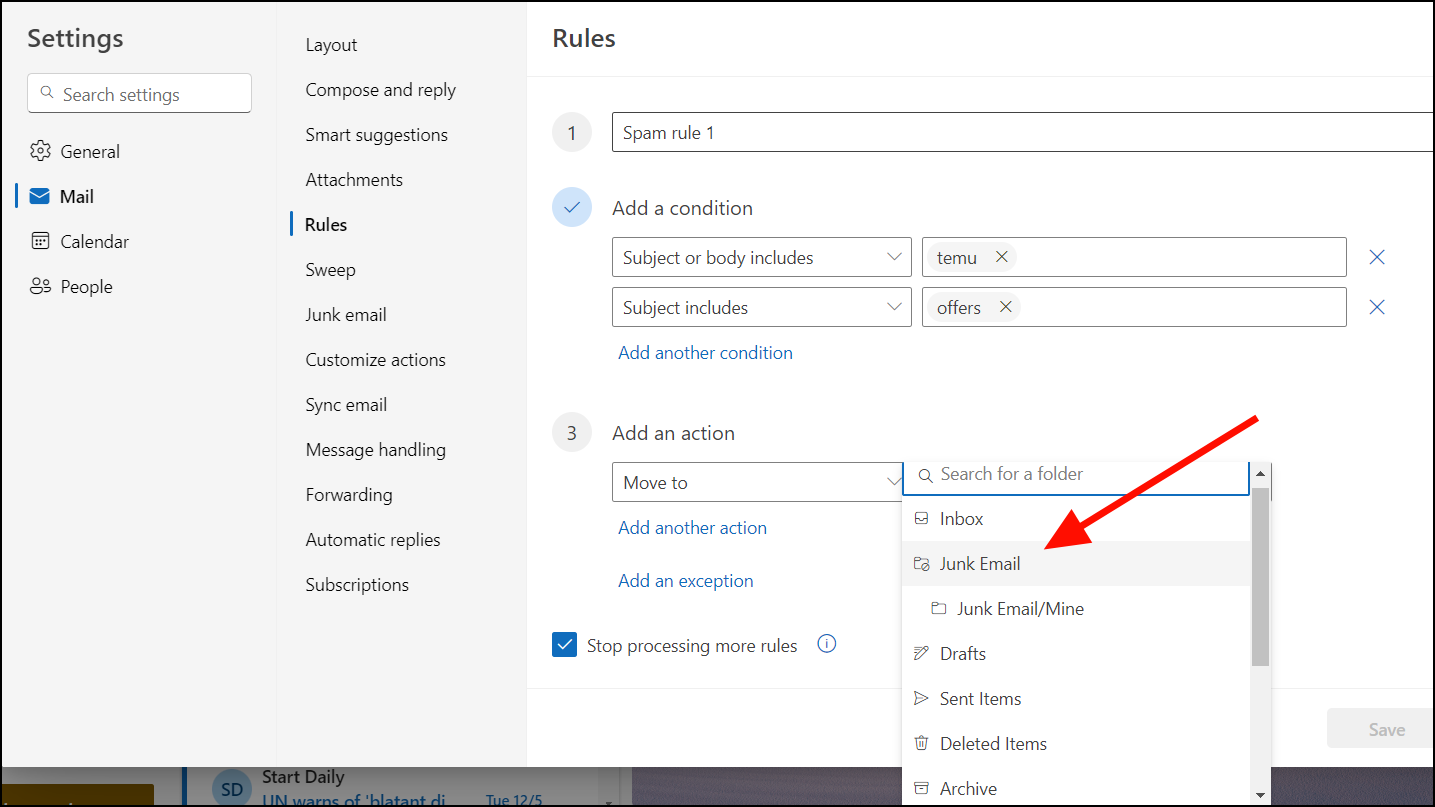
- Type a name for your rule, and choose a condition from the ‘Select a condition’ drop-down like ‘Subject or body includes’.
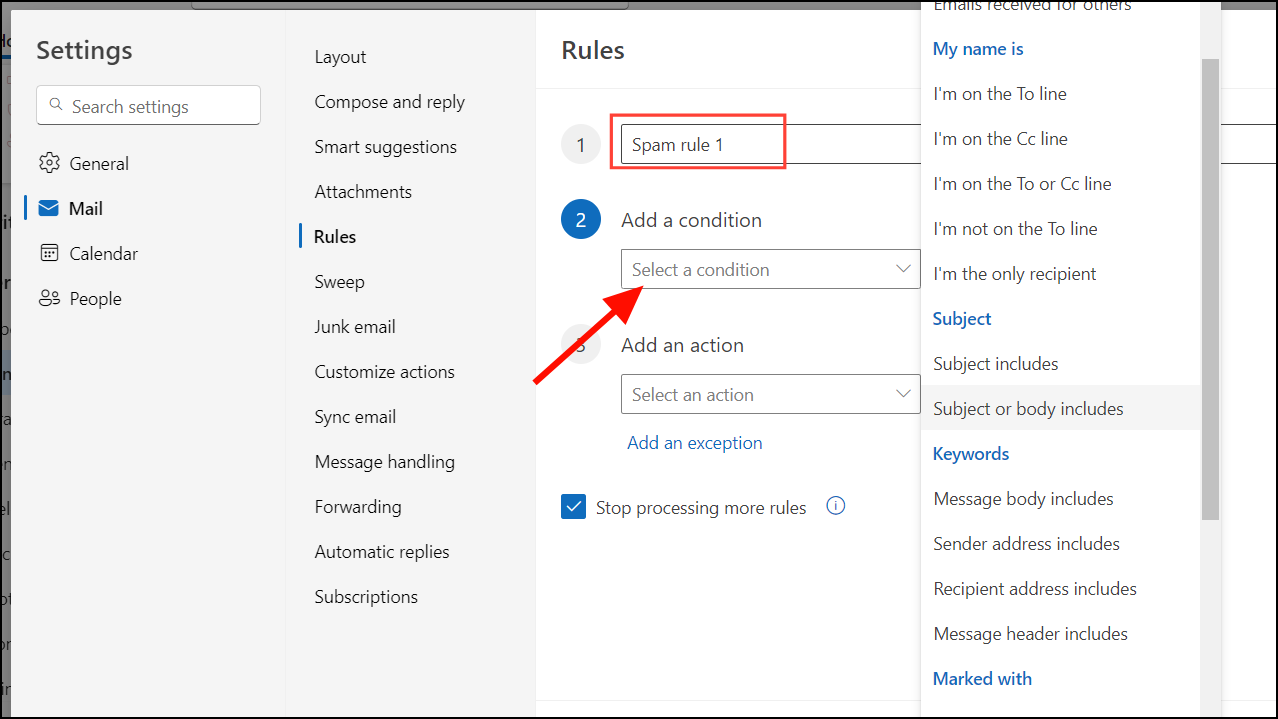
- Then, type the keyword in the text field beside it.
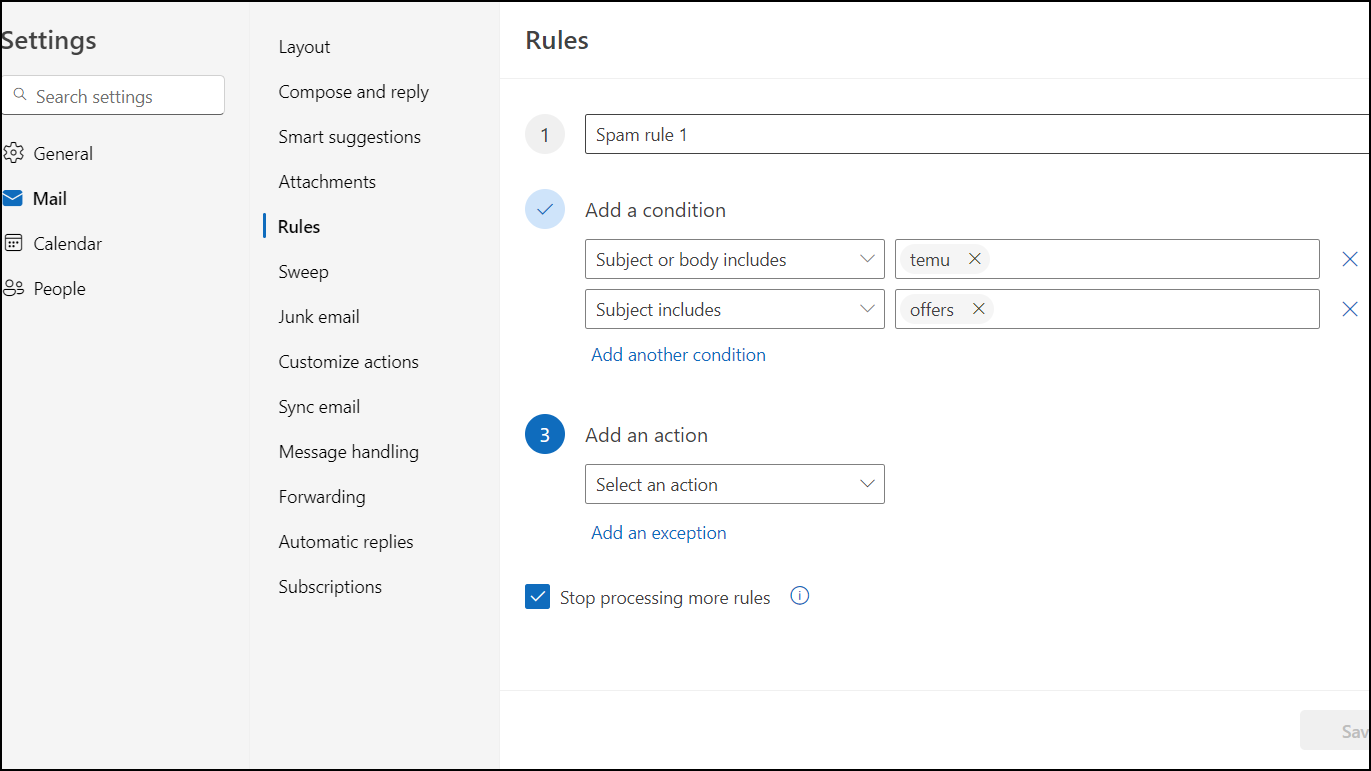
- While you can add multiple conditions to a rule, it will only activate if all of those conditions are satisfied.
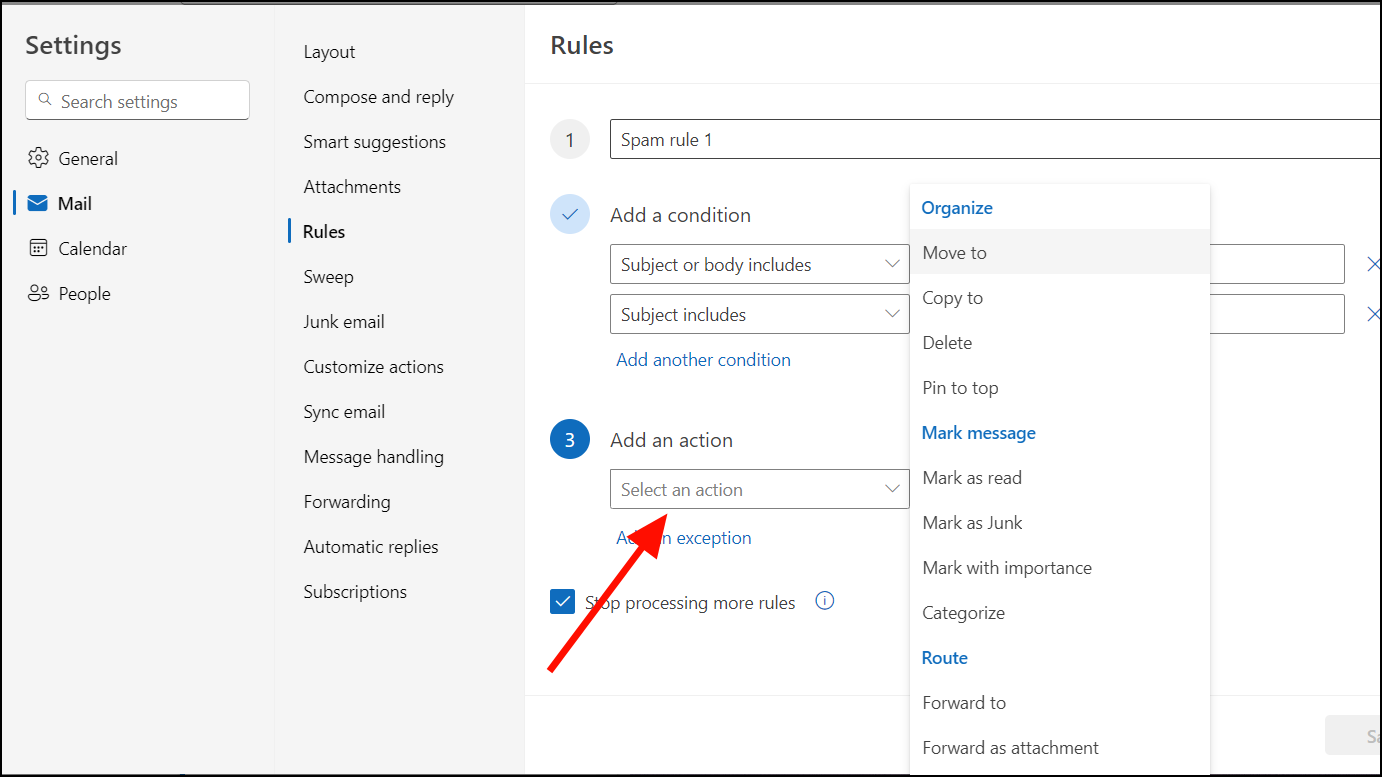
- From the ‘Select an action’ drop-down, choose what you want to do with email such as move it, or delete it.
- Then, click the corresponding drop-down and select ‘Move to a different folder’.
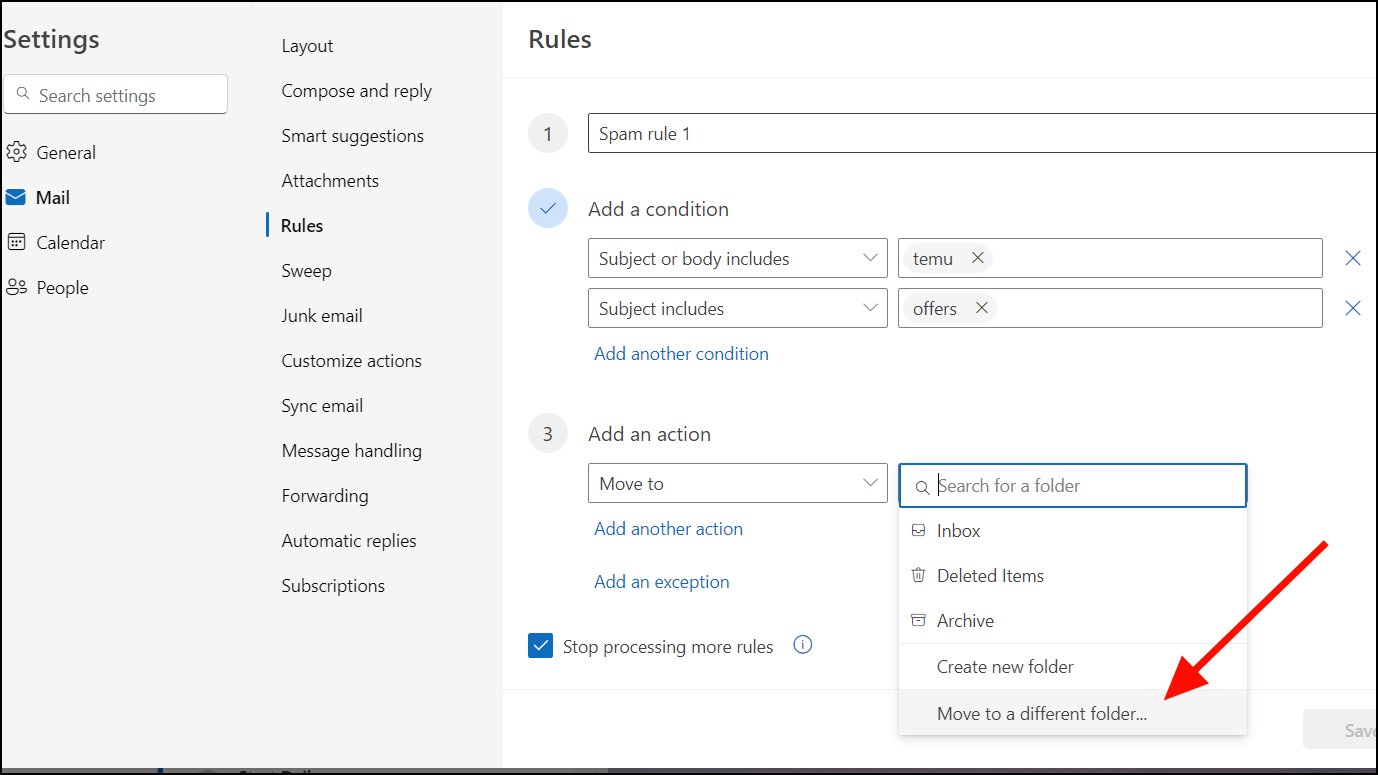
- Select the ‘Junk Email’ option.
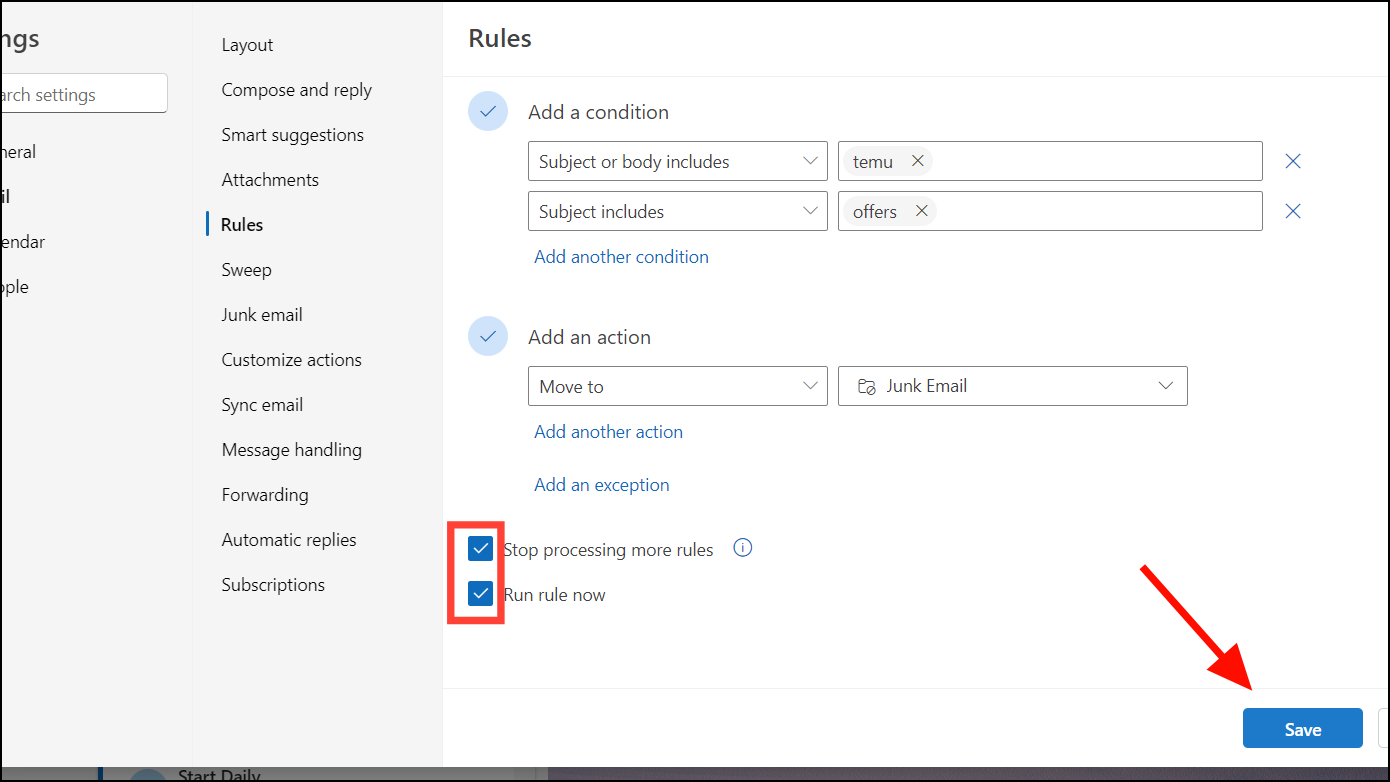
- After that, check the ‘Run rule now’ option and click ‘Save’.
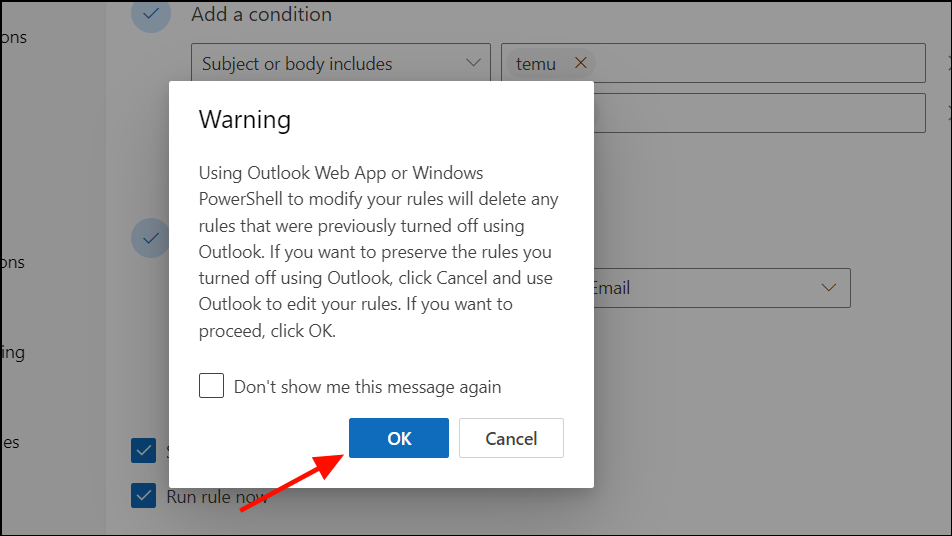
- In the Warning box, click ‘OK’ to continue.
Even the best spam filters can sometimes make mistakes. Don’t forget to routinely check your Spam and Junk Email folders for any misdirected legitimate emails, and clear out the junk while you’re at it.
Change Your Account Passwords
If you think your email address was leaked in a data breach (check your email for a data breach), changing your password along with taking other measures like enabling two-factor authentication and reporting spam emails can stop spam.
Create complex passwords with a mix of uppercase and lowercase letters, numbers, and symbols, and avoid using the same password for multiple accounts. Enable two-factor authentication security for a second code, such as from your phone, when logging into your email account.
Don’t Share Your Primary Email Address
Be careful where you share your email address: Only give it to trusted websites and individuals. When you sign up for newsletters use aliases or separate email accounts.
When you limit sharing your primary address, you decrease the chances of it falling into the hands of spammers or being scraped from vulnerable online forms. Don’t post your email address on websites and social media. This minimizes the risk of being added to their target lists and bombarded with unwanted emails.
Don’t Respond to Spam
If you think an email is spam, avoid opening it. Block the sender, report it, mark it as junk, and delete it. Replying or engaging with spam, sometimes even just opening it, can inform the sender that your address is active and invite more junk mail.
If you did open a spam email, close it immediately. Don’t click any links, or buttons, or download/ open any attachments – these could be phishing traps or malware. Remember, clicking can infect your device, account, and personal data.
Sometimes when an email account is hacked, it can be used to send spam and other malicious emails to everyone in the contact, potentially infecting other users. So, if you receive spam or suspicious emails from a friend or colleague, don’t engage with it directly. Contact them through a different means (phone, social media) to confirm their account hasn’t been compromised. Let them know their email might be sending spam without their knowledge.
Use Third-Party Spam Filters to Stop Junk
There are many third-party anti-spam filters available to stop junk. In fact, some can be even more effective than the built-in filters from your email provider.
Many free spam filter services exist for individual users but they often have limitations like short trial periods, missing key features, or limited customer support.
While free filters offer basic protection, paid third-party solutions go beyond basic junk blocking. They often block 99.9% of junk, along with advanced features like user behavior analysis, customizable filtering, and integration with various business software, enhancing your overall email security and workflow. Here are some popular options:
- MailWasher (Free)
- ESET Protect Mail Plus (Free Trial)
- SpamTitan
- MX Guarddog
- ZEROSPAM
- Securence
- SPAMfighter
Changing Your Email Address
If you’re bombarded with spam with no reprieve and none of the solutions haven’t worked, changing your email address is your last option. This essentially cuts you off from past spam-related connections and allows you to start fresh with a clean slate.
You’ll need to manually migrate your contacts (friends, family, important contacts) to your new address. Keep the old address active for a while to make sure all your accounts and subscriptions move to the new one seamlessly.
That’s it.