Changing the default action of your power button on Windows 11 allows you to tailor your computer's behavior to better suit your needs. Instead of shutting down your PC every time you press the power button, you can set it to sleep, hibernate, turn off the display, or even do nothing. This guide will walk you through various methods to customize what the power button does on your Windows 11 system.
Using Power Options
One of the simplest ways to change the power button's function is through the Power Options in the Control Panel. This method is straightforward and doesn't require advanced technical knowledge.
Step 1: Open the Control Panel by typing Control Panel in the Windows search bar and selecting it from the results.
Step 2: In the Control Panel, click on 'Hardware and Sound'.
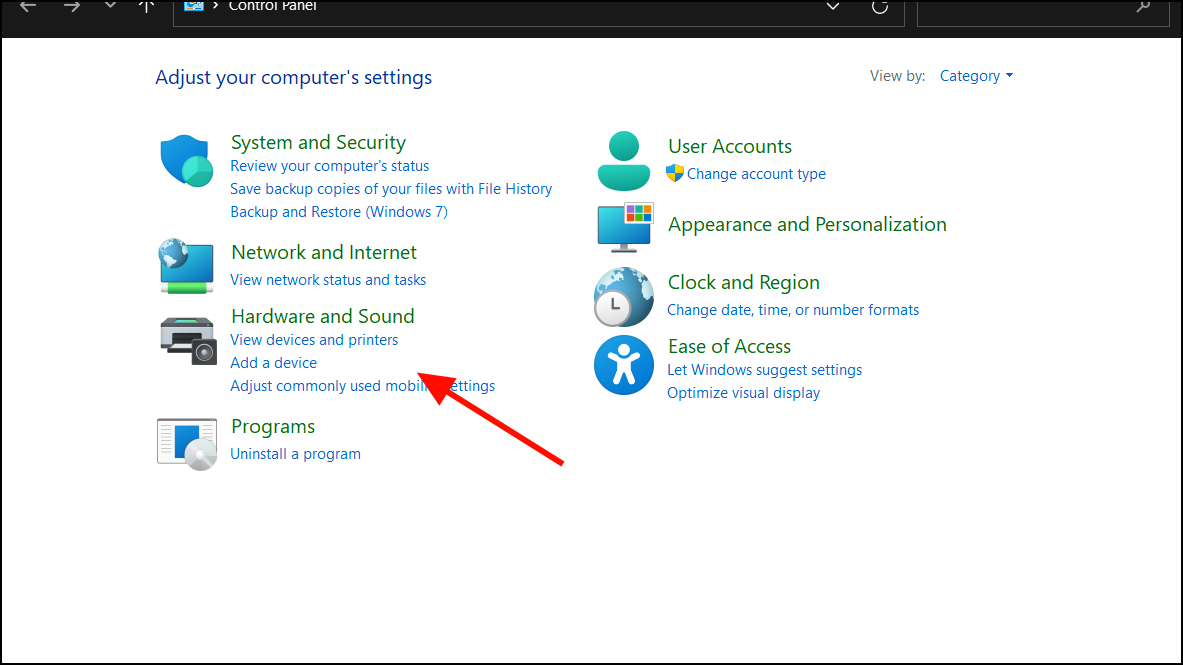
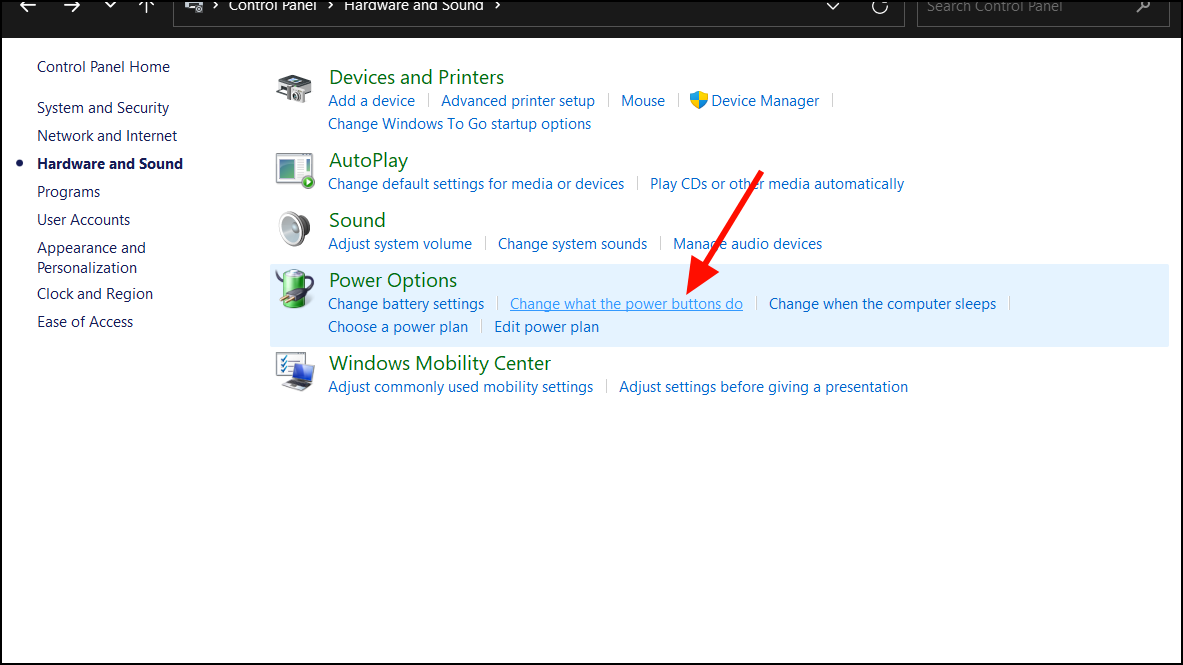
Step 3: Under the 'Hardware and Sound' section, click on 'Change what the power buttons do' found under 'Power Options'.
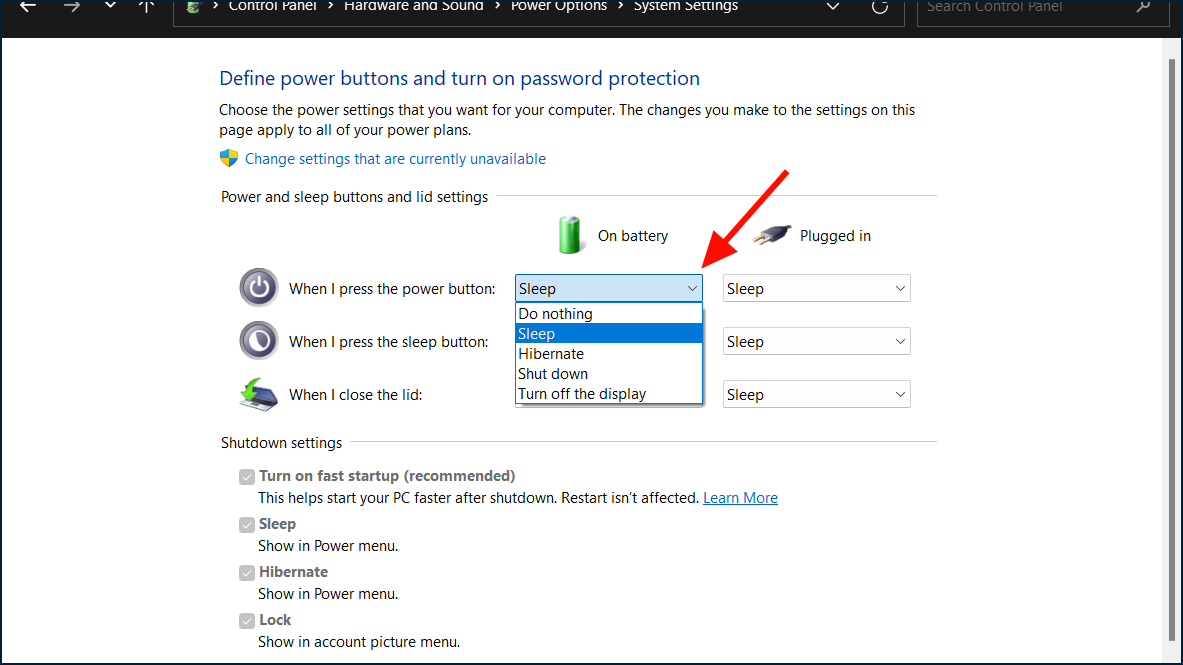
Step 4: On the next page, you'll see options to customize the power button's behavior. Find the dropdown menu labeled "When I press the power button". Here, you can select an action for both 'On battery' and 'Plugged in' modes. The available options are:
- Do Nothing: The power button will not perform any action when pressed.
- Sleep: Puts your computer into a low-power state while preserving your session.
- Hibernate: Saves your current session to the hard drive and powers off the computer.
- Shut Down: Closes all programs and turns off your computer completely.
- Turn off the Display: Switches off the screen while keeping the computer running.
Step 5: After selecting your preferred actions, click on 'Save changes' at the bottom to apply the settings.
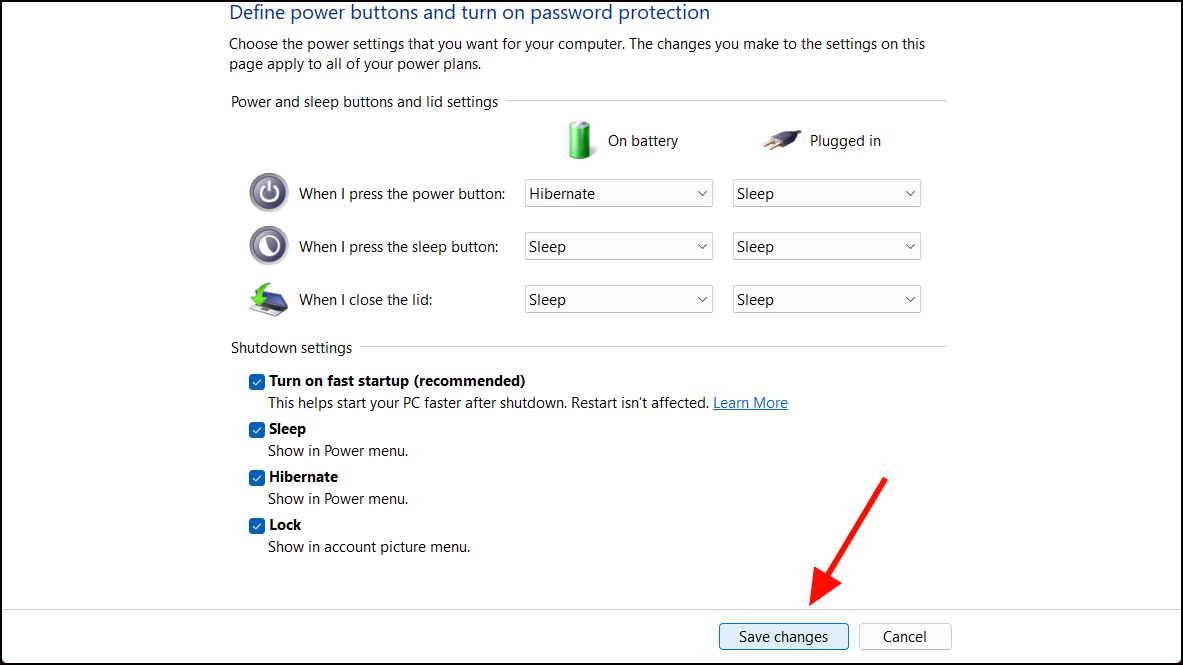
Note that the available options may vary depending on your device. For instance, laptop users might also see settings for "When I close the lid," and some desktop computers may not support certain power states like 'Turn off the display' if the hardware doesn't support it.
Using Command Line or PowerShell
For those comfortable with command-line tools, you can use Command Prompt or Windows PowerShell to change the power button behavior. This method is particularly useful for system administrators or when you need to apply changes across multiple systems.
Step 1: Open Command Prompt or Windows PowerShell with administrative privileges. To do this, search for cmd or PowerShell, right-click on the application, and select 'Run as administrator'.
Step 2: Enter one of the following commands based on the desired action for when your computer is on battery power:
Battery Settings
Do Nothing:
powercfg -setdcvalueindex SCHEME_CURRENT 4f971e89-eebd-4455-a8de-9e59040e7347 7648efa3-dd9c-4e3e-b566-50f929386280 0Sleep:
powercfg -setdcvalueindex SCHEME_CURRENT 4f971e89-eebd-4455-a8de-9e59040e7347 7648efa3-dd9c-4e3e-b566-50f929386280 1Hibernate:
powercfg -setdcvalueindex SCHEME_CURRENT 4f971e89-eebd-4455-a8de-9e59040e7347 7648efa3-dd9c-4e3e-b566-50f929386280 2Shut Down:
powercfg -setdcvalueindex SCHEME_CURRENT 4f971e89-eebd-4455-a8de-9e59040e7347 7648efa3-dd9c-4e3e-b566-50f929386280 3Turn off Display:
powercfg -setdcvalueindex SCHEME_CURRENT 4f971e89-eebd-4455-a8de-9e59040e7347 7648efa3-dd9c-4e3e-b566-50f929386280 4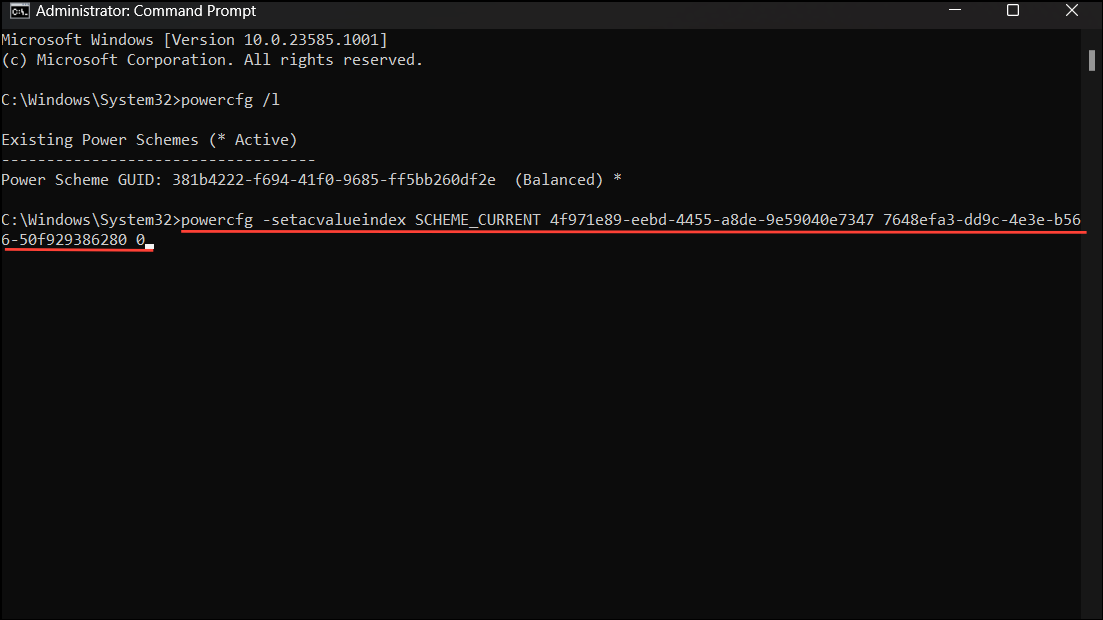
Step 3: For plugged-in settings, use the following commands:
Plugged-in Settings
Do Nothing:
powercfg -setacvalueindex SCHEME_CURRENT 4f971e89-eebd-4455-a8de-9e59040e7347 7648efa3-dd9c-4e3e-b566-50f929386280 0Sleep:
powercfg -setacvalueindex SCHEME_CURRENT 4f971e89-eebd-4455-a8de-9e59040e7347 7648efa3-dd9c-4e3e-b566-50f929386280 1Hibernate:
powercfg -setacvalueindex SCHEME_CURRENT 4f971e89-eebd-4455-a8de-9e59040e7347 7648efa3-dd9c-4e3e-b566-50f929386280 2Shut Down:
powercfg -setacvalueindex SCHEME_CURRENT 4f971e89-eebd-4455-a8de-9e59040e7347 7648efa3-dd9c-4e3e-b566-50f929386280 3Turn off Display:
powercfg -setacvalueindex SCHEME_CURRENT 4f971e89-eebd-4455-a8de-9e59040e7347 7648efa3-dd9c-4e3e-b566-50f929386280 4These commands modify the current power scheme settings. The GUIDs in the commands correspond to specific power settings, and the numerical value at the end determines the action. Be sure to enter the commands carefully to avoid errors.
Using Registry Editor
Advanced users can alter the power button's behavior by editing the Windows Registry. This method provides deeper customization but comes with risks, as incorrect changes can affect system stability. It's advisable to back up the registry or create a system restore point before proceeding.
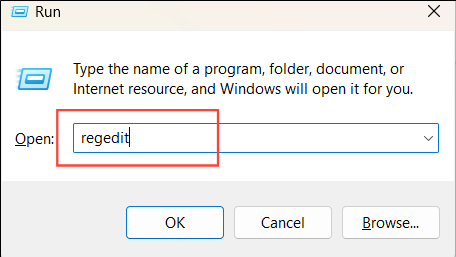
Step 1: Press Windows + R to open the Run dialog box. Type regedit and click 'OK' to launch the Registry Editor.
Step 2: Navigate to the following registry path:
HKEY_LOCAL_MACHINE\SOFTWARE\Policies\Microsoft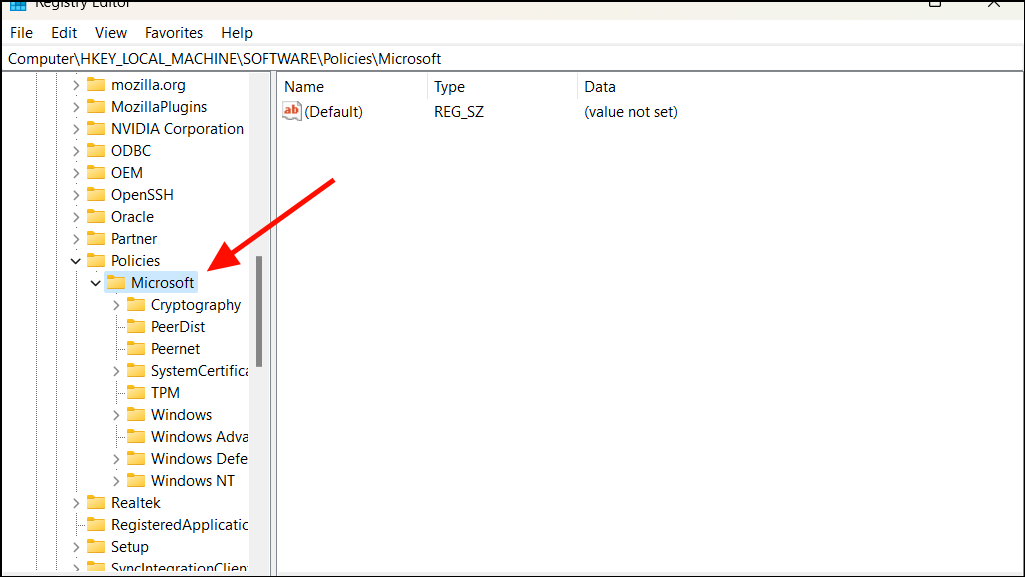
Step 3: Right-click on the 'Microsoft' key, select 'New', then click on 'Key'. Name this new key Power.
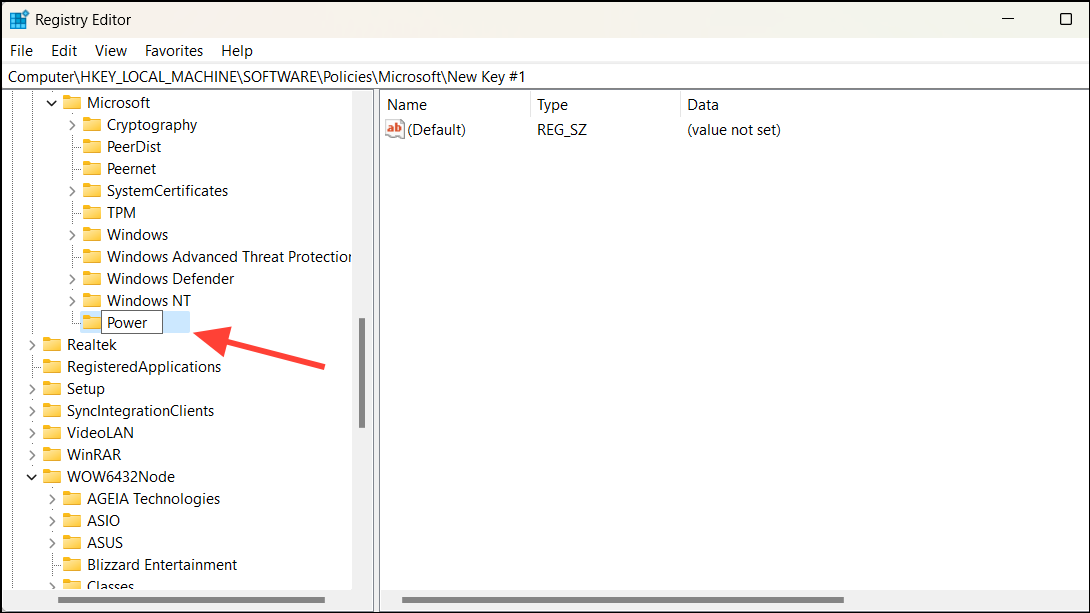
Step 4: Right-click on the newly created Power key, select 'New', and choose 'Key' again. Name this key PowerSettings.
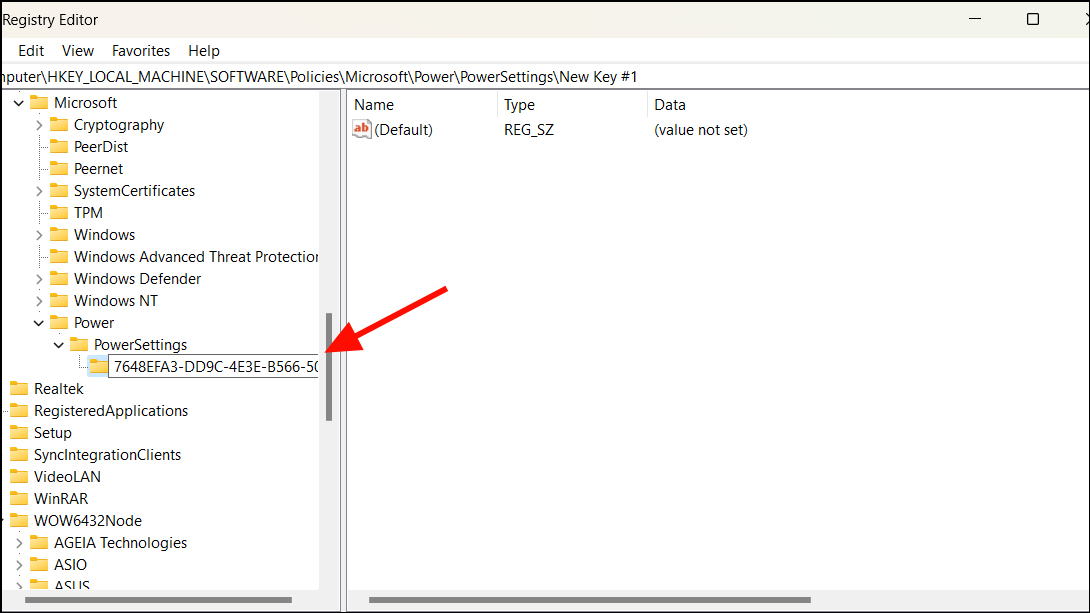
Step 5: Inside the PowerSettings key, create a new key named 7648EFA3-DD9C-4E3E-B566-50F929386280. If this key already exists, you can skip this step.
Step 6: With the 7648EFA3-DD9C-4E3E-B566-50F929386280 key selected, right-click in the right pane, select 'New', and then click on 'DWORD (32-bit) Value'. Name this value ACSettingIndex for plugged-in settings or DCSettingIndex for battery settings.
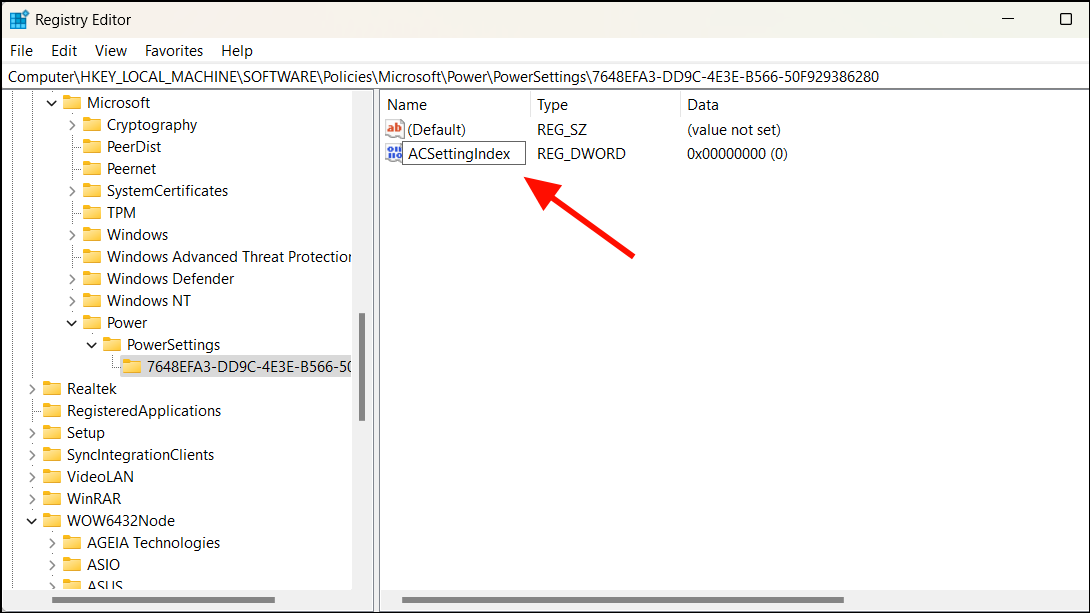
Step 7: Double-click on the DWORD value you created. In the 'Value data' field, enter one of the following numbers corresponding to your desired action:
- Do Nothing:
0 - Sleep:
1 - Hibernate:
2 - Shut Down:
3
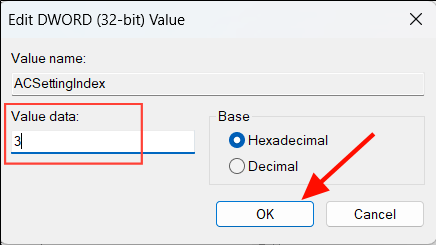
Step 8: Click 'OK' to save the changes. If you wish to set different actions for plugged-in and battery modes, create both ACSettingIndex and DCSettingIndex DWORD values and assign them accordingly.
Be cautious when editing the registry, as incorrect changes can lead to system instability. Only proceed if you are comfortable with registry operations.
Using Local Policy Editor
If you want to enforce power button settings across all user accounts on your computer, you can use the Local Group Policy Editor. This method overrides any individual user settings made in the Control Panel.
Step 1: Open the Local Group Policy Editor by pressing Windows + R, typing gpedit.msc, and clicking 'OK'.
Step 2: In the Group Policy Editor, navigate to:
Computer Configuration > Administrative Templates > System > Power Management > Button Settings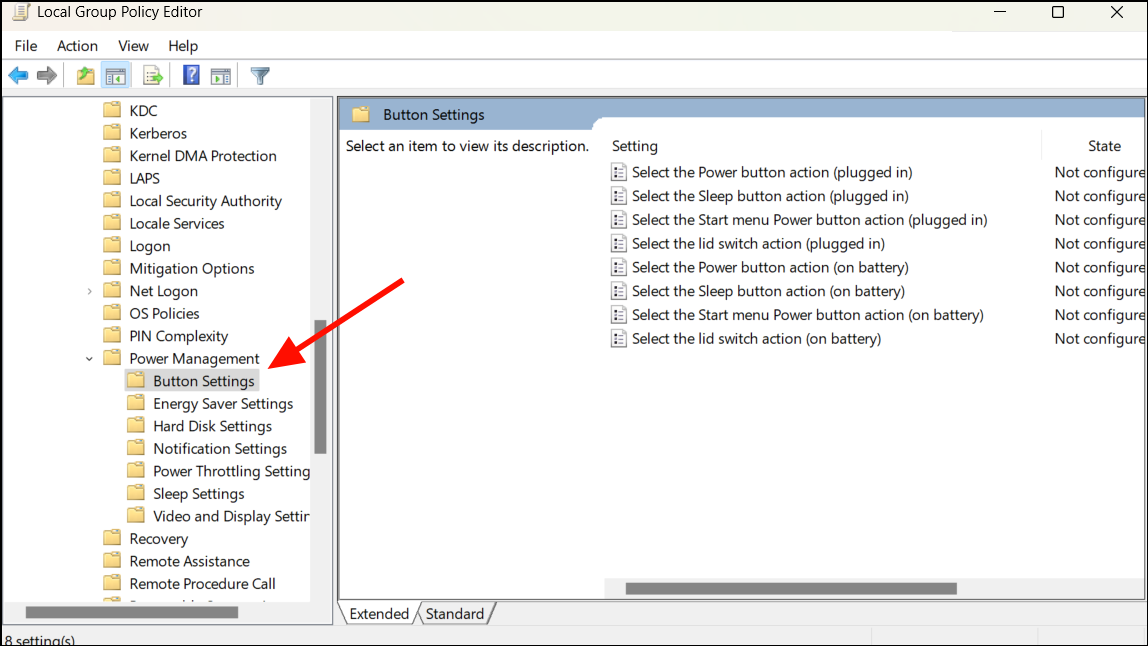
Step 3: Locate and double-click on 'Select the Power button action (plugged in)' to set the action when the computer is plugged in.
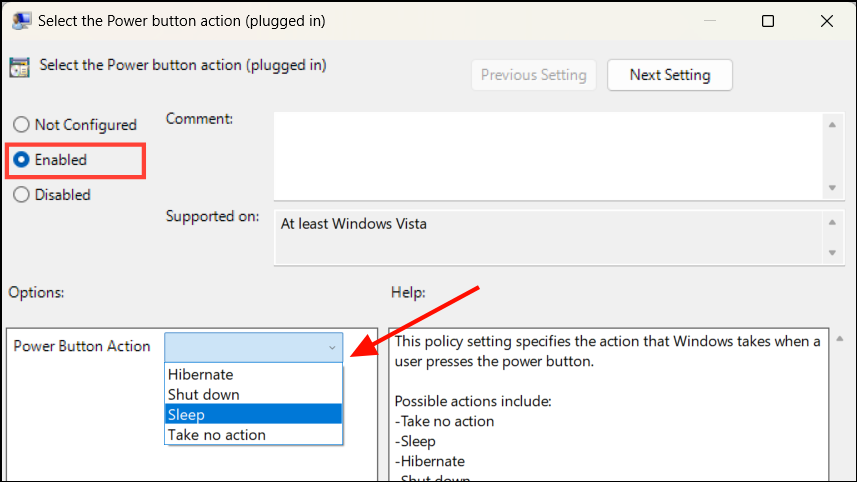
Step 4: In the policy settings window, select 'Enabled'. Then, choose your desired action from the 'Power Button Action' dropdown menu.
Step 5: Click on 'Apply', then 'OK' to save the changes.
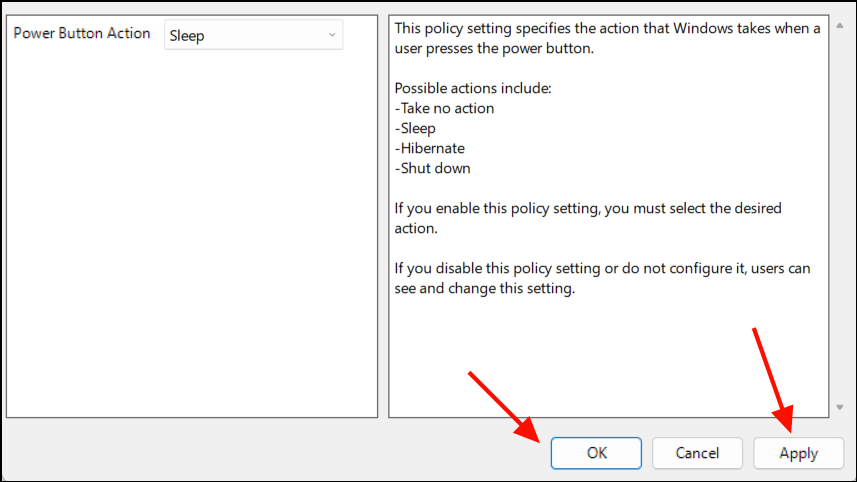
Step 6: To set the action when the computer is on battery power, double-click on 'Select the Power button action (on battery)' and repeat the same steps.
This method ensures that the power button settings are consistent and cannot be altered by individual users through the Control Panel. It's particularly useful in environments where you need to maintain strict control over system configurations.
Note that the Local Group Policy Editor is not available in Windows 11 Home edition. If you're using the Home edition, consider using the Registry Editor or Command Prompt methods instead.
By customizing the power button's action, you can streamline your workflow and prevent unintended shutdowns or sleeps. Choose the method that you're most comfortable with, and always ensure you understand the steps to avoid any unintended changes to your system.


