Microsoft Edge had rarely been the popular choice due to its lack of features and the functionalities offered by the competition. However, with Windows 11, Microsoft gave all its love to the Edge browser and brought it to par with all the major browsers, in terms of design, performance, and features.
Moreover, since the browser comes pre-installed on every Windows computer, it also reduces the storage footprint and consumes significantly fewer resources than almost every third-party browser.
However, not all is hunky-dory with Microsoft Edge. Even with the major overhaul, Microsoft couldn’t keep the browser away from occasional bugs and issues. Many users are reportedly facing one such issue, where Edge either stops responding or just plain crashes.
Fortunately, the problem does not originate due to a hardware issue and seems to be software-based; hence, you can easily resolve it. That being said, there might be a bit of trial and error involved when trying fixes as the problem can present itself due to a number of reasons.
In case you have also been facing such issues on your Edge browser, just follow the simple fixes listed below, and hopefully, you will be done long before you realize it.
Close Other Apps and Tabs
One of the most prominent reasons when Edge hangs or crashes is that your computer might have run out of memory. When that happens, it can’t load any sites while also running your apps and other tabs.
Close any apps and tabs that are open but are not important to you. Also pause any downloads on your computer for the time being. Then, wait and see if Edge starts working again. Otherwise, move on to other fixes in this list.
Make Sure Edge is Updated
This may seem like a very elementary fix. However, it is one of the most effective fixes. If your browser is not updated, it may not be able to work properly with Windows and exhibit issues such as non-responsiveness or crashing abruptly. Hence, it is always a good practice to keep your browser updated.
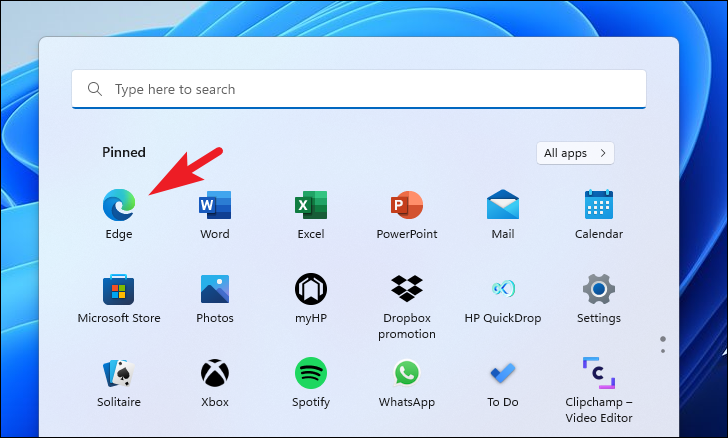
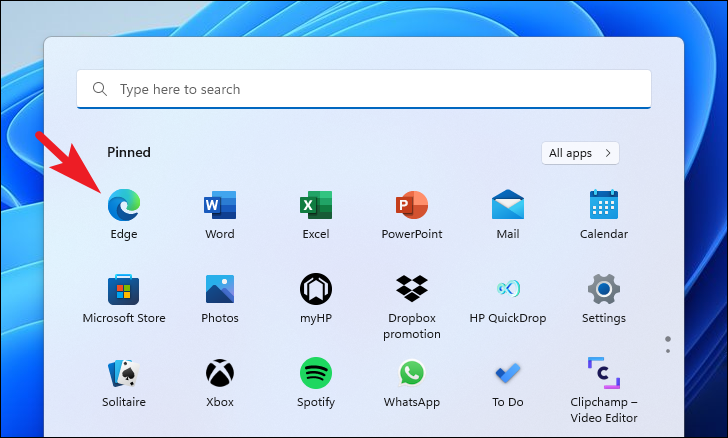
To do so, first, head to the Start Menu and click on the ‘Edge’ icon present under the ‘Pinned apps’ section to continue. Otherwise, type Edge in the menu to perform a search for it.
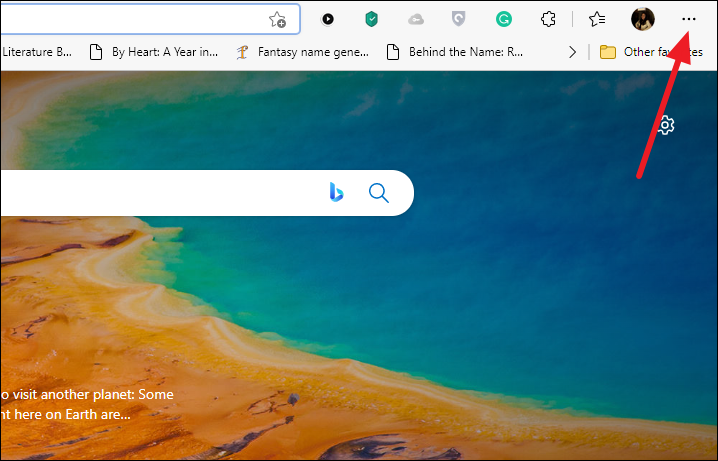
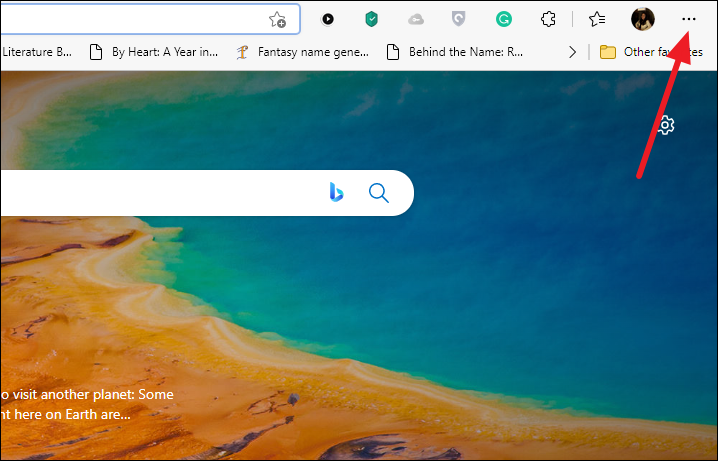
Then, from the Edge window, click on the ‘Settings and more’ icon (three horizontal dots) present in the top right corner of the browser window to reveal the overflow menu.
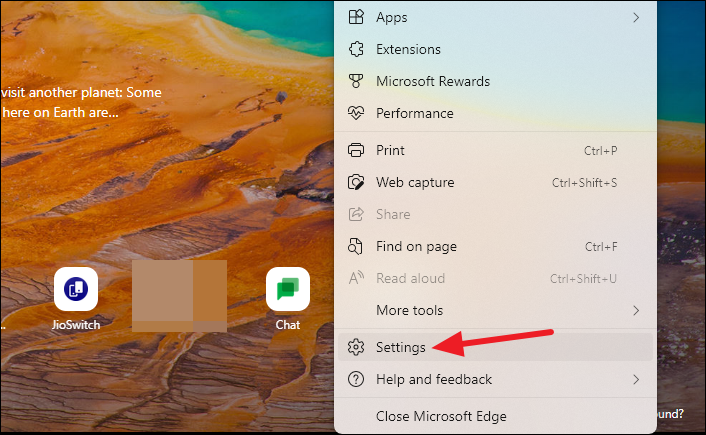
Then, locate and click on the ‘Settings’ option from the list to proceed. This will open a separate tab in Edge.
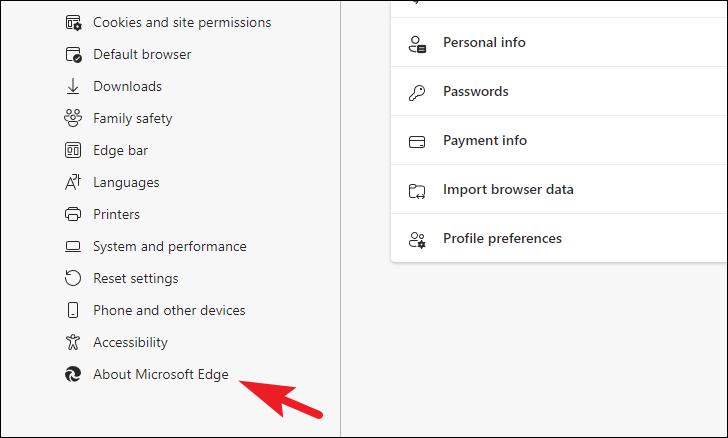
Now, from the separately opened tab, click the ‘About Microsoft Edge’ option present on the left sidebar of the webpage to continue.
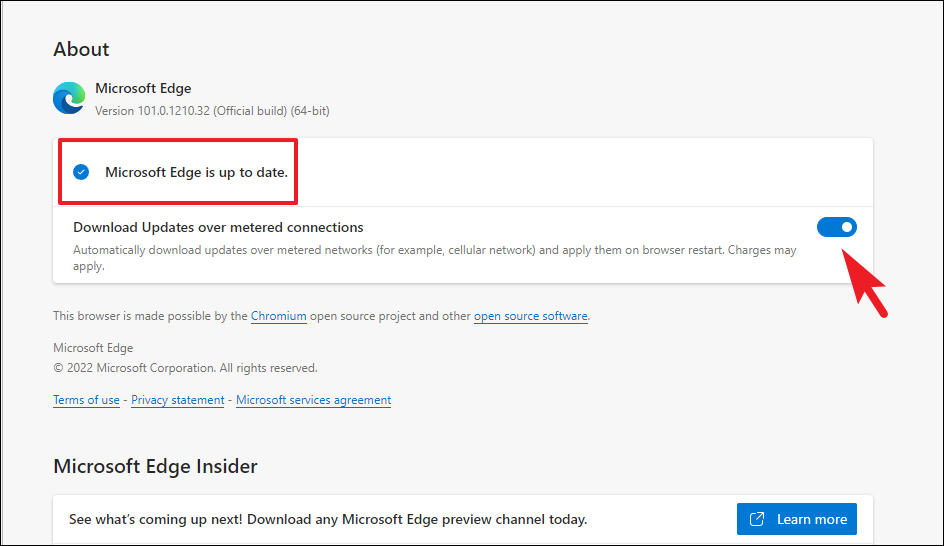
On the right section of the page, Edge will check for updates. And in case it is not updated, it will start downloading the updates. If an update is available but is not downloading, locate the ‘Download update over metered connections’ option and click on the toggle switch following the option to bring it to the ‘On’ position.
Once updated, your browser should work fine if an outdated version of the browser was the culprit behind the issue.
Run Windows Store Apps Troubleshooter
One of the least effort-requiring fixes includes running the troubleshooter for Windows Store apps. It only requires a couple of clicks from your side and has the potential to fix a majority of underlying issues on your computer.
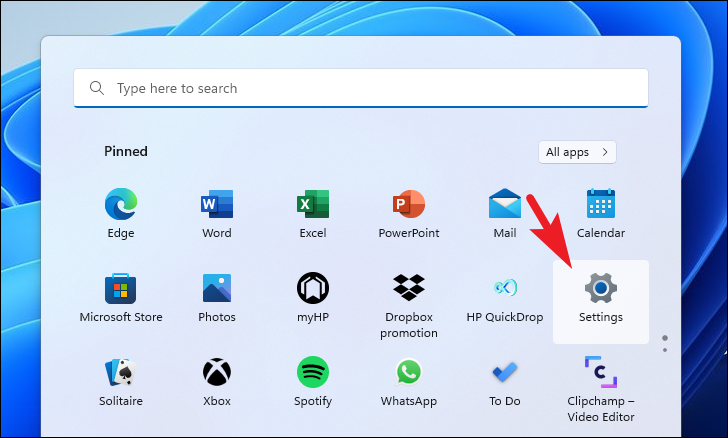
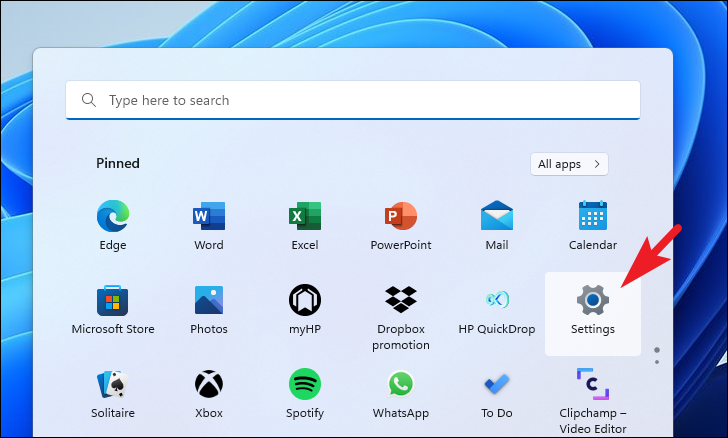
To run the troubleshooter, first head to the Start Menu and click on the ‘Settings’ tile present under the ‘Pinned apps’ section to continue. Otherwise, type Settings in the menu to perform a search for it. Alternatively, you can also press the Windows+I keys together on your keyboard to open the app.
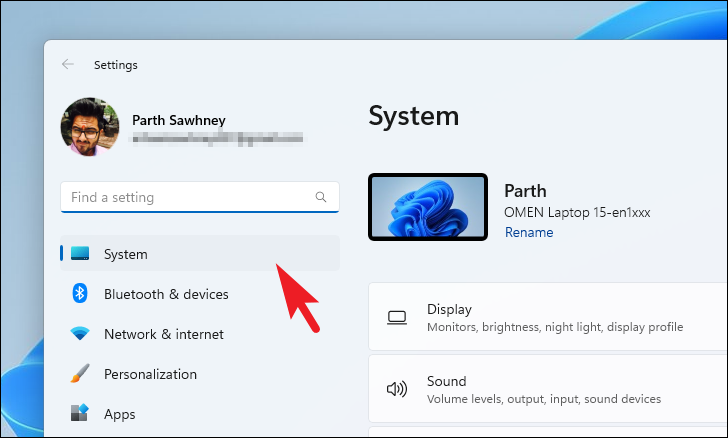
Then, from the Settings window, make sure you are on the ‘System’ tab present on the left sidebar to proceed.
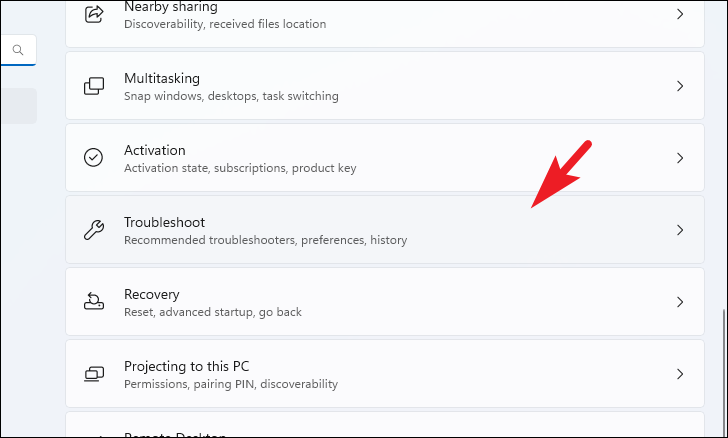
Now, from the right section of the window, locate and click on the ‘Troubleshoot’ tile to proceed.
On the next screen, click on the ‘Other troubleshooters’ tile present under the ‘Options’ section to continue.
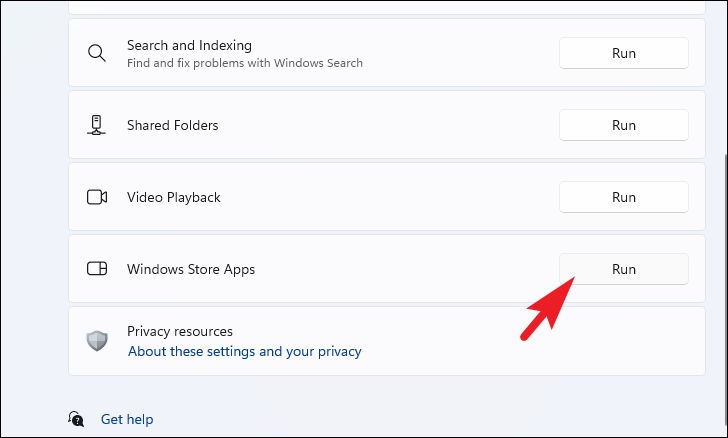
Then, on the ‘Other troubleshooters’ screen, scroll down and click the ‘Run’ button present on the far right edge of the ‘Windows Store apps’ tile to continue. This will open a separate window on your screen.
Now, let the troubleshooter run in the background. If it finds any anomalies, it will report them in the same window and suggest appropriate actions.
Repair Microsoft Edge
Repairing Microsoft Edge is as easy and plain sailing as it gets. All you need to do is click a few buttons and the in-built repair tool will automatically take care of everything.
To do so, first, head to the Start Menu and click on the ‘Settings’ tile present under the ‘Pinned apps’ section to continue. Otherwise, type Settings in the menu to perform a search for it.
Then, locate and click on the ‘Apps’ tab present on the left sidebar of the Settings window.
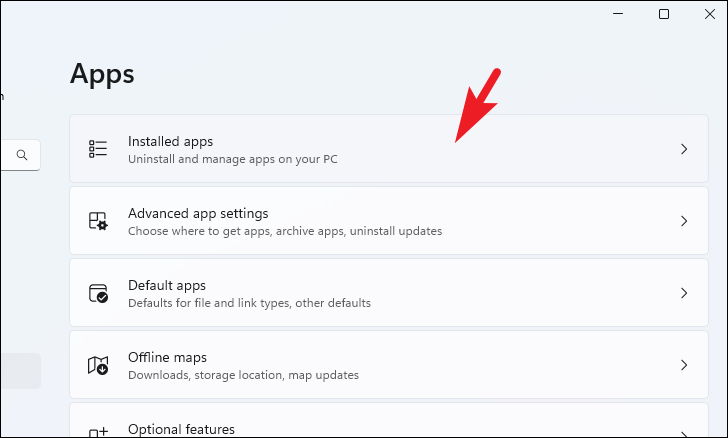
Next, from the right section of the window, locate and click on the ‘Installed apps’ tile from the list to continue.
Then, on the next screen, you can either type Microsoft Edge in the search bar present on the top section of the page to perform a search for it. Or, you can manually, scroll down the list to locate the app.
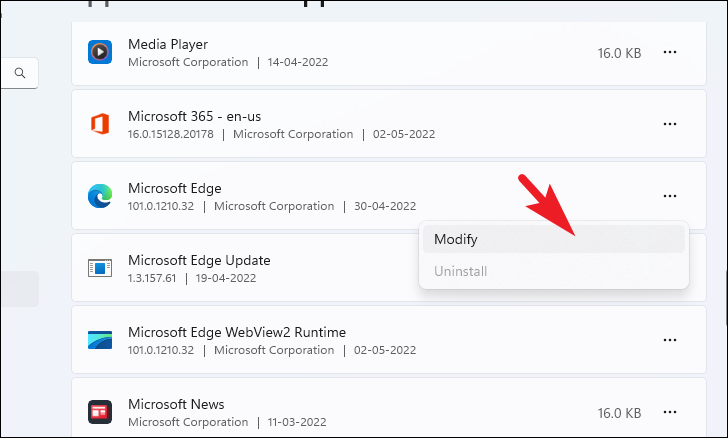
Once located, click on the ‘ellipsis’ icon (three horizontal dots) present on the far right edge of the tile to reveal the overflow menu. Then, click on the ‘Modify’ option from the list to continue. This will open a separate UAC window on your screen.
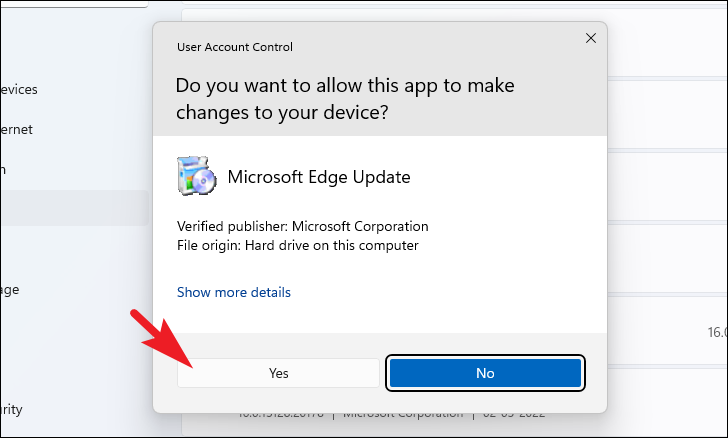
The UAC (User Account Control) screen will appear on your screen. If you are not logged in with an admin account, enter the credentials for one. Otherwise, click on the ‘Yes’ button to proceed.
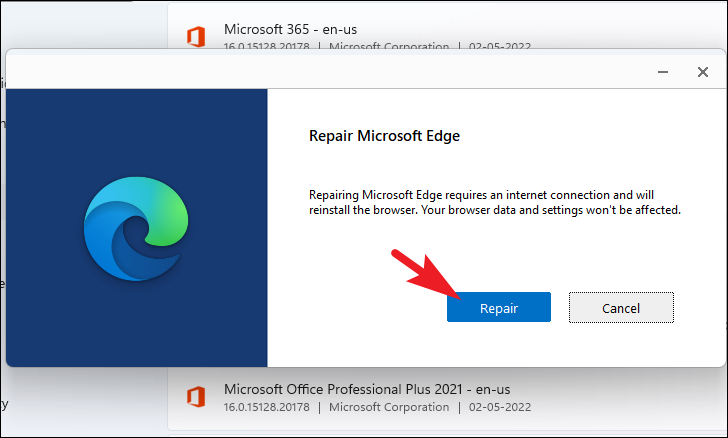
Then, from the separately opened screen, click on the ‘Repair’ button to continue. The repair tool will now look into the issues and try to fix the problems for you.
Once done, you will receive a message stating the same on your screen. Now, launch Microsoft Edge and check if you are facing the issue anymore.
Restart your Computer
If nothing else has worked till now, there’s still the age old solution to many problems on your computer. It’s time to restart your computer. Some program or process currently running on the computer could be the cause of troubles with Edge. Restarting your computer will fix that program or process. After restarting, open Edge again to see if it’s working.
Reset Browser Settings
Many times, a buggy feature, improper settings, and/or corrupted cookies can cause random problems in the browser. Fortunately, Edge allows you to completely reset your browser settings which will bring it to almost a factory state. Your passwords, history, and favorites will not be cleared.
To do so, first, head to the Start Menu and click on the ‘Edge’ icon present under the ‘Pinned apps’ section to continue. Otherwise, type Edge in the browser to perform a search for it.
Then, on the Microsoft Edge window, click on the ‘ellipsis’ icon present in the top right corner to reveal the overflow menu.
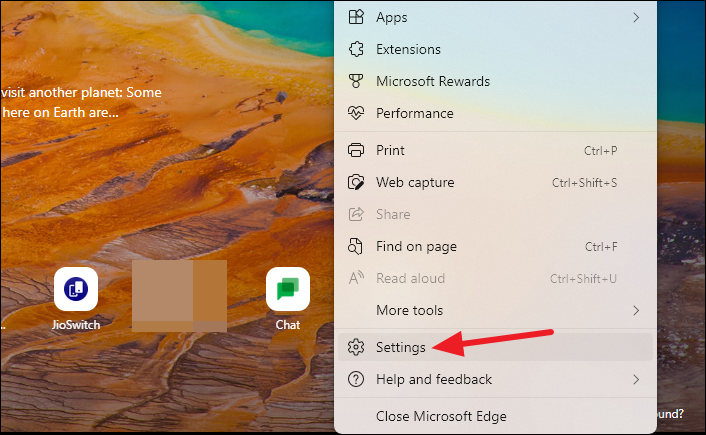
Next, click on the ‘Settings’ option from the list to continue. This will open the browser Settings in a separate tab.
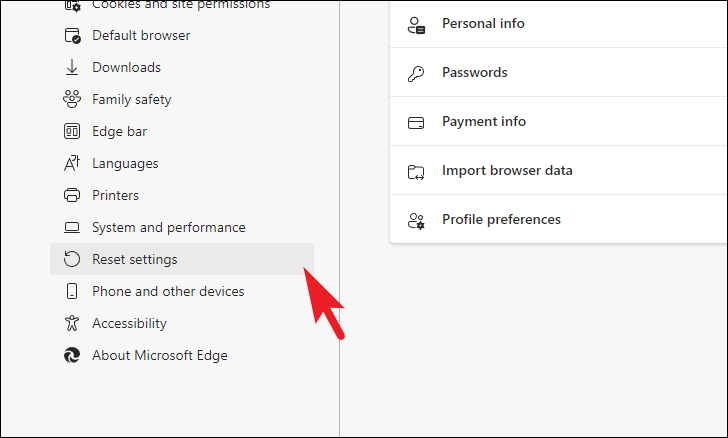
Now, locate and click on the ‘Reset settings’ tab present in the left sidebar of the window to proceed.
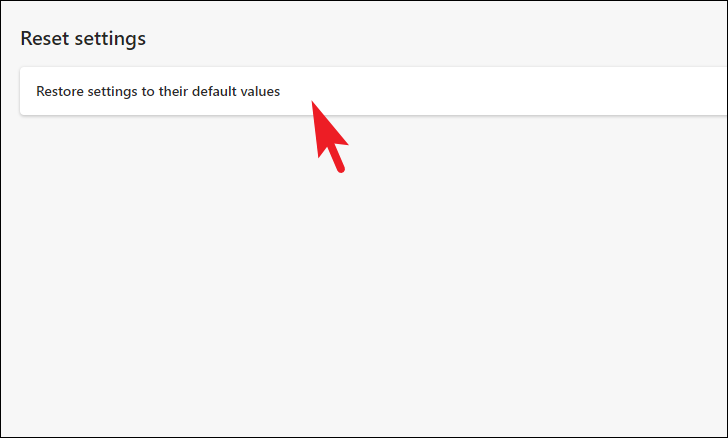
After that, from the right section of the webpage, click the ‘Restore settings to their default value’ button present under the ‘Reset settings’ section to proceed. This will open a separate overlay window on your screen.
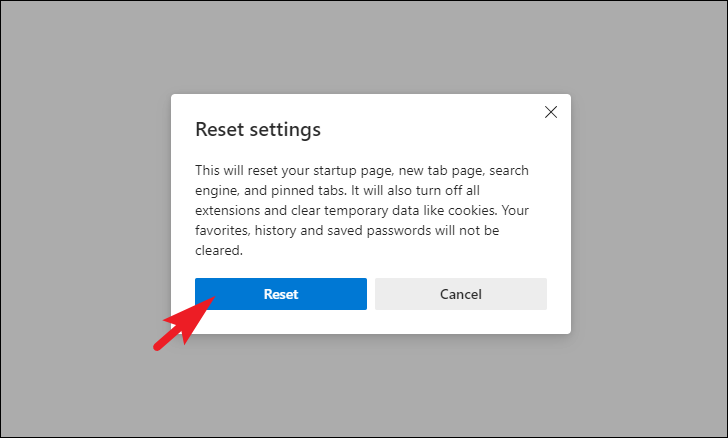
Now, from the overlay window, read the information presented to you carefully and then click on the ‘Reset’ button to continue. The Edge browser will now reset itself.
Once the reset is complete, close the browser and launch again. Then, check if the issue still persists.
Clear Cache, Site data, and Browser History
Deleting site data including cookies and cache is not recommended as it will log you out of all accounts and also reset your preferences on all websites. However, if the above methods did not work, clubbing this fix with it just might do the trick for you.
To do so, from the Edge home screen, click on the ‘ellipsis’ icon present in the top right corner of the window to reveal the overflow menu.
Then, locate and click on the ‘Settings’ option from the list to continue. This will open the Settings page in a separate tab.
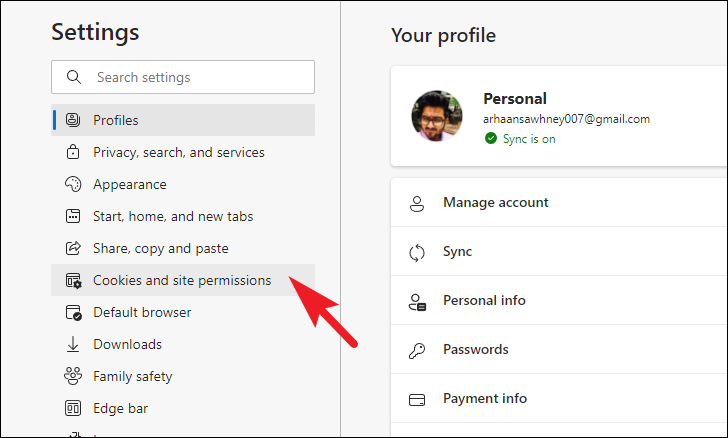
Then, locate and click on the ‘Cookies and site permissions’ option present on the left sidebar of the settings page.
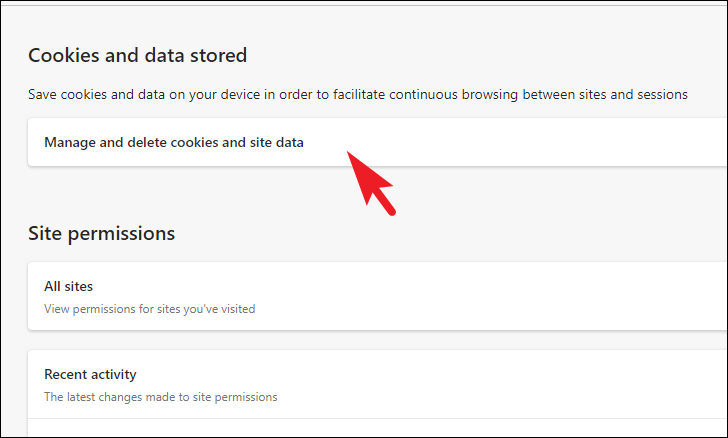
After that, from the right section of the screen, click on the ‘Manage and delete cookies and site data’ option present under the ‘Cookies and data stored’ section to proceed.
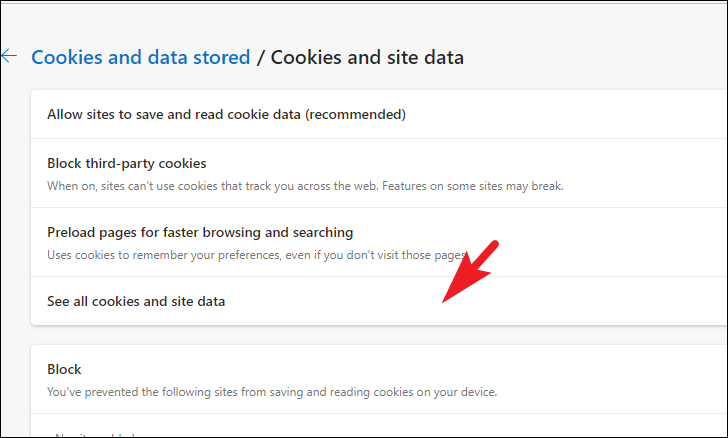
Now, on the next screen, click on the ‘See all cookies and site data’ option present under the ‘Cookies and site data’ section.
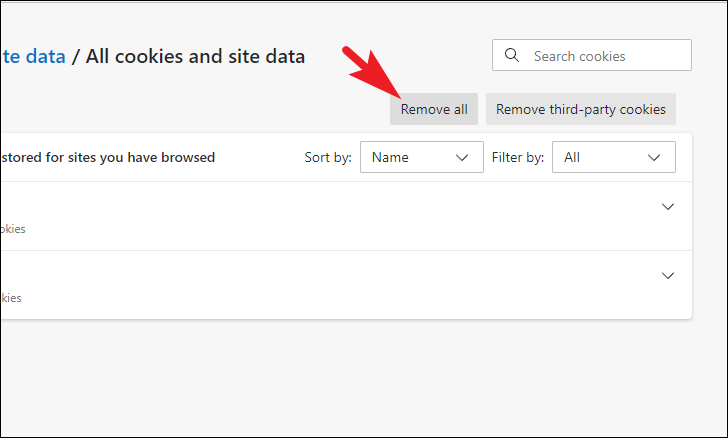
Finally, on the next screen, click on the ‘Remove all’ button to delete all site data and cookies from Edge.
Once deleted, exit the browser and launch it again to check if it resolved the issue for you.
Remove Edge Extensions
Over the period of time, you tend to add a ton of extensions to your browser. However, not many are regularly updated and might develop incompatibility with the latest iteration of the browser and be the root cause behind the issue. Hence, removing them one at a time and then reinstalling them might help you with pinpointing the faulty extension.
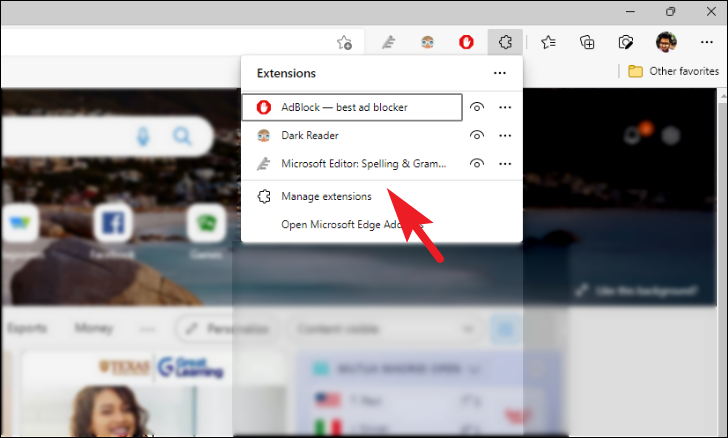
To remove unwanted extensions, from the Edge home page, click on the ellipsis icon (three horizontal dots) present on the top right corner of the window to reveal the overflow menu. Then, from the menu, locate and click on the ‘Extensions’ option. This will display an overlay prompt on your screen.
From the prompt, click on the ‘Manage extensions’ option to continue. This will open the extensions page in a separate tab.
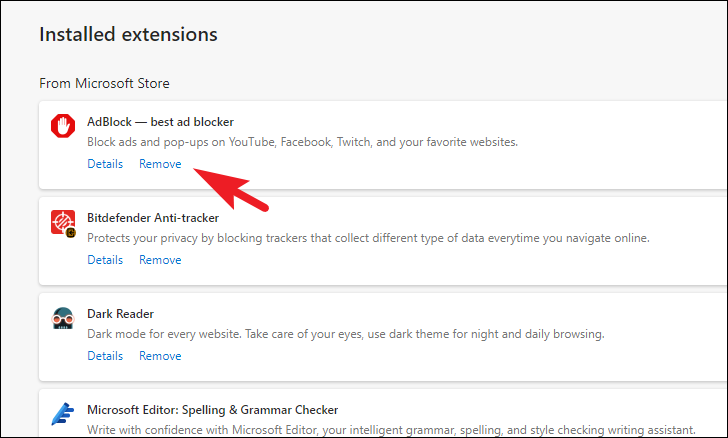
Now, under the ‘Installed extensions’ section, locate the extensions that you do not use frequently, and click on the ‘Remove’ button present on the tile to delete the extension. This will bring up a prompt on your screen.
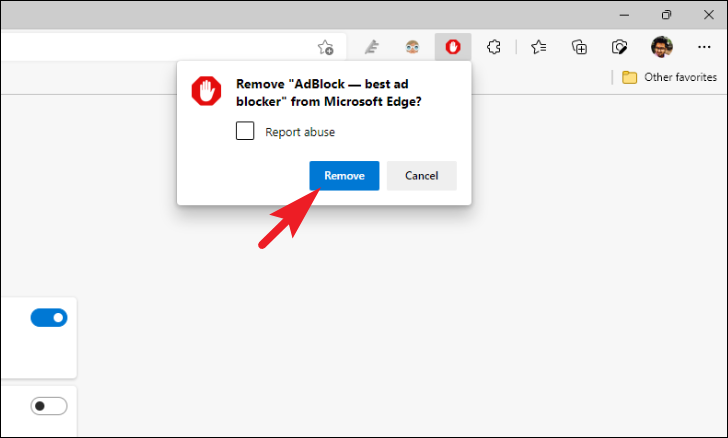
Now, from the prompt displayed on your screen, click on the ‘Remove’ button to uninstall the extension.
Now repeat the above process for all the extensions present on your browser. Once removed, relaunch the browser and again add the earlier installed extensions one by one to know which specific extension was causing the issue.
There you go folks. Hopefully, this guide will help you resolve the not responding issue or Edge not working problem on your Windows 11 PC.
Member discussion