Microsoft Store is a marketplace or a platform from where you can purchase and download various applications as well as games. It functions similarly to the Apps Store in iOS or the Play Store on Android but for your Windows 11 PC. The Store has a decent selection of apps and games available for you to download.
Even though the Microsoft store offers a convenient and secure platform to download and install apps, it has not been very reliable since its introduction in October 2012. It is very common for the Microsoft Store to encounter various problems like crashing, not opening at all, or being unable to download apps.
What Causes Microsoft Store to Not Open on Windows 11?
Numerous factors can be responsible for causing the ‘Microsoft Store not opening’ issue. This is due to the app being dependent on certain settings apps or services. Some of the reasons why you might be facing this issue are:
- Faulty internet connection
- Outdated version of Windows
- Wrong Date & Time settings
- Wrong Country or Region settings
- Broken or corrupted cache date
- Having Anti-virus or VPN enabled
- Windows update services being disabled
Now that we know about the possible causes of this issue, let’s move on to the solutions or methods to eliminate this issue. We will start with some basic adjudgments and move towards some advanced solutions for you to try if the basic ones fail to resolve the issue.
1. Check the Internet Connection
It is needless to say that you must have a proper internet connection to access the Microsoft store. If your internet connection is slow or faulty, the Microsoft Store won’t be able to connect to the Microsoft servers to receive or send any data. Thus, before you go ahead and make any other change, it would be a wise choice to see if the internet isn’t causing the problem.
There are a few ways to make sure that you have a decent internet connection. You can go to Network settings to check if you are connected to the internet. Open up the Settings menu by pressing Windows+i on your keyboard by searching for it in Windows Search.
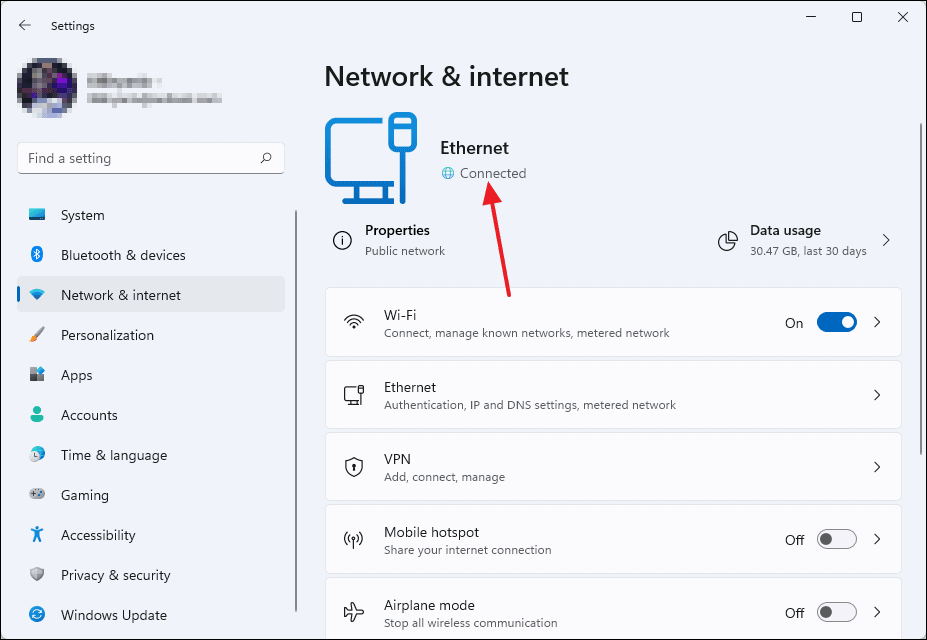
On the Settings window, click on ‘Network & internet’ from the left panel. Now make sure that under the bold Ethernet text, it says ‘Connected’ next to the blue globe icon. If you are connected to Wifi instead of Ethernet, then the bold text shows Wifi in place of Ethernet but the rest will be the same.
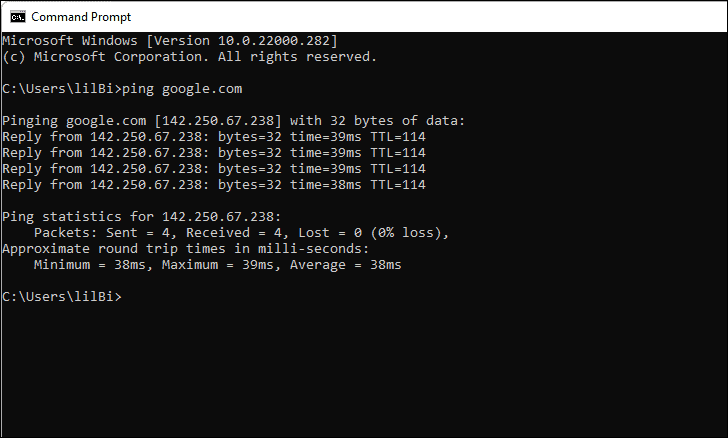
Alternatively, you can also use the Command Prompt window to ping to any IP such as google.com to see if you get consistent pings. If you do not get consistent pings and see texts like ‘Request time-out’, this means you have a faulty internet connection.
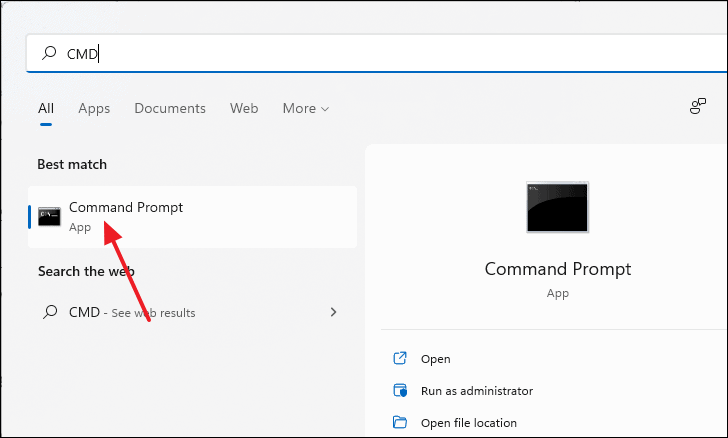
To check it by yourself, open up the Command Prompt window by typing CMD in Start Menu Search and selecting it from the search results.
On the Command Prompt window, type the following command in the command line and press Enter.
ping google.com
Make sure that it shows 0% loss which refers to packet loss. If you have a high percentage of packet loss or your average ping is above 80-100ms then you have a slow or faulty internet connection which is causing the Microsoft Store not opening issue. In this case, contact your internet provider.
2. Reset Microsoft Store Cache
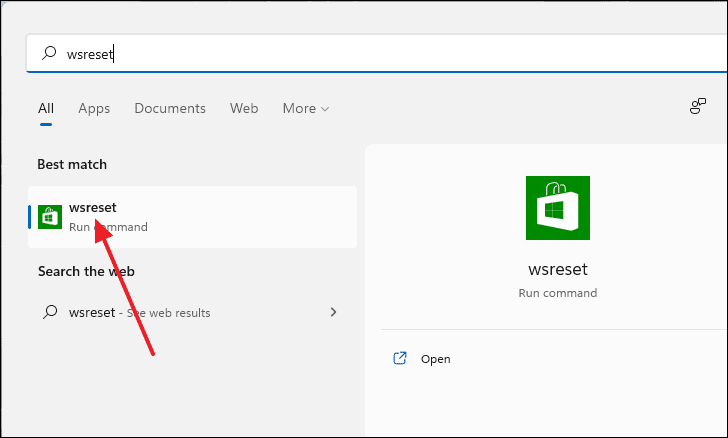
Resetting the Store cache is a very simple and quick process. It can remove any broken or corrupted file present in the cache data which might be blocking you from opening the store. All you have to do is type ‘wsreset’ in Start Menu search and select it from the search results
Now a black console window will appear and it is normal. Be patient and wait for it to automatically finish the process and close itself.
Once the console closes, the cache data will be deleted and the Microsoft Store will open.
3. Re-register Microsoft Store Using Powershell
As the Microsoft Store is a system application, it cannot be removed and reinstalled by any normal means and it is also not a good idea to do so. But you can use the Windows PowerShell console to re-register the application to the system and it might remove any bugs or glitches.
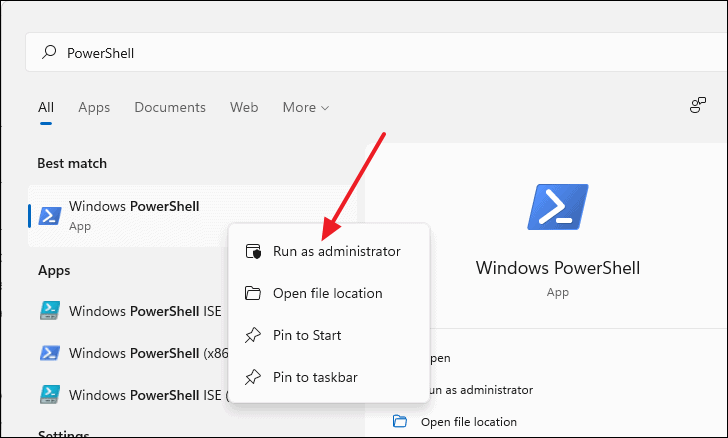
First, type ‘PowerShell’ in the Windows search. Right-click on it from the search results and select ‘Run as administrator’.
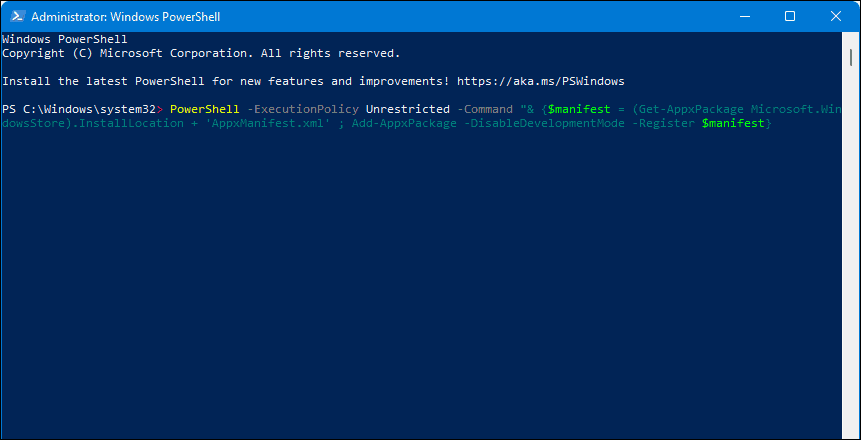
On the PowerShell window, copy & paste the following line in the command line and press Enter.
PowerShell -ExecutionPolicy Unrestricted -Command "& {$manifest = (Get-AppxPackage Microsoft.WindowsStore).InstallLocation + 'AppxManifest.xml' ; Add-AppxPackage -DisableDevelopmentMode -Register $manifest}
Try accessing the Microsoft Store now and see if it works.
4. Use Windows Store Apps Troubleshooter
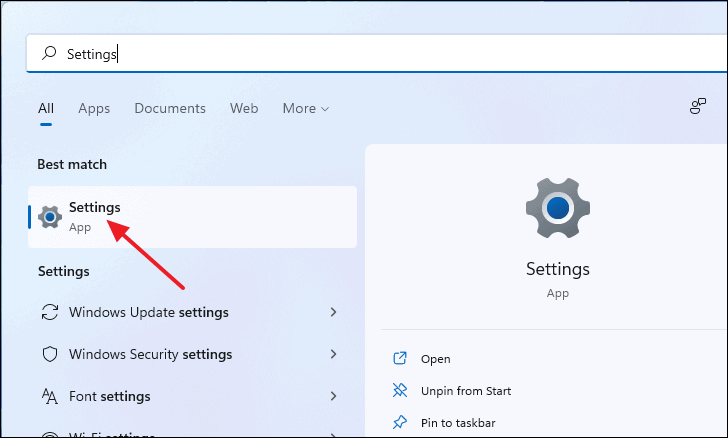
Microsoft is aware of the Store application breaking. Thus Windows 11 comes with a built-in troubleshooter for Microsoft Store. To access the troubleshooter, first, open up Settings by pressing Windows+i on your keyboard or by searching for it in Windows Search.
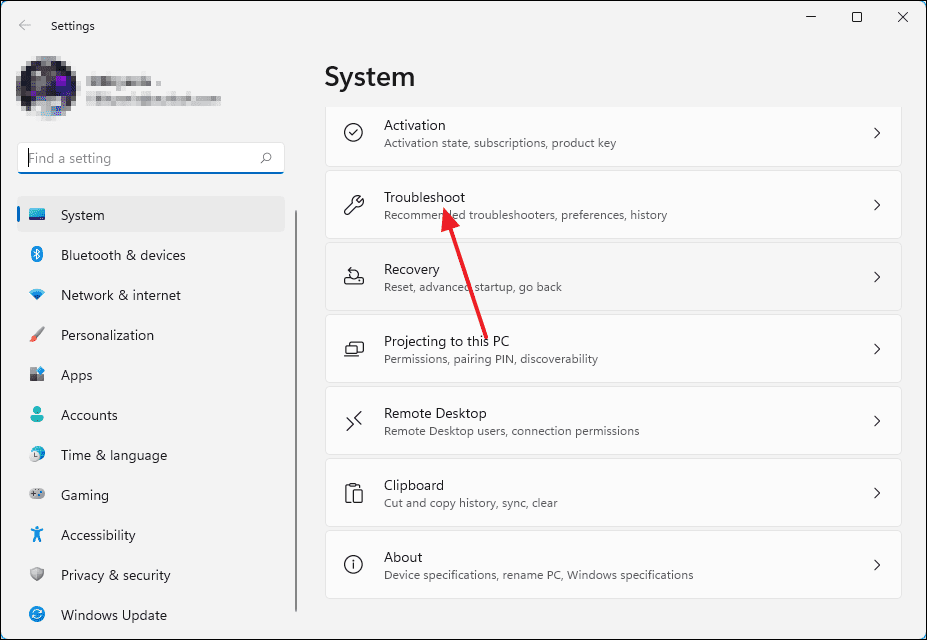
On the Settings window, scroll down on the right panel and select ‘Troubleshoot’.
After that, under the Options section, click on ‘Other troubleshooters’.
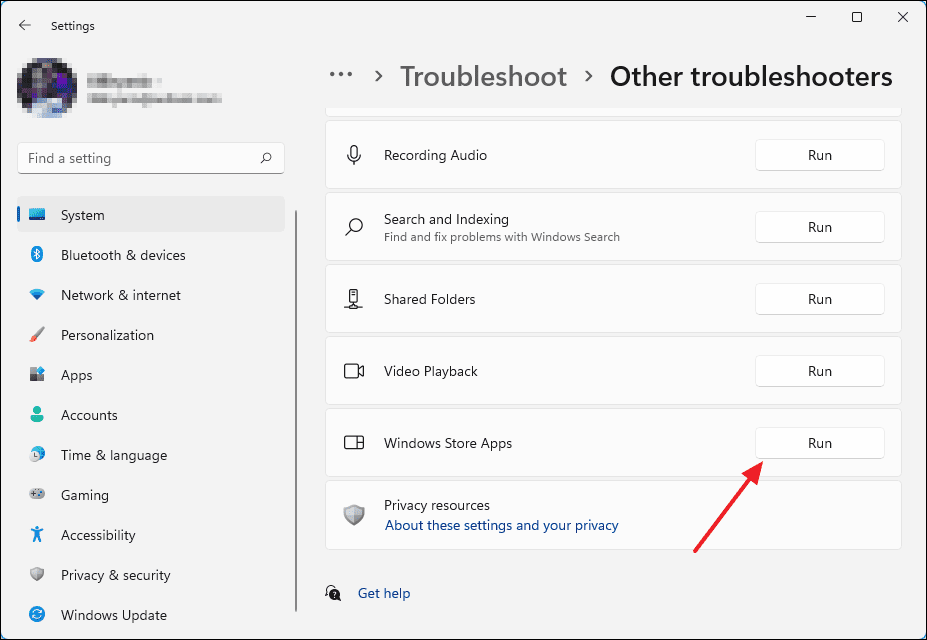
From there, scroll down until you see Windows Store Apps and click on the ‘Run’ button next to it.
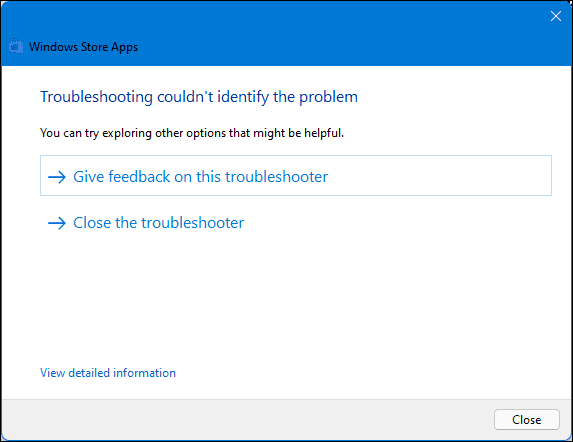
Now, wait for the troubleshooter to identify the problem.
If the troubleshooter manages to identify the issue, it will show up here and you will be given the options to resolve it.
5. Reset or Repair the Microsoft Store Application
One of the easiest methods of fixing Microsoft Store not working is just simply resetting or repairing the application using the App settings menu. First, open up settings by right-clicking on the Start button on your Taskbar and selecting ‘Settings’.
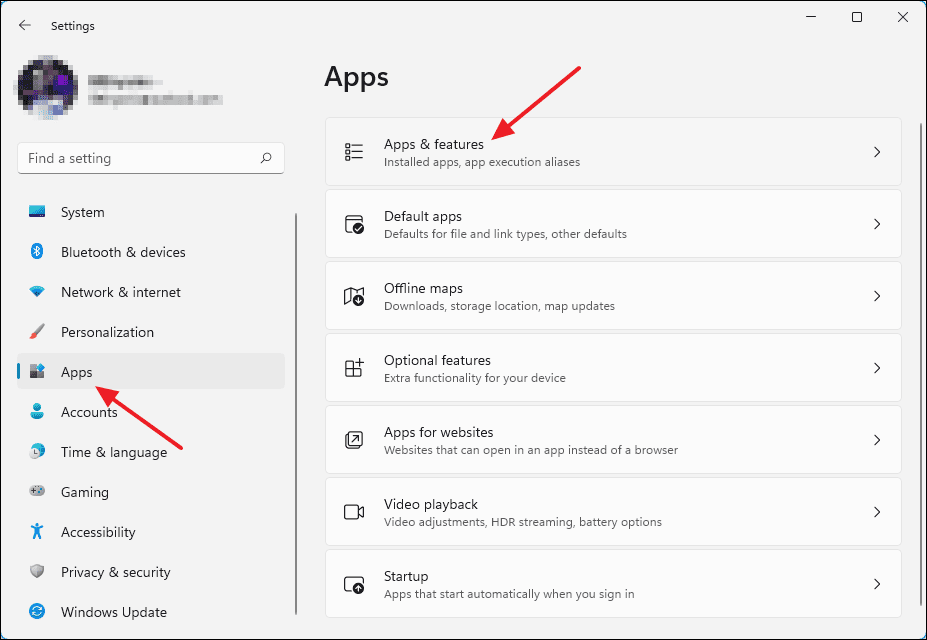
On the Settings window select Apps from the left panel and then select ‘Apps & features’ from the right panel.
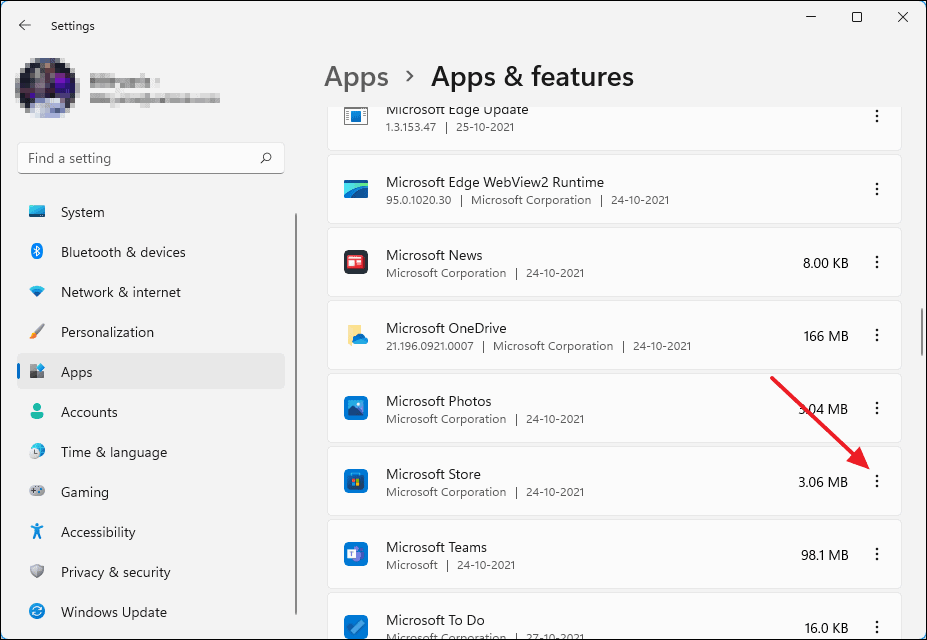
After that, scroll down until you find Microsoft Store and click on the 3 vertical dots on the opposite side of the text.
Now, click on ‘Advanced options’.
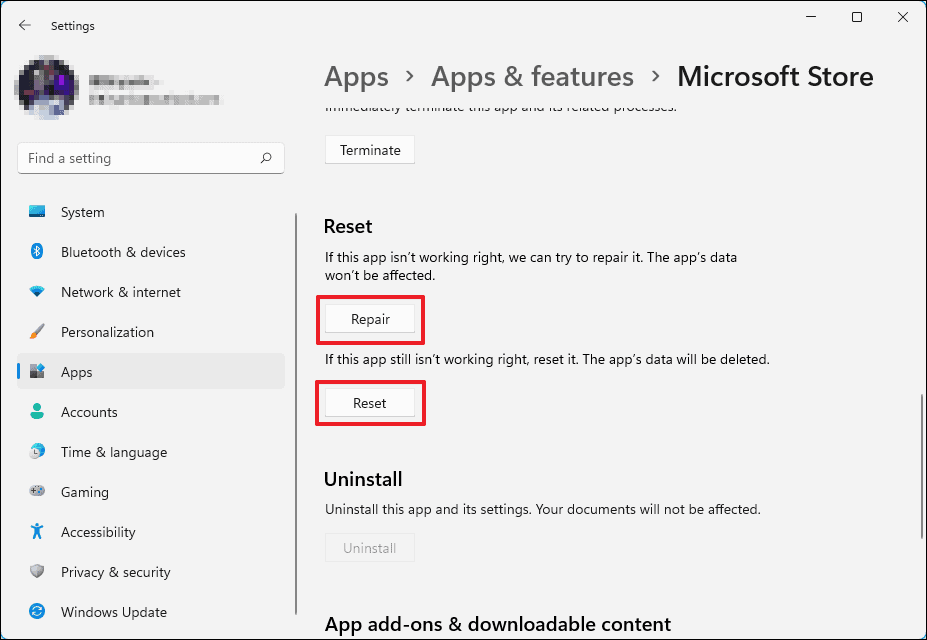
After clicking on ‘Advanced options’ if you scroll down, you will get the option to ‘Repair’ or ‘Reset’ the Microsoft Store application. Try both and see if this fixes the “Microsoft Store not opening issue”.
6. Make Sure Windows Update Services are Enabled
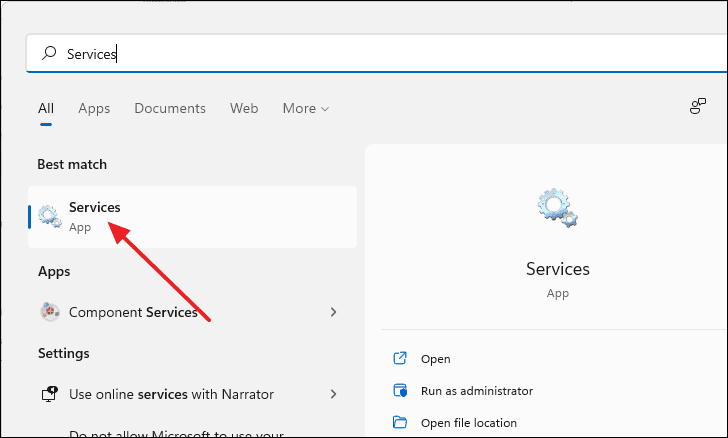
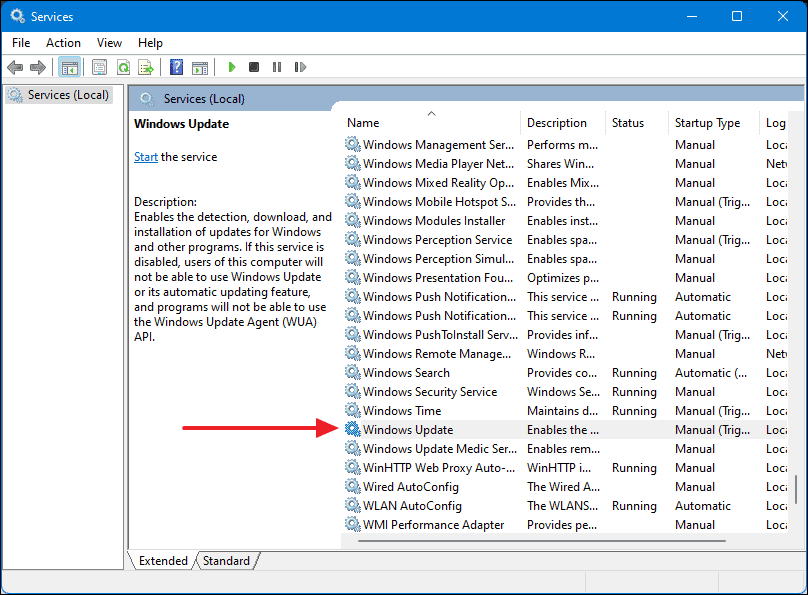
Microsoft Store relies on many internal services and one of them is the ‘Windows Update’ service. If this service is turned off for some reason, it causes many issues in the Microsoft store. To make sure this service is running, type ‘Services’ in Windows search and select the app from the search results.
You will be presented with a list of local services running on your PC. Locate ‘Windows Update’ from the list. Double-click on the Windows Update service.
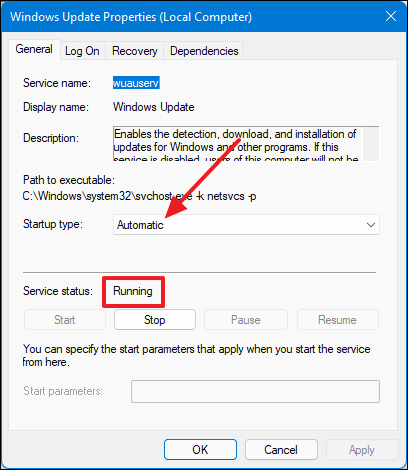
Now, a dialog box will appear called Windows Update Properties (Local Computer). Here, make sure the Startup type is set to ‘Automatic’ and it says ‘Running’ next to Service status. If not then just click on the ‘Start; button below and you are done.
7. Check and Install any Pending Windows Update
Windows updates do not only bring new features but also come with bug fixes, performance improvements, numerous stability improvements, and many more. additionally, when Microsoft does notice bugs or issues in the OS, they push hotfixes via updates. Thus, simply keeping your Windows 11 computer up to date can automatically resolve your issue.
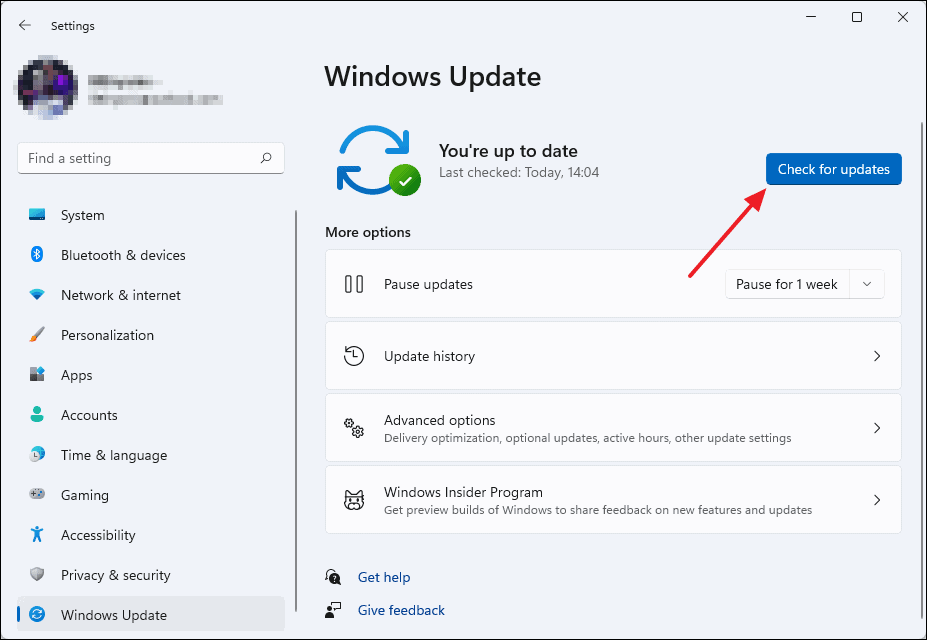
To check if you have the latest version of Windows installed, first, open up the Settings menu by pressing Windows+i. Now on the Settings window, select ‘Windows Update’ from the left panel and click on the blue ‘Check for updates’ button on the right panel.
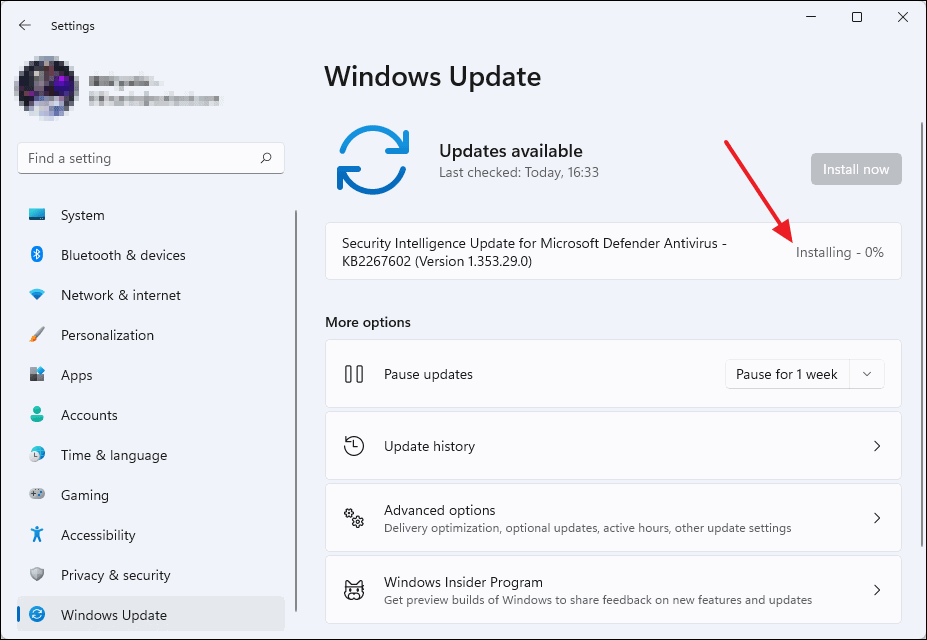
Once the system finishes searching for updates, it will automatically download and install any update that is available. Wait for the process to finish and you might or might not have to restart your PC depending on the type of update.
8. Make Sure You are Signed into Your Microsoft Account
It should not come as a surprise that you have to be signed in to your Microsoft account if you wish to download or purchase anything from the Microsoft Store. To check if you are signed in to your Microsoft account, open up Settings by searching for it in Start Menu Search or pressing Windows+i on your keyboard.
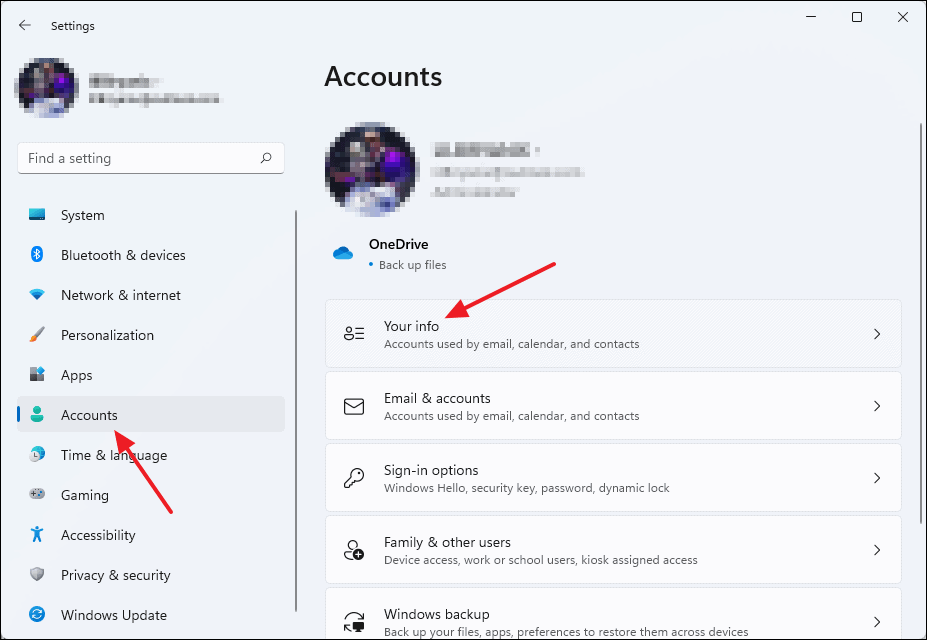
On the Settings window, select ‘Accounts’ from the left panel and select ‘Your info’ from the right panel.
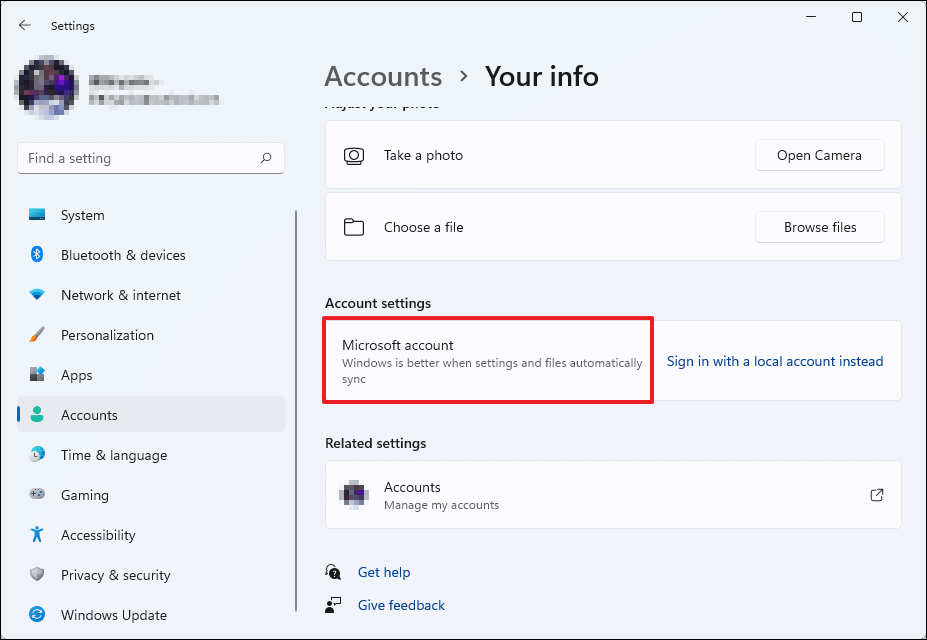
Now, under the Account settings section if it says ‘Microsoft account’ then you are logged into your Microsoft account. Otherwise, you have to sign in to your Microsoft account.
9. Fix Date and Time Settings
If you have the wrong date and time set on your PC, it can prevent Microsoft Store from opening. This is because the Microsoft store will be unable to sync the date and time of your computer and the server and this can cause it to crash constantly.
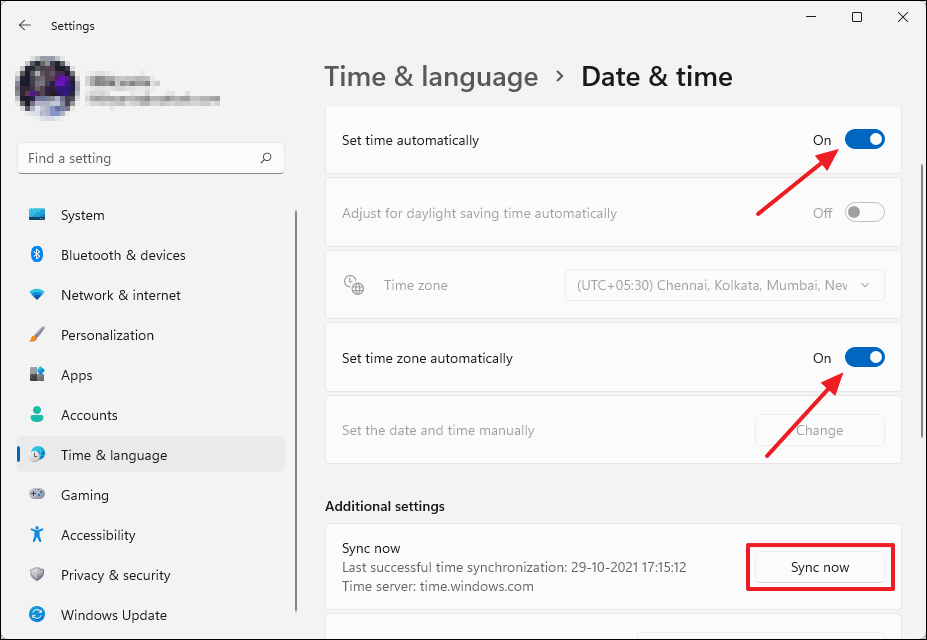
To set the proper date and time on your computer, start with launching the Settings menu by pressing Windows+i on your keyboard. On the Settings window, Select ‘Time & Language’ from the left panel and then click on ‘Date & Time’ on the right panel.
Now, set the toggles next to ‘Set time automatically’ and ‘Set time zone automatically’, to ‘On’. After that, click on the ‘Sync now’ button under the Additional settings section and your time and date will be updated automatically.
10. Set Correct Region on your PC
Having the correct region selected is very important for Microsoft Store to work properly. Microsoft has different variations of Microsoft Store depending on the region. The store application on your PC needs to connect to the proper regional server to enable numerous features like regional currency, payment options pricing content censorship, etc.
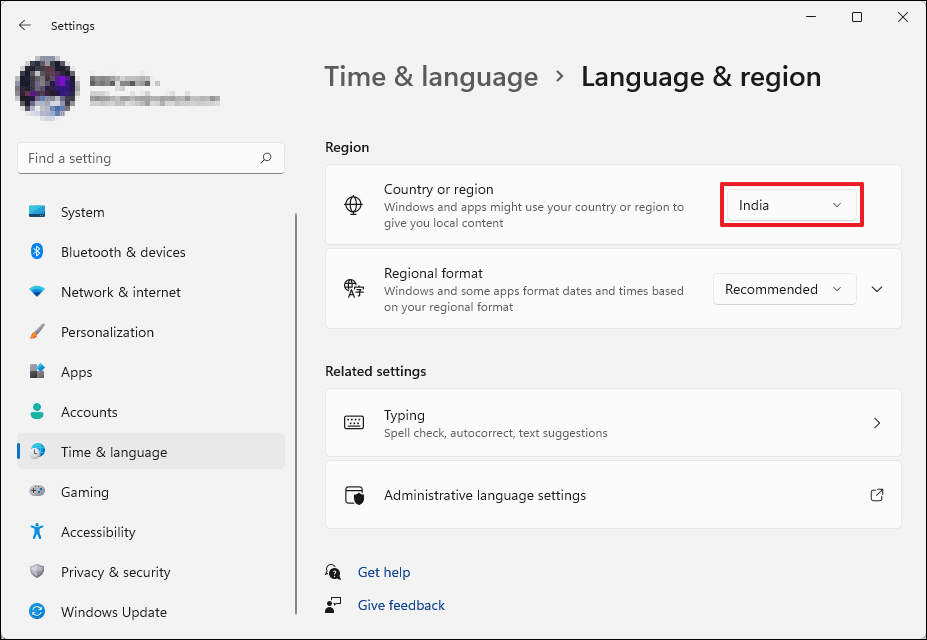
To check or change the Region Settings, first, open up Settings by pressing Windows+i on your keyboard. After the Settings window opens, click on ‘Time & Language’ from the left panel and select ‘Language & Region’ from the right panel.
After that, scroll down until you see the Region section. Use the drop-down menu labeled ‘Country or region’ to select your region and it’s done.
11. Turn Off Proxy Servers
Having Proxy servers turned on is good for reinforcing privacy but it can interfere with the connectivity of the Microsoft Store and stop it from opening. To disable proxy, first, open up Settings by searching for it in the Start Menu search.
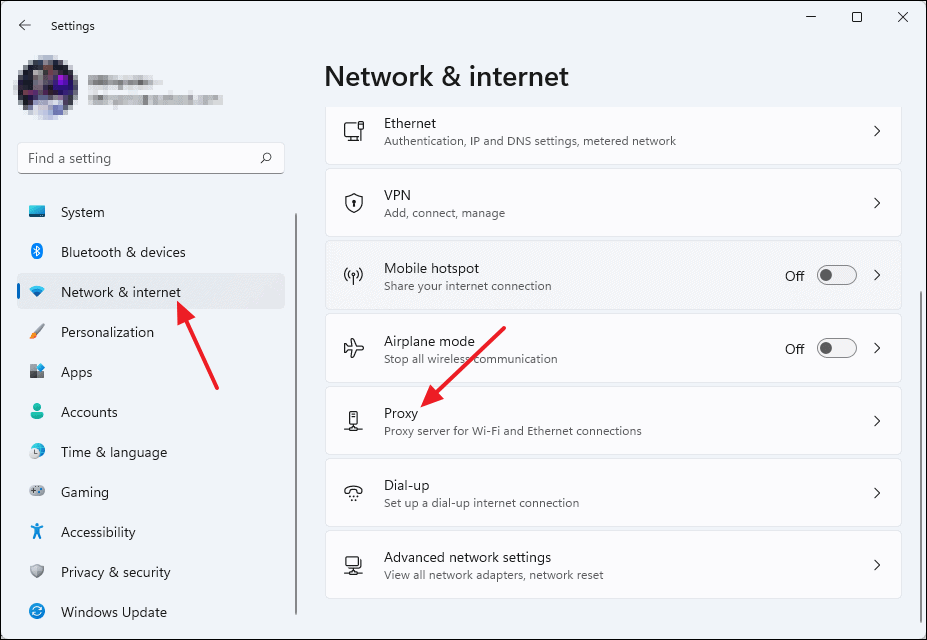
On the Settings window, first, click on ‘Network & internet’ from the left panel and then click on ‘Proxy’ from the right panel.
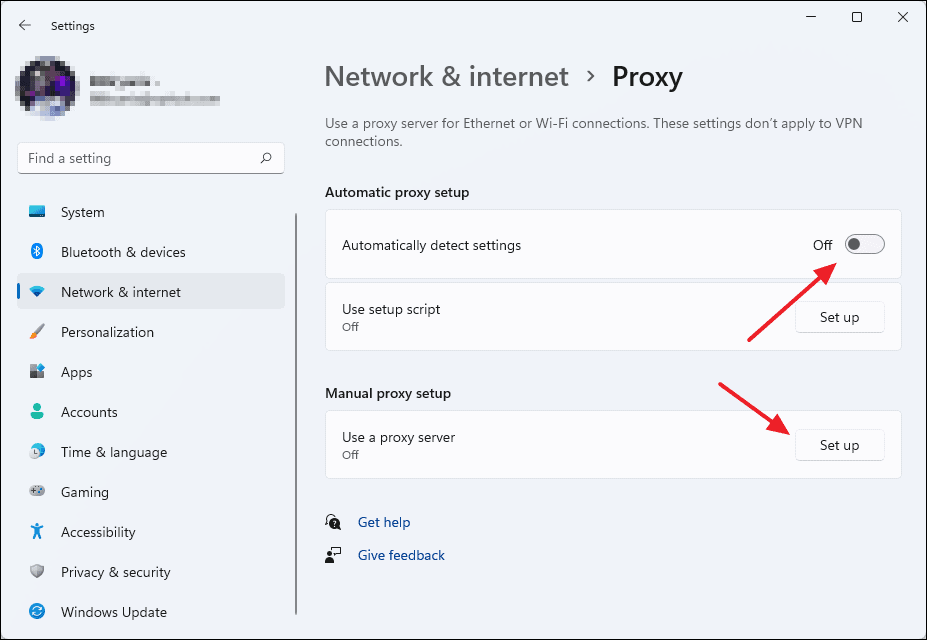
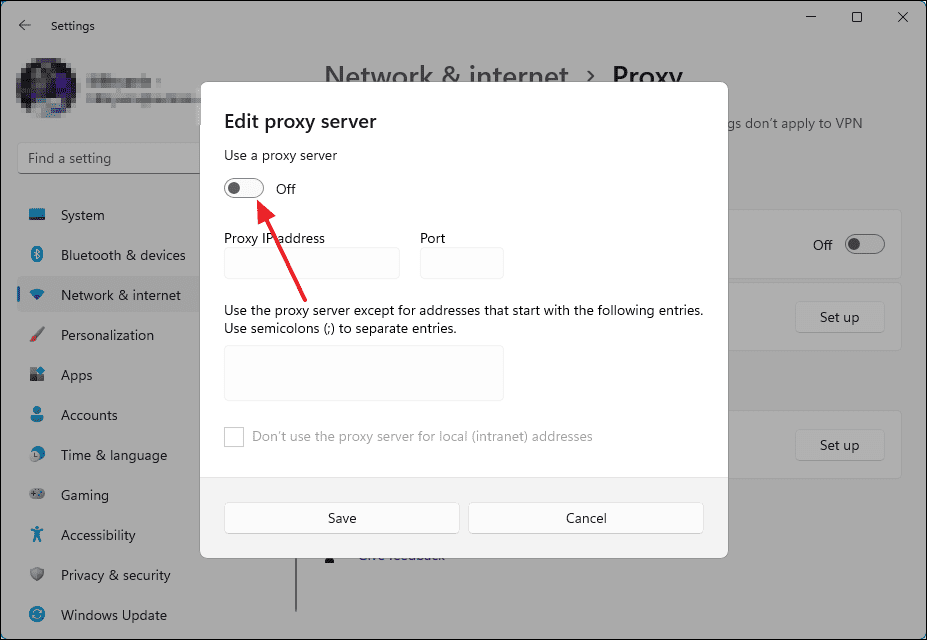
Now, first, make sure that under the Automatic proxy setup the toggle labeled as ‘Automatically detect settings’ is set to Off. After that click on the ‘Set up’ button under the Manual proxy setup section to open up manual proxy settings.
A dialog box will appear called Edit proxy server. Turn of the toggle named Use a proxy server and you are done.
12. Use a custom DNS server
It can be possible that the Microsoft Store is not opening because the DNS you are using is blocking the application from accessing the serves. If this is the case, maybe changing the DNS can resolve this issue. We recommend you to use Google’s DNS as it is compatible with every internet provider and does not block access to any websites or servers.
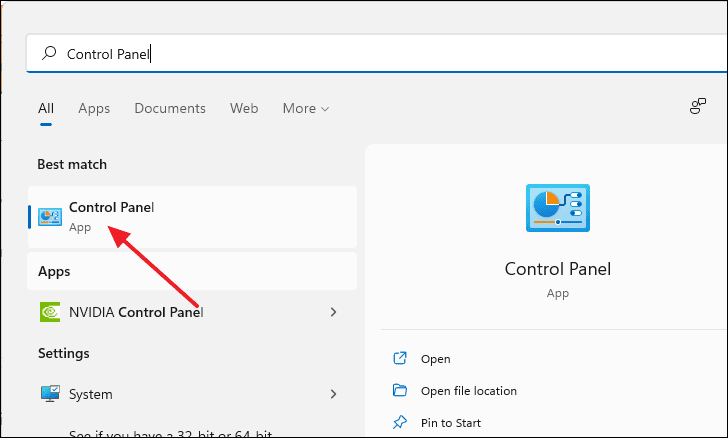
Changing DNS settings on your PC. You can set a custom DNS for the network you’re using right on your PC as well. To start, first, open Control Panel by searching for it in Windows Search.
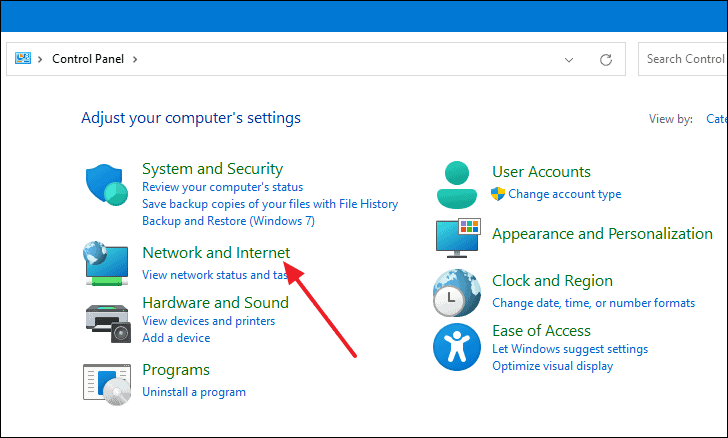
Once you are on the Control Panel window, click on ‘Network and internet’.
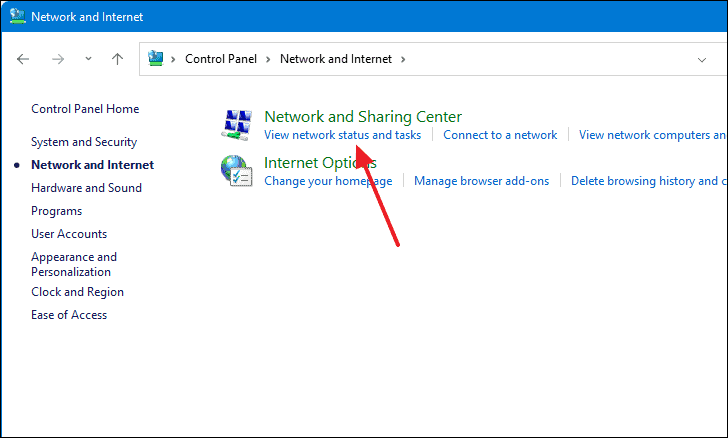
After that, click on ‘View network status and tasks’ under the Network and Sharing Center section.
Now, from the left side of the window, select ‘Change adapter settings’.
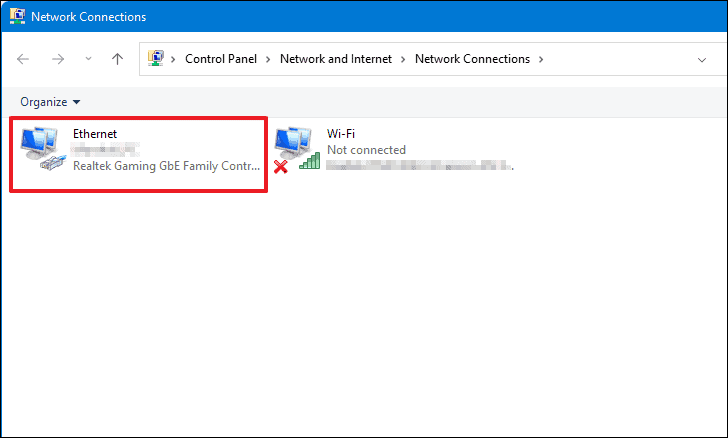
A new window will come up called ‘Network connections’. From here, select the network adapter in use by double-clicking on it.
Now, a dialog box will pop up labeled as Ethernet Status. Click on the Properties button to continue.
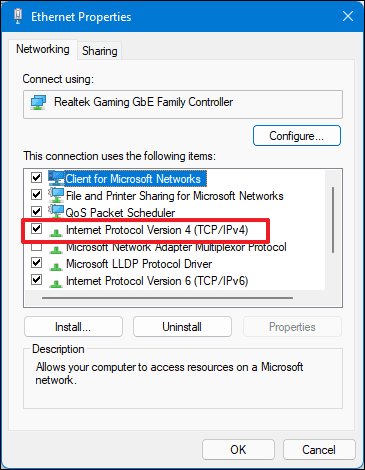
After that, double-click on Internet Protocol Version 4 (TCP/IPv4)’.
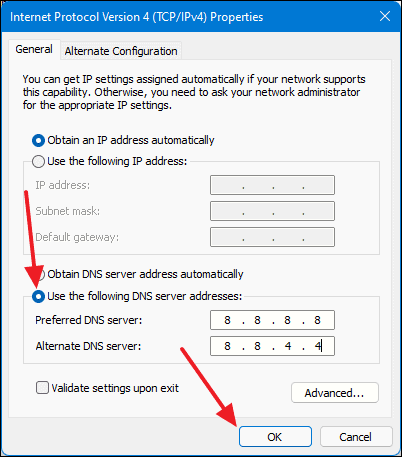
Another dialog box will appear. Select the ‘Use the following DNS server addresses’ near the bottom of the dialog box and put 8.8.8.8 inside the Preferred DNS server text field and 8.8.4.4 inside the Alternate DNS server text field. Then, hit the ‘OK’ button to save the changes.
Changing DNS in router settings. To get to your router settings, open your browser and type on your address bar, and press Enter. This will take you to your router’s homepage. Once you are there, log in with your credentials.
After you log in, select the option that says ‘Internet’.
After that, put 8.8.8.8 inside the Primary DNS text field and 8.8.4.4 in the Secondary DNS text field. The Secondary DNS is not mandatory and you can skip it if you want to. Lastly, click on ‘Save’ and your DNS will be changed.
Note: If you have a router from a manufacturer other TP-link, the process will remain fairly the same. Just look for similar settings and you will be able to change the DNS of your router.
This is how you can change your DNS to the Google DNS if you are having Microsoft Store not opening issue.
13. Uninstall your Antivirus Software
It is possible that the reason you are facing Microsoft Store not opening issue is that you have an Antivirus installed. Antiviruses do sometimes fail to distinguish the difference between a system process and any other network activity and thus interrupt many system applications like Microsoft Store.
In this case, it is best to uninstall the Antivirus and you can do it from the Control Panel. First, open up the Control Panel by searching for it in Windows Search. Open it by selecting it from the search results.
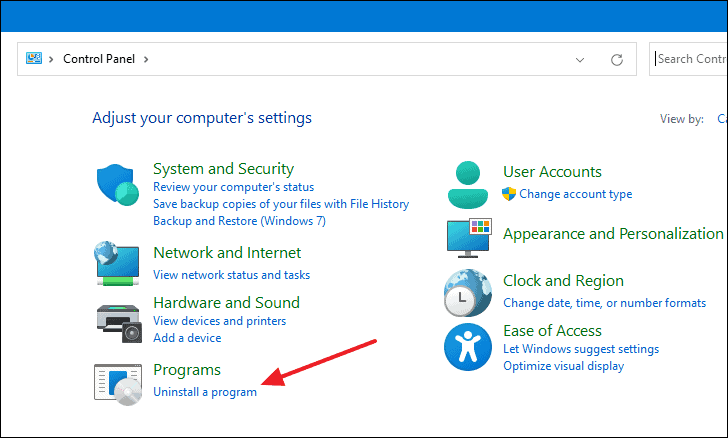
On the Control Panel window, click on ‘Uninstall a program’.
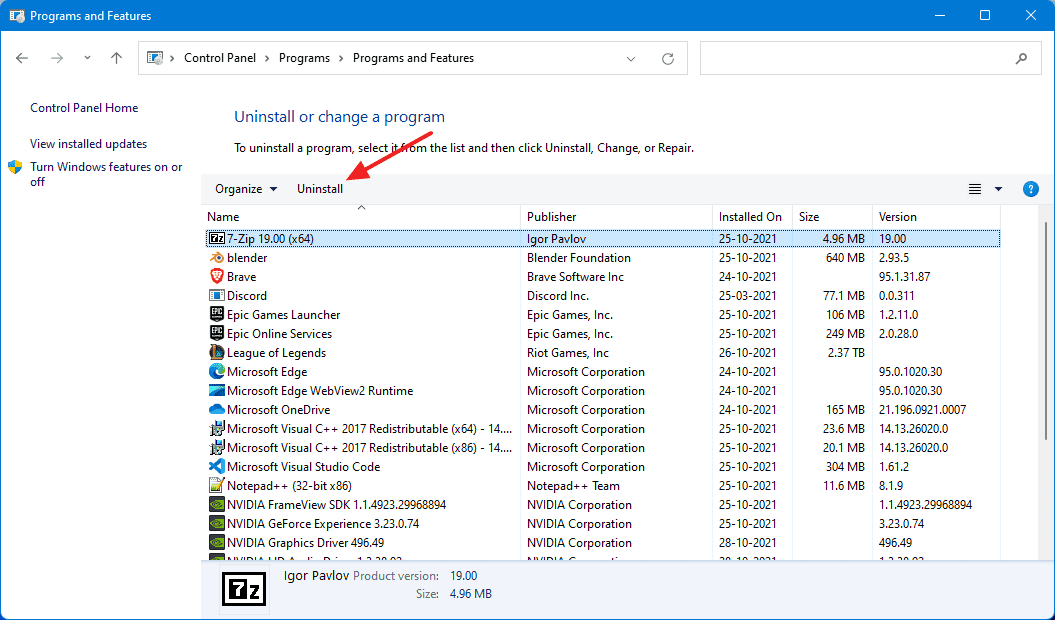
Now you will get a list of all the installed software on your computer. You can uninstall the antivirus by selecting it from the list and clicking on the Uninstall button.
14. Disable VPN on your PC
VPNs can be very useful to browse the internet safely or bypass content moderation. But because of how VPN functions, it might not be able to connect to Microsoft Store servers. On the other hand, there are cases where some users can only connect to Microsoft Store by using a VPN.
There is no concrete list of which VPN is allowed to access Microsoft Store servers. It depends on which one you are using and its connectivity. If you are using one and unable to open Store then try turning off the VPN and open then open the Store.
These are the methods that you can use to resolve the ‘Microsoft Store not opening’ issue in Windows 11.
Member discussion