Even though the Windows Subsystem for Android (WSA) now runs on Windows 11 PCs, as of now, there is no direct way to transfer files between Windows 11 and WSA. It’s because WSA runs inside its own container and uses a different file system.

Now, Microsoft has announced that Android 13 support is coming to Windows 11. And with it, we’ll have a handful of new features, including file transfer between WSA and Windows 11. But there’s still time in it. Meanwhile, there are still a few workarounds you can use to transfer files to WSA from Windows 11 and vice versa.

In this article, we will see how to access and transfer files to WSA storage and vice versa in Windows 11 using Android Debug Bridge (ADB) command line tool and Android apps.

If you haven’t installed Windows Subsystem for Andriod (WSA) yet, you can easily install it by installing the ‘Amazon Appstore’ app (which will automatically install WSA) from Microsoft Store or by using this link.

Alternatively, if you are unable to download and install Windows Subsystem for Android (WSA) from Microsoft Store or if the Amazon Appstore is not available in your country or region, you can check out this article to manually install WSA on your Windows 11 PC.

Copy Files between Windows 11 and Windows Subsystem for Android using the ADB command line 

The Android Debug Bridge (ADB) is a command line tool used to communicate with your android devices from a computer and perform various tasks such as transferring files, installing/uninstalling apps, debugging, and more. You can also use the ADB command line tool to copy files from your Windows 11 PC to your WSA storage and vice versa. Android Debug Bridge (ADB) is included in the Android SDK Platform-Tools package, so you first need to install the SDK package on your computer. 

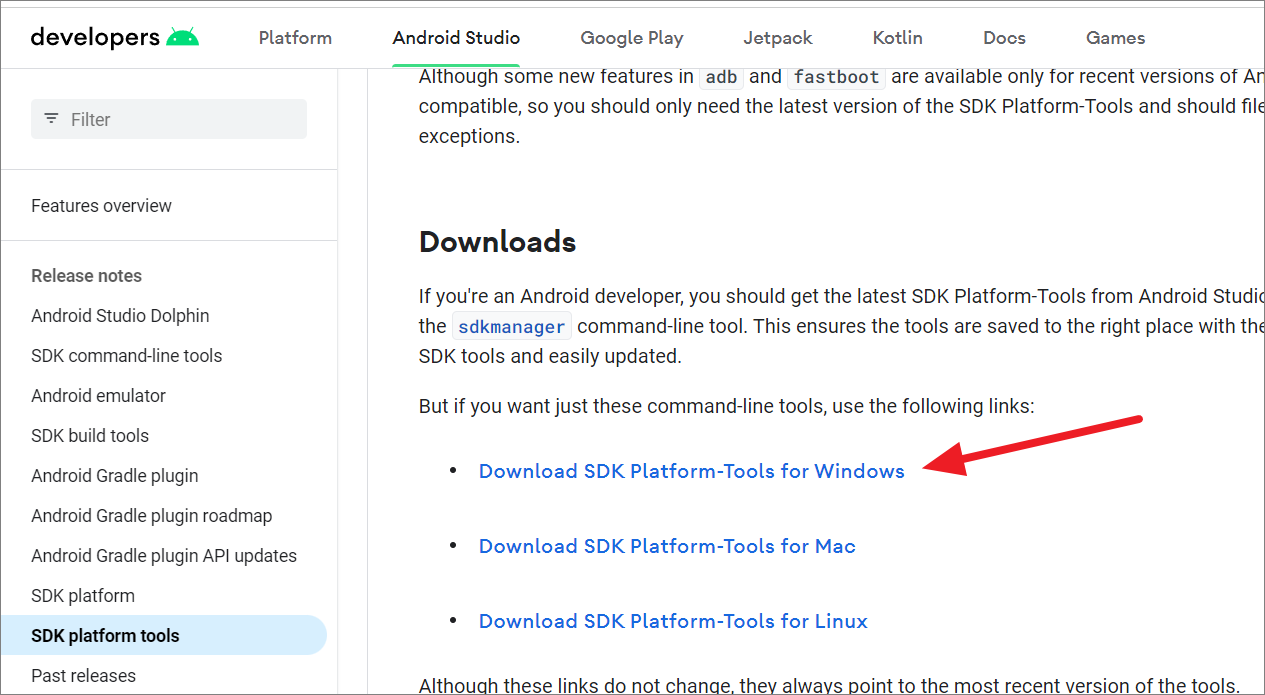
First, head to the Android SDK Platform Tools download page and click the ‘Download SDK Platform-Tools for Windows’ link under the Downloads section.

Then, agree to the terms and conditions and click the ‘Download’ button.

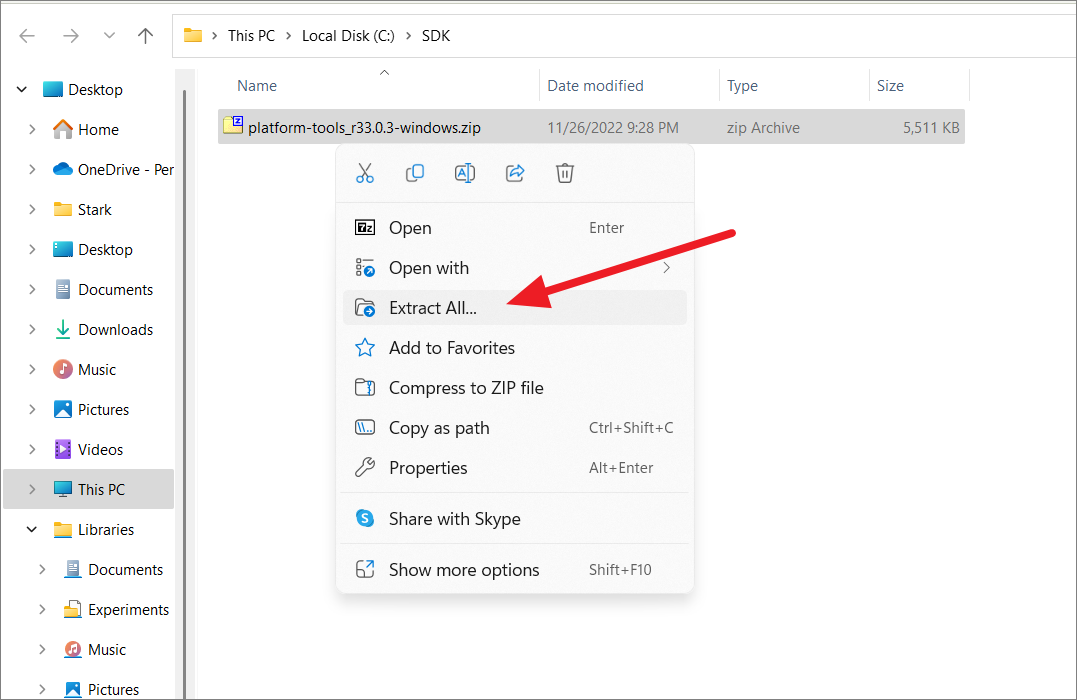
After the zip file is downloaded, extract it to an easy location and remember where you extracted it. Here we are extracting the files to a folder named SDK under the boot drive (C:).

After that, open Windows Subsystem for Android app from the Start menu.

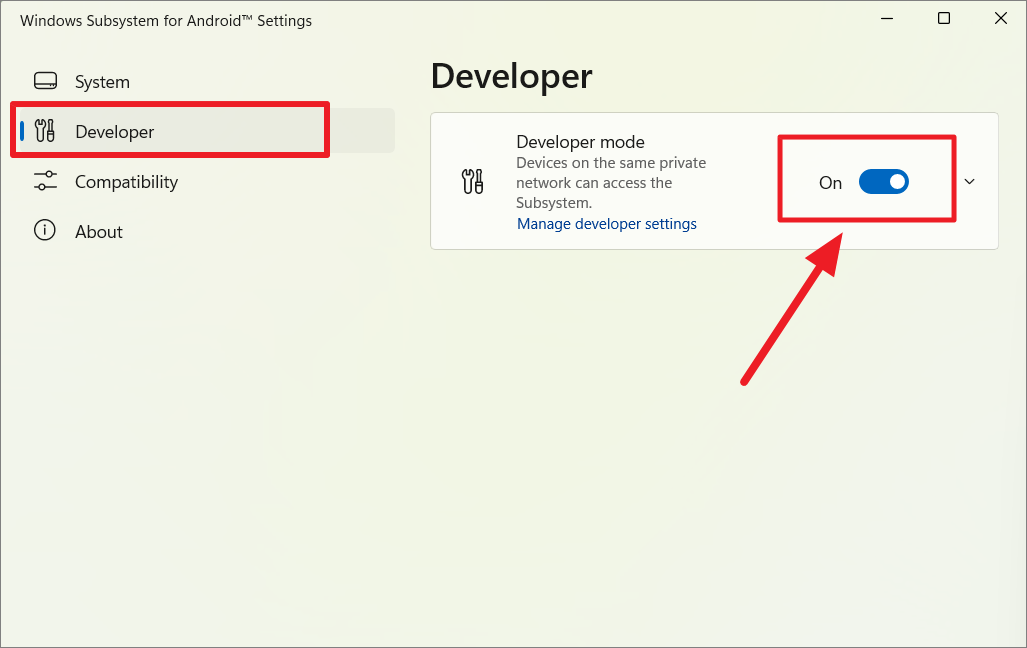
Go to the ‘Developer’ tab from the left and turn on the ‘Developer mode’ toggle on the right pane.

Then, click ‘Allow access’ in the Windows Security Alert prompt to allow app access through the firewall.

This will start the WSA hypervisor and provide you with an IP address that you can use to connect to the Android subsystem.

Next, open the command prompt and change to the directory where you have extracted the SDK zip file.

To do that, go back to the extracted folder (directory/folder for the Android SDK Platform-Tools) and open the subfolder (platform-tools). Then double-click the ‘adb.exe’ file inside that folder.

When you see the ‘Allow USB Debugging prompt?’, click ‘OK’ or ‘Yes’. Then, copy the path of that folder. Click the address bar and copy the folder path.

Then, open Command Prompt with administrative privileges. You can also search for it in the Start menu and select ‘Run as administrator’.

In the Command Prompt, use the copied path with the cd command to navigate to the SDK directory:

cd C:\SDK\platform-tools_r33.0.3-windows\platform-tools

Now, you can connect to the Windows Subsystem for Android using the IP address you note down from the ‘Windows Subsystem for Android Settings’ app.

adb connect 127.0.0.1:58526

or

adb connect localhost:58526

If you see the ‘connected to [IP]’ message, the WSA instance is connected to the Windows PC.

To verify that you are only connected to one Android device, run the following command:

adb devices

After the connection is established, you can start transferring files using the ADB push and pull commands.  

Copy Files from Windows 11 PC to Android Subsystem (WSA) using ADB Push command

To copy files from Windows to WSA you will need two things: the path for the file you want to copy from your Windows 11 (with the filename) and the path for the destination folder in the Android subsystem. 

First, you should navigate to the file you want to copy from your Windows using File Explorer. Then, click on the address bar and copy the file path. You can copy files from anywhere on your local drive. 

Alternatively, you can click right-click the file and select ‘Copy as path’.

Then, save the path in something like Notepad with the file name or make a mental note of it if it’s easy to remember.

Second, you need the path to the destination folder in the Andriod subsystem.

To get that, open the ‘Windows Subsystem for Android settings’ app again and click the arrow in a square icon next to the ‘Files’ option in the System tab.

In the Optional diagnostic data prompt box, uncheck the ‘Share my diagnostic data’, and click ‘OK’.

This will open up the Android System’s File manager. It will take a while to initialize the file manager of WSA. Here, find the location where you want to transfer the file. 

You can use this local path for Android before the folder name – /storage/emulated/0/.

For example, if you want to transfer the file to a folder named Allthings inside the Pictures folder, then your Android local path should be – /storage/emulated/0/Pictures/Allthings.

Open the Command Prompt/PowerShell window where you connected to WSA with ADB and use the following ADB push command syntax to copy the files.

adb push <local file path from Windows 11> <Android local path>

Where

  • <local file path from Windows 11> – is the full path to the file on the Windows PC with the filename.
  • <Android local path> –  is the path of location on the Android subsystem where you want to transfer the file

Example:

To transfer the image named ‘background_yoda.bmp’ from Windows to WSA, we are using the following command:

adb push C:\Software\functionList\background_yoda.bmp /storage/emulated/0/Pictures/Allthings

Make sure there’s no space in the file path and filename. In case the file name has a space in it, change it to underscore (_) or dash (-). Also, before running the above command, ensure that the ADB connection is established.

Now, you can check the location where you copied the files on the Windows Subsystem for Android and the file should be there.

Copy Files from Android Subsystem (WSA) to Windows 11 PC using the ADB Pull command

Transferring files from Windows Subsystem for Android to Windows PC can be done by using the ADB Pull command. All you have to do is use the pull command instead push and then switch the Windows file path and the Android Subsystem file path.

After the connection is established, use the below pull command syntax to copy files from WSA to Windows PC:

adb pull <Android local path> <local file path from Windows 11>

Where

  • <local file path from Windows 11> – is the full path to the file on the Android subsystem with the file name.
  • <Android local path> –  is the path of location on your Windows PC where you want to transfer the file.

Example:

To transfer an image named ‘background_yoda.bmp’ from WSA to Windows PC, we are using the following command:

adb pull /storage/emulated/0/Pictures/Allthings/background_yoda.bmp C:\Users\rajst\OneDrive\Pictures\Toru

Now, you can check the destination folder on your Windows PC and you will see the file has been pasted there.

After the files have been transferred, you can disconnect the WSA from the Windows PC with the below command:

adb disconnect 127.0.0.1:58526

Make sure to replace 127.0.0.1:58526 with the IP address of your WSA.

Transfer Files between Windows 11 and WSA using Android Apps

As you know, it is much easier to transfer files between Windows PC and WSA with an app than it is with a command line tool. To transfer files between two file systems (android and PC), first, you need to install a file transfer app. There are two ways you can install apps in WSA — using App stores like Google Store or using apk files. Installing apps with apk files is not recommended as they can contain vulnerabilities, or even malware.

Install Google Play Store on Windows 11 and Run Android apps

We need Google Play Store to install apps in WSA since the Amazon Store app has only a limited number of apps. However, Windows Subsystem for Android doesn’t come with Google Store, so you have to manually install it on your WSA container. There are two ways to install Google Store as well as Google apps — install Google Store on a pre-modified WSA package or install Google Play Store and Google Apps on an official WSA package.

If you are concerned about the reliability and security of a pre-modified WSA package, then you can follow the below instructions to install Google Store on a custom package. However, we must warn you this is a long and complicated process, so you must follow the steps exactly:

Uninstall existing Windows Subsystem for Android

Before you create a custom version of WSA that uses Android Kernel from Google Apps, you need to remove any previous installation of the Windows Subsystem for Android (WSA) from your device because you cannot run both the original and custom versions of WSA.

To uninstall any existing Windows Subsystem for Android (WSA) from your device, follow these steps:

Open Windows Settings by pressing the Win+I shortcut keys simultaneously. On the left, click on ‘Apps’ and select ‘Installed apps’ from the right side.

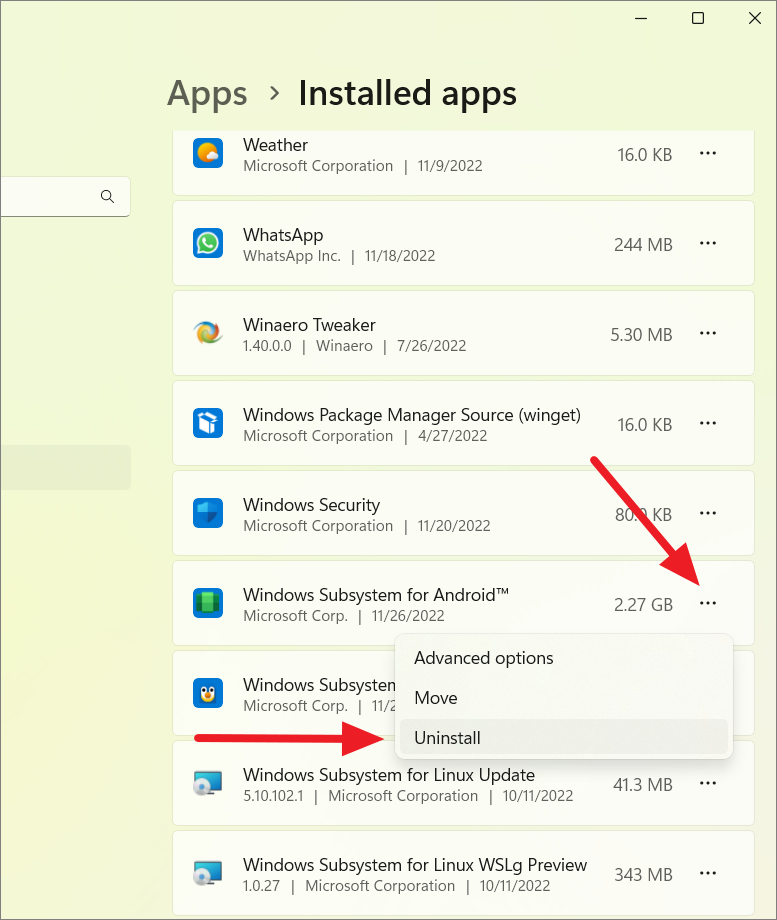
In the list of apps, find the ‘Windows Subsystem for Android’ app, click the three-dot menu button to the right of its name, and then select ‘Uninstall’. If you installed WSA by installing the ‘Amazon Appstore’ app, uninstall that app. If both applications exist in the installed apps, remove them both.

Once the existing WSA is removed, proceed to install WSL and Virtual Machine platform features.

Install Windows Subsystem for Linux (WSL) and Virtual Machine Platform

If you don’t have the Windows Subsystem for Linux already installed on your system, then follow these steps to install WSL2 and a Linux distribution (Ubuntu):

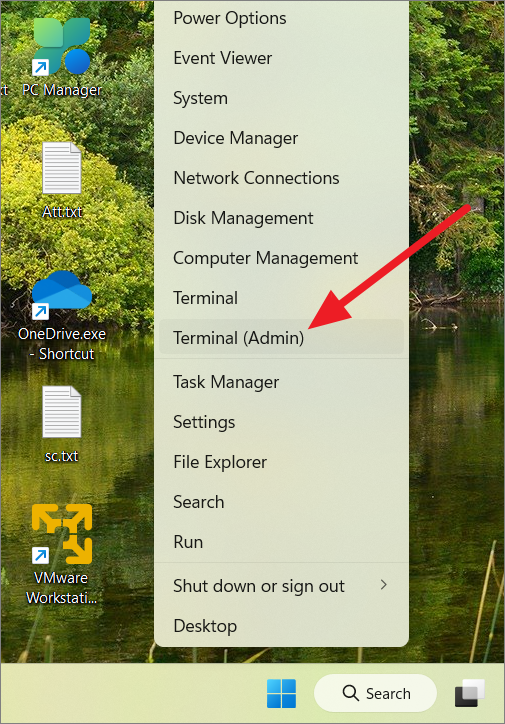
First open Windows Terminal by right-clicking the Start menu and selecting ‘Terminal (Admin).

If you see User Account Control, click ‘Yes’ to continue.

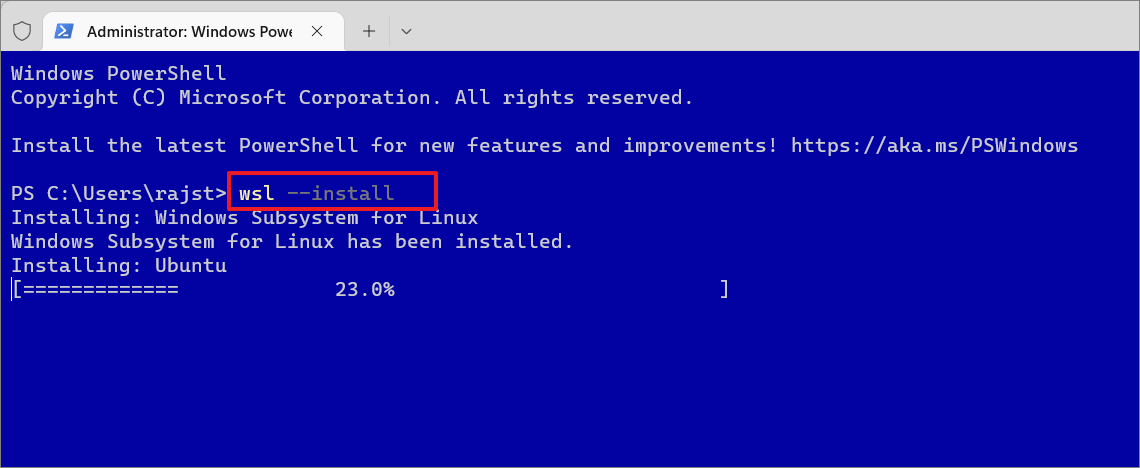
When the Windows Terminal opens, type the following command and press Enter to install WSL:

wsl --install

The process can take some time to finish. The above command will automatically download and install WSL2 latest version of the Ubuntu Linux distribution.

After you see the ‘The requested operation is successful’ message, restart your device to complete the process.

Next, you need to enable Virtual Machine Platform from Windows optional features.

To do that, open the Run command box with Win+R, type optionalfeatures, and hit Enter.

In the Windows Features dialog window, find the ‘Virtual Machine Platform’, check the box in front of it and click ‘OK’.

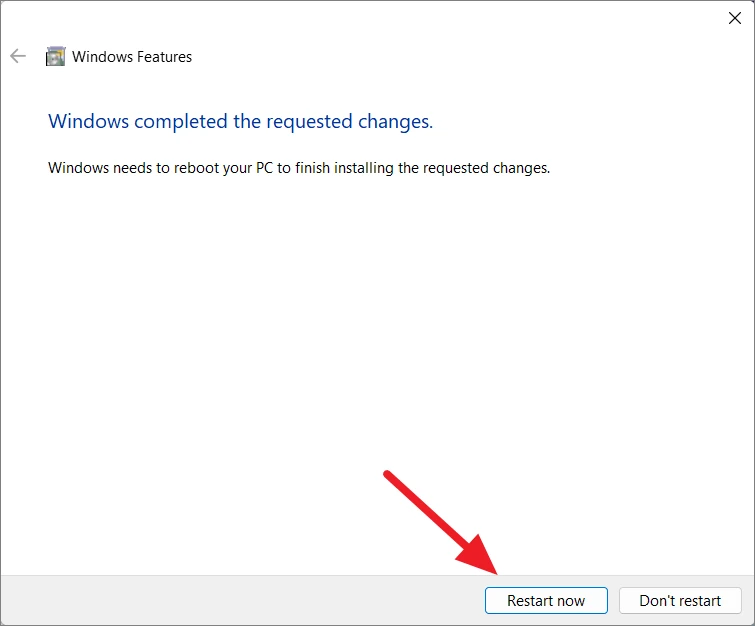
Once the changes are applied, click ‘Restart now’ to restart your computer.

Enable Developer Mode

Next, you need to enable developer mode on Windows 11.

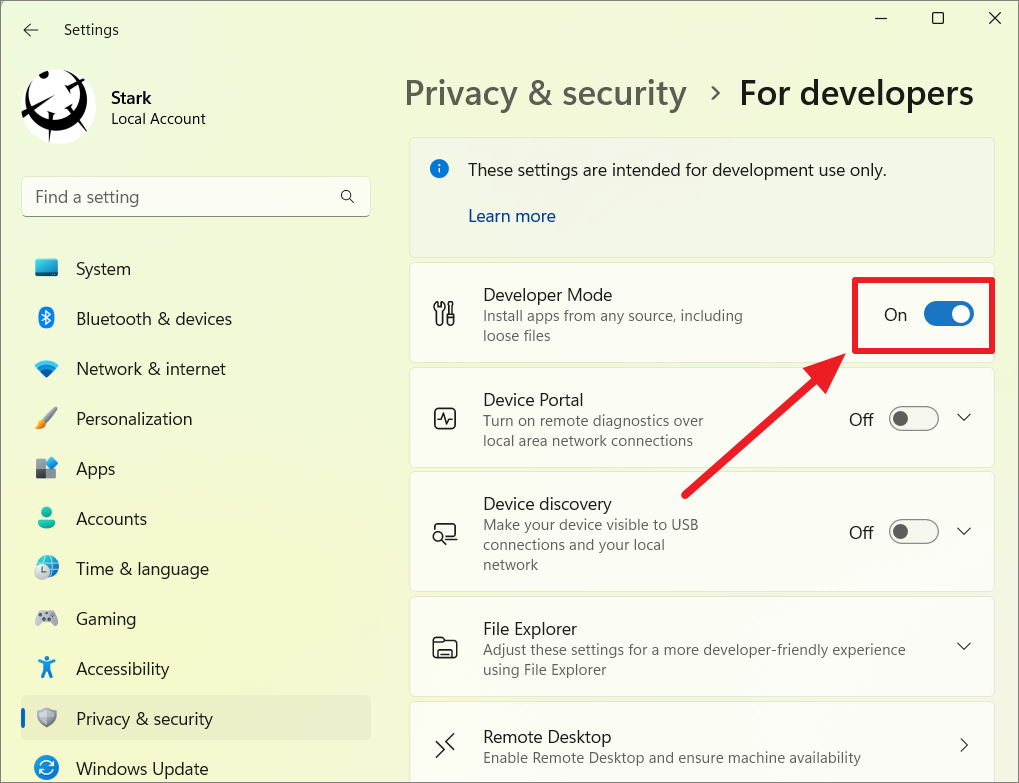
Open Windows settings (Win+I), move to ‘Privacy & Security’ on your left, and choose ‘For developers’ under Security on your right.

Now, enable the toggle next to the ‘Developer Mode’ option.

Then, click ‘Yes’ to confirm the action.

Install 7-zip or WinRAR

You will need to extract some files from different packages, so you will a third-party archiving software like 7zip or WinRAR. If you don’t have it, download and install it.

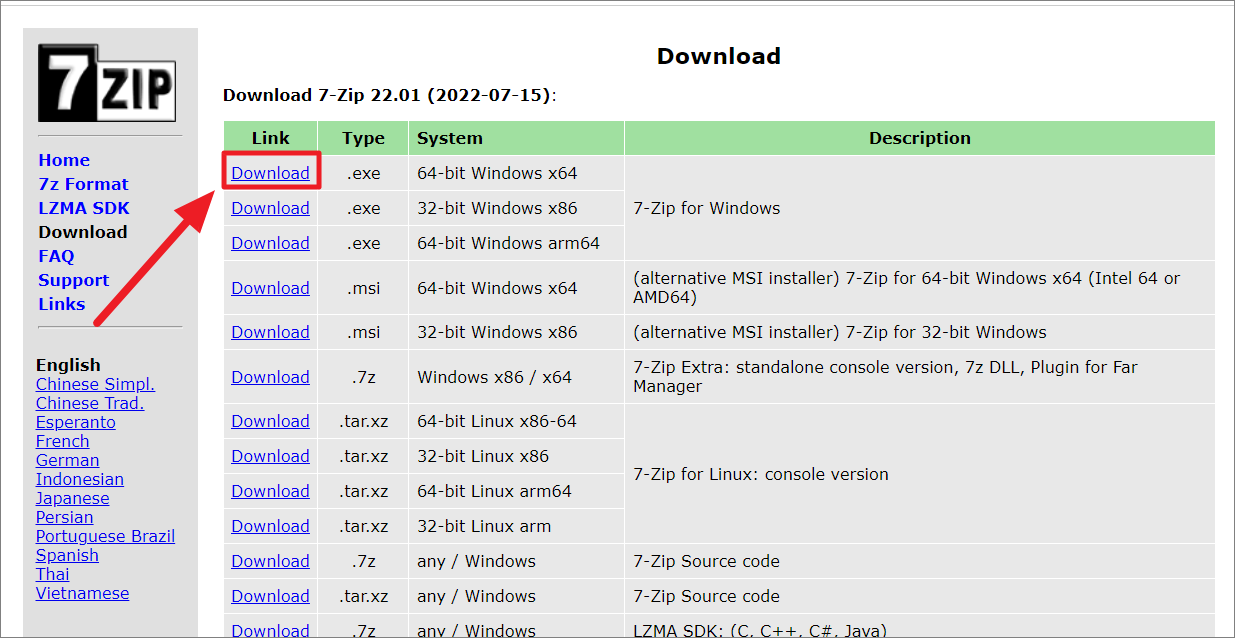
You can go to the official 7-zip download page and click the ‘Download’ link next to the ’64-bit Windows x64′ under the latest version.

After the .exe file is downloaded, install the software.

Alternatively, you can go to the 7-zip Microsoft Store page and click the ‘Get in Store app’ button.

Then, click on the ‘Open Microsoft Store’ button on the prompt.

When the Microsoft Store app opens, click the ‘Get’ button to automatically download and install the app.

Download and Setup Windows Subsystem for Android Contents

First, you will need to download the appropriate WSA package to customize it. To download the WSA package, follow these steps:

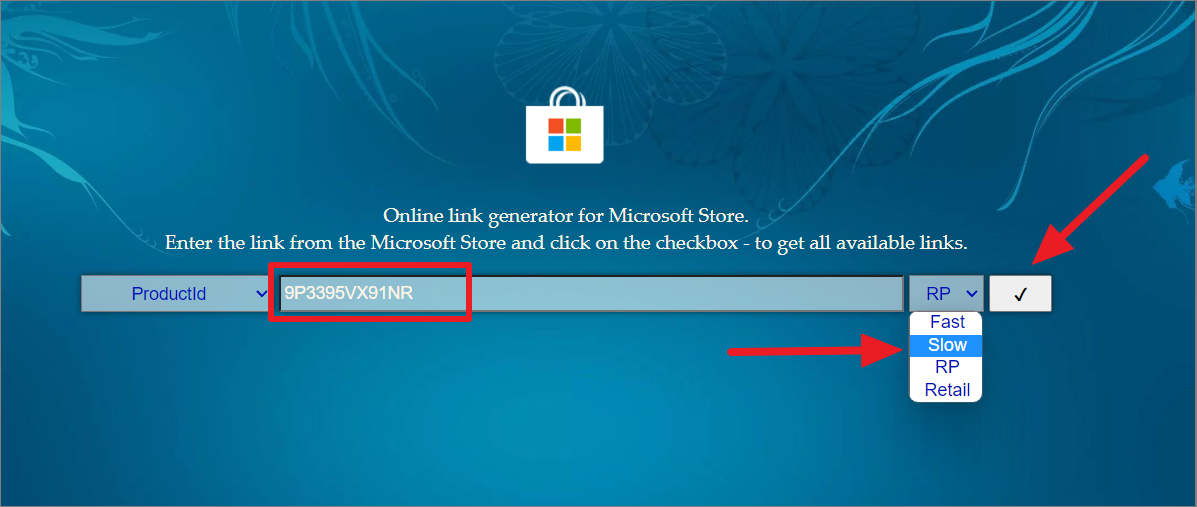
Open the store.rg-adguard.net website and select ‘ProductID’ from the first drop-down list.

Then, type or copy and paste this ID 9P3395VX91NR into the text field. After that, select the ‘Slow’ option and click the check button.

Once the results appear, scroll down to the bottom and find the largest .msixbundle file (approximately 1.35GB), and click on it. For instance, the latest file is ‘MicrosoftCorporationII.WindowsSubsystemForAndroid_2210.40000.7.0_neutral_~_8wekyb3d8bbwe.msixbundle’. 

If the file doesn’t download, right-click the link, and select ‘Save link as…’.

Some browsers like Google Chrome may refuse to download the file. In such cases, click the arrow button and select the ‘Keep’ option.

Once the file is downloaded, navigate to the file and open it in an archiver software. Right-click the .msixbundle file, and select ‘Show more options’.

In the next context menu, go to ‘7-Zip’ and select the ‘Open archive’ option in the sub-menu.

Once the file is open in the 7-Zip app, scroll to the bottom and double-click the bundle that ends with ‘Nightly.msix’. For instance, ‘WsaPackage_2209.40000.28.0_x64_Release-Nightly.msix’.

This will show you a list of files inside that package. Select all the files (Ctrl+A keyboard shortcut) and click the ‘Extract’ or ‘Extract to’ button above.

In the ‘Copy to’ or ‘Destination’ field, specify this path – C:\WindowsSubsystemAndroid\, and click the ‘OK’ button. Or, click the three dots button and select the ‘WindowsSubsystemAndroid’.

After the files are extracted, open the WindowsSubsystemAndroid folder in the C: drive and select the following folder and files. 

  • AppxMetadata (folder)
  • AppxBlockMap.xml (file)
  • AppxSignature.p7x (file)
  • [Content Types].xml (file)

Then, Delete them.

Or, you can also exclude the above files while extracting.

Download WSAGAScript and Set up the GAppsWSA contents

The next step is to download the WSAGAScript which lets us install Google Apps and Play Store into a WSA image. 

Before that, you need to create another folder on your boot drive (C:) and rename it to ‘GAppsWSA’.

Now, visit the WSAGAScript GitHub page, click on the Code menu, and select the ‘Download ZIP’ option to get the script package in a zip file. 

Now, you need to extract the WSAGAScript-main.zip file to the new ‘GAppsWSA’ folder that you created earlier.

Navigate where you just downloaded the zip file ‘WSAGAScript-main.zip’, right-click on it, and select ‘Open with’ then ‘7-Zip File Manager’ or any other third-party archiver.

In the archiver, open the ‘WSAGAScript-main’ folder inside the file.

Select all the files and click the ‘Extract’ or ‘Extract to’ button.

Then, specify this path C:\GAppsWSA\ in the ‘Copy to’ or ‘Destination’ field, and click ‘OK’.

After the contents are extracted, proceed to the next step.

Download OpenGApps and Set up the GAppsWSA contents

Next, you need to download the OpenGApps tool and set up its contents. OpenGApps is an open-source application developed by Open Source Project (AOSP) that helps you install Google Apps (GApps) on a custom WSA package. Here’s how to do it:

First, open the OpenGApps website. On the site, select the ‘x86_64′ option under Platform, the ’11’ option for the Android version, and the ‘pico’ option for the Variant.

Then, click the ‘Download’ icon below.

This will redirect you to a download page in Sourceforge. Wait a few seconds and the file should download automatically. If not, click the green ‘Download’ button to manually initialize the download.

In the Save As window, select the C:> GAppsWSA > #GAPPS location and click ‘Save’.

Alternatively, you can download the ‘open_gapps-x86_64-11.0-pico-xxxxxxxx.zip’ file to your desired location and then copy the file to the following location.

C:\GAppsWSA\#GAPPS

You don’t need to extract this file, just copy-paste the ZIP file with Gapps to the above-mentioned location.

Copy Some Images files to the GAppsWSA folder

Next, you need to copy four essential files from the WindowsSubsystemAndroid folder to the ‘#IMAGES’ folder in the GAppsWSA folder.

Open File Explorer, and go to the C:\WindowsSubsystemAndroid\ location.

Then, select the following image files while holding the Ctrl key:

  • vendor.img
  • system_ext.img
  • system.img
  • product.img

Next, copy the selected image files with Ctrl+C.

Then, browse to the following path –C:\GAppsWSA\#IMAGES in the File Explorer and paste the files there (Ctrl+V).

Download ADB toolkit

The final step of the preparation process before you start modifying the Windows Subsystem for Android (WSA) is to download Android Debugging Bridge (ADB) Toolkit which we will need at the end of this procedure.

Before we download the toolkit, create a new folder in the C drive and rename it to ADBKit.

Then, visit this Mediafire download site and click the ‘Download’ button.

After the file is downloaded, extract its content to the newly created ‘ADBKit’ folder.

To do that, navigate to the downloaded file ‘ADBKit.zip’ and open it with 7-Zip. Then, select all the files and click the ‘Extract’ button.

Then, specify the ‘Copy to’ or ‘Destination’ path to C:\ADBKit\ and click ‘OK’.

Customize Windows Subsystem for Android to install Google Play Store

Now, we have all the files necessary to create a custom Windows Subsystem for the Android kernel to run Google Play Store. Follow these steps to modify WSA:

First, launch Ubuntu. Right-click the Start menu, and select ‘Terminal (Admin)’ from the context menu. 

Then, click on the drop-down arrow at the top and select ‘Ubuntu’ to launch a Ubuntu terminal in the new tab. You can also use other Linux distributions like Debian, Kali Linux, etc.

You can also launch Ubuntu as an administrator from the Start menu.

In the Ubuntu terminal, run the following command to gain root access.

sudo su

Enter your UNIX password if prompted.

Enter the following command and hit Enter to update your repositories and packages:

sudo apt-get update

To upgrade all available packages, enter the below command:

sudo apt upgrade

Then, type Y at the prompt to continue the installation.

Next, type the below command and press Enter to change the directory to the GAppsWSA directory:

cd /mnt/c/GAppsWSA 

After that, you need to install the ‘lzip’ and ‘unzip’ tools which you will need for WSA customization using the below commands:

apt install lzip unzip

Next, we need to install another tool called ‘dos2unix’. Use the below command and press Enter:

apt install dos2unix

Now, run the following commands one by one in the exact order and press Enter after each to convert the script to Unix formats :

dos2unix ./apply.sh
dos2unix ./extend_and_mount_images.sh
dos2unix ./extract_gapps_pico.sh
dos2unix ./unmount_images.sh
dos2unix ./VARIABLES.sh

At this point, you can also use the clear command to clear the console for better management.

After converting the necessary scripts to Unix format, execute the below commands one by one in the same order.

Use the below command to execute the first step.

./extract_gapps_pico.sh

Wait for the terminal to return the ‘Gapps Folder Ready!’ message and enter the next command.

Use the below command to execute the second step and wait for the console to return the ‘Images Mounted’ message.

./extend_and_mount_images.sh

Type the following command to execute the third step and press Enter

./apply.sh

Finally, execute the fourth step and wait for the Unmounting completed message:

./unmount_images.sh

Once you finish executing the above commands, you have created a custom kernel with Google Apps (GApps) integrated. Now, we are finished with the Ubuntu terminal, you can close it now.

Next, open the ‘#IMAGES’ folder under GAppsWSA by navigating to C:> GAppsWSA > #IMAGES in the File Explorer.

Now, you need to select the following four files and copy them to your clipboard:

  • vendor.img.
  • system_ext.img.
  • system.img.
  • product.img.

Then, browse to the ‘WindowsSubsystemAndroid’ folder on the boot drive (C:\WindowsSubsystemAndroid) and paste those copied image files in there. When you see the prompt, click the ‘Replace the files in the destination’ option to replace the existing files.

After that, navigate to your ‘GAppsWSA’ folder under C drive and open the ‘misc’ folder. 

Now, copy the ‘kernel’ file here.

Then, go to the ‘Tools’ folder under the WindowsSubsystemAndroid folder by navigating to this path C:\WindowsSubsystemAndroid\Tools. Here, rename the existing ‘kernel’ file to ‘kernel_back’ using the ‘Rename’ button from the toolbar. 

The renamed file can be used as a backup if anything goes wrong.

Now, paste the previously copied ‘kernel’ file in the same location.

Once you complete the steps, you are ready to install custom WSA with Google Play Store on Windows 11.

Install the Customized version of WSA on Windows 11

Now, it’s time to install the customized version of WSA to run Google Playstore on your device. Follow the steps below to proceed:

Launch PowerShell with administrative privileges. Right-click the Start menu, and select ‘Terminal (Admin)’.

If Windows PowerShell is not your default profile in the Windows Terminal, select ‘Window PowerShell’ from the drop-down menu.

Type or paste the following command in the terminal and hit Enter:

Add-AppxPackage -Register C:\WindowsSubsystemForAndroid\AppxManifest.xml

This will install the modified WSA and Play store on your device.

Set up Google Play Store on WSA

Open the Start menu and you will see Windows Subsystem for Android is successfully installed on your computer. Select the app to launch it or search for ‘Windows Subsystem for Android Settings’ and select the top result.

When the app opens, switch to the ‘Developer’ tab and enable the toggle for ‘Developer mode’

Then, move back to the ‘System’ tab and click on the square with an upward arrow button next to the ‘Files’ option, so that Windows Subsystem for Android actually starts running on your computer.

If you see an Optional diagnostic data prompt, uncheck the Share my diagnostic option, and click ‘Continue’.

When the Android Subsystem file manager opens, close it.

Now, search for ‘Play Store’ in the Windows Search, and you will find the Play Store app is installed but you won’t be able to sign in to your Google account.

To fix the Play Store app and get it working correctly, follow these steps:

Open Command Prompt as an administrator and change the directory to the ADBKit folder that we created earlier using the below command:

cd C:\adbkit

Now, execute the following command to connect to the Windows Subsystem for Android:

adb.exe connect 127.0.0.1:58526

If ADB fails to connect the WSA, then open the Windows subsystem for Android Settings and check if the IP address under the ‘Developer mode’ option is the same as the one that you are trying to connect to. If it is a different address, make sure to replace it in the above command and try it again.

Once ADB is connected to the Windows Subsystem for Android, type in the following command to launch the ADB shell:

adb.exe shell

Next, run the below command to gain root access:

su

Finally, type the below command to change the SELinux mode to permissive:

setenforce 0

After that, you can close the ADB shell with the exit command and close the command prompt. That’s it, you have successfully installed Google Play Store on your Windows 11 computer.

Now, close all the Windows, open the Start menu, and search for ‘Play Store’ in the Windows search. Then, launch it from the search result.

Now, you can click on the ‘Sign in’ button to login into your Google account. 

Enter your username and password to sign in with your Google Account.

You can now download and install Android apps from the Google Play Store.

Transfer Files between WSA and Windows using LAN Drive App

Now, you have installed Google Play Store on your Windows PC, it’s time to install an android app that can help you exchange files between Android Subsystem and Windows. There are several third-party apps that can be used to transfer files between two file systems. Here we are going to see how to use the ‘LAN drive – SAMBA Server & Client’ app to transfer files between WSA and Windows.

LAN Drive uses an SMB server and client to view and transfer files between the Android subsystem and Windows. First, you need to install LAN Drive from the Google Play Store.

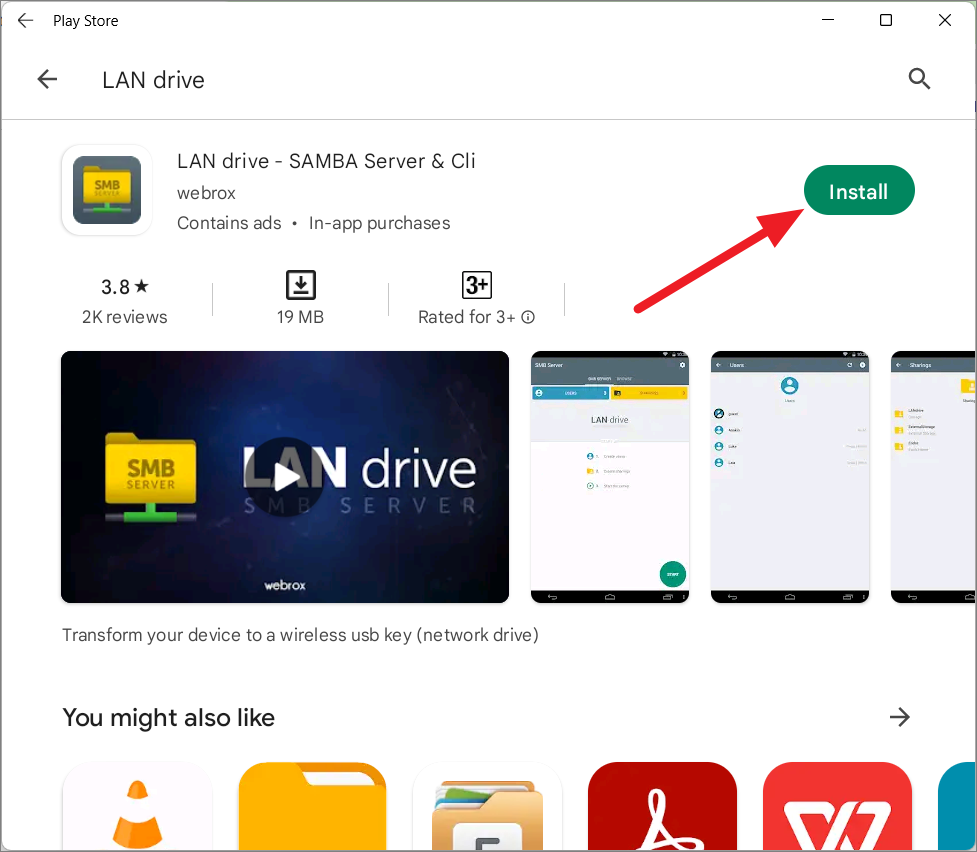
Open the Google Play Store app and search for the ‘LAN Drive’ app in the search bar above.

Then, click the ‘Install’ button for the LAN drive – SAMBA Server & Client app.

After the app is installed, you can search for it using Windows search and launch it just like any other Windows app.

If you see the prompt for allowing LAN drive to access photos, media, and files on your device, click ‘Allow’.

First, click on the ‘Users’ button, you need to set up a user with full permissions so that you can view/transfer files to WSA and vice versa.

Under the Users page, click on the button next to ‘Authentication Type’.

By default authentication type is set to ‘Anonymous’ which lets you connect to the server without any authentication or confirmation. ‘Anonymous with confirmation’ lets you connect to the server without any authentication but with a pop-up confirmation of whether to accept or reject the connection.

But you should select ‘Users with rights’ which lets you connect to the server with authentication but also customize permissions (Read and Write) for every user.

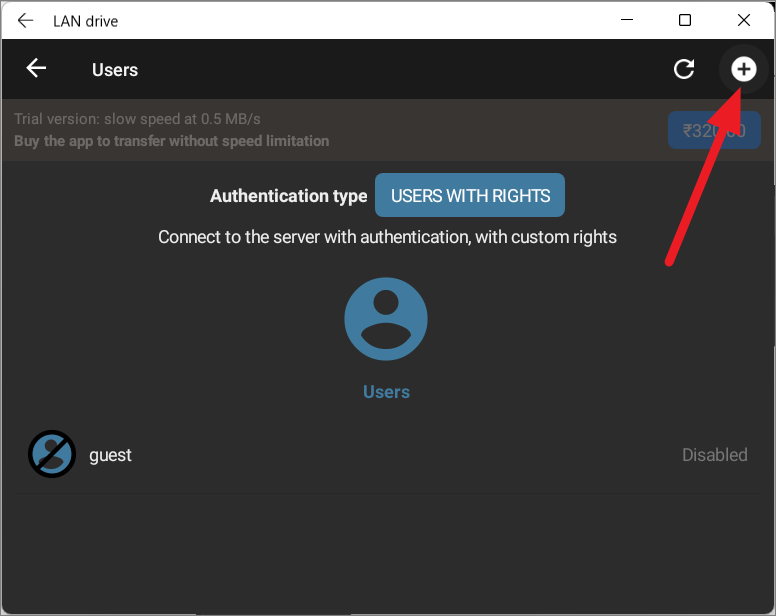
After that, click on the ‘+’ icon from the above right corner to add users.

On the next page, set up a username and password.

You can then enable or disable read/write permission for different directories. Here enable both ‘Read’ and ‘Write’ under the global permission section and then click ‘Save’ at the top right corner of the app window.

After setting up the users, return to the Home page of the LAN drive app and click the ‘Start’ button at the bottom to start the server.

You can use the provided IP address and network drive to access the android subsystem.

LAN drive app has a built-in file manager that lets you view, copy, cut, and paste files in the Android subsystem. Switch to the ‘BROWSE’ tab on the app and access a list of main directories such as InternalStorage, SDCard, Root directory, etc.

Now, you have successfully set up an SMB Server of Windows Subsystem for Android.

Use File Explorer to Transfer Files between WSA and Windows

Once the SMB server is created and running in the LAN drive app, you can access WSA files through File Explorer.

Keep the server running in the app and open Windows 11 File Explorer on your computer.

There are two ways you can access WSA files through File Explorer — IP address or the Googleredfin server.

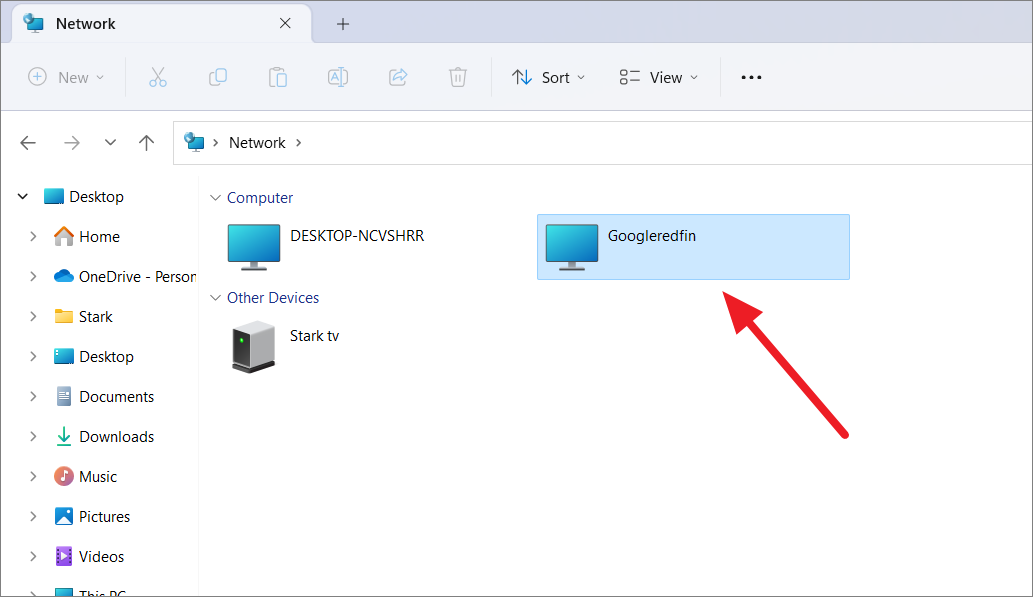
Open Windows 11 File Explorer, and go to the ‘Network’ section on the left-side panel.

In the Network window, you will find LAN drive’s ‘Googleredfin’ under the Computer section. Just double-click on it to open your WSA storage.

Alternatively, you can type the IP address displayed on the LAN drive app in the address bar of the File Explorer and hit Enter to access WSA storage.

However, the server IP address will be reset every time your restart your device so it is recommended to use the ‘Googleredfin’ device in the Network.

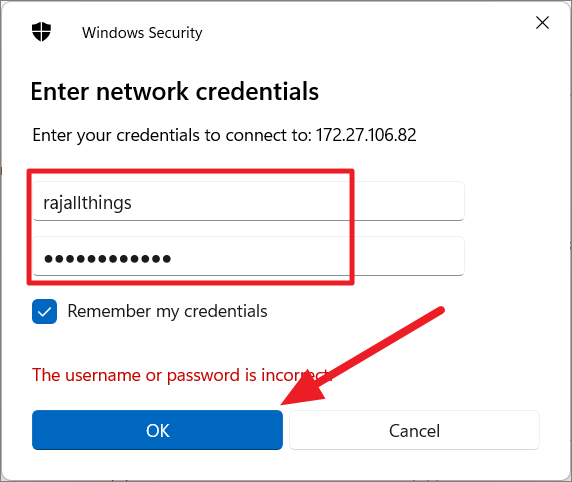
In the Windows Security prompt box enter your username and password and click ‘OK’. You can also check the ‘Remember my credentials’ option to automatically log in without entering your credentials every time.

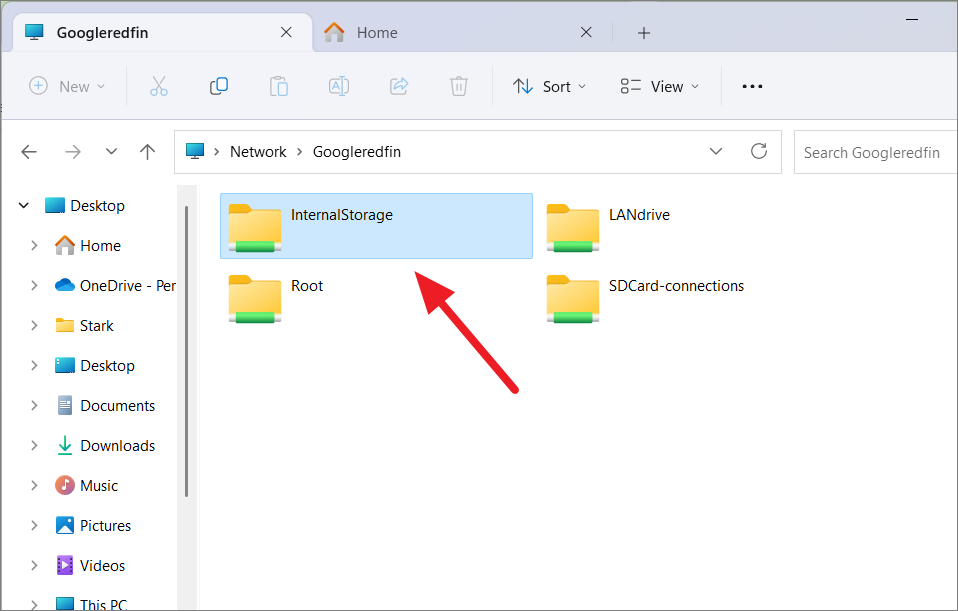
Now, you can access your WSA storage like just any other windows local drive.

You can access Android system files from the ‘Root’ directory and local storage from the ‘InternalStorage’ directory.

Now, you copy or cut files from your Windows local drive.

Then, paste it into the WSA storage easily and vice versa.

You can also open your Windows drive and WSA storage side by side and drag and drop files.

That’s it, now you can easily transfer files to and from your WSA storage. If the LAN drive app is too slow for you, there are other several FTP apps you can install and use, such as Sweech, Material Files, SwiFTP, etc.

If you are having trouble installing Play Store, you can download the apk file for the app from a trusted website and install it using the ADB command.