
Owning an iPhone or iPad while using a Windows 11 PC can make syncing your data feel challenging due to perceived compatibility issues. However, Apple and Microsoft have made it easy to manage your iCloud account directly on your Windows computer. By installing the iCloud app from the Microsoft Store, you can seamlessly keep your photos, documents, and bookmarks updated across all your devices.
Downloading and setting up iCloud on Windows 11
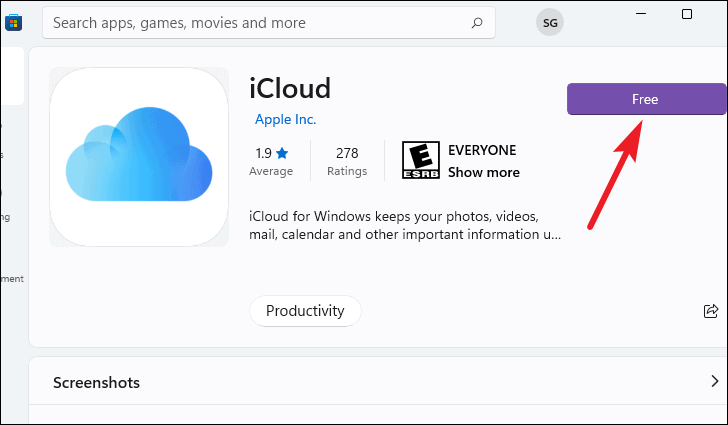
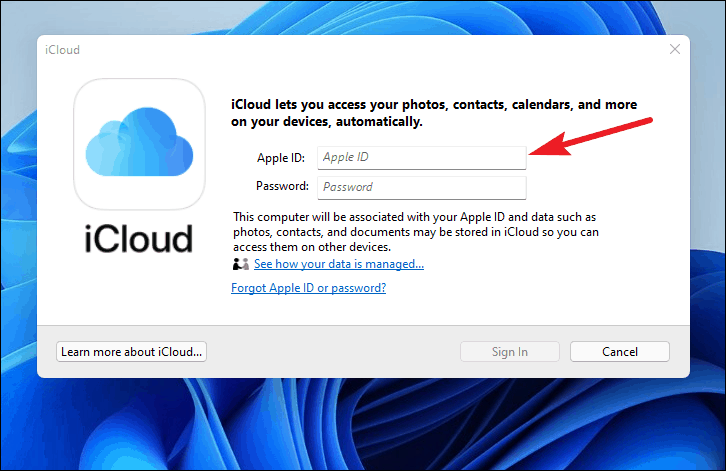
Before you begin, ensure that iCloud is set up on your iPhone or iPad and that you’re signed in with your Apple ID. To use iCloud on your Windows 11 PC, you’ll need to download the iCloud app from the Microsoft Store.
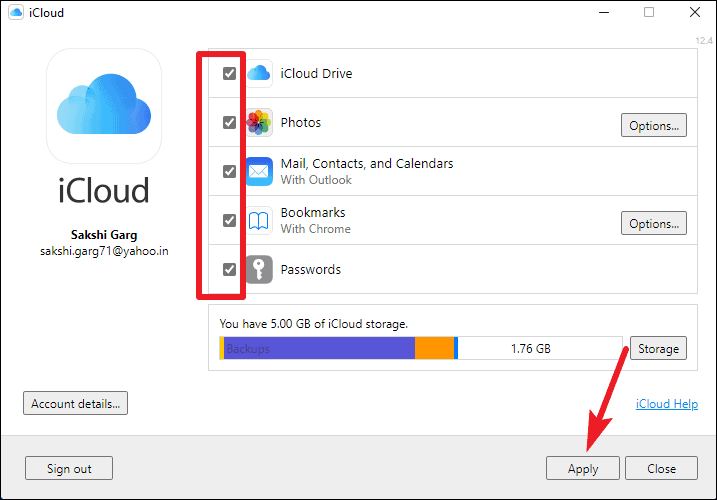
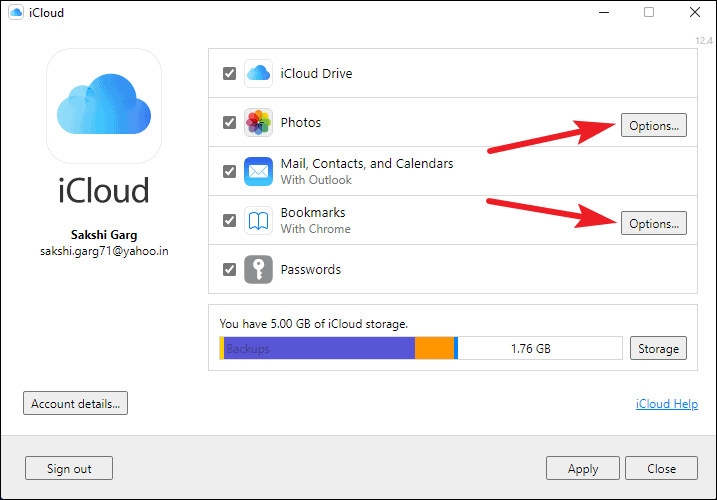
For certain features like Photos and Bookmarks, you can configure additional options. Click the ‘Options’ button next to each feature to access these settings.
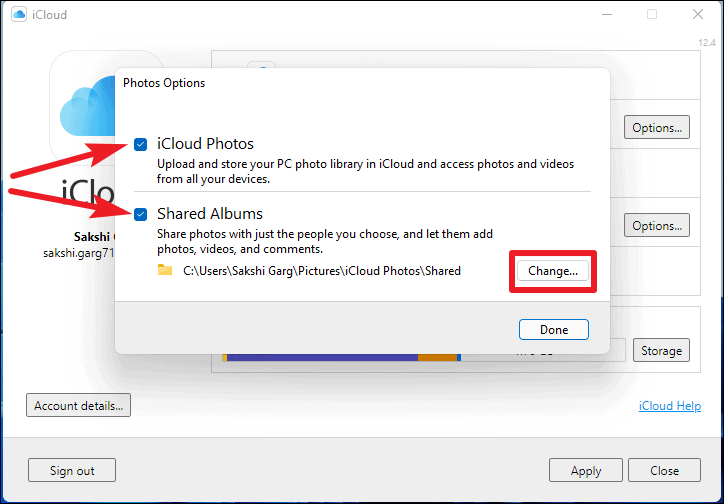
Under Photos Options, you can decide whether to enable iCloud Photos and Shared Albums on your PC. You also have the option to change the folder location for shared albums if you wish.
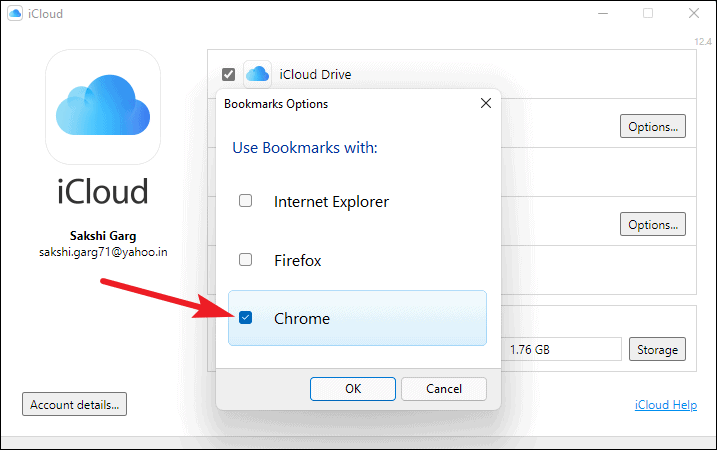
For Bookmarks, select the browser you want to sync your bookmarks with. The bookmarks from your chosen browser will sync to your Apple devices, and bookmarks from your Apple devices will sync to your PC. By default, it displays your default browser, but you can choose any supported browser.
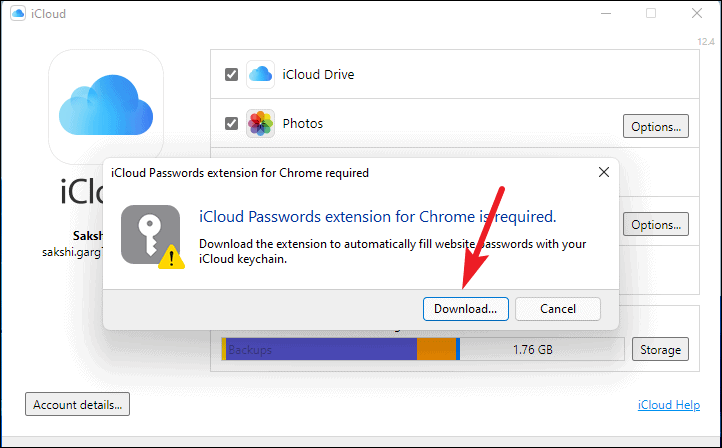
If you have enabled the Passwords feature, a message may appear indicating that it requires the iCloud Passwords extension for your browser. Click ‘Download’ to install the extension, or uncheck the Passwords option if you prefer not to use it. If the extension is already installed, you won’t see this message.
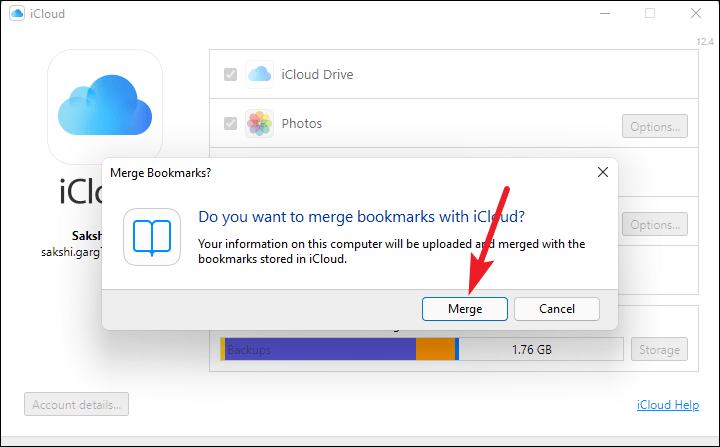
If you’ve selected the Bookmarks feature, a confirmation prompt will ask whether you want to merge the bookmarks on your PC with those on your Apple devices. Click ‘Merge’ to proceed or ‘Cancel’ to skip merging.
Note: You can change these preferences at any time by accessing the iCloud app settings on your PC.
With these steps completed, iCloud is now set up and ready to use on your Windows 11 PC.
Using iCloud Photos
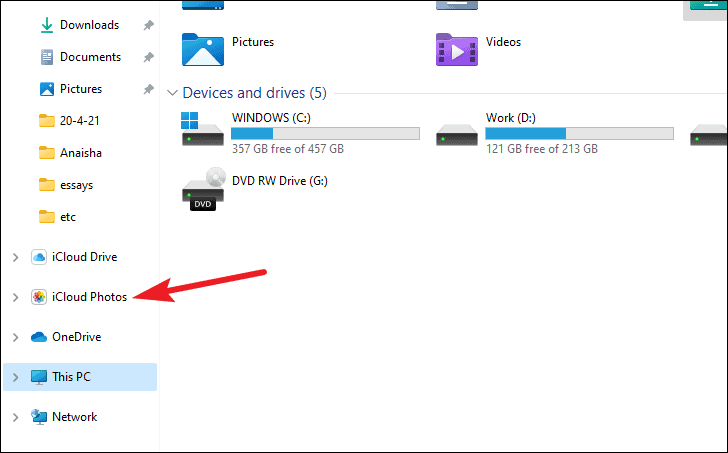
When you enable the Photos feature during setup, an iCloud Photos folder is created in File Explorer. This allows you to upload photos and videos from your PC to iCloud and access them across all your Apple devices.
To upload photos from your PC, open the iCloud Photos folder in File Explorer. Drag and drop the photos or videos you wish to upload into this folder. Ensure that iCloud Photos is enabled on your Apple devices to view these uploaded files there; otherwise, they will only be accessible on iCloud.com.
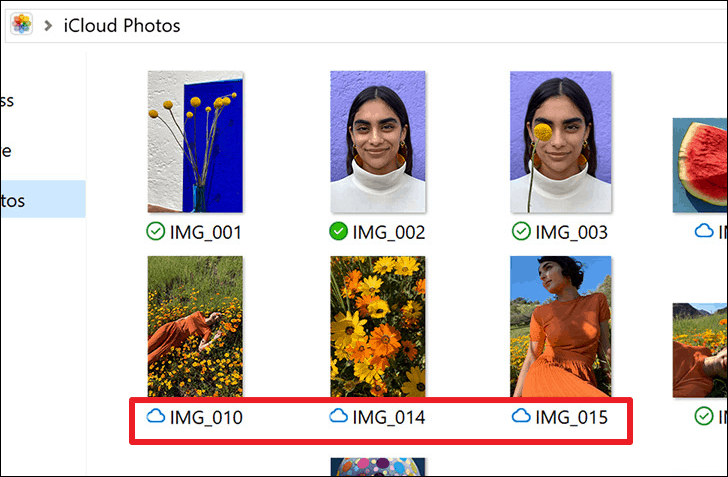
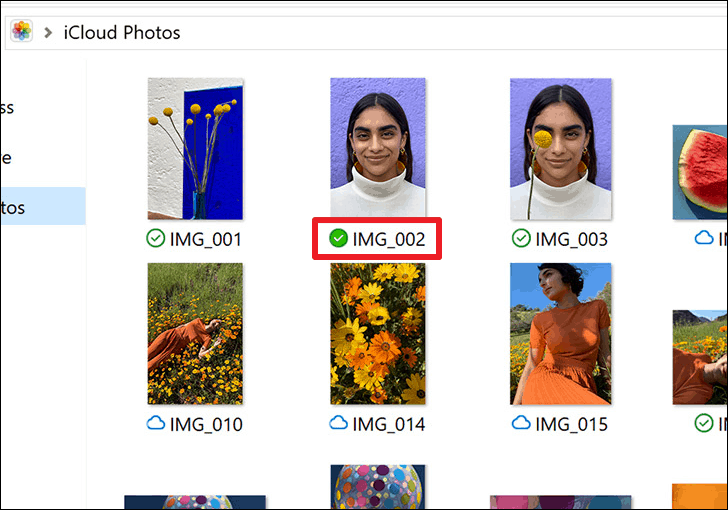
If iCloud Photos is active on your Apple devices, any new photos or videos you take will automatically appear on your PC. You can choose to download them to your device or keep them in the cloud to save storage space. Photos stored only in the cloud are indicated by a cloud icon next to their filenames.
To download a photo from iCloud to your PC, double-click its thumbnail. Downloaded photos display a checkmark icon with a white background, indicating they are stored locally.
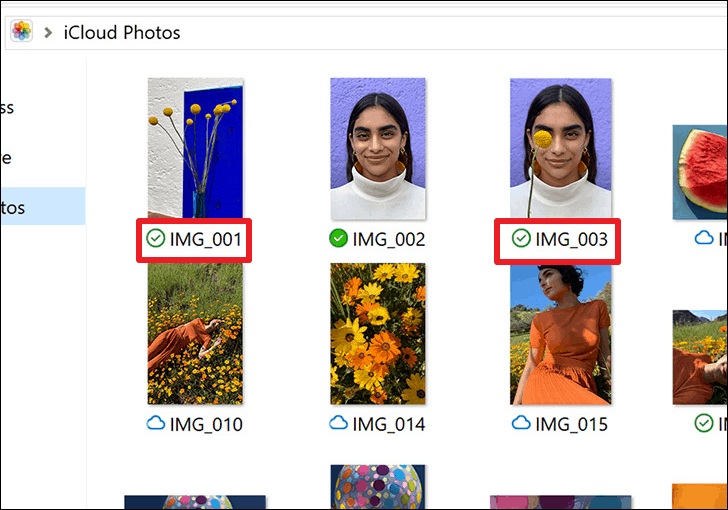
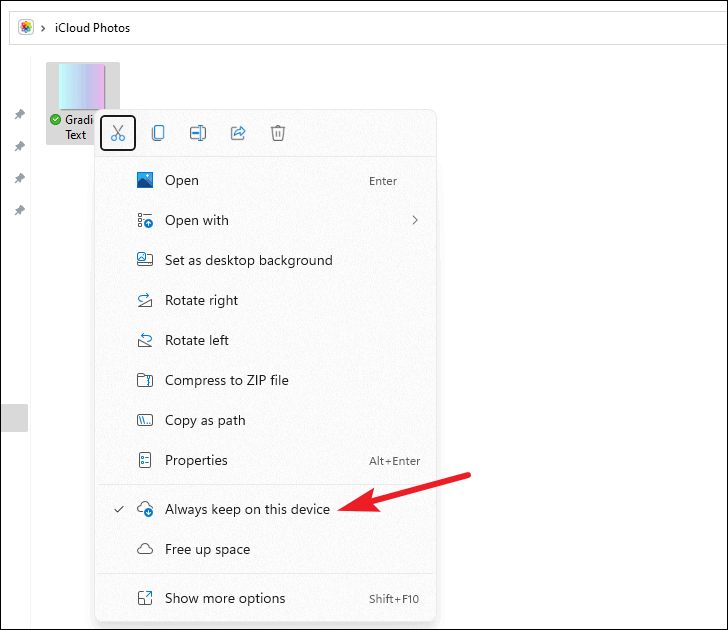
To permanently keep a downloaded photo on your PC, right-click the photo and select ‘Always keep on this device’. Permanently stored photos will have a green checkmark icon.
If you no longer want a photo to be permanently stored on your PC, right-click it again and uncheck the ‘Always keep on this device’ option.
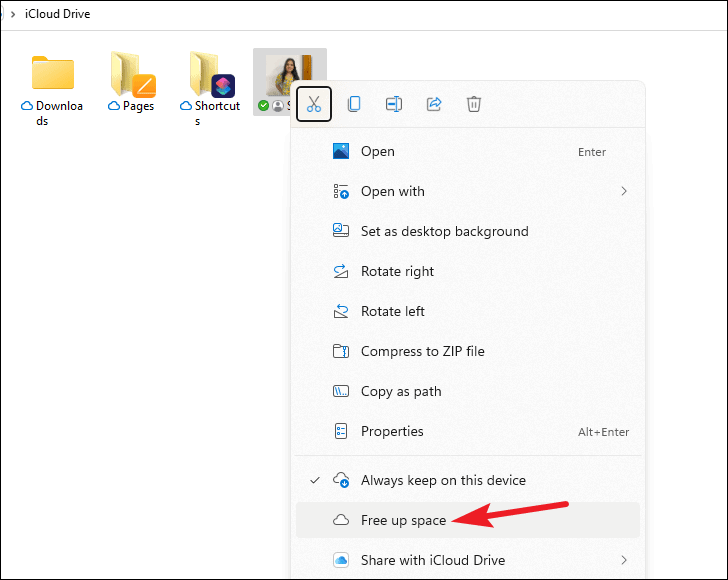
To remove a downloaded photo from your PC while keeping it in iCloud, select the photo, right-click, and choose ‘Free up space’. This action deletes the photo from your PC but retains it in iCloud.

Using Shared Albums
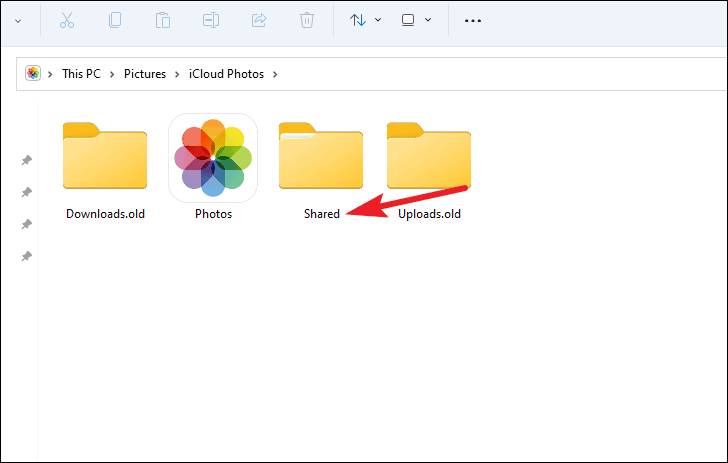
You can also share photos using Shared Albums in iCloud for Windows. By default, the Shared Albums folder is located at C:\Users\<USERNAME>\Pictures\iCloud Photos\Shared, unless you changed it during setup.
Ensure that Shared Albums is enabled on your Apple devices to view shared photos on your PC. Shared Albums allow you to view and share photos and videos with others, as well as like and comment on shared content.
A shared album can contain up to 5,000 photos and videos. This shared content does not count against your iCloud storage limit. If you reach the maximum capacity, you’ll need to delete some items to add new ones.
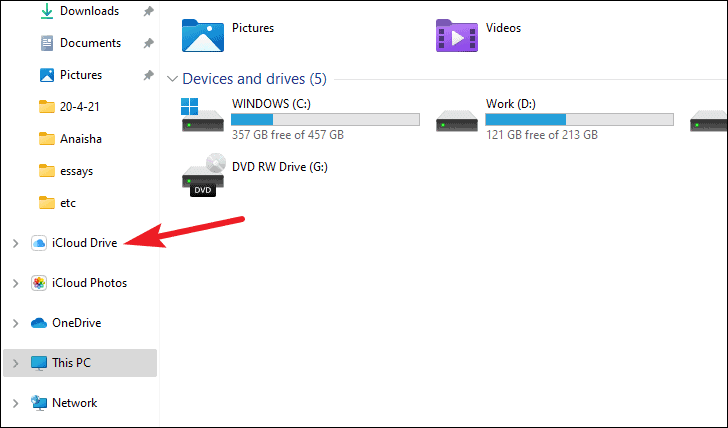
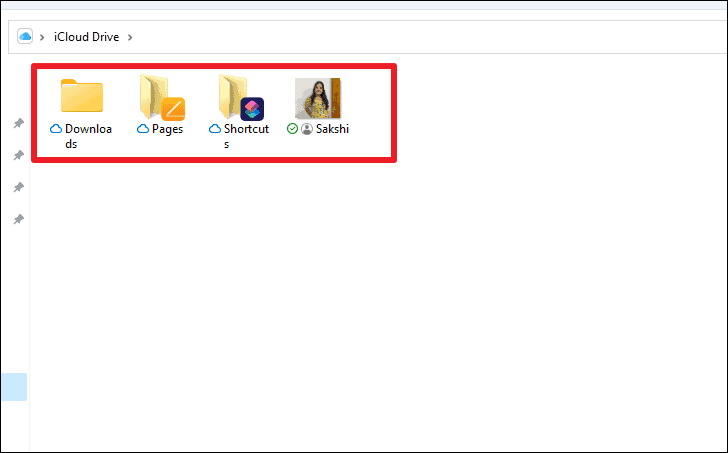
Using iCloud Drive
When you enable iCloud Drive, a corresponding folder is created in File Explorer. This folder contains all your documents organized into folders, just as they are on your Apple devices.
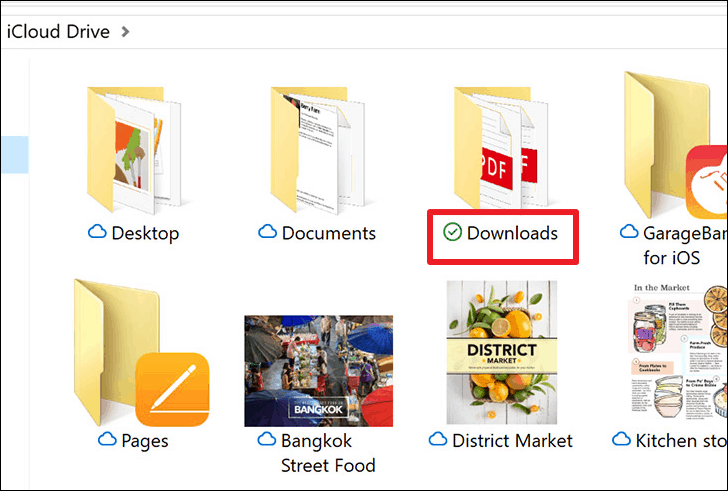
Within the iCloud Drive folder, you can view and download documents from iCloud. Files stored only in the cloud are marked with a cloud icon.
To download a document to your PC, double-click the file. Downloaded files display a checkmark icon with a white background, indicating they are stored locally.
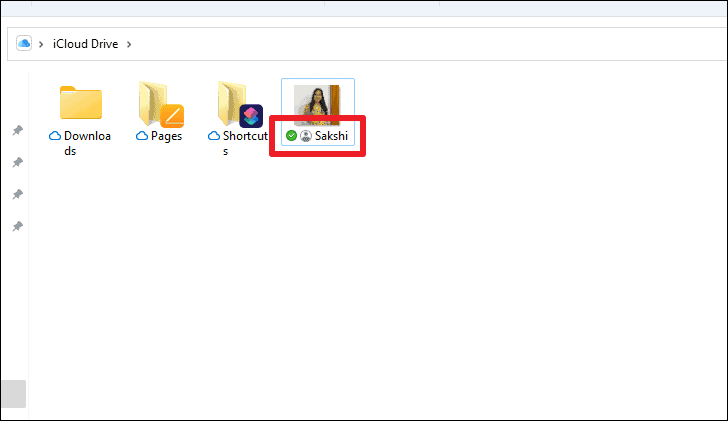
You can choose to keep files temporarily or permanently on your PC. To keep a file permanently, right-click it and select ‘Always keep on this device’. Permanently stored files will display a green checkmark icon.
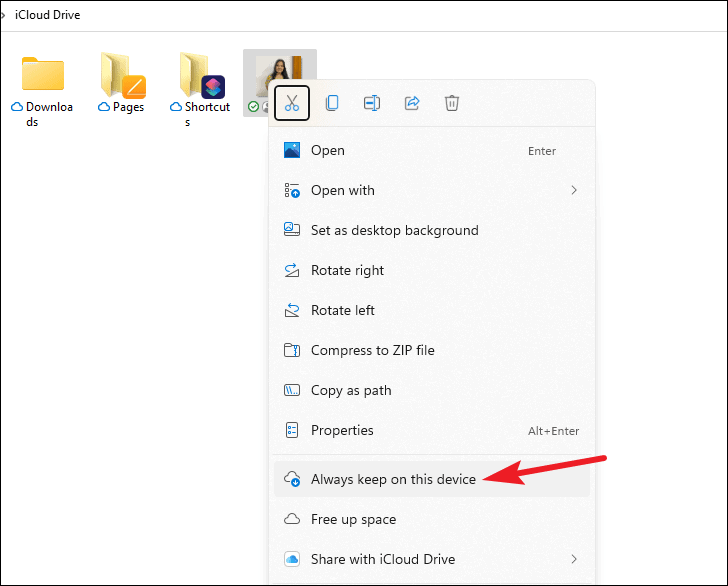
If you want to change a file from permanent to temporary storage, right-click it again and uncheck ‘Always keep on this device’.
To remove a downloaded file from your PC while keeping it in iCloud, right-click the file and choose ‘Free up space’.
You can also upload new documents or create folders within the iCloud Drive folder on your PC. Any files or folders added will automatically sync and appear on your Apple devices.
Sharing folders with iCloud Drive
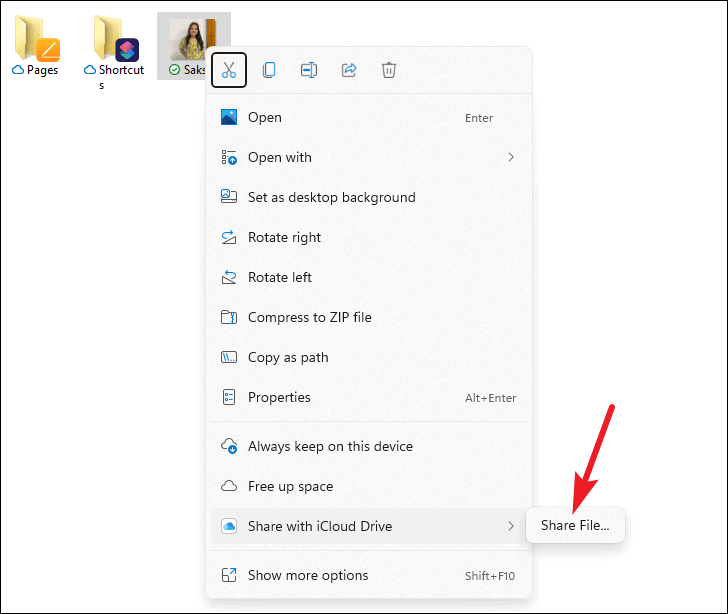
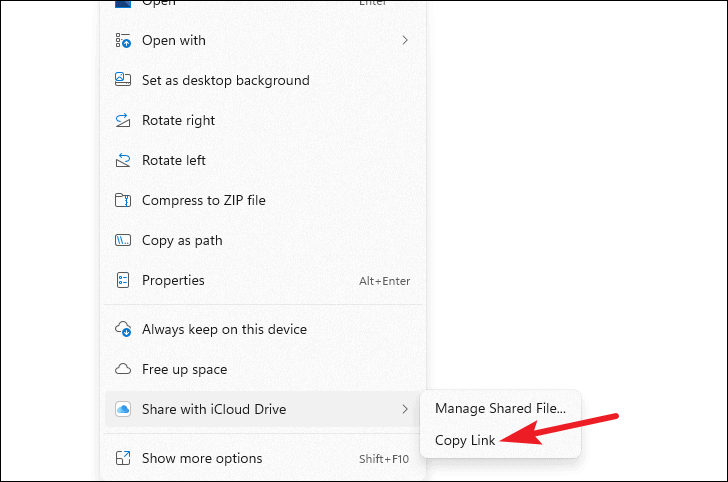
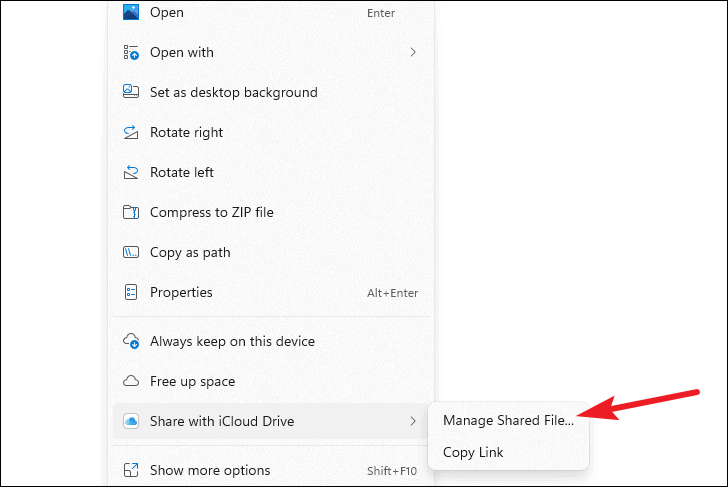
iCloud for Windows allows you to share files and folders with others, facilitating collaboration. To share a file or folder, right-click it and select ‘Share with iCloud’, then choose ‘Share File’ or ‘Share Folder’.
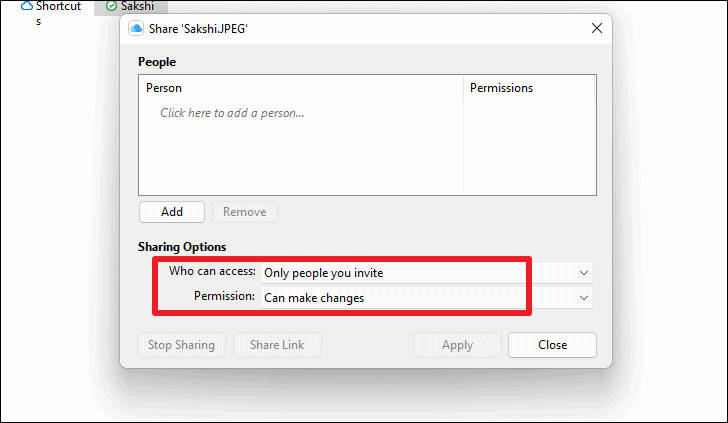
The iCloud sharing dialog box will appear, allowing you to configure sharing options.
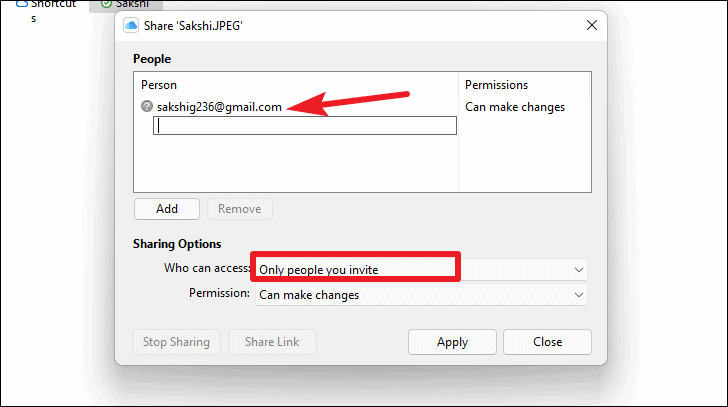
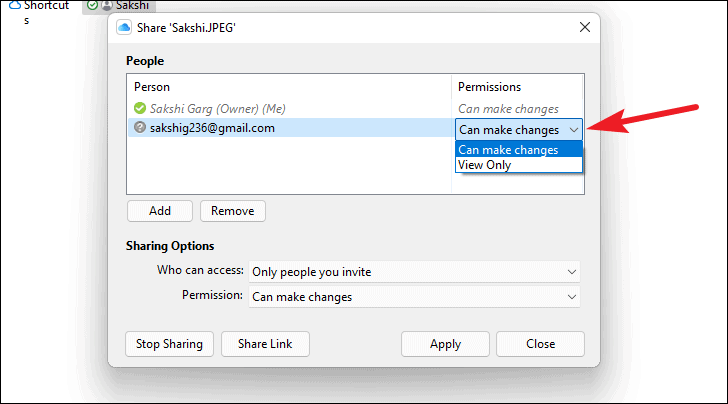
Under ‘Sharing Options’, decide who can access the document by selecting either ‘Only people you invite’ or ‘Anyone with the link’. You can also set permissions to allow others to ‘View only’ or ‘Make changes’.
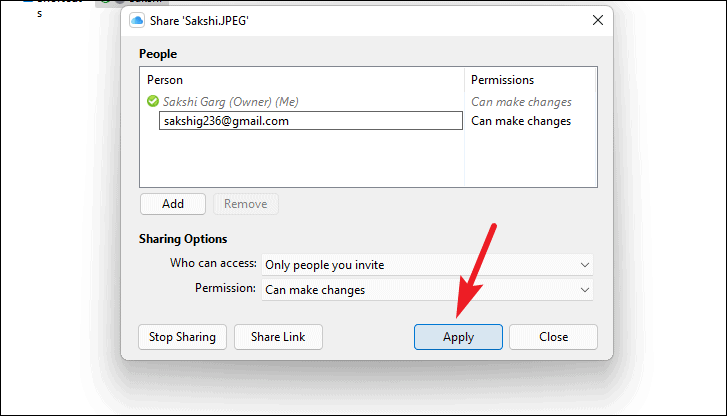
If you choose ‘Only people you invite’, enter the email addresses of the individuals you want to share the file or folder with in the ‘People’ textbox.
If you select ‘Anyone with the link’, click ‘Copy Link’ to generate a sharing link after setting your permissions.
You can assign different permissions to individual participants. In the participants list, click the permission next to a person’s name and adjust it as needed.
After configuring the sharing options, click ‘Apply’ to share the file or folder.
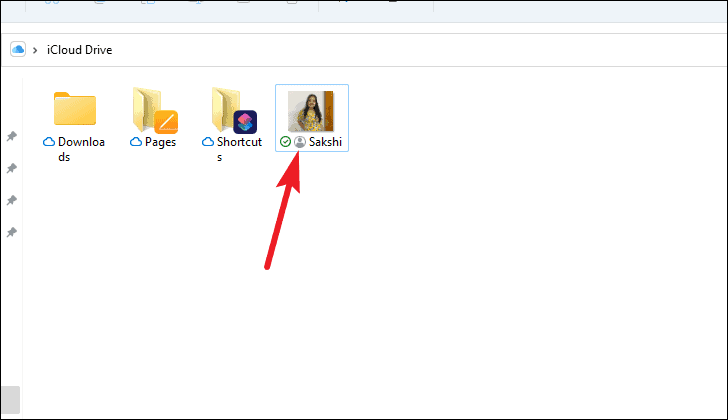
Shared files or folders will display a ‘people’ icon next to them, indicating their shared status.
After sharing, you can manage participants and permissions at any time. Right-click the shared item, select ‘Share with iCloud’, and then choose ‘Manage Shared File’ or ‘Manage Shared Folder’.
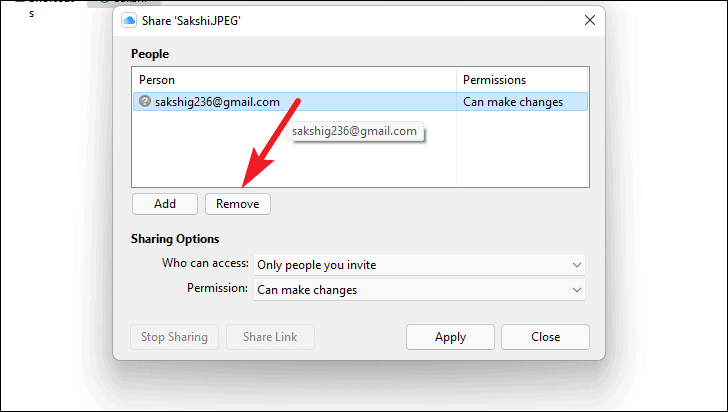
To remove someone’s access, select their name from the list and click ‘Remove’.
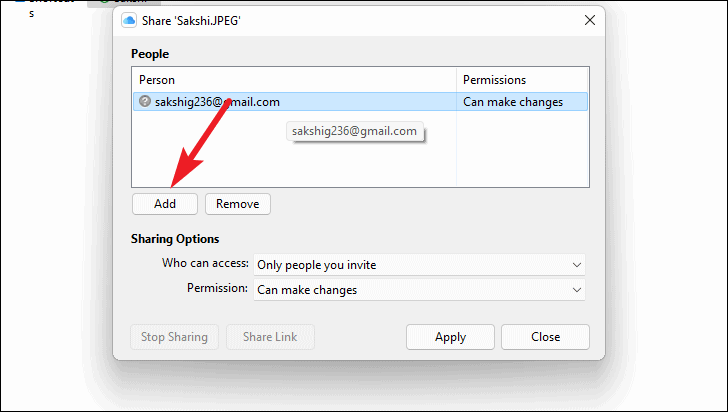
To add new participants, click ‘Add’ and enter their email addresses.
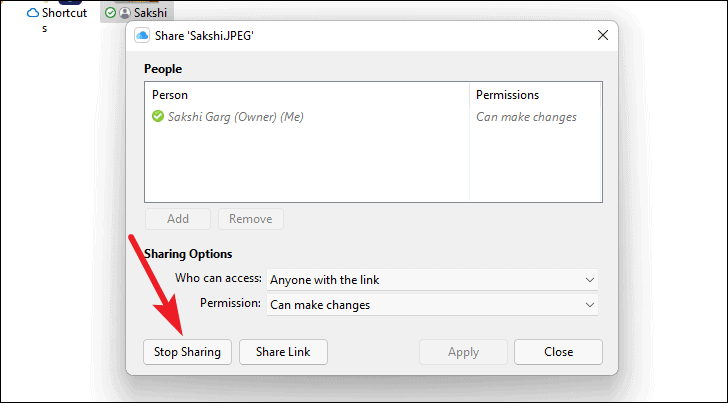
If you wish to stop sharing the file or folder entirely, click the ‘Stop Sharing’ button.
Using Passwords with iCloud
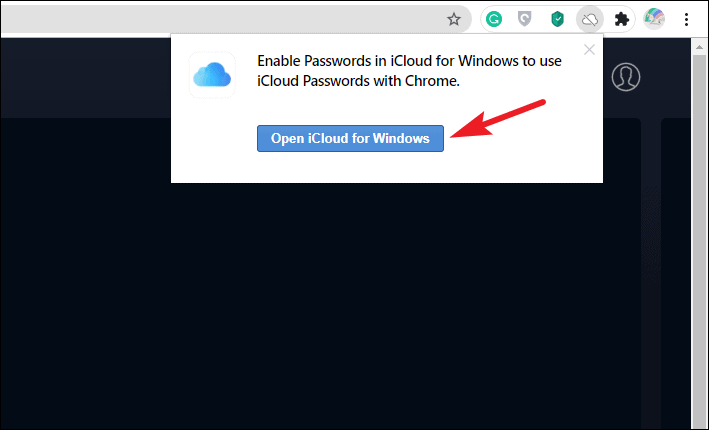
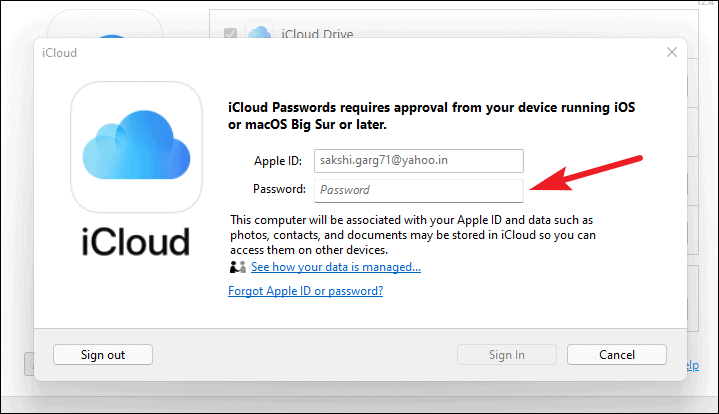
If you’ve enabled the Passwords feature and installed the iCloud Passwords browser extension, you’ll need to approve iCloud Passwords on your Windows PC using an Apple device before you can use it.
An iPhone, iPad, or a Mac running macOS Big Sur or later is required to approve iCloud Passwords for Windows.

You may need to check the Passwords option again and click ‘Apply’ to save the changes.
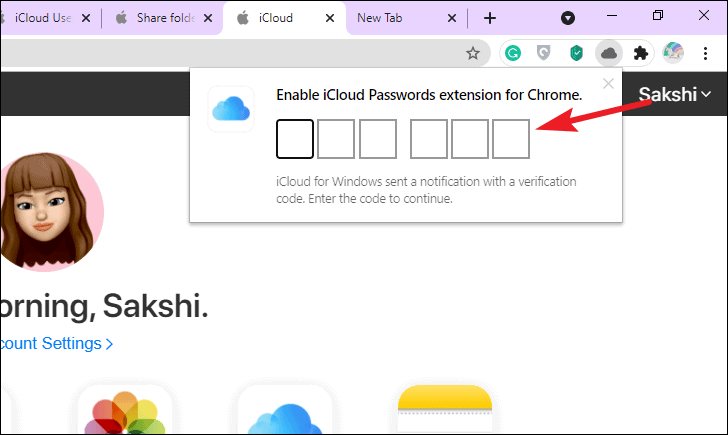
Now, open your browser and navigate to a site where you use iCloud Passwords. Click the iCloud Passwords extension icon.
The extension will prompt you for a verification code, which will be displayed in the iCloud app on your PC. Enter the code to enable the extension. The extension may periodically request verification to ensure your passwords remain secure.
Once set up, you can use the extension to autofill passwords when logging into websites. Simply click the iCloud Passwords extension icon when prompted.
With iCloud for Windows, managing your data across devices becomes straightforward. After setting it up, you can seamlessly access your photos, documents, bookmarks, and even passwords between your Apple devices and Windows 11 PC. Additionally, you can keep your emails, calendars, and contacts in sync, and iCloud even integrates with Outlook by adding an iCloud tab in the desktop app.


