Whether you love or hate their products, you have got to applaud Apple for its tireless efforts to protect user privacy. In a world where most companies are like vultures circling on users’ privacy every way they can, Apple is making ripples with their privacy initiatives.
But even if you were impartial to their privacy features till now, the newest endeavor in iOS 16 – Safety Check – will make it impossible not to commend the company. The new feature is designed for users at risk of domestic or intimate partner violence and puts their personal safety at the forefront.
How Does Safety Check Work?
Most people share access to their devices and even their passwords with partners. But in abusive relationships, this can make it harder to escape or get help. Apple has partnered with several organizations that support domestic violence victims to implement this feature.
Safety Check can quickly reset any access you’ve given to others in any app. It also disables location sharing via FindMy as well as resets all privacy permissions for all your apps. Additionally, it also signs you out of iCloud on all other devices except the one in hand, i.e., the iPhone you’re using for the emergency reset. By signing out of iCloud, it restricts access to Messages (past and new) and FaceTime to only the device you’re currently using.
So, in times of crisis, you can use the Emergency Reset button to cut all ties with the people you were previously sharing information with. In such situations, knowing who has your information and access to your location makes all the difference. Safety Check gives you back that control.
Apart from an Emergency Reset button, Safety Check also lets you manage the access you’ve given to apps and people on a per-app/ person basis and review your account security manually.

Perhaps one of the most thoughtful additions is the ‘Quick Exit’ button in the interface. If while trying to check out the settings, you’re afraid of getting caught, the Quick Exit button will quickly close the settings app and leave no trace behind that Safety Check was ever open.
Here’s how to use it, whether you want to perform an emergency reset or manage your access manually.
How to Use Safety Check
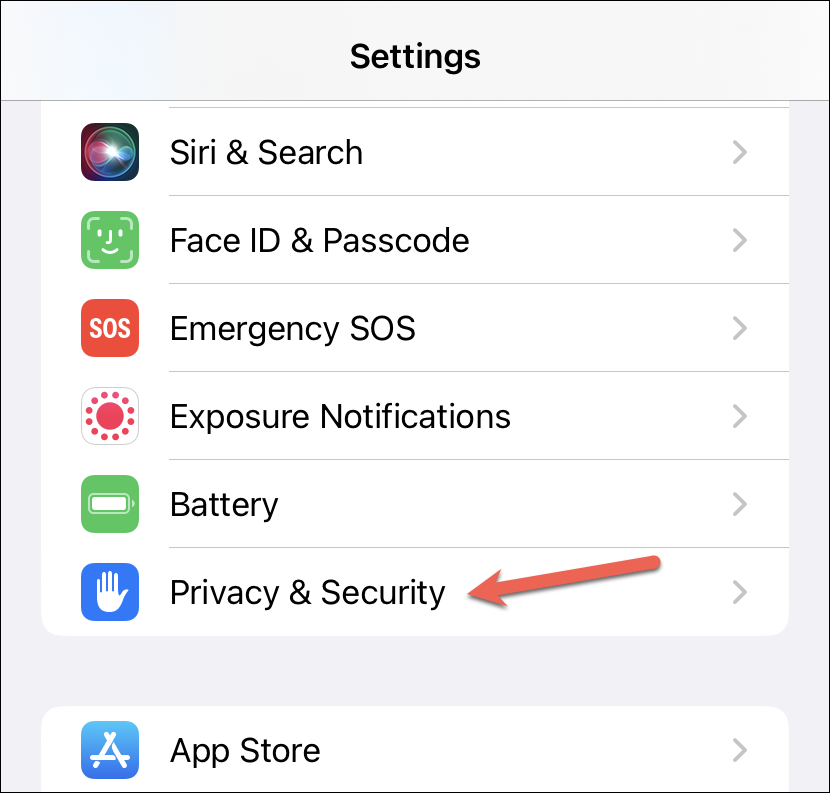
Using Safety Check is rather easy, as it should be so everyone can benefit from the feature. On an iPhone running iOS 16, open the Settings app.
Then, scroll down and tap the option for ‘Privacy & Security’.
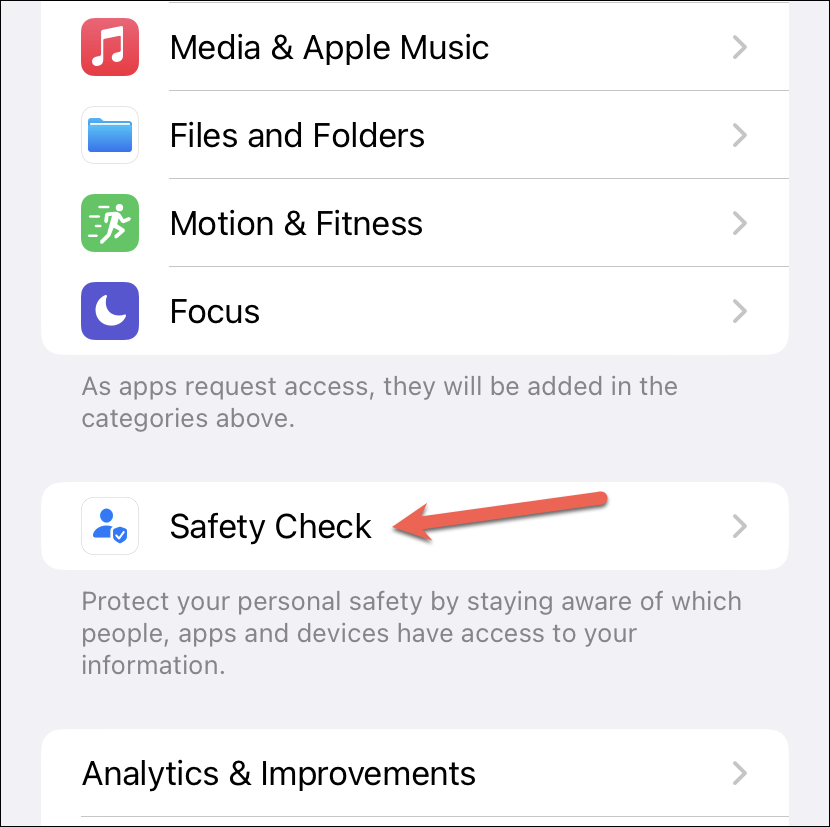
In the Privacy Settings screen, again scroll down until you find the option for ‘Safety Check’.
Use Emergency Reset
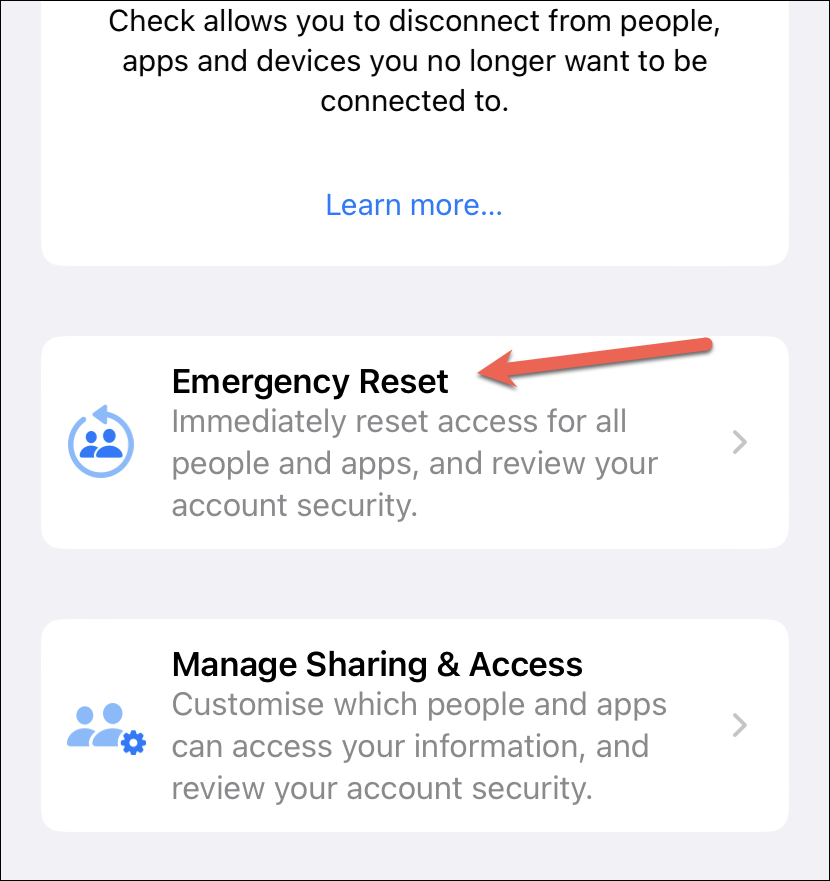
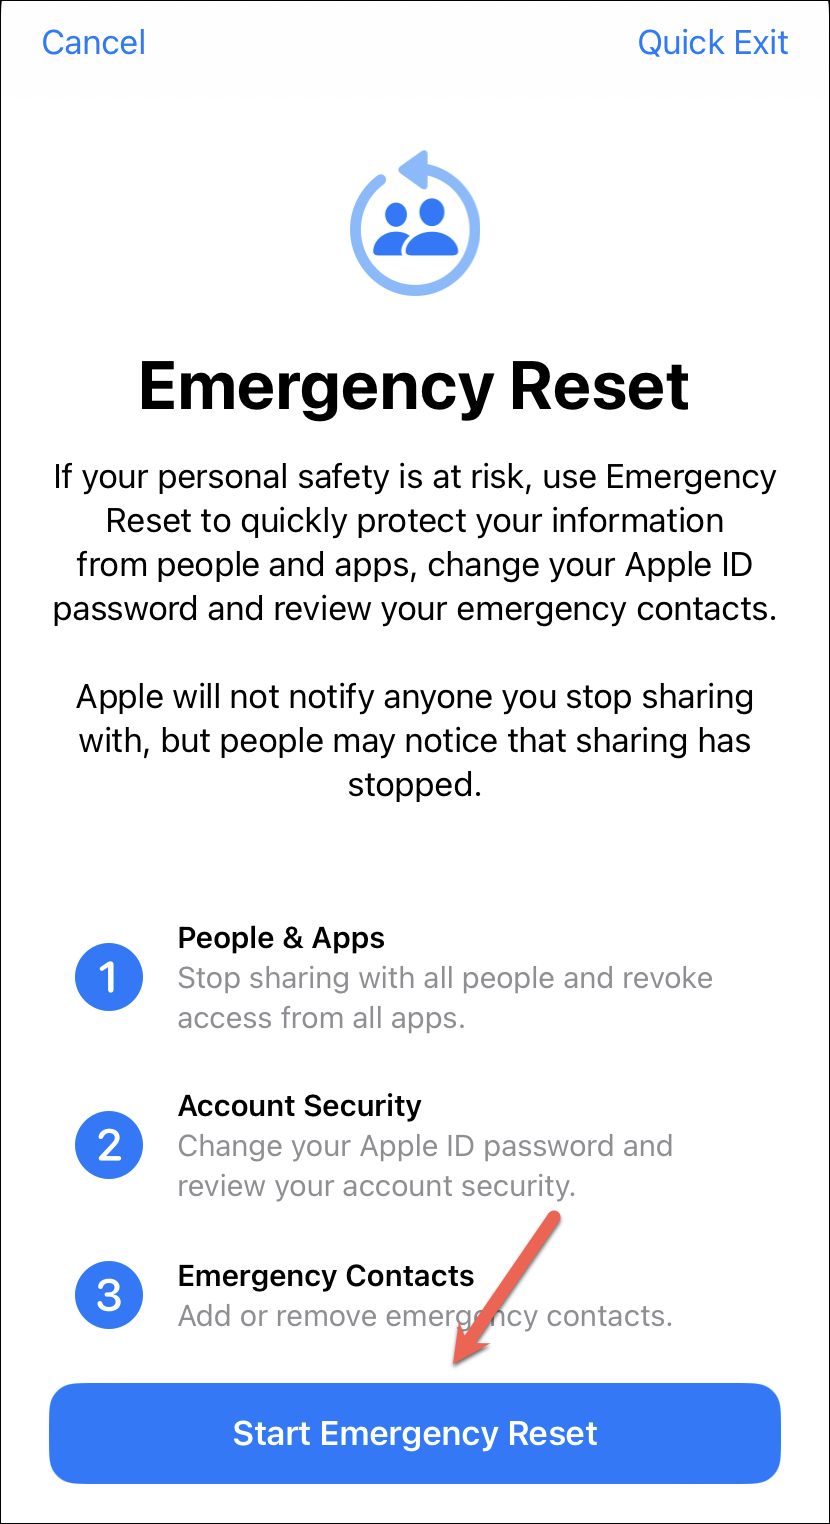
In a critical situation, completely revoking access for all people and apps might be the safest way to go. To immediately reset access for all people and apps, tap the option for ‘Emergency Reset’.
You’ll need to authenticate yourself using Face ID, Touch ID, or your iPhone passcode.
Then, the screen for starting the emergency reset will appear.
Under emergency reset, you’ll have to reset access for all people and apps, change your Apple ID password and review account security (remove your Apple ID from other devices), and add or remove emergency contacts. Unlike customizing access, when using emergency reset, you cannot choose which information you want to stop sharing with which people or apps. Neither can you choose which devices to keep and which to remove. It is a nuclear option that removes all access completely. But it’s also a lot faster as you don’t have to spend time reviewing the settings one by one.
Tap the option for ‘Start Emergency Reset’ to begin.
Then, follow the instructions on the screen to complete the emergency reset. Apple will not notify anyone that you have stopped sharing access with them. But you must note that people might notice on their own.
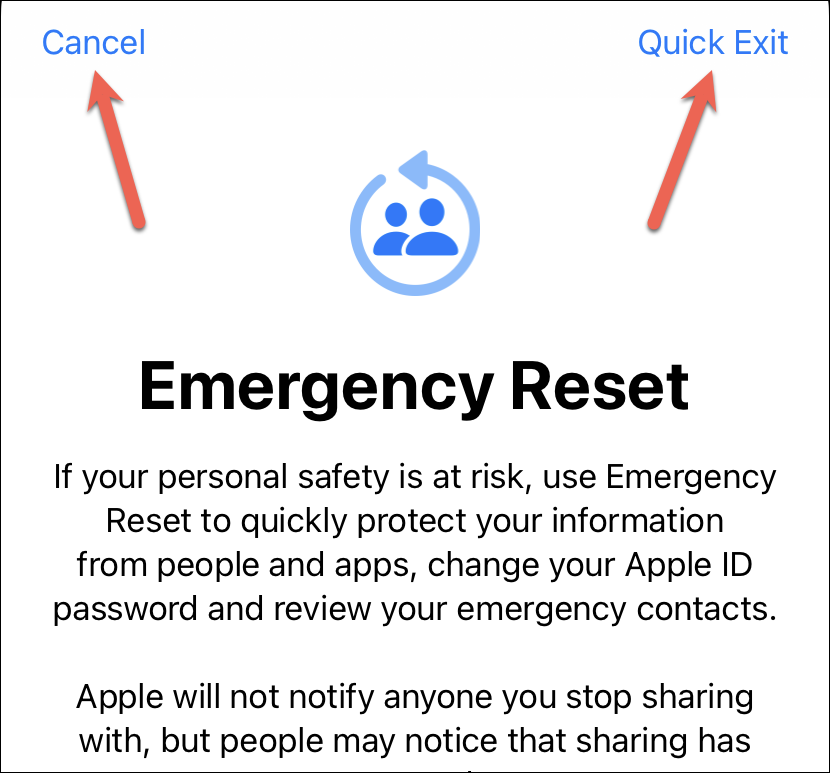
At any time, tap ‘Cancel’ in the upper-left corner of the screen to stop the emergency reset and get back to Safety Check settings. Or, tap ‘Quick Exit’ in the upper-right corner to close Safety Check settings in a hurry.
Customize the Access
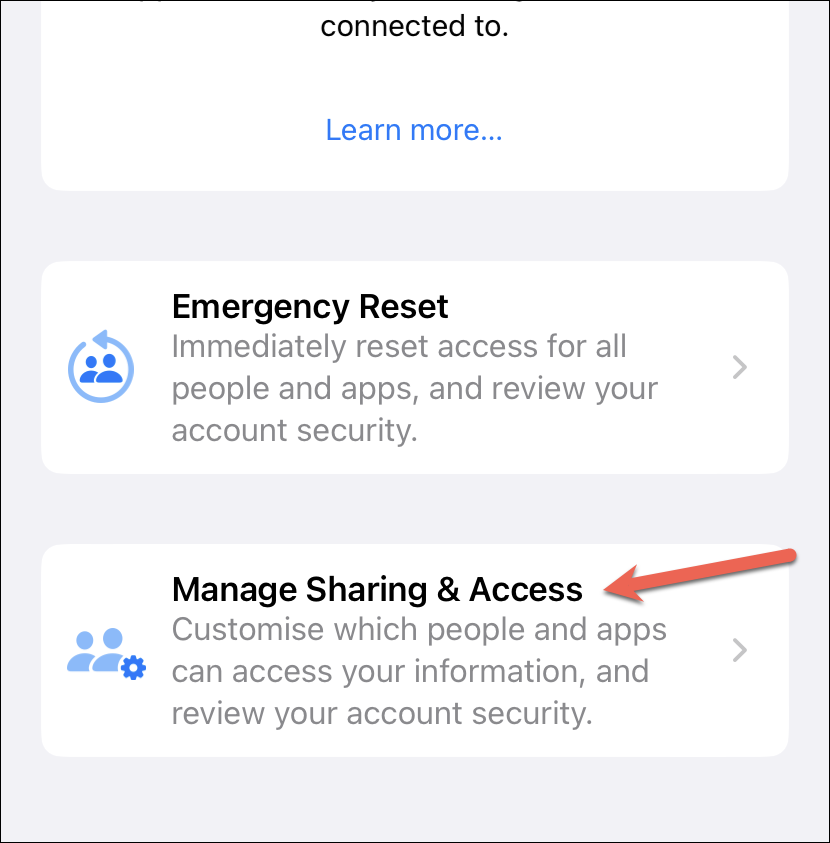
If you only need to revoke access for certain people, you can do it from the Manage Sharing & Access settings. It allows you to manually review every person and app that has access to your information. You can also view which information these people or apps have access to and then decide what to allow and what to revoke.
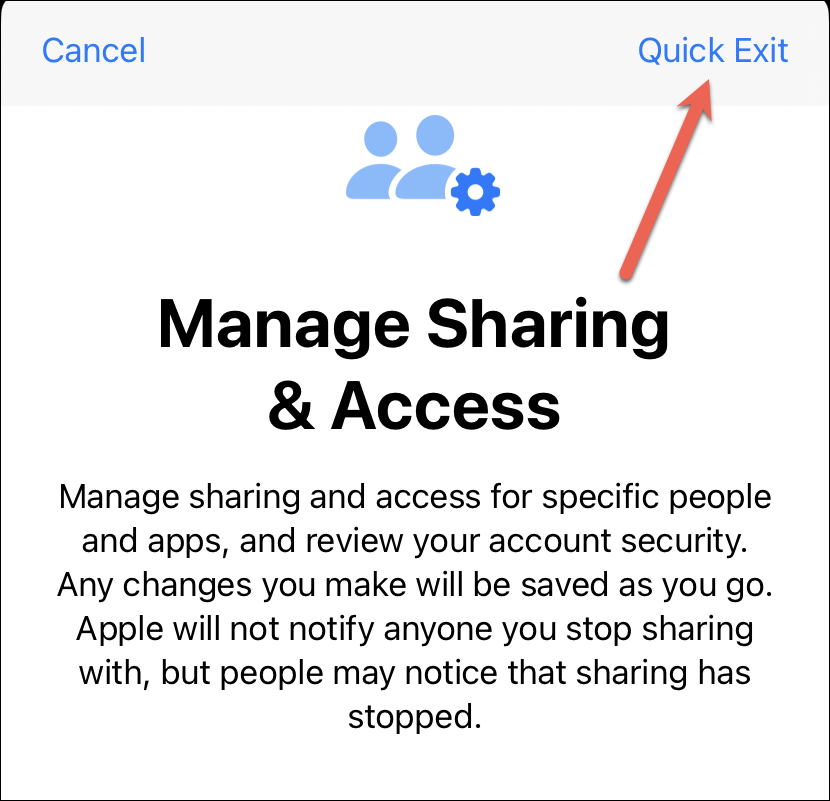
To customize access for people and apps instead of revoking everything for everyone, tap the option for ‘Manage Sharing & Access’ from the Safety Check settings.
You’ll have to authenticate yourself using Face ID, Touch ID, or a passcode. The screen for Managing Sharing & Access will open; tap ‘Continue’ at the bottom to proceed.
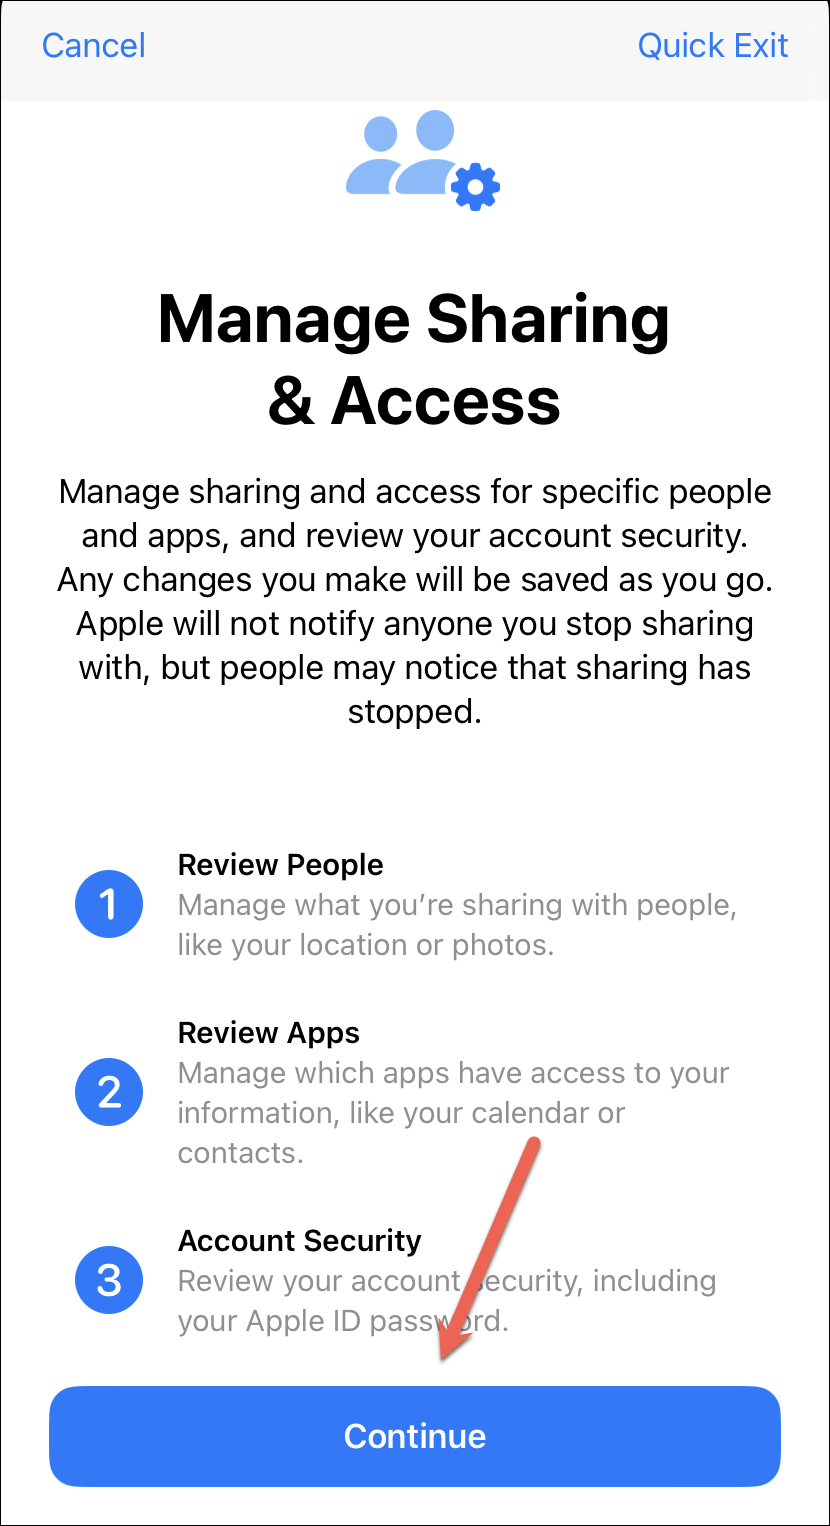
At any time while reviewing your settings, you can tap ‘Quick Exit’ in the top-right corner of the screen to quickly get out of Safety Check settings. The option is present on all the subsequent screens to make it easy to get out.
First, you’ll be able to see all the people you’re currently sharing any information with. Each tile for an individual will also list an overview of the information you’re sharing with them.
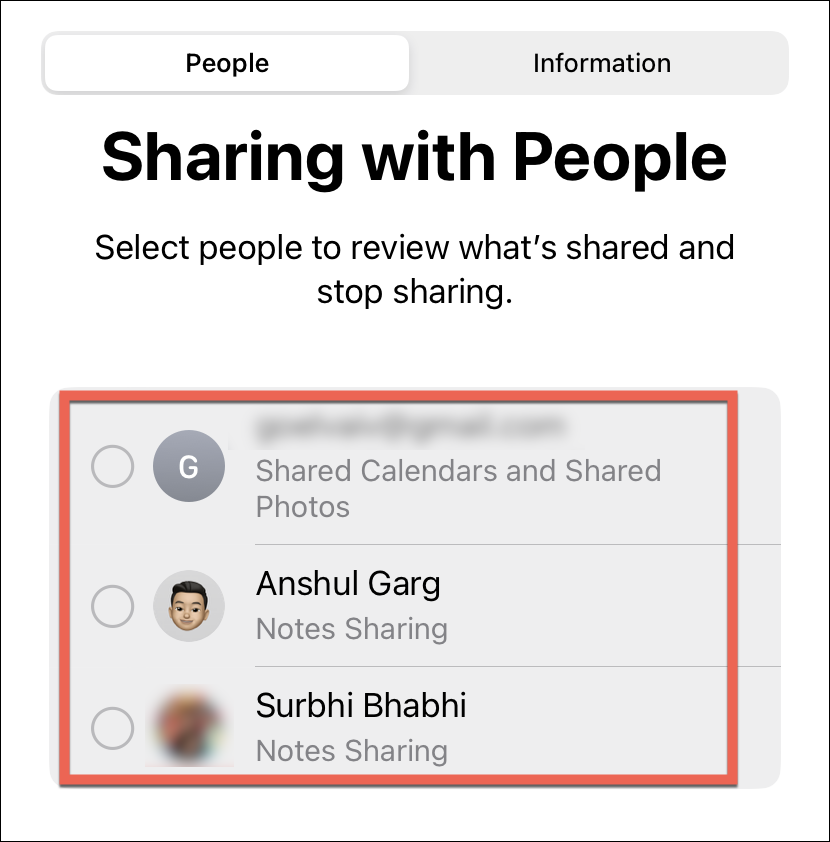
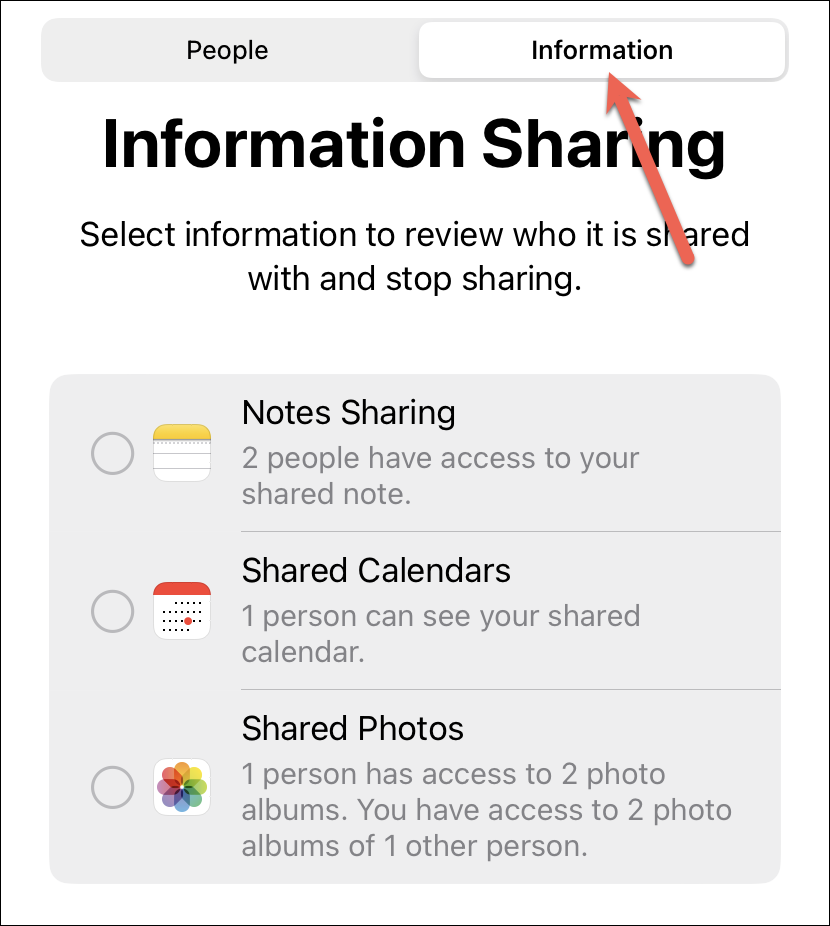
To review access on the information basis, switch to the ‘Information’ tab instead.
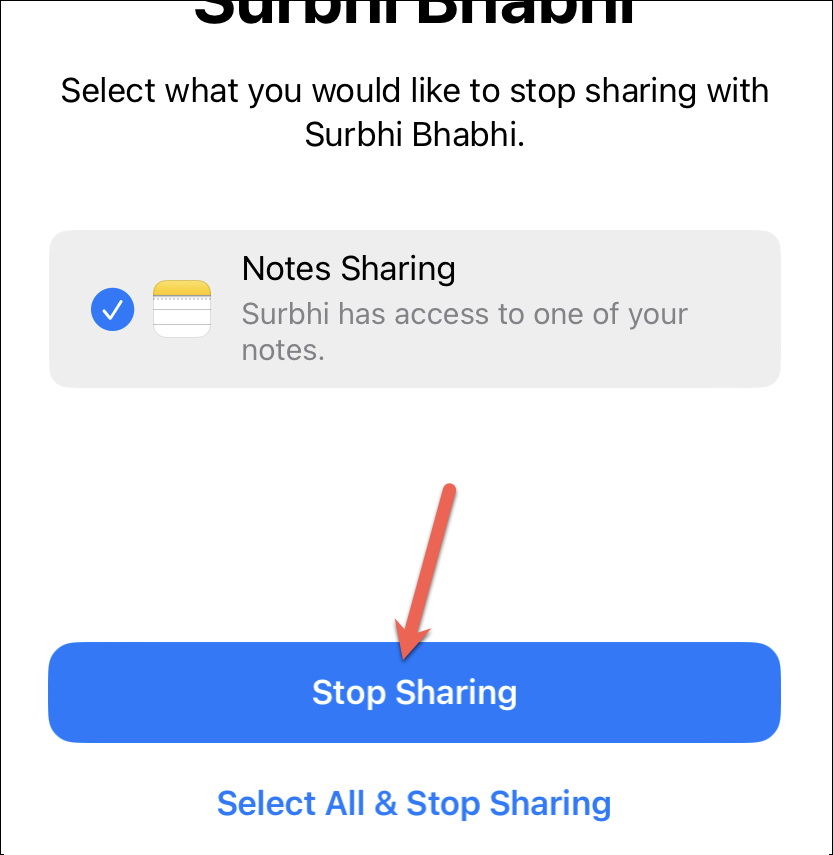
Select the people you want to review the access for and tap ‘Review Sharing’ at the bottom. To stop sharing information with everyone, tap ‘Select All & Stop Sharing’ at the bottom of the screen. If you don’t want to stop sharing access with anyone, tap ‘Skip’ without selecting anyone to move on to the next step, i.e., apps.
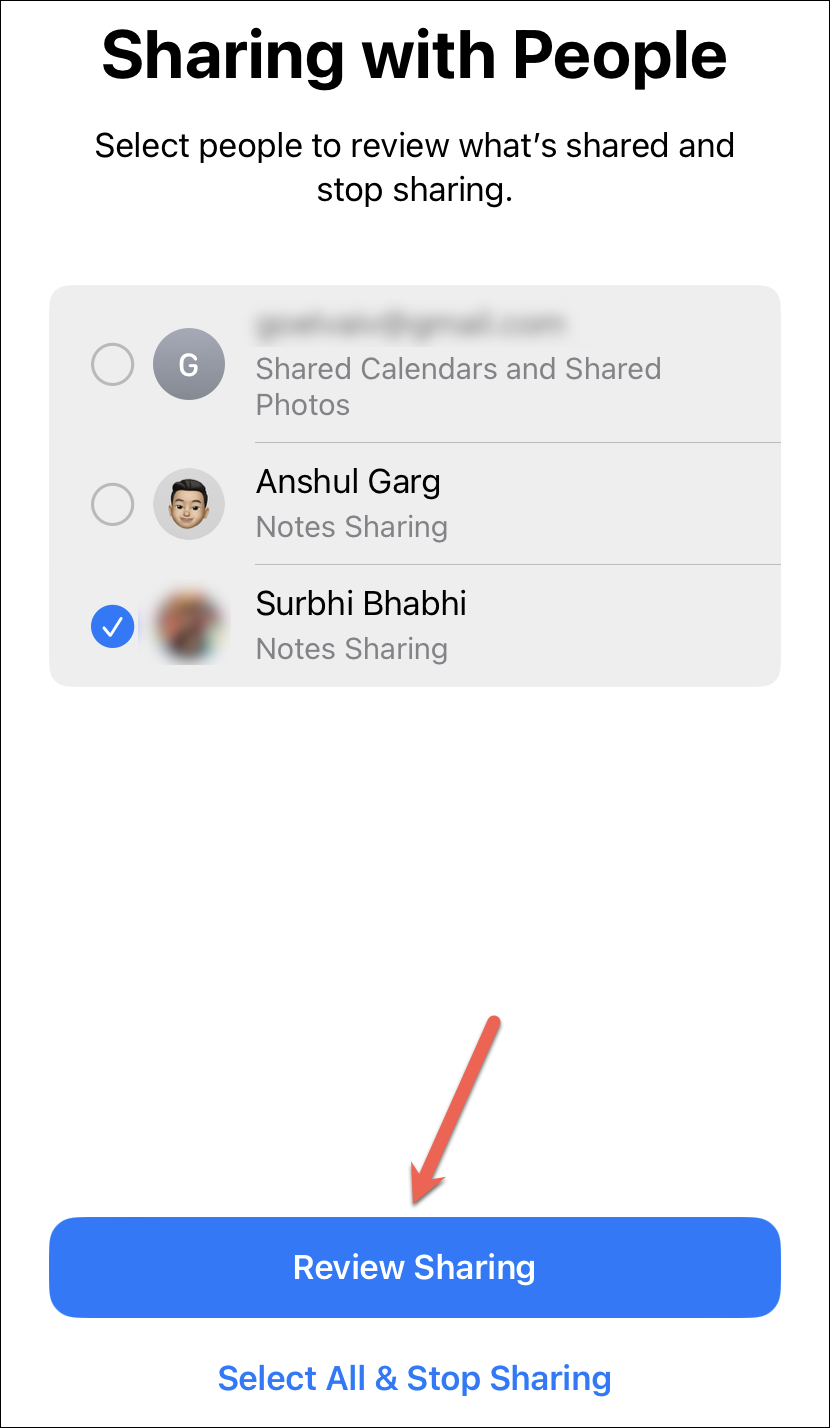
If you chose ‘Review Sharing’, you’ll see all the information being shared with each of the people one by one (if you chose more than one on the previous screen). Select the apps where you’d like to stop sharing access and tap ‘Stop Sharing’.
Once step 1 is complete, the changes you made will be saved. Tap ‘Continue’ to move to the next step.
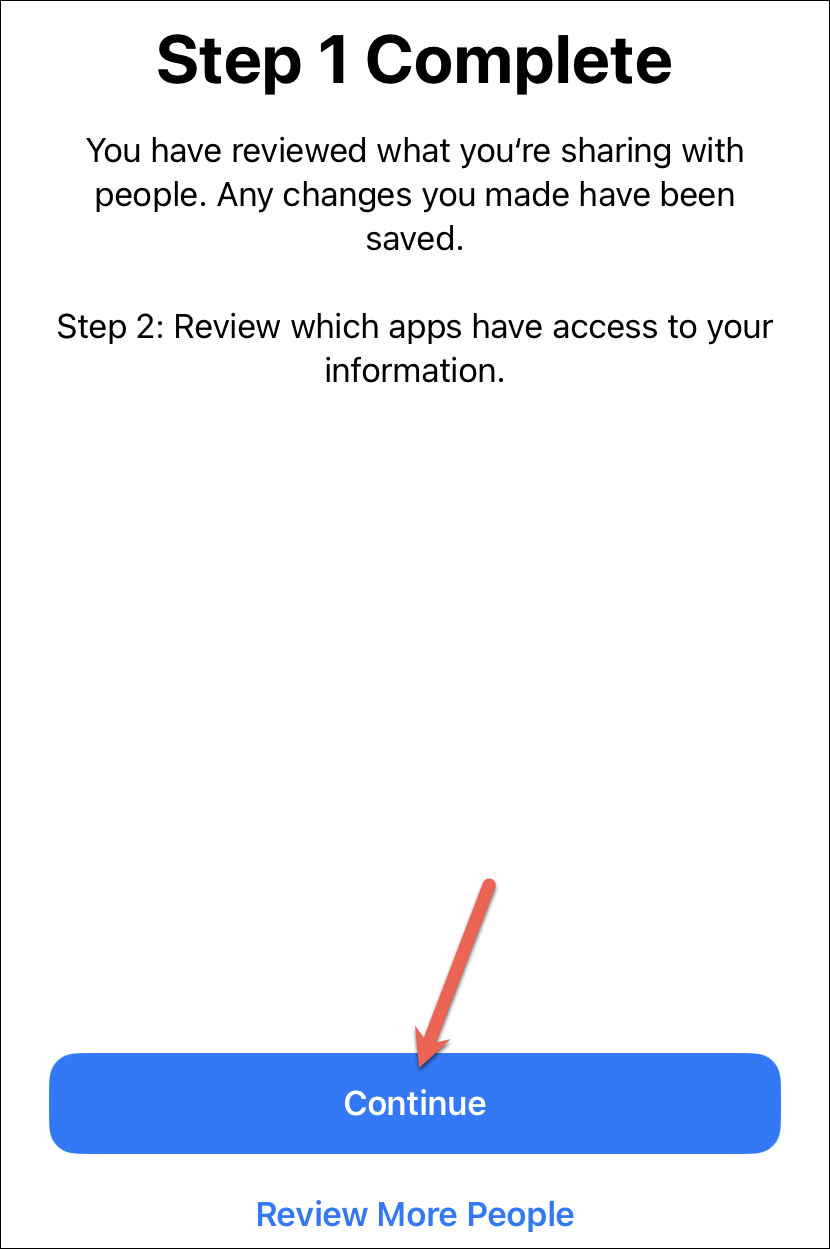
Then, you can similarly review all the apps that have access to any of your information.
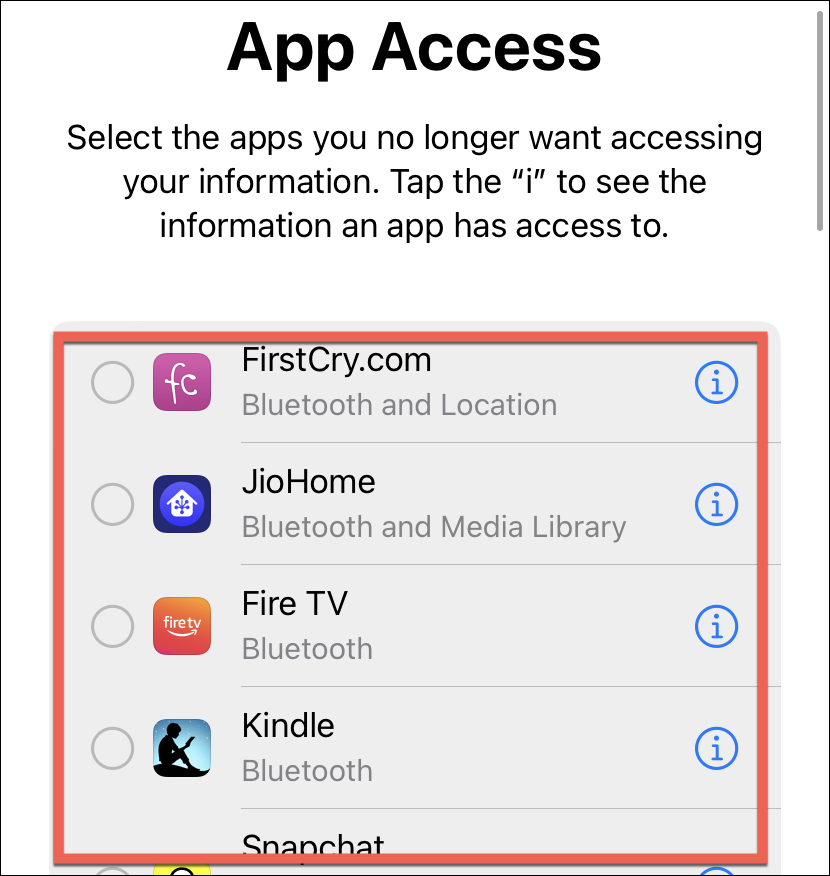
To review on the basis of the information, switch to the ‘Information’ tab from the top.

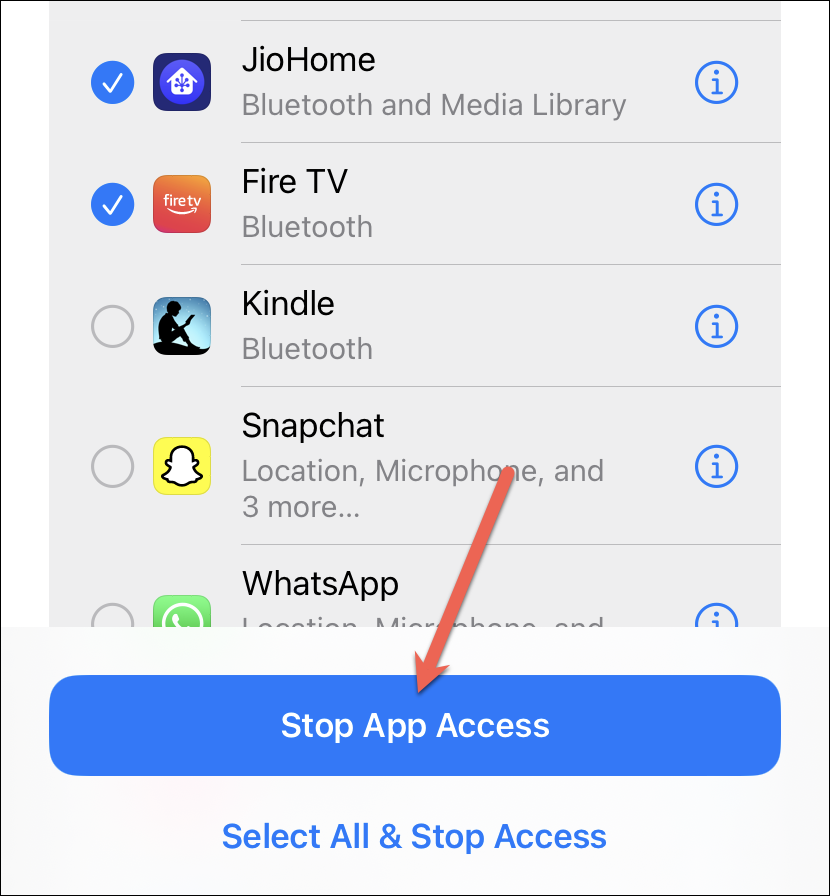
Select the apps you want to stop the access for and tap ‘Stop App Access’ at the bottom. To stop sharing information with all the apps, tap ‘Select All & Stop Access’ from the bottom. You can also skip this step if you don’t want to stop access to any of the apps.
You’ll see that step 2 is complete, no matter which option you choose. Tap ‘Continue’ to move on to the last step.
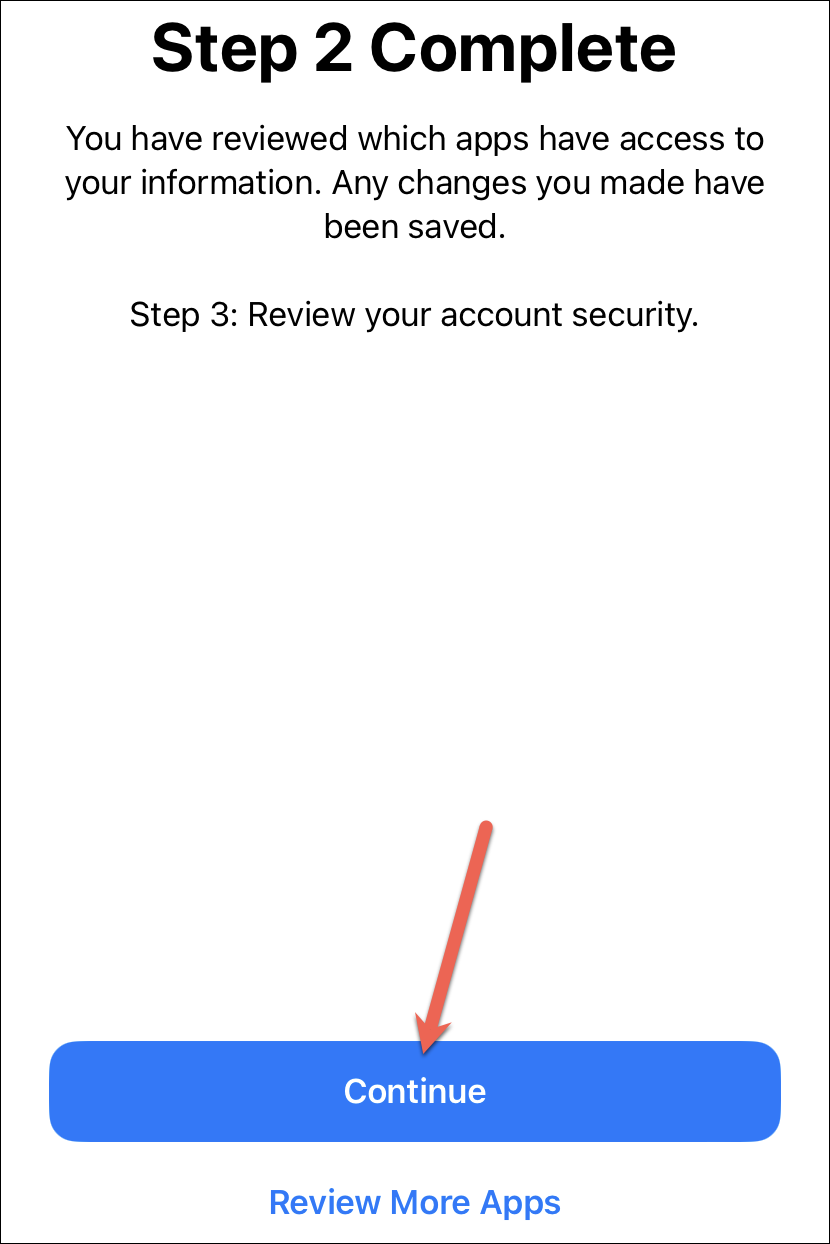
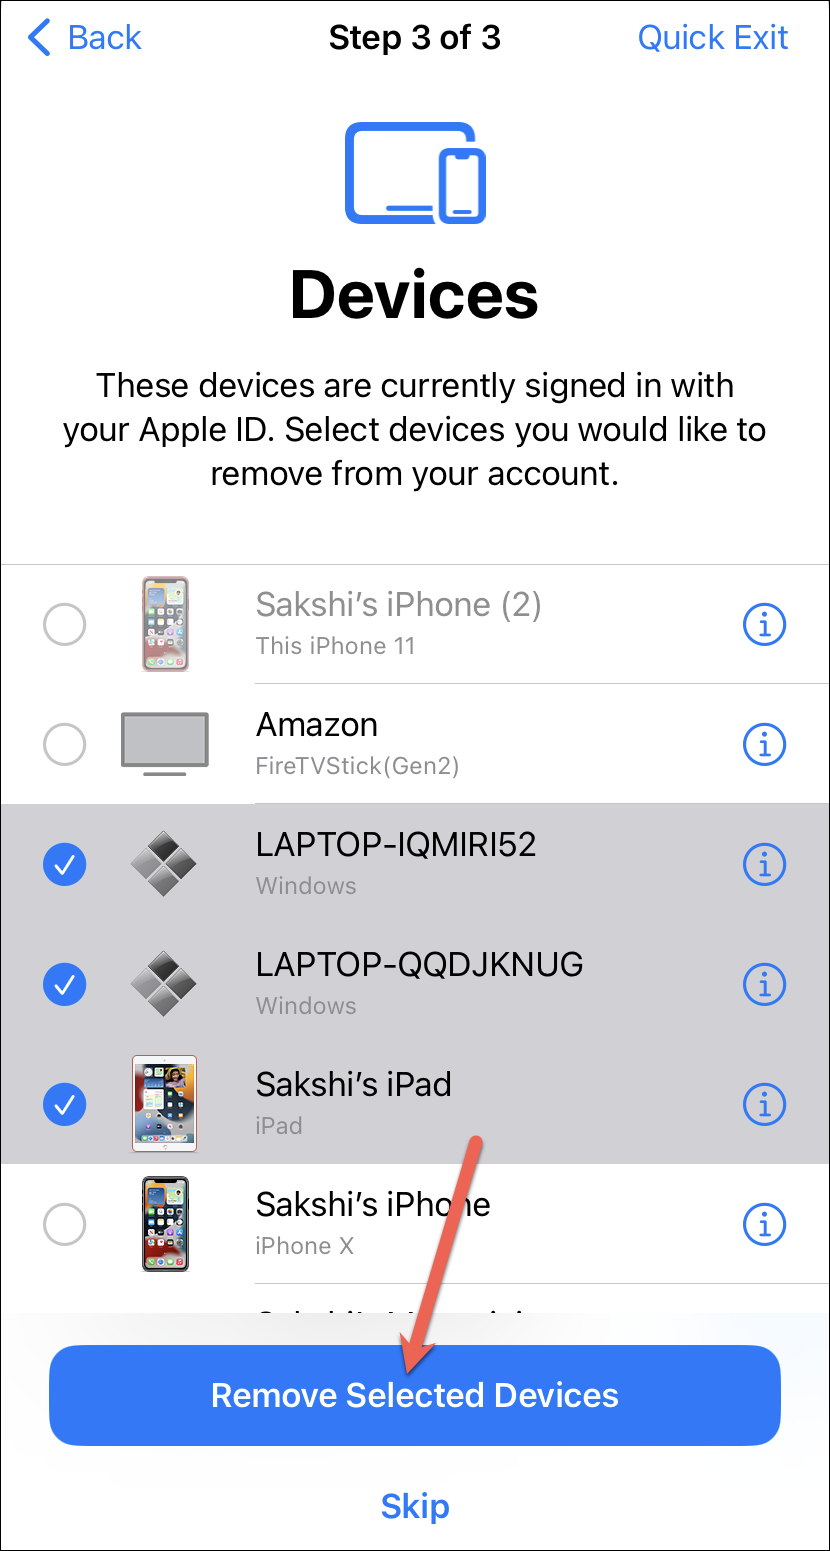
In the last step, all the devices where your Apple ID is currently signed in will appear. Select the devices you want to remove and tap ‘Remove Selected Devices’ at the bottom. Tap ‘Skip’ if you don’t want to remove any device.
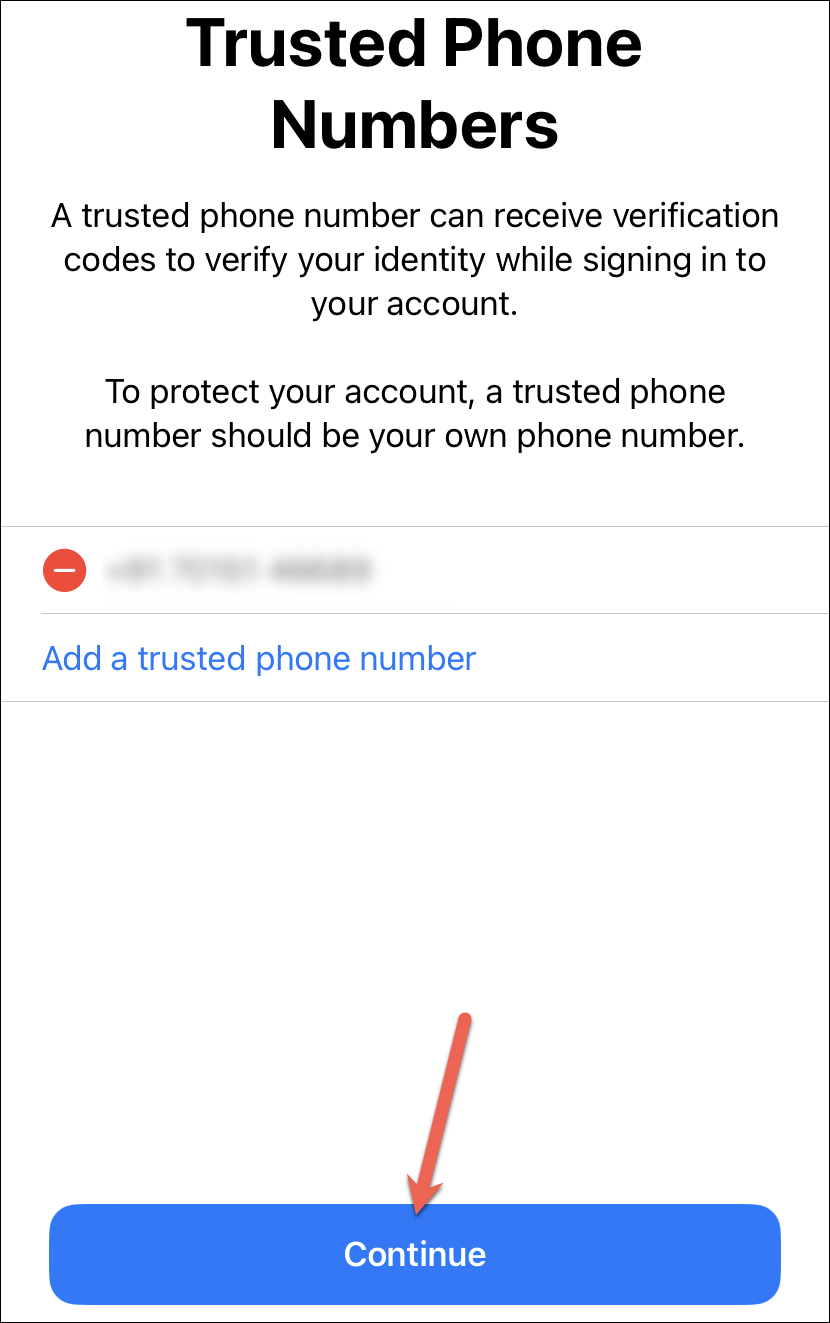
Then, review the trusted phone numbers where you can receive verification codes while signing in to your Apple ID. You can add new numbers, remove any number, or tap ‘Continue’ without making any changes.
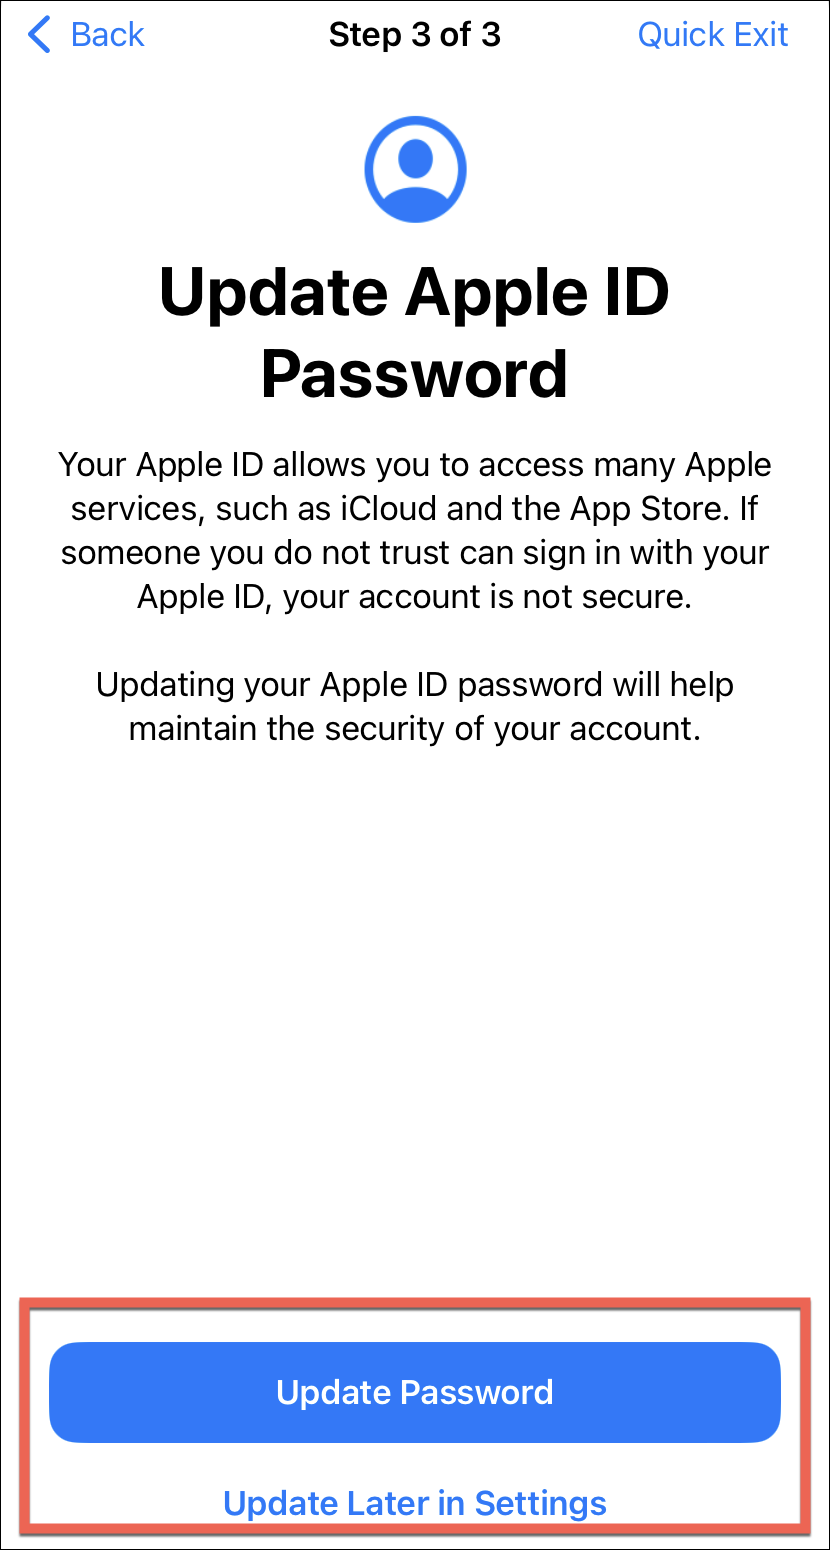
Then, choose whether you want to update your Apple ID password. Tap ‘Update Password’ to change it or ‘Update Later in Settings’ to leave it as it is.
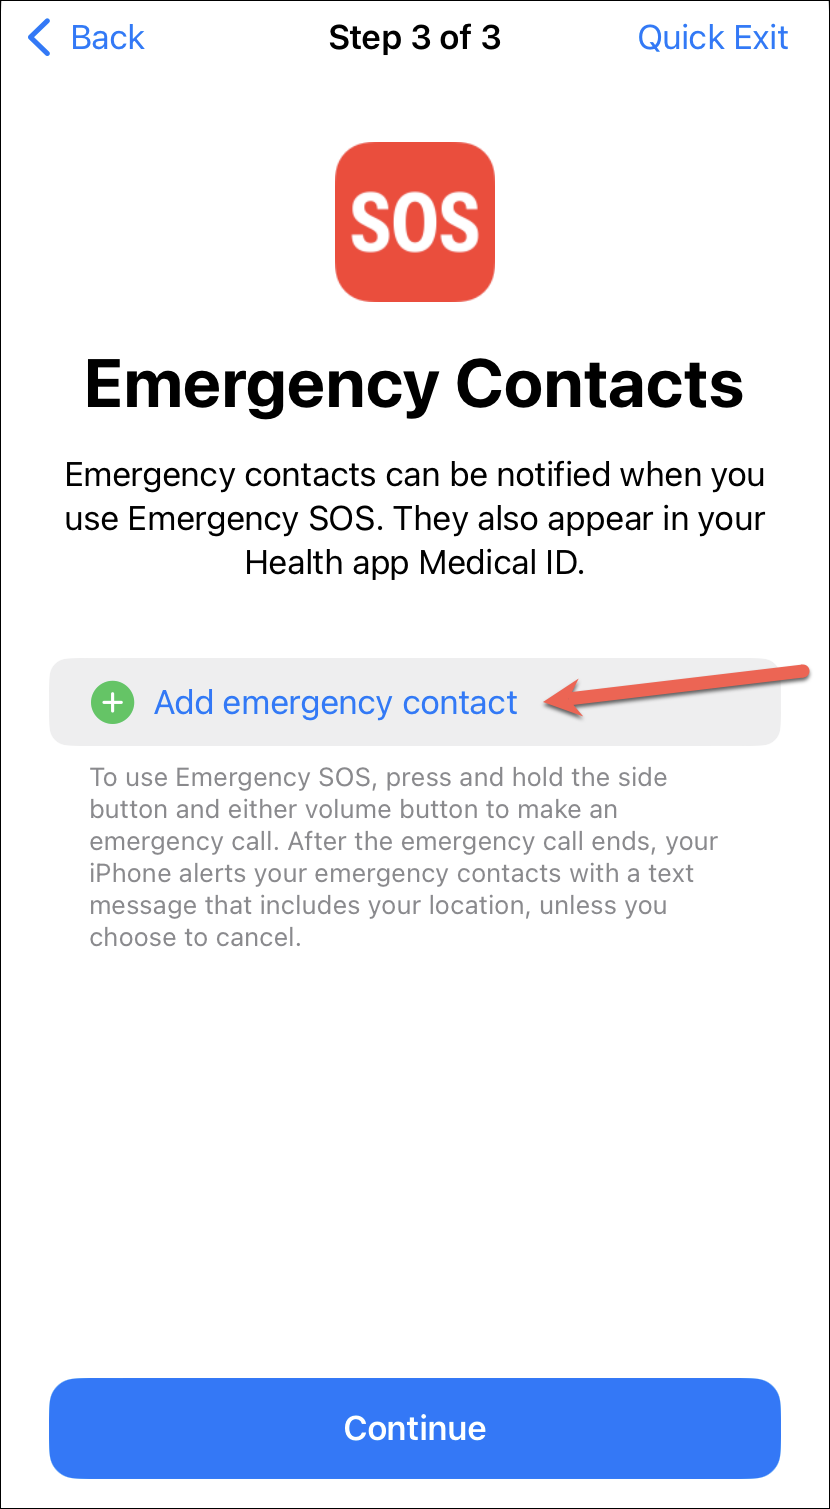
You’ll also have to review your emergency contacts. You can add any new contacts or remove previously added ones.
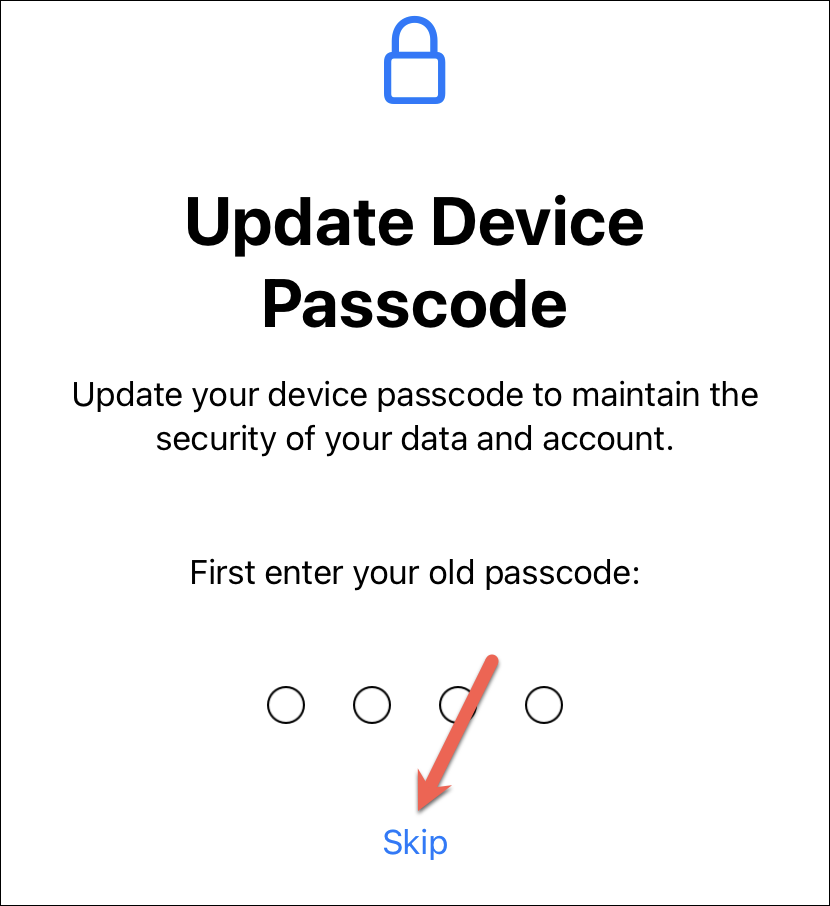
Finally, update your device passcode if someone else has access to it. Otherwise, tap ‘Skip’.
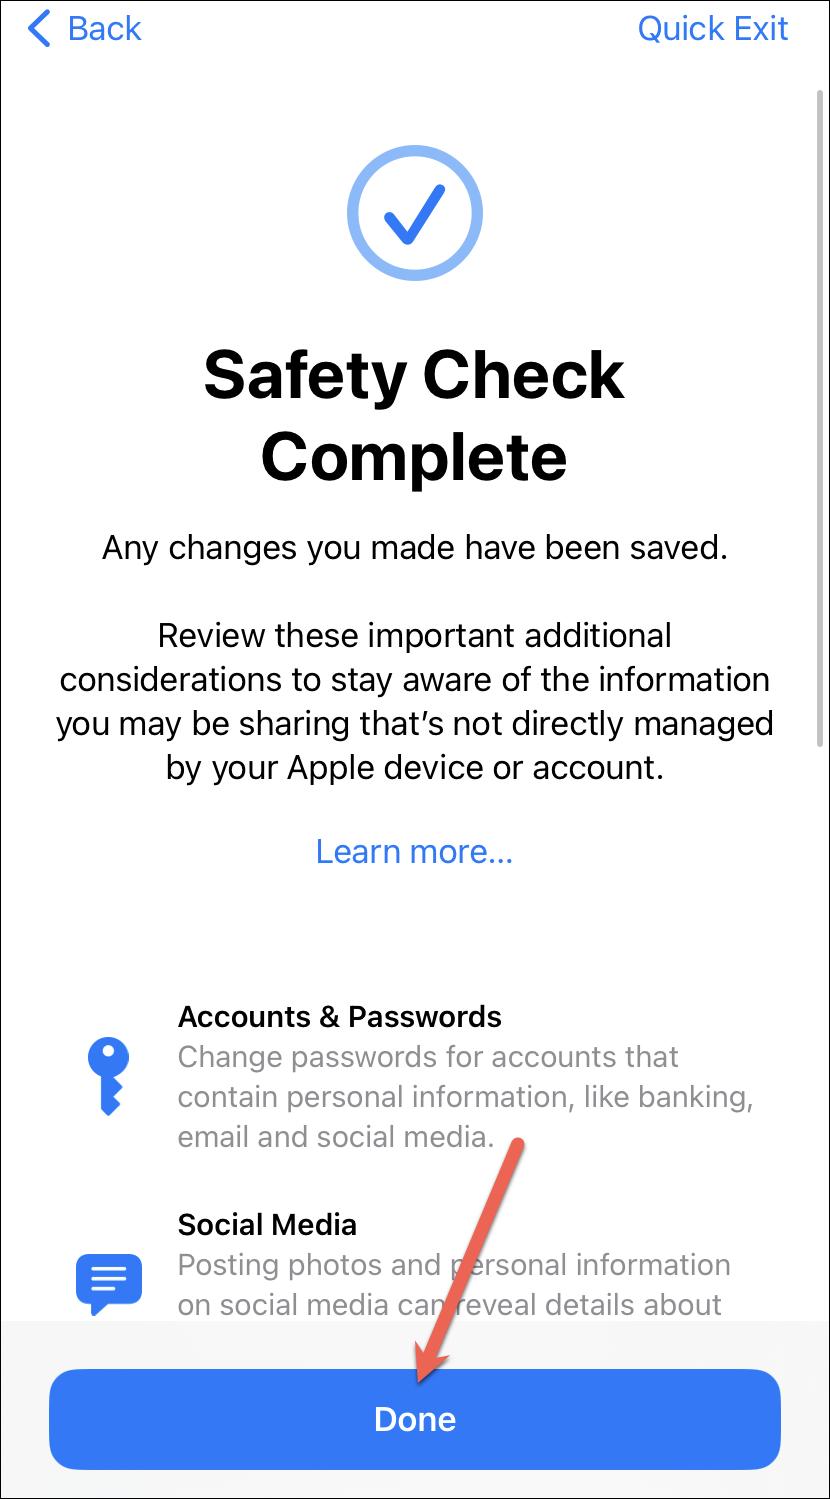
Your safety check is complete. Once you complete the safety check, your iPhone will also recommend additional considerations you should be aware of.
Some of these include changing passwords for any shared accounts, keeping location tracking notifications on to get notifications about any AirTags moving with you, leaving the family sharing group if you share the group with someone you don’t trust, and reviewing settings on additional devices (like a child’s) as well as any shared mobile plans, etc. These do not fall under the jurisdiction of Safety Check but are important nonetheless and you should go over them.
Tap ‘Done’ to close the overlay screen.
Safety Check is a great initiative to protect the safety of users in abusive situations. If you find yourself in such a situation, hopefully, this guide will help you. We hope you stay safe!


