
Apple introduced the iCloud Shared Photo Library at the WWDC’22 keynote for iOS 16. But when iOS 16 arrived for the public, the feature was absent. But finally, with iOS 16.1, users have access to the shared library that makes sharing memories extremely seamless on the Apple ecosystem.
Here’s everything you need to know to set up iCloud Shared Photo Library on your iPhone.
How Does iCloud Shared Photo Library Work?
iCloud Shared Library is a separate library in the Photos app on your Apple device where you can share photos with up to five other friends or family members. iCloud Shared Library is separate from Family Sharing. You can invite participants other than the ones in your Family group. Or if you don’t have a family group, you don’t need to create one to use Shared Photo Library.
Note: Users under 13 can only join or create a shared library with members of their family group.
Everyone who is a part of the library will be a collaborator, i.e., they can contribute photos to the library. All members of the library, and not just the organizer, also have equal privileges when it comes to the photos in the library – they can view, edit, and delete the photos.
But while everyone has equal privileges when it comes to the shared library, only one user has to bear the brunt. We’re talking about the storage space.
All content that you add to the shared library counts toward the organizer’s iCloud storage.
That’s basically the only difference between the organizer, i.e., the person who initially sets up the Shared Library, and the other participants. No matter how much content other participants contribute to the Shared Library, it won’t towards their iCloud Storage; only the creator’s.
There’s also one other prominent difference. Only the organizer can invite other people to the library. There can be a total of 6 participants in the library. You can only belong to one Shared Library at a time, whether you create it or join someone else’s.
When you add anything to the Shared Library, it is moved from your personal library and isn’t available there any longer. Since iCloud Shared Library is only available on iOS 16.1, iPadOS 16.1, and macOS Ventura, you won’t be able to view these photos and videos on devices running an OS version older than these. But it is easy to move content back to your personal library.
The only additional requirement for setting up Shared Library is that you must have iCloud Photos turned on. If you don’t have iCloud Photos enabled, go to the Settings app. Then, tap your name at the top.
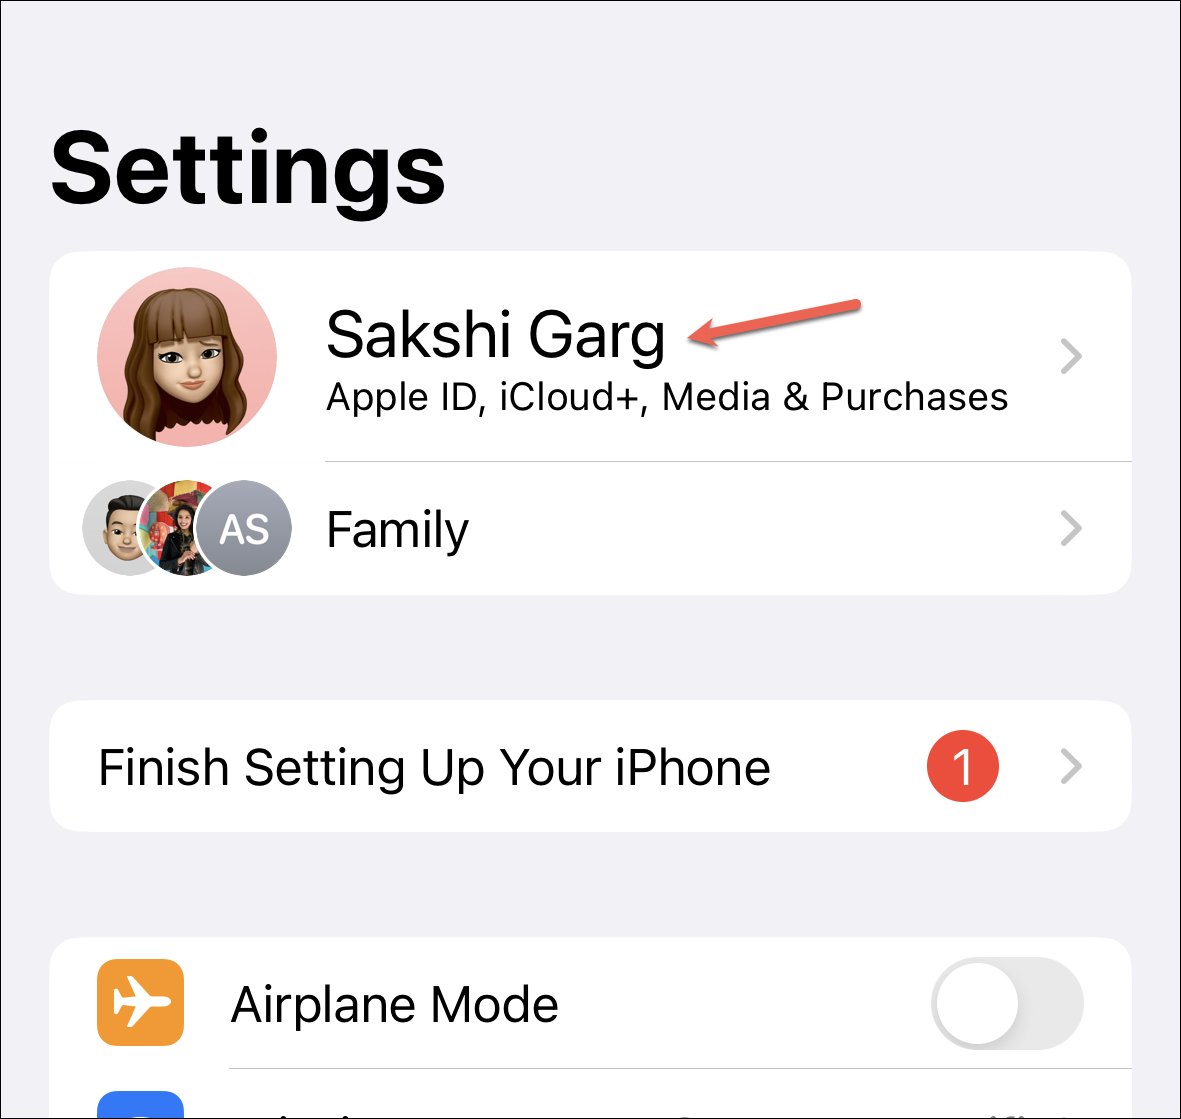
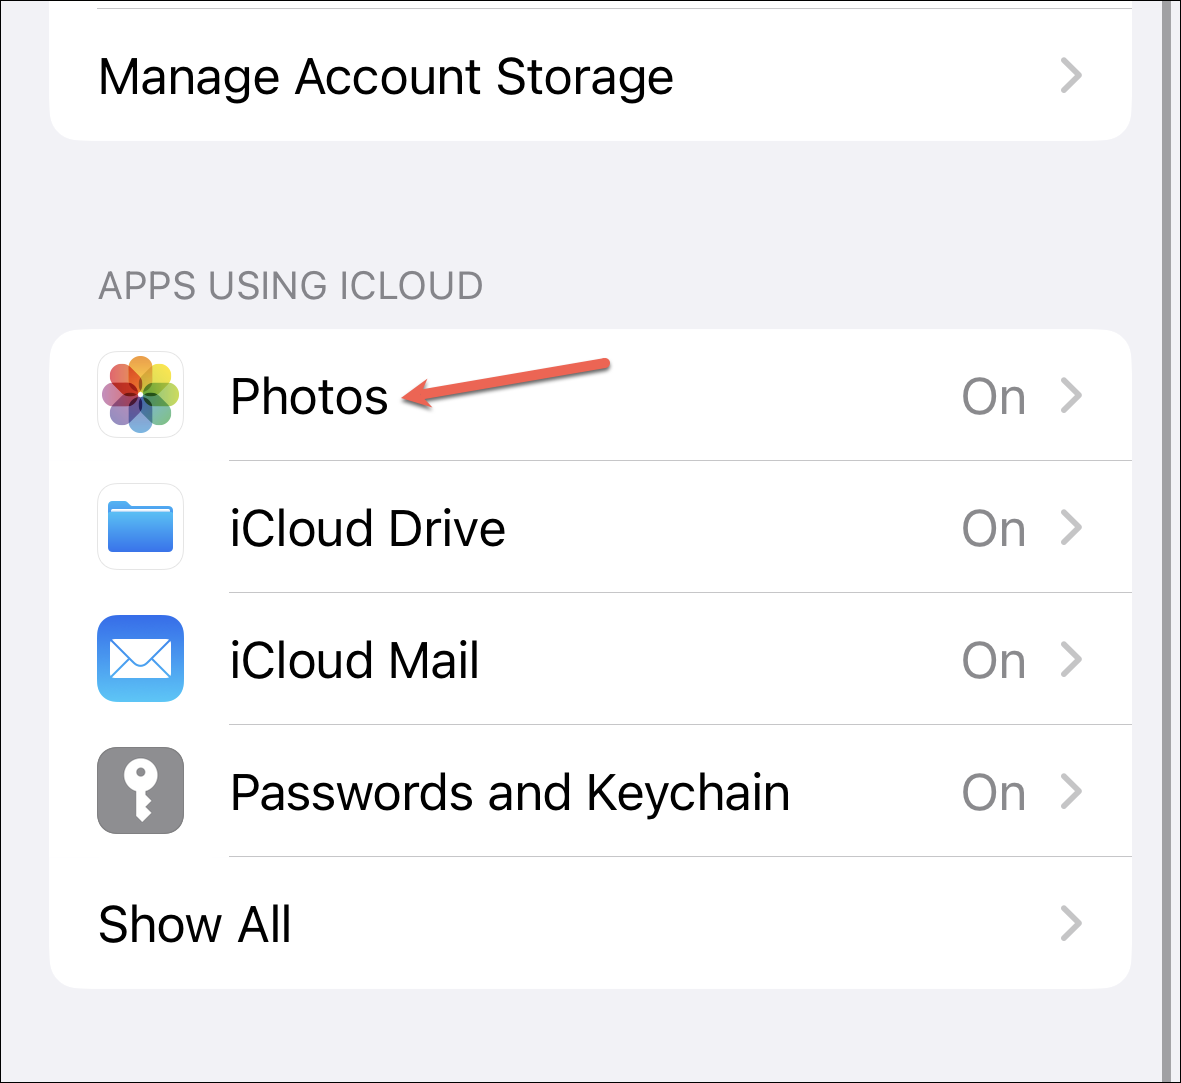
Tap the option for ‘iCloud’.

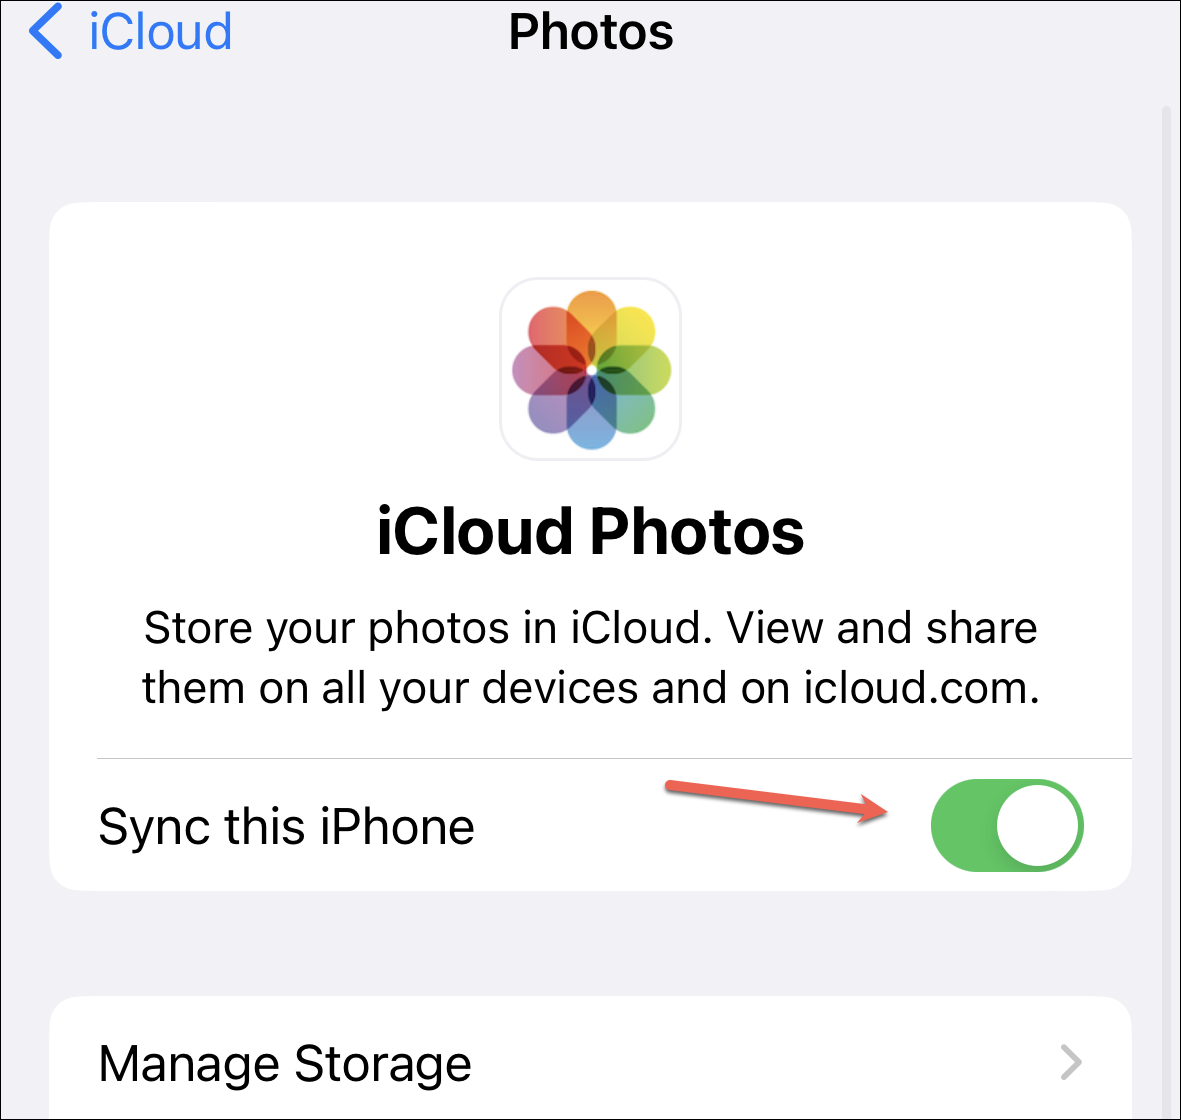
Now, tap the option for ‘Photos’.
Finally, enable the toggle for ‘Sync this iPhone’ if it isn’t enabled.
Setting Up iCloud Shared Library on iPhone
If you are willing to helm this ship, i.e., be the creator of the library and give up your iCloud storage, then setting up Shared Library on your iPhone is easy.
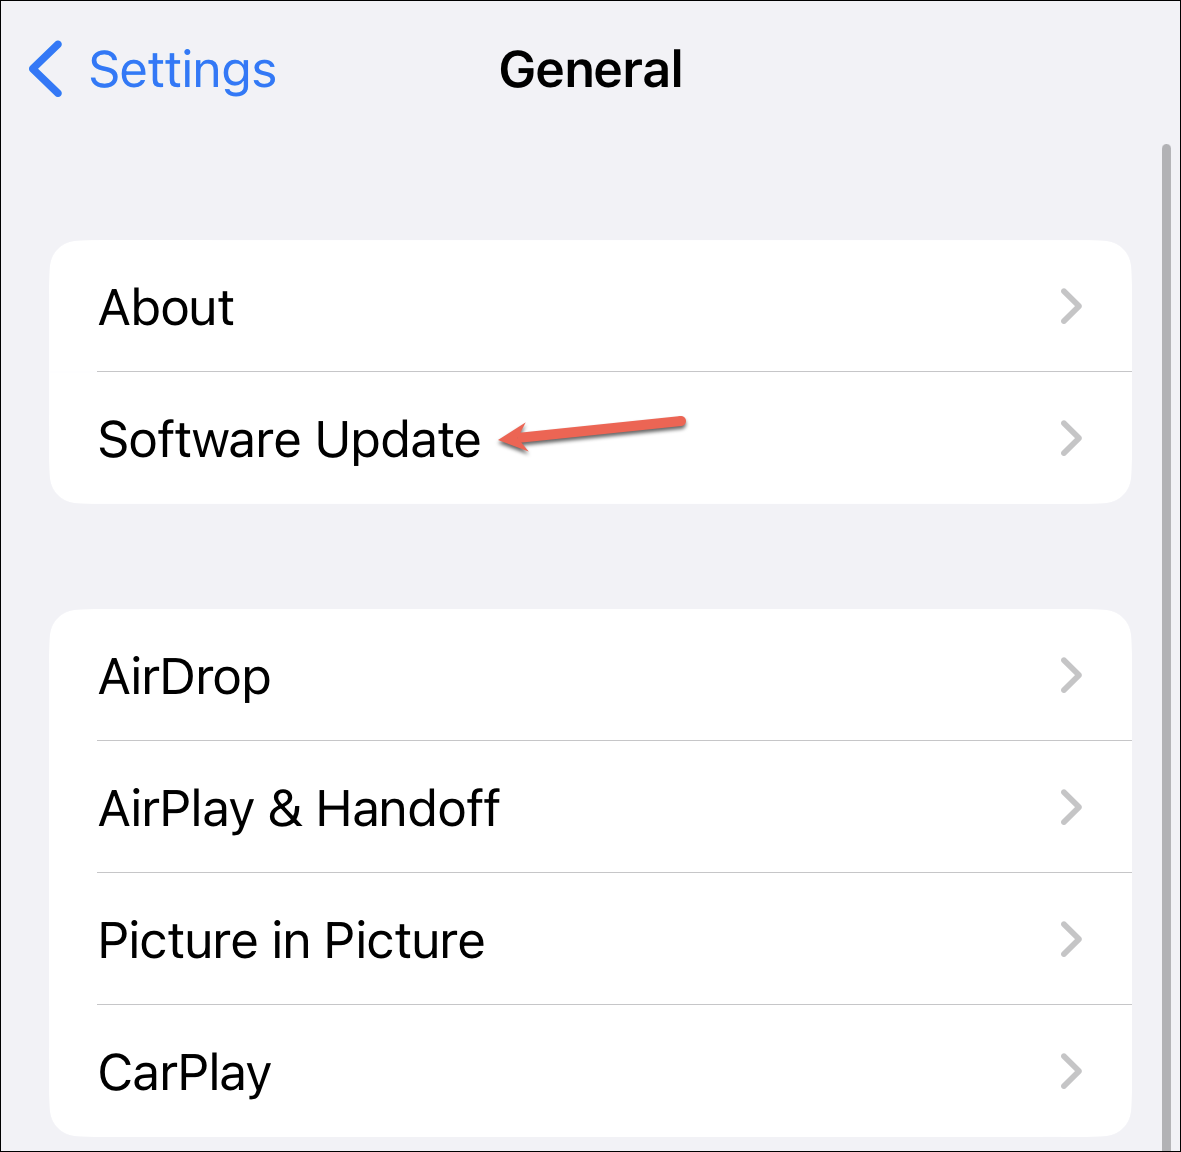
Make sure you’ve updated to iOS 16.1 by going to General > Software Update from the Settings app.
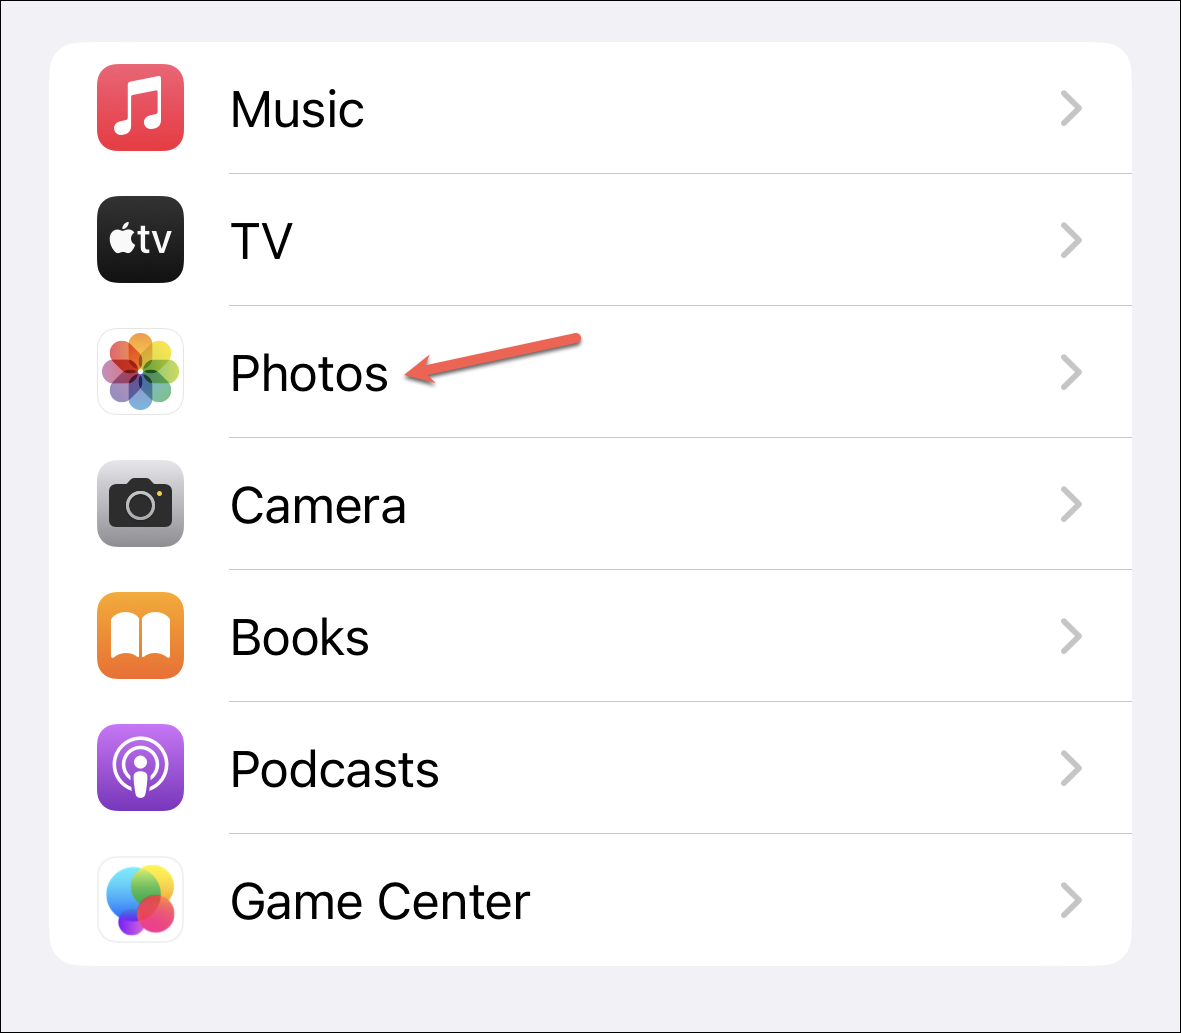
Now, navigate to ‘Photos’ from the Settings app.
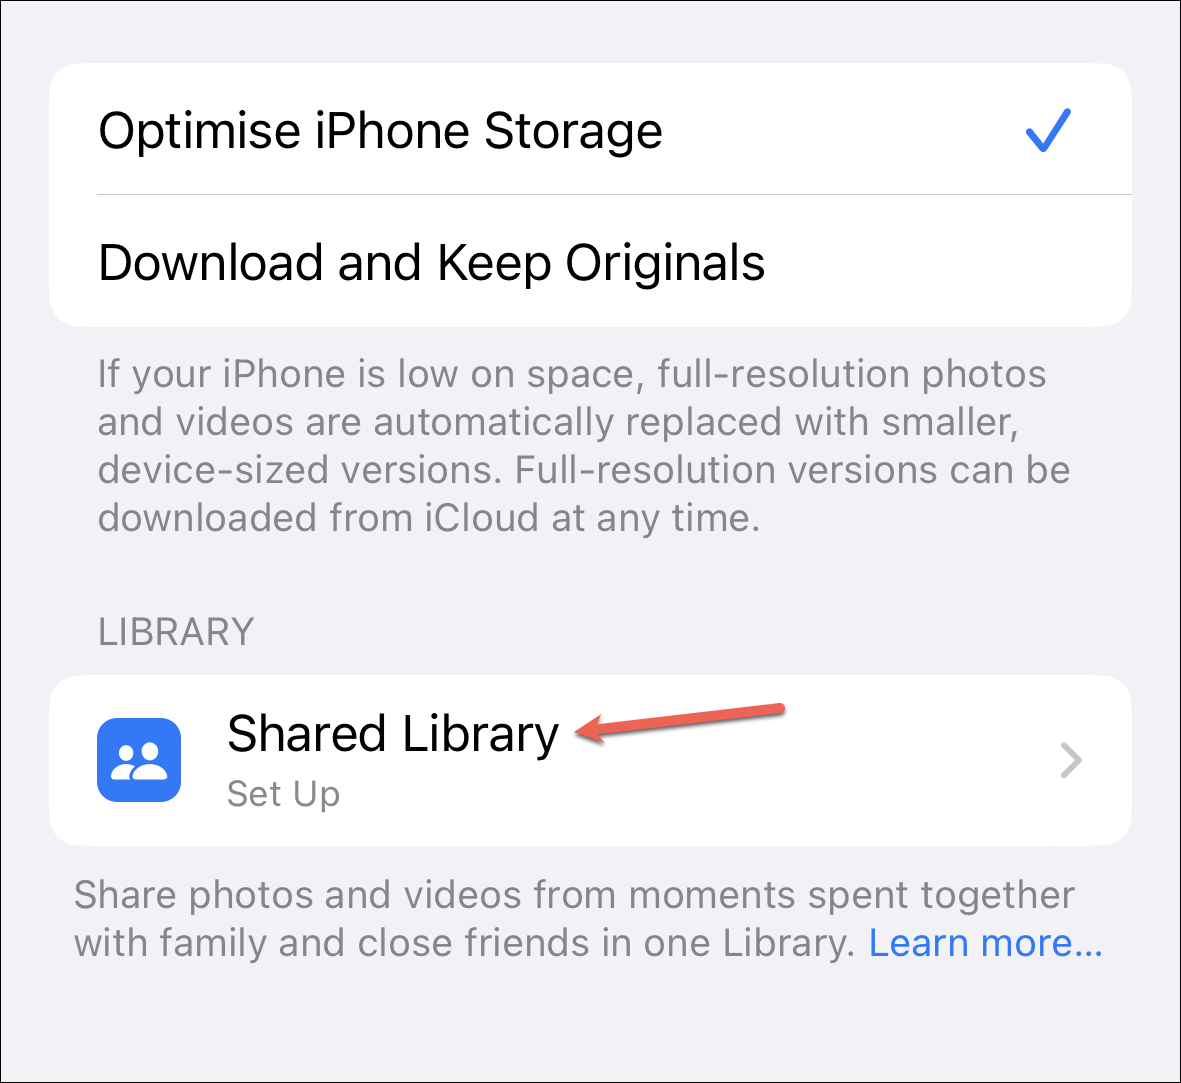
Then, tap the option for ‘Shared Library’.
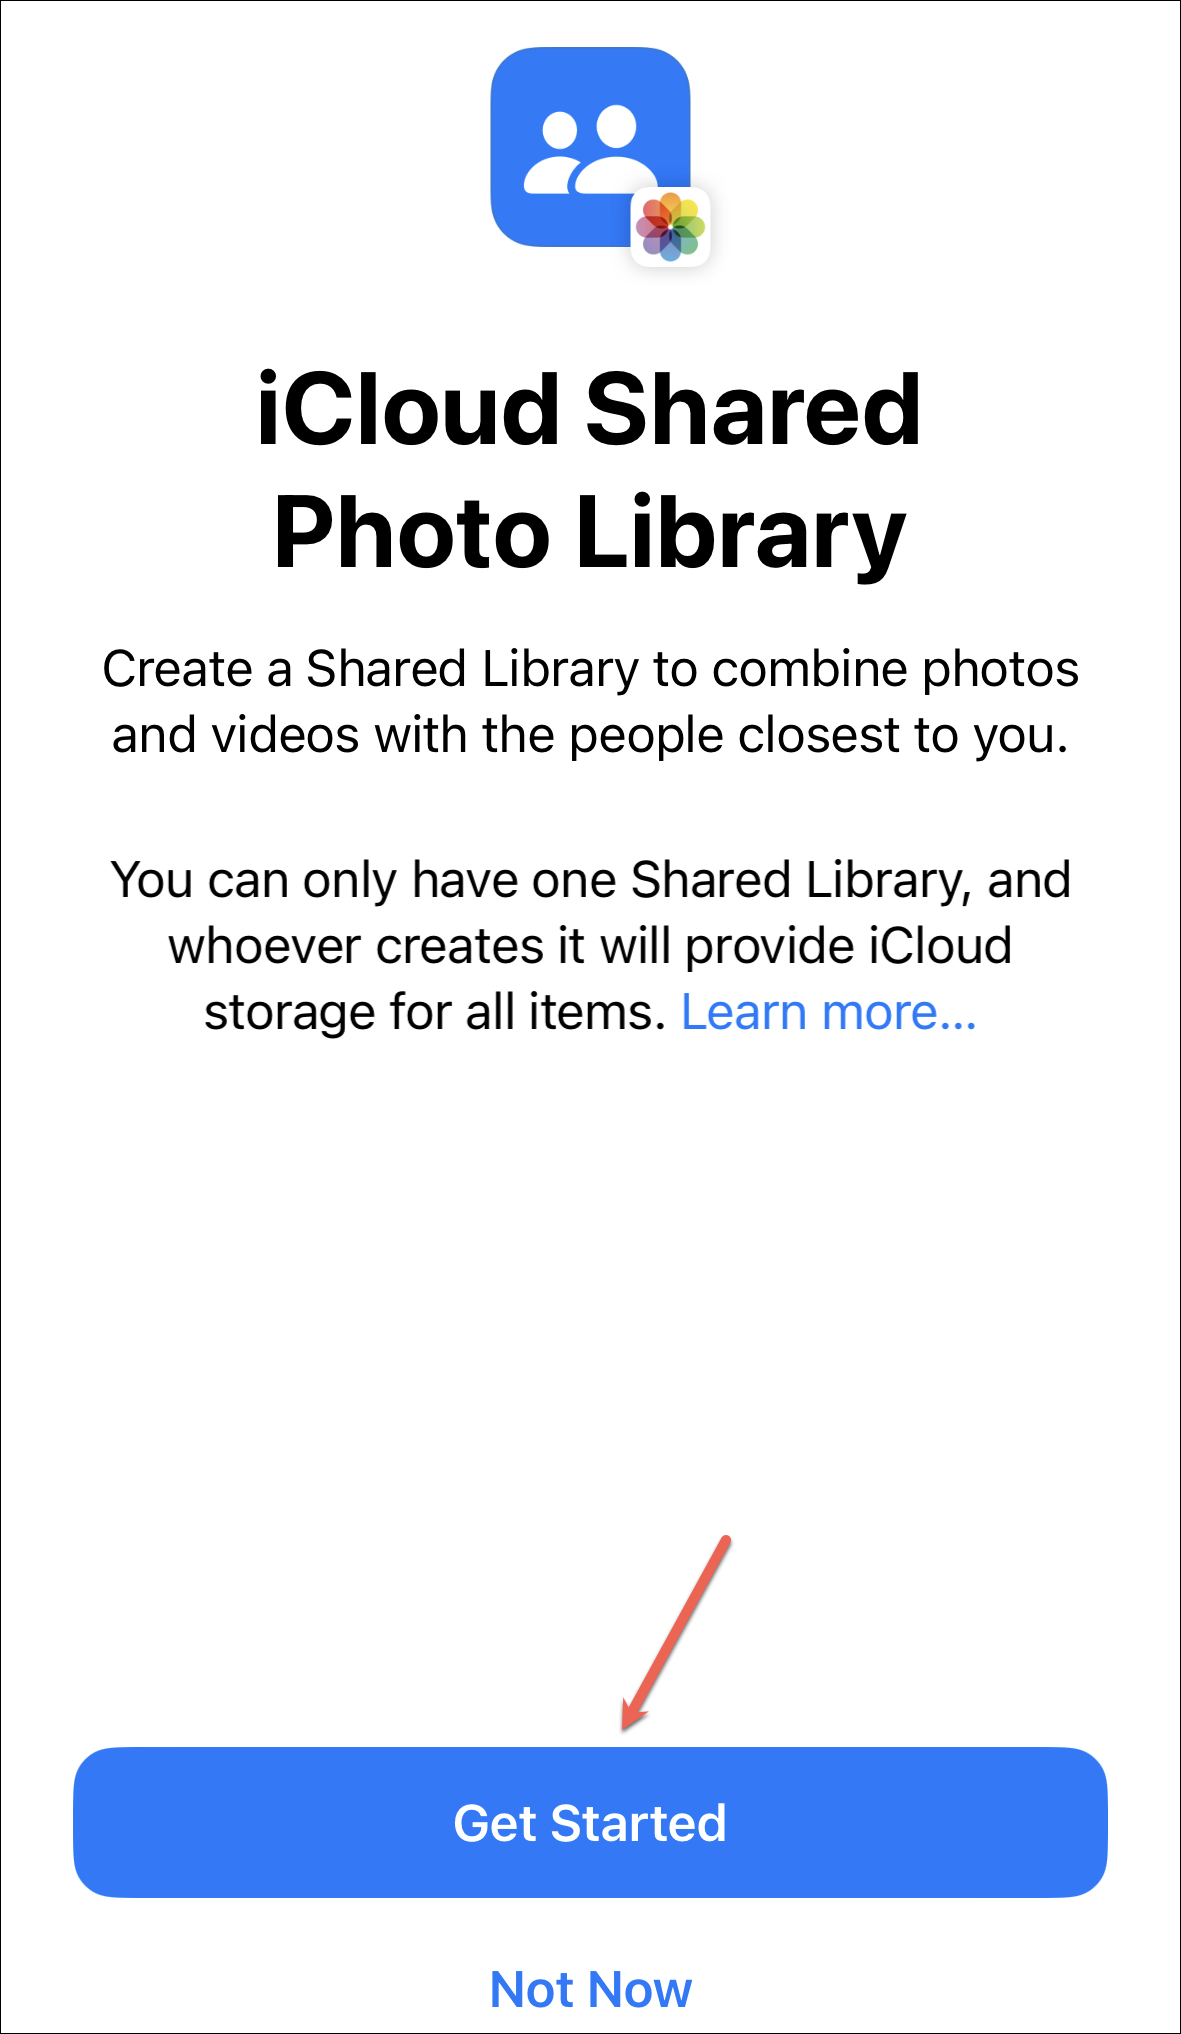
An onboarding screen will appear. Tap ‘Get Started’ to create the library.
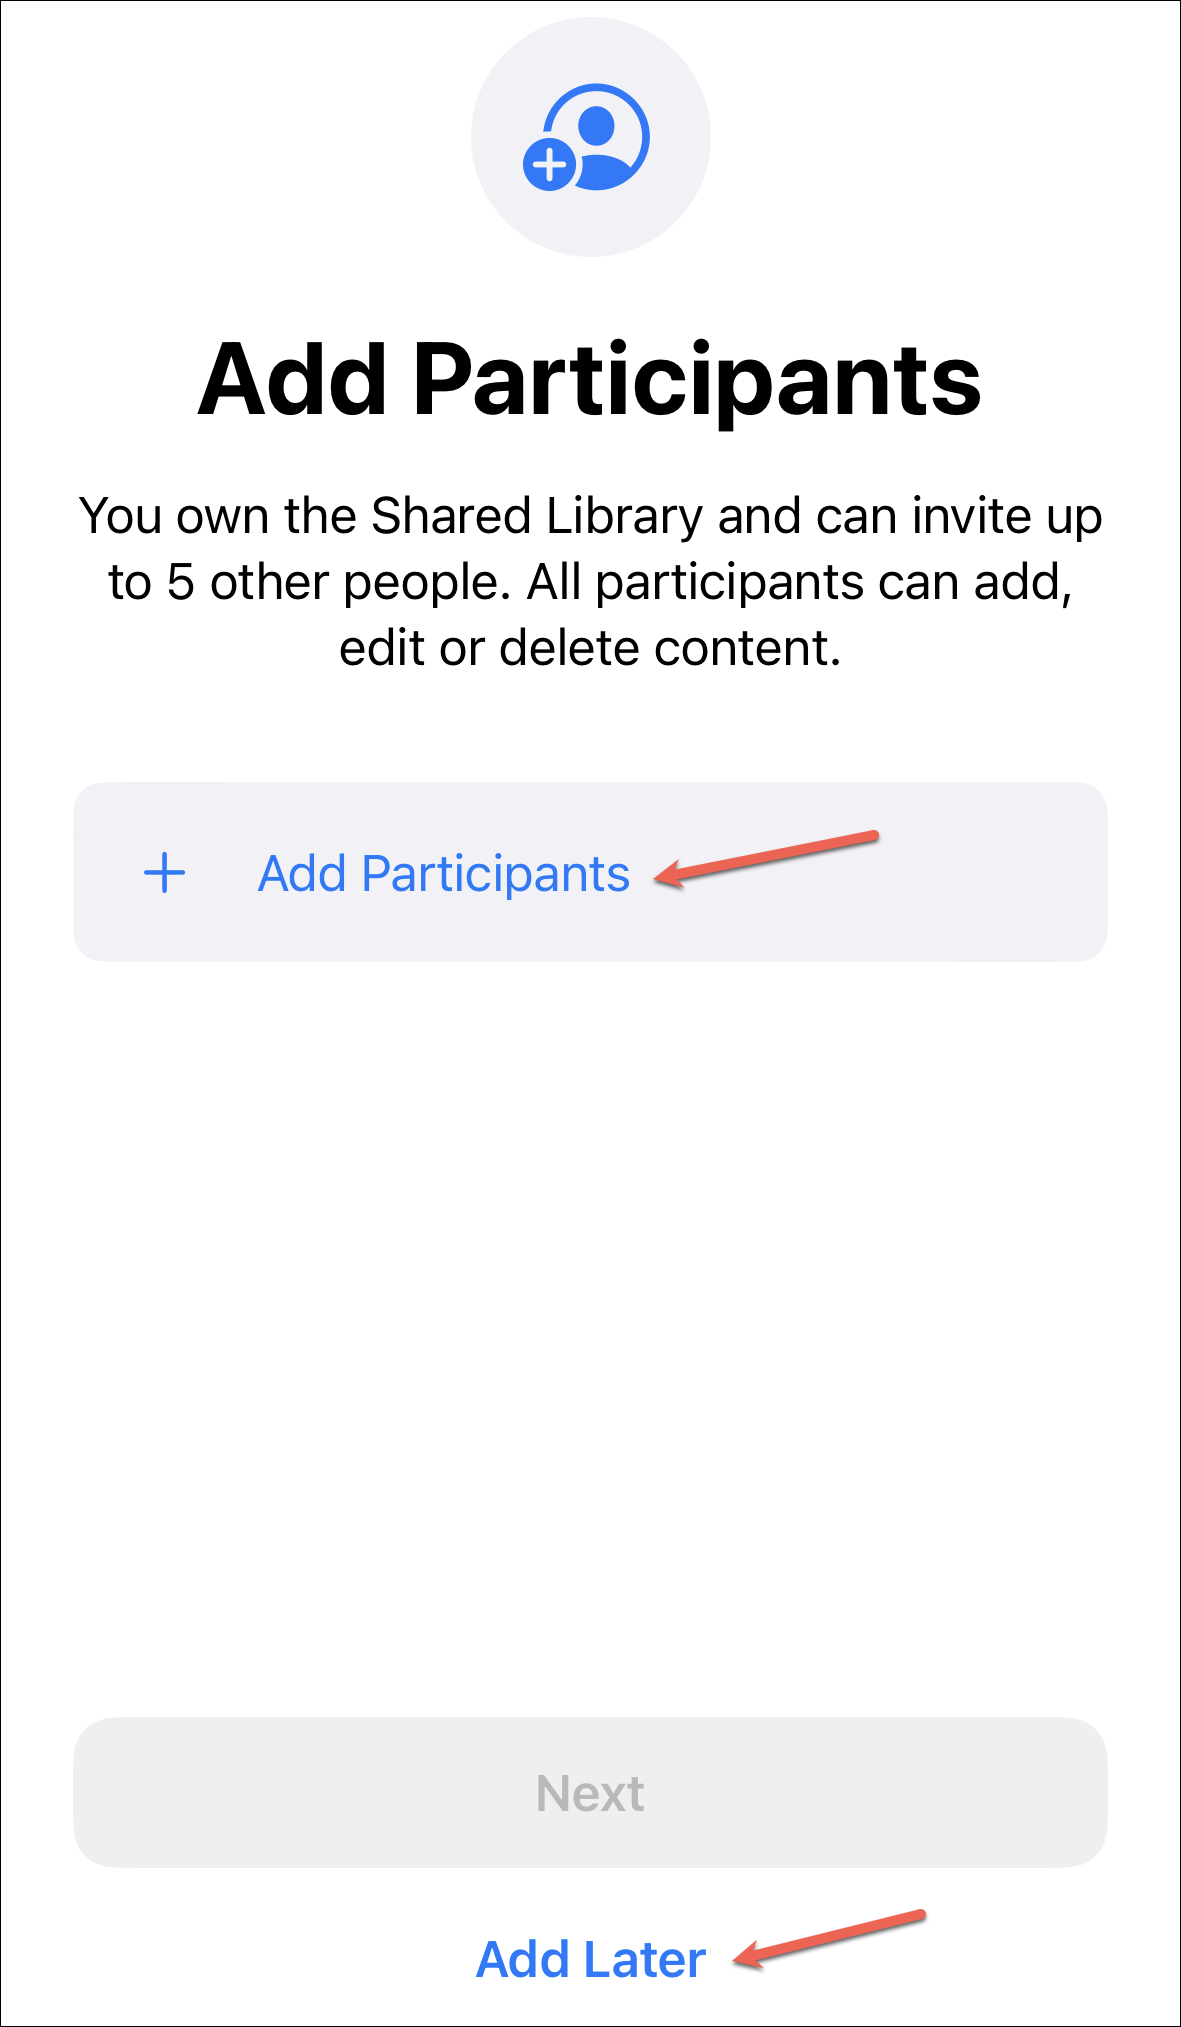
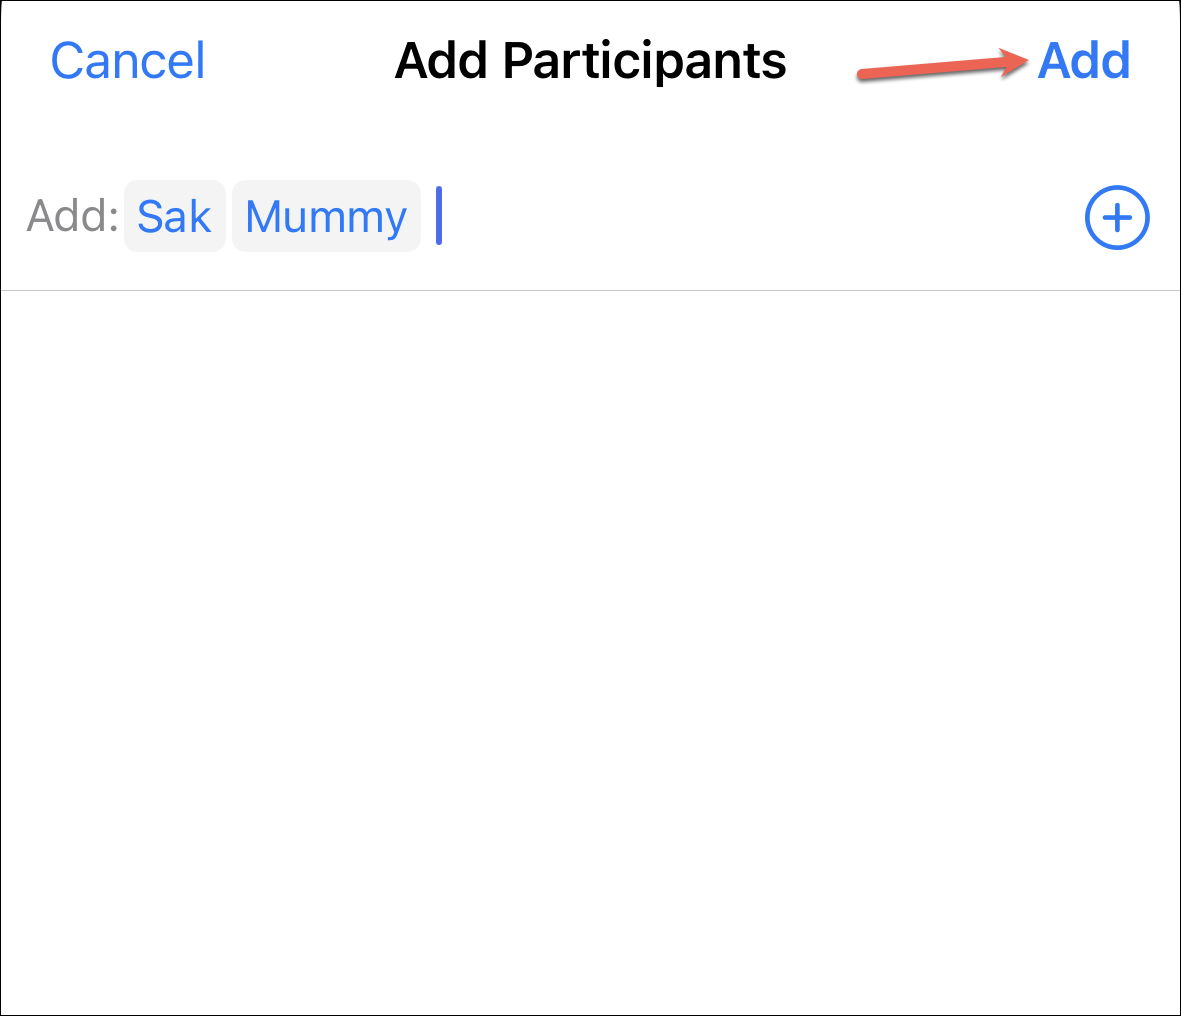
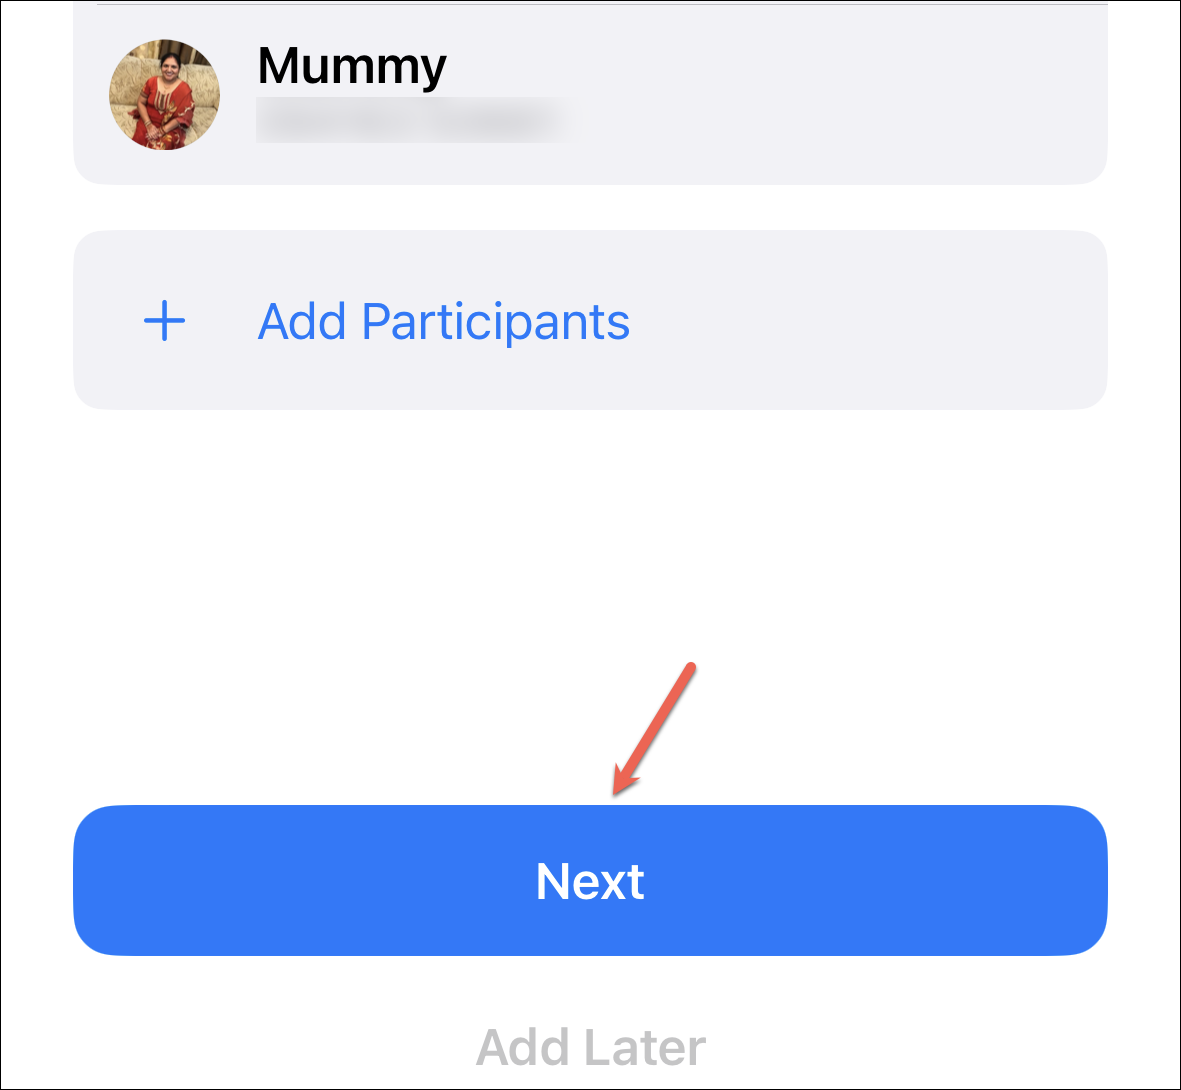
Then, tap ‘Add Participants’ to invite up to 5 other people. You can also skip this step now and tap ‘Add Later’ to add the participants later. The people you invite would need to accept your invitation.
If you chose to add a participant, type their Apple ID or phone number on the next screen. Then, tap their address from the suggestions. After adding all the participants, tap ‘Add’ in the upper-right corner.
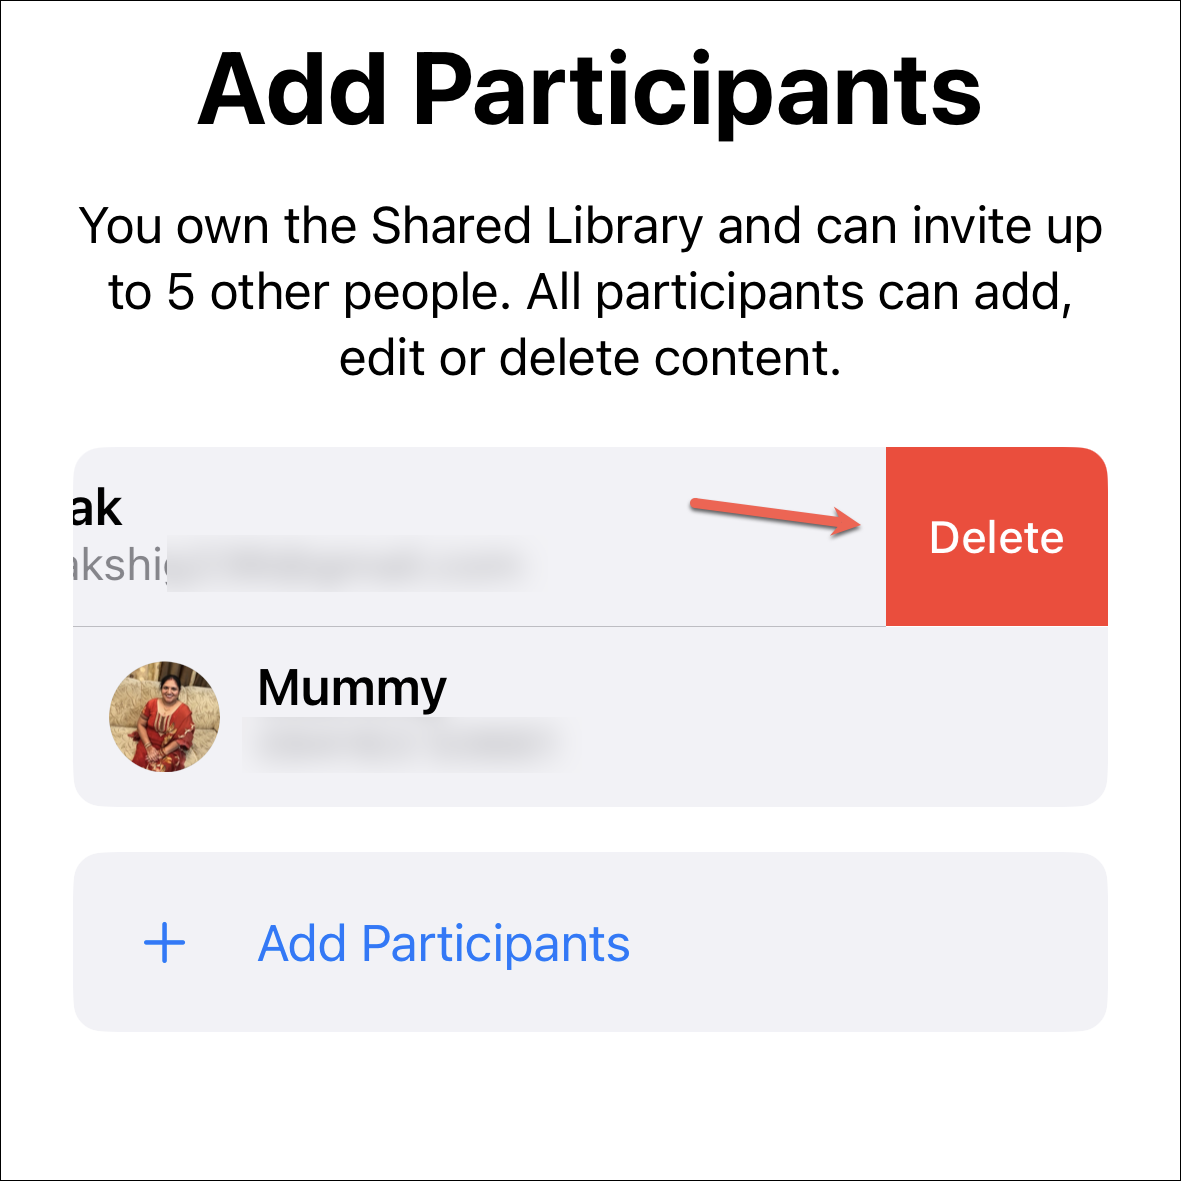
Your chosen participants will appear on the Add Participants screen. You can swipe left on any contact and tap ‘Delete’ if you included someone by mistake.
Tap ‘Next’ to proceed to the next step.
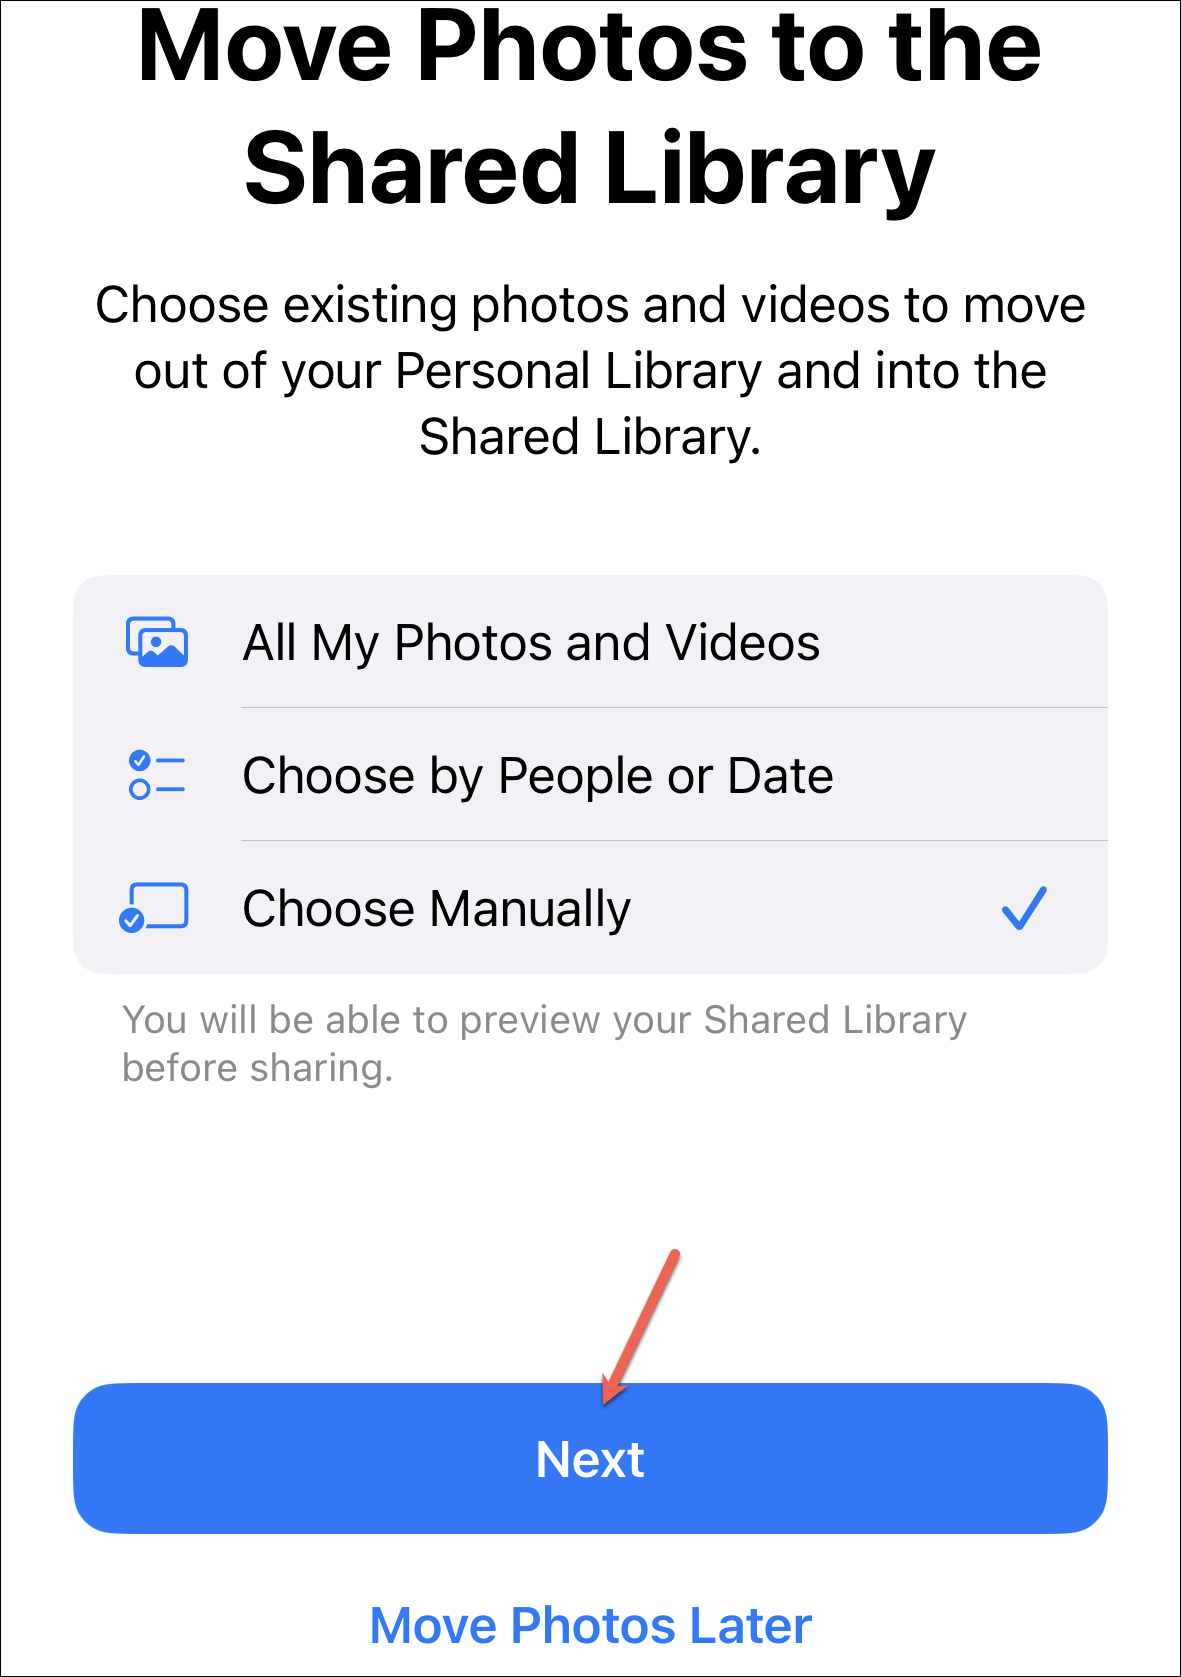
Now, it’s time to move photos to the shared library. During setup, you can move existing photos from your personal library to the shared library using one of these three options:
- All My Photos and Videos: This option is rather self-explanatory; it’ll move all the photos and videos in your personal library to the shared library.
- Choose by People or Date: You can choose to add photos by either people or date. For People, you can share photos that include certain people or that were taken when those people were nearby. Or, you can select a date on the Calendar and add all photos and videos taken after that day to the shared library.
- Choose Manually: You manually select the photos and videos you want to add to the shared library.
Note: When adding all photos and videos or choosing specific people or dates, hidden and recently deleted items as well as screenshots aren’t included. When moving photos manually, you can select screenshots or photos from the Hidden album, but not the Recently Deleted album.
Tap the option you want to move forward with to select it and tap ‘Next’ at the bottom. You can also skip this step altogether and tap ‘Move photos later’ to deal with it later. No matter which option you chose, you’ll be able to preview your shared library before the setup is complete.
Now, if you chose the first option, your work is done. If you chose the third option, all you have to do is select the photos individually from your library.
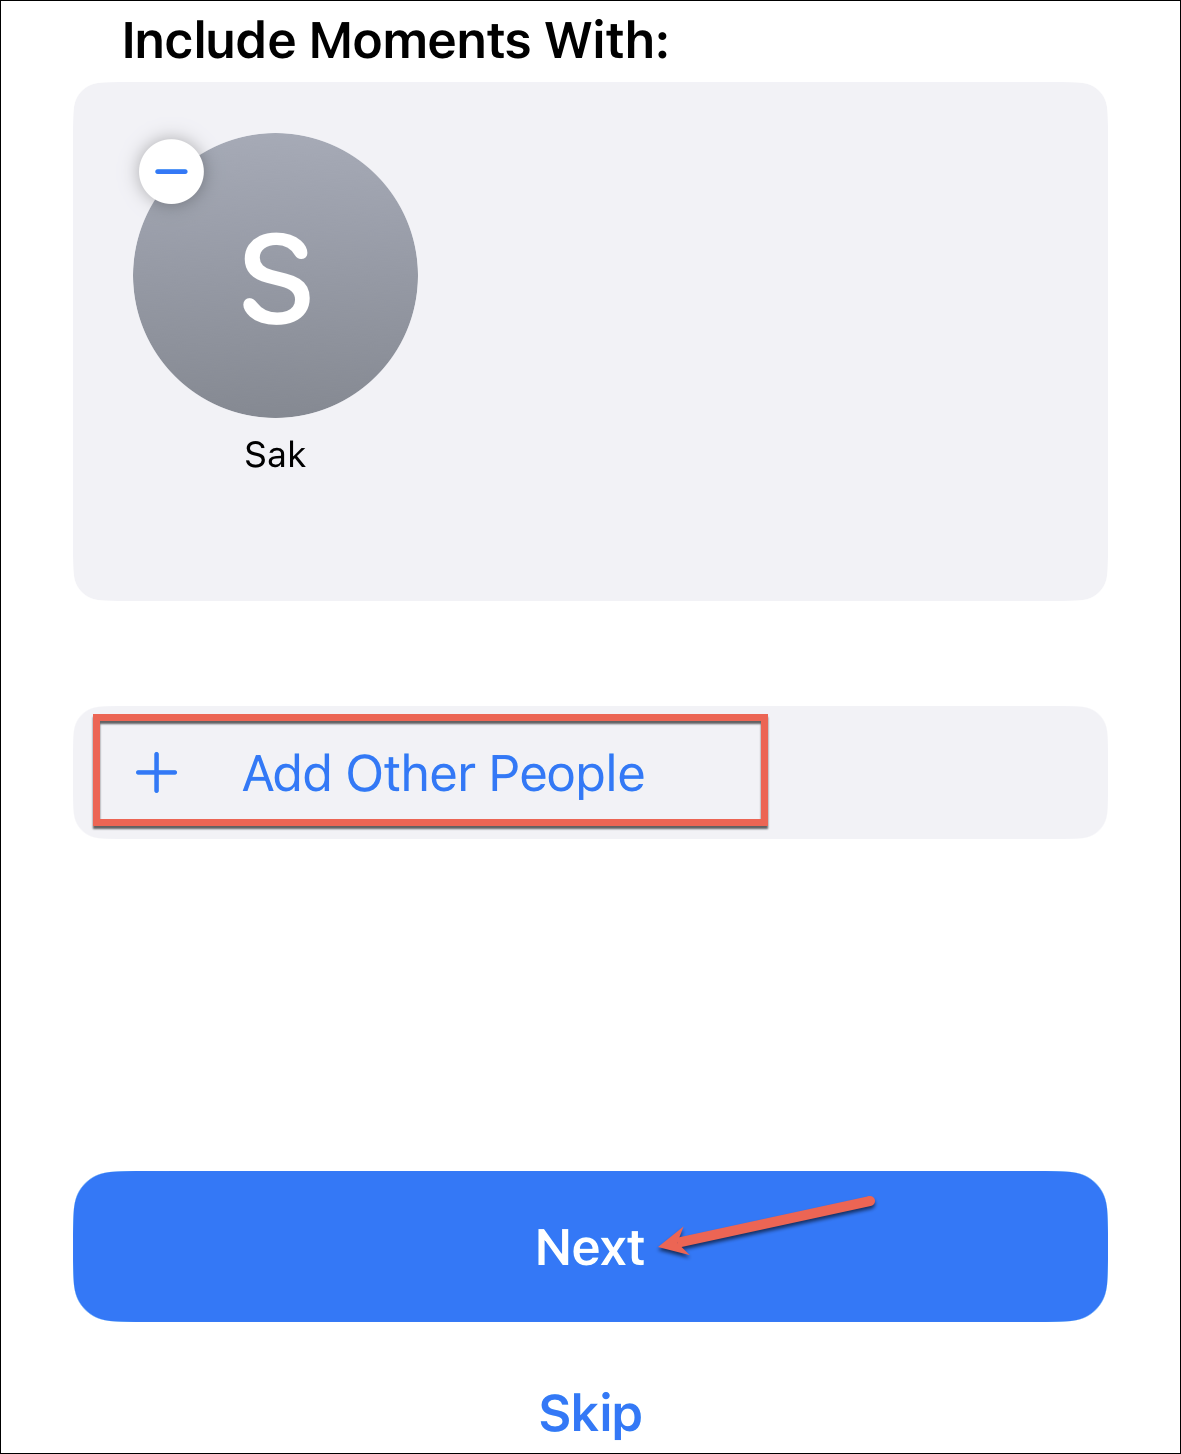
But if you chose the second option, on the next screen, you’ll be asked to choose the people. iOS will automatically include people you’re inviting to the Shared Library. But you can include other people or remove the ones iOS has included. To remove someone, tap the ‘–’ on their icon.
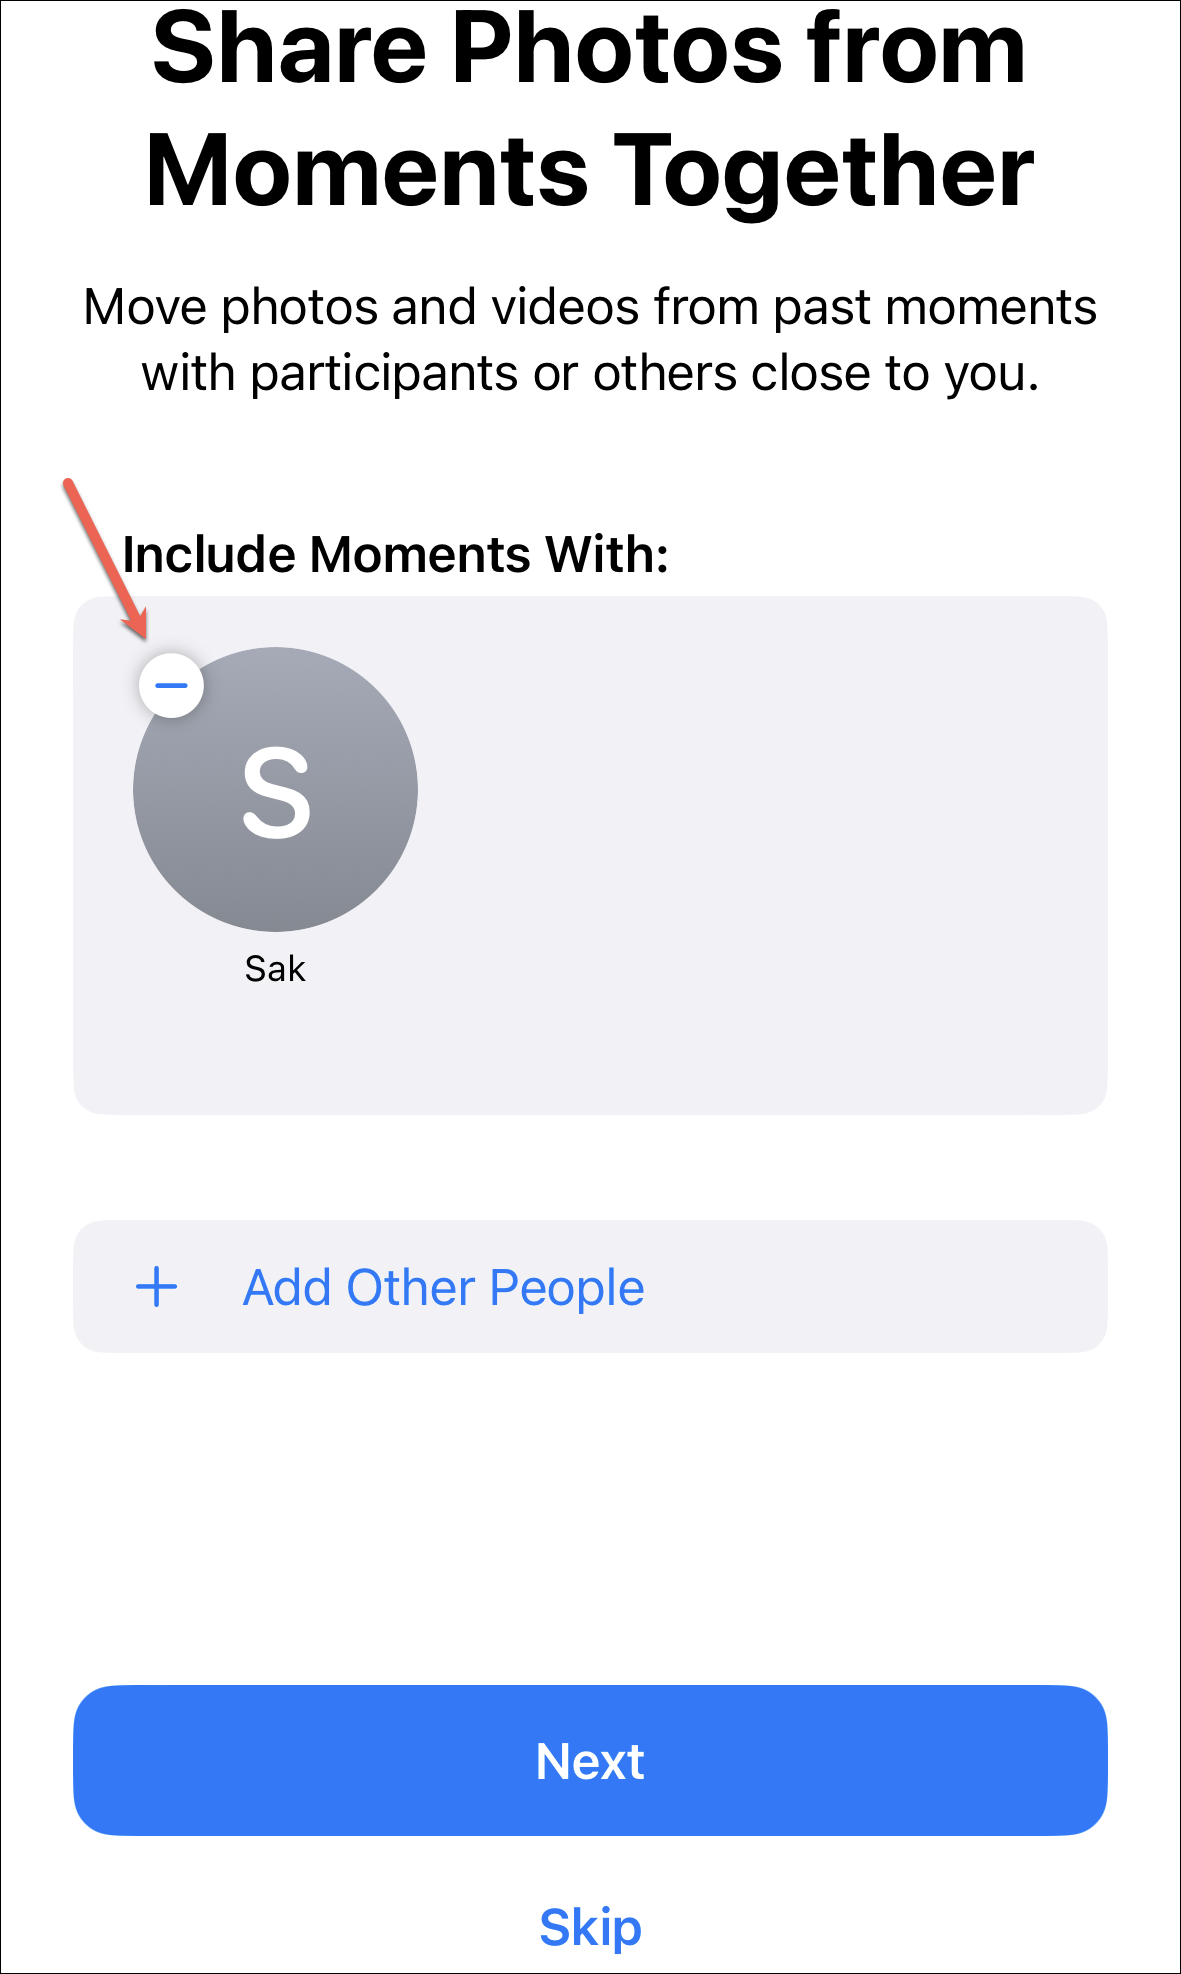
To add more people, tap ‘Add Other People’ and select the people from your Photos ‘People’ list. Then, tap ‘Next’.
When iOS includes people automatically on the basis of your invitations, it might ask you to identify the person from the People list. Tap ‘Identify Person; from the prompt and select the person from the People list of the Photos app.

If you wanted to add photos by date and not people, tap ‘Skip’ at the bottom.
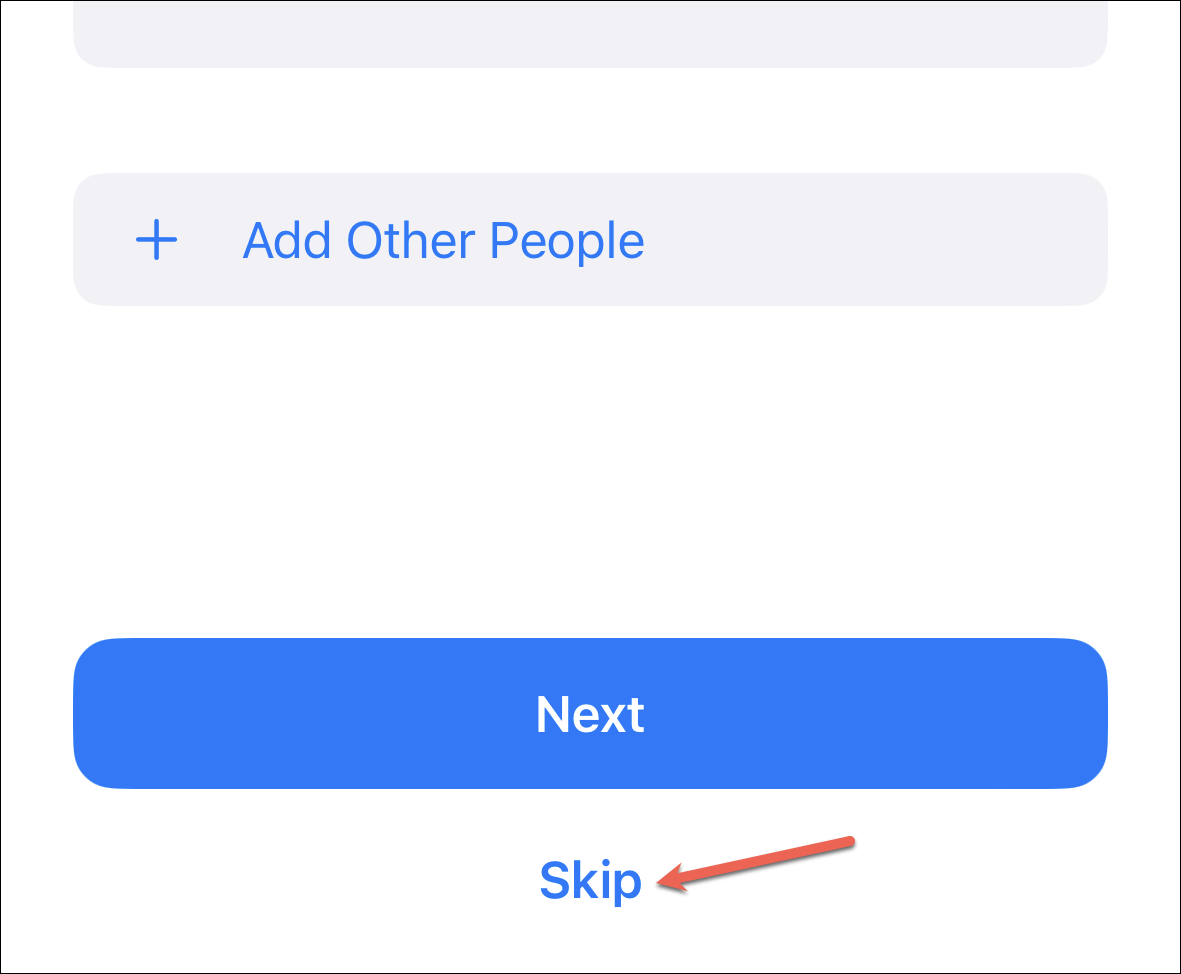
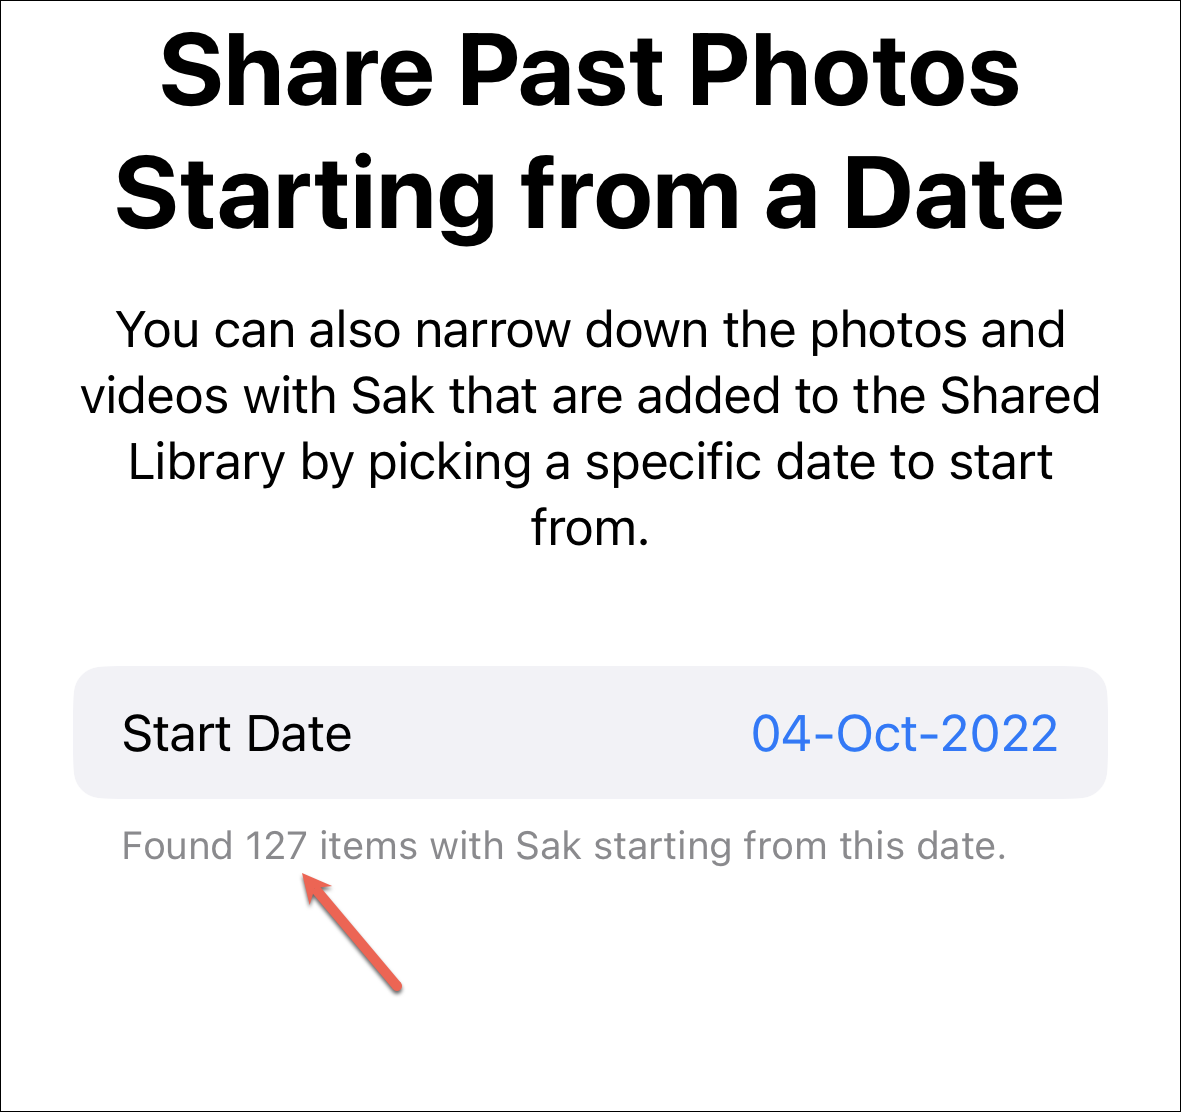
Then, on the next screen, choose the starting date after which all photos should be added to the library, and tap ‘Next’. Or, tap ‘Skip’ to not include photos based on a date.
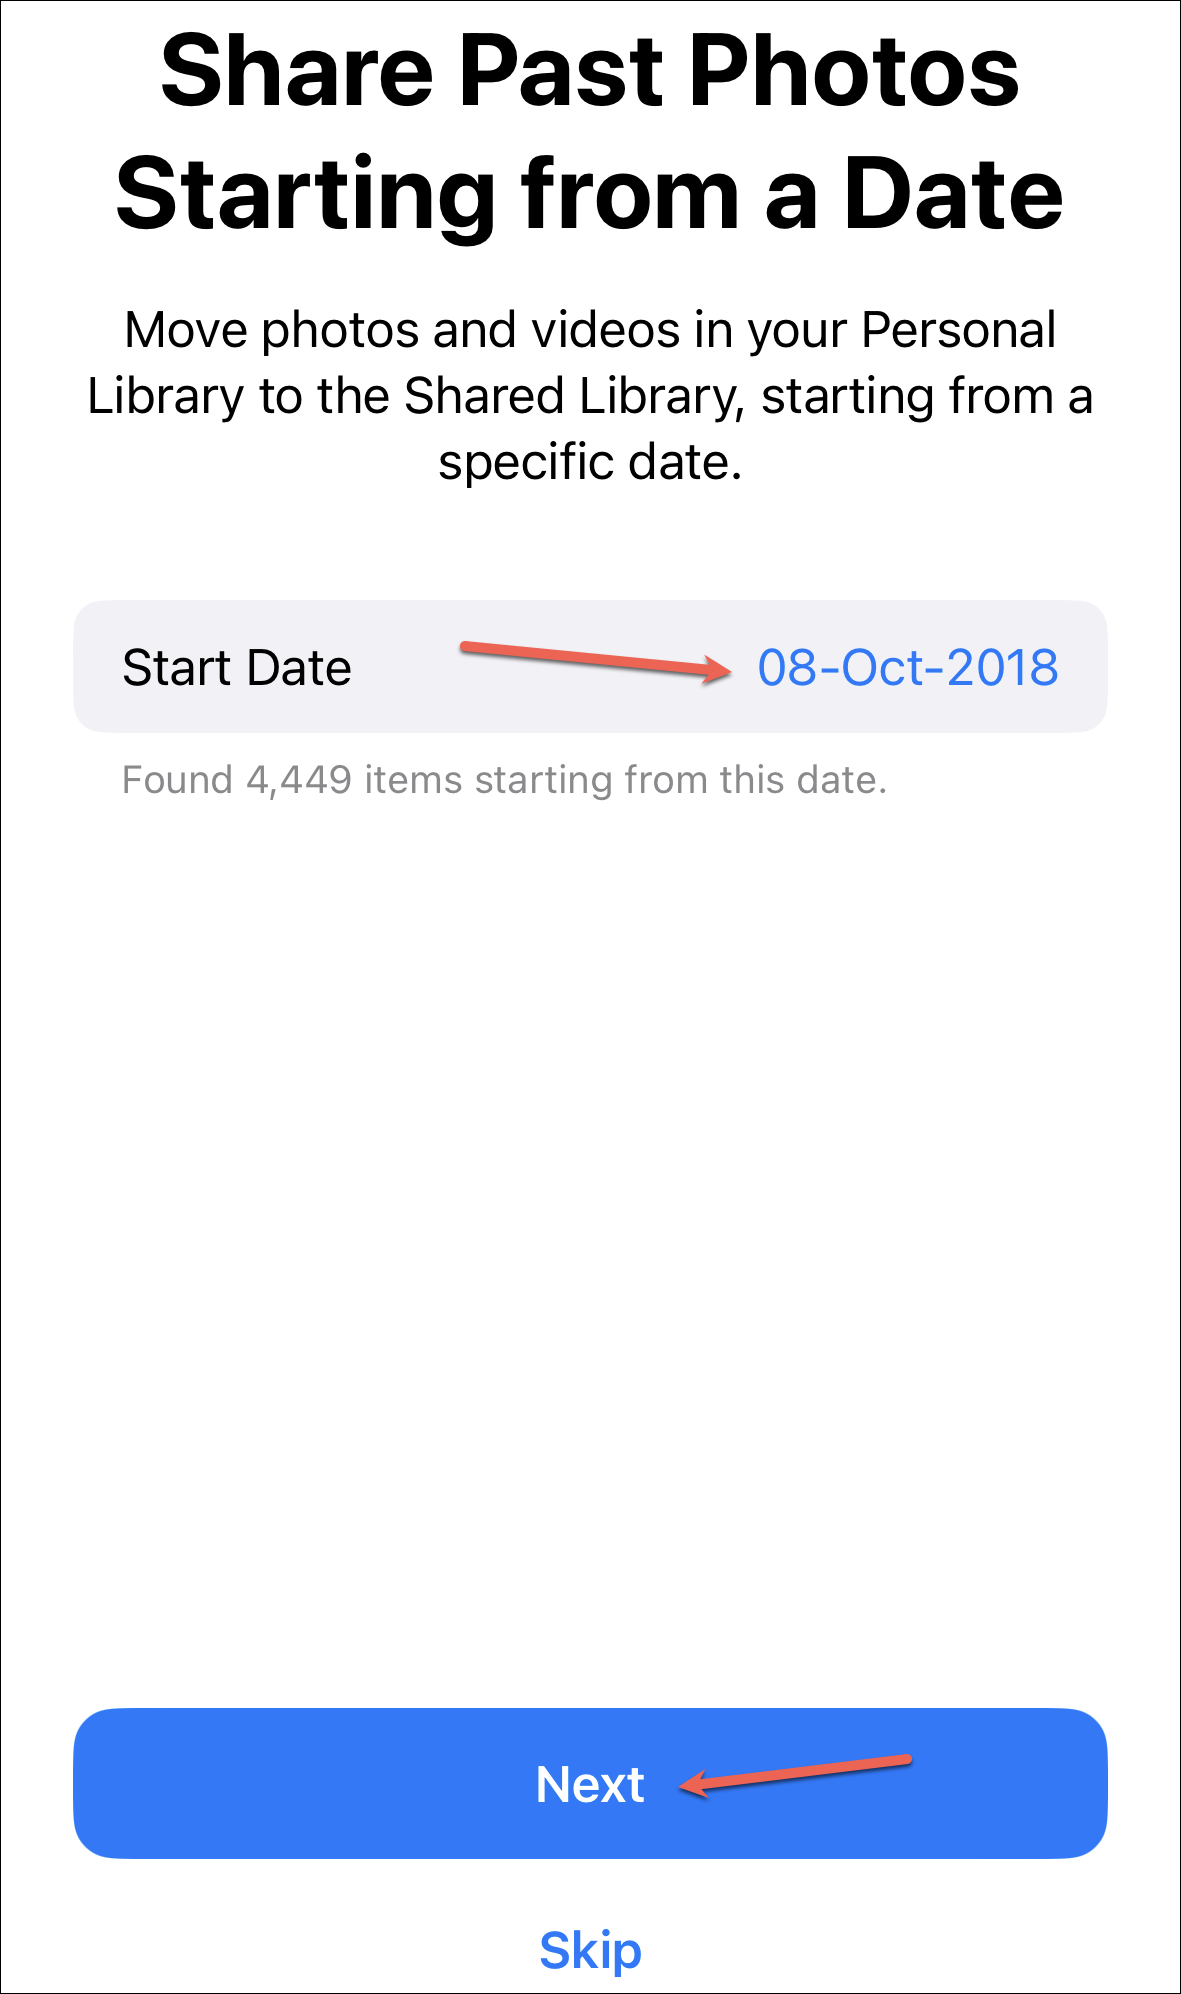
If you chose any people in the previous step and also select the date in this step, only the photos that have the people you selected that were taken after your selected date will be chosen.
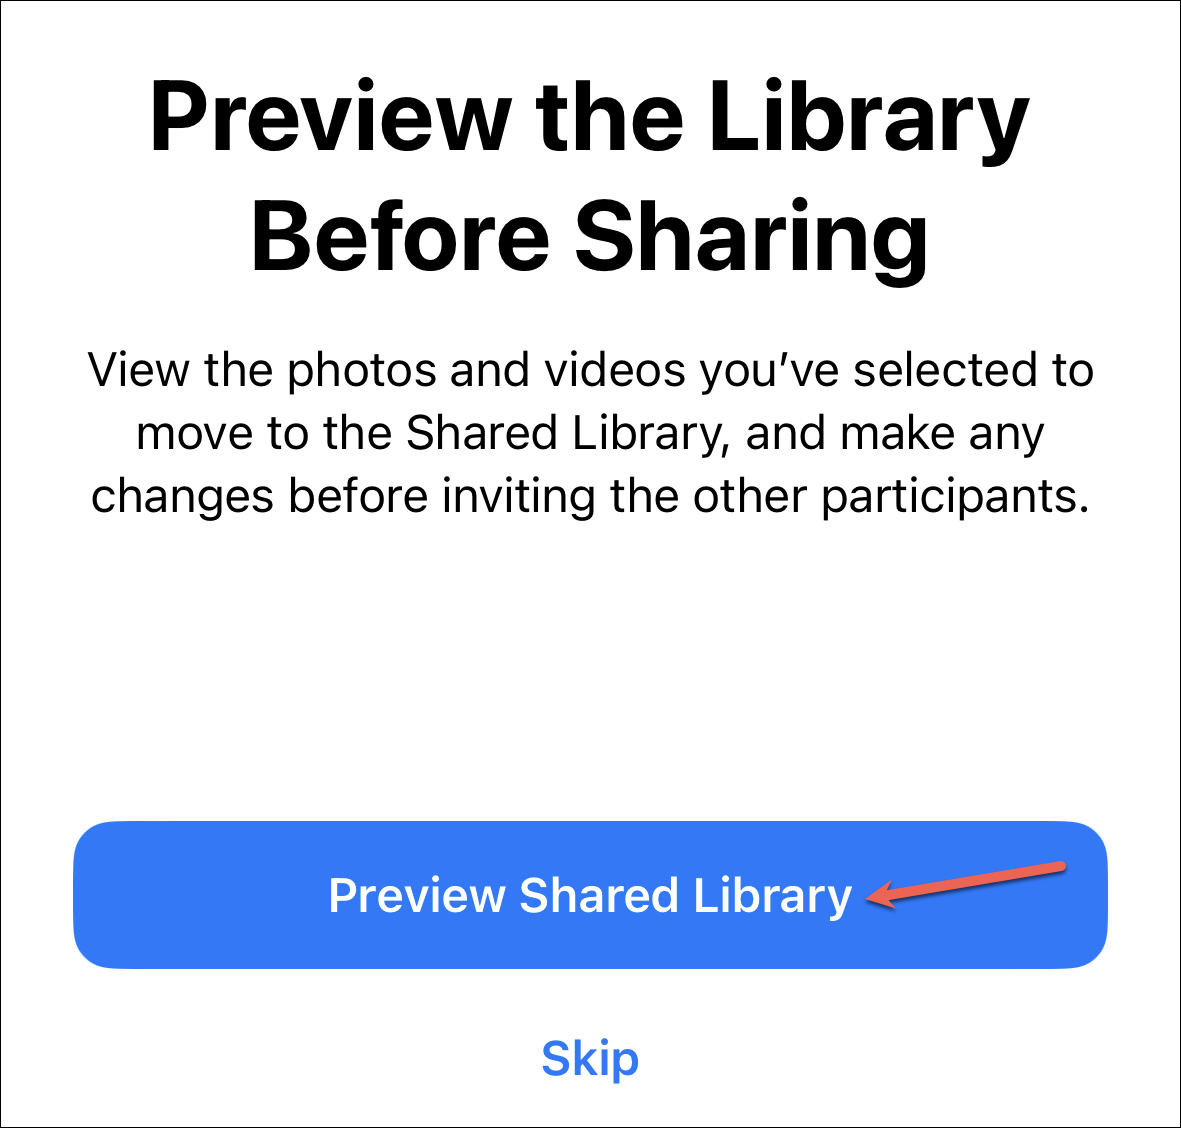
You can preview your shared library in the next step. Tap ‘Preview Shared Library’ to preview the library.
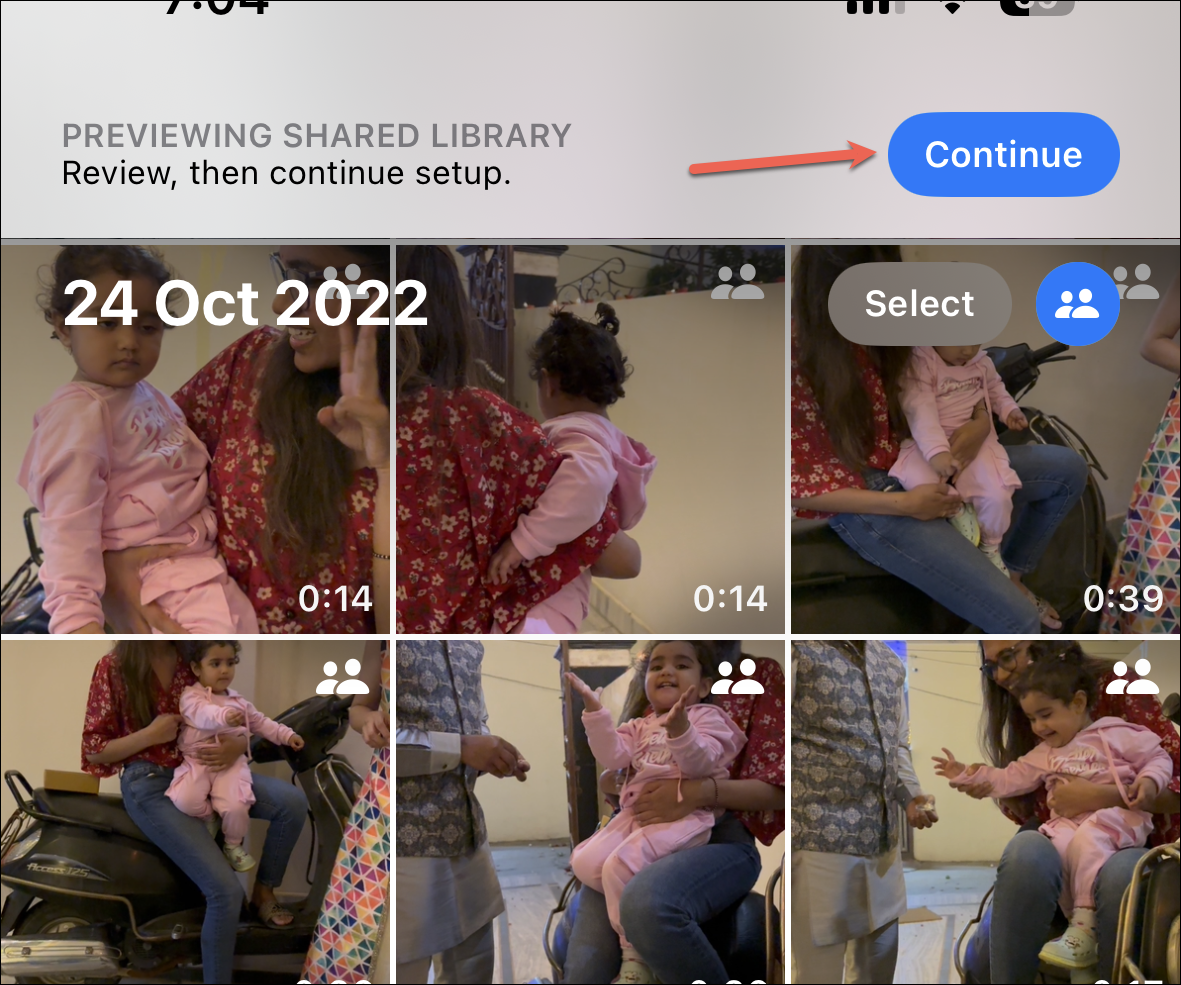
You’ll exit the setup momentarily and go to the Photos app. If you see any photos that you don’t want to include, tap ‘Select’ in the upper-right corner. Then, select the photos by tapping on them and tap ‘Move to Personal Library’ at the bottom.
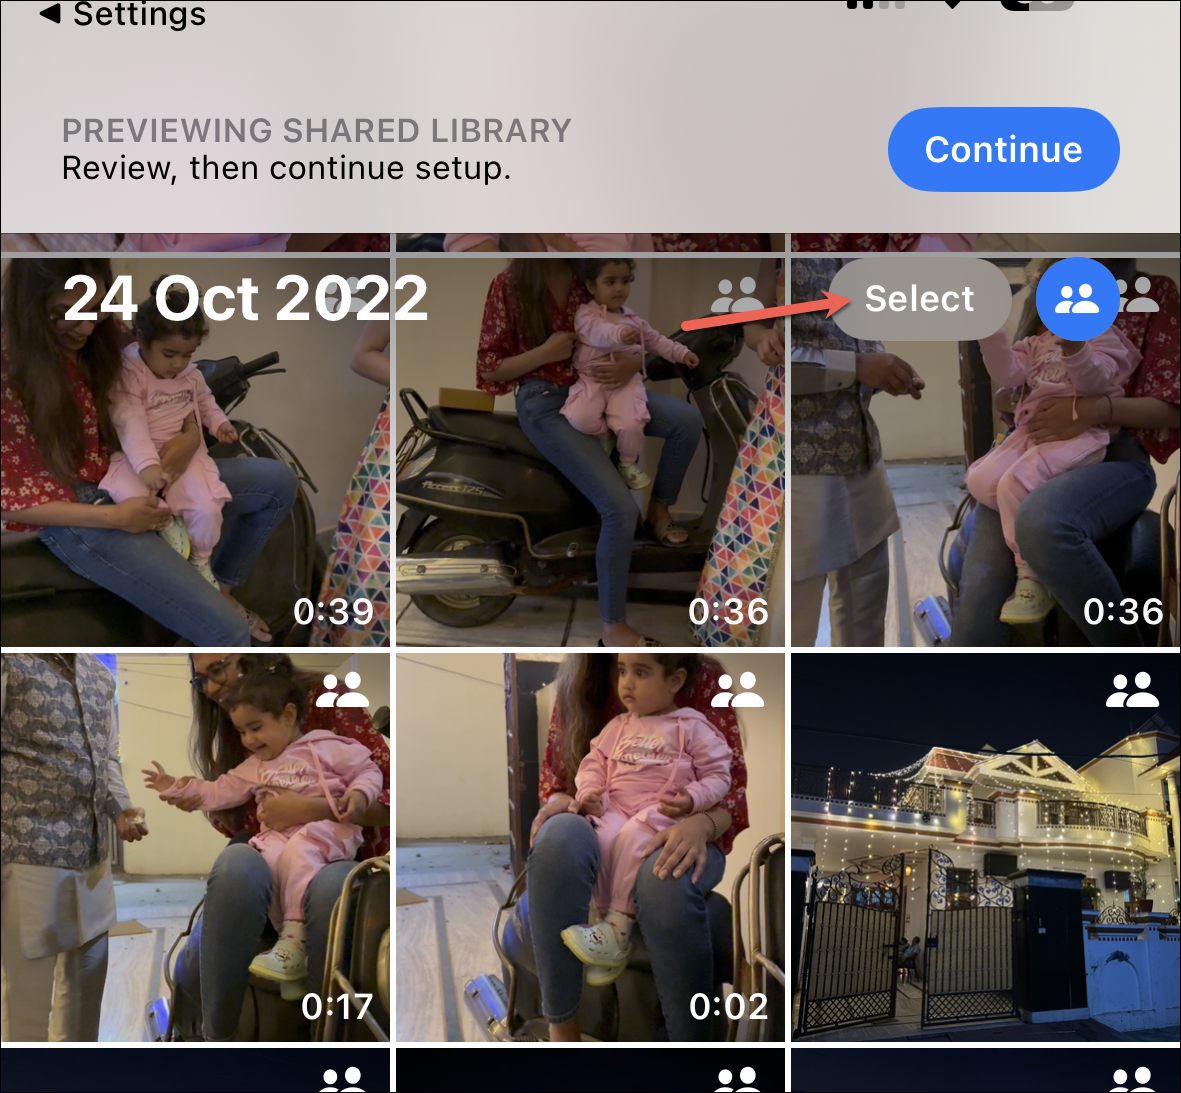
Whether you moved any photos to your personal library or not, tap ‘Continue’ at the top to return to the setup screen.
Then, tap ‘Invite via Messages’ to send the invite to the people using the Messages app. If you want to invite them using some other means, tap ‘Share Link’ to get a link you can share.

If you chose messages, the invitation will load in the message box. Tap ‘Send’ to invite the people.

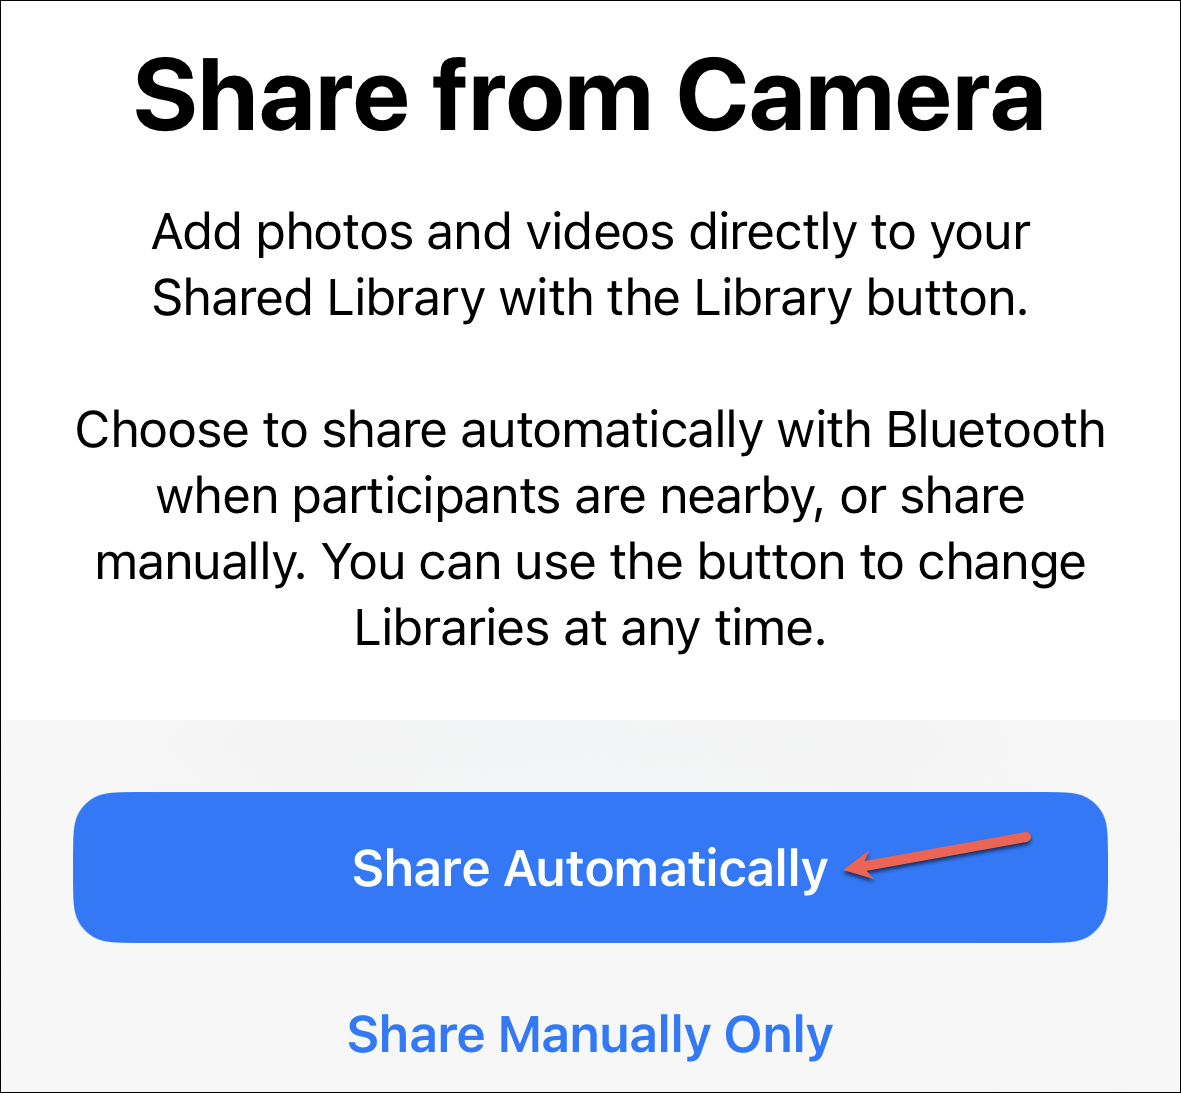
You can also add new photos and videos to your library automatically from the camera. Tap ‘Share Automatically’ to enable the Shared Library button in the Camera app. Otherwise, tap ‘Share Manually Only’. You can change these settings later. If you choose to share the photos automatically, it’ll do so when the participants of your shared library are nearby (detected by Bluetooth) when you’re taking photos.
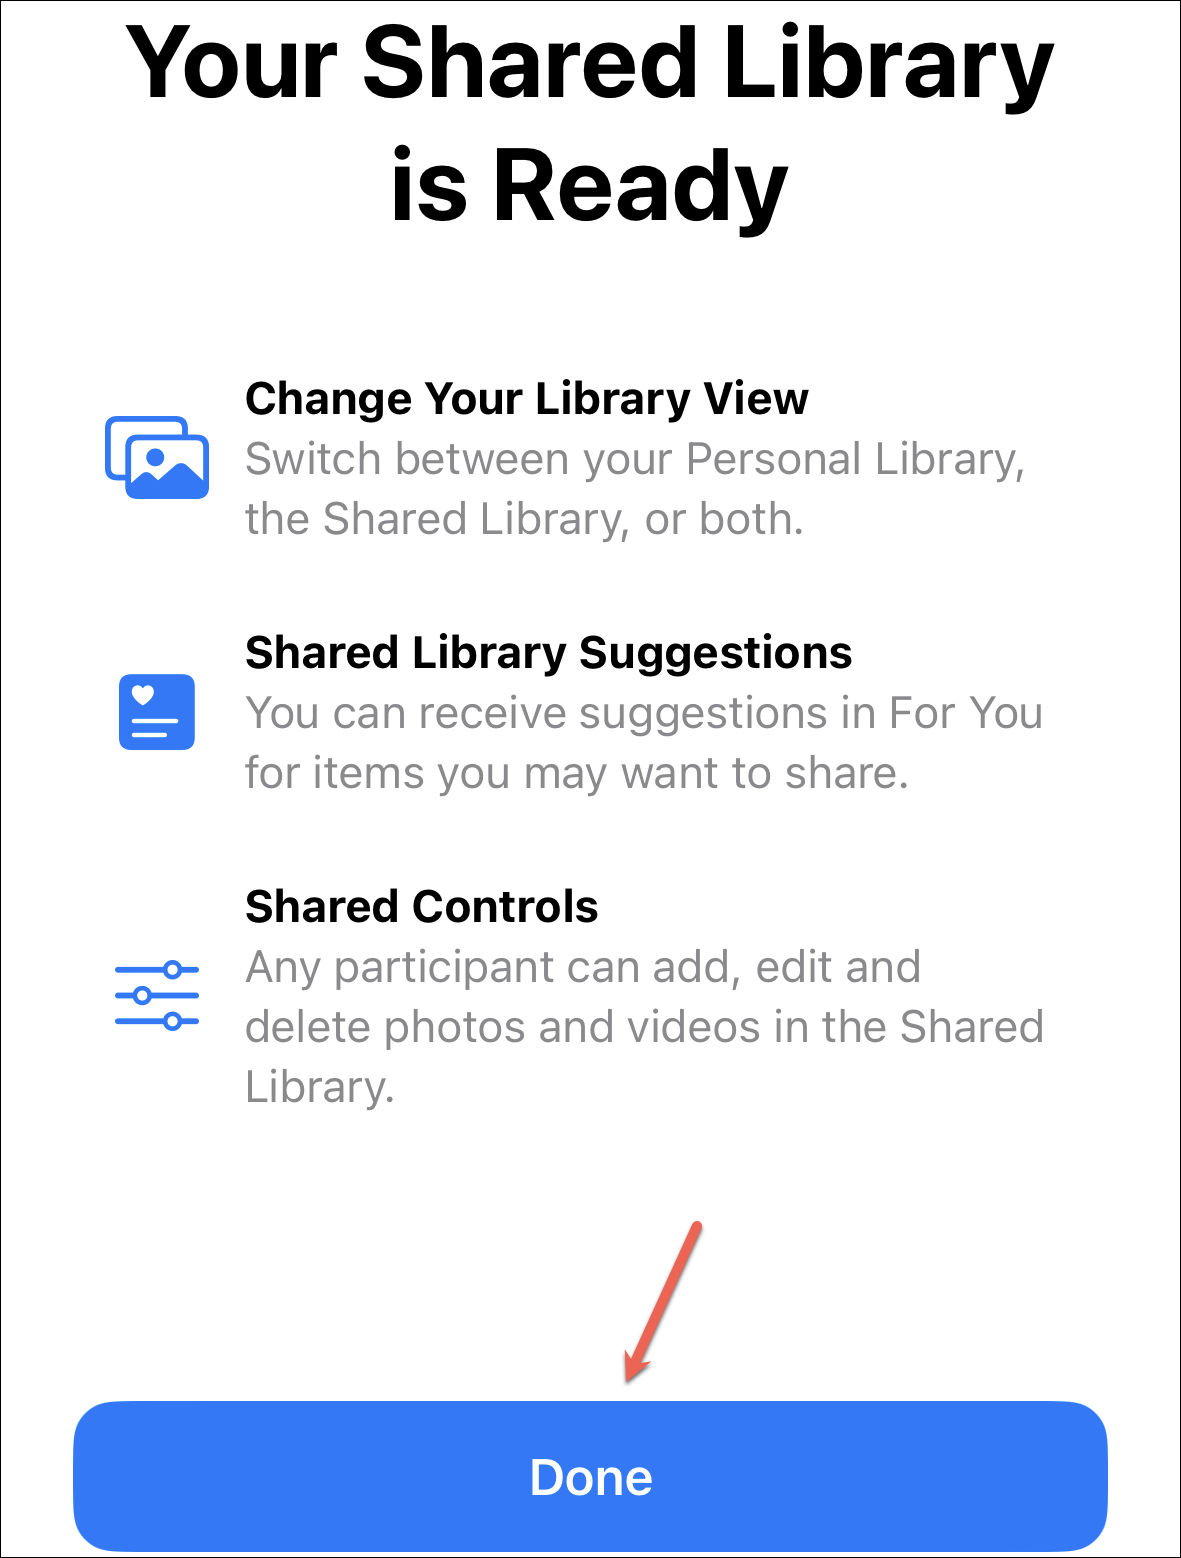
Your Shared Library is finally set up. Tap ‘Done’ to close the setup screen. The Photos app will open automatically.
Using the Shared Library
Once you become a part of the shared library, navigating your way around it is easy. Here’s everything you need to know.
Joining a Shared Library
To join a Shared Library, you must also have iCloud Photos turned on. You can join the Shared Library from a device running iOS 16.1, iPadOS 16.1, or macOS Ventura.
Open the message or web-link invitation from the library creator and tap the invitation.
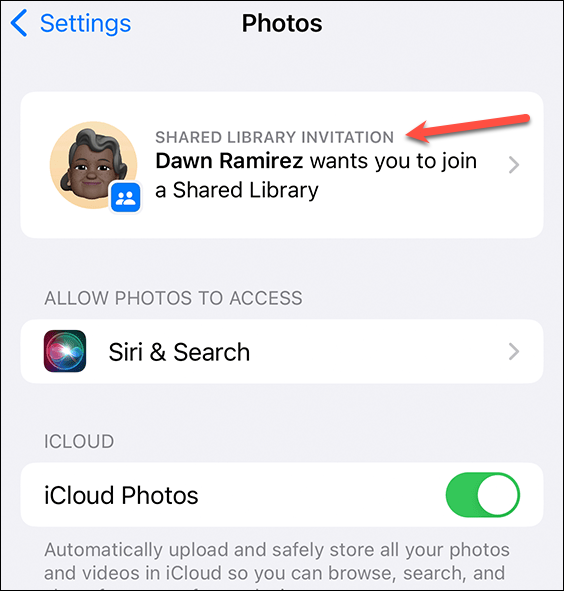
You can also go to ‘Photos’ from the Settings app and find the invitation there. Tap the invitation in the Settings app to join it.
Then, tap ‘Accept & Continue’ to join the shared library.
Also, choose the photos and videos you want to move from your personal library to the shared library, or tap ‘Move Photos later’ to skip the step right now. Then, preview the Shared Library (if you’re sharing content at this stage) and confirm.
You’ll be a part of the shared library and the content you selected will be shared.
Switching Between your Libraries
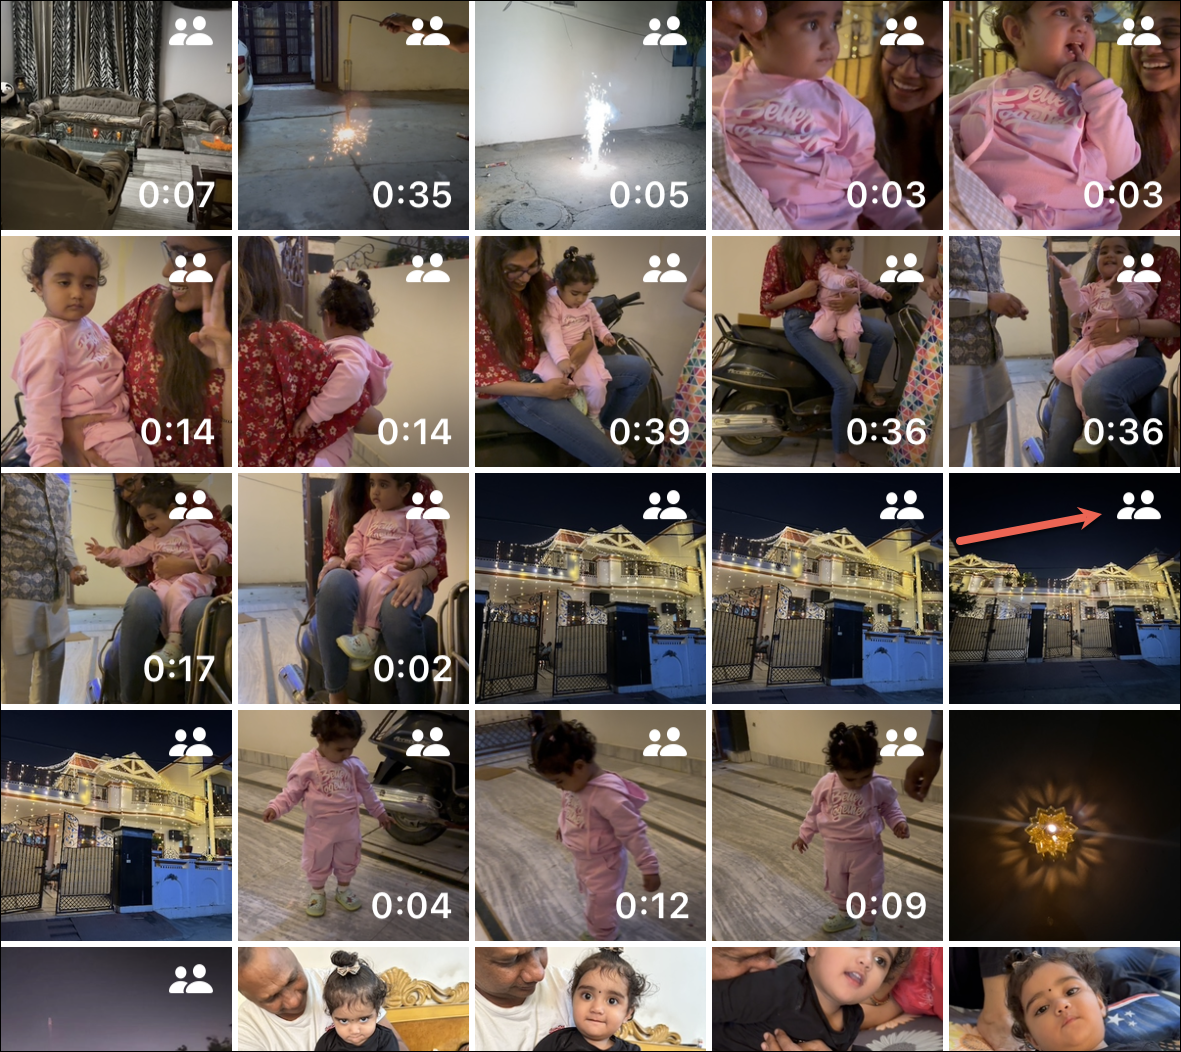
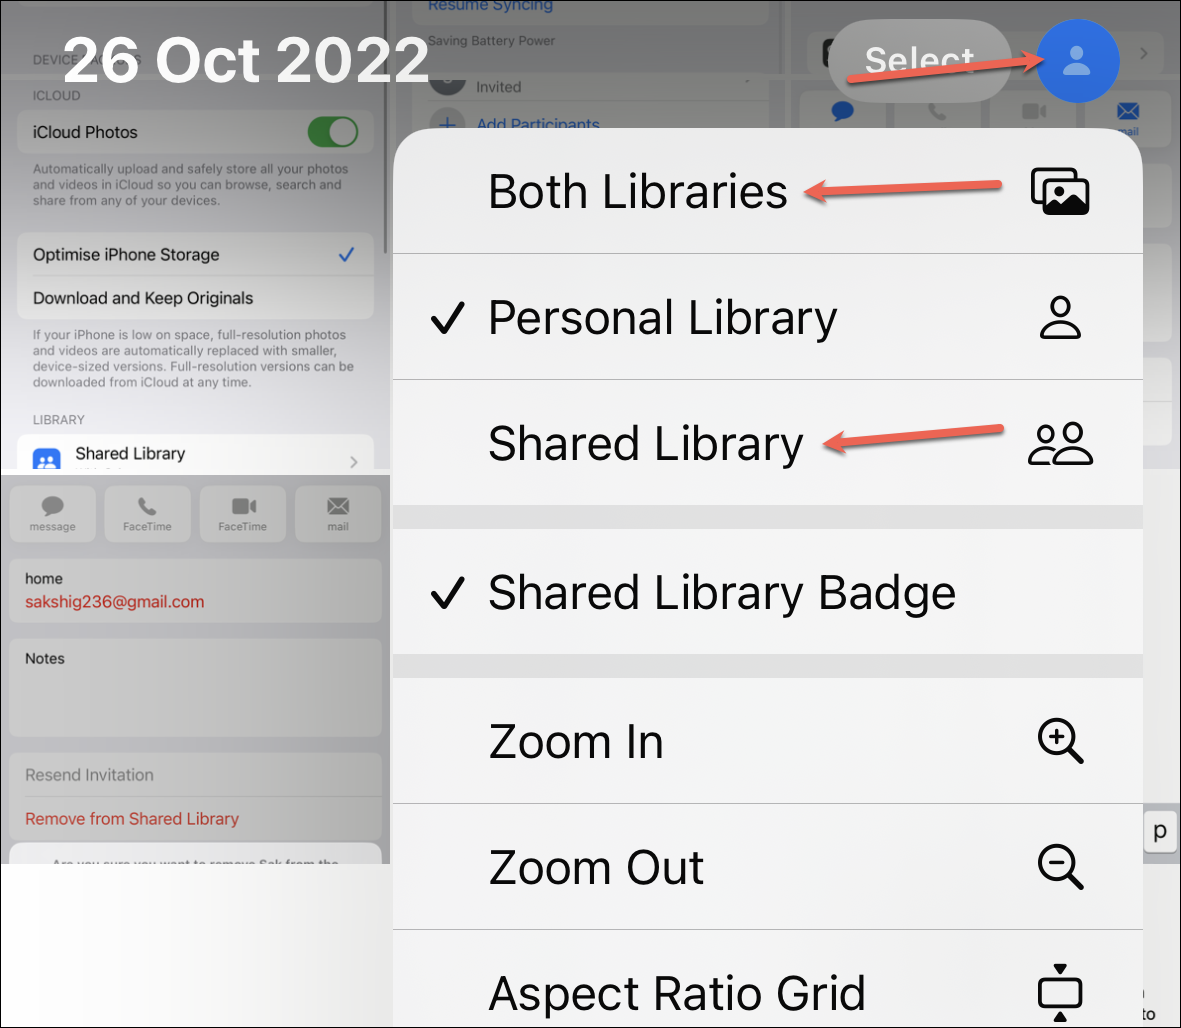
By default, when you go to the library from the Photos app, it’ll show both, your personal library as well as the shared library in one place. The photos from the Shared Library will have a Shared Library icon on the top-right corner of the thumbnail to help you easily differentiate.
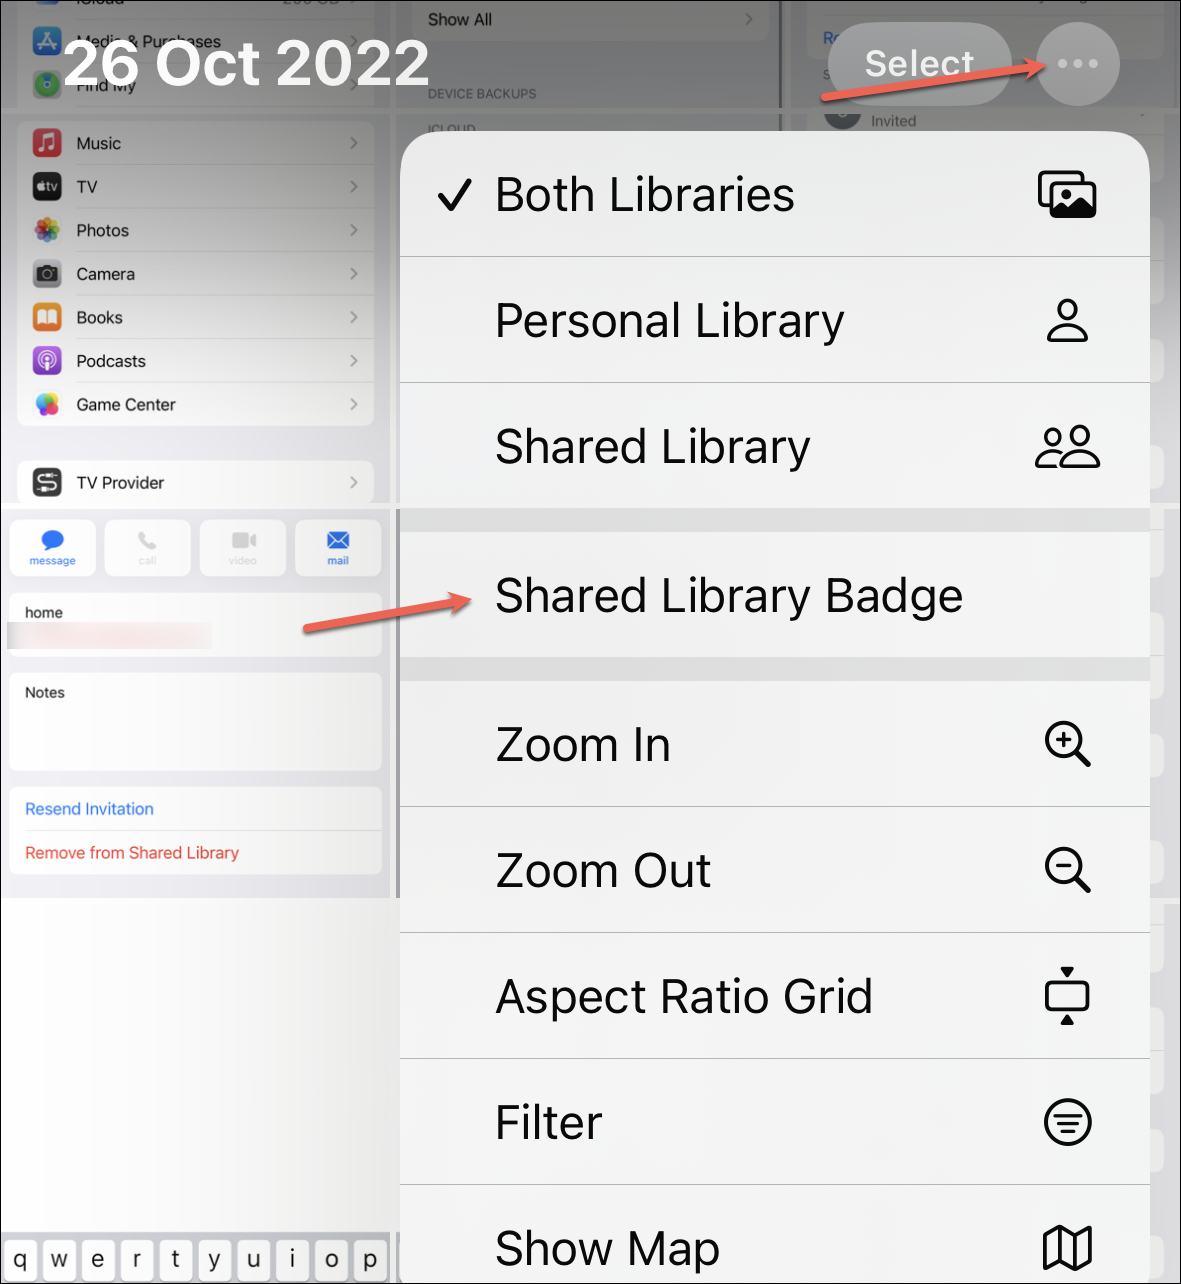
If you want, you can disable the Shared Library badge from appearing on the thumbnail. Tap the three-dot menu icon in the top-right and tap ‘Shared Library Badge’ so it no longer has a checkmark next to it.
Now, you can also switch the library view and view only the personal or shared library at any time.
Tap the three-dot menu icon in the top-right corner. Then, tap ‘Personal Library’ to view only your personal photos, or ‘Shared Library’ to view only the shared library content.
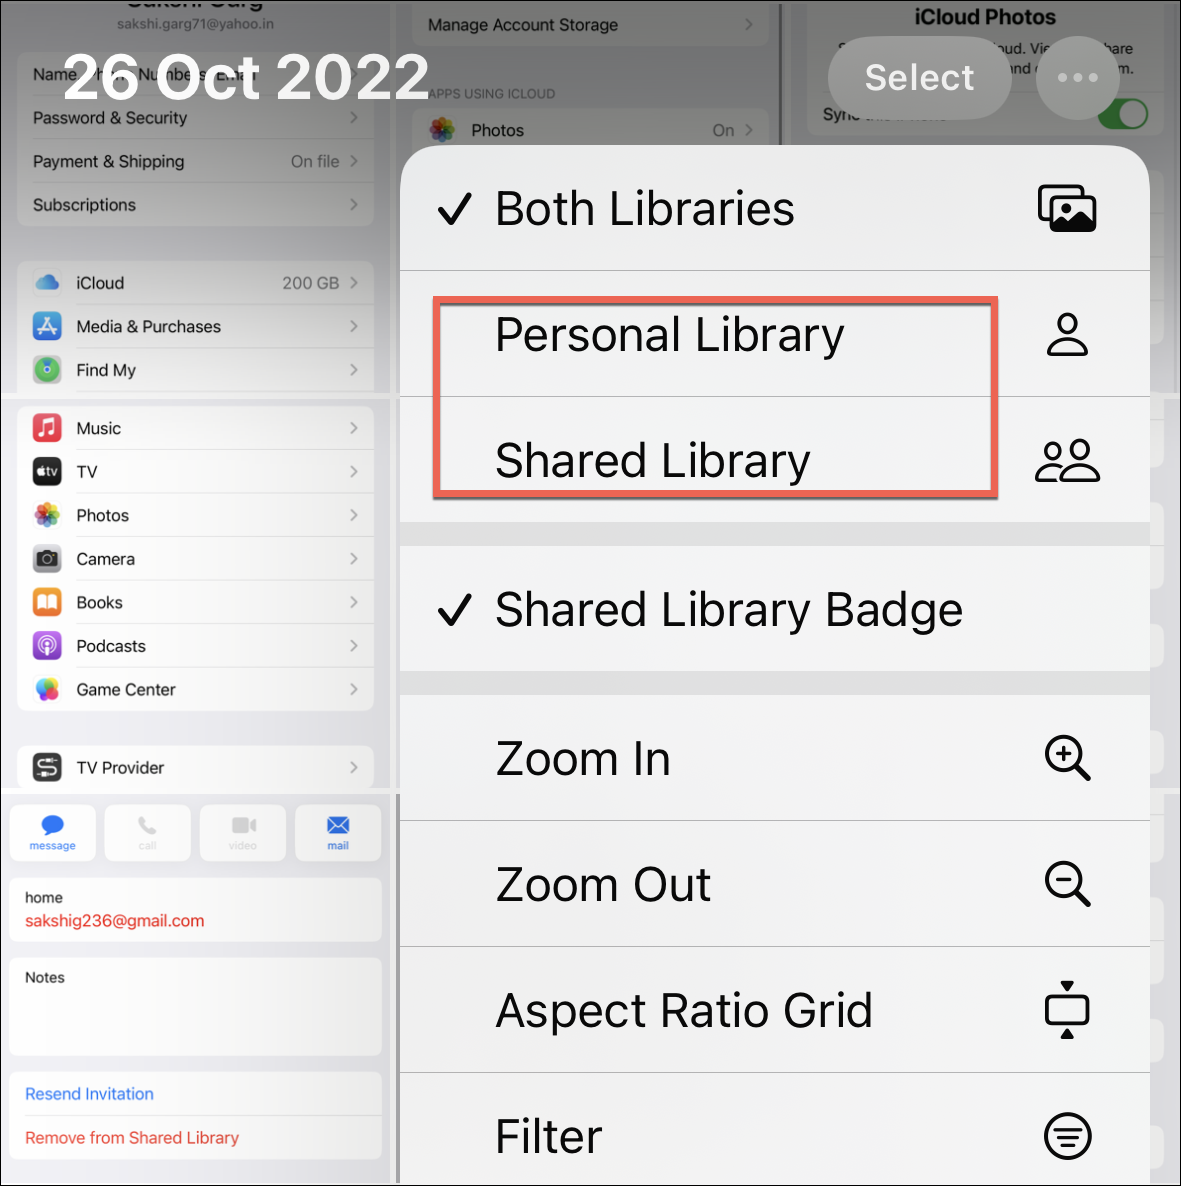
To go back to viewing both libraries or the other library, tap the library button in the top-right, which will either be ![]() if you’re viewing the personal library or
if you’re viewing the personal library or ![]() if you’re viewing the shared library. Then, select ‘Both Libraries’ or the option for the other library from the menu.
if you’re viewing the shared library. Then, select ‘Both Libraries’ or the option for the other library from the menu.
Making Changes to the Library Content
Since everyone has the same privileges, you cannot just view but also make changes to the photos and videos in the shared library, regardless of who added them.
You can make edits to photos and videos, favorite them, add captions or keywords, or make adjustments to date and time.
You can also delete any photos and videos from the shared library. When you delete anything, it’ll be moved to the ‘Recently Deleted’ folder from where only the original contributor of the content will be able to access it.
The original owner can either delete it from the Recently Deleted folder or move it back to their personal library within 30 days.
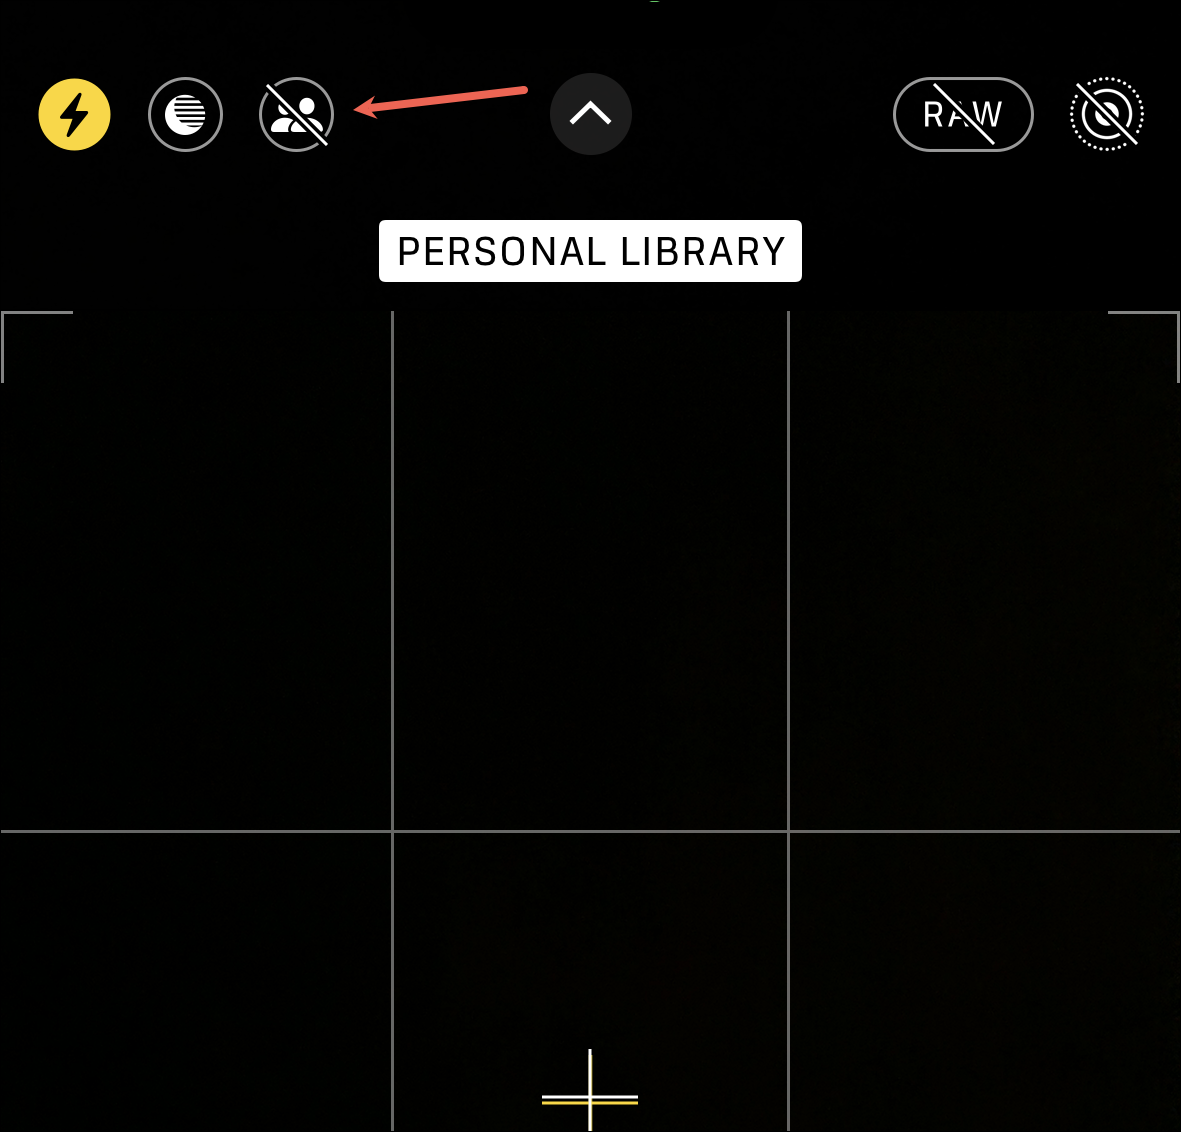
Share Photos Straight from the Camera
Although you get the option to share photos and videos automatically from your camera to the shared library during setup, you can change your choice later from the Camera app. You can also choose to share the photos manually while capturing them.
Open the Camera app on your iPhone.
Then, tap the ‘Shared Library’ icon in the top-left so it turns yellow to share photos and videos automatically.
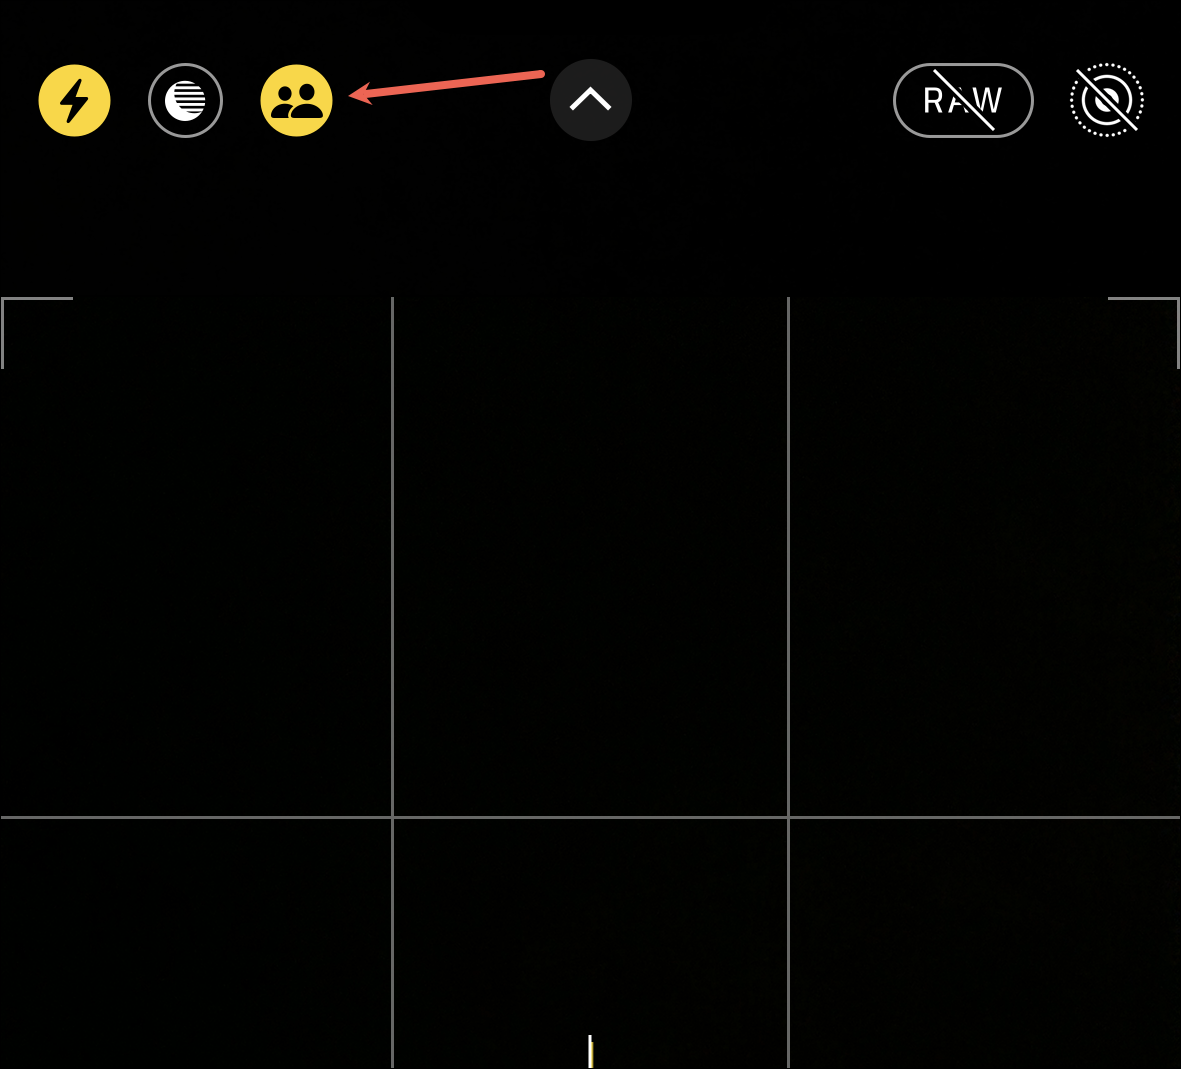
To stop sharing photos from the camera, tap the icon again to disable it so it has a diagonal line across it.
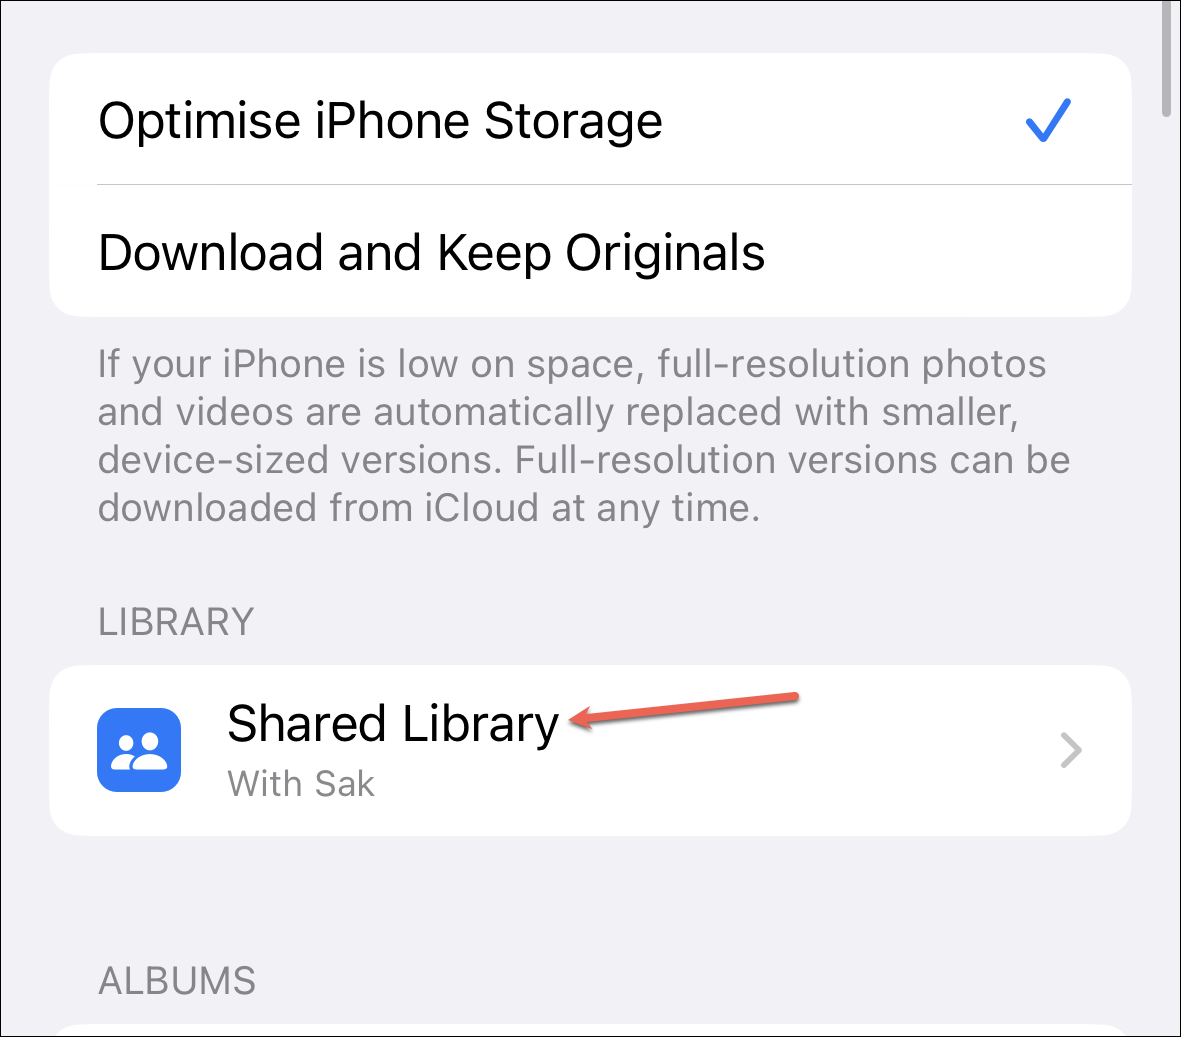
If you don’t just want to disable camera sharing but also don’t want the camera control for the shared library in the Camera app, you can also disable it from Settings. Open the Settings app and go to ‘Photos’.
Then, tap the option for ‘Shared Library’.
Tap the ‘Sharing from Camera’ option.
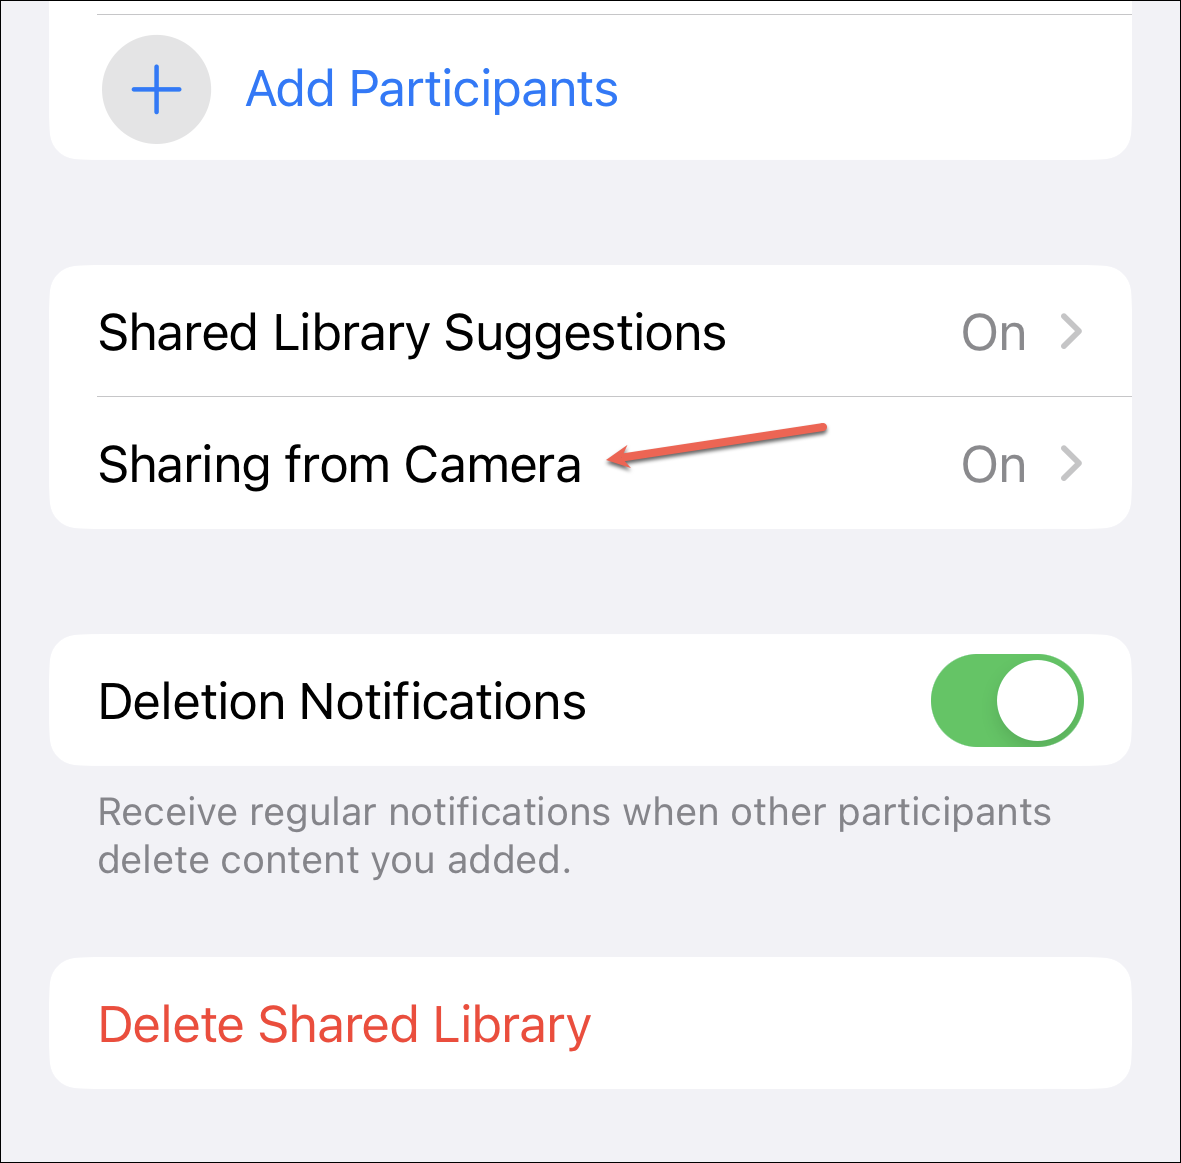
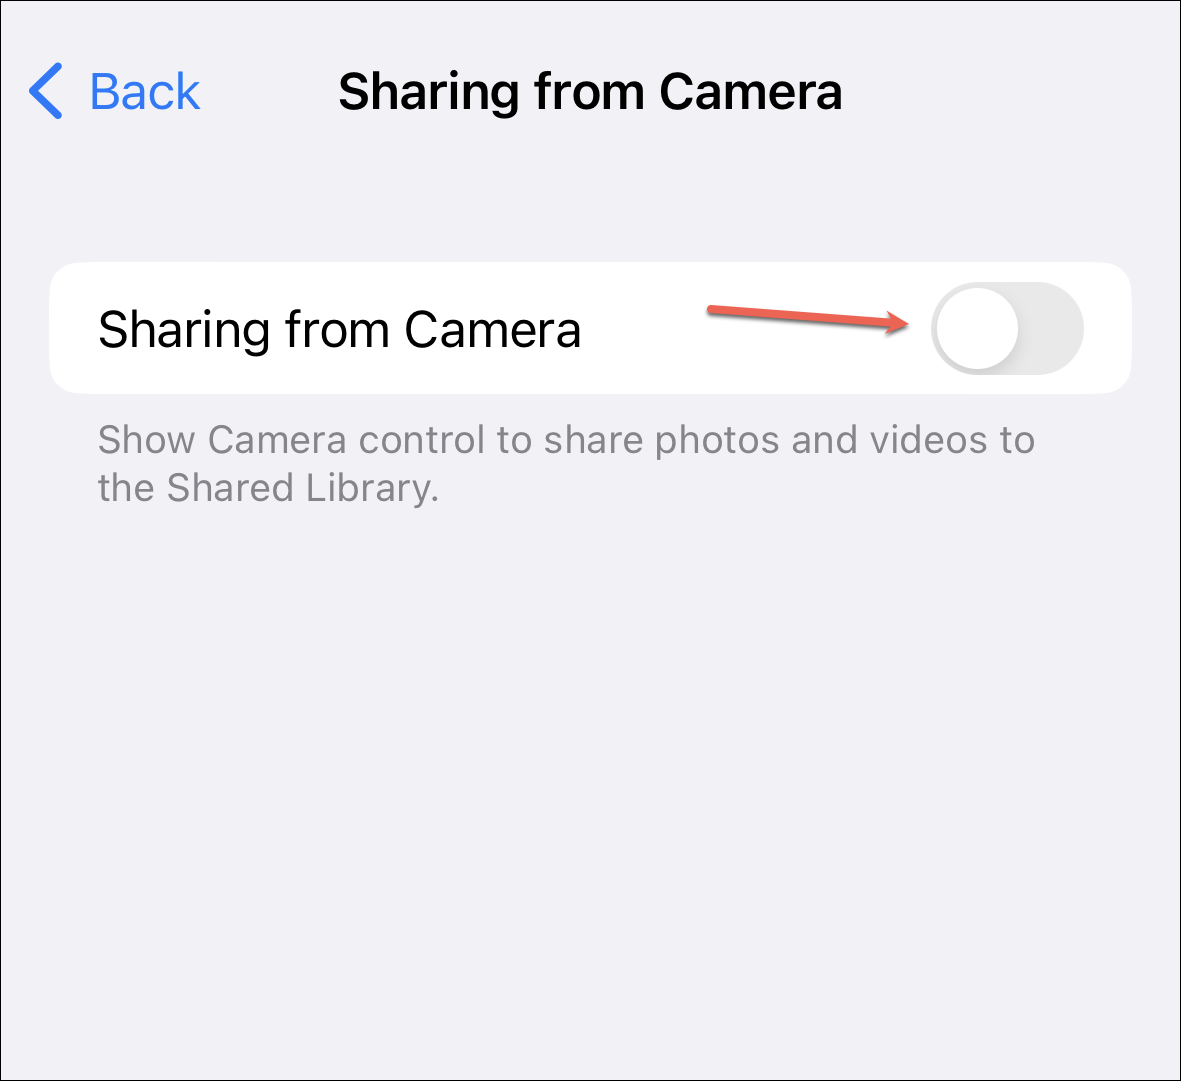
Now, turn off the toggle for ‘Sharing from Camera’.
Inviting or Deleting Participants
Only the creator of the library can invite more participants (if there’s room) or delete existing participants.
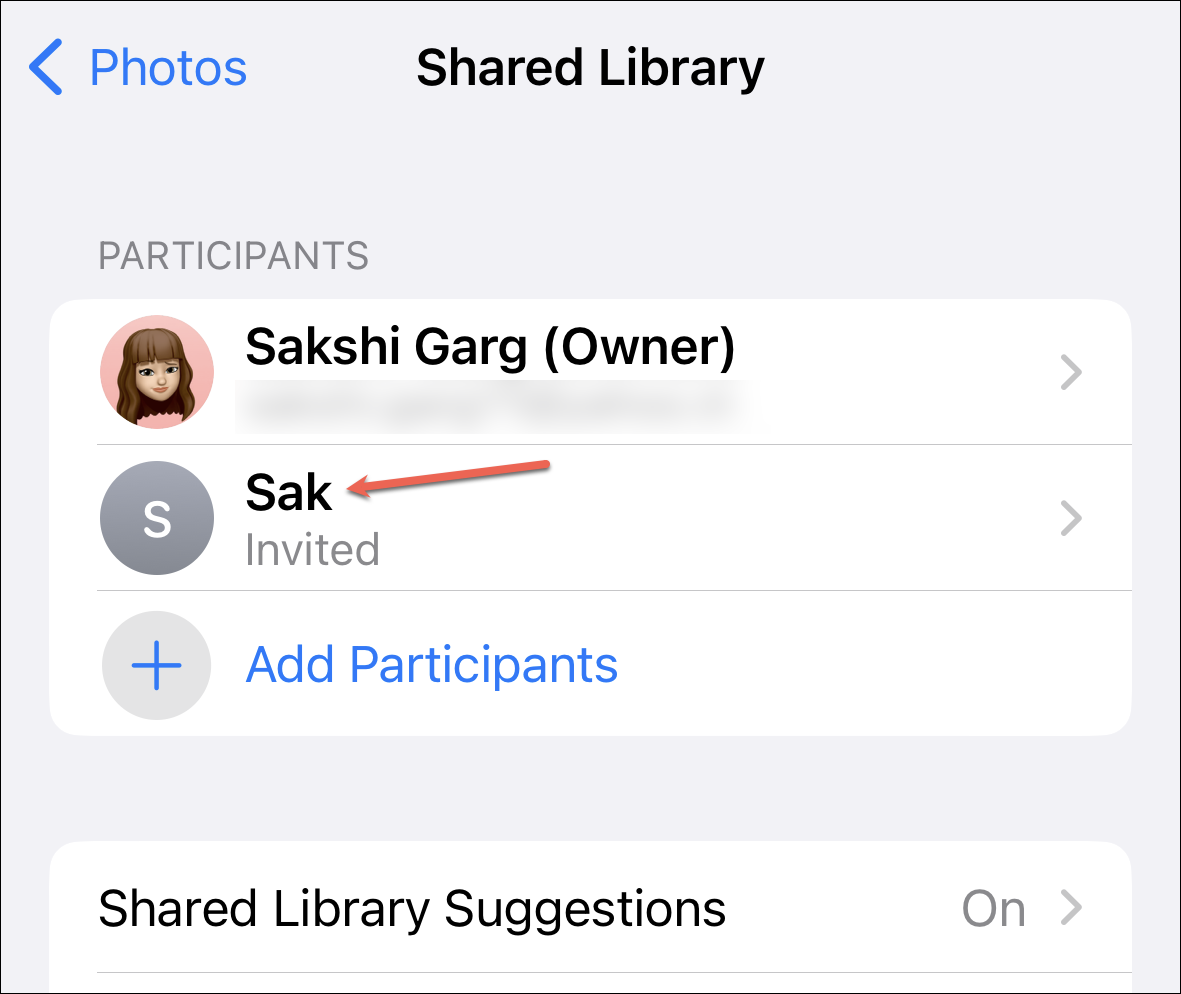
To remove any participant from the library, go to ‘Photos’ from the Settings app.
Then, tap the ‘Shared Library’ option.
Tap the name of the person you want to remove.
Now, tap ‘Remove from Shared Library’.
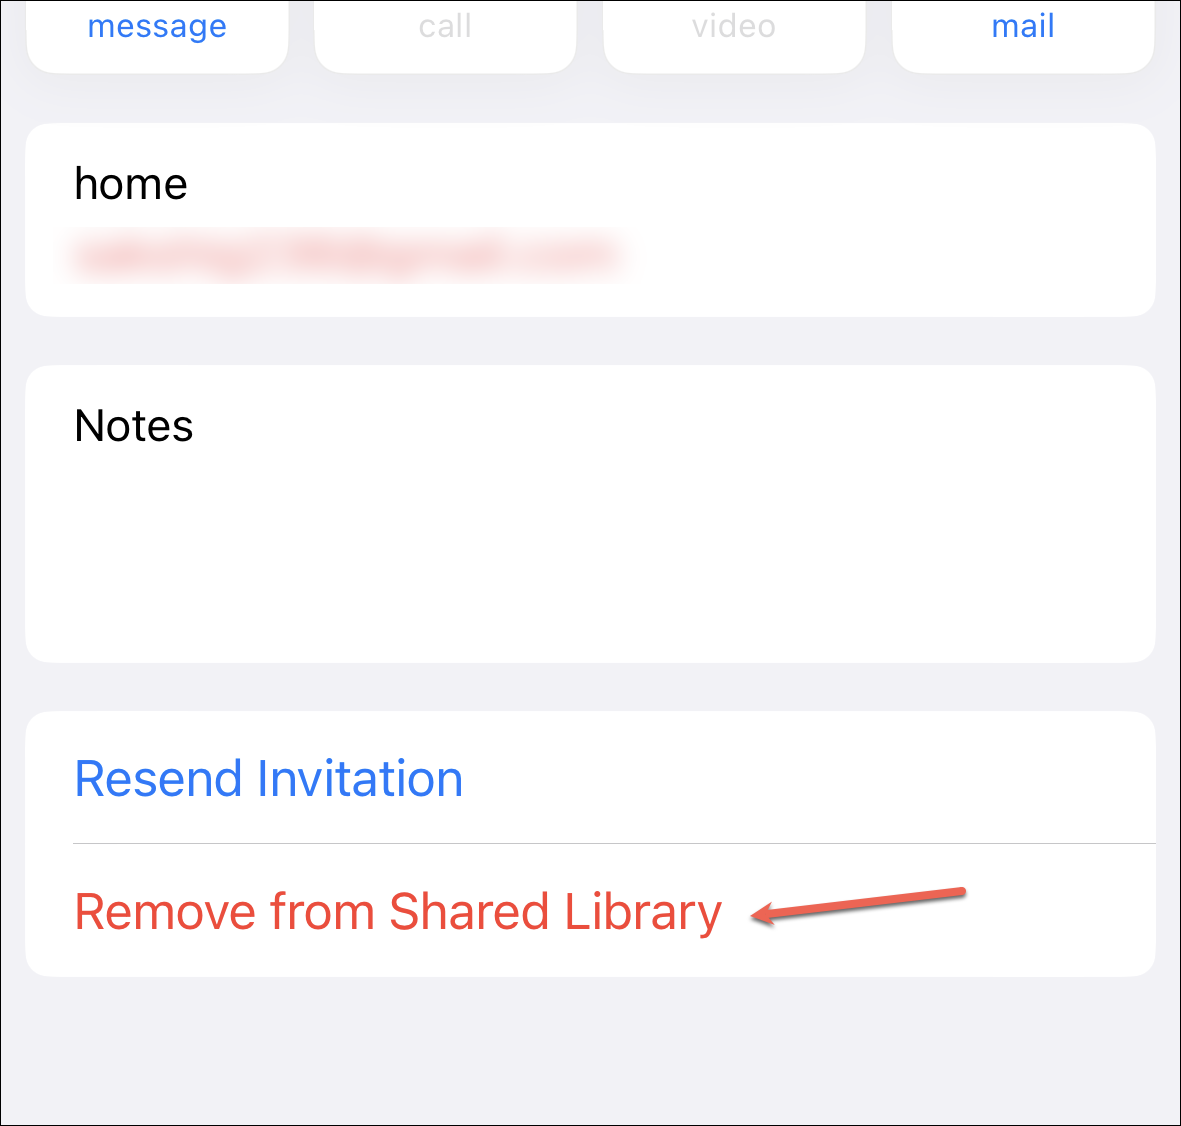
A confirmation prompt will appear. Tap ‘Remove from Shared Library’ again to confirm.

Whenever you remove a participant from the Shared Library, they’ll receive a notification. If they’ve been in the library for more than 7 days, they’ll receive a copy of all the photos and videos in the shared library in their personal library. But if they’ve only been a part of the library for less than 7 days, they’ll only receive a copy of the content they contributed.
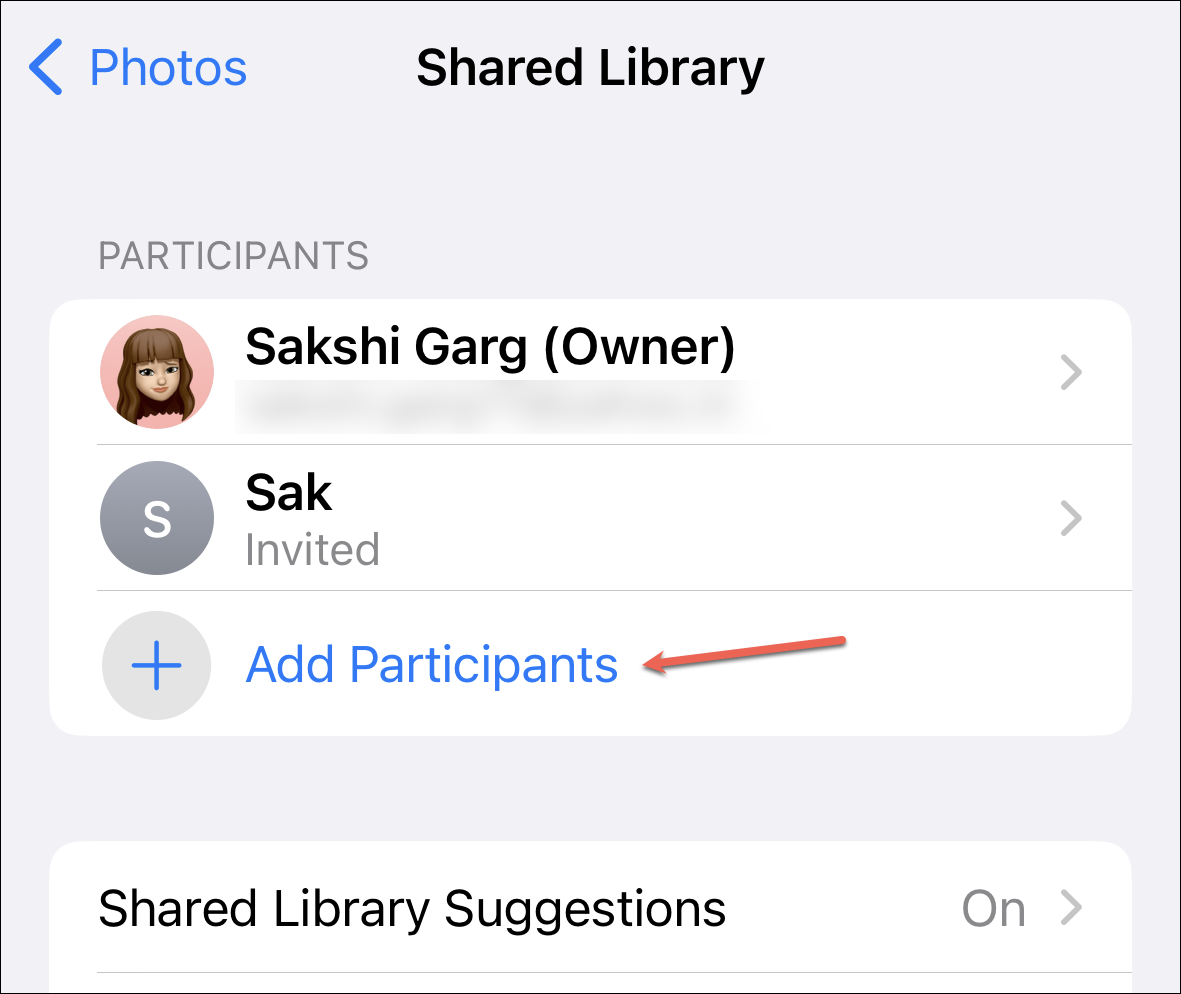
To invite another participant, go back to the Shared Library option in the settings. Then, tap ‘Add Participants’.
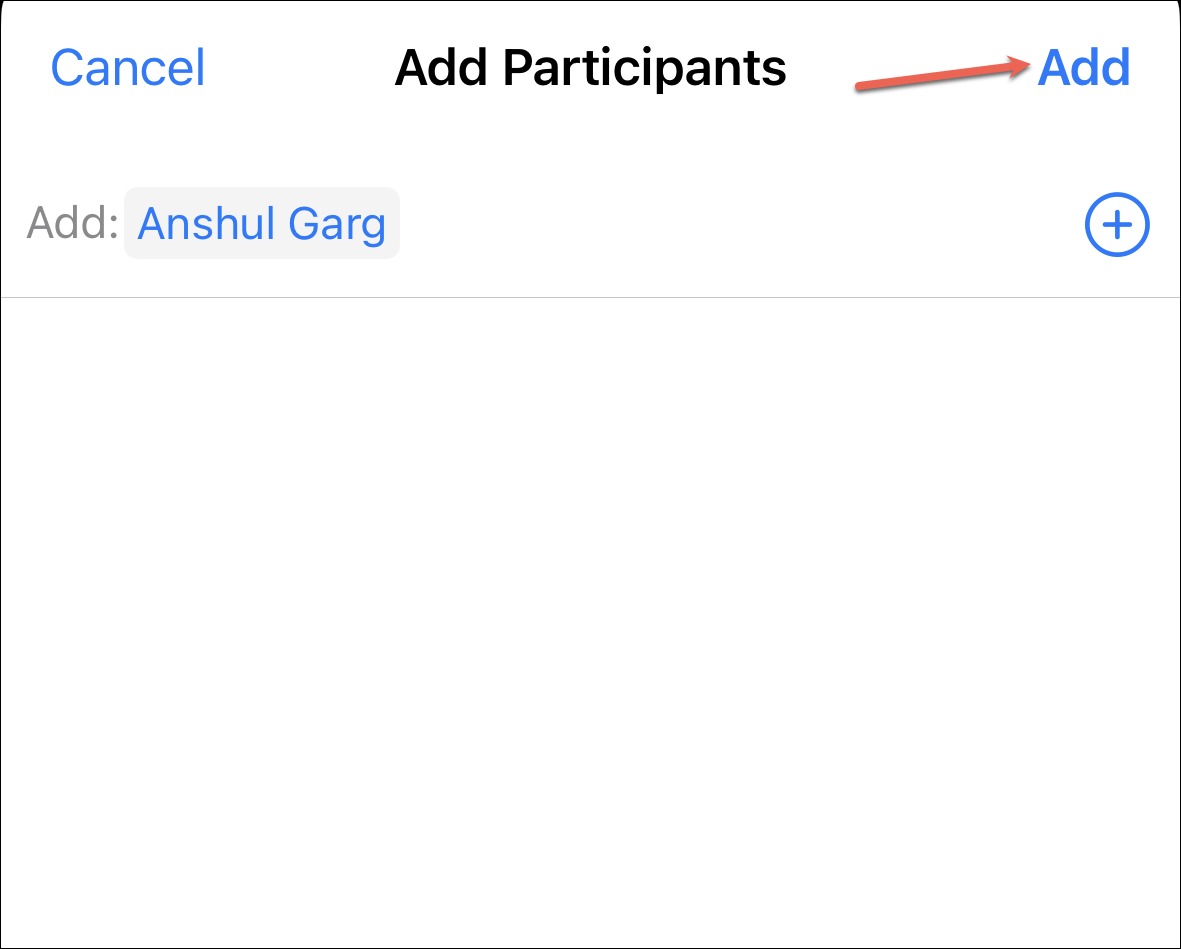
Enter the contact information (phone number/ Apple ID) in the ‘Add’ field and tap ‘Add’ to send the invitation.
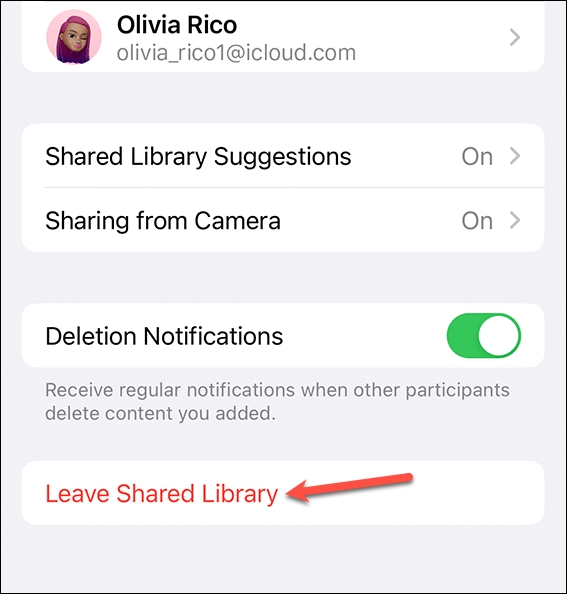
Leaving a Shared Library
Other participants can choose to leave the Shared Library at any time. Go to ‘Photos’ from the Settings app on your iPhone.
Then, tap the option for ‘Shared Library’.
Tap ‘Leave Shared Library’ at the bottom. Then, choose whether you want to copy everything from the Shared Library to your Personal Library or only the content that you contributed.
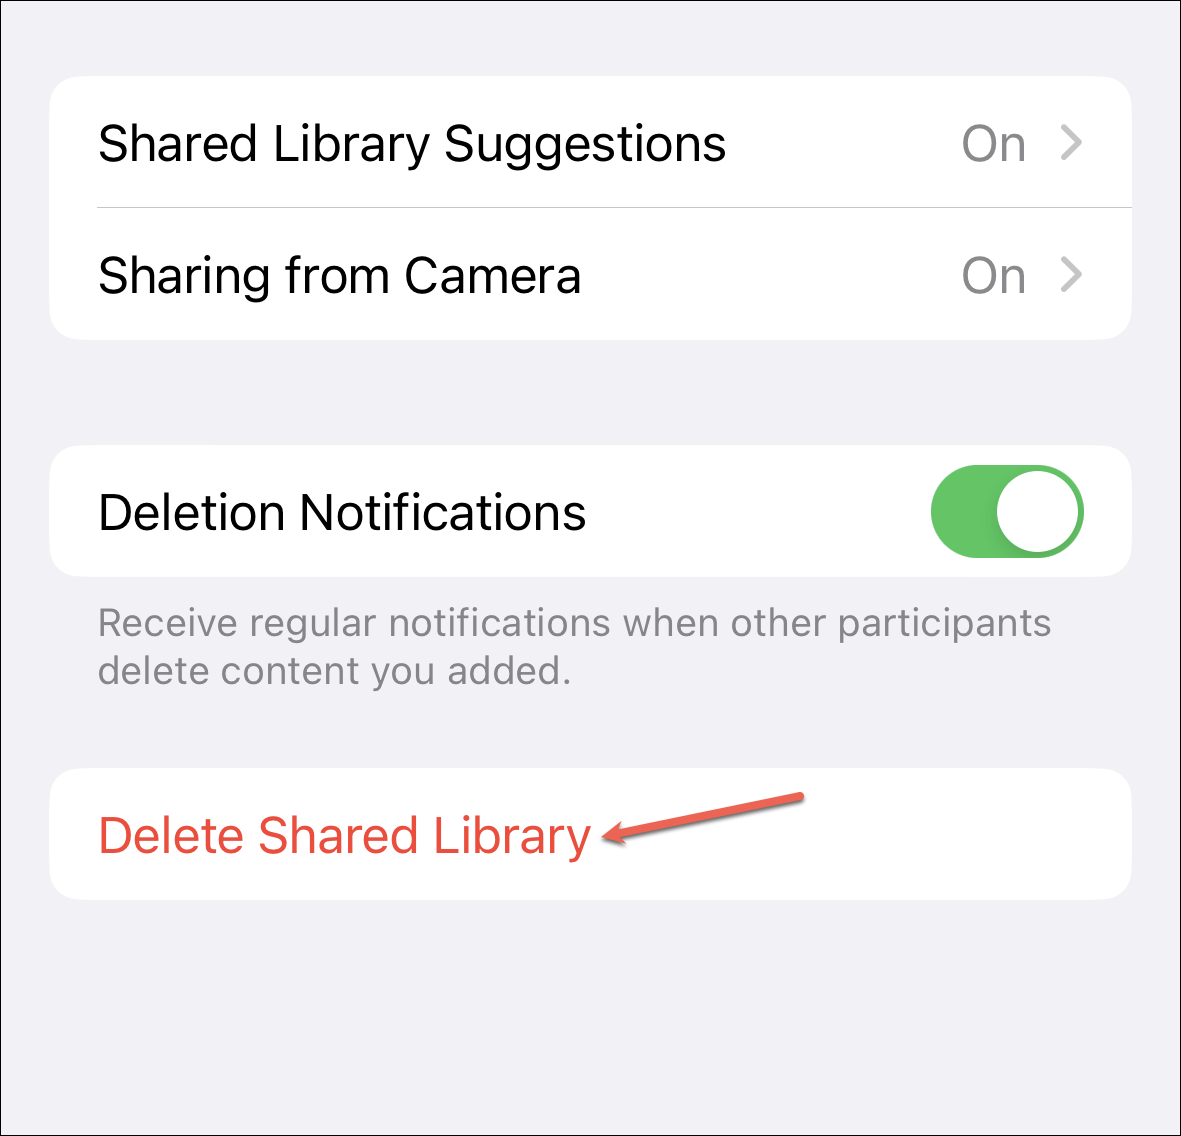
Deleting a Shared Library
The library creator can also delete the library at any time. From the Shared Library option in the Photos settings, tap the ‘Delete Shared Library’ option at the bottom.
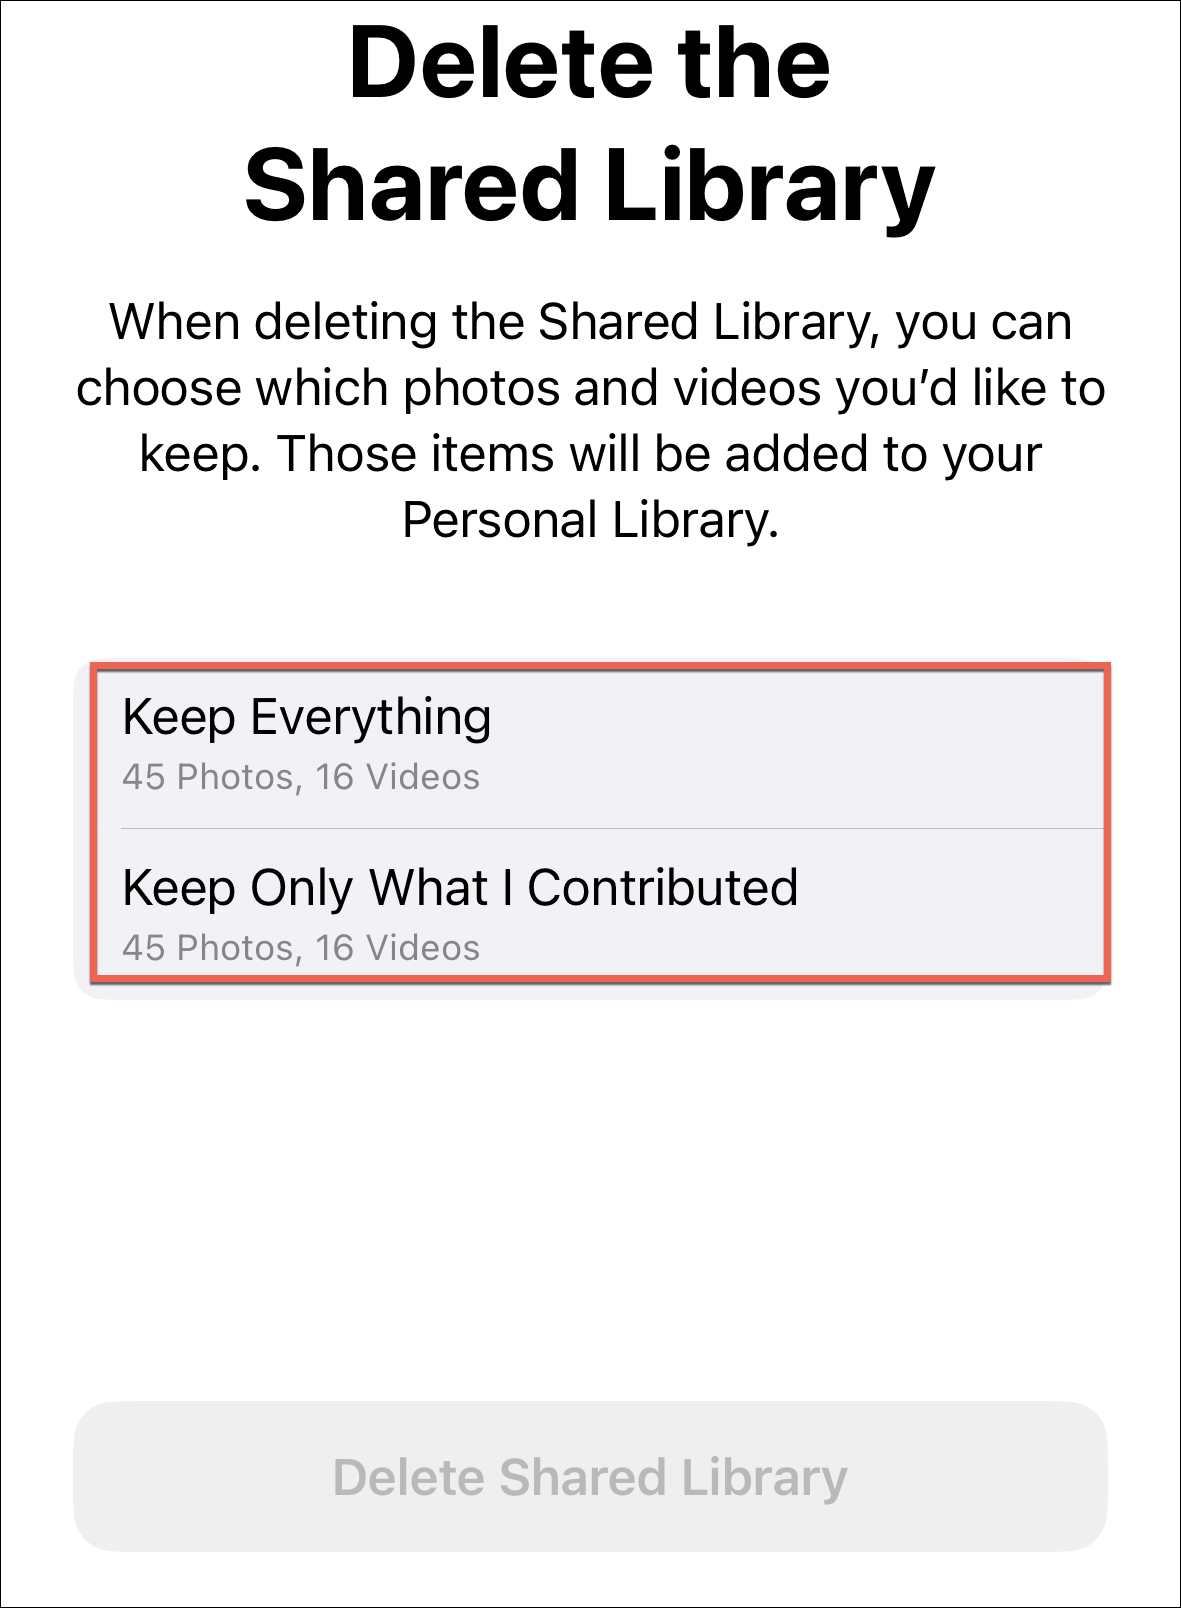
Then, choose whether you want to keep everything from the shared library in your personal library or only the content that you contributed. Tap the respective option to select it. Then, tap ‘Delete Shared Library’ to proceed.
All participants of the library will receive a notification.
Shared Library is one of the greatest features of iOS 16. With it, you can stop worrying about sharing memories with people when you’re going on a vacation with them; your complete focus can be on capturing them instead. And the best part is it’s easy to discard one library and start anew with another group. And now that you know how to use this feature to its full extent, go and have fun with it.


