Getting bored of long video meetings in Microsoft Teams or Zoom, and looking for ways to make them more fun? Well, you just stumbled to the perfect place looking for the solution. Let us introduce to you the Snap Camera app.
Snap Camera lets you apply lenses to your face or the background while using your computer’s webcam in any third-party app. You can use these filters in Microsoft Teams and Zoom meetings to add a little spice to them. They can also be really handy for people who are a little camera shy and need a little nudge to turn their camera on.
The app creates a virtual webcam on your computer that takes the input of the physical webcam and presents the output feed with added filters. This virtual webcam can then be used as a camera device in its own right in third-party apps, instead of the physical camera.
Download Snap Camera App
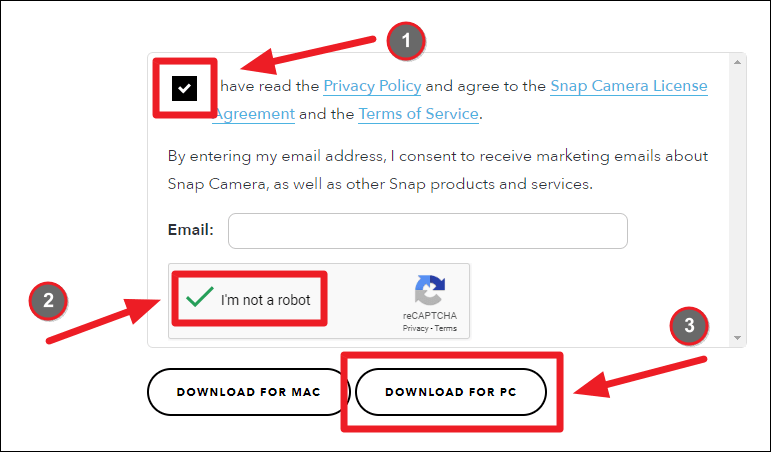
Using Snap Camera filters is also really easy and simple. To get started, go to snapcamera.snapchat.com/download to get the Snap Camera installer for your computer.
Snapchat requires you to accept the ‘Snap Camera License Agreement’ to be able to download the installer file. So go though the agreement, then tick the checkbox for ‘I have read the Privacy…’ and verify that you’re human on the reCAPTCHA box, then finally, click the download link to get the Snap Camera installer for your computer. No need to enter the Email address, it’s optional.
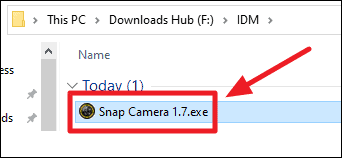
After downloading the installer file, run/double-click on it to install Snap Camera on your computer.
Set up Snap Camera on your PC
The Snap Camera app is not exactly like the app on your Apple or Android devices, but it isn’t all that different either. Figuring it out will be simple.
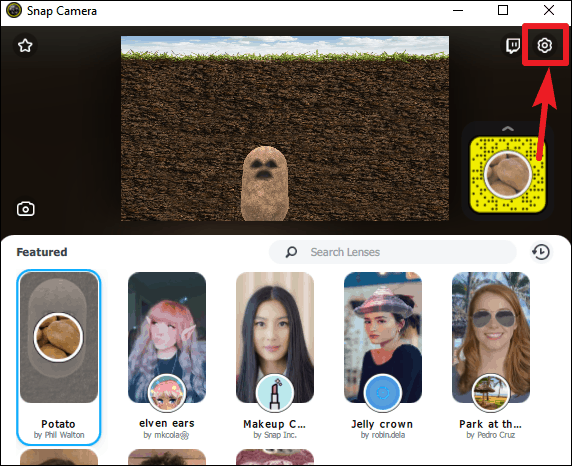
Launch Snap Camera app on your computer. It should display the camera stream right away. If not, you may have to configure the app to use your computer’s webcam. Go to the settings of the app by clicking on the ‘settings’ (gear) icon on the top right of the screen.
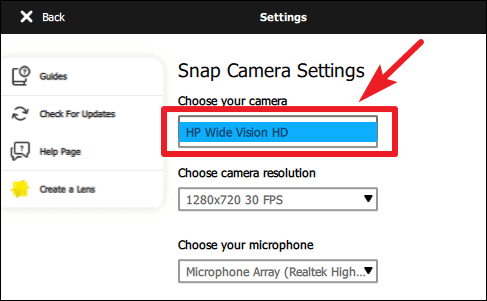
Then, under the ‘Choose your Camera’ option, select your computer’s webcam if it isn’t already selected.
Select a filter you want to use in your Zoom or Teams video call in the Snap Camera app. The most used and popular filters of Snap Camera are displayed under the ‘Featured’ section of the app, but we suggest you go check out the ‘Top Community Lenses’ section too.

You may minimize the app after selecting a filter. You can even close the app, just don’t quit it completely. Keep it running in the background.
Best Snap Camera Filters
Below are some of our favorite Snap Camera filters that you may want to use in your Teams and Zoom meetings.

Drift Visor
For the IT guy in the team, or the one knows stuff

Im Aware
For that kind of BOSS!

Invisible Person
For THE BOSS of the boss!

Baby
For the noob in the team

SNORKLE
For the one who never misses a meeting

Potato
For the one who’s following the trend

Metropolis
For the one who joined as a guest in the meeting
Using Snap Camera in Microsoft Teams
Open the Microsoft Teams app after setting up the Snap Camera app on your computer.
Note: If the Teams app was open before you set up the Snap Camera app, you will have to restart it for it to be able to access the Snap Camera virtual webcam.
In the Teams app, you will have to set the Snap Camera as your preferred camera device. You can change these settings during a call, or before.
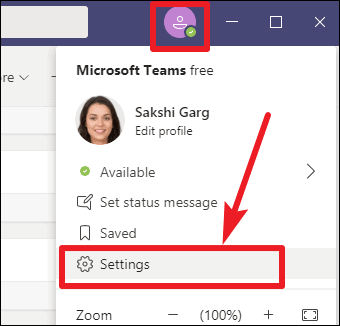
Click on the ‘Profile’ icon on the Title Bar in Teams app, and select ‘Settings’ from the menu.
In settings, click on ‘Devices’ on the left to go to device settings. Scroll down and click on the drop-down menu under the ‘Camera’ option, and select ‘Snap Camera’ from the list.
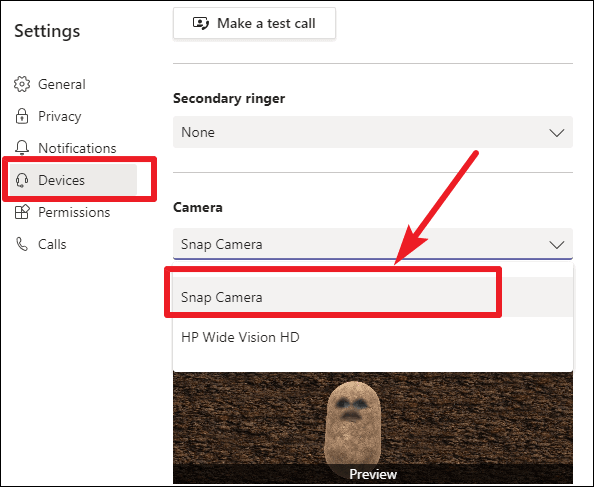
Note: If the Snap Camera option isn’t available in the list of devices, restart the Microsoft Teams application.
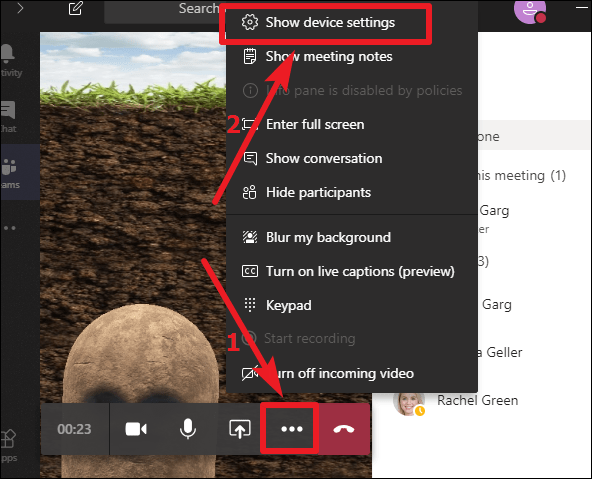
If you have already joined the call, don’t worry. You can switch to the Snap Camera stream during an ongoing call as well. In the call, click on the ‘More options’ icon (three-dot menu) and select ‘Show Device Settings’ from the menu.
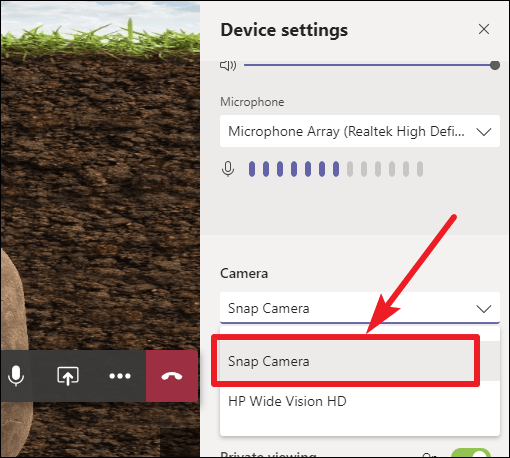
The Device Settings screen will open on the right side of the screen. Go to ‘Camera’ and select ‘Snap Camera’ from the drop-down menu. You will only have to change these settings the first time you use Snap Camera with Teams. The settings will stay the same until you change them again.
And that’s it. That’s all you need to do to use Snapchat filters in your Microsoft Teams meetings and video calls. You can even turn yourself into a potato if that’s what you want, just select the potato filter from the Snap Camera app. But please don’t do it during serious meetings. We don’t want you to get in trouble.
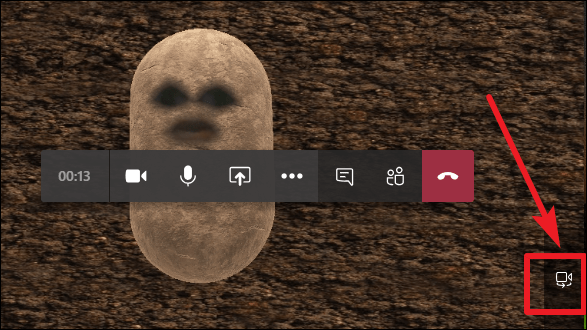
And if you don’t want to get stuck as a potato, you can switch back to a normal camera at any moment from within the teams. Click on the ‘Switch Camera’ button on the lower-right corner in the video call in Microsoft Teams to switch back to the normal camera.
Using Snap Camera in Google Meet
The best thing about Snap Camera is that it just doesn’t work like an app, but an actual camera. It can replace your physical camera with its virtual camera in almost any app. So, you can use the captivating and funny Snap Camera filters in even Google Meet.
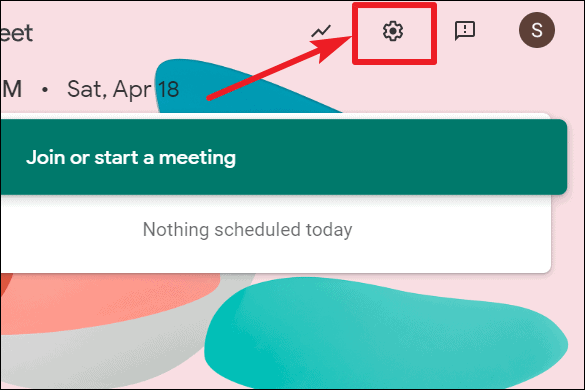
Open Google Meet by going to meet.google.com. Then, click on the ‘Setting’ icon on the upper right corner of the screen.
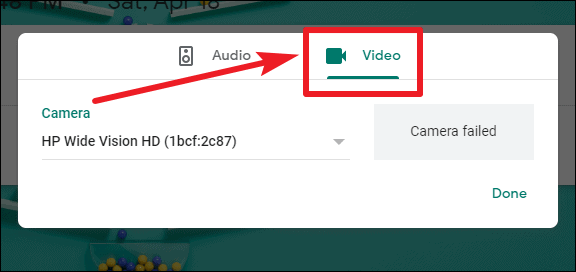
Click on the ‘Video’ tab on the pop-up menu to go to video settings.
From the video settings screen, click on the drop-down menu under ‘Camera’ and select ‘Snap Camera’ from the available devices. Then, click on ‘Done’.
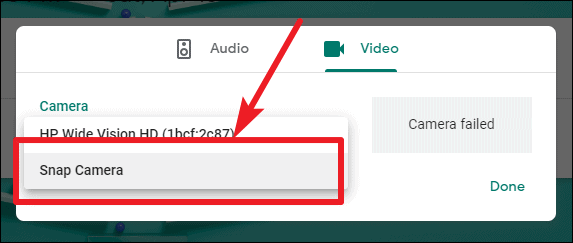
Note: If Snap Camera isn’t available in the list of options, refresh the page.
Now when you join a meeting in Google Meet, the selected filter from Snap Camera will be in effect in the meeting. To turn off Snap Camera in an ongoing meeting, click on the ‘More options’ icon on the bottom right corner of the screen and select ‘Settings’ from the menu.
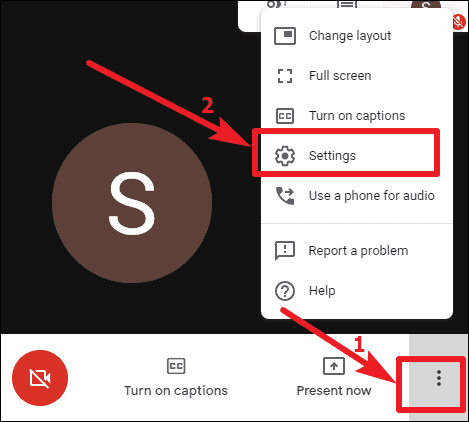
Click on the ‘Video’ tab on the pop-up menu to go to video settings. Then, click on the drop-down menu for Camera.
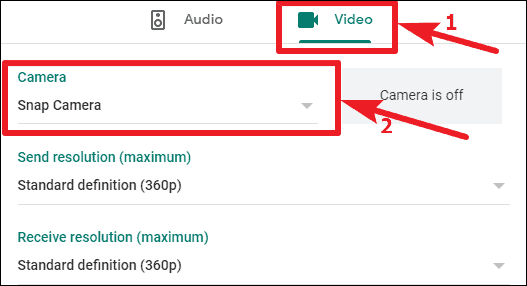
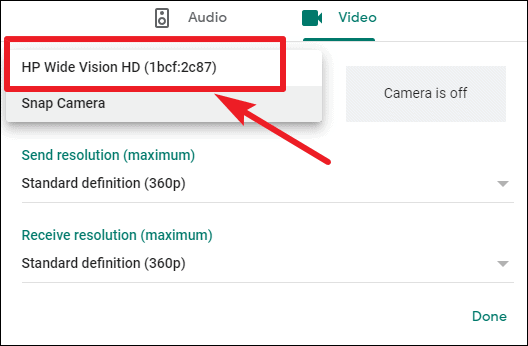
Switch from Snap Camera to your system’s camera by selecting the name of your camera device and click on ‘Done’ to turn off Snap Camera in the meeting.
Using Snap Camera in Zoom
Snap Camera works as a virtual webcam on your computer. It takes the camera feed from your primary camera, applies effects/filters to it, and then makes it available as a virtual camera called ‘Snap Camera’. You can then select that as the default camera in the Zoom app, so the camera filters are applied to your Zoom meetings.
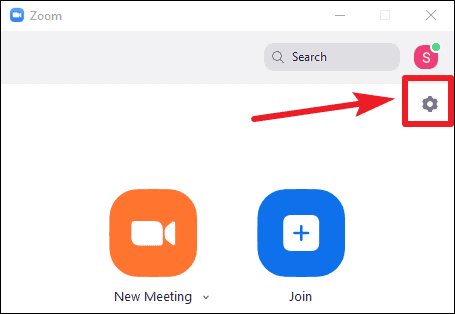
To get started, open the Zoom app on your computer and then click on the ‘Settings’ icon at the upper right corner.
Note: If the Zoom app was open before you set up the Snap Camera app, you will need to restart Zoom to be able to use the Snap Camera in it.
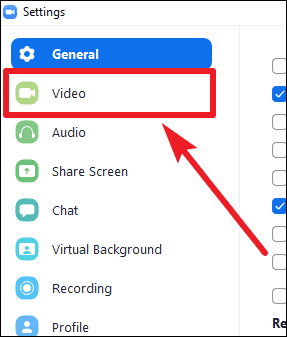
Click on ‘Video’ on the left panel in the Zoom settings window to open video settings for Zoom.
Click on the drop-down next to ‘Camera’ option and select ‘Snap Camera’ from the available options. This is just a one-time requirement, and you won’t have to change these settings every time you run Zoom. The settings will stay the same until you choose to change them.
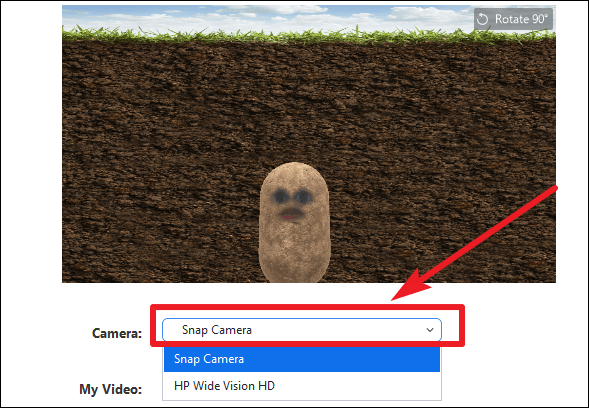
Note: If Snap Camera is not showing up in Zoom video settings, then restart the Zoom app on your computer.
Now, when you join or start a meeting in Zoom, the filter you selected in the Snap Camera app will be applied to your video stream in the meeting. You can change the filters from the Snap camera app at any time in a meeting.
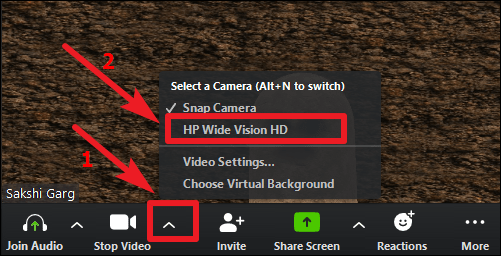
To turn off Snap Camera filter in an ongoing Zoom meeting, click on the ‘arrow’ icon next to the ‘Stop Video’ button on the host control bar at the bottom of the screen. You’ll see the ‘Snap Camera’ and ‘<Your Device Camera Name>’ under the ‘Select a Camera’ section in the menu. Click on your device camera to switch back to the normal camera feed.
💡 Use the Alt + N keyboard shortcut to quickly switch between your main camera and Snap Camera in an ongoing Zoom meeting.
Conclusion
Snap Camera app can provide the much-needed uplifting we all need in these dire times by being the source of some comic-relief in our meetings and video calls. Become a potato, an elf, a matzo ball, or choose from literally hundreds of available filters to add some cheer to your Microsoft Teams or Zoom meetings. But please, don’t do it in any serious meetings that might get you in trouble.

