When you’re using graphics-intensive apps such as web browsers, photo editors, video games, and media players, it’s a good idea to keep an eye on your GPU usage since these apps heavily rely on graphics processing.
Task Manager is the best way to monitor all your system resources including GPU, CPU, Memory, Disk, and Network – all in one place. However, many users have reported that their GPU usage isn’t visible in the Task Manager, both in the Process and Performance tabs. Luckily, there are several ways to fix the GPU not showing up in the Task Manager problem.
Why is my GPU not showing up in Task Manager?
Here are the main reasons why your GPU might not show up in Task Manager on Windows 11:
- Driver Problems: Sometimes, your GPU’s drivers can be outdated, corrupt, or not compatible with Windows 11. This can prevent Task Manager from recognizing your GPU.
- GPU is not properly inserted: If your graphics card isn’t sitting properly in its slot on the motherboard or isn’t getting the power it needs through its connectors, it might not show up.
- BIOS Settings: Your GPU could be disabled in your computer’s BIOS settings. Checking these settings and making sure the GPU is enabled can solve the issue.
- Software Conflicts: Certain software, like overclocking utilities or monitoring tools, can clash with your GPU and cause it to go incognito in Task Manager.
- Windows Updates: Sometimes, Windows updates may be incompatible with the GPU drivers or hardware detection functions, causing your GPU to disappear from Task Manager.
- Hardware Problems: If there’s something wrong with the GPU itself, the motherboard, or the slot it’s plugged into, Task Manager might not see it.
Fixing GPU Not Showing Up in Task Manager issue on Windows 11
Now that you’re aware of the common causes behind the issue, let’s delve into some potential troubleshooting solutions to help you resolve the problem.
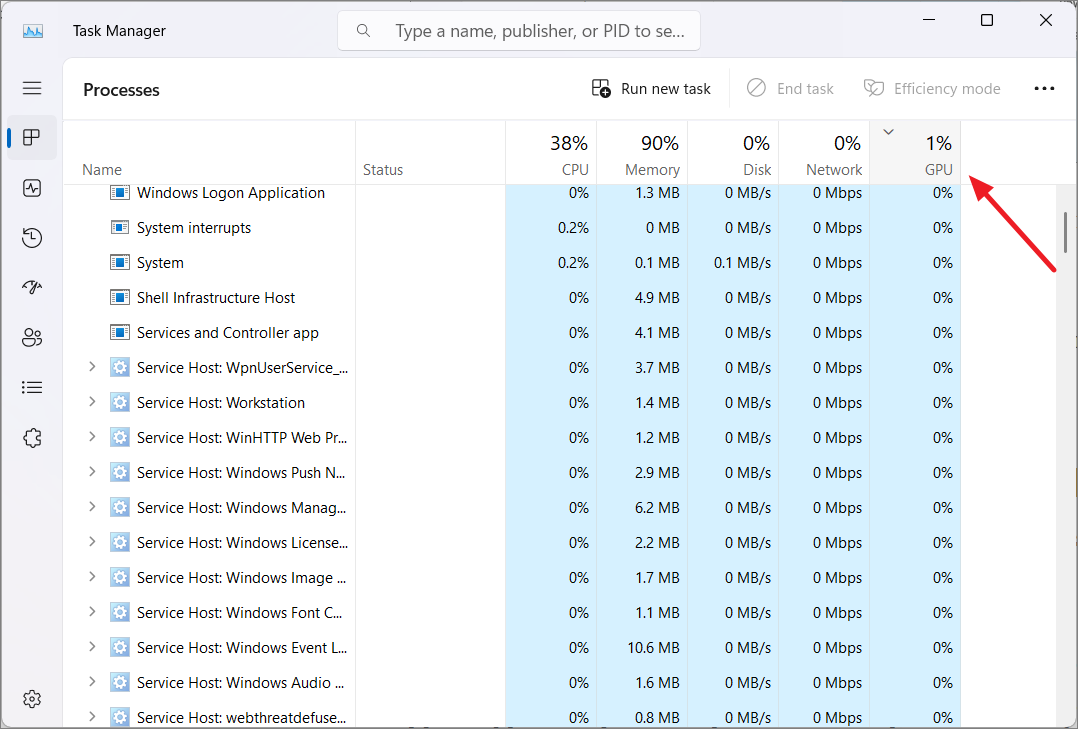
1. Unhide the GPU column in the Task Manager
If you can’t see the GPU column that normally shows the GPU usage for each process in the Processes tab of Task Manager, it’s usually not actually missing; it’s just hidden. The GPU column is hidden by default after certain Windows Updates.
Just navigate to the Task Manager and enable the GPU column, and you’ll be able to see how much GPU your computer is using and how much each app is using.
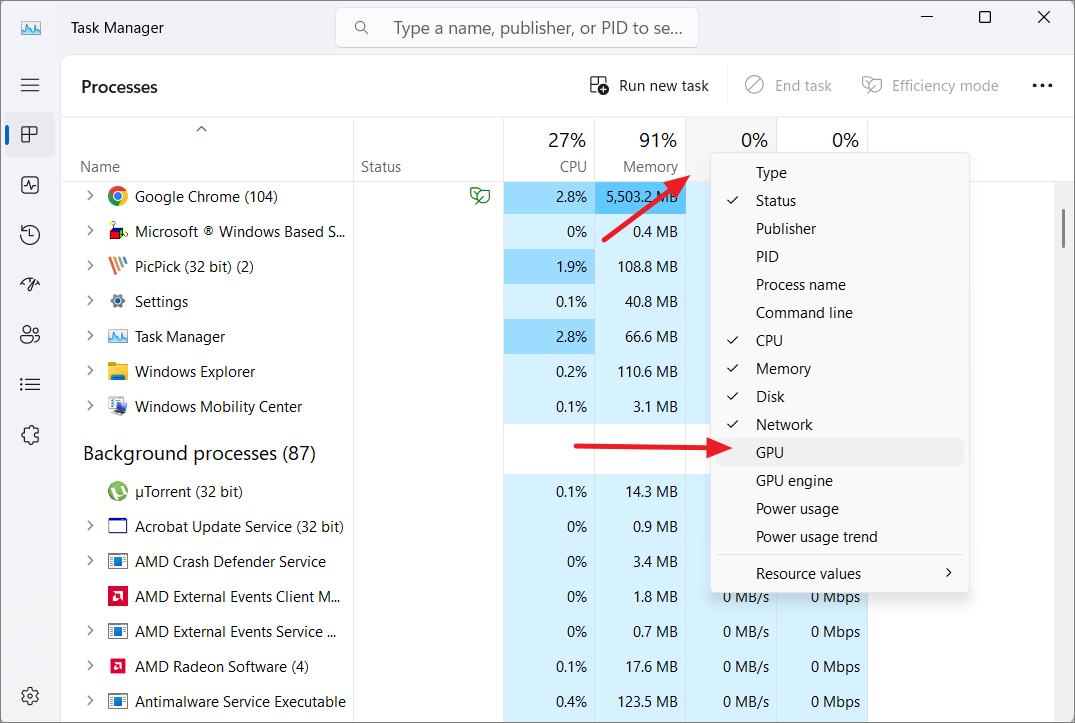
- To begin, open the Task Manager by pressing
CTRL+Shift+ESCkeys together or right-clicking the taskbar and selecting ‘Task Manager’. - Then, head over to the ‘Processes’ tab.
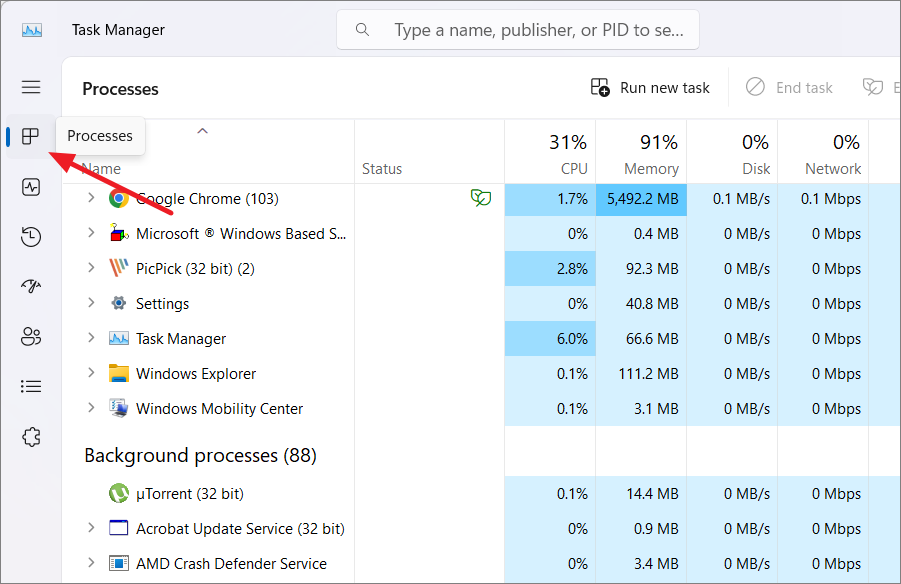
- Now, right-click on any of the columns you see, like Name or Status, and a menu with various options will pop up. Then, select the ‘GPU’ option from this menu, and it should appear on the right side of the Task Manager.
If you still can’t spot the GPU column, it might not be showing in the Task Manager due to other reasons.
2. Keep Your Operating System Up to Date
It’s always a good idea to regularly update your operating system to ensure your PC stays safe and runs at its best.
Updates bring improvements in quality, including bug fixes, new features, and important patches. Plus, they can help resolve issues you might be experiencing, like problems with your task manager not showing GPU information on your PC. To update your Windows operating system, just follow these steps:
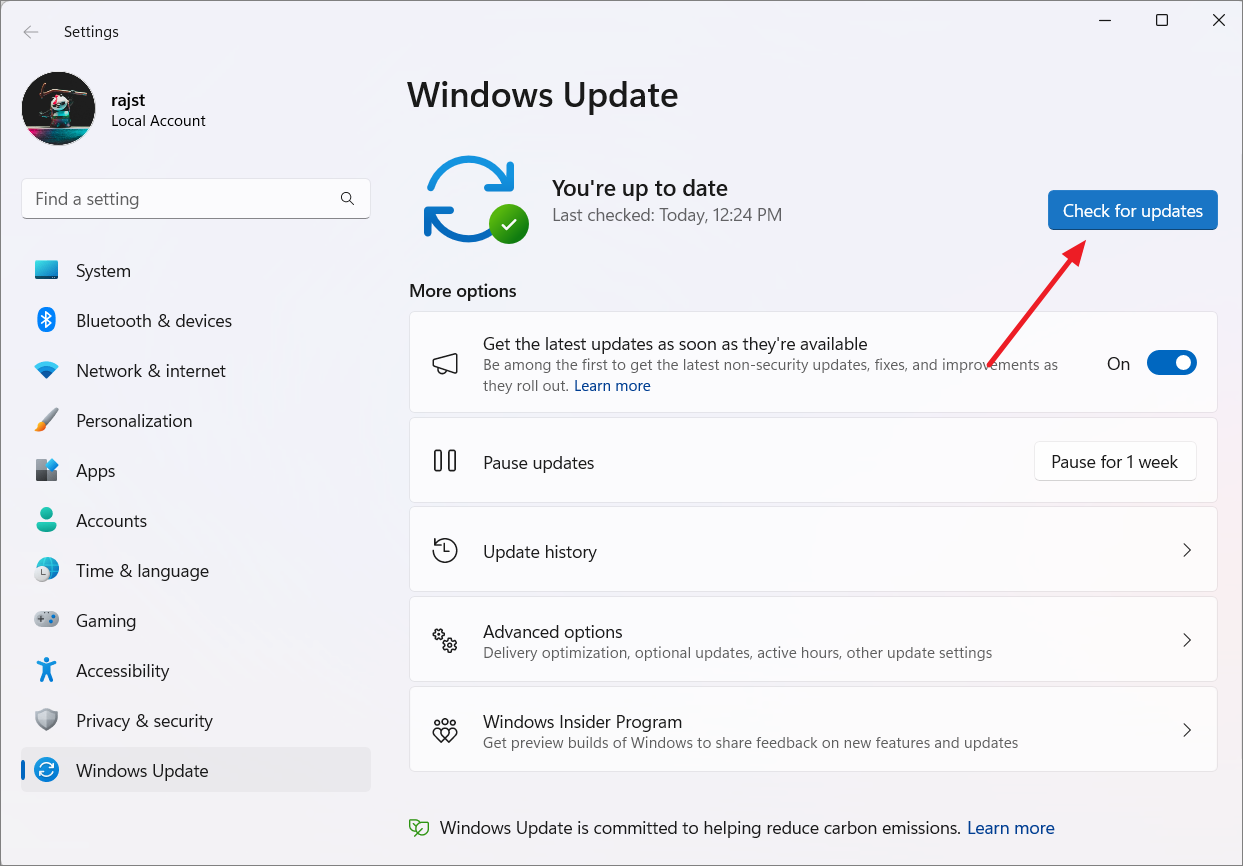
- Start by opening the Windows Settings app by pressing
Windows+Iand selecting ‘Windows Update’ in the left panel.
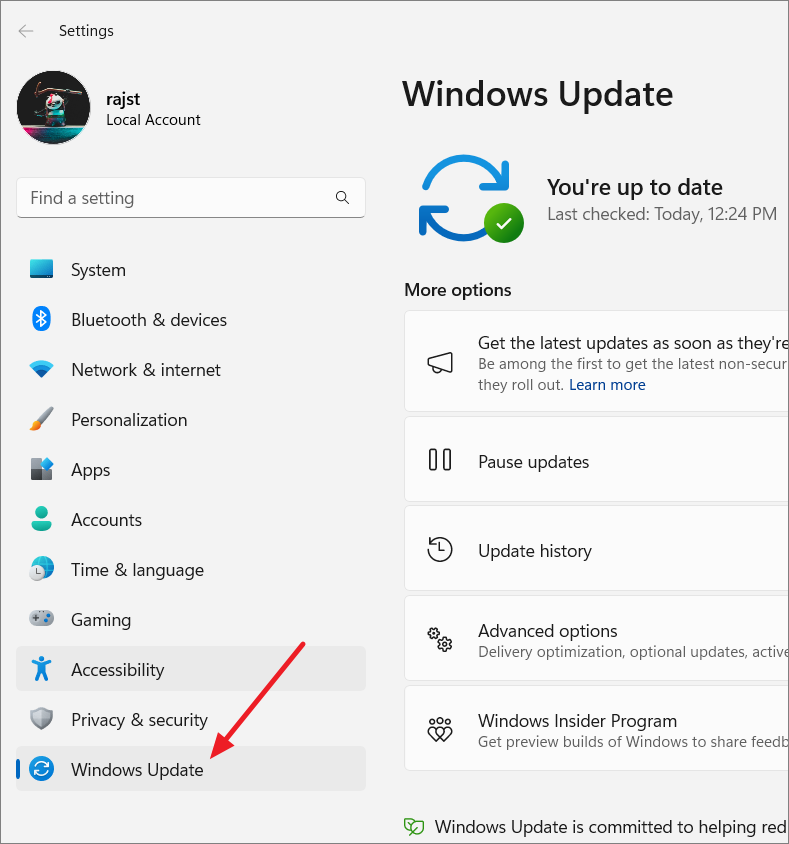
- Once you’re in the update settings, click the ‘Check for Updates’ button on the right side of the window.

- If there’s an update available, it will be downloaded automatically.
Don’t forget to restart your computer after the update finishes. This way, you’ll keep your system running smoothly and securely.
3. Rebuild the Performance Counter
Performance counters are a feature in Windows that keeps tabs on various aspects of your system’s performance and resource usage. These counters give you data and stats about how your hardware, software, and other parts of your computer are running.
If the registry entries of the performance counter become corrupted, it can cause the GPU option to disappear. To resolve this, you will have to rebuild the performance counter, which will automatically restore the corrupted registry entries. To do so, follow the steps:
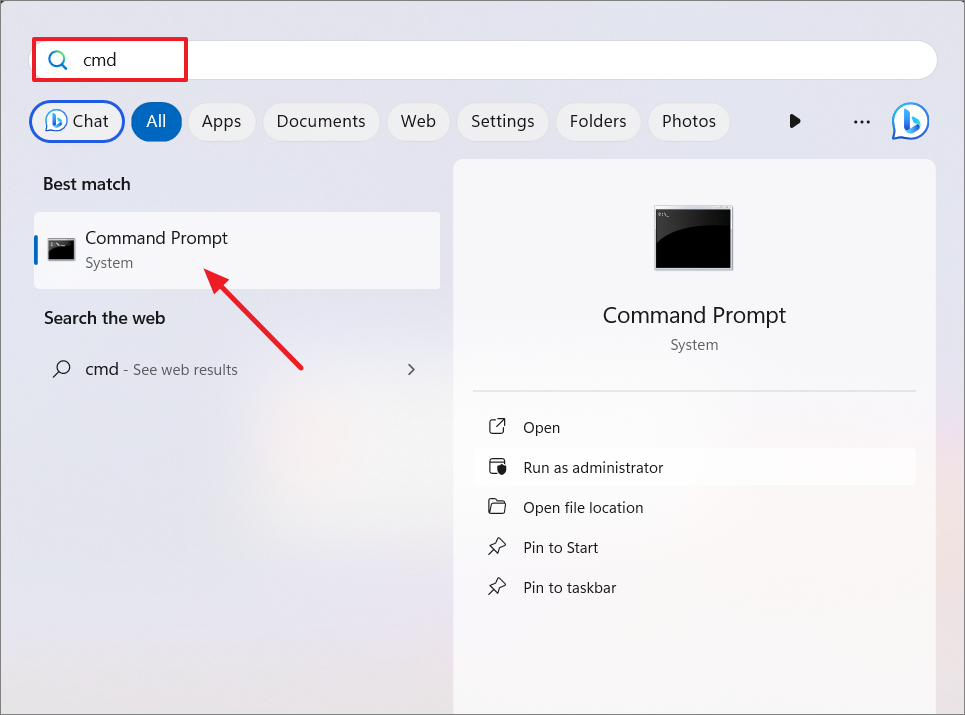
- Search for ‘Command Prompt’ or ‘cmd’ in the Windows Search and select ‘Run as administrator’.
- In the command prompt, type the following command to rebuild the performance counter:
lodctr /R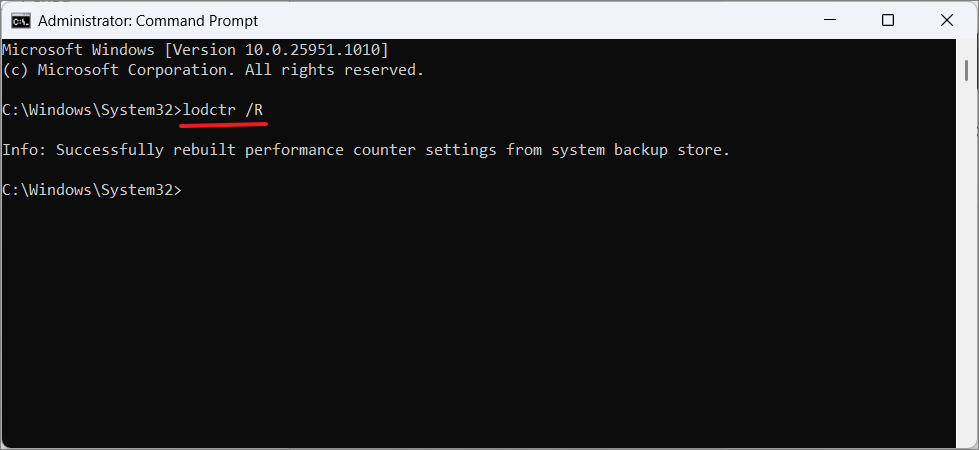
- If you get an error message saying “unable to rebuild performance counter”, run the below commands one after the other:
cd c:\windows\sysWOW64lodctr /Rcd c:\windows\system32lodctr /ROnce it’s done, check if the GPU option is displaying in the task manager.
4. Repair Corrupted System Files
Corrupted system files can also lead to GPU not showing up in Task Manager. To scan and repair these faulty system files, you can run a combination of SFC and DISM. To do so:
- Type
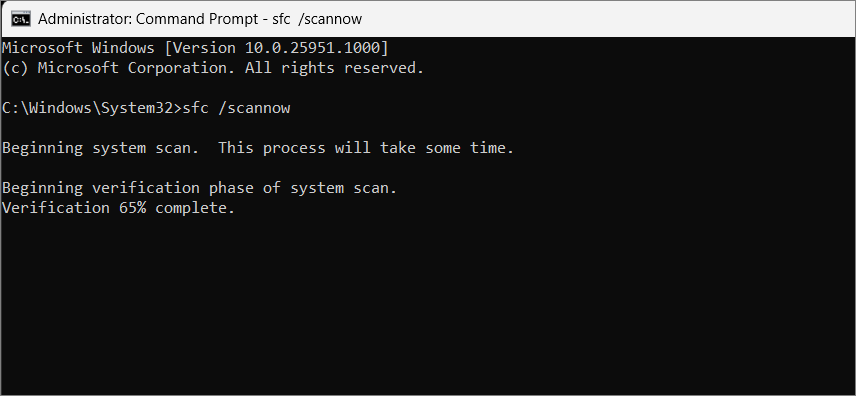
cmdin the search bar to locate Command Prompt and right-click on it to choose ‘Run as administrator’. - Type
sfc /scannowand then hitEnter.
After running the System File Checker, it’s time to run the Deployment Image Servicing and Management (DISM) scan.
- To run a DISM scan, type the following commands one after the other and hit ‘Enter’ after each:
Dism /Online /Cleanup-Image /CheckHealthDism /Online /Cleanup-Image /ScanHealthDism /Online /Cleanup-Image /RestoreHealth
5. Disable Power Saving Mode
The power-saving mode may restrict the GPU’s performance to conserve energy, which can result in the GPU not appearing in the Task Manager.
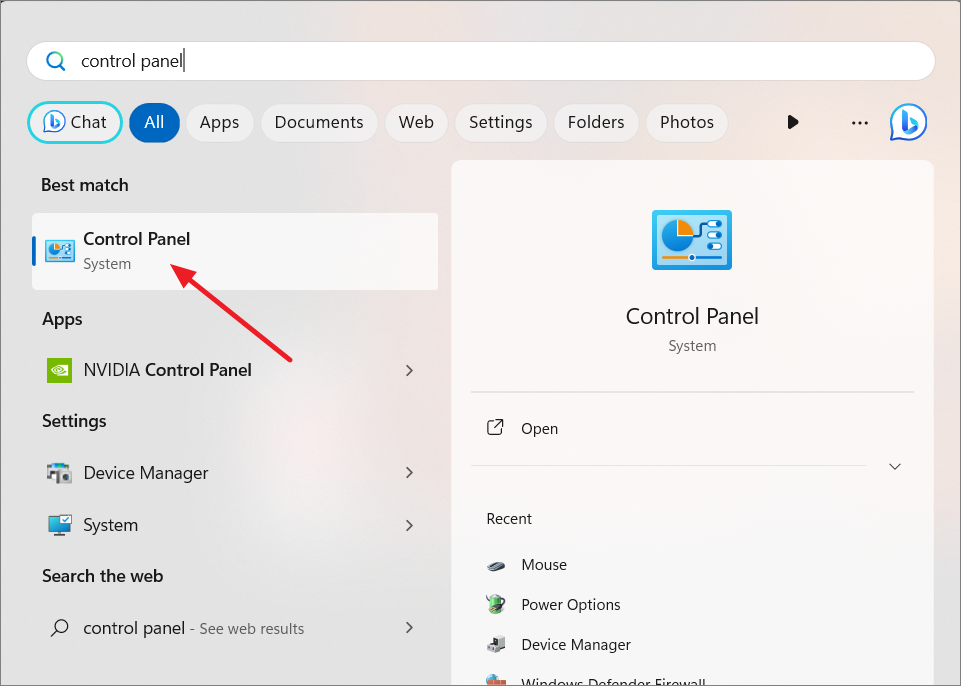
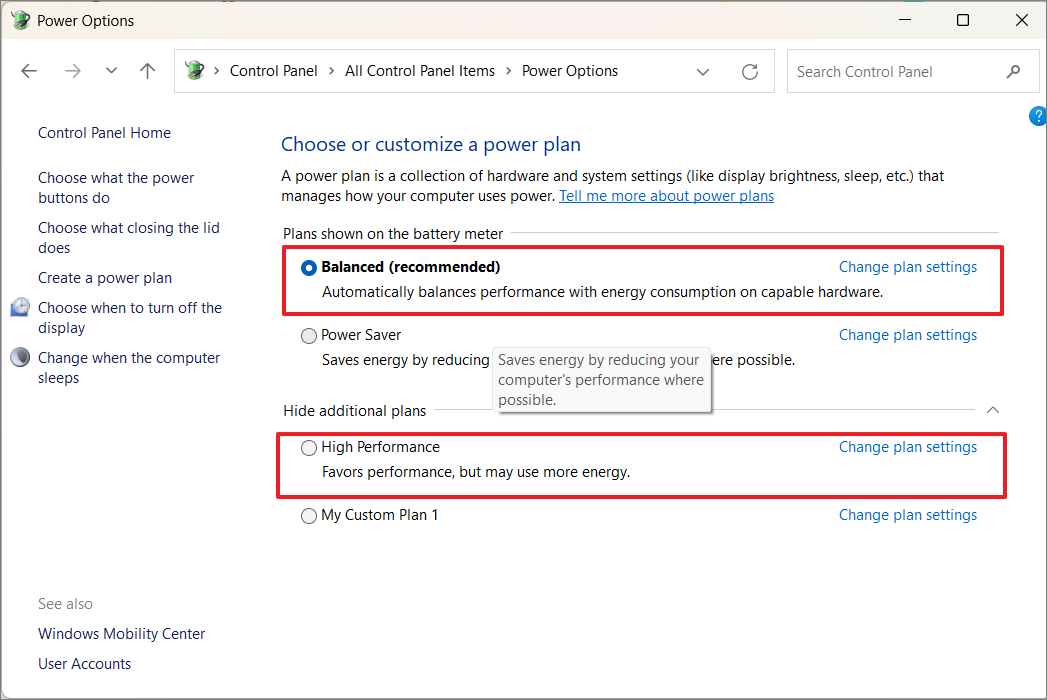
- Open the Control Panel by searching for it in the Windows Search and selecting ‘Control Panel’.
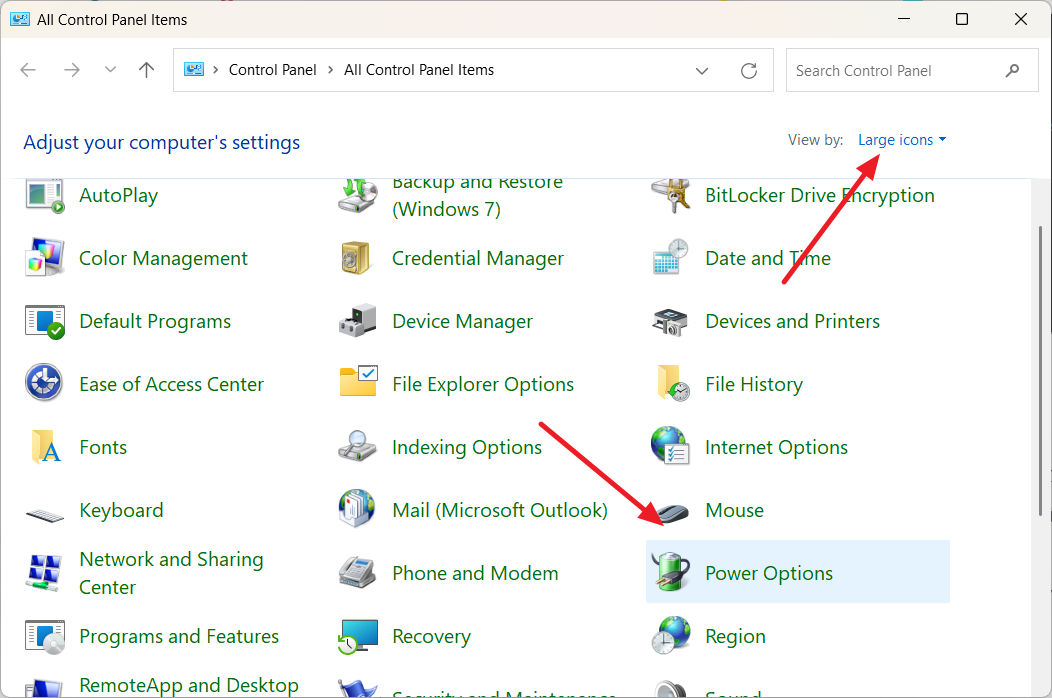
- In Control Panel Windows, make sure the View by is set to ‘Large icons’, and select ‘Power Options’.
- Under ‘Choose or customize a power plan’ section, select either the ‘Balanced’ or ‘High Performance’ option.
6. Restart the NVIDIA Display Container Service
Starting or restarting the NVIDIA Display Container Service may help resolve issues related to NVIDIA GPU detection in some cases, especially if the service is not running correctly. Here’s how you can do it:
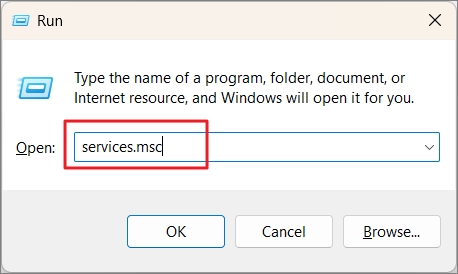
- Press
Windows+R, typeservices.mscand press Enter: This will open the Services window.
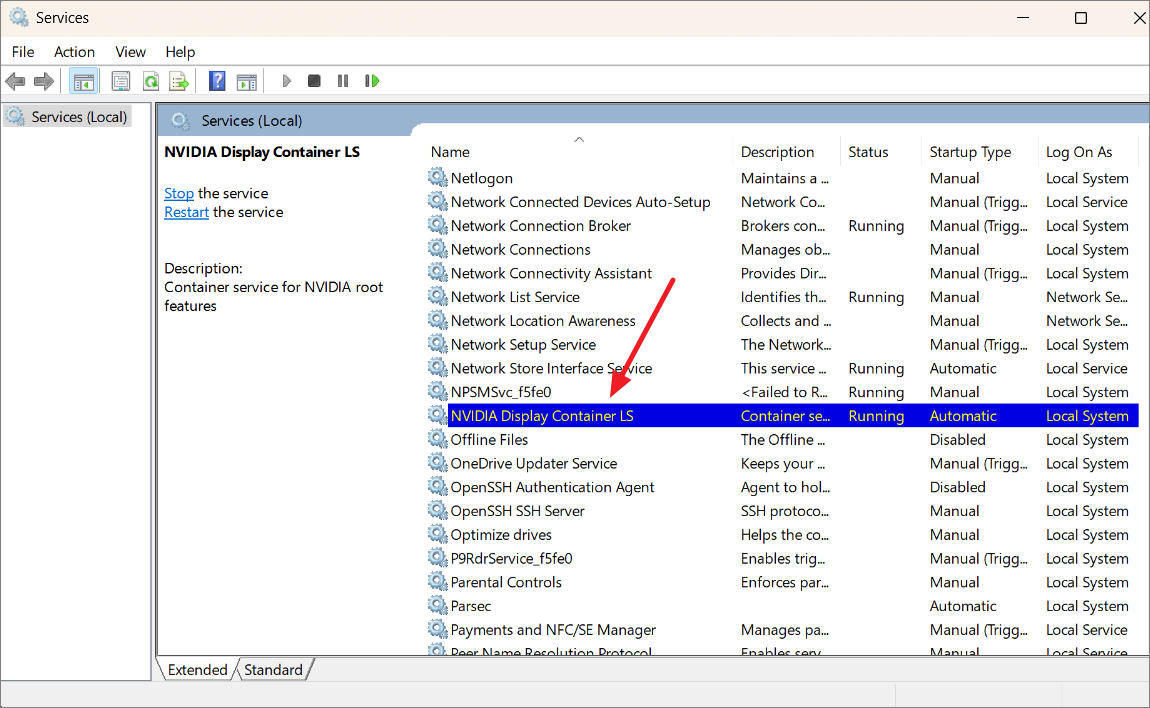
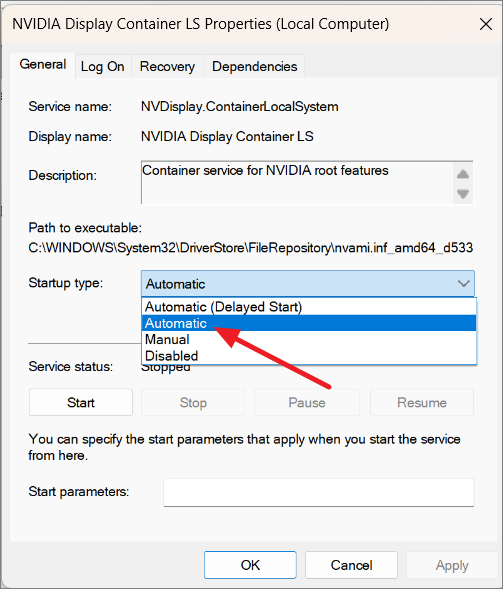
- In the Services window, scroll down till you find the ‘NVIDIA Display Container LS’ service. Then, double-click on it.
- Next, set the Startup type to ‘Automatic’ if it is not already set.
- If the service is stopped, click ‘Start’ to start the service. Then, click ‘Apply’. You can also find and restart any GPU-related services.

- Close the registry editor and restart your PC.
7. Check the Version of WDDM
WDDM, also known as Windows Display Driver Model, serves as a graphics framework responsible for managing various graphics-related tasks, including showing GPU performance in the task manager. However, it’s important to note that this feature isn’t supported by older graphics cards, such as APUs and iGPUs. As a result, the GPU option won’t appear.
To check whether your graphics card supports this feature, you’ll need a WDDM version of 2.0 or higher. Here’s how you can find out your WDDM version in a few simple steps:
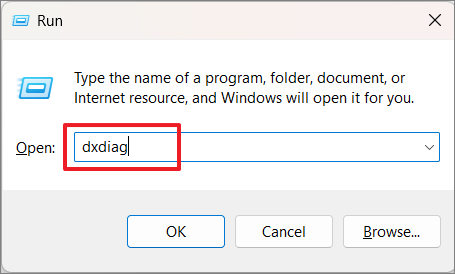
- Press the
Windows+Rkeys to open the Run dialog box. Then, typedxdiagin the box and pressEnterto launch the Direct Diagnostic Tool.
- Click on ‘Display 1’ from the top menu. In the Drivers section, look for the ‘Driver Model’ version and ensure it’s 2.0 or higher.
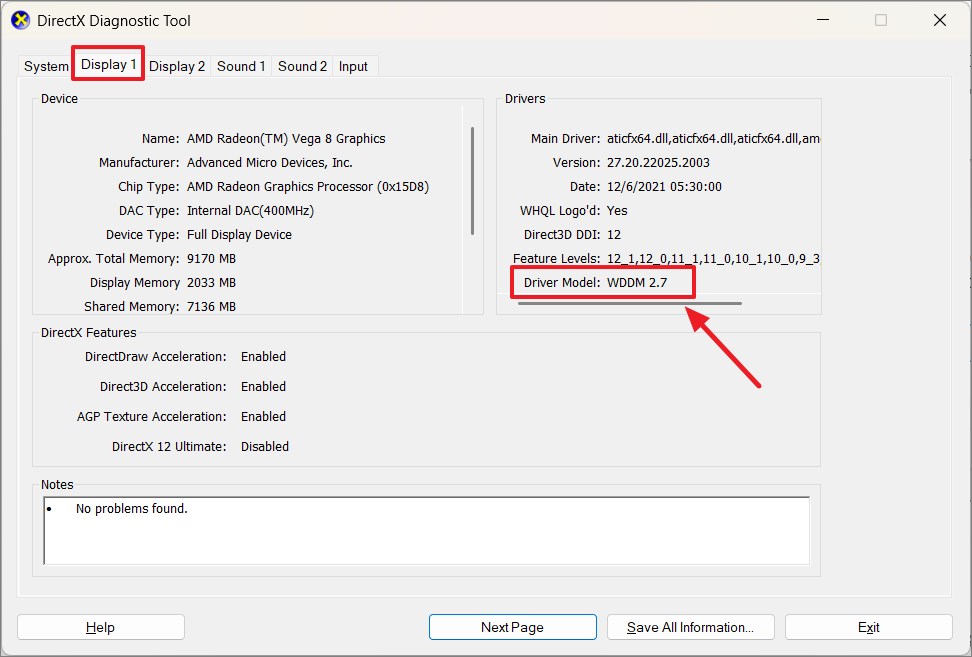
If it’s not, the GPU option won’t be visible in the task manager due to compatibility issues.
8. Update Your Display Drivers
The problem is often caused by outdated or corrupt GPU drivers on your computer. Graphics drivers serve as a link between your operating system and the graphics card, ensuring smooth communication and functionality.
When your graphics drivers are outdated or incompatible, it can lead to issues where the Task Manager struggles to properly recognize your GPU. To fix this problem, simply update your graphics drivers to the latest version, which often resolves the issue.
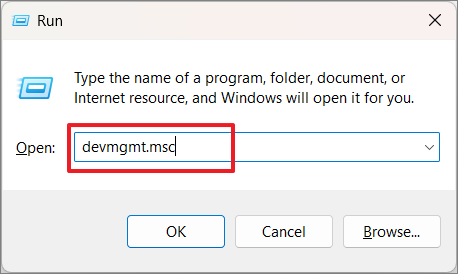
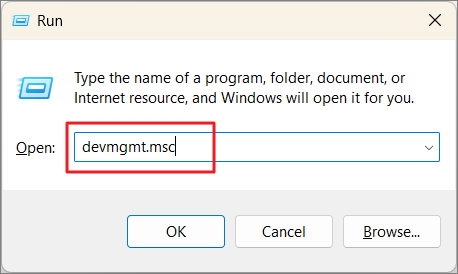
- Press
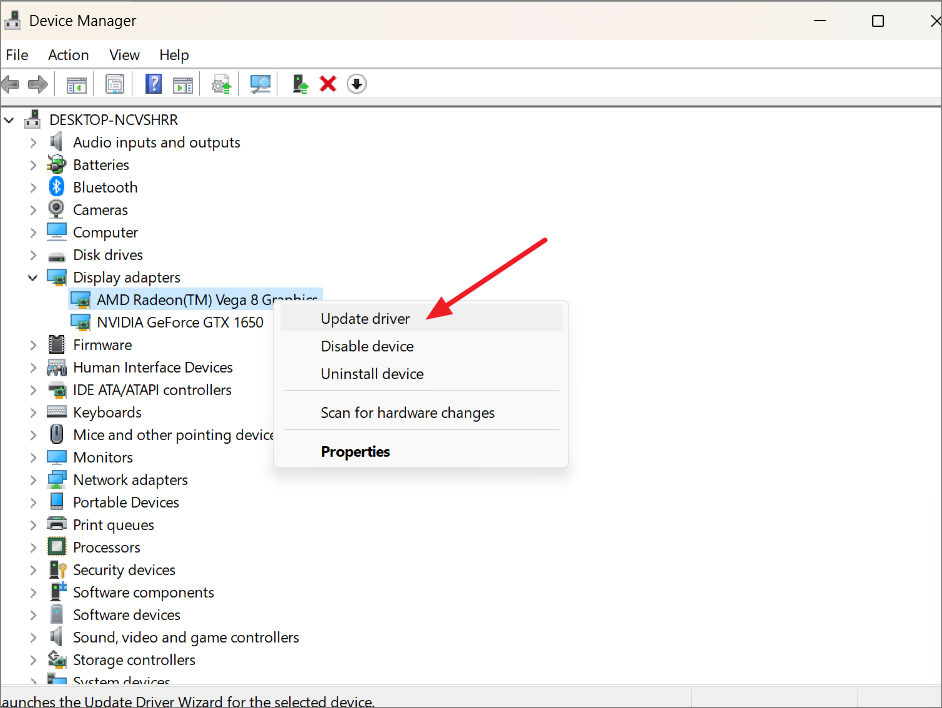
Windows+R, typedevmgmt.mscand hitEnterto launch Device Manager.
- In the Devic Manager, expand ‘Display adapters’.
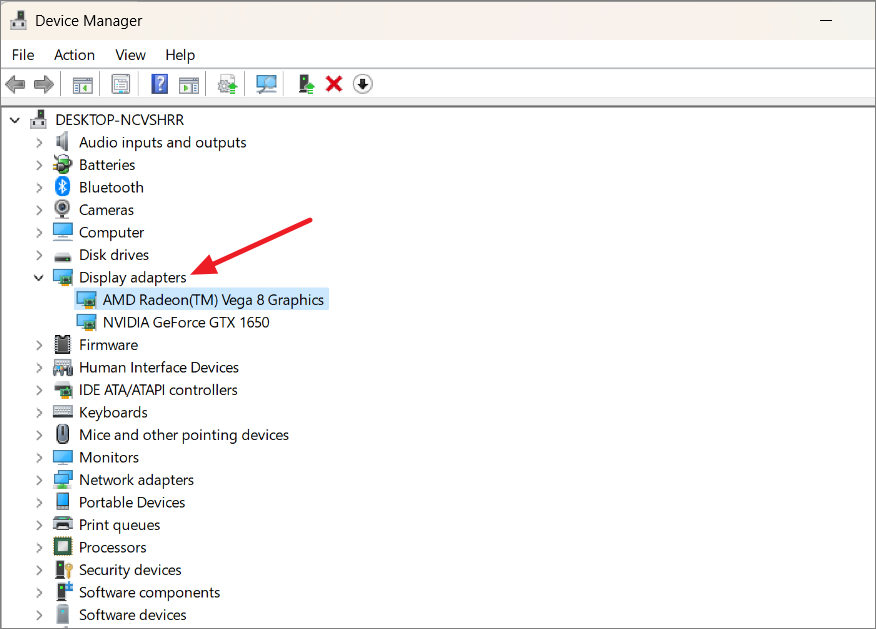
- Right-click the GPU adapter you want to update and select ‘Update driver’.
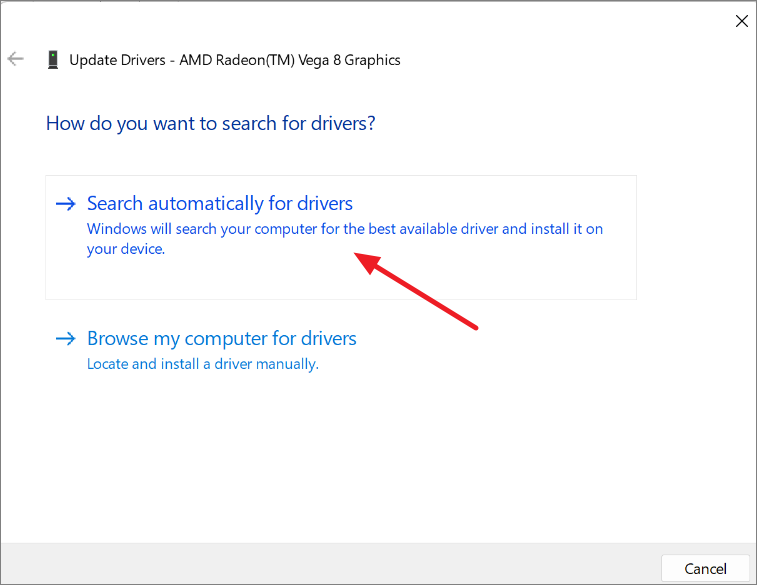
- Then, select the ‘Search automatically for drivers’ option to allow Windows to automatically search and install drivers.
Device Manager often fails to install the latest drivers. In such cases, you can manually download the most recent drivers from the manufacturer’s website (e.g., NVIDIA, AMD, Intel). Visit the official website, and then download and install the latest driver for your specific GPU model.
9. Rollback the Graphics Driver
Sometimes, when you update your GPU driver to the latest version, it can introduce compatibility issues or bugs that mess up how Windows interacts with your GPU. When this happens, Task Manager might not be able to detect or work with the GPU properly.
Rolling back GPU drivers can be helpful when you run into problems like Task Manager not recognizing your GPU, especially if the issue cropped up right after you installed a new GPU driver. Here’s how you do this:
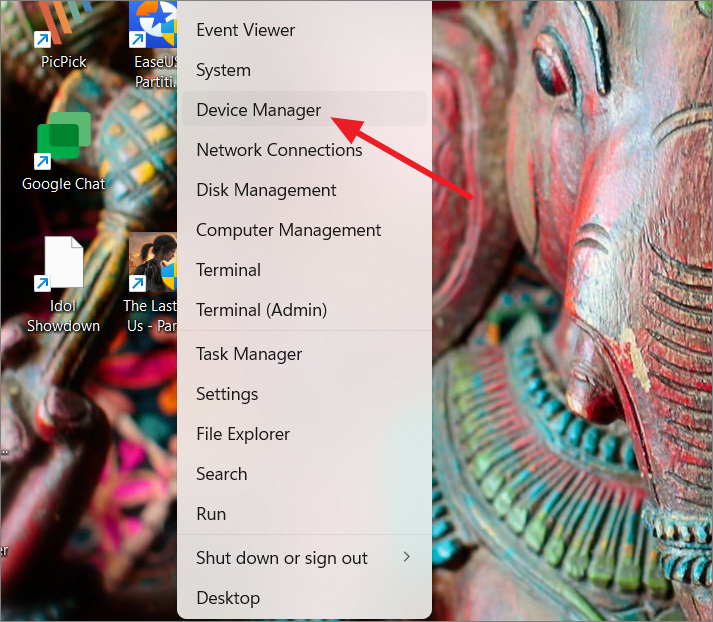
- Right-click on the Start button and select ‘Device Manager’.
- Look for your GPU under the ‘Display adapters’ section in Device Manager. Right-click on your GPU’s name, and choose ‘Properties’.
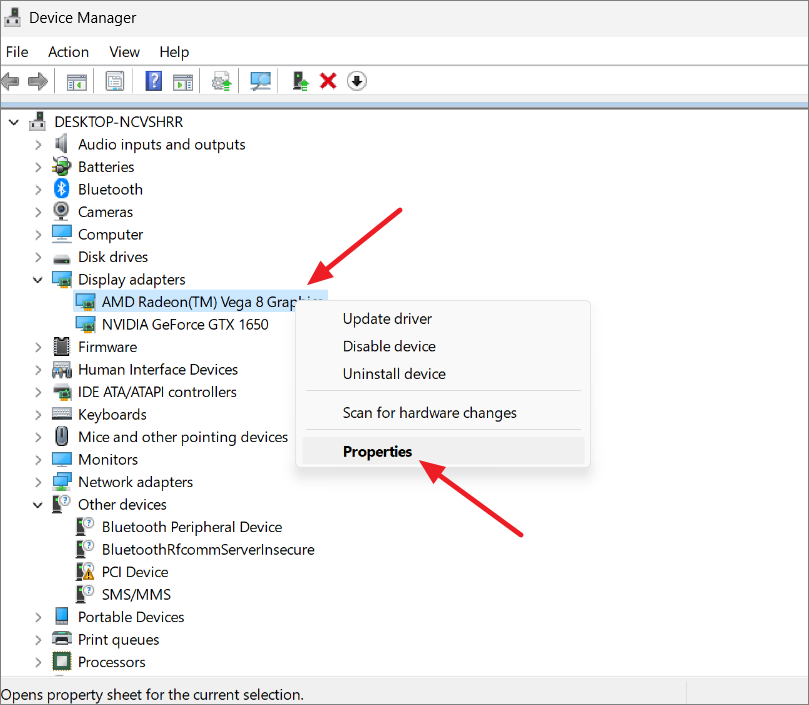
- In the Properties window, click on the ‘Driver’ tab. If you see the ‘Roll Back Driver’ button available (it’s only there if you recently updated the driver), click on it.

- In the confirmation box, specify the reason for rolling back and click ‘Yes’.

- After rolling back the driver, restart your PC.
10. Reinstall the GPU Drivers
If updating and rolling back the graphics drivers doesn’t fix the problem, you can try completely reinstalling GPU drivers. You can either use Device Manager or a specialized software called Display Driver Uninstaller to uninstall the GPU driver.
When you use Display Driver Uninstaller to uninstall drivers, it completely removes the driver and its associated registry files. This method is highly effective in removing drivers and ensures that no leftover files are left behind.
Method 1:
- Open the Run command, type
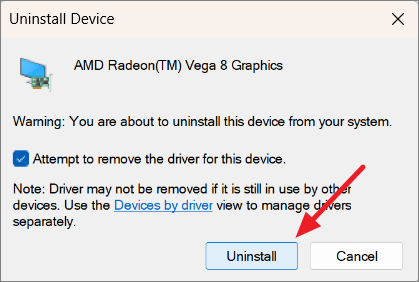
devmgmt.msc, and hitEnterto open Device Manager.
- Navigate to the Display adapters and expand it. Right-click the driver, and select ‘Uninstall device’.
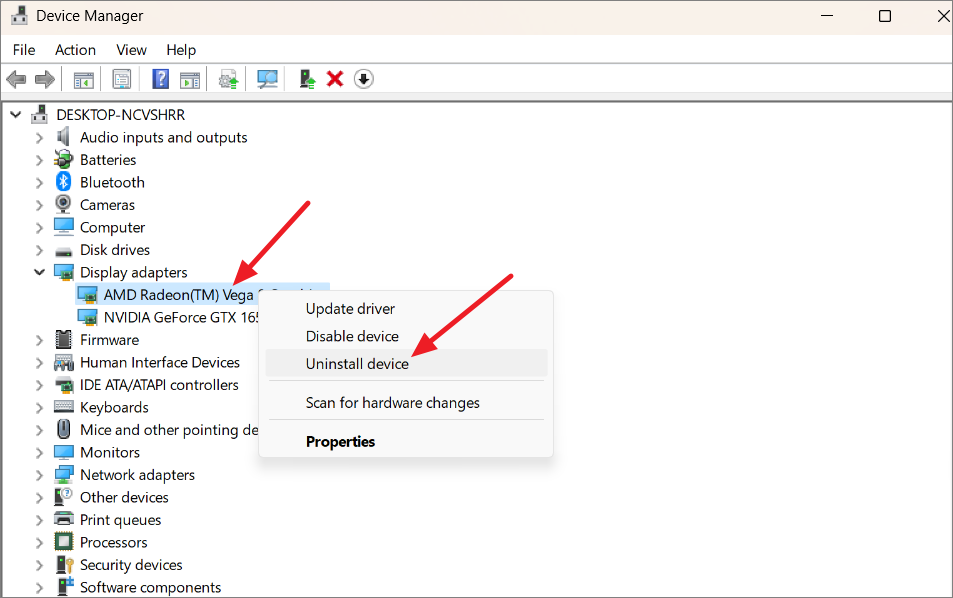
- On the prompt box, check the ‘Attempt to remove the driver for this device’ option, and click ‘Uninstall’.
Method 2:
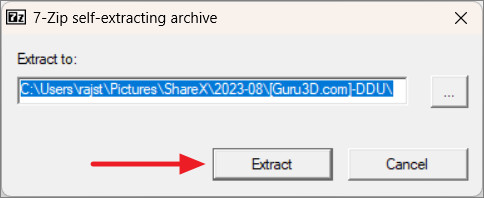
- Download the Display Driver Uninstaller and extract the DDU zip folder using the archive software.
- Once extracted, navigate to the extracted folder and run the DDU file (7zip file).
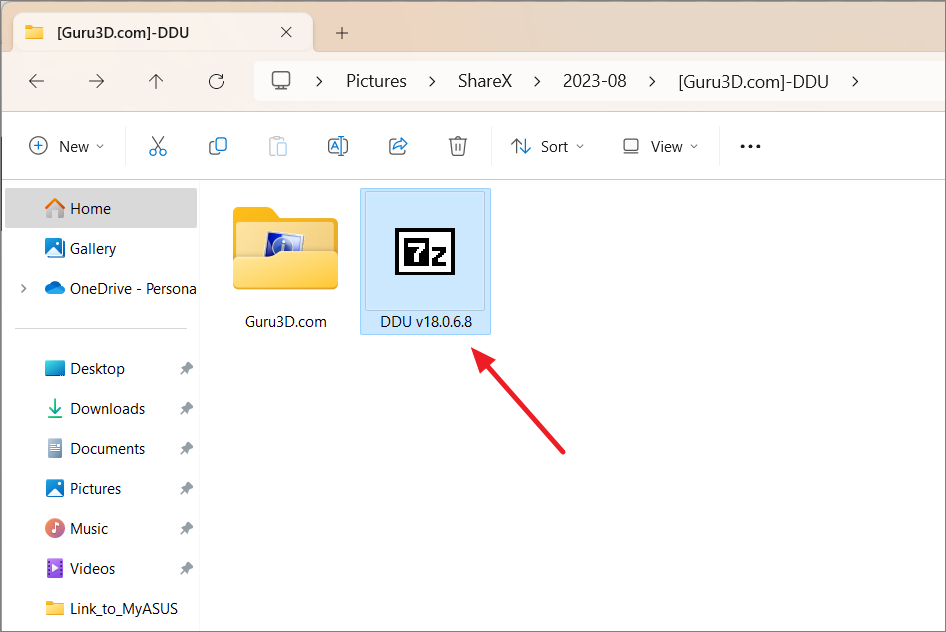
- Then, click the ‘Extract’ button.
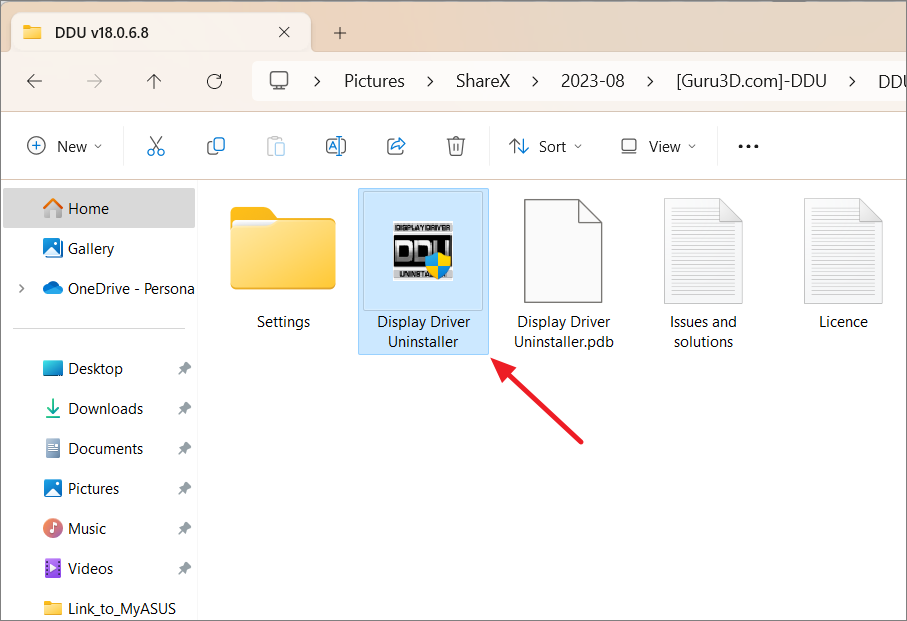
- Open the extracted folder, and run the ‘Display Driver Uninstaller’ app.
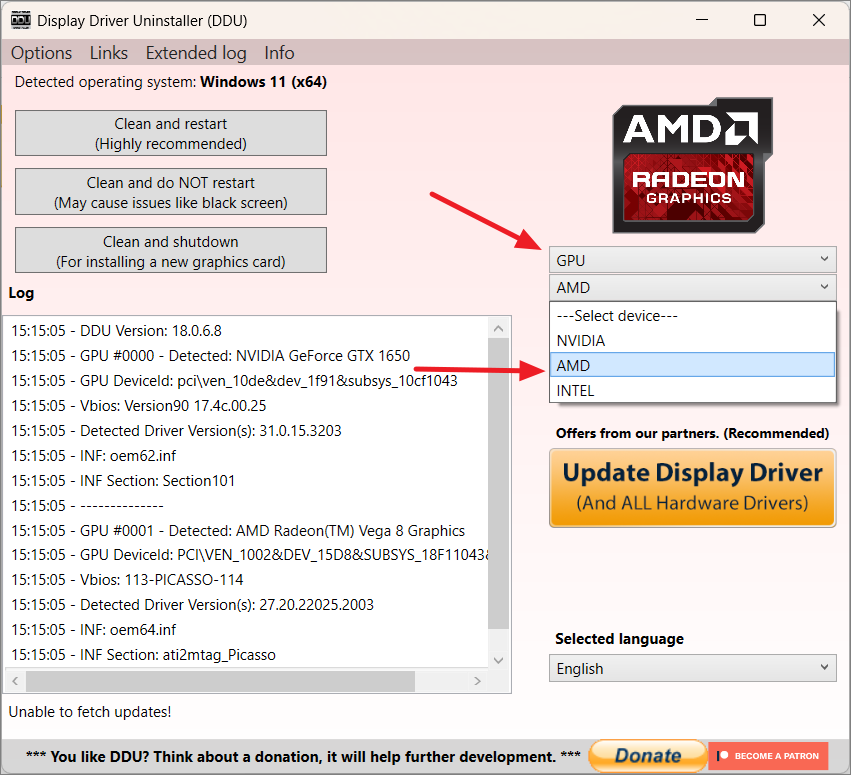
- Select ‘GPU’ in the first drop-down and then select your GPU device in the second drop-down menu.
- Then, click ‘Clean and Restart’ to remove the driver completely.
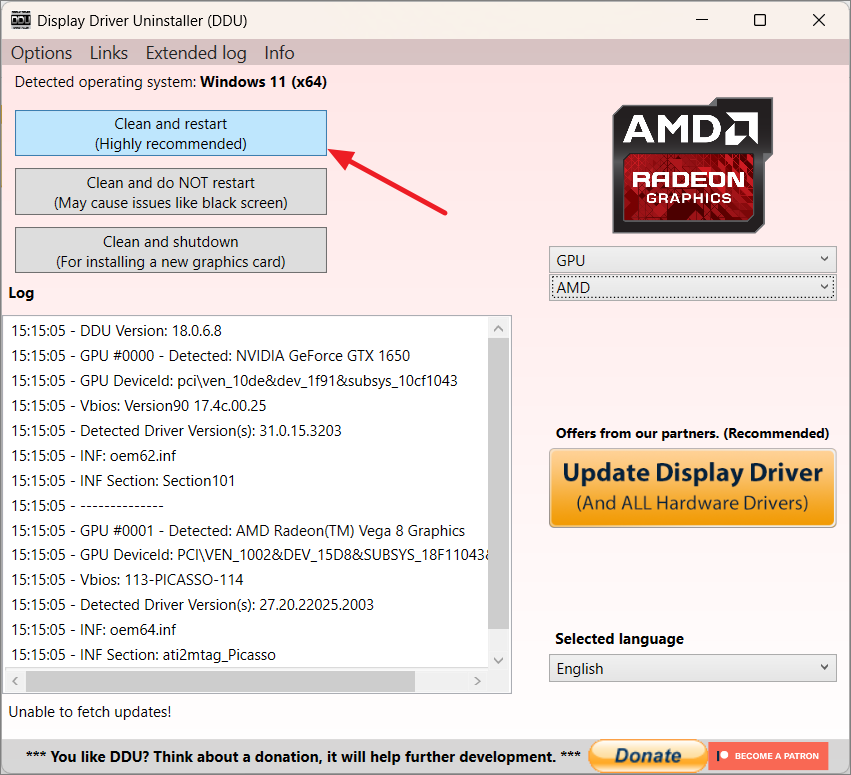
- After the cleanup is done, go to your GPU manufacturer’s website. Download and install the latest graphics driver.
11. Check the Graphics Card
Check to see your GPU is correctly installed and connected, and that it is free of dust. Dust accumulates over time in GPU slots, potentially making it difficult for your computer to recognize the GPU or even causing harm to its hardware.
Start by taking off the computer’s back cover. Check the motherboard and the card slots. Turn on your PC and keep an eye on the GPU fan; if it’s not spinning, there might be an issue with the graphics card slot. Turn off your PC, take out the graphics card, and try inserting it into a different slot. Don’t forget to clean out any dust if you find any.
12. Check the BIOS Settings
If you’re unable to see your GPU listed in the Task Manager, one possible explanation could be that it’s turned off in the system BIOS. The system BIOS, which stands for Basic Input/Output System, is responsible for managing essential functions of your computer’s hardware, including the GPU.
When a GPU is disabled in the system BIOS, the operating system won’t detect it, and as a result, it won’t show up in the Task Manager. This can happen for various reasons, like incorrect settings, accidental changes, or sometimes even a BIOS update that disables the GPU by default.
To fix this issue, you’ll need to access your computer’s BIOS settings and enable the GPU. The exact steps to access the BIOS can vary depending on your computer’s manufacturer, but usually, you can get there by pressing a specific key (such as F2, Del, or Esc) during the startup process.
Once you are inside the BIOS settings, locate the GPU configurations. It is usually located under the ‘Pheriperals’ or ‘Advanced’ options. Check your GPU or display settings to see if the GPU is set to ‘Enabled’ or a similar option. If it’s currently disabled, change the setting to ‘Enabled’ and save your changes.
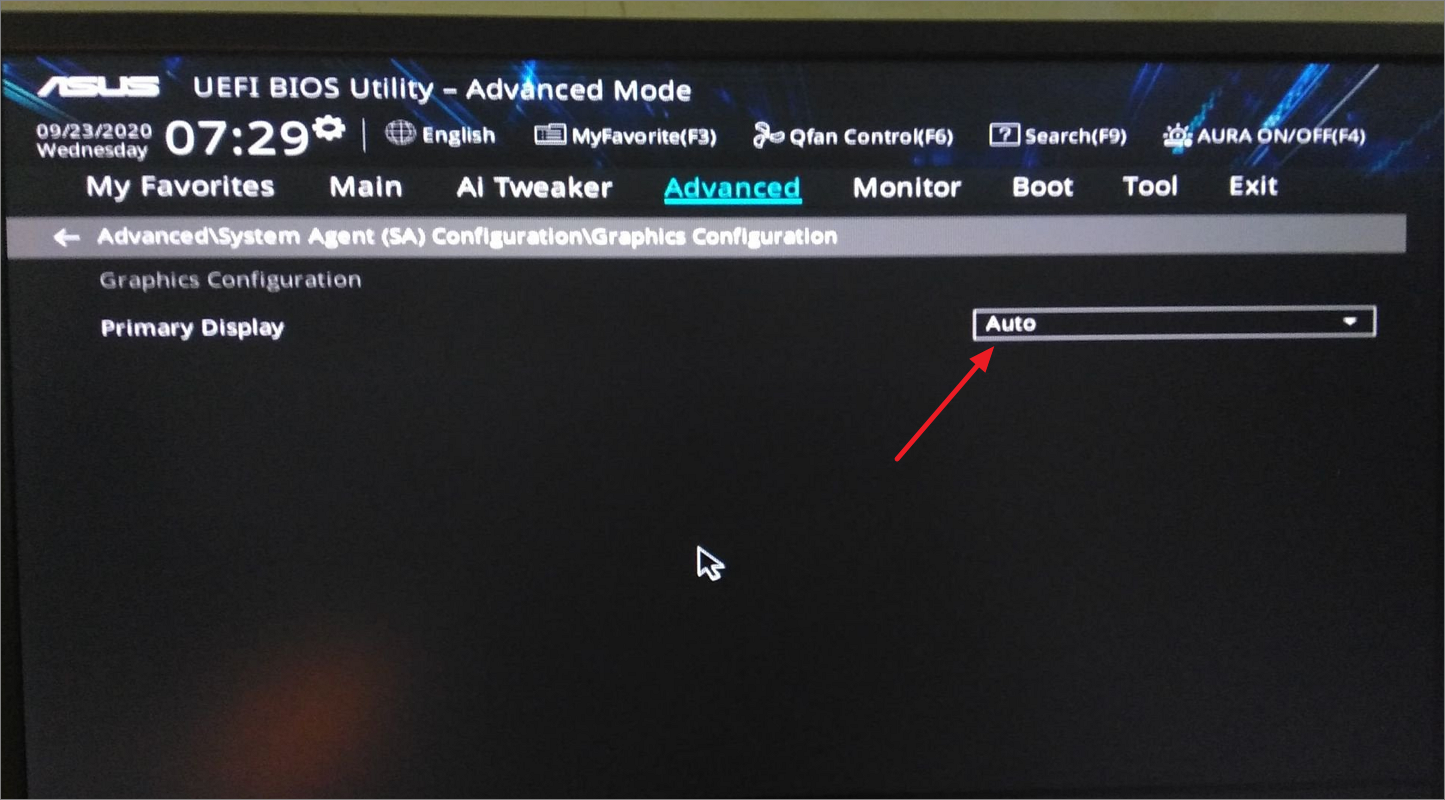
Sometimes, your computer’s BIOS may have extra settings related to the GPU, such as ‘Initiate Graphic Adapter’ or ‘Primary Display’. Make sure these settings are set to prioritize the dedicated GPU over integrated graphics if possible.
13. Update the BIOS
If none of the previous methods have been effective, updating the BIOS will wipe out all issues. The GPU card will then be compatible with the new BIOS version. To update the BIOS, follow these steps:
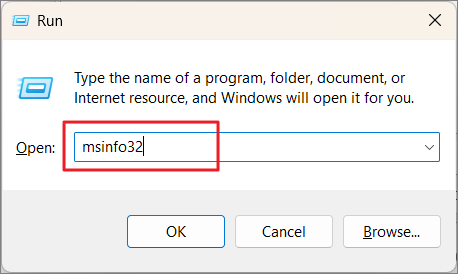
- Simultaneously press the
Windowslogo key andRon your keyboard, and then pastemsinfo32into the provided box before pressingEnter.
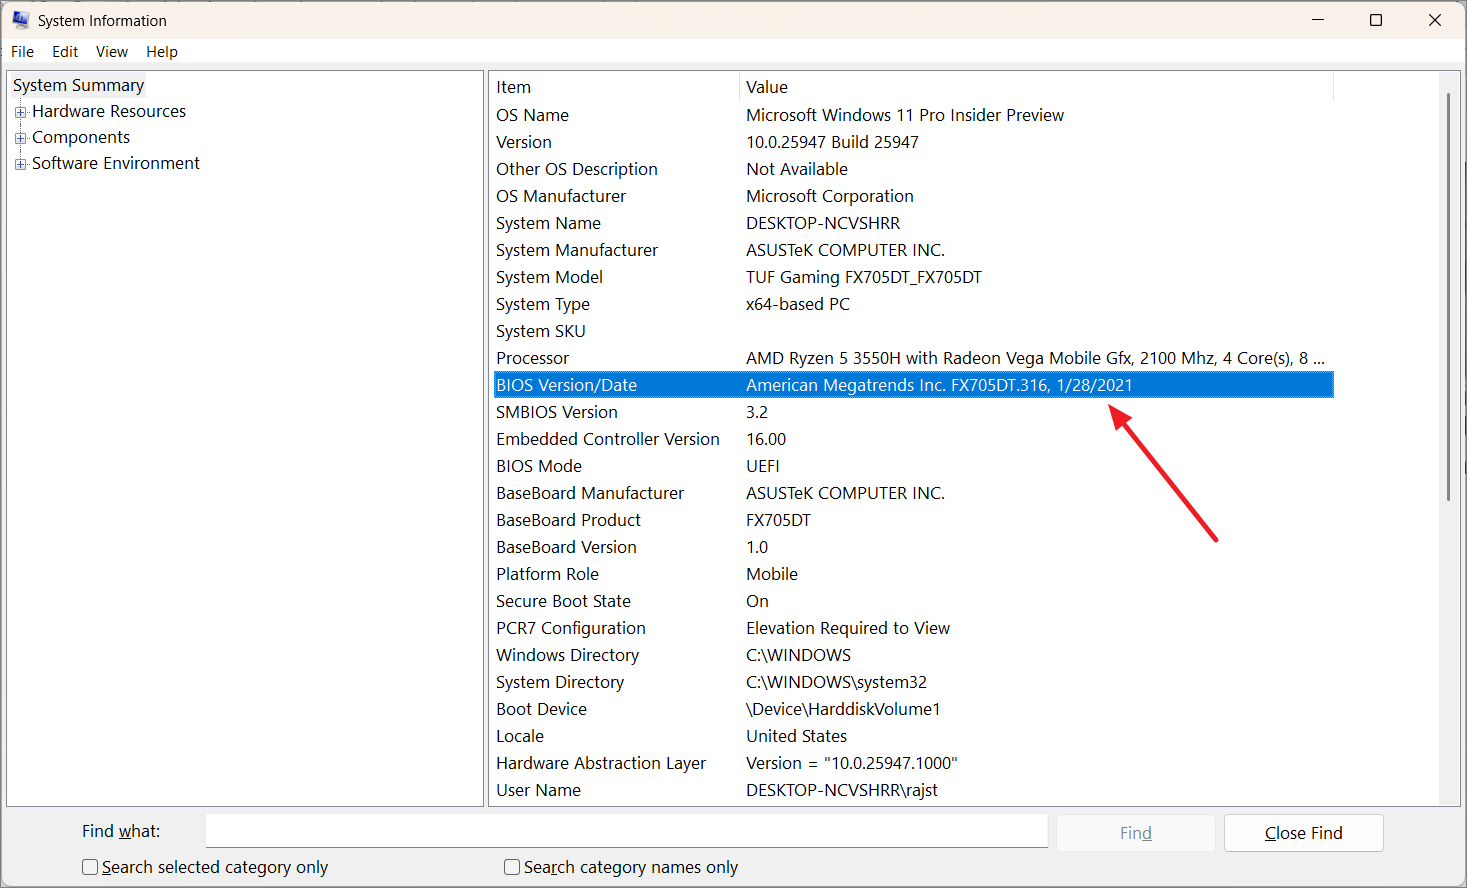
- When the System Information tool opens, find the ‘BIOS Version/Date’ item and check its value for the BIOS version and when it was updated. Note down the BIOS version.
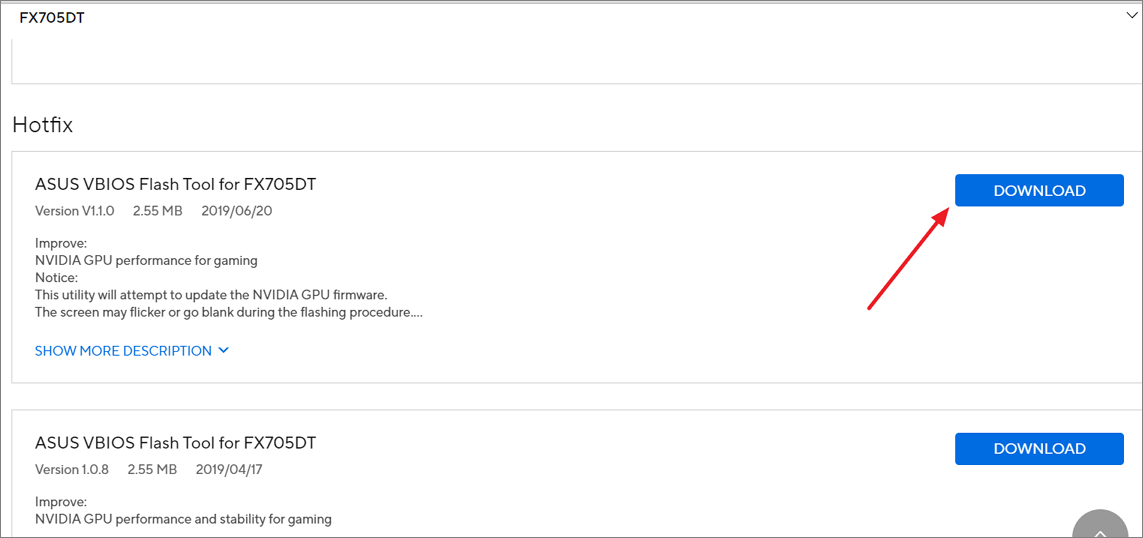
- Then, visit the official manufacturer’s website and look for BIOS updates. Go to the ‘Support’ (or Drivers) section, choose the correct OS, version, and search for the most recent BIOS update. If there is any update available, download it.
- Plug the USB flash drive into your PC and copy the BIOS update file into the USB drive. The USB drive should be formatted in ‘FAT32’.
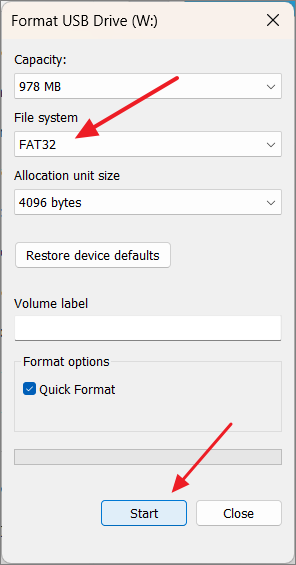
- To do that, open File Explorer, right-click the USB drive, and select ‘Format’.
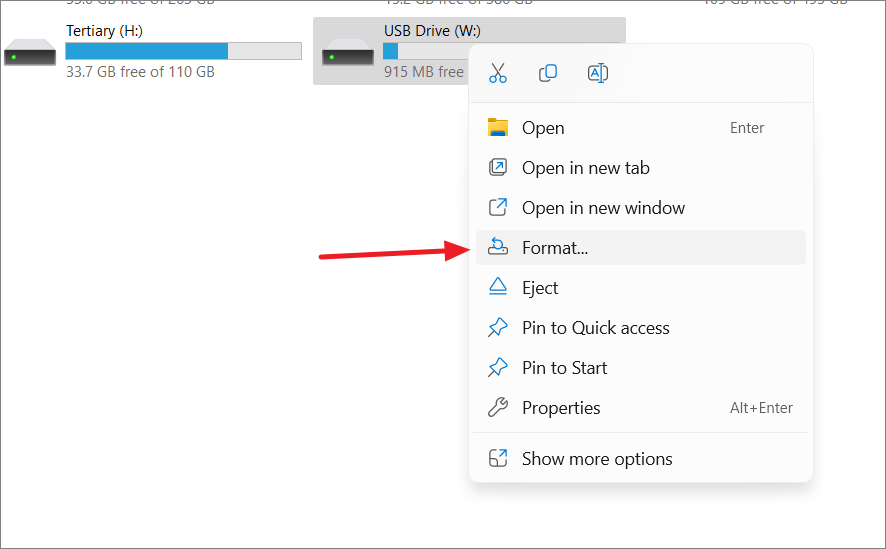
- Select ‘FAT32’ from the File system menu and click ‘Start’. Then, click ‘OK’ on the confirmation box. Once formatted, copy the BIOS update file into the newly formatted drive.
- After that, insert the USB drive, which now contains the BIOS update file, into any USB port on your computer.
- When you restart your PC, press the
F2,Del, orEsckey during boot-up to access the BIOS menu. From there, find the ‘Update BIOS’ option, select the BIOS update file from the USB drive, and start the BIOS update process.
14. Resetting Your BIOS
If you suspect that a misconfigured BIOS (Basic Input/Output System) is the reason your GPU isn’t showing up in the Task Manager, you can try resolving the issue by resetting your BIOS settings back to their default state.
To reset your BIOS settings, we’ll use the CMOS battery method. Follow these steps:
- Turn off your computer and unplug it from any power sources.
- Find the CMOS (Complementary Metal-Oxide-Semiconductor) battery on your computer’s motherboard. It usually looks like a small silver coin-shaped battery.
- Carefully take out the CMOS battery from the motherboard.
- Make sure you’ve completely taken out the CMOS battery.
- Then, hold down the power button continuously for 15 to 30 seconds to discharge any residual power. This clears out the CMOS memory, thus resetting the BIOS settings on your system.
- After that, carefully, reinsert the CMOS battery.
- Reconnect the power sources and start up your computer. Your BIOS settings will be reset to their original factory defaults.
We hope one of these methods helps you bring back the GPU performance information to the Task Manager.