Is your Windows system experiencing random crashes, freezes, restarts, or not functioning as expected? The problem might be related to RAM or memory modules. The good news is that many modern versions of Windows come equipped with a memory testing tool that can assess and test your RAM for any problems.
The Windows Memory Diagnostic (WMD) tool is a free memory testing tool in Windows systems that performs a series of tests on your computer’s RAM (Random Access Memory) for any memory-related problems.
In this article, we will discuss how to use the Windows Memory Diagnostic tool to test your RAM. We’ll also walk you through checking the results from the tool and offer some solutions in case any errors are found during the test.
Run the Windows Memory Diagnostic
The Windows Memory Diagnostic tool is an inbuilt testing tool that was introduced in Windows 7 and has been included in all modern Windows operating systems, including Windows 11. While we have used Windows 11 in this guide to showcase the tool, you can use these steps to use it on any Windows that supports it.
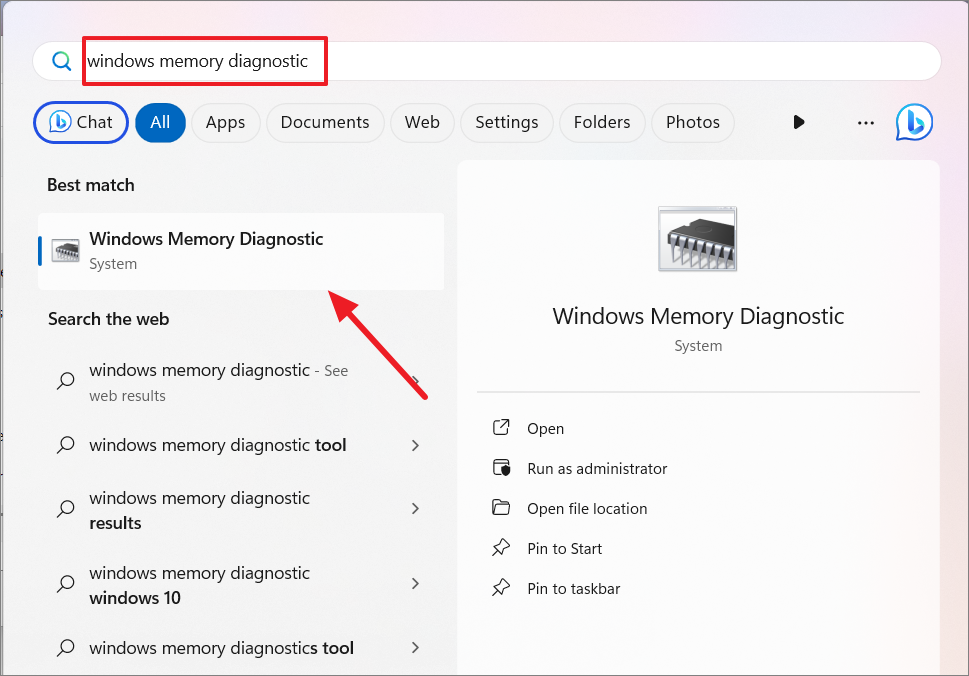
To open the Windows Memory Diagnostic tool, click the Start button, type Windows Memory Diagnostic, and select the console from the result.
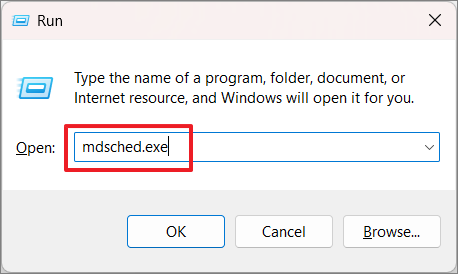
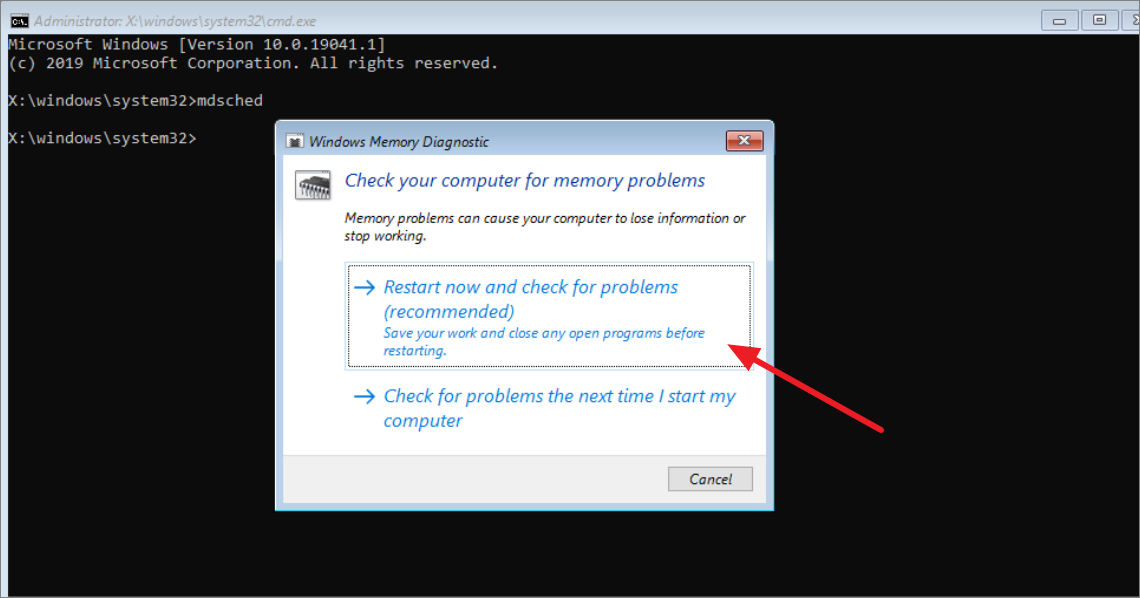
Alternatively, you can press Windows +R, type mdsched.exe into the Run command box, and press Enter.
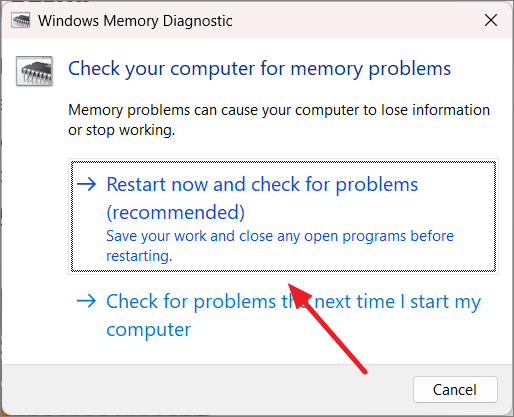
Windows Memory Diagnostic tool is a simplistic tool that presents you with only two options. Since the tool needs to run during startup, you’ll need to choose whether to run diagnostics now or later.
To run the tool right away, click ‘Restart now and check for problems (recommended)’. But make sure to save your work or any ongoing tasks before you do that. Or you can select ‘Check for problems the next time I start my computer’ to check your RAM the next time your computer reboots.
Once your PC restarts, the Memory Diagnostic Tool’s RAM test will run automatically. You’ll see a blue screen with the testing progress.
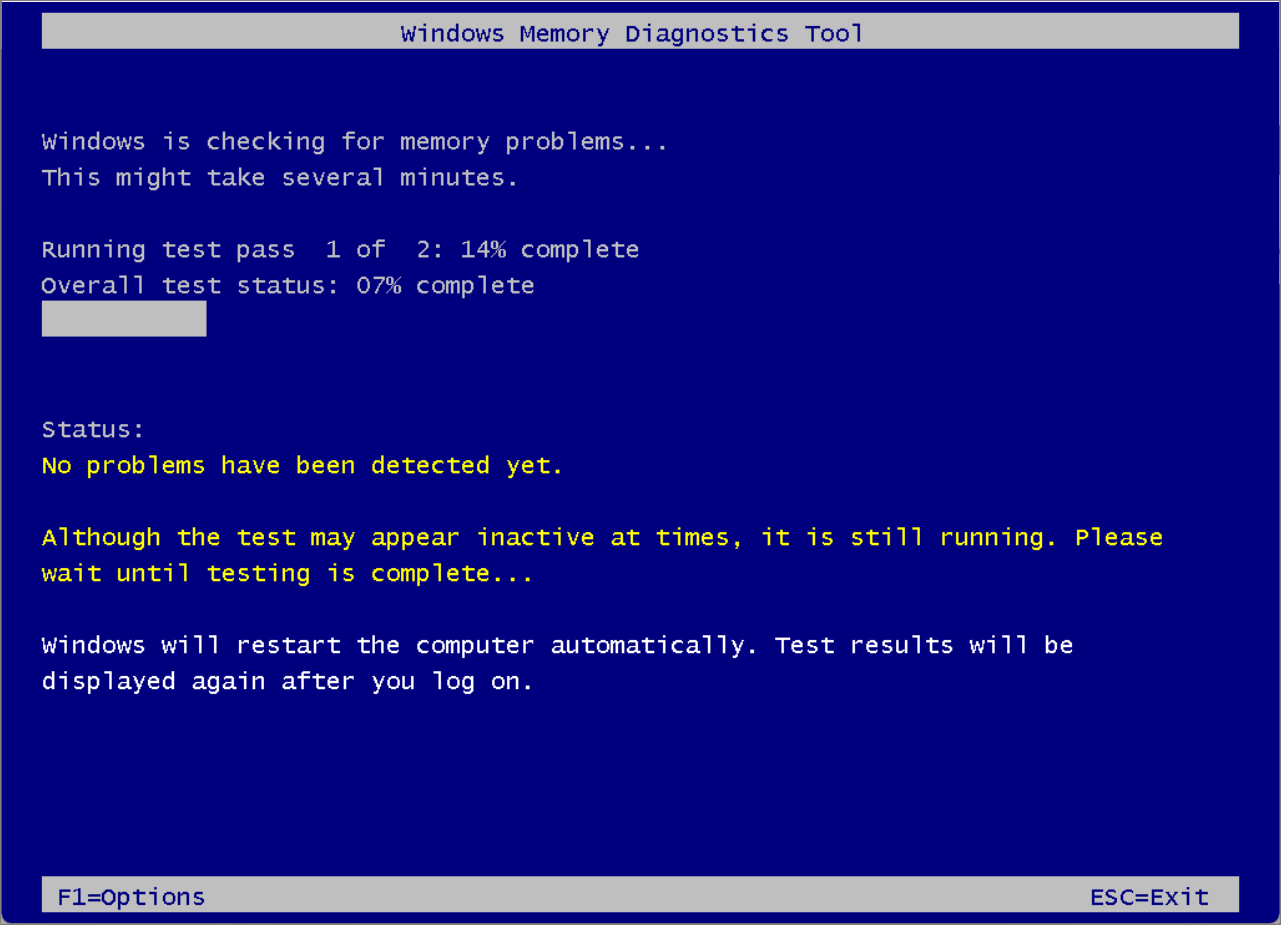
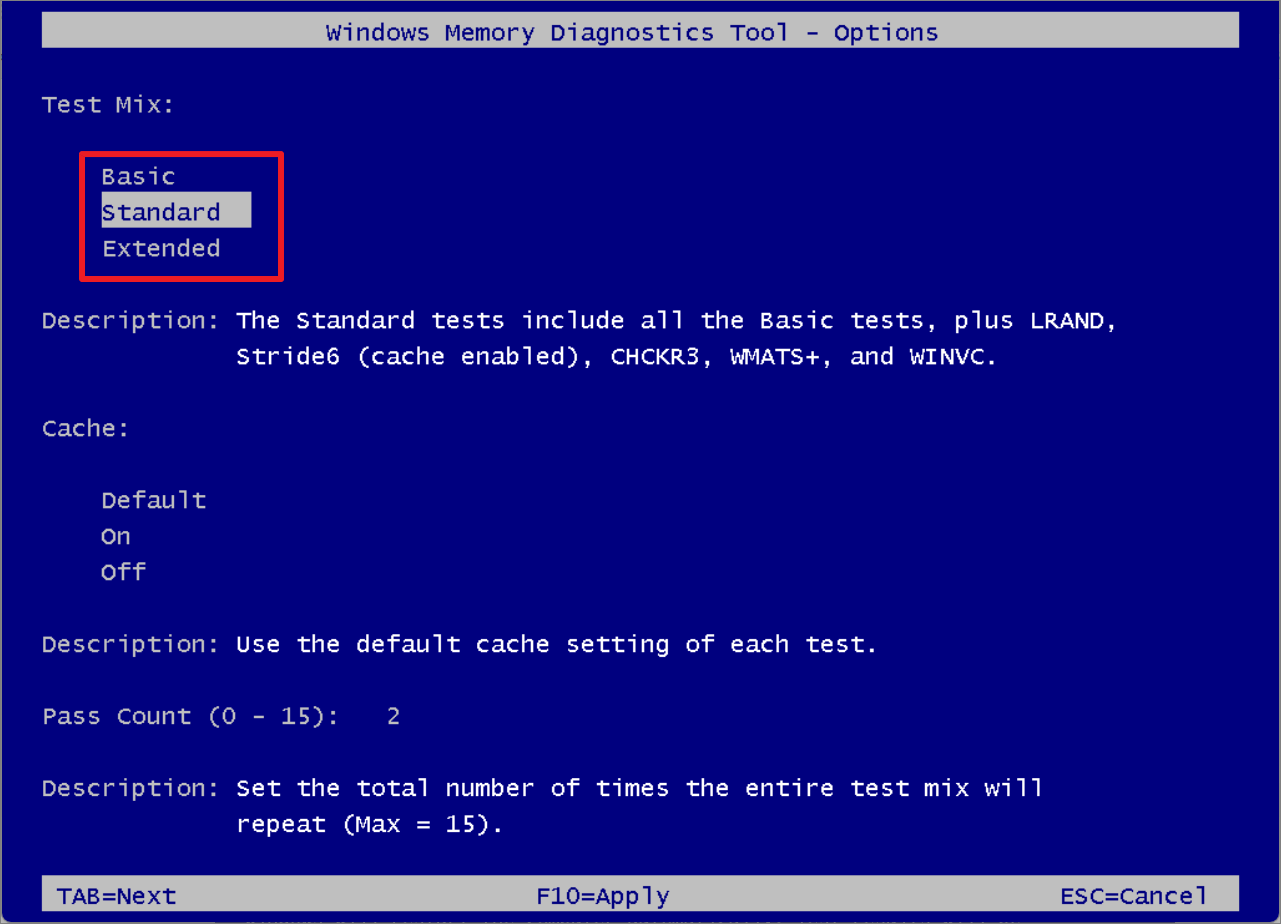
To view more test options, simply press F1 at any time during the test. To configure the test options, use the arrow keys on your keyboard to highlight the desired setting. Press the Tab key to move between the options.
Test Mix (Mode):
Windows Memory Diagnostic tool has three different modes for testing your computer’s memory. These modes have different numbers of tests. The basic mode, being the fastest mode, runs only 3 tests. The Standard mode runs 8 tests, and the Extended mode performs 17 tests. By default, the WMD kicks into Standard mode.
- Basic mode runs MATS+, INVC, and SCHCKR tests.
- Standard mode tests include LRAND, Stride6, CHCKR3, WMATS+, and WINVC, in addition to all the basic tests.
- Extended mode runs include all the Standard tests, plus MATS+, Stride38, WSCHCKR, WStride-6, CHCKR4, WCHCKR3, ERAND, Stride6, and CHCKR8.
Cache:
On the same screen, you have the option to choose whether you want the tests to use the CPU’s built-in cache. Select the cache setting you want for each test: ‘Default’, ‘On’, or ‘Off’. It’s better to leave it on ‘Default’.
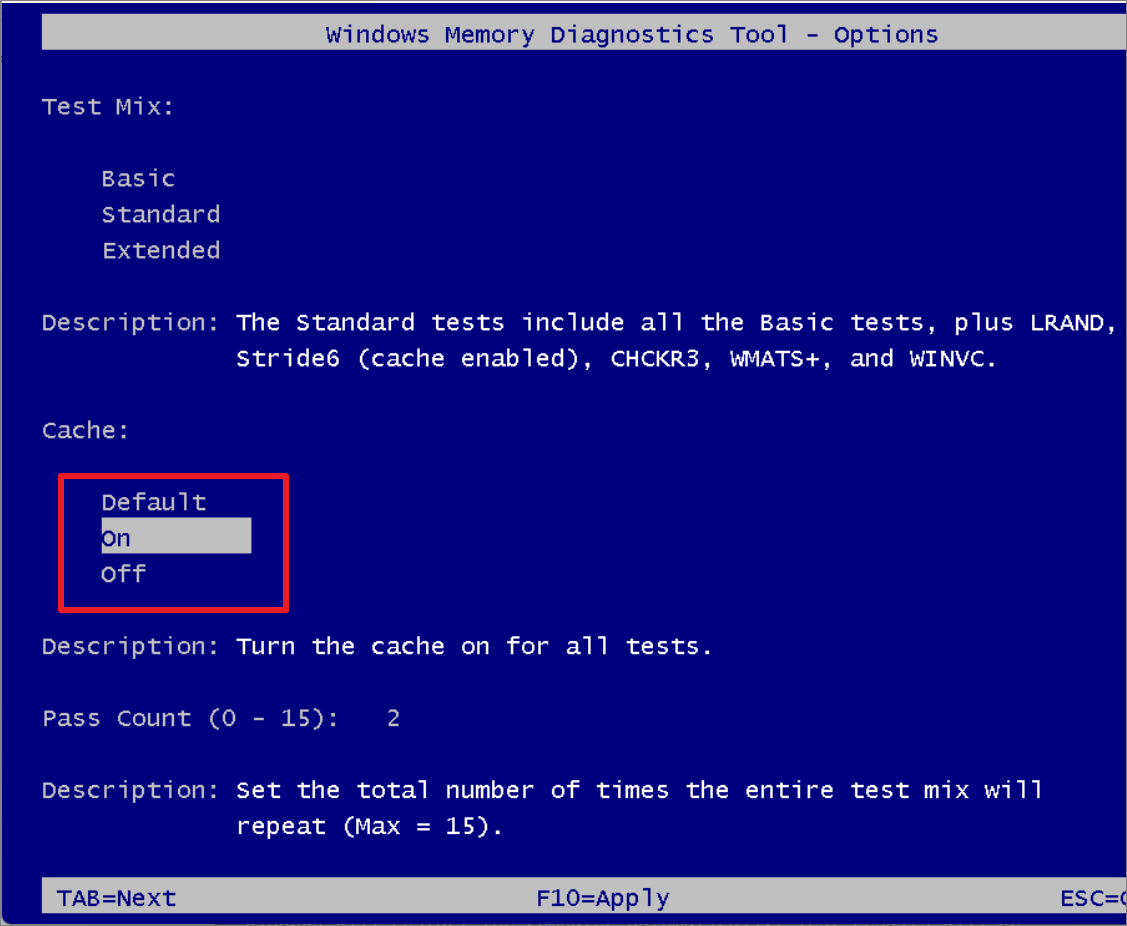
But if you want a more thorough test, you can try turning the cache ‘Off’, which forces the tool to get data directly from the RAM, which helps it test more effectively.
Pass Count:
Pass Count allows you to specify how many passes the test should perform over the memory.
‘2’ is the default and recommended option and is usually enough for most users. However, you can also specify a specific number of passes for the tests to perform. This might be useful for advanced users who want more control over the testing process.
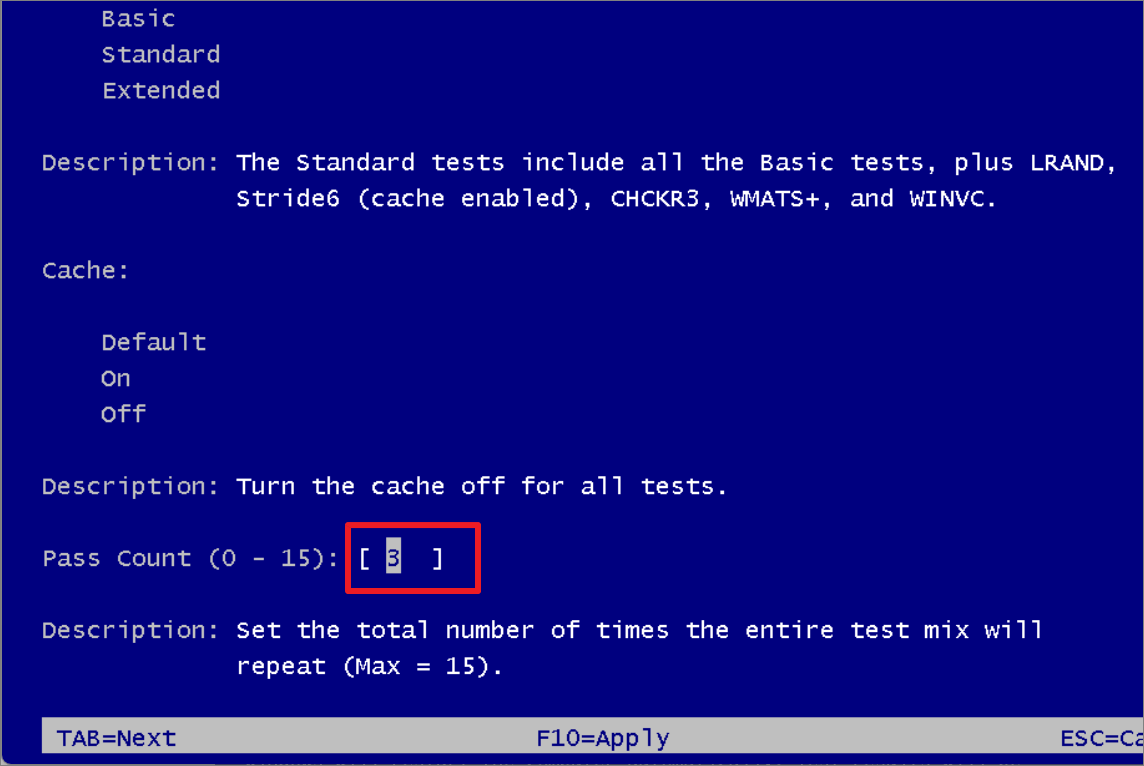
Once you’ve configured the test options, press F10 to apply the settings and start the tests.
After the test is completed, the tool will display the results of the memory test below. If no problems are found, you’ll see a message that says, “No memory errors were found.” For a more detailed report of the test, you should use the Windows Event Viewer.
Remember that while changing the test options can provide more thorough testing, it might also increase the time it takes to complete. For most users, the default options should be sufficient to find memory-related issues. If you think the memory problems are severe or you’re not able to find the problem with Standard tests, then you can choose the ‘Extended’ test mix, but it will take more time.
How to Run the Windows Memory Diagnostic tool if Windows won’t Boot
If there are problems with your computer’s RAM, it might occasionally stop your computer from booting up Windows correctly, or Windows may start but crash shortly after. If this happens, you can’t use the method above to run Windows Memory Diagnostic.
In that case, you can use Windows Recovery Environment to start the Windows Memory Diagnostic tool. Here’s how you do it:
Turn on your computer, and when the first screen appears, press and hold the F11 key to launch the Windows Recovery Environment (WinRE). If F11 doesn’t work, you can try F9 or F12.
If the shortcut key didn’t work on your computer, try the force restart method instead. To get started, turn on your computer. As soon as you see Windows log0, press and hold the power button to forcefully shut down your PC. Repeat these steps at least twice, and on the third restart, let the system boot normally. It will load into the Windows Recovery Environment on the third try.
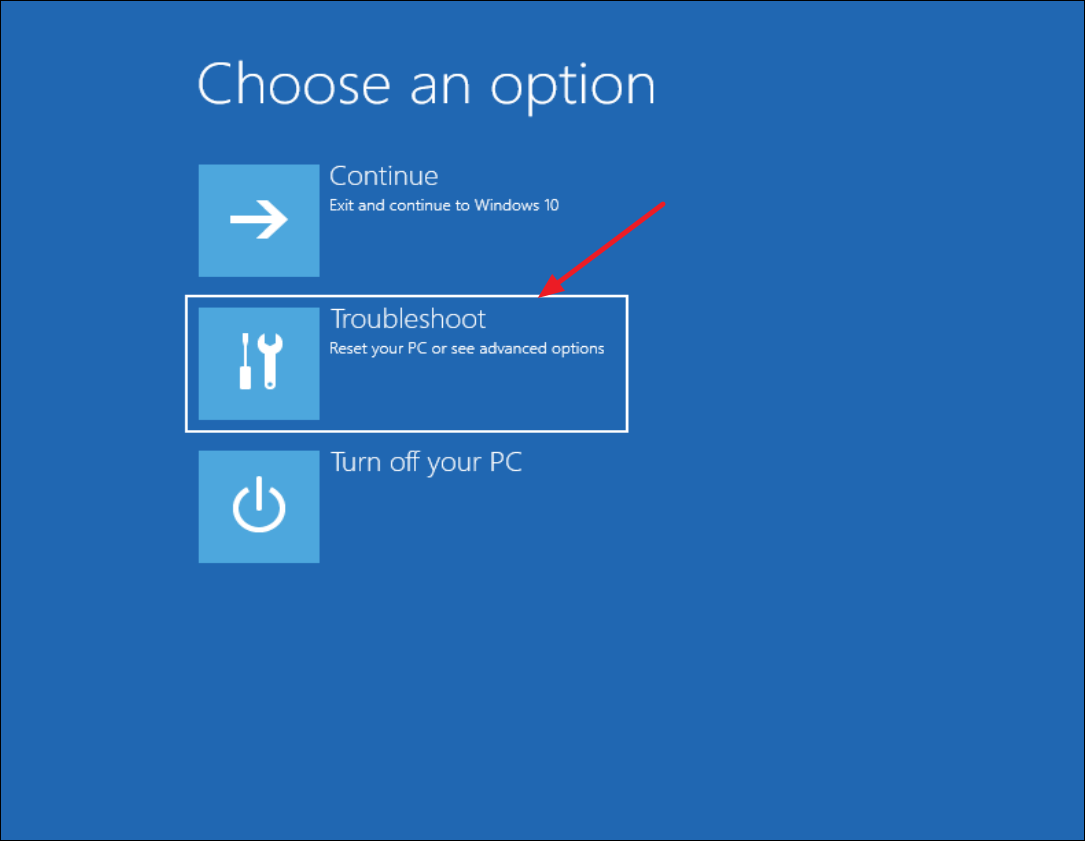
Once you are in the Windows Recovery mode (WinRE), click the ‘Troubleshoot’ option.
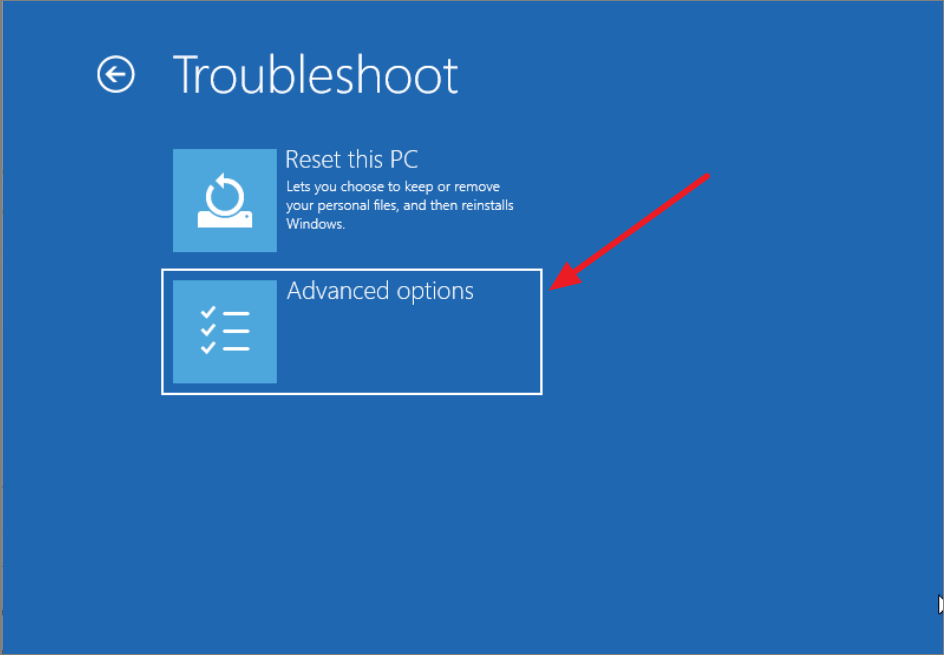
On the next screen, select ‘Advanced options’.
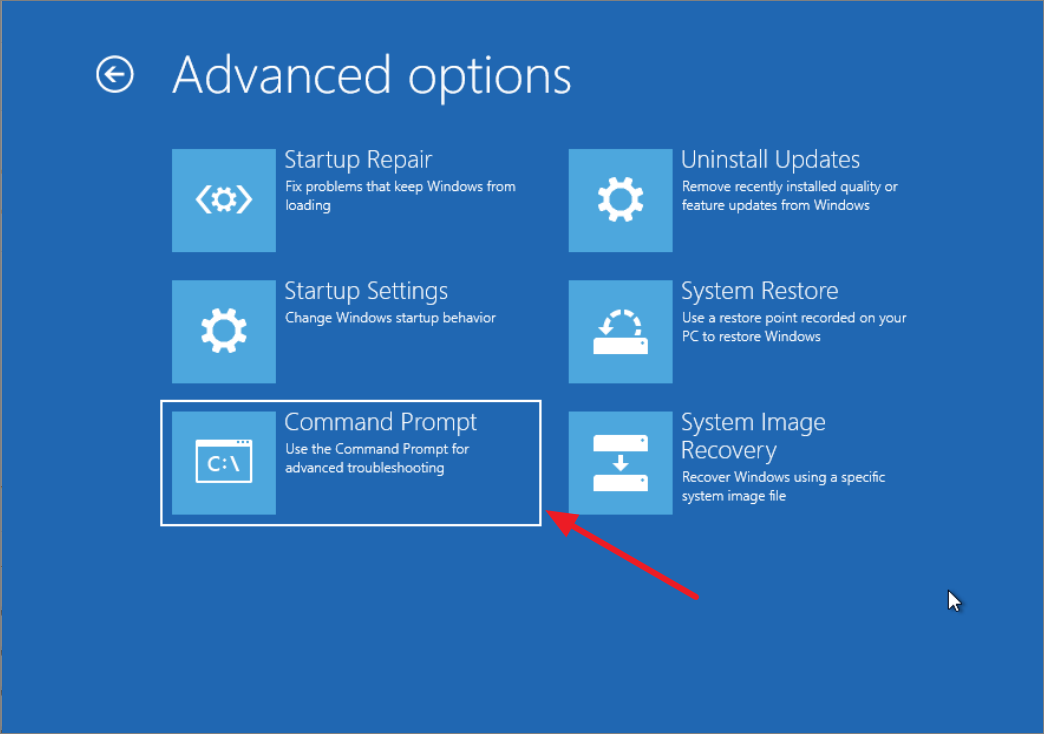
From the Advanced options screen, select ‘Command Prompt’.
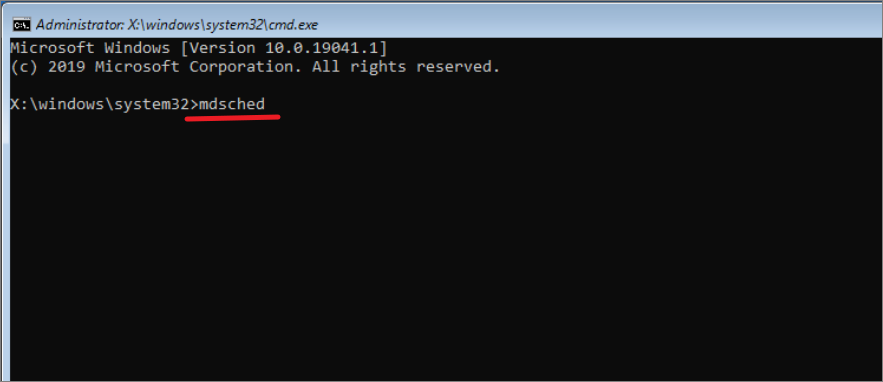
In the Command Prompt, type mdsched to launch the Windows Memory Diagnostic tool.
Then, select the ‘Restart now and check for problems(recommended)’ option from the tool window.
Your computer will restart and launch the Memory Diagnostic Tool. It will begin scanning your memory right away, and it will let you know if it discovers any issues. Once the test is completed, your computer will restart on its own and go back to the Windows desktop.
How to Check the Windows Memory Diagnostic Tool Results?
Once you’re logged into Windows, you might get a notification from Windows Memory Diagnostic that lets you know if there are any problems with your computer’s memory or not.
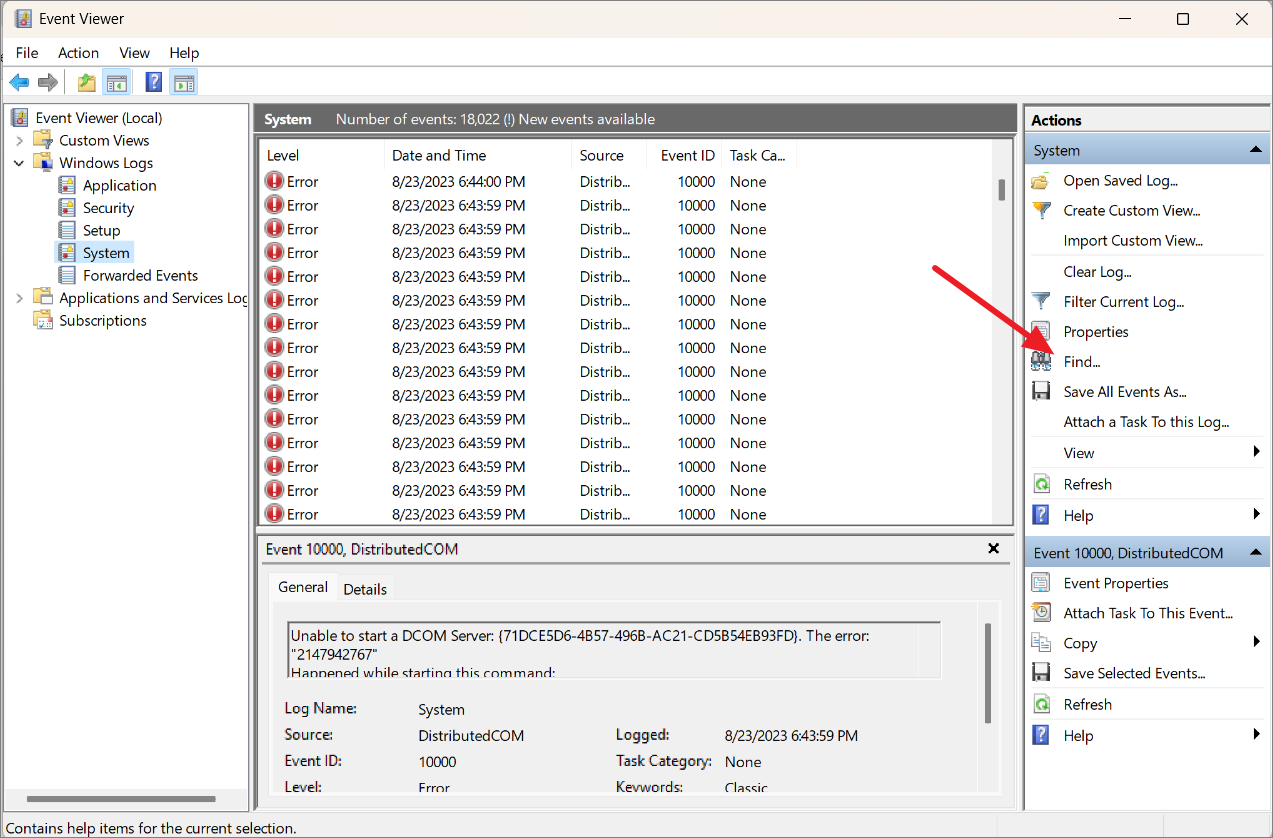
You can also check more detailed results of the Windows Memory Diagnostic tool in the Event Viewer. Open the Start menu, type Event Viewer, and launch the app from the results.

After the Event Viewer opens, expand ‘Windows Logs’ and select ‘System’ in the left panel.

Then, click the ‘Find’ button on the right-side panel or press Ctrl+F to open the Find tool.
In the ‘Find what’ field, type MemoryDiagnostics-Results and click the ‘Find Next’ button.
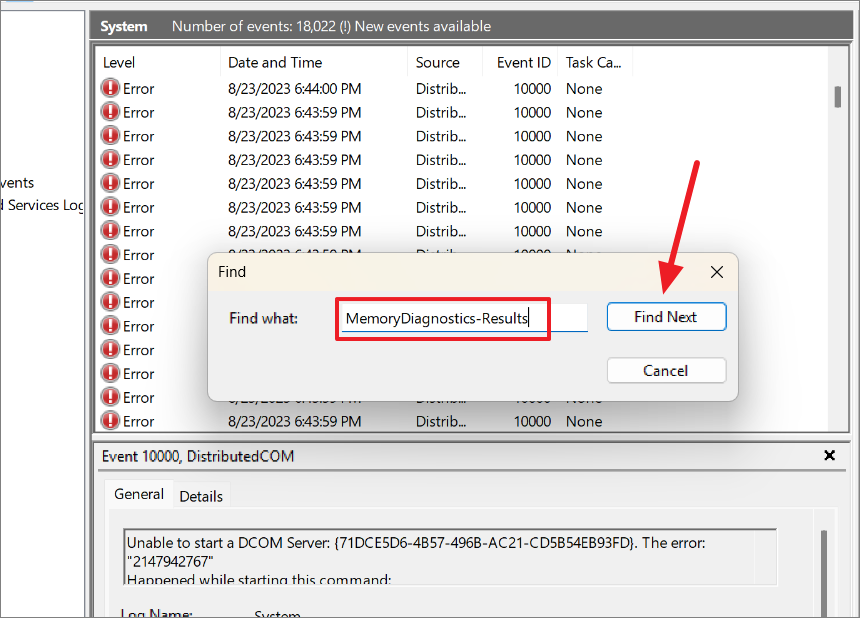
Then, close the Find dialog window and double-click the first highlighted entry in the middle column.

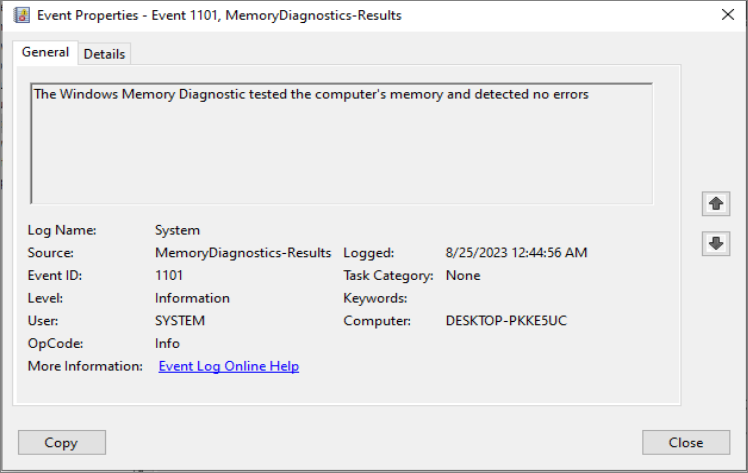
The scan results will give you more details about the tests. If you see a message saying, “The Windows Memory Diagnostic tested the computer’s memory and detected no errors,” then you can rule out memory as the cause of the issue.
If you find errors in the result, you can run an extended memory test to double-check the results. If you still see errors after that, one of the computer’s memory modules (RAM) might be bad, and you might need to change it for a new one.
What to Do If a Windows Memory Diagnostics Tool Finds Error
If there’s an issue with the RAM, you’ll see an error message. Two of the commonly occurring error messages from the tool are ‘Hardware problems were found’ or ‘Physical Address Limit Exceeded’. The errors indicate that there might be a fault in one or more of the memory modules installed on your computer.
Before you do anything else, it’s a good idea to use another free reliable tool called MemTest86 to check if your RAM is indeed experiencing issues.
If you come across these errors, here are a few troubleshooting steps you can try to resolve the issue:
- Stop Overclocking: If you’re pushing your GPU, CPU, or RAM to their maximum limits through overclocking, it could lead to the ‘Hardware problems were detected’ error. You can try turning off the overclocking settings in your BIOS/UEFI and resetting them to their default settings.
- Remove and Reinsert Memory: Sometimes, memory sticks might not be properly seated in their slots. Turn off the computer, unplug it, and open it up. Then, carefully remove the RAMs from their slots, then reinsert them. Make sure that all memory sticks are securely and fully inserted.
- Try One by One: If you have multiple memory sticks, check them one by one. Take out all but one, run the diagnostics tool, and note the results. Repeat this process with each RAM. This can help you find out if one of the RAMs is causing the errors.
- Swap Slots: If your computer has different slots for memory, switch the memory sticks to different slots. This helps to see if a certain slot is causing the problem.
- Replace Faulty RAM: If you find a particular RAM is faulty, you might have to get a new one. If you happen to have extra RAM available, you can replace your existing RAM modules and check if your computer works properly with the different RAM.
That’s it. Memory errors can be daunting, but with the Windows Memory Diagnostic Tool at your side, you can tackle them. Hopefully, with this guide at your disposal, you’ll become an expert (or a proficient user, at least) at using the tool in no time at all.