
As the most popular desktop operating system worldwide, Windows often becomes a prime target for viruses and malware. Cybercriminals focus on Windows due to its extensive user base, aiming to exploit vulnerabilities and compromise systems. To counter these threats, Windows 11 comes equipped with a built-in security suite called Microsoft Defender Antivirus, also known as Windows Security. This comprehensive tool provides robust protection without the need for additional antivirus software.
This guide will help you navigate and utilize Windows Security on Windows 11 to safeguard your computer from viruses, spyware, and malware.
Windows Security and its features in Windows 11
Windows Security (Microsoft Defender Antivirus) is an integrated antivirus and anti-malware solution included with Windows 11. This free program offers protection comparable to many paid antivirus services like Avast and Kaspersky. According to Microsoft, Windows Security can defend your computer against approximately 99.7% of threats.
For most users, third-party antivirus software isn’t necessary, as Microsoft Defender provides solid protection against various cyber threats at no extra cost. If you install another antivirus program, Microsoft Defender Antivirus will automatically disable itself. Conversely, if you uninstall the third-party software, Microsoft Defender will reactivate to ensure continuous protection.
Windows Security features
When you open the Windows Security app, you’ll find several security features organized into eight protection areas that you can monitor and manage:
- Virus & threat protection: Options to scan your computer, monitor threats, receive security updates, perform offline scans, and configure advanced anti-ransomware settings.
- Account protection: Helps protect your Windows 11 identity using Windows Hello sign-in options, account settings, and Dynamic Lock.
- Firewall & network protection: Allows you to monitor and configure network connections and firewall settings.
- App & browser control: Enables you to manage reputation-based protection (SmartScreen), isolated browsing, and exploit protection settings to defend against potentially harmful apps, files, websites, and downloads.
- Device security: Provides access to built-in hardware security features like the Security Processor (TPM) and Secure Boot to protect your device from threats and attacks.
- Device performance & health: Displays health and performance reports of your device based on regular scans.
- Family options: Helps you monitor and manage your family’s devices and children’s online activities through a Microsoft account.
- Protection history: Allows you to view and manage recent protection actions and recommendations from Windows Security.
These services operate in the background with minimal impact on system performance to keep your device protected.
Always install the latest Windows updates on your PC
Microsoft regularly releases security, feature, and other updates to keep your system secure and up-to-date. Security updates are crucial as they patch vulnerabilities in Windows and related software, helping protect against new threats. Even if you use third-party antivirus programs, these updates are essential.
Microsoft Defender Antivirus receives definition updates, known as Security Intelligence Updates, through Windows Update to stay current with the latest threats. By default, Windows 11 is set to download and install updates automatically. However, if you’ve disabled automatic updates or haven’t connected to the internet for an extended period, you might miss critical Security Intelligence updates.
To ensure Microsoft Defender Antivirus functions effectively, make sure your Windows 11 PC has the latest updates installed. You can download and install Security Intelligence Updates either through Windows Update or directly from the Windows Security app.
Updating Windows to get the latest security updates
- Open Windows Settings by clicking the Start menu and selecting Settings or by pressing
Windows + I.
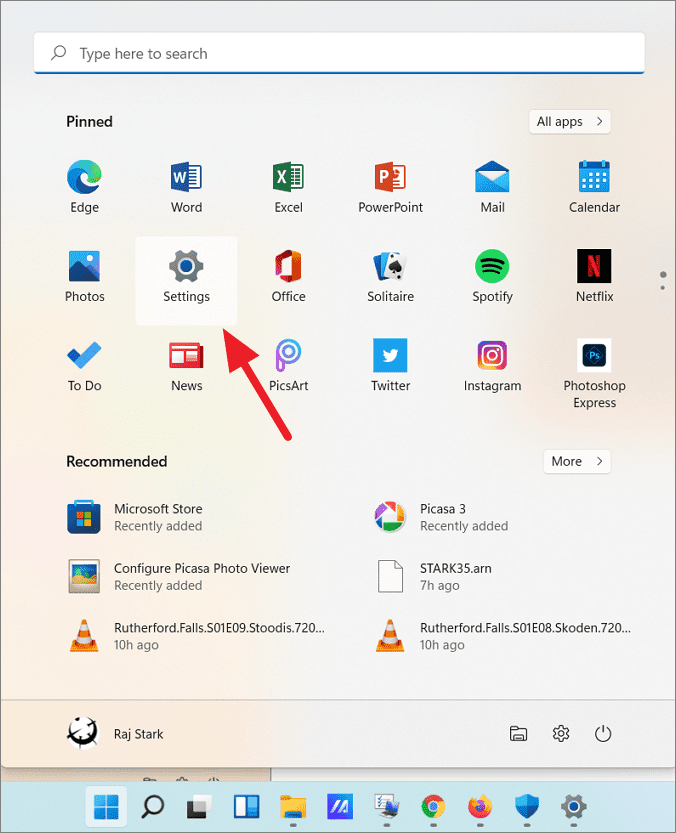
- In the Settings app, click on Windows Update in the left-hand menu.
- Click the Check for updates button on the right pane.
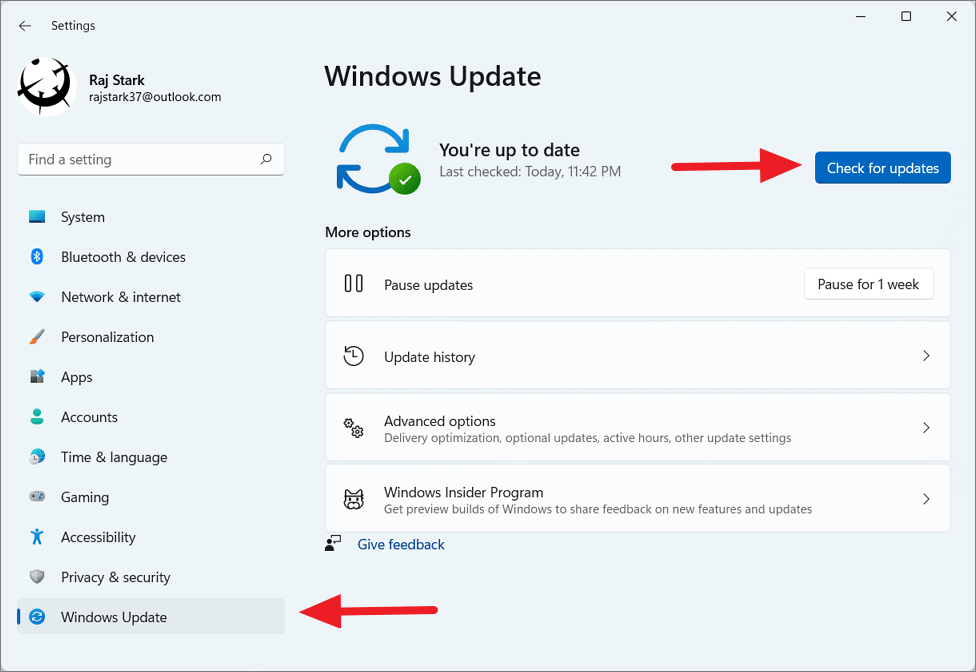
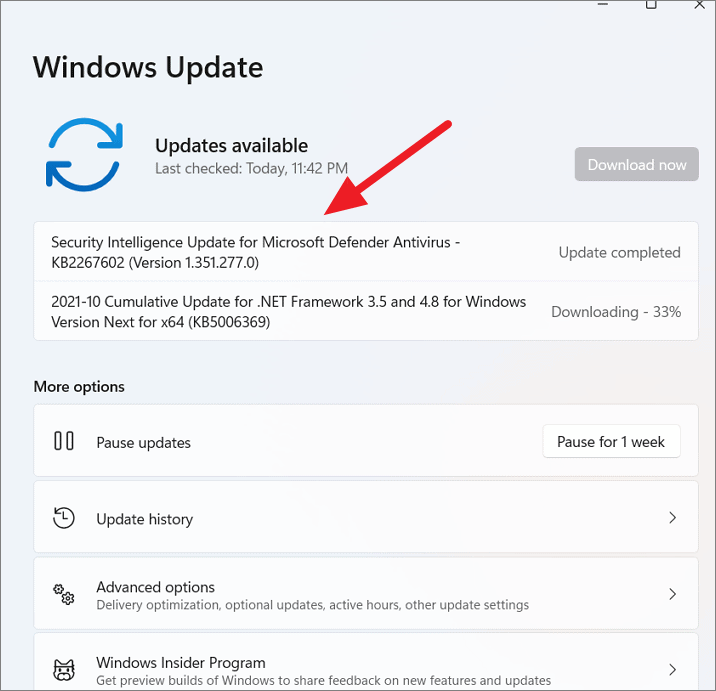
If updates are available, they will begin downloading and installing automatically. Security Intelligence updates don’t require a restart, but if other updates are installed simultaneously, you may need to restart your PC.
Updating Microsoft Defender Antivirus through Windows Security
If you prefer to install only the Security Intelligence updates (which are typically small in size), you can do so directly from the Windows Security app:
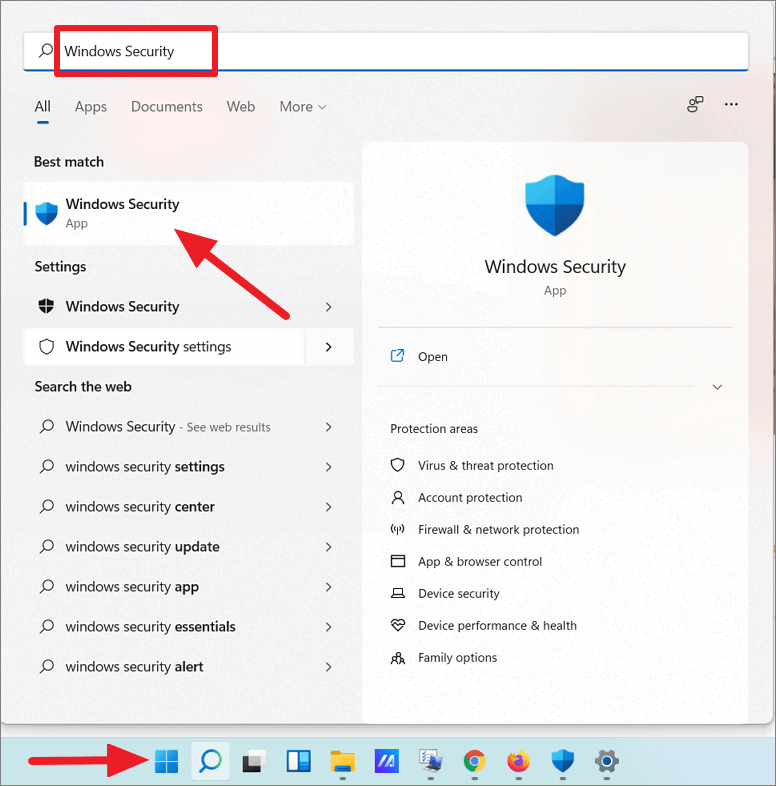
- Open the Windows Security app by searching for Windows Security in the Start menu.
- In the left-hand menu, click on Virus & threat protection.
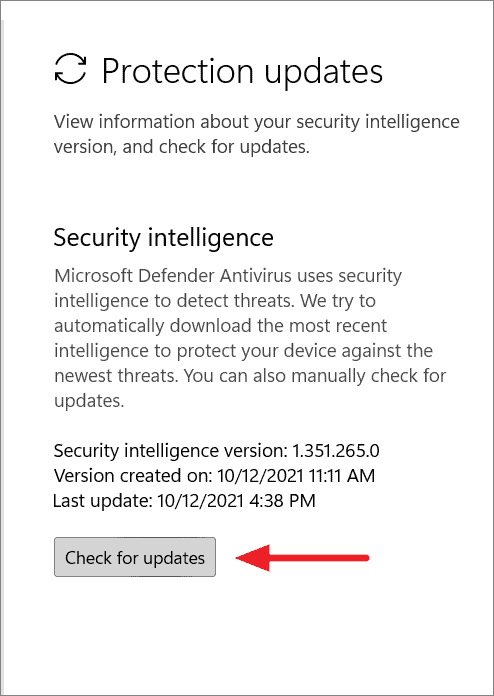
- Under the Virus & threat protection updates section, click on Protection updates.
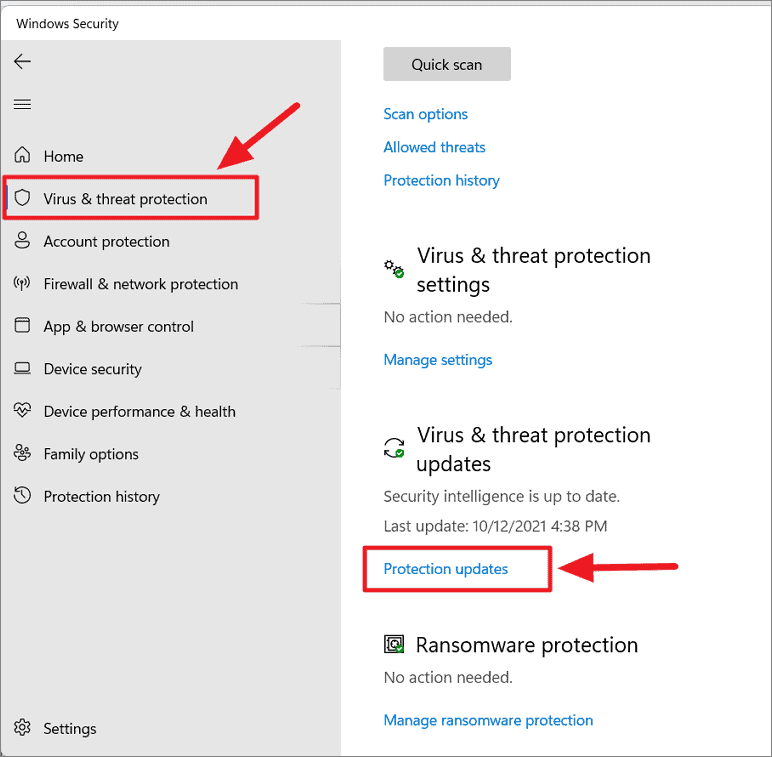
- Click the Check for updates button to download and install the latest Security Intelligence updates.
Accessing Windows Security in Windows 11
There are several ways to open the Windows Security app in Windows 11:
Using the Start menu
- Click the Start button and type Windows Security in the search bar.
- Select the Windows Security app from the search results.
Using the system tray
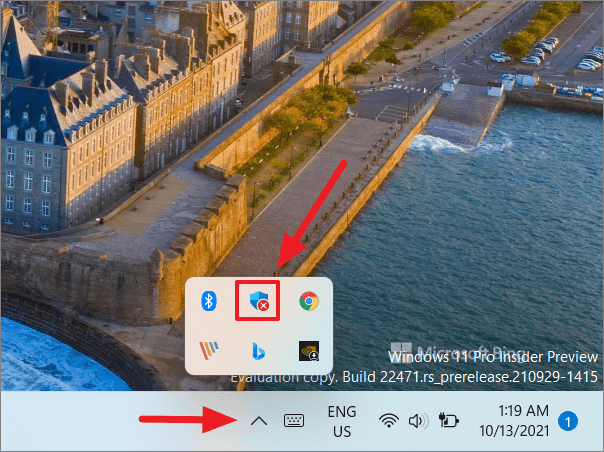
- Click the up arrow in the right corner of the taskbar to open the system tray.
- Click the Windows Defender icon (a blue shield) to open the Windows Security app.
Once opened, the Windows Security dashboard displays eight protection areas for you to manage and monitor:
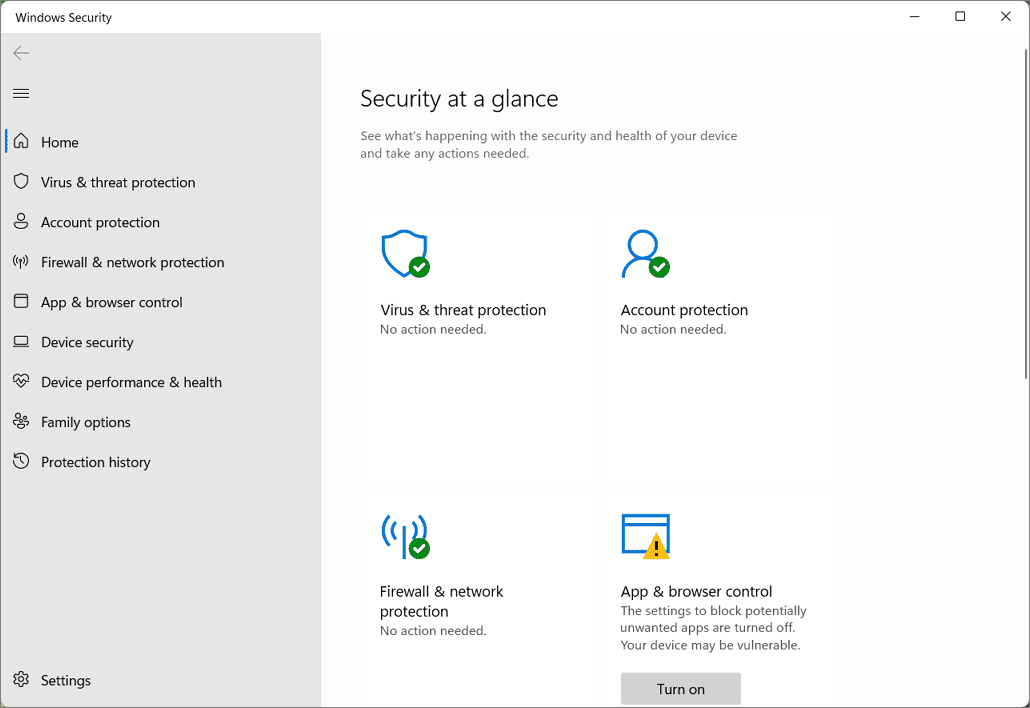
We’ll delve into each of these protection areas in the following sections.
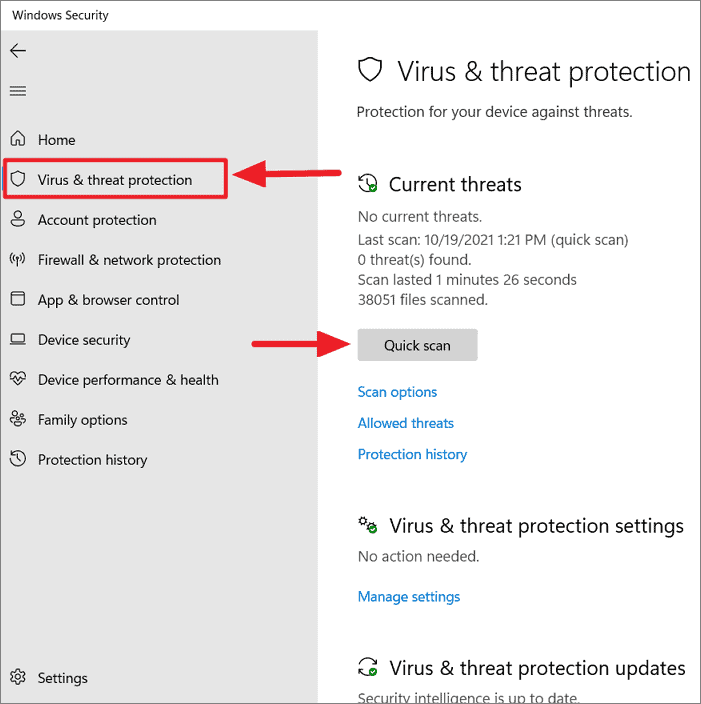
1. Virus & threat protection
The Virus & threat protection section allows you to scan your computer, monitor threats, receive updates, and configure advanced anti-ransomware features.
Quickly scanning your computer for viruses and malware
Windows Security automatically scans your device for malware and viruses, but you can also perform manual scans. There are four types of scans available:
- Quick scan: Checks the areas of your computer most likely to be infected.
- Full scan: Thoroughly scans all files and running programs.
- Custom scan: Allows you to choose specific files or folders to scan.
- Microsoft Defender Offline scan: Scans your computer before Windows starts up, useful for removing hard-to-detect malware.
Performing a Quick Scan
- Open the Windows Security app and select Virus & threat protection.
- Click the Quick scan button.
The quick scan will begin and usually takes a few minutes to complete.
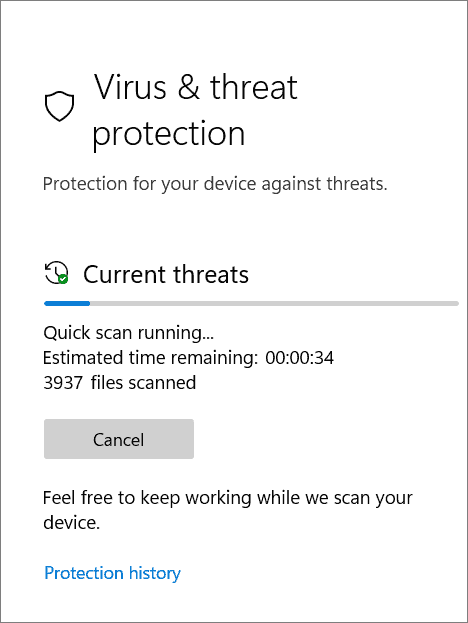
Once completed, you’ll see the results. If no threats are found, a message saying “No current threats” will appear.

Performing Other Types of Scans
- In the Virus & threat protection section, click on Scan options under the Current threats section.
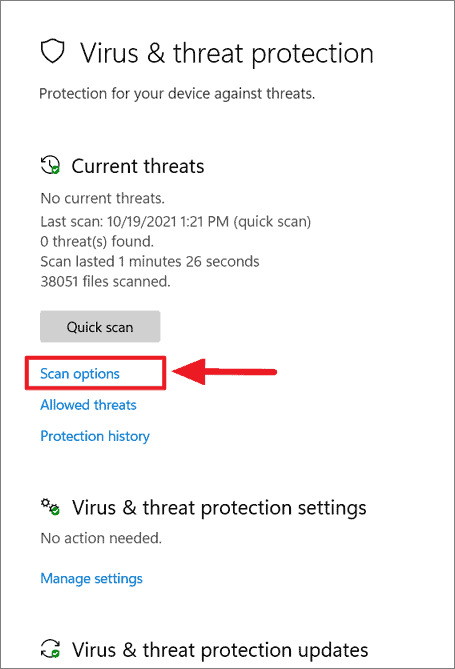
Here, you can choose from the following scan options:
- Quick scan: Checks common areas for threats.
- Full scan: Scans all files and programs on your hard drive. This can take an hour or more.
- Custom scan: Select specific files or folders to scan.
- Microsoft Defender Offline scan: Restarts your device to scan before Windows loads.
Running a Full Scan
- Select the Full scan option.
- Click Scan now.
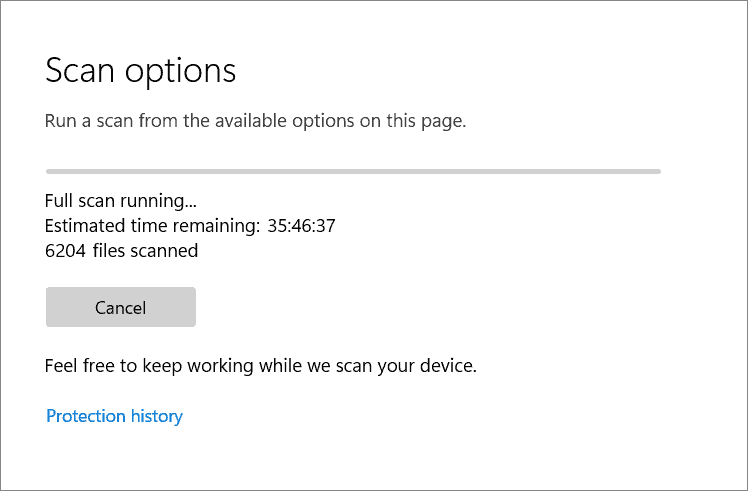
A full scan will commence, thoroughly checking all files and running programs on your device. This process may take some time and could slow down your computer, so it’s best to run it when you’re not actively using your PC.
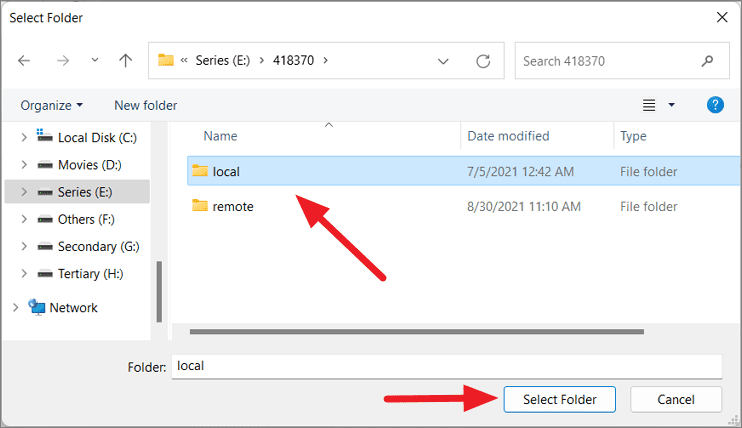
Performing a Custom Scan
- Select the Custom scan option and click Scan now.
- Browse and select the specific folder or drive you want to scan.
- Click Select Folder to start the scan.
Scanning from File Explorer
You can also initiate a scan directly from File Explorer:
- Right-click the file or folder you wish to scan.
- Select Show more options from the context menu.
- Click on Scan with Microsoft Defender….

Performing a Microsoft Defender Offline Scan
- Select the Microsoft Defender Offline scan option.
- Click Scan now.
- You will be prompted to save your work; click Scan to proceed.
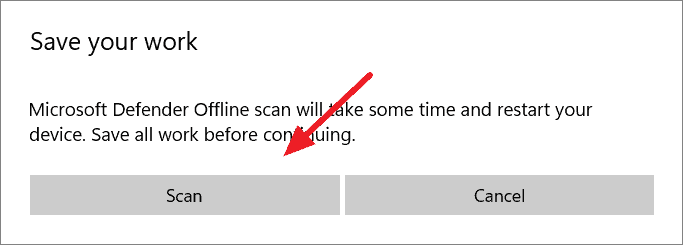
Your computer will restart, and the scan will run before Windows boots up. This is useful for detecting and removing persistent malware.
Handling detected threats
If threats are found during a scan, you’ll receive a notification. To address these threats:
- Click on the notification or go to Virus & threat protection in Windows Security.
- Under the Current threats section, you’ll see the detected threats listed.
- Click on each threat to see action options: Quarantine, Remove, or Allow on device.
- Select the appropriate action and click Start actions.
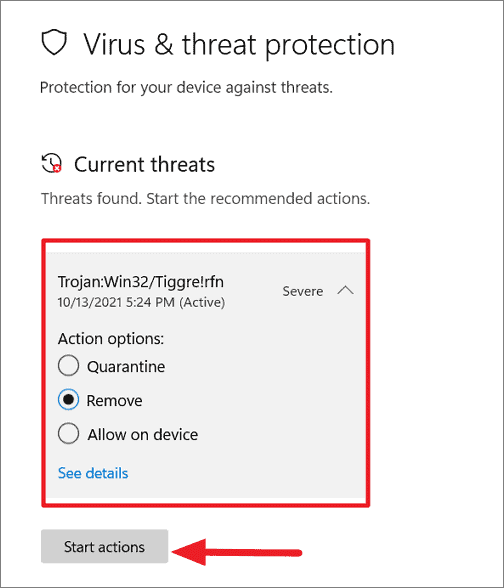
- Quarantine: Isolates the threat, preventing it from running.
- Remove: Deletes the threat from your computer.
- Allow on device: Permits the item to remain on your computer if you trust it.
Viewing protection history
You can review past threats and actions taken:
- In Windows Security, select Protection history from the left-hand menu or click on Protection history under the Current threats section.
Here, you can see a log of all threats detected and actions taken. You can filter the list using the Filters drop-down menu.

To restore a quarantined item:
- Click on the item in the list.
- Click Actions and select Restore to return it to its original location, or Remove to delete it permanently.
Configuring Virus & threat protection settings
Windows Security offers several settings to customize your protection:
- In the Virus & threat protection section, click on Manage settings under Virus & threat protection settings.
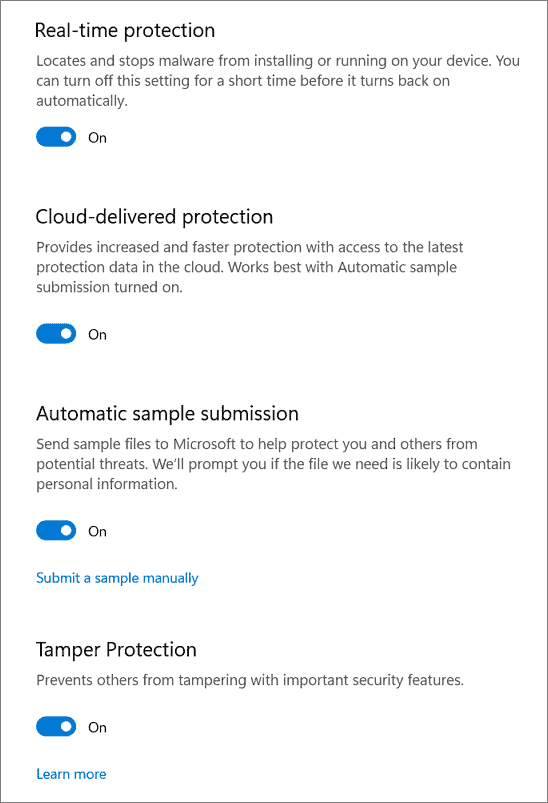
Here, you can toggle the following settings:
- Real-time protection: Scans your device in real-time to detect and stop malware.
- Cloud-delivered protection: Provides faster protection using cloud-based services.
- Automatic sample submission: Sends samples of suspicious files to Microsoft for analysis.
- Tamper Protection: Prevents unauthorized changes to Windows Security features.
Temporarily disabling Microsoft Defender Antivirus
If you need to install an app that Windows Security is blocking, you can temporarily disable real-time protection:
- In the Virus & threat protection settings, toggle Real-time protection to Off.
- If prompted by User Account Control (UAC), click Yes.

Note that real-time protection will automatically re-enable after a short period or when you restart your computer.
Enabling anti-ransomware protection in Windows 11
Ransomware is a type of malware that encrypts your files and demands payment for their release. Windows Security offers features to protect against ransomware:
- In Windows Security, go to Virus & threat protection.
- Click on Manage ransomware protection under the Ransomware protection section.
- Toggle Controlled folder access to On.
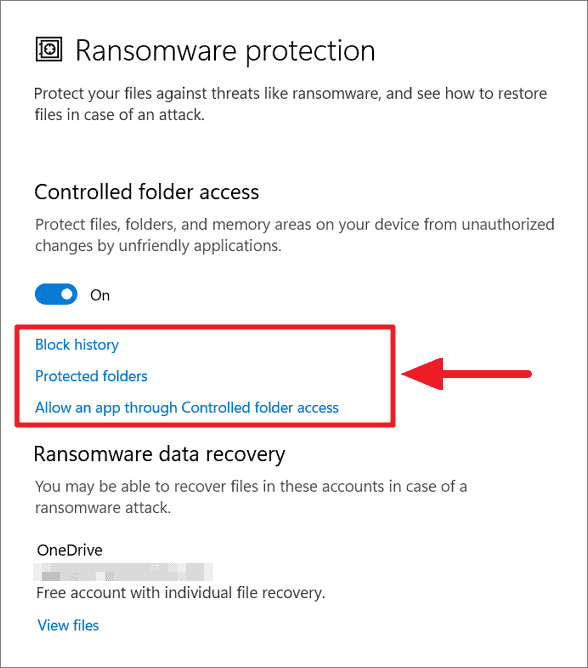
With Controlled folder access enabled, you can:
- Protect additional folders: Click on Protected folders to add more folders to protect.
- Allow trusted apps: Click on Allow an app through Controlled folder access to permit apps you trust to access protected folders.
Excluding items from Microsoft Defender Antivirus scans
If you want to prevent certain files, folders, file types, or processes from being scanned:
- In the Virus & threat protection settings, click on Manage settings.
- Scroll down to Exclusions and click Add or remove exclusions.
- Click Add an exclusion and choose the type of exclusion (File, Folder, File type, or Process).
- Specify the item to exclude.
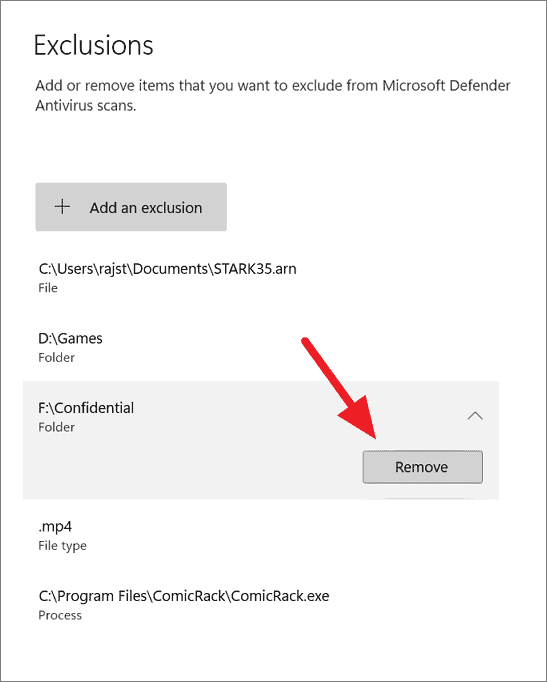
Be cautious when excluding items, as this may leave your device vulnerable if the excluded items contain threats.
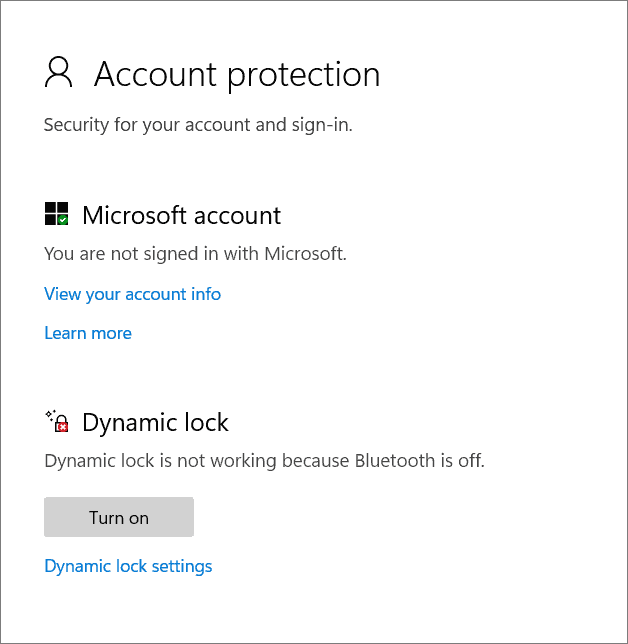
2. Account protection
The Account protection area helps secure your Windows 11 identity with sign-in options like Windows Hello, account settings, and Dynamic Lock. It monitors and notifies you of any issues related to your account protection and sign-in methods.
- Open the Windows Security app and select Account protection from the left-hand menu.
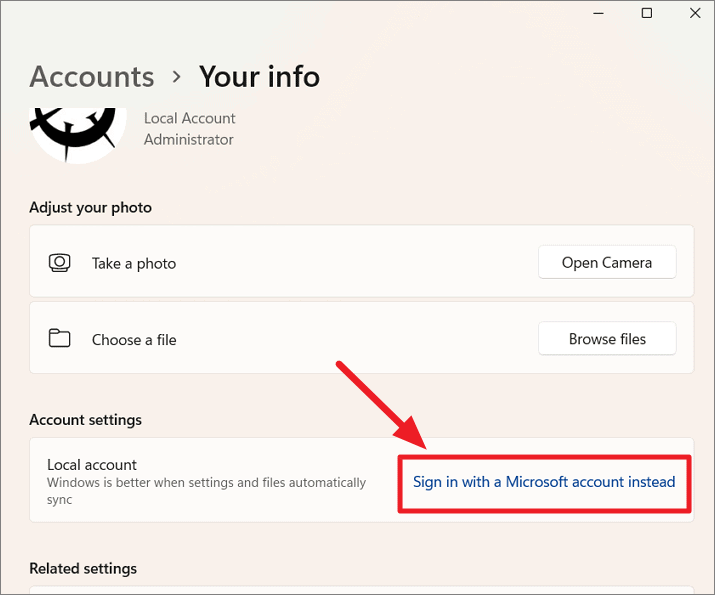
If you’re signed in with a local account, you may see a prompt to sign in with a Microsoft account to access all features:
To sign in with a Microsoft account:
- Click on View your account info under the Microsoft account section.
- In the Settings app, click Sign in with a Microsoft account instead.
- Enter your Microsoft account credentials to sign in.
After signing in, return to the Account protection section in Windows Security. You’ll see options to manage Windows Hello, Dynamic Lock, and other account settings. Ensure there are green checkmarks next to each feature, indicating that they are functioning correctly.
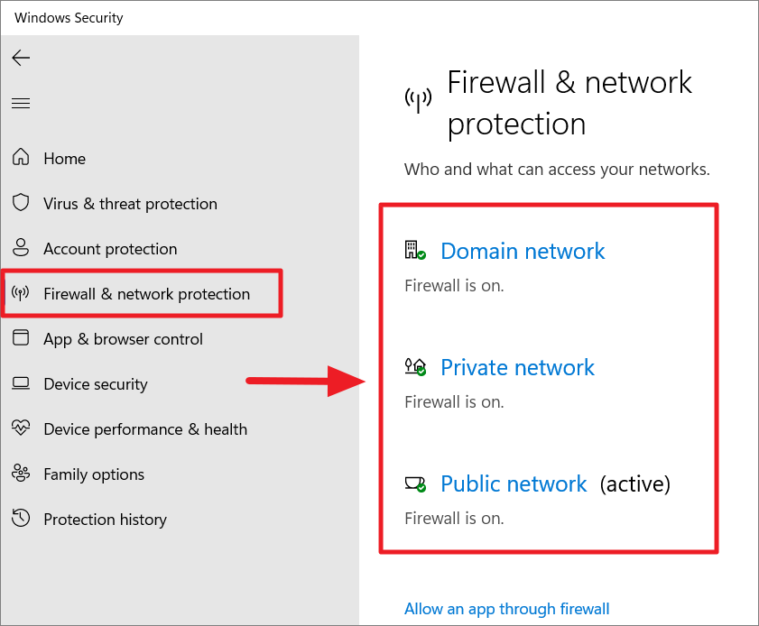
3. Firewall & network protection
The Firewall & network protection section allows you to monitor and manage Windows Defender Firewall settings for your networks. By default, the firewall is enabled for all network profiles.
- In Windows Security, select Firewall & network protection.
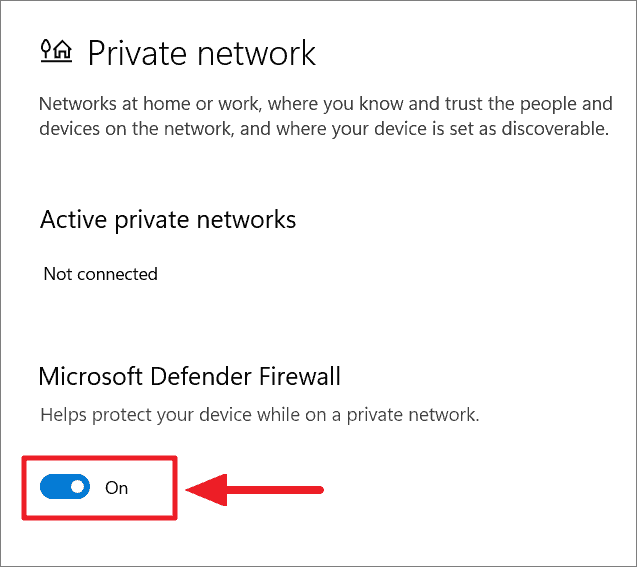
Managing firewall settings
You can enable or disable the firewall for each network type:
- Click on the active network profile (e.g., Public network).
- Under Microsoft Defender Firewall, toggle the switch to Off or On as needed.
- If prompted by User Account Control, click Yes.
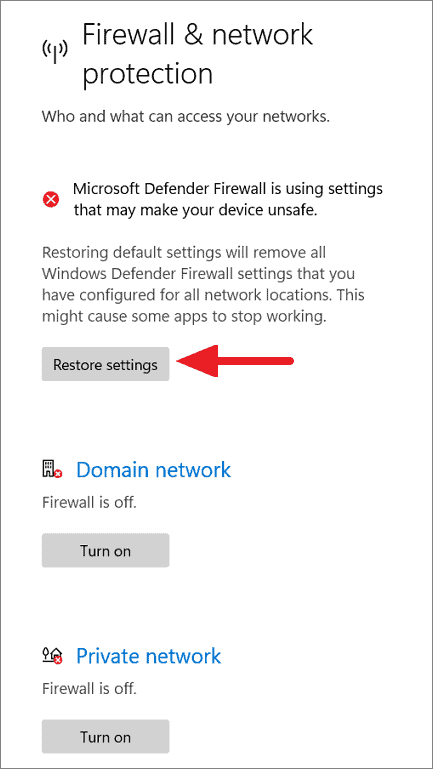
You can also restore firewall settings to their defaults by clicking on Restore firewalls to default.
Blocking all incoming connections
To provide additional security, you can block all incoming connections, including those in the list of allowed apps:
- Under the selected network profile, check the box for Block all incoming connections, including those in the list of allowed apps.
This setting can help protect your device when connected to untrusted networks.
4. App & browser control
The App & browser control section lets you configure settings for Windows Defender SmartScreen, which helps protect your device against potentially dangerous apps, files, websites, and downloads.
- In Windows Security, select App & browser control.
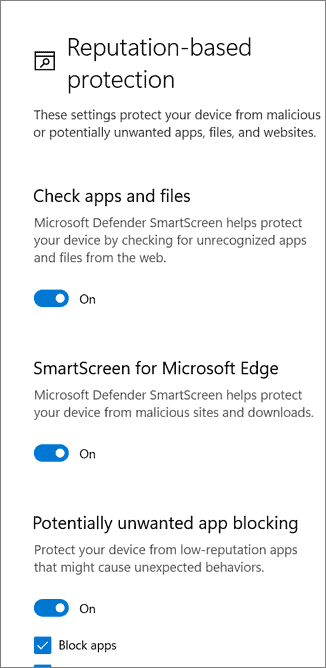
Configuring reputation-based protection
- Click on Reputation-based protection settings.
- Toggle settings for Check apps and files, SmartScreen for Microsoft Edge, and Potentially unwanted app blocking as desired.
Using isolated browsing with Application Guard
Microsoft Defender Application Guard helps protect your device by opening untrusted websites in an isolated Hyper-V-enabled container. This feature is available on Windows 11 Pro, Education, and Enterprise editions.
- In App & browser control, click on Install Microsoft Defender Application Guard.
- If prompted, enable virtualization in your device’s BIOS settings.
- Check the box for Microsoft Defender Application Guard in the Windows Features dialog, then click OK.
- Restart your computer when prompted.
- Open Microsoft Edge, click the three dots to open the menu, and select New Application Guard window.
5. Device security
The Device security section provides information and management options for built-in security features like Core isolation and Secure Boot.
- In Windows Security, select Device security.
- Click on Core isolation details to enable or disable memory integrity, which helps prevent attacks by isolating core processes.
6. Device performance & health
This section offers a health report of your device, including storage capacity, battery life, apps and software, and Windows Time service.
- In Windows Security, select Device performance & health.
- Review the health report and address any issues indicated.
7. Family options
The Family options section helps you manage parental controls and keep track of your family’s devices.
- In Windows Security, select Family options.
- Click on View family settings to manage parental controls through your Microsoft account online.
Scheduling Windows Defender Antivirus scans using Task Scheduler
You can schedule regular scans using Task Scheduler:
- Search for Task Scheduler in the Start menu and open it.
- Navigate to Task Scheduler Library > Microsoft > Windows > Windows Defender.
- Right-click on Windows Defender Scheduled Scan and select Properties.
- Go to the Triggers tab and click New.
- Set your desired schedule and click OK.
- Adjust conditions under the Conditions tab if necessary.
By leveraging the comprehensive tools and features within Windows Security, you can ensure your Windows 11 device remains secure and protected against a multitude of threats.


