
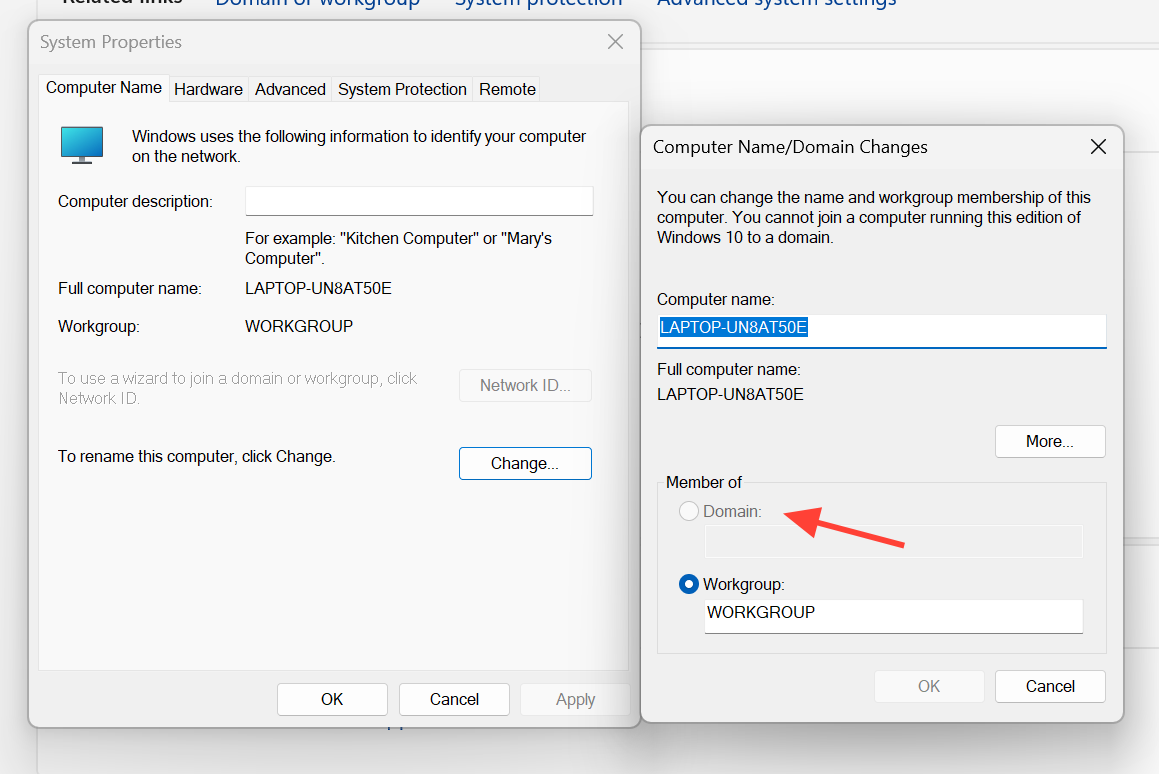
Adding a Windows 11 PC to an Active Directory domain hands central control over that machine to a domain controller, which then manages sign-ins, policies, and security from one place. The process runs through the same System Properties dialog Windows has used for years, and reversing it later is just as direct.
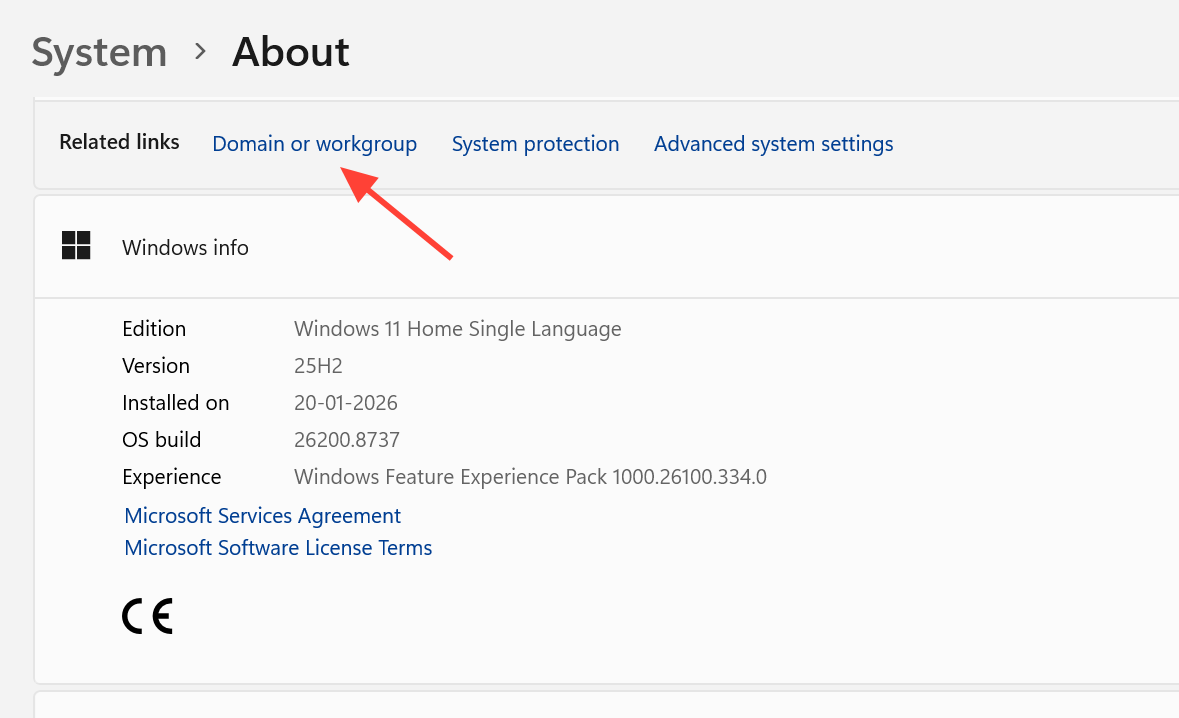
Quick answer: Open Settings, go to System > About, click Domain or workgroup, press Change, select Domain, type the domain name, enter a domain account that is allowed to join computers, then restart. You know it worked when a “Welcome to the domain” message appears and you can sign in with a domain account after the reboot.
What you need before joining a domain
Every requirement below has to be met before the join will succeed. Missing any one of them is the most common reason the process fails partway through.
| Requirement | Detail |
|---|---|
| Windows edition | Pro, Enterprise, or Education (and their N variants). Home edition cannot join a domain. |
| Local admin rights | The account performing the join must be an administrator on the local PC. |
| Domain account with join rights | A domain administrator, or a user delegated permission to add computers to the domain. |
| Network path to the domain controller | Reachable over LAN, WAN, or VPN. Confirm by pinging the domain controller’s IP or FQDN. |
| Correct DNS | The PC must use an internal DNS server that can resolve the domain name. If the domain name won’t ping, set the domain controller’s IP as the preferred DNS server. |
Note: Windows updates, including KB5020276, harden the domain join process with extra validation, so only trusted devices are allowed onto the domain. Keeping both the client and domain controller patched helps avoid join failures tied to that hardening. You can read the specifics in Microsoft’s KB5020276 Netjoin hardening notes.
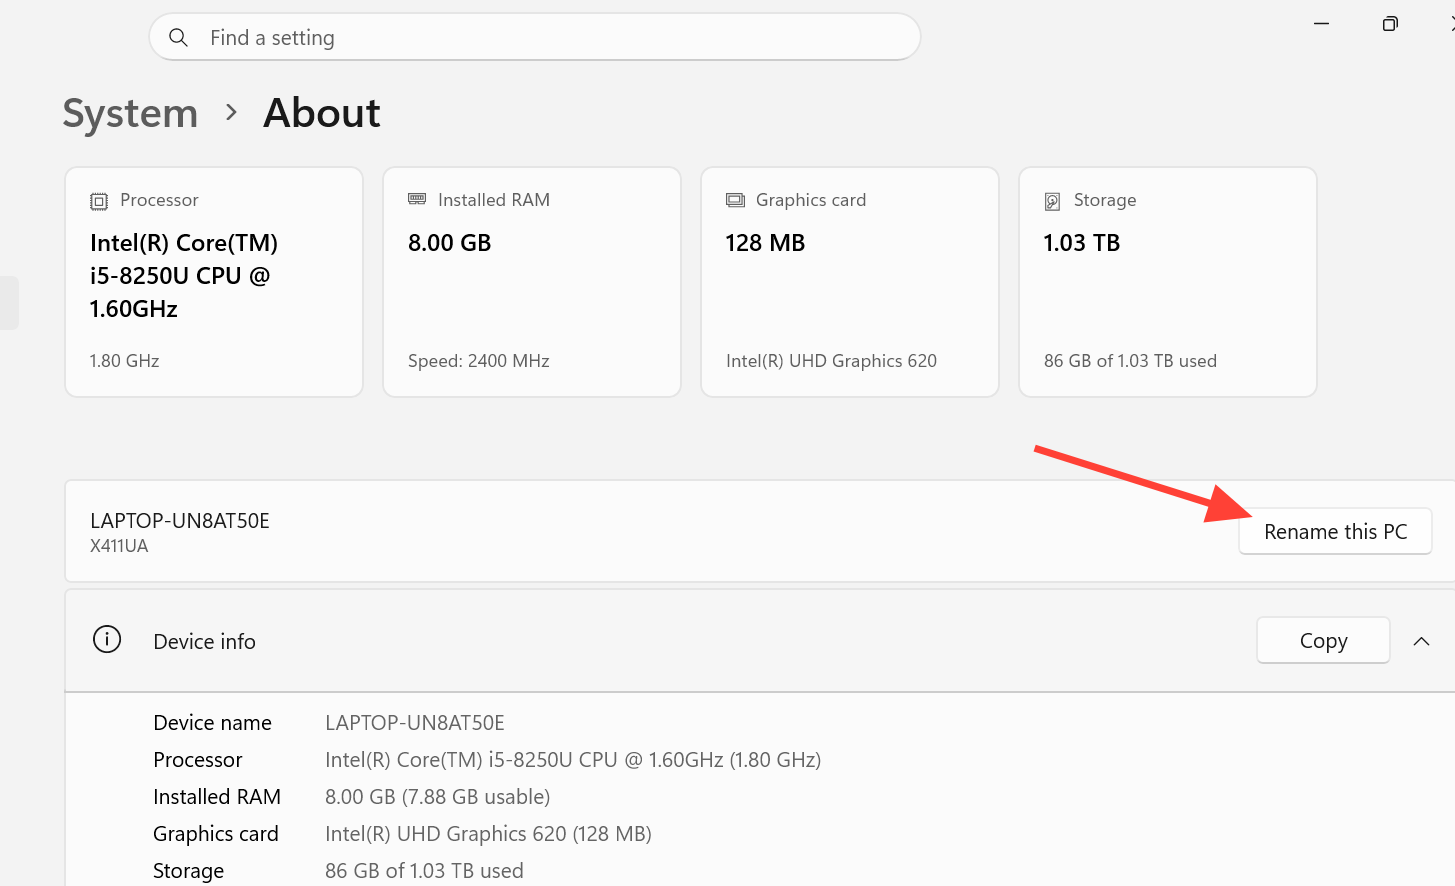
Tip: Rename the PC to something meaningful before joining. In a directory with many machines, a clear name makes the computer easy to find later. Open Settings, go to System > About, choose Rename this PC, then restart.
Join Windows 11 to a domain through Settings

Note: A regular domain user who signs in to the freshly joined PC will not have local administrator rights. To grant them, choose Restart Later, open Computer Management, expand Local Users and Groups, select the Administrators group, and add the domain user. Then reboot.
Prestage the computer account in Active Directory (optional)
Creating the computer object in advance is not required, but it lets you place the machine in the right organizational unit and set permissions before the join happens. Do this on the domain controller with the Active Directory Domain Services role installed.
Remove Windows 11 from a domain
Disconnecting a PC returns it to a workgroup and restores local control. Two things matter before you start. You need a working local account with administrator rights, because after leaving the domain you can no longer sign in with a domain account. Back up anything you still need from the domain user profile first, since that data becomes inaccessible once the machine is off the domain.
Standard method with domain credentials

Offline method without domain credentials
Use this when you are away from the office network and acting as the local administrator. It does not need domain credentials or a connection to Active Directory.
Remove a computer from a domain with PowerShell
The GUI is faster for a single PC, but PowerShell is useful on Server Core installations without a desktop and when disjoining many computers at once. The Remove-Computer cmdlet takes the local computer off its domain, disables the computer’s domain account, and moves it to a workgroup. You must supply explicit unjoin credentials even if they belong to the current user, and a restart is required for the change to take effect.
To remove the local machine and restart it in one command:
Remove-Computer -UnjoinDomainCredential Domain01Admin01 -PassThru -Verbose -Restart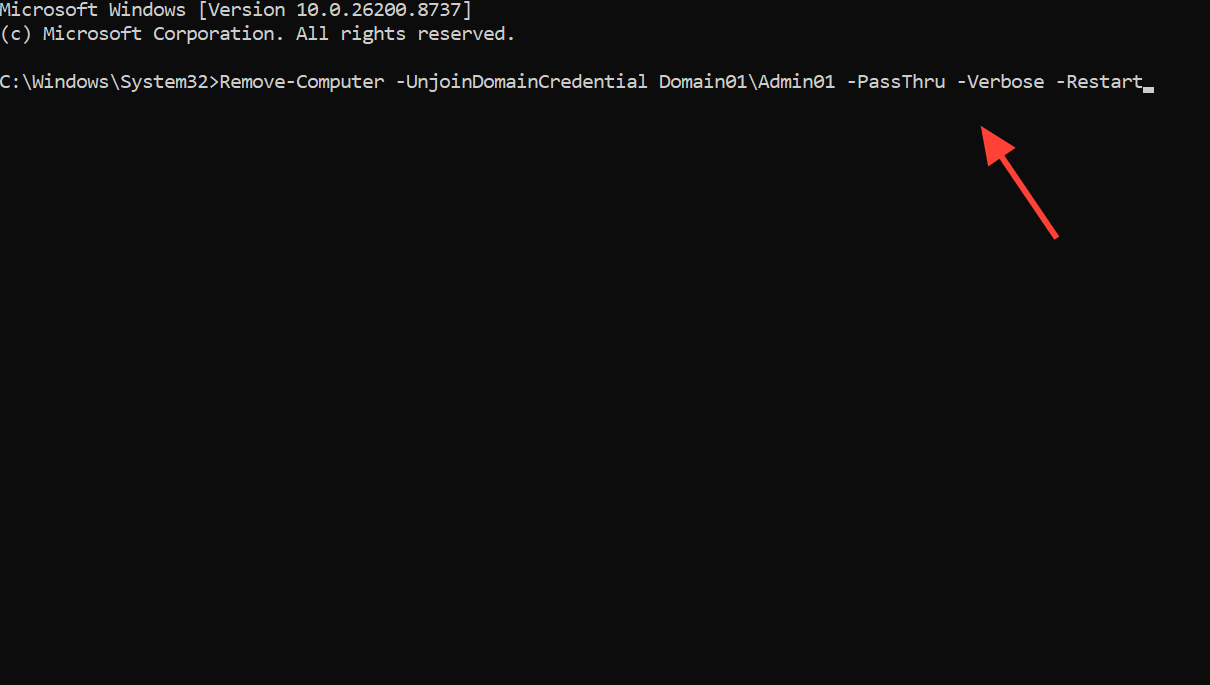
When no workgroup name is given, the computer joins a workgroup named WORKGROUP by default. To place several machines into a specific workgroup and skip the confirmation prompts:
Remove-Computer -ComputerName "Server01", "localhost" -UnjoinDomainCredential Domain01Admin01 -WorkgroupName "Local" -Restart -Force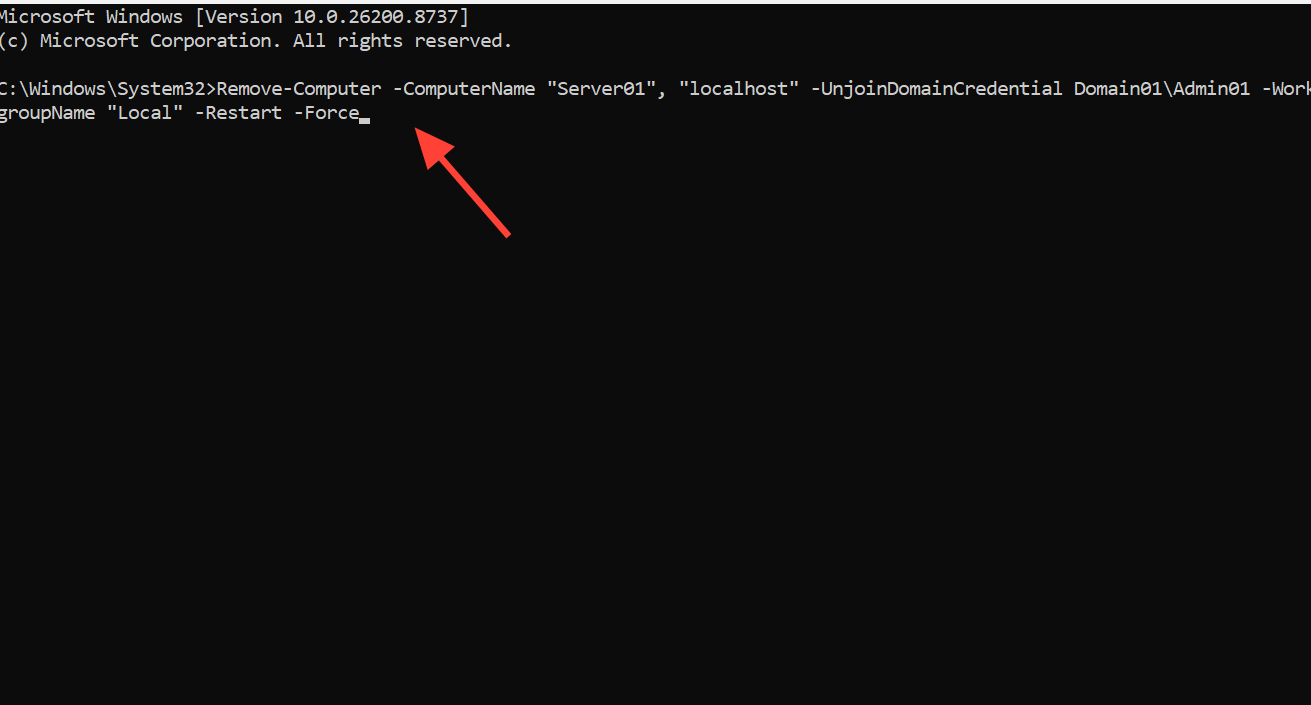
Key parameters to know when scripting this:
| Parameter | What it does |
|---|---|
| -UnjoinDomainCredential | Account allowed to remove the computer from the domain. Required, even for the current user. |
| -LocalCredential | Account with permission to connect to remote computers named with -ComputerName. |
| -WorkgroupName | Workgroup the computer is added to after leaving the domain. Defaults to WORKGROUP. |
| -Restart | Restarts the affected computers to complete the change. |
| -Force | Suppresses the per-computer confirmation prompt. |
| -PassThru / -Verbose | Report whether the operation succeeded or failed. |
Full parameter details are in Microsoft’s Remove-Computer reference.
Confirm it worked and fix common failures
A successful join shows a welcome message naming the domain, and after restarting you can sign in with a domain account. A successful removal drops you back to a local sign-in and the machine appears in a workgroup rather than the domain. When either action stalls, the cause is almost always one of these.
| Symptom | Cause and fix |
|---|---|
| Domain name won’t resolve | DNS is pointing at the wrong server. Set the domain controller’s IP as the preferred DNS server, then ping the domain FQDN again. |
| No Domain option available | The PC runs Home edition. Only Pro, Enterprise, and Education can join a domain. |
| Access denied on join | The domain account lacks permission to add computers. Use a domain admin or a delegated account. |
| Can’t sign in after removal | No usable local admin account. Activate the local administrator and know its password before disjoining. |
| Domain user has no admin rights | Add the domain user to the local Administrators group through Computer Management. |
Whether you are onboarding a new machine or handing one back to a single user, the join and removal flows both come down to reaching the domain controller, using an account with the right permissions, and restarting once to lock in the change.


