The Heavy is the armored frontline specialization in Star Wars Zero Company, and it is the only class that gets to decide who the enemy shoots at. In a turn-based tactics game where an operator dies for good after three injuries, controlling incoming fire is worth as much as damage. That is the entire pitch for the Heavy, and it is why the class keeps showing up in squads built around fragile, high-value damage dealers.
Quick answer: Drop Bulwark on a cluster of enemies to force them to attack your Heavy, then cast Unstoppable in the same turn so the first two hits that land are answered with free counterattacks. Bulwark costs Advantage rather than Action Points, so it does not eat the Heavy’s turn.
How a Heavy turn works: Bulwark plus Unstoppable
Bulwark is the Heavy’s Ultimate. You target an area, and every enemy inside it is taunted into attacking the Heavy for the rest of the turn, while the Heavy gains +2 Defense until the turn ends. It costs 4 Advantage from the squad’s shared pool, which is capped at 10, and Advantage abilities do not consume Action Points. That is the key detail. Bulwark redirects a whole enemy group and still leaves the Heavy free to shoot, reposition, or cast something else.
Unstoppable is the standard active, and it grants two stacks of Retaliation. Each stack fires a free counterattack against the next incoming hit, then is spent. Used after Bulwark, it flips the Heavy from a damage sponge into something that punishes the enemies you just baited. Against a group all firing at the same target in one turn, that is two guaranteed counters before their attacks finish resolving.
Intimidating Posture covers the gap. The Heavy’s primary blaster attacks taunt on hit, giving you a cheap single-target pull for turns when Advantage is spent elsewhere. Bulwark is the better tool when you can afford it, but Intimidating Posture is what saves a squishy operator when you cannot.
Heavy abilities and upgrade tiers
Specialization abilities scale by spending Focus in the operator’s Focus Tree. Bulwark’s tier progression is where most of the class’s power lives, since it widens both the taunt range and the blast of area it can pull from.
| Bulwark tier | Taunt range | Area | Defense |
|---|---|---|---|
| 1 | 16m | 4m | +2 |
| 2 | 17m | 5m | +3 |
| 3 | 18m | 6m | +4 |
| 4 | 20m | 7m | +5 |
| 5 | 22m | 8m | +6 |
| 6 | 24m | 8m | +6, plus Impervious and Immovable |
Unstoppable always grants two Retaliation stacks. What scales is how hard each counter hits, and at the final tier you can hand the buff to an ally instead.
| Unstoppable tier | Effect |
|---|---|
| 1 | +2 Retaliation stacks |
| 2 | +2 stacks, Retaliation damage +1 |
| 3 | +2 stacks, Retaliation damage +2 |
| 4 | +2 stacks, Retaliation damage +3 |
| 5 | +2 stacks, Retaliation damage +4 |
| 6 | +2 stacks, Retaliation damage +4, castable on an ally |
The three passives run in the background and need no input.
| Passive | Effect |
|---|---|
| Conditioning | Max Health +4, scaling to +20 at tier 5 |
| Heavy Armor Training | +2 Defense, cannot be upgraded |
| Intimidating Posture | Primary blaster attacks taunt the target on hit |
Why stacked Defense matters under permadeath
Defense in Zero Company is a flat subtraction from every incoming hit, not a dodge roll. Heavy Armor Training’s permanent +2 and Bulwark’s +2 stack to +4 on the turn you use the Ultimate, so every shot the enemy sends at your Heavy that turn lands for four points less. Against enemies that attack multiple times per turn, that reduction compounds fast.
Health works the same way. An operator takes an injury each time they hit zero HP, and three injuries kill them permanently. Conditioning’s flat health increase is not exciting on paper, but it is the difference between an operator surviving a concentrated volley and picking up a scar that follows them for the rest of the campaign.
Best Heavy talent: Taunt, Grit, or Fortitude
Taunt is the default pick. It costs 1 AP and pulls a single enemy, which sounds redundant next to Bulwark until you remember Bulwark drains the squad’s shared Advantage. Taunt also becomes a damage debuff at higher tiers, cutting the target’s damage by up to 6.
| Talent | What it does | Top tier |
|---|---|---|
| Taunt | Taunts one enemy for 1 AP and reduces its damage | Damage reduced by 6 |
| Grit | Applies Invulnerable stacks and raises Max Health for 1 AP | 2 stacks per turn, +12 Max Health |
| Fortitude | Increases Defense while the operator is injured | +6 Defense, ignores the injured chance-to-hit penalty |
Grit is the selfish alternative, and it turns the Heavy into something close to unkillable at the cost of a point of AP each turn. Fortitude is the late-campaign swap, once your Heavy is carrying injuries you cannot fully heal between missions. For a custom operator, A Life of Labor is a solid pick at creation for the bonus health and defense it grants.
Weapon class and secondary specialization
Weapon class changes how much AP an attack costs, so it is not a cosmetic choice. The Repeater suits the Heavy because it rewards committing a full turn to firing, which is what an operator anchored to a position is doing anyway. A Rifle works as the flexible alternative and helps build Advantage.
A second specialization unlocks at Cycle 18. Most custom operators and some story companions can take any of the other standard classes, with the Astromech and Tel-Rea Vokoss as exceptions. Focus Tree upgrades for a secondary cap at tier 5, so it will always be slightly weaker than the same class run as your primary.
Soldier is the strongest partner for the Heavy. It adds melee damage, a Daze that stops enemies attacking, bonus grenade damage, and Rocket Strike for area damage, which gives an otherwise defensive operator something to do on turns when nothing needs taunting. Medic is the other common pairing if your squad needs sustain more than output.
Squad compositions where the Heavy earns its slot
You take four operators into a mission and Hawks occupies one of those slots, so every other pick is one of only three real choices. The Heavy justifies one of them when the squad contains an operator whose build collapses if it gets shot.
| Composition | The Heavy’s job |
|---|---|
| Heavy, Scout, Soldier, Soldier | Taunts so both Soldiers can close and Daze; the Scout’s Combat Recon funds the Advantage for Bulwark every turn |
| Gunslinger, Heavy, Medic, Sharpshooter | Pulls fire off the fragile Gunslinger while it stacks Onslaught with Combat Stim and gifted AP |
Note: a Scout in the squad matters more than it looks. Bulwark’s 4 Advantage per cast is expensive, and Combat Recon generating Advantage off enemy groups is what lets you afford the taunt on consecutive turns rather than every other one.
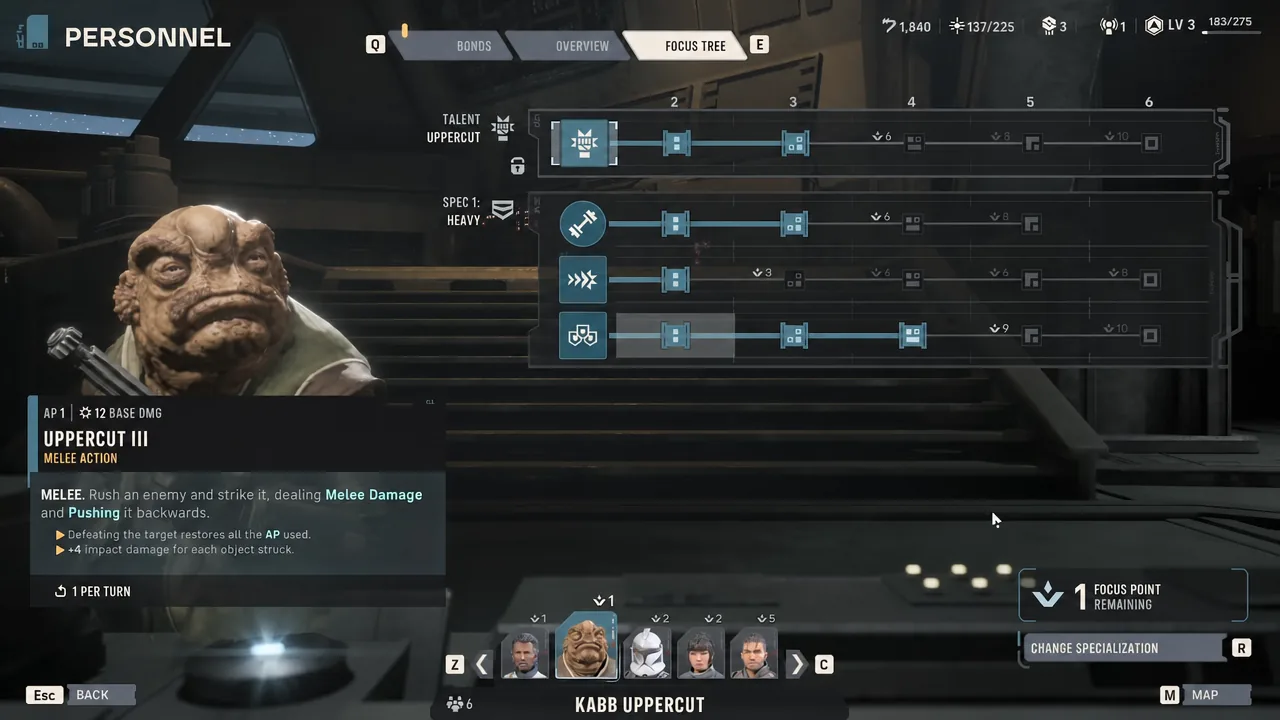
Kabb is worth a mention here because his Uppercut talent refunds all AP on a killing blow at its third tier, which stretches any frontline turn considerably further. He is most often built as Assault or Assault/Soldier for the mobility and displacement, but that AP refund is doing the same job whichever frontline role he fills.
When to leave the Heavy at base
Five of the Heavy’s abilities are survivability tools, and survivability only pays off when there is something worth protecting. Fixed objectives, chokepoints, and any mission where the squad has to hold ground are where the class is at its best. Mobile missions are where it falls off, because a taunt engine that cannot keep pace with the fight is not doing anything.
Treat the Heavy as a per-mission swap rather than a permanent fixture. You can respec any operator at any time, with unique recruits as the exception, so there is no long-term cost to pulling the class in for a defensive mission and out again for a fast one.
How to tell the taunt worked
Confirmation is immediate on the enemy phase. Taunted enemies redirect their attacks onto the Heavy instead of their original target, and Retaliation stacks fire counterattacks as those hits land, with each counter consuming one stack. If nothing redirects, the usual causes are simple. Enemies stood outside Bulwark’s area radius, or the squad’s Advantage pool was below 4 when you tried to cast, or the taunt expired because it only lasts through the current turn and needs recasting on the next one.
Played that way, the Heavy is less a damage dealer and more a targeting system you control. It does not add much to your kill count, but it decides which operator absorbs the volley, and in a campaign where deaths are permanent, that choice is usually worth more than another rifle.