
Hard Mode Towers in Palworld 1.0 push every boss into massive HP pools, extra summoned allies, and attacks that can drop you in one hit. The counter to all of that is a single carry Pal built around raw burst. Bellanoir Libero, running Nightmare Bloom, deletes tower bosses no matter their element as long as you feed it the right status effects and buffs.
Quick answer: Build Bellanoir Libero around Nightmare Bloom, summon it and immediately trigger the Nightmare Stare partner skill for the x2.5 damage multiplier, then apply Poison and Burn with the Crossbow so Prixter and Jormuntide Ignis each add +65% damage. That single combo clears every Hard Mode Tower regardless of the boss’s type.

Why one Pal beats every tower
The build ignores elemental counters on purpose. Instead of swapping a fresh counter Pal into each tower, it stacks damage multipliers that apply to any target. Nightmare Bloom is a Dark move with a base Power of 600, and Nightmare Stare adds a x2.5 multiplier whenever Bellanoir Libero casts it. On top of that, two party members reward you for putting status effects on the boss.
Prixter grants +65% damage to any enemy suffering Poison, and Jormuntide Ignis grants +65% damage to anything afflicted with Burn. Apply both with elemental arrows and Nightmare Bloom starts landing hits well over 10,000 damage. This is why the setup works even against Shadowbeak, which naturally resists Dark, and against Fire bosses that are immune to Burn.
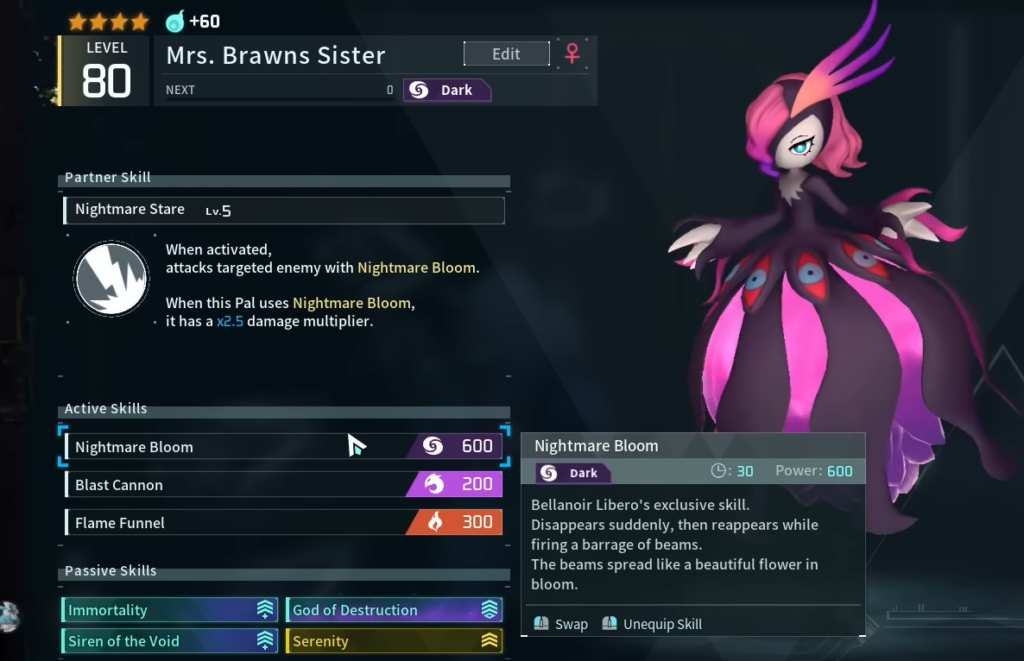
Bellanoir Libero core build
The carry sits at Level 80 with 8,950 HP and an Attack stat of 5,534 in its base loadout. The passive lineup is the important part. God of Destruction trades survivability for raw power, and Immortality stops the Pal from ever fainting, which offsets that lower health ceiling.
| Slot | Setup |
|---|---|
| Partner Skill | Nightmare Stare Lv. 5 (Nightmare Bloom cast, x2.5 damage) |
| Active Skills | Nightmare Bloom (Dark, 600), Blast Cannon (Dragon, 200), Flame Funnel (Fire, 300) |
| Passive | Immortality (cannot faint) |
| Passive | God of Destruction (Attack +40%, Defense +20%, Max Health -50%) |
| Passive | Siren of the Void (Dark +30%, Ice +30%) |
| Passive | Serenity (cooldown -30%, Attack +10%) |
Support party that powers the build
The rest of the team never attacks directly. Their partner skills sit in your party and buff the carry passively.
| Support Pal | Partner Skill effect |
|---|---|
| Lapure | Long-Sleeved Hurray Lv. 5 — cuts other party partner-skill cooldowns by 50% |
| Prixter | Phantom Venom Lv. 5 — +65% damage to Poisoned enemies |
| Jormuntide Ignis | Stormbringer Lava Dragon Lv. 5 — nullifies lava damage, +65% damage to Burning enemies |
| Orserk | Ferocious Thunder Dragon Lv. 5 — bullet hits add +5% Attack/Defense, stacking up to 30 times for 5 seconds |
Orserk’s role is the attack-stacking buff, which you build up by peppering the boss with drone fire. If you want to run this without Orserk, you lose that stacking layer, so the damage leans entirely on the two +65% status amplifiers and Bellanoir Libero’s own passives. Keep Poison and Burn applied at all times to make up the difference.

Accessories and weapons
Accessories push Bellanoir Libero’s Dark damage and Attack even higher. Swapping the Katress Ring and Lyleen Noct’s Talisman in alongside the Baton raised the carry’s Attack to 6,917 in testing, while also softening incoming Neutral damage.
| Gear | Effect |
|---|---|
| Lord of the Underworld’s Baton (Epic) | Pal Attack Up Lv. 4, Pal Dark Damage Enhancement Lv. 4 |
| Katress Ring (Epic) | Reduces incoming Neutral damage, boosts Dark damage |
| Lyleen Noct’s Talisman (Epic) | Raises Defense, boosts Dark damage |
| Drone Launcher (Common, 200) | Deploys drones to stack the attack buff |
| Crossbow (Epic, 448) | Loaded with Fire and Poison arrows for status effects |
The combat loop


Tip: Against bosses with a large body, position so Nightmare Bloom’s projectiles overlap the hitbox. Multiple hits land at once, which is how Selyne’s health bar drops almost instantly.
Skill swaps for Fire and flying bosses
Faleris is a Fire-type boss, so it is immune to Burn and you lose one of the two amplifiers. For those fights, drop Blast Cannon and Flame Funnel and run a mixed damage kit instead.
| Active skill | Type / Power | Use |
|---|---|---|
| Nightmare Bloom | Dark / 600 | Main burst, kept in every loadout |
| Lightning Streak | Electric / 160 | Extra chip on flying targets |
| Splash | Water / 160 | Filler damage while Nightmare Bloom cools down |
Against Faleris, focus on keeping Poison applied with the Crossbow since Burn does nothing, and fall back on Splash and Lightning Streak between Nightmare Bloom casts.

Hard Mode tower boss notes
Every Hard Mode boss gets much higher HP, added allies that cannot be caught, and new tracking AoE attacks. The build handles the damage race in each arena, but positioning still matters.
| Tower boss | Element | Fight note |
|---|---|---|
| Zoe & Grizzbolt | Electric | Stay close to interrupt casts while drones stack the buff |
| Lily & Lyleen | Grass | Fire and Poison arrows shred; out-damage the heal |
| Axel & Orserk | Dragon / Electric | Volcanic arena; dodge lightning, apply Poison and Burn |
| Marcus & Faleris | Fire (flying) | Burn is useless; use Poison plus Splash and Lightning Streak |
| Victor & Shadowbeak | Dark | Resists Dark, but amplifiers push Nightmare Bloom through; a clone spawns around 30% HP |
| Saya & Selyne | Dark | Large hitbox lets Nightmare Bloom multi-hit for fast kills |
| Bjorn & Bastigor | Ice | Highest HP pool; bring resistance accessories for survivability |
How to know the run worked
A clear registers the moment the boss’s HP bar empties inside the time limit, and the tower awards its unique cosmetic hat plus a Training Crystal. Some fights also drop rare schematics, such as the Cold-Resistant Ancient Armor Schematic 4 from Victor & Shadowbeak’s icy arena.
If damage suddenly stalls, the usual reason is a missing status effect. Re-check that both Poison and Burn are still ticking on the boss, keep drones out to hold your attack stacks, and make sure Nightmare Stare is active so the x2.5 multiplier is applied to every Nightmare Bloom. Keep those layers up and even the half-million HP walls fall inside the timer.