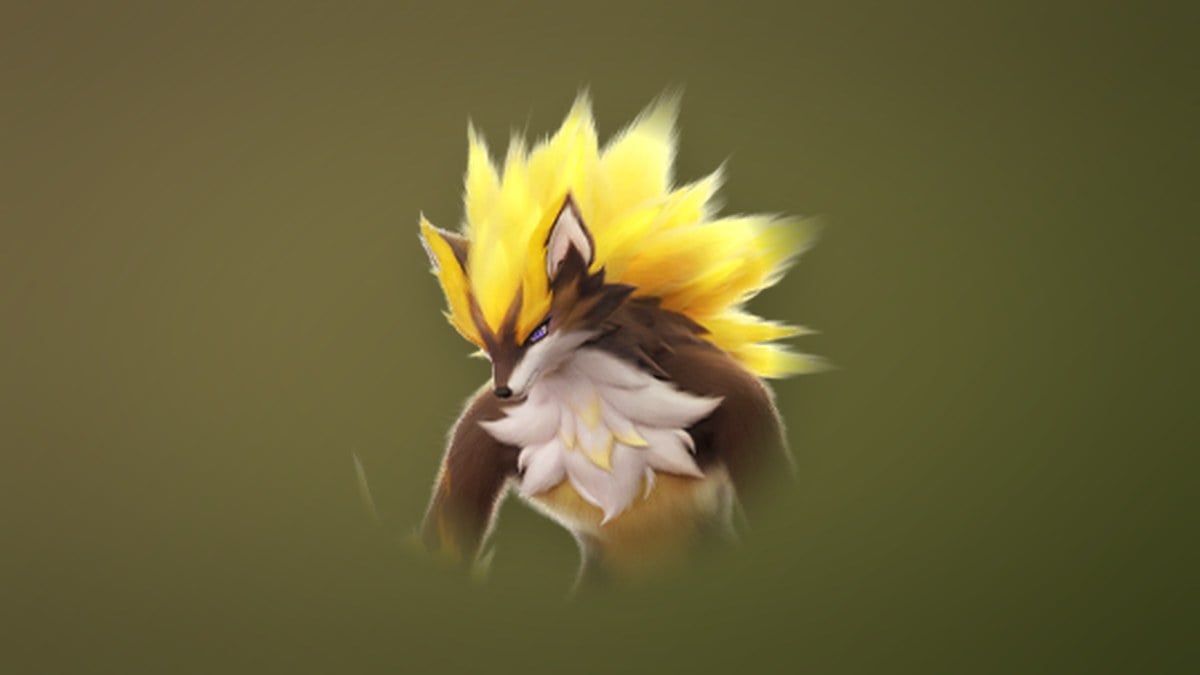
Alpha Blazen is one of the tougher overworld minibosses in the Breezy Plains, and it punishes players who try to out-trade it. It hits fast, it cycles into a state where touching it costs you health, and it resists the obvious Lightning answer. The fight is mostly about patience and timing your break window.
Quick answer: Alpha Blazen sits on top of a mountain south of Blitzwood Bloom. It is a level 30 Lightning boss weak to Ice and Earth, so dodge through its Overcharged phase and break it once it tires out.
Alpha Blazen location in Blitzwood
Head to Blitzwood in the Breezy Plains and fast travel to Blitzwood Bloom. From there, travel south and climb. Alpha Blazen holds a fixed spot at the top of a mountain, so there is no wandering spawn to chase down. The nearest transporter drops you close enough that the approach is a short climb rather than a trek.
If you wipe or want to farm it, the boss returns quickly. The respawn interval is 20 seconds, which makes repeat runs practical once you have a team that can reliably win.
Alpha Blazen level, element, and weaknesses
Bring a team at or above the boss’s level. Going in underleveled is the most common way these fights drag out long enough for the Overcharged phase to finish you.
| Detail | Value |
|---|---|
| Level | 30 |
| Region | Blitzwood, Breezy Plains |
| Species |  Blazen Blazen |
| Element | Lightning |
| Weak to | Ice (1.6×), Earth (1.6×) |
| Resists | Lightning, Wind, Light (0.625× each) |
| Neutral | Fire, Water, Grass, Dark (1×) |
| Respawn | 20 seconds |
Do not bring your best Lightning damage dealer out of habit. Lightning, Wind, and Light attacks all land at 0.625× against Alpha Blazen, which turns a short fight into a long one.
Best Aniimo to counter Alpha Blazen
Build around the 1.6× multiplier first, then fill in the roles. A good squad has a super-effective damage dealer, a Breaker to crack the boss while it is exhausted, and a healer for the stretches where you are stuck dodging.
| Aniimo | Element | Role | Tier |
|---|---|---|---|
 Grizbo Grizbo | Earth | DPS | S |
 Glacy Glacy | Ice | Healer | S |
 Bailite Bailite | Earth | Support | A |
 Magmarex Magmarex | Earth | Breaker | B |
 Glynsera Glynsera | Ice | DPS | B |
 Minespine Minespine | Earth | Breaker | B |
 Bouldus Bouldus | Earth | Support | B |
Grizbo is the standout pick, since it pairs the Earth multiplier with high damage output. Glacy covers both boxes at once, hitting for Ice damage while keeping the party topped up. Magmarex and Minespine are the practical Breaker choices if you want the break bar to fall fast during the boss’s recovery window.
Rotate an Aniimo out before it drops low rather than after. Losing the whole team means restarting the fight from the beginning.
Alpha Blazen attacks and the Overcharged state
Blazen’s kit leans on crit-heavy claw attacks and an unblockable dash, so chip damage arrives constantly. Its innate Lightning Flash leaps into the air, gathers electricity, and slams down on the target, and that slam is what pushes it into the Overcharged state.
| Skill | Power | EP | Effect |
|---|---|---|---|
 Lightning Cross Lightning Cross | 45 | 20 | Up to 3 hits, +50% CRIT Rate |
| Electrified Impact | 33 | 20 | Unblockable dash, restores 5 EP on crit |
| Dark Claw | 30 | 20 | Silences the target for 4s |
 Lightning Claw Lightning Claw | 20 | 20 | Three-hit combo, +50% CRIT Rate |
What Overcharged changes
Blazen’s Power Sustain trait kicks in after its skills land six critical hits. It gains a shield worth 5% of its HP, all of its skills cost 12 less EP, and the state runs for 6 seconds. In the boss fight, that translates into a period where Alpha Blazen moves much faster, damages you simply for getting close, and can fire off arena-wide lightning attacks.
The trade-off is what makes the fight winnable. Once Overcharged ends, Alpha Blazen exhausts itself and stands vulnerable. That recovery gap is your break window and your best damage window.
How to beat Alpha Blazen
How to catch Alpha Blazen after the fight
Alpha Aniimo do not work like wild encounters. You cannot weaken and catch one mid-battle, and you cannot accidentally kill it out of a catch. You have to fully defeat it first, and only then does the capture prompt appear with a limited time window.

The game hands you a free Aniipod for the attempt. Every standard Aniipod type has an extremely low chance of landing an Alpha, so use an Aniipod Ultra or a Sparkling Cube if you want a guaranteed catch.
Always throw the free Aniipod even if you expect to fail. A failed attempt still pays out the rewards. Quitting the catch screen gives you nothing, and it does not refund the 30 Primegy either.
Alpha Blazen rewards and Roar Stone drops
You know the fight registered when the first clear payout appears after the capture attempt resolves. Those rewards only land once, while Roar Stone keeps dropping on repeat kills.

| First clear reward | Amount |
|---|---|
| Safaris | 500 |
 Irisalis Petal Irisalis Petal | 1 |
| Glimmer | 50 |
| Lumin Amber: Breezy Plains | 1 |
 Roar Stone Roar Stone | 5 |
Roar Stone is the repeatable material drop, and it is the reason most players come back to this mountain. Beating Alpha Blazen is also what unlocks the Bolty evolution line. Once it is down, a Lv. 33 Bolty standing under the Blitz Tree in Blitzwood can evolve into Blazen for a cost of three Roar Stone, which means a single farming trip can cover both the unlock and the materials.