Standard equipment in Anime Expeditions gives your units flat stat bonuses that stack on top of levels, traits, and upgrades. There are 17 of these pieces, and any unit can equip them, which makes them the first real power boost most new players can control. The trick is knowing which stats actually change your damage output and which ones just look good on the stat panel.
Quick answer: Prioritize Damage and Damage Dealt first, then SPA reduction, then Range, and treat Critical stats as the lowest priority. Put Shinigami Sword, Magic Book, Three Swords From Hell, or Katana on your main carry, then reroll for the highest percentages in the Armory.

Stat priority for standard equipment
Every roll on a piece of equipment falls into one of four stat categories, and they are not worth the same amount. Damage and Damage Dealt raise your unit’s output directly, so they sit at the top. SPA reduction lowers Seconds Per Attack, meaning your unit attacks faster and applies status effects more often. Range only matters when the extra area lets a unit reach more of the lane or cover allies. Critical stats are the weakest because they are inconsistent and depend on the unit’s kit supporting crits.
| Priority | Stat | What it does |
|---|---|---|
| 1 | Damage / Damage Dealt | Raises total output; best on carries |
| 2 | SPA reduction | Faster attacks and more status applications |
| 3 | Range | Useful only at real placement breakpoints |
| 4 | Critical Chance / Damage | Inconsistent; needs a crit-focused kit |

All 17 standard equipment pieces ranked
The pieces are grouped from S+ down to C based on their stat spread and how consistently they help a unit’s real job. Damage-plus-SPA combinations and universal damage boosts rank highest, while pure Critical gear sits at the bottom.
S+ tier
| Equipment | Bonuses |
|---|---|
| Shinigami Sword | Critical Chance and Damage, plus 0.87% Damage per enemy in range (up to 15%) |
| Magic Book | Up to 20% Magical Damage Dealt |
| Three Swords From Hell | Up to 15% Damage (works on physical and magical units) |
| Katana | Up to 10% Physical Damage Dealt and 5% Damage |
S tier
| Equipment | Bonuses |
|---|---|
| Staff of Chaos | Up to 10% Magical Damage Dealt and 5% SPA reduction |
| Warrior’s Axe | Up to 10% Physical Damage Dealt and 5% SPA reduction |
| Kunai | Up to 10% Damage and 5% SPA reduction (physical and magical) |
| Accursed Equipment | Up to 10% SPA reduction |
| Cursed Finger | Up to 10% Damage, 5% Critical Chance, and +4% bleed DOT per bleed stack (up to 20%) |
A tier
| Equipment | Bonuses |
|---|---|
| Raid Cape | Up to 10% Damage and 5% Range |
| Magic Orb | Up to 10% Range and 5% Damage |
| Elf Suitcase | Up to 10% Magical Damage Dealt and 5% Range |
| Soul Splitter | Up to 10% Physical Damage Dealt and 5% Range |
B tier
| Equipment | Bonuses |
|---|---|
| Pirate’s Slingshot | Up to 15% Range; strong on support and crowd control units |
| Bamboo Bottle | Up to 10% Range and up to 1.81% cooldown reduction per stack (max 10) on active skill use |
C tier
| Equipment | Bonuses |
|---|---|
| Enhanced Katana | Up to 10% Critical Chance and 5% Critical Damage |
| Dragon Hilt | Up to 10% Critical Damage and 5% Critical Chance |
Pirate’s Slingshot and Bamboo Bottle land in B tier because their value is narrow. The Slingshot’s Range helps a support unit like Salmon Sorcerer cover more of the lane, and the Bottle only pays off on units that lean on active skills.

Match equipment to the unit’s damage type
A high stat number is wasted if it targets the wrong damage type. Magical Damage Dealt does nothing for a physical attacker, and a physical bonus does nothing for a mage. Before equipping, check whether the unit does physical or magical damage, then pick a piece that matches.
- Physical carries: Katana, Warrior’s Axe, or Soul Splitter.
- Magical carries: Magic Book, Staff of Chaos, or Elf Suitcase.
- Either damage type: Three Swords From Hell or Kunai, since both bonuses apply universally.
- Bleed units: Cursed Finger, which scales its bonus with each bleed stack.
Craft, reroll, and lock equipment in the Armory
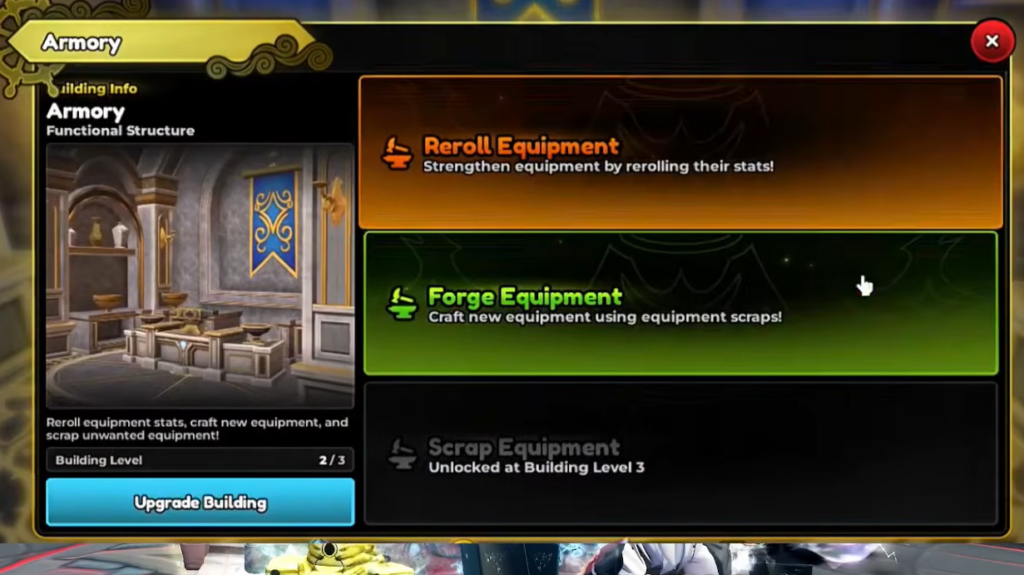
Equipment starts with random roll values, and the real optimization happens in the Armory. Higher percentages inside a stat’s range make the piece stronger, so the goal is to push each roll toward its maximum without draining your reroll resources on gear you will replace.
You know it worked when the equipment panel shows the higher percentage after a reroll, and a locked stat stays fixed while the unlocked one changes. Rerolls and locks are limited resources, so save them for pieces on units that will stay in your main team.
Common mistakes that waste equipment
Most early losses come from equipping by tier instead of by fit. A top-tier magic relic on a physical unit adds nothing, and a Range piece on a unit that already covers the lane is a dead slot. Spend rerolls only after a unit has earned a permanent spot, fill empty slots with useful pieces first, and keep Critical gear off units whose kits do not build around crits. Get the stat priority and damage-type match right, and even mid-tier equipment will carry your early roster further than a mismatched S+ piece.