
Windows 11 brings drastic changes to the user interface and functionality of the operating system, but not everyone appreciates the changes. The most noticeable changes are to the Start menu, Taskbar, File Explorer, Context menu, and Settings. Microsft added a lot of new features to Windows but also removed some of the essential features.
If you find the new user interface and design aspects jarring and annoying, you can still customize or personalize the appearance and various other elements of Windows 11 to make the experience a little more personal and exciting. With Windows 11 Personalization Settings, you can personalize the background, themes, colors, lock screen, start menu, taskbar, and more.
In this tutorial, we will walk you through the different ways of customizing the look and feel of Windows 11 to make it your own.
Change Background (Wallpaper) on Windows 11
The most common thing that people do to make their computer look different or feel personal to them is to change its wallpaper with a personal picture or some others. In Windows 11, you personalize your desktop background with a background image, a slideshow, or a solid background color. In this section, let us see how to change the background in Windows 11.
First, open Windows Settings by clicking the ‘Start’ icon or pressing the Windows button and selecting the ‘Settings’ icon. Or, you can press the Windows+I shortcut to launch the Settings app.
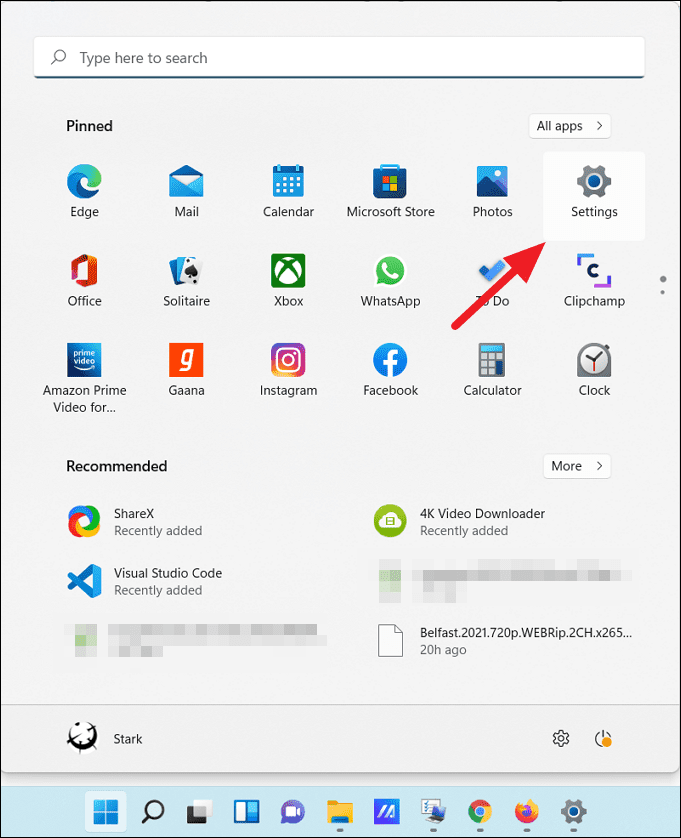
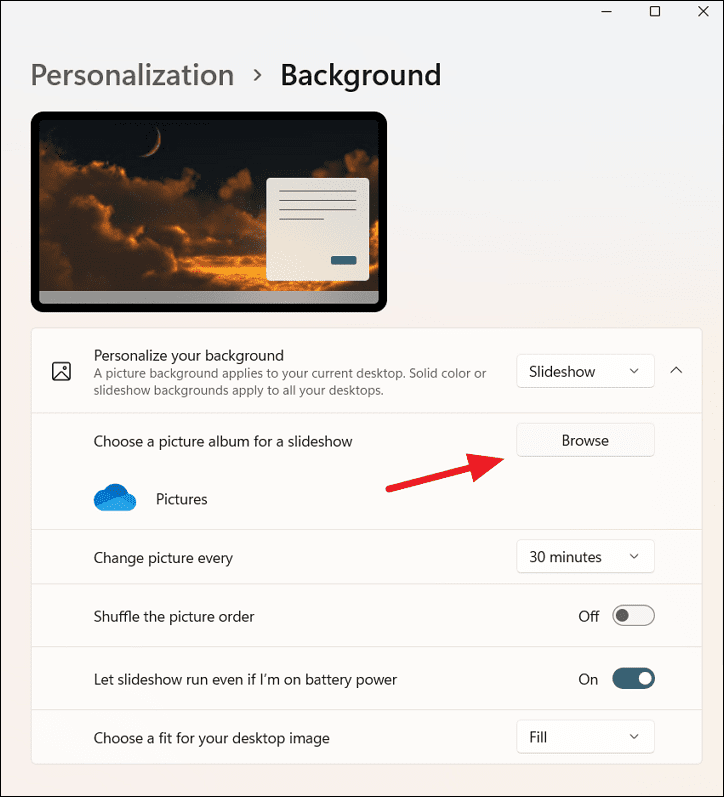
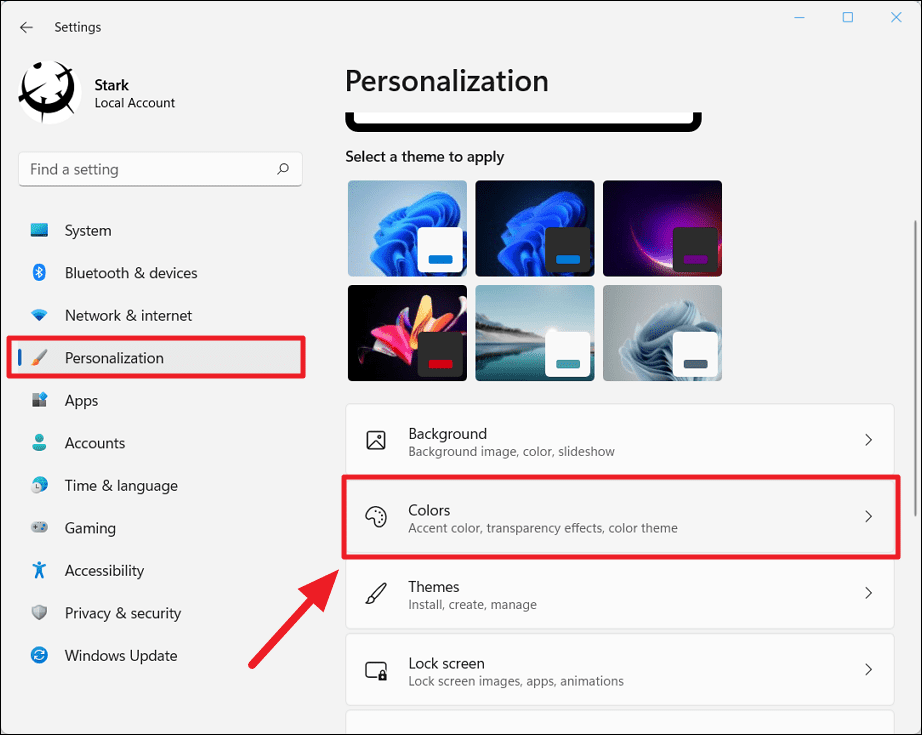
In the Settings app, go to ‘Personalization’ from the left panel and click the ‘Background’ option on the right.
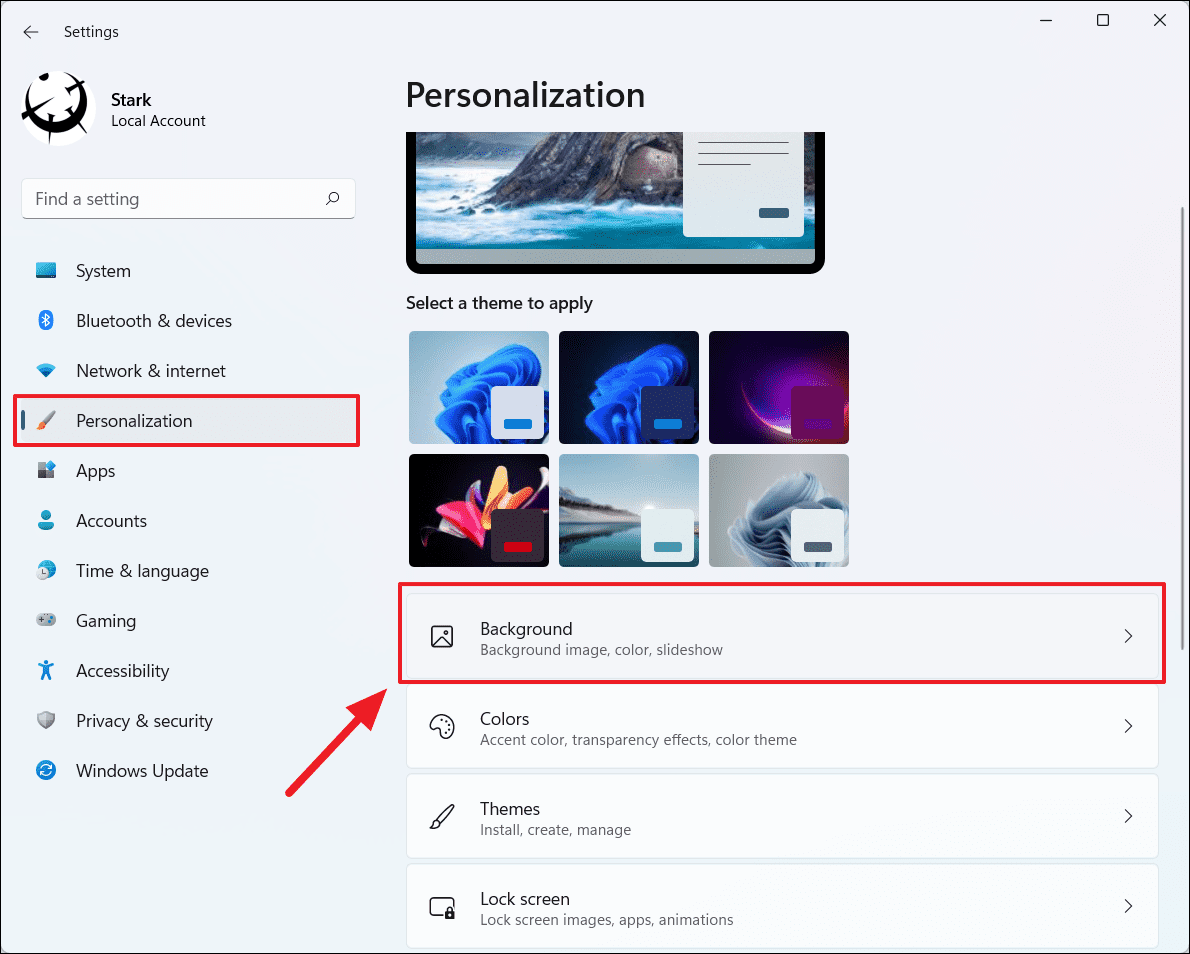
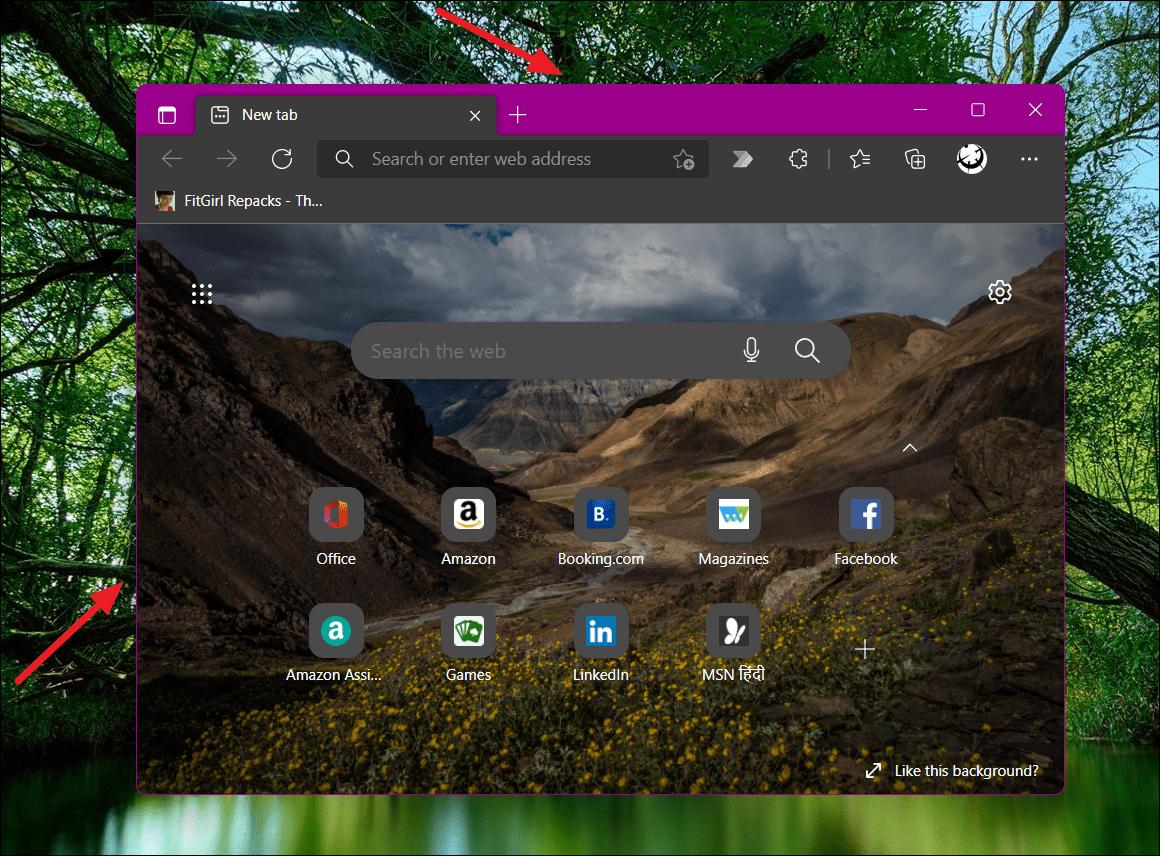
Alternatively, you can go to ‘Personalization’ settings straight from the desktop by right-clicking on the desktop and selecting the ‘Personalize’ option from the context menu.
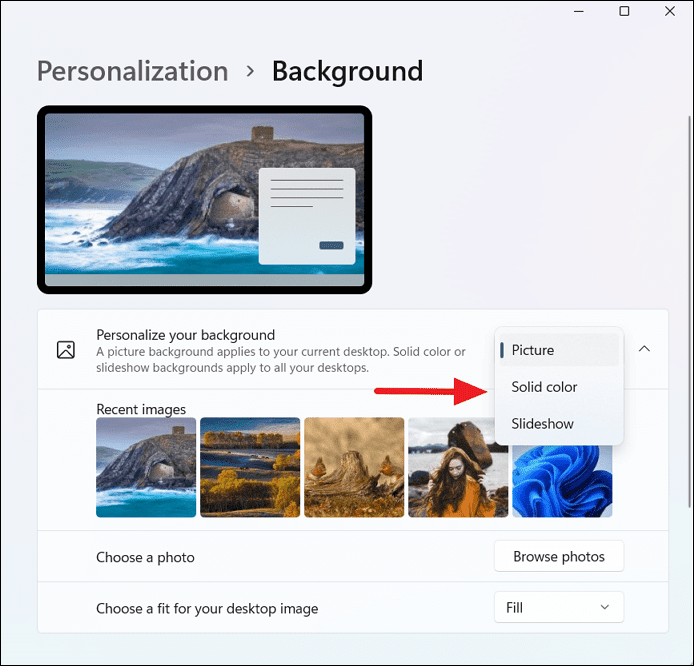
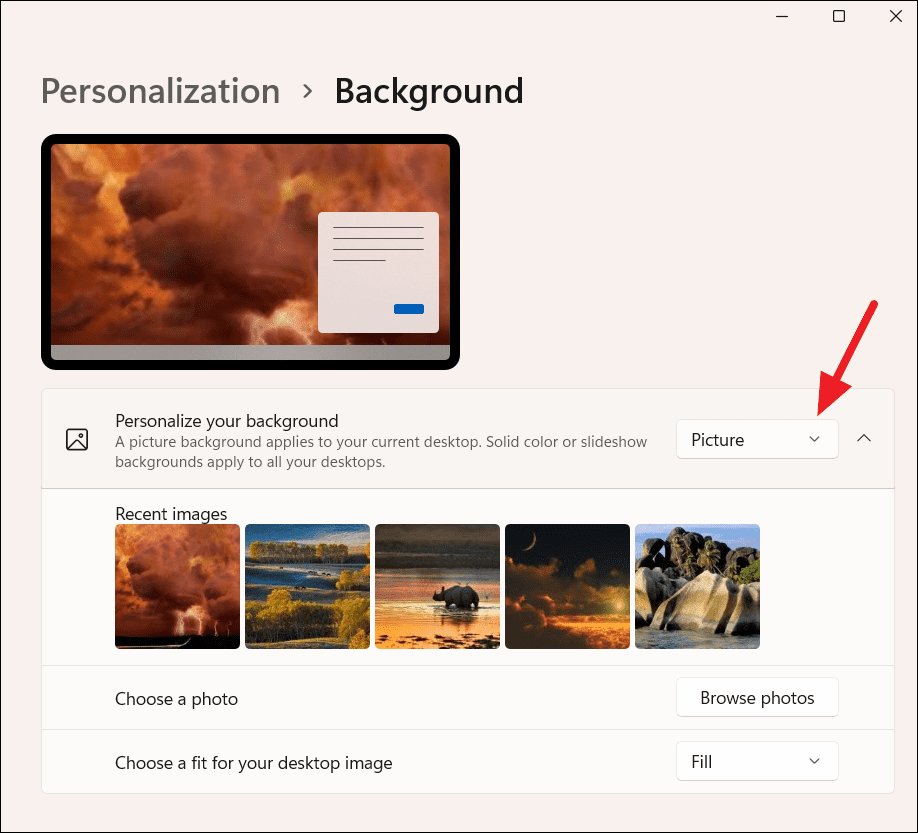
From the ‘Personalize your background’ drop-down, you can change the type of background you want to set for your desktop.
Changing Desktop Wallpaper
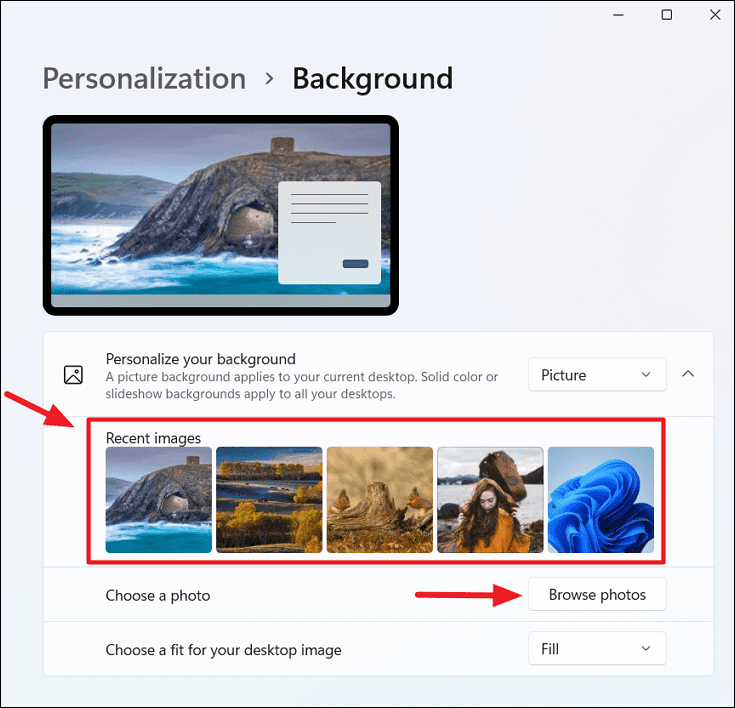
To change the desktop wallpaper/background, first, select ‘Picture’ from the ‘Personalize your background’ drop-down. Then, you can either select an available image under ‘Recent images’ or choose one of your own photos or images from the local storage.
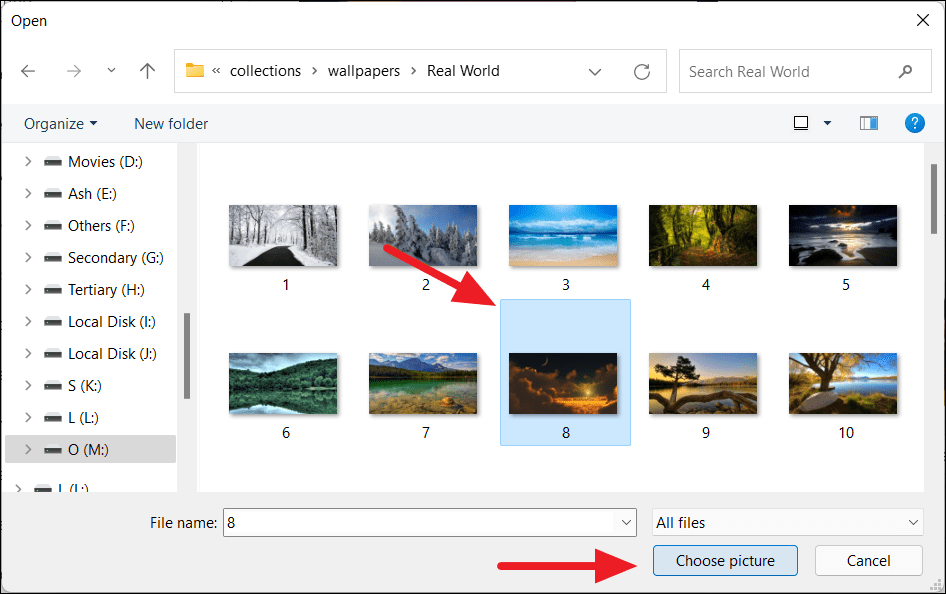
To select your picture, click the ‘Browse photos’ button next to the ‘Choose a photo’ option.
Then, navigate to the image you want to use as the desktop background and select the photo. Then, click the ‘Choose picture’ button or double-click on the image.
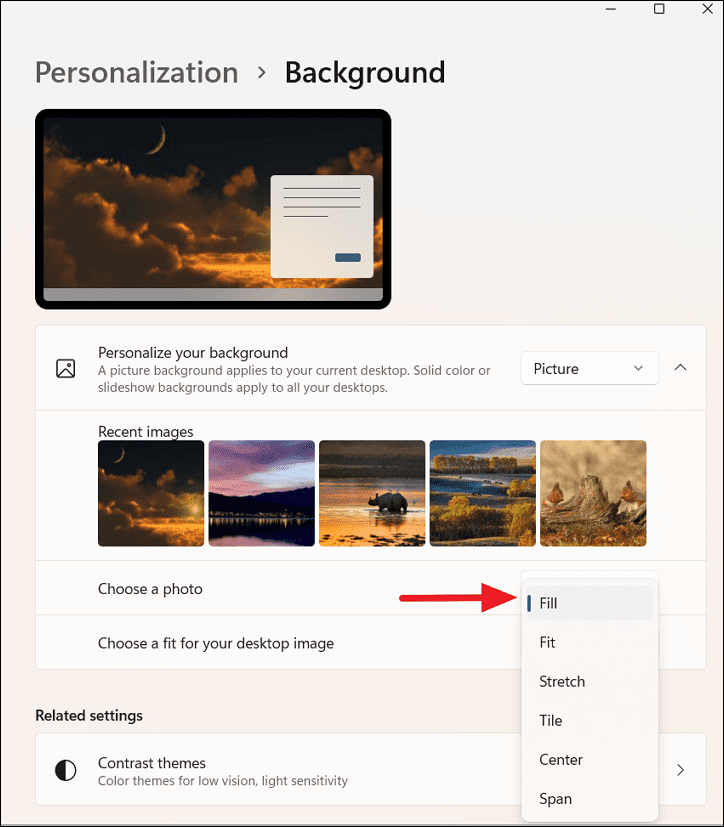
Once the image is selected, you can choose how the image covers or fits the screen. Click on the ‘Choose a fit for your desktop image’ drop-down to select a fitting for the image. If you select the ‘Fill’ option, the photo will cover the entire screen. You can select other options include Fit, Stretch, Tile, Center, and Span.
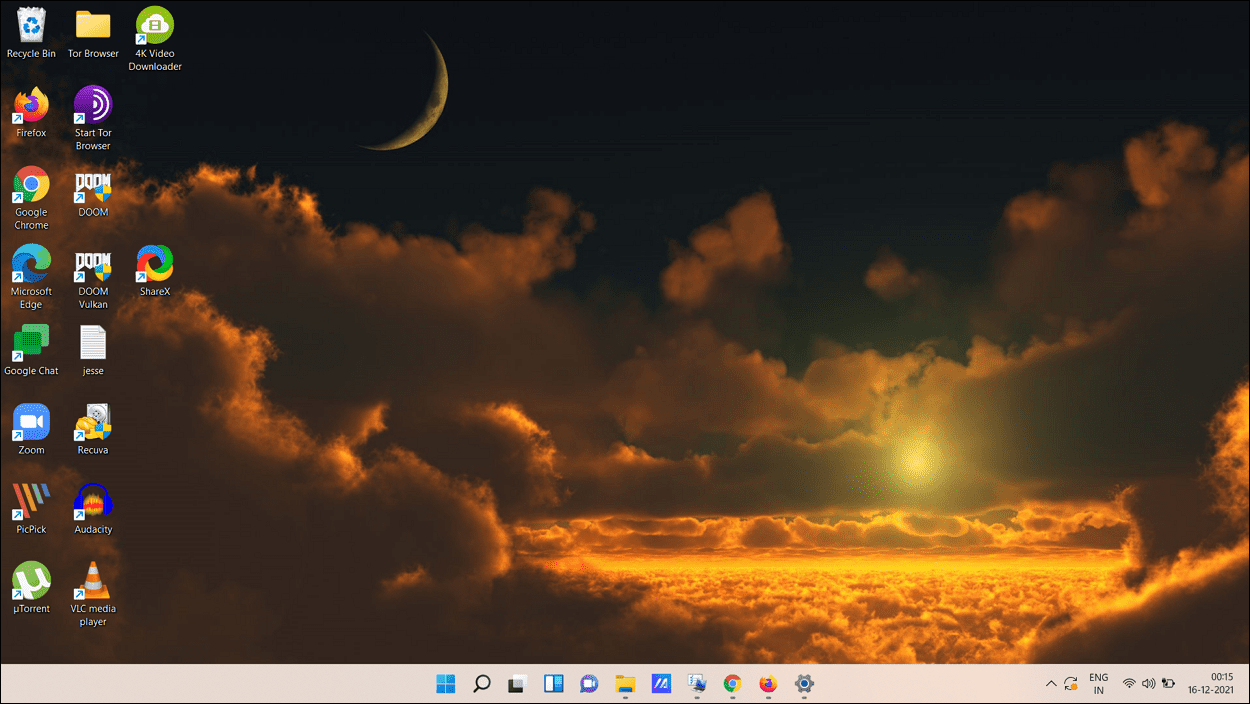
Now, the selected photo will be set as your new desktop background as shown below.
Creating a Slideshow for Background
You can set a slideshow for the background if you want your background image to change automatically. To create a slideshow on the desktop, select the ‘Slideshow’ option from the ‘Personalize your background’ drop-down. Selecting the Slideshow option will reveal a different set of options as shown below.
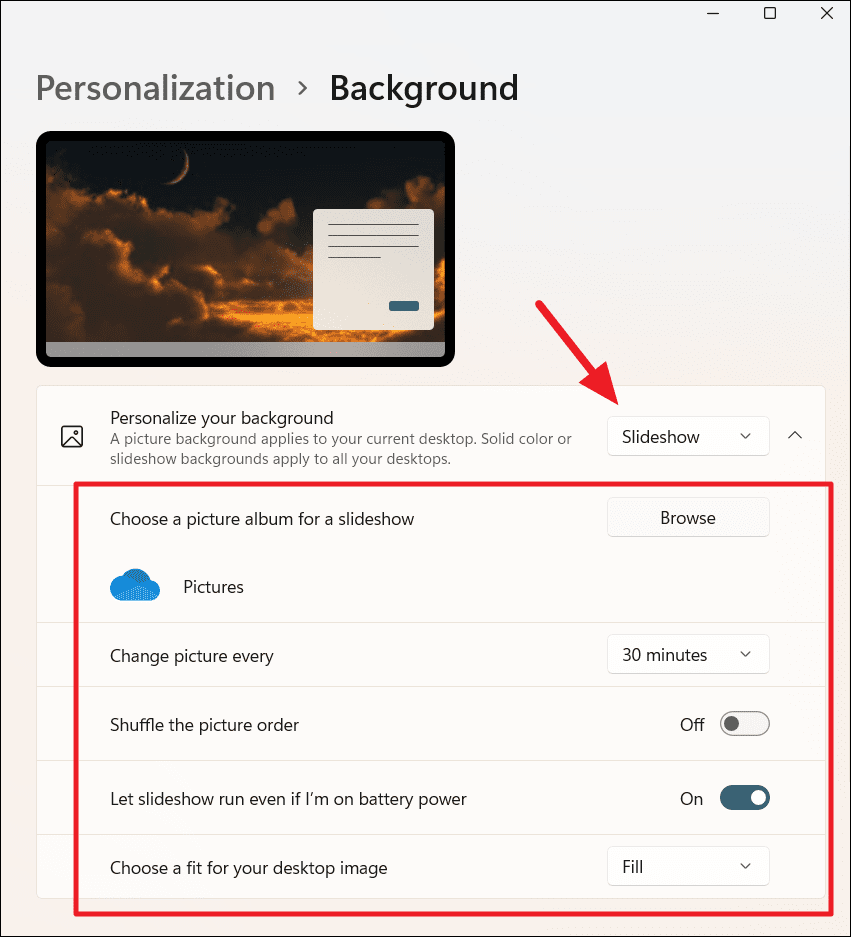
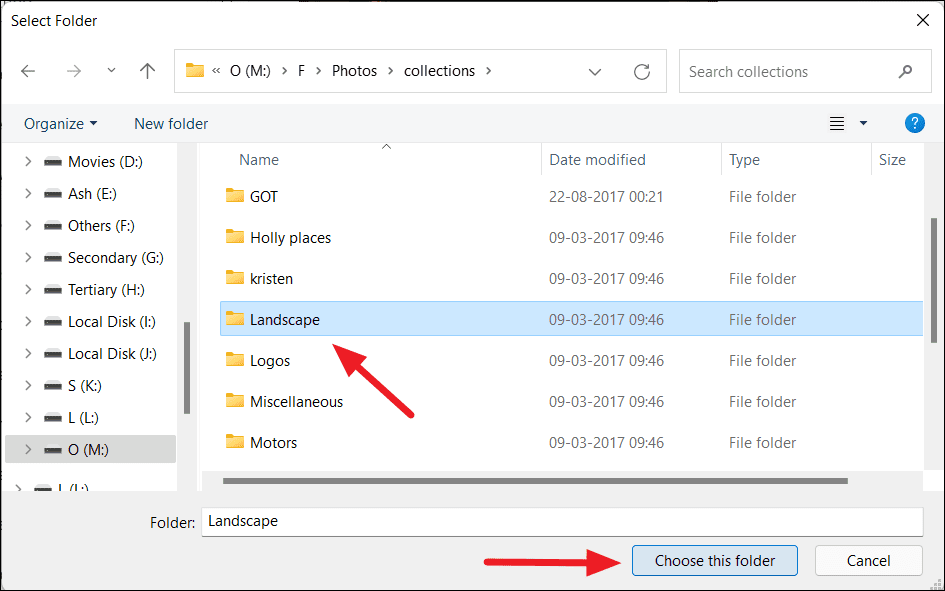
By default, the Pictures library folder is selected as the album. To choose a folder or album for the slideshow, click the ‘Browse’ button.
Then, select a specific folder with the images you wish to show on the desktop and click the ‘Choose this folder’ button.
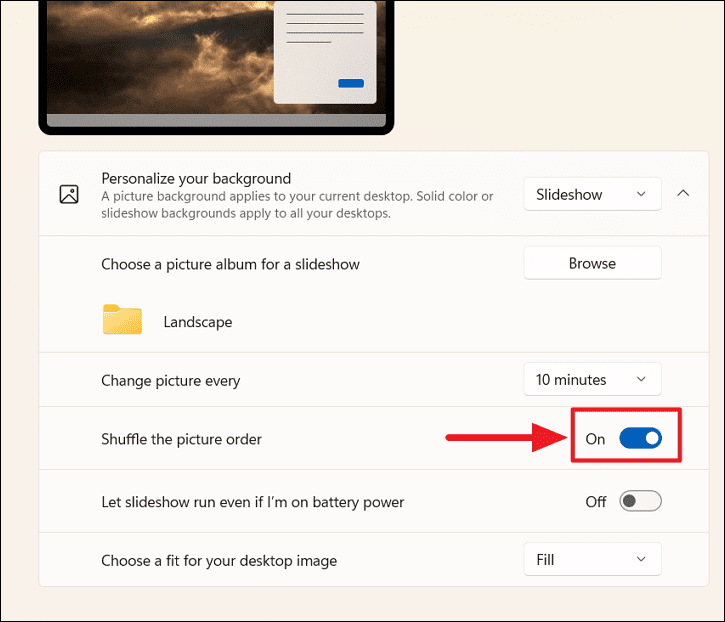
After the folder is selected, you can use the ‘Change picture every’ setting to choose how long an image should remain as your background before changing. By default, the picture will change every ’30 minutes, but you can change it to 1, 10, or 30 minutes, 1 or 6 hours, or 1 day.

You can also turn on the toggle for ‘Shuffle the picture order’ to shuffle your picture order and change the wallpaper randomly at the selected time interval.
The background slideshow consumes more energy than a picture or solid color background. But if you want the PC to keep changing the wallpaper even when you are running on battery, then turn on ‘Let slideshow run even if I’m on battery power’ settings.
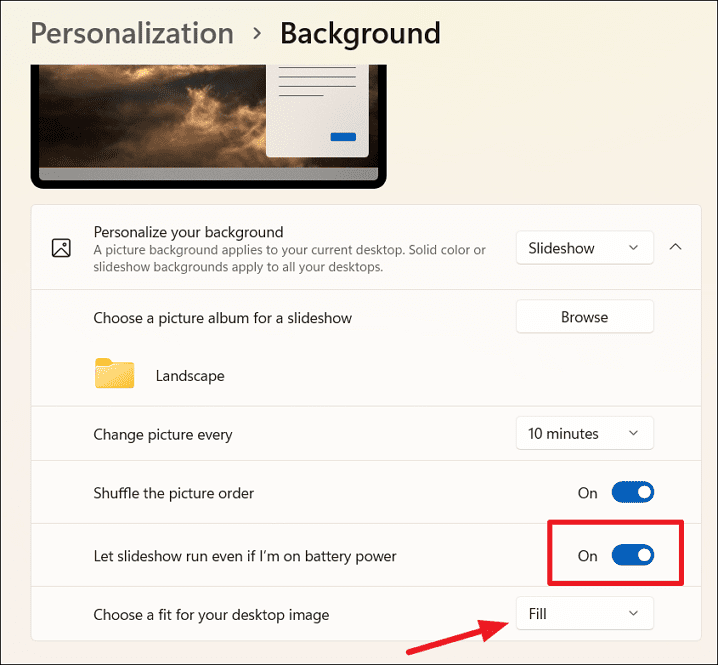
Then, select a fit type for your slideshow backgrounds from the last drop-down if you want. The same slideshow will be applied to all your desktops as backgrounds.
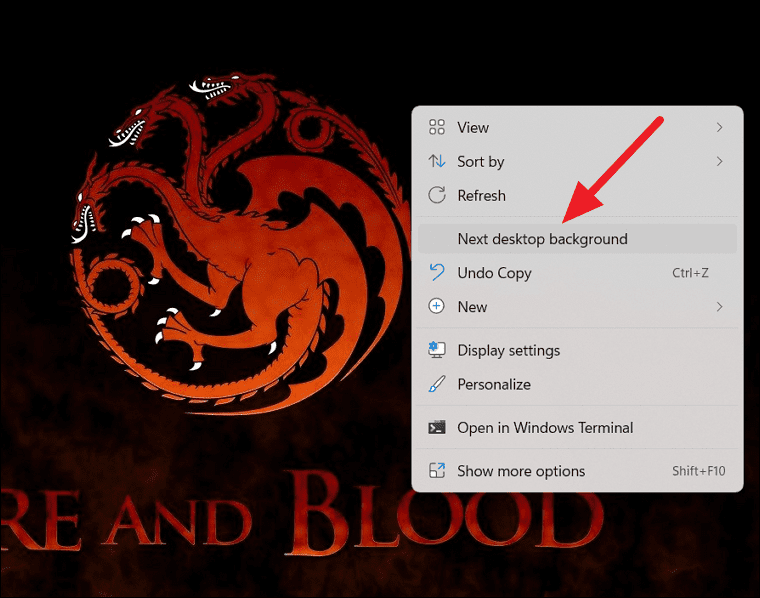
Let’s say you set your slideshow time interval to ’30 mintues’ and you are bored of the current slide on the backgrounds. You don’t need to wait the whole 30 minutes for the slide to change, you can simply right-click on the desktop and select the ‘Next desktop background’ option to quickly change the background to the next image in the slideshow.
Changing Solid Color for Background
If you’re not interested in any wallpaper for your background, you can simply set a plain solid color as your desktop background.
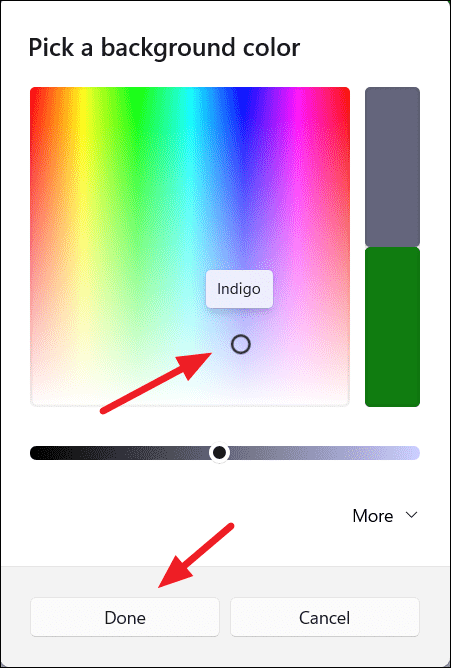
To do that, select ‘Solid color’ from the ‘Personalize your background’ drop-down and select a color you wish to set as background from the table of colors. If you wish to set a custom color as your desktop background, click the ‘View colors’ button.

Then, click a color of your choice on the color picker and select ‘Done’.
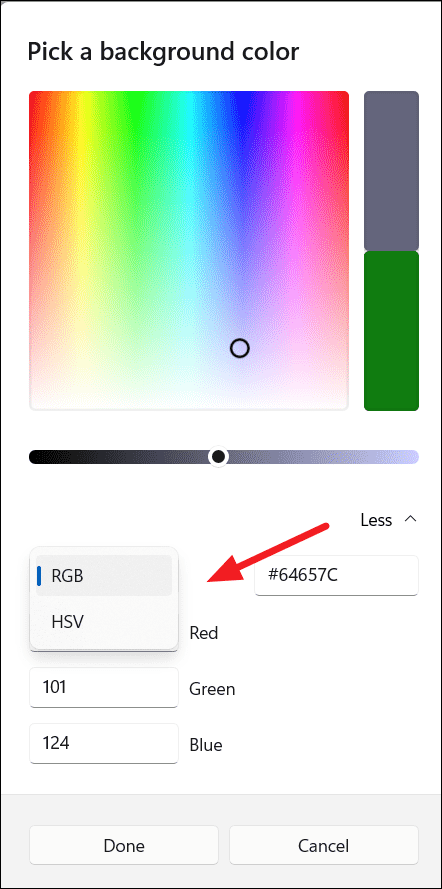
You can also click on the ‘More’ button and set custom ‘RGB’ or ‘HSV’ color values to get the required color.
Setting Different Wallpaper for Each Desktop on Windows 11
Windows 11 enables you to create separate virtual desktops which allow you to multitask efficiently. If you change your background on the current desktop while using multiple desktops, the background will only apply to the current desktop. However, if you create a new virtual desktop after changing the background, the last changed background will apply to all the new desktops.
But if you change your background to a solid color or a slideshow, it will apply to all the existing desktops and new desktops.
If you want to change different background wallpaper for different desktops, first, switch to the desktop you want to change the wallpaper for and open the ‘Background’ settings. Then, set the ‘Personalize your background’ setting to ‘Picture’.
Then, right-click one of the recently used pictures under the ‘Recent images’ section and you will see two options: ‘Set for all desktops’ or ‘Set for desktop’. Select ‘Set for all desktop’ to apply the selected picture as wallpaper to all desktops.
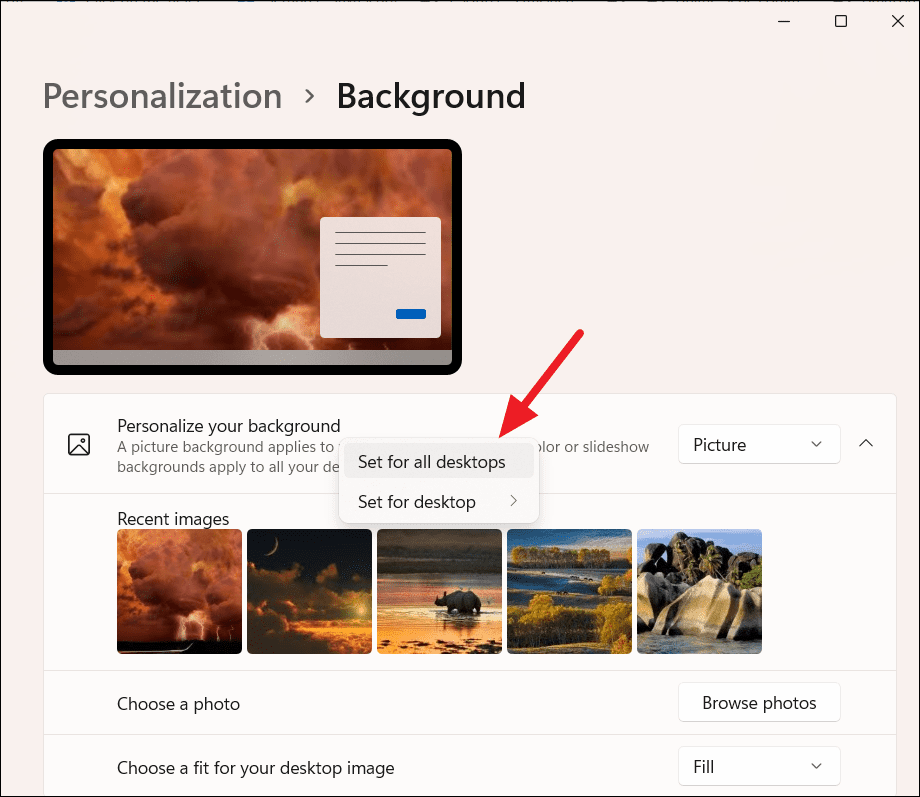
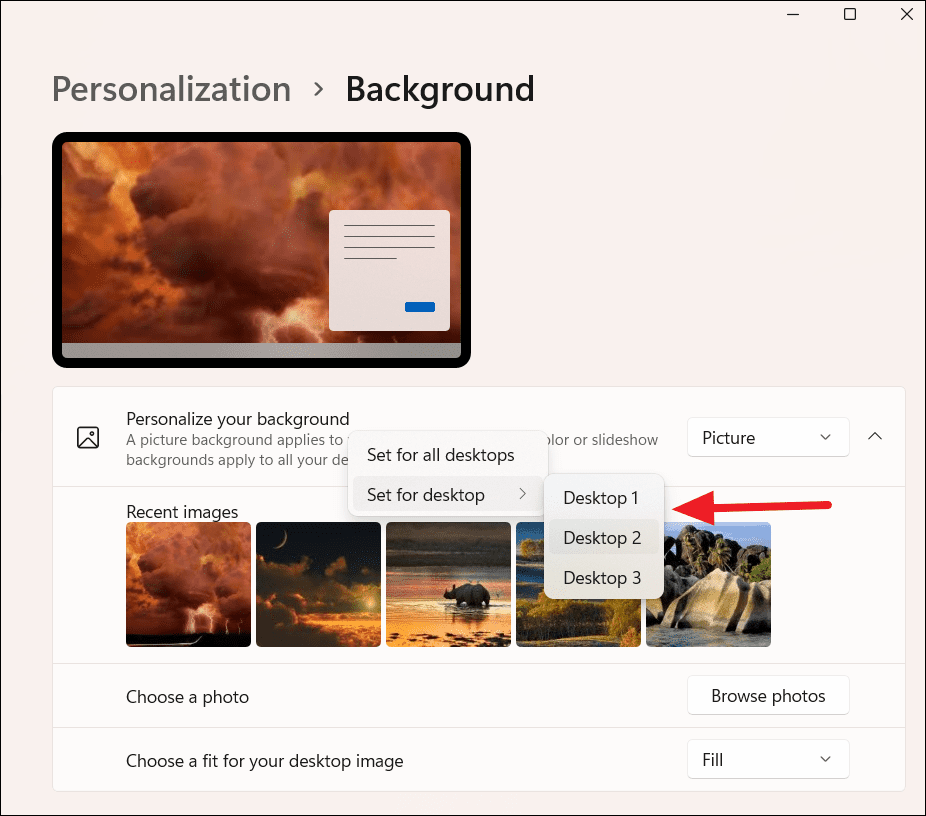
Or, hover over ‘Set for desktop’, and select the desktop (Desktop 1, 2, 3, or any other number) for which you want to set this picture as background.
If you want to set a different picture as background other than the ones under the ‘Recent images’, you can use the ‘Browse photos’ button to select a new picture from your local drive. The selected picture will be added to the Recent images. Then, use that image to set backgrounds for the desktops.
You can also hover over or left-click the ‘virtual desktop’ (Task View) icon on the taskbar and right-click on the desktop for which you want to change the background, and then select ‘Choose background’.
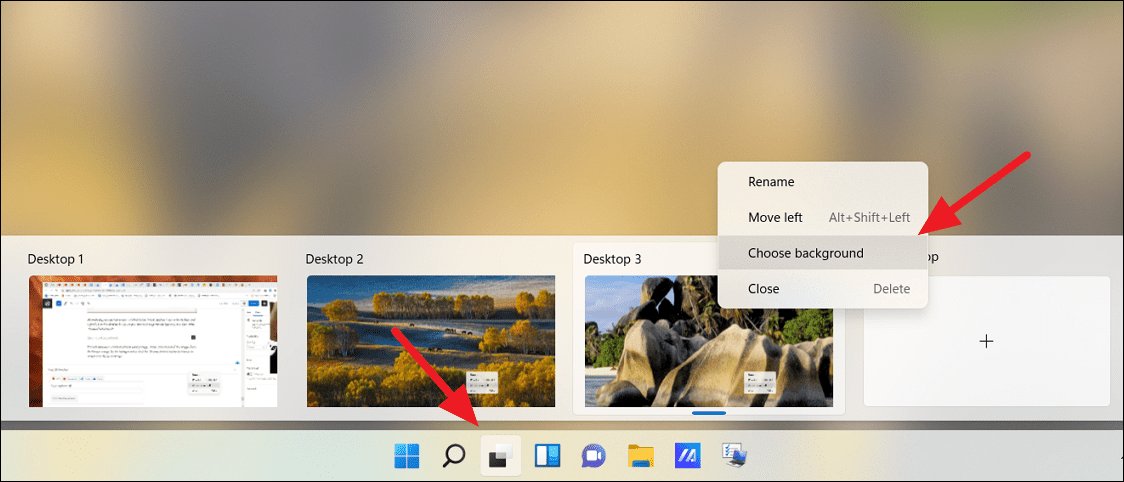
This will open up the Background settings page. There, choose one of the images from the Recent images for the background or click the ‘Browse photos’ button to select an image from your local drive.
In the same way, you can set a different background image for each monitor if you have multiple monitors connected to your system.
Changing Wallpaper from File Explorer
The easiest and quickest way to change wallpaper in Windows 11 is to directly set wallpaper from the file explorer.
Open the File Explorer and locate the picture you want to set as background. Then, right-click on the image and select ‘Set as desktop background’ from the context menu.
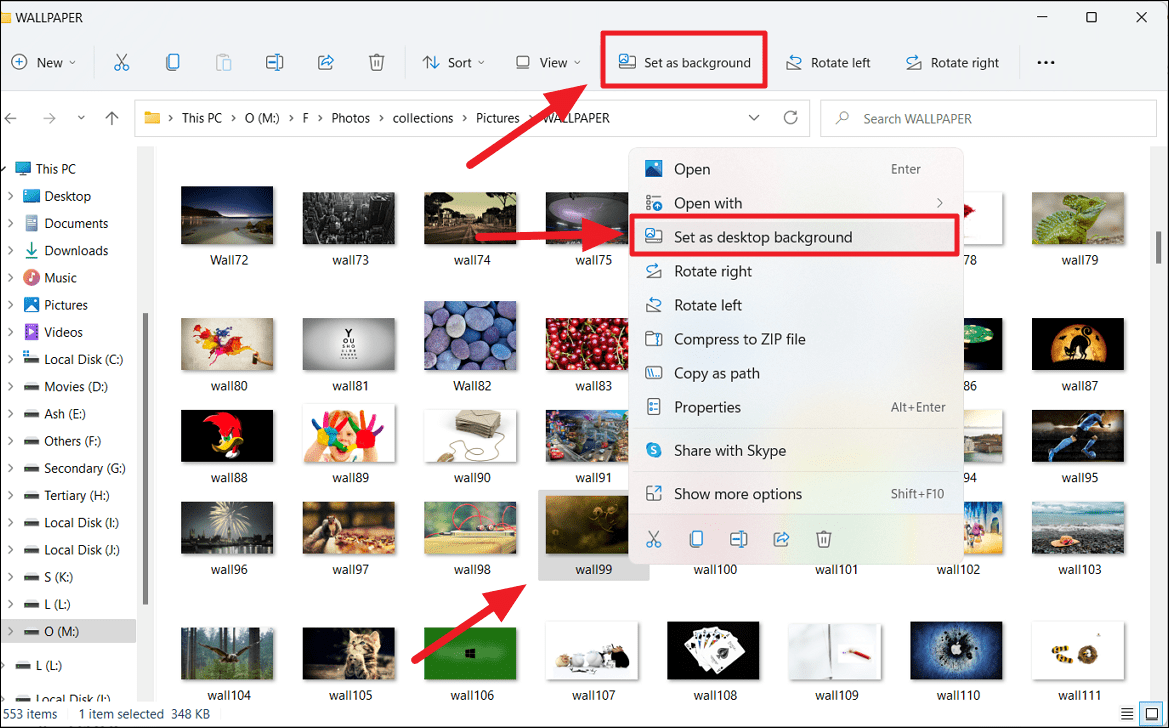
Or, you can simply select the picture and then click the ‘Set as background’ button in the toolbar at the top.
Change Colors on Windows 11
To spruce up the look and feel of your Windows 11, you can try changing lightning mode, color theme, and accent color of Windows. Windows 11 allows you to specify the dark or light mode for Windows and your apps. Changing mode will reflect on the Start menu, Taskbar, Notification Center, Quick Settings, Title bars, Borders, and Apps.
In addition to switching between light and dark modes, Windows 11 allows you to apply accent color (color scheme) across various elements of Windows including, Start menu, Taskbar, Notification Center, Quick Settings, Settings, Title bars, Borders, Buttons, Text, Settings, sign-in screen, and apps. To change the color mode, transparency effect, and accent color, follow these steps:
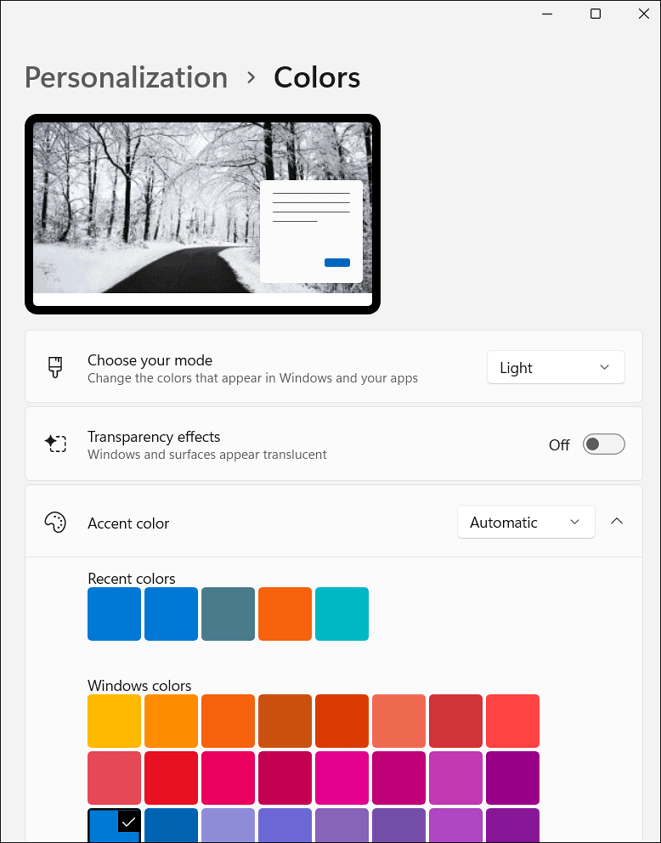
First, open Settings and Click on ‘Personalization’ on the left pane. Then, select ‘Colors’ on the right pane.
Under Colors settings, you have various options to personalize mode, accent color, and transparency effects.
Switch Between Light or Dark Color Mode in Windows 11
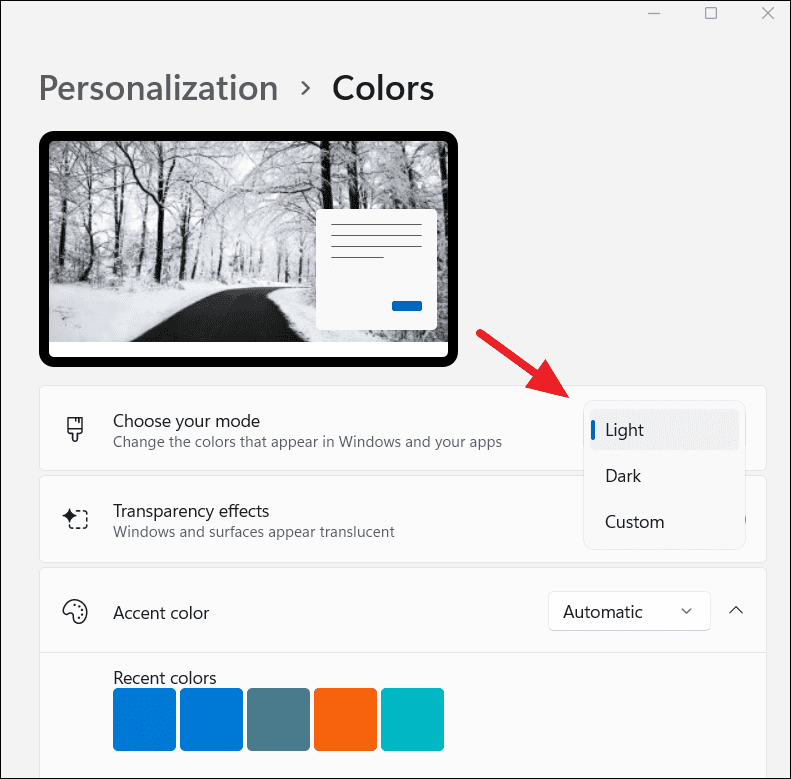
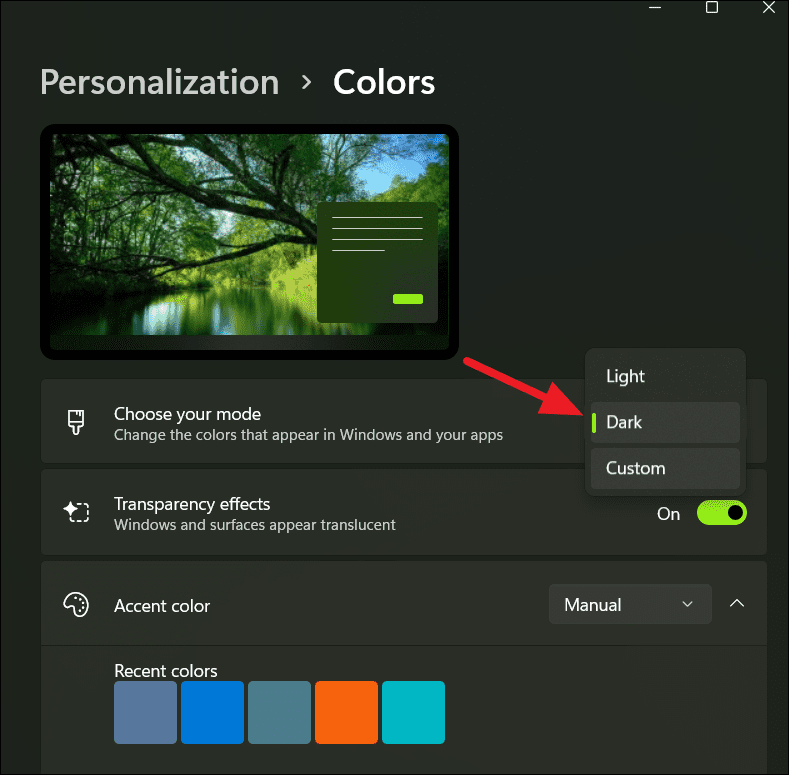
To switch between the Dark or Light mode of UI on Windows 11, first, go to the ‘Colors’ settings page. Then, click the drop-down menu next to ‘Choose your mode’ and choose between ‘Light’ and ‘Dark’ mode, or choose ‘Custom’ instead.
Selecting the ‘Dark’ mode will change various elements of Windows and app to dark grey or black as shown below.
If you select ‘Custom’ mode, you can choose one mode for Windows and another for apps from the below options. You can use the ‘Choose your default Windows mode’ option to set light or dark mode for Windows elements like Start menu, Taskbar, etc. Then use the ‘Choose your default app mode’ setting to set light or dark color mode for apps.
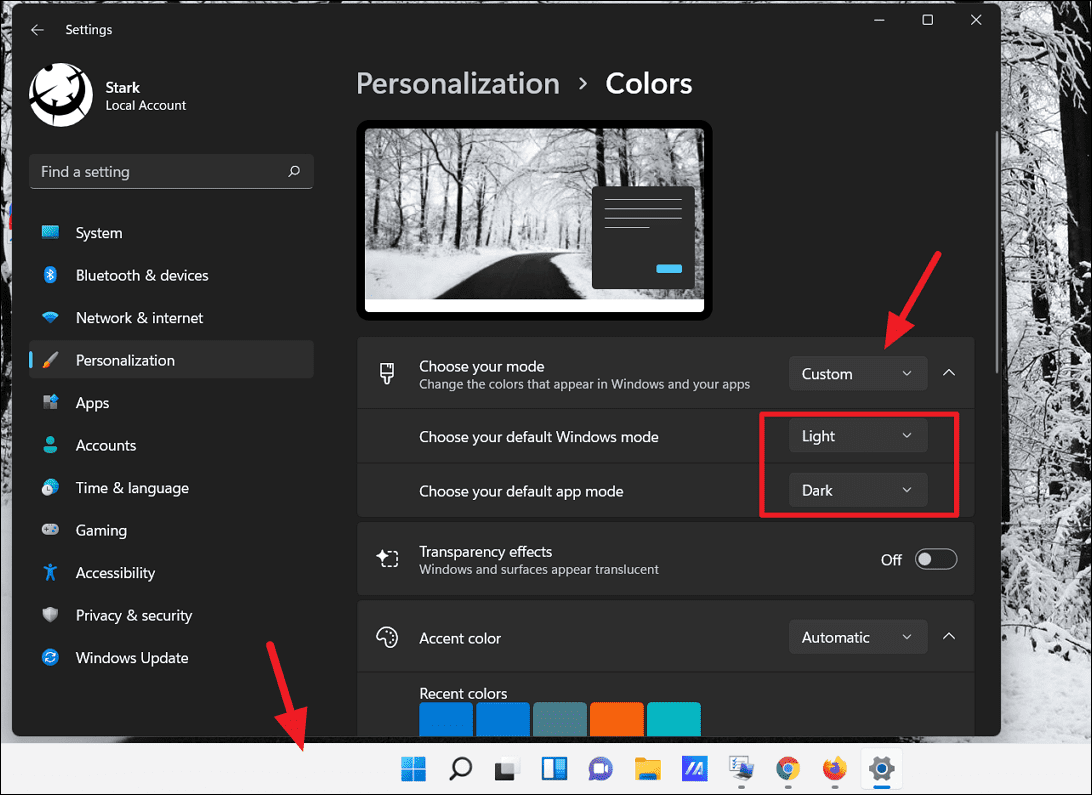
Here, we selected ‘Light’ mode for Windows and ‘Dark’ mode for apps. As you can see above the Windows element below Taskbar is white (Light) while the Settings app is black (Dark).
Turn On/Off Transparency Effects
When transparency effects is enabled, Windows 11’s elements such as the Settings app, Start menu, Notification center, Taskbar, and others appear translucent (semi-transparent). You can enable or disable the transparency effect from the ‘Colors’ settings page.
Go to the ‘Colors’ settings page under the Personalization section, then turn on or off the toggle next to ‘Transparency effects’ to enable or disable it. However, if you turn on this feature in dark mode, you will not notice much difference in the effect.
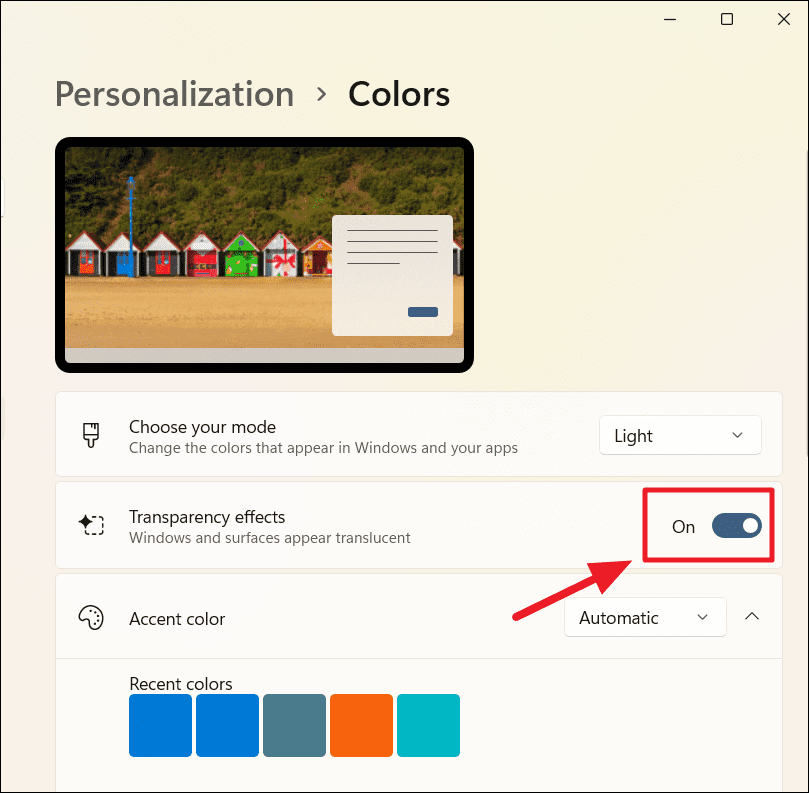
As soon as you turn on this feature, you will the difference in the Settings app itself.
Change Accent Color on Windows 11
On the same Color settings page, you can configure accent color for the Start menu, Taskbar, Title bars, and windows borders. However, the custom accent color can only be applied if your Windows mode is set to ‘Dark’.
To change color accent, either set the ‘Choose you mode’ setting to ‘Dark’ or ‘Custom’. If you selected ‘Custom’, change the ‘Choose your default Windows mode’ option to ‘Dark’.
Then, you can choose your own custom accent color or let Windows automatically select one that matches or contrasts with your wallpaper.
From, ‘Accent color’ dropdown menu, select ‘Automatic’ if you want to let Windows choose the accent color or select ‘Manual’ to choose your favorite accent color.
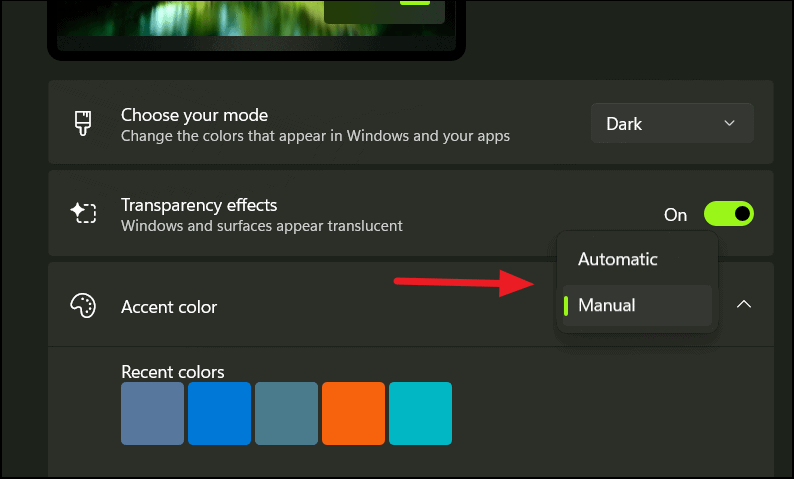
If you select ‘Manual’, you will be able to choose your favorite color from the color palette of 48 predefined colors. Or, you can set your custom color using the ‘View colors’ button.
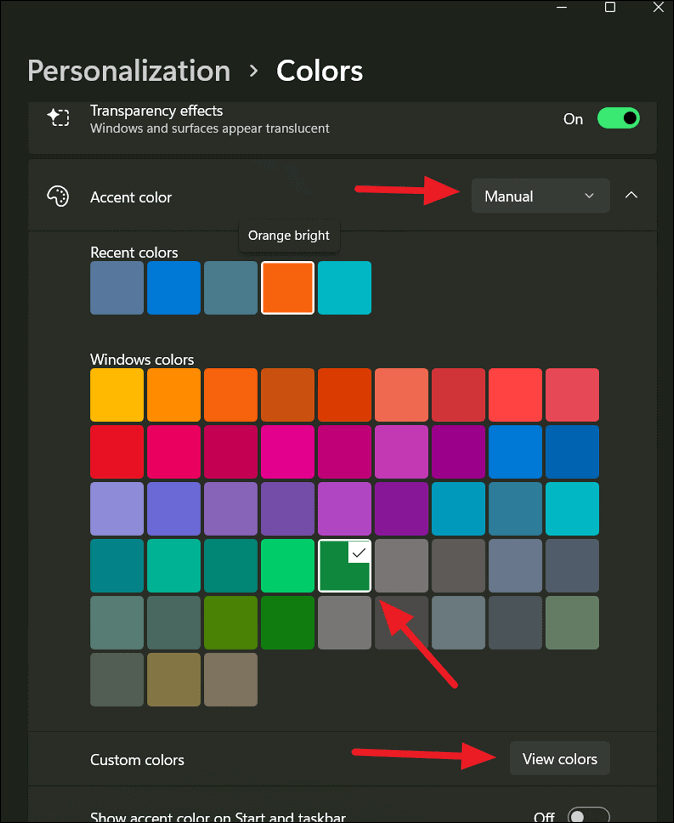
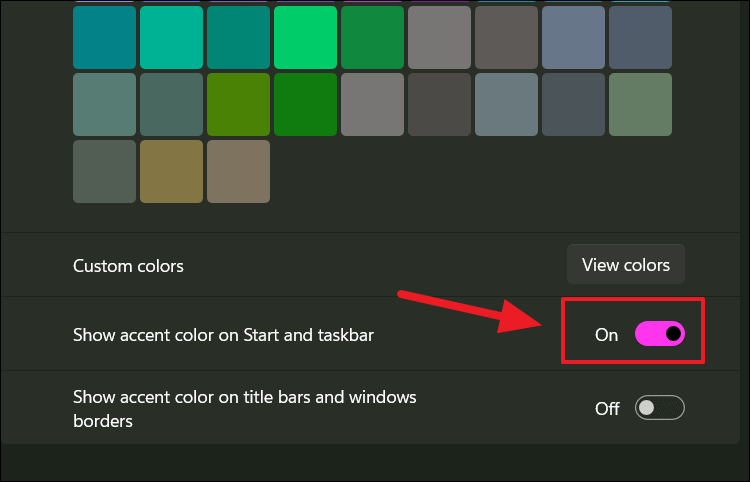
Below accent color settings, you have two more options: ‘Show accent color on Start and taskbar’ and ‘Show accent color on title bars and windows borders’
Change the Color of Start Menu, Taskbar, and Other UI
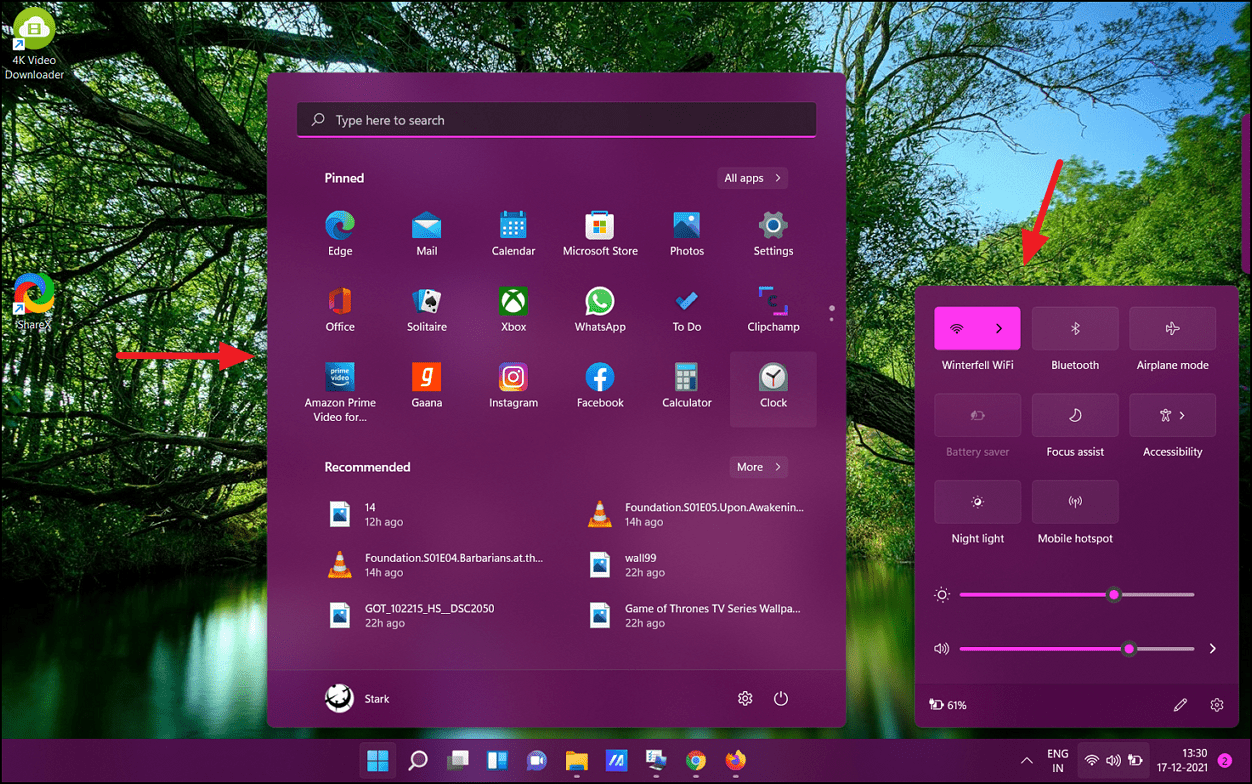
To show accent color on Start menu, Taskbar, Quick Settings, and other elements turn on the toggle for ‘Show accent color on Start and taskbar’.
As you can see below, the Start menu, Quick settings, Taskbar, buttons, and selected items are shown in the chosen accent color (Orchid). Besides these, various other elements like Notification center, Calender, text, etc. are also shown in the accent color.
Change the Color of Title bars and Borders
To show accent color for title bars and borders, turn on the toggle for the ‘Turn on the Show accent color on title bars and windows borders’ setting.
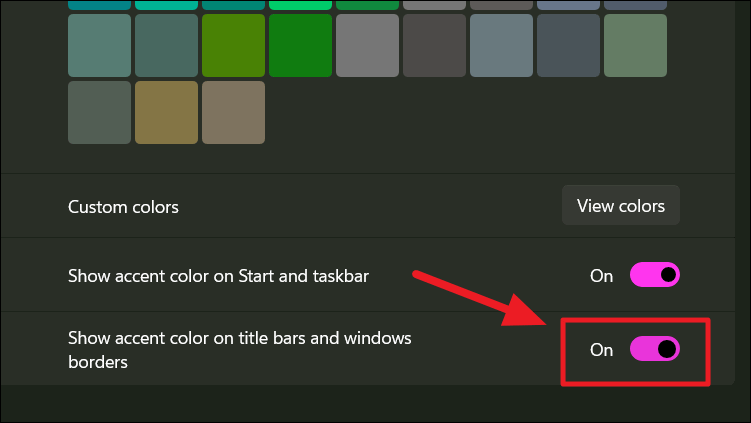
This setting will show the accent color in windows borders and title bars (except in File Explorer) as shown below.
Customize Windows 11 Lock Screen Background
The lock screen is the first screen that appears whenever you turn on or wake up or lock your PC. The lock screen appears before the sign-in screen which is where you enter your password or PIN to get into your PC. The lock screen displays time, date, network, battery, notifications, and maybe info about the Windows spotlight image on top of the wallpaper.
By default, Windows 11 lock screen is set to show Windows Spotlight images. Windows Spotlight is an option for the lock screen background that automatically downloads images from Bing and displays a different high-quality image as wallpaper on the lock screen every day. But you can also set your own background image for the Lock screen. Here’s how you do that.
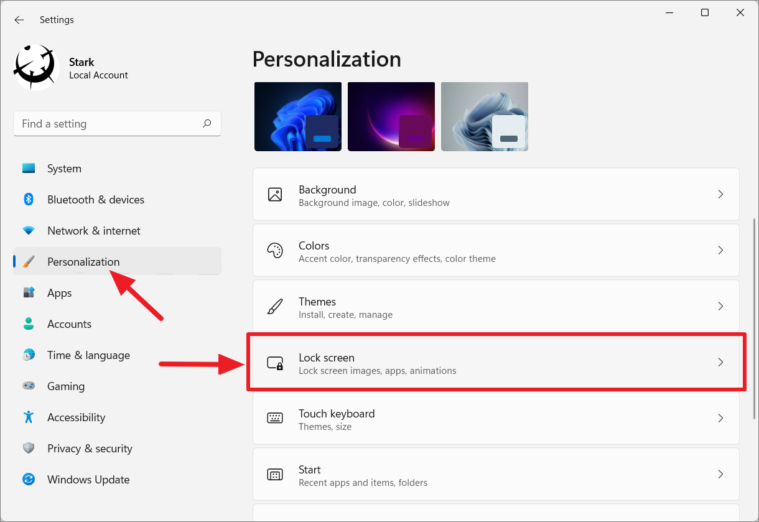
First, open Windows 11’s Settings app and go to the ‘Personalization’ section. Then, click ‘Lock screen’ settings on the right pane.
Change the Windows 11 Lockscreen
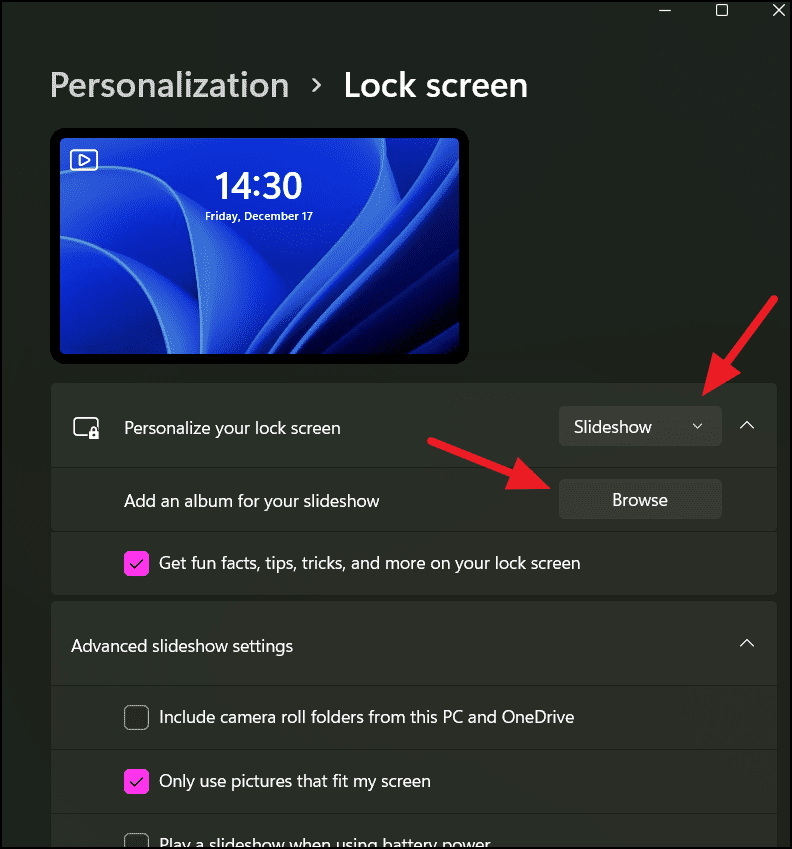
Under the Lock screen page, you will see multiple options to customize the Lock screen on Windows 11. In Windows 11, you can set your picture, Windows spotlight images, or a slideshow as your lock screen background.
To change the type of lock screen background, click the drop-down next to ‘Personalize your lock screen’ and choose one of the three options.
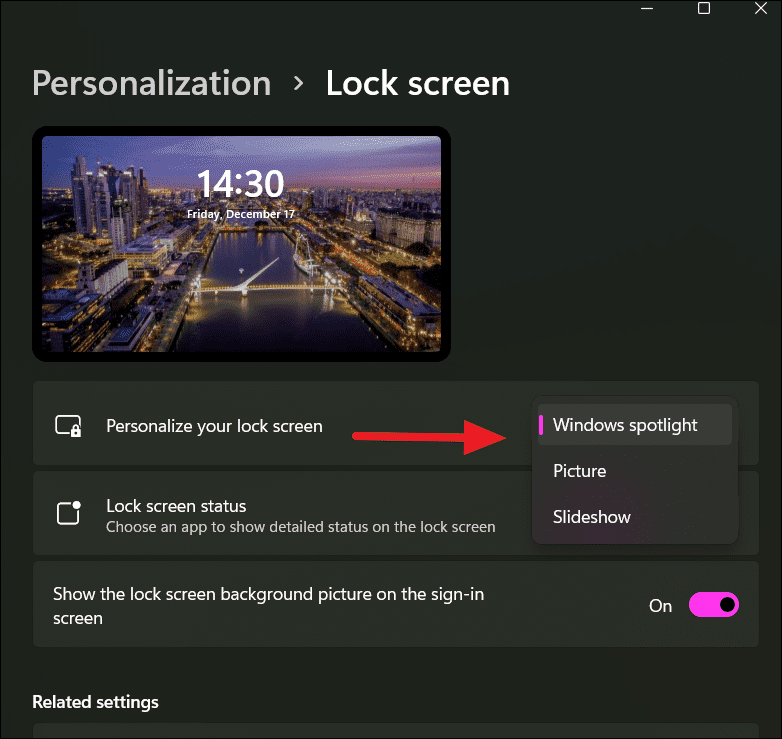
To set Windows Spotlight images as your lock screen background, click the ‘Personalize your lock screen’ drop-down and select ‘Windows spotlight’ earlier, which automatically fetches the background images of beautiful sceneries from around the globe.
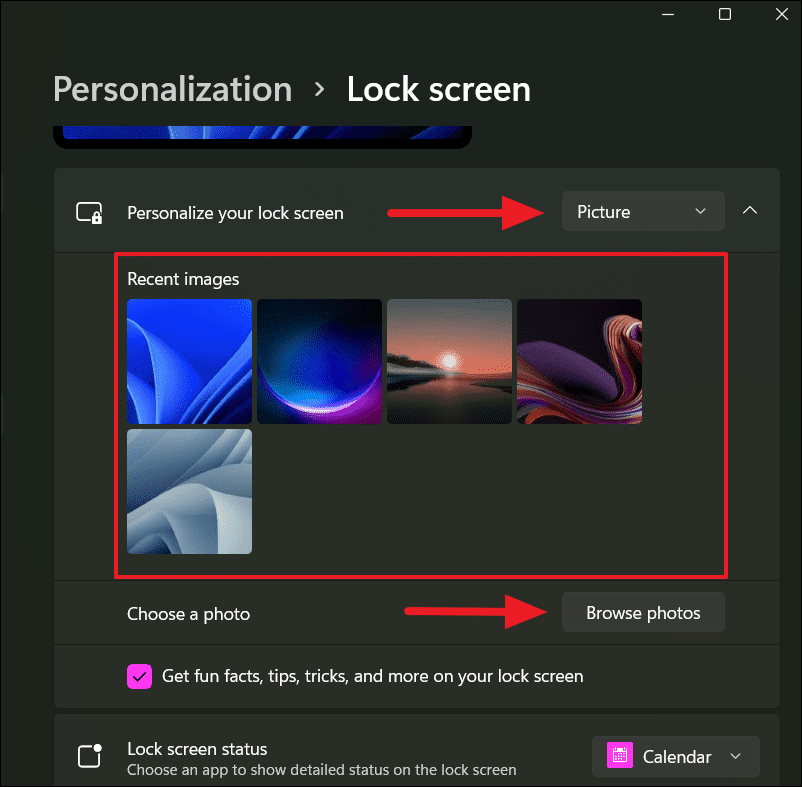
To set a custom image as your lock screen background, click the ‘Personalize your lock screen’ and select the ‘Picture’ option. Then, you can either select one of the default images under ‘Recent images’ or click the ‘Browser photos’ button and pick a picture from your computer.
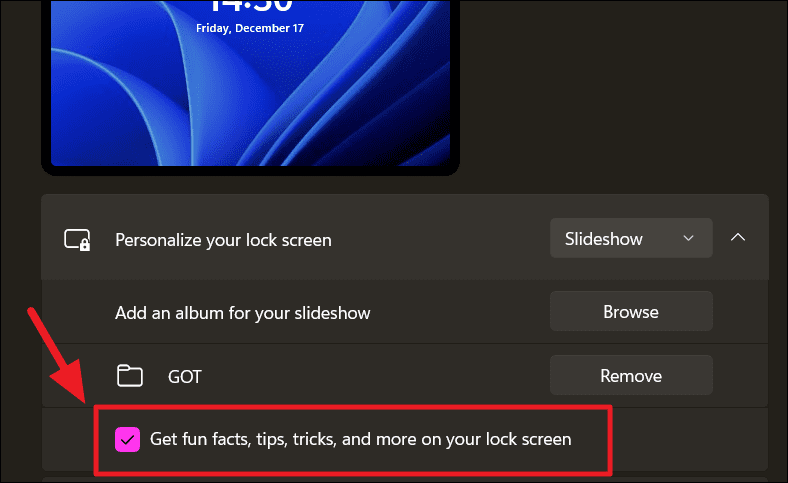
To create a slideshow for your lock screen background, click the ‘Personalize your lock screen’ and select the ‘Slideshow’ option. Then, click the ‘Browse’ button next to ‘Add an album for your slideshow’ and select a folder with pictures from which you want to rotate images as the lock screen background.
However, you cannot choose how often you want to rotate the images.
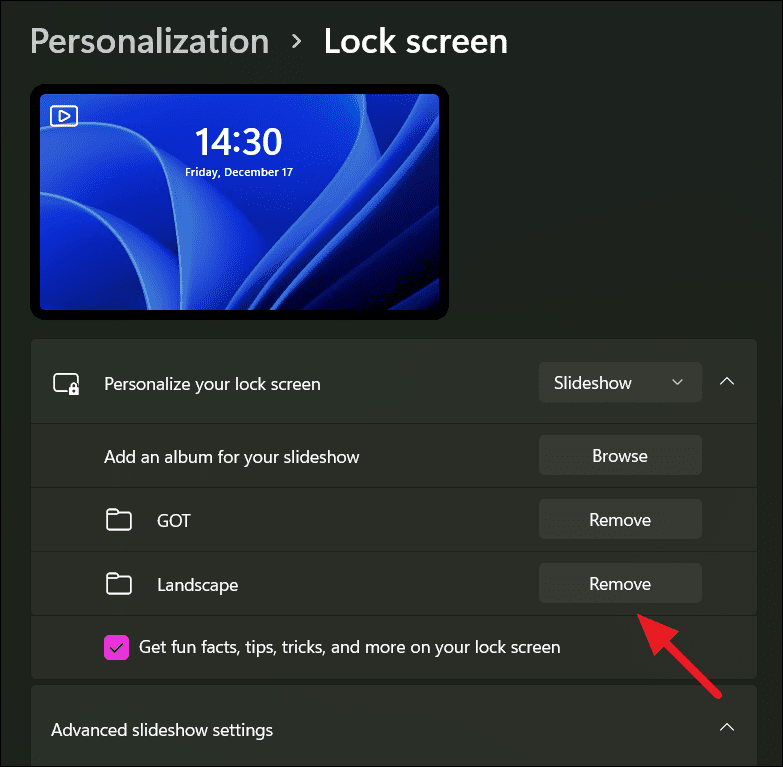
You can add multiple albums or folders for your slideshow. To remove an album, click the ‘Remove’ button.
If you select the ‘Slideshow’ option as lock screen type, you will also see ‘Advanced slideshow settings’. When you expand ‘Advanced slideshow settings’, you will see the following options which let you further customize the slideshow:
- Include camera roll folders from this PC and OneDrive
- Only use pictures that fit my screen
- Play a slideshow when using battery power
- When my PC is inactive, show the lock screen instead of turning off the screen
All of the above settings are self-explanatory. Simply check the options you want to enable.
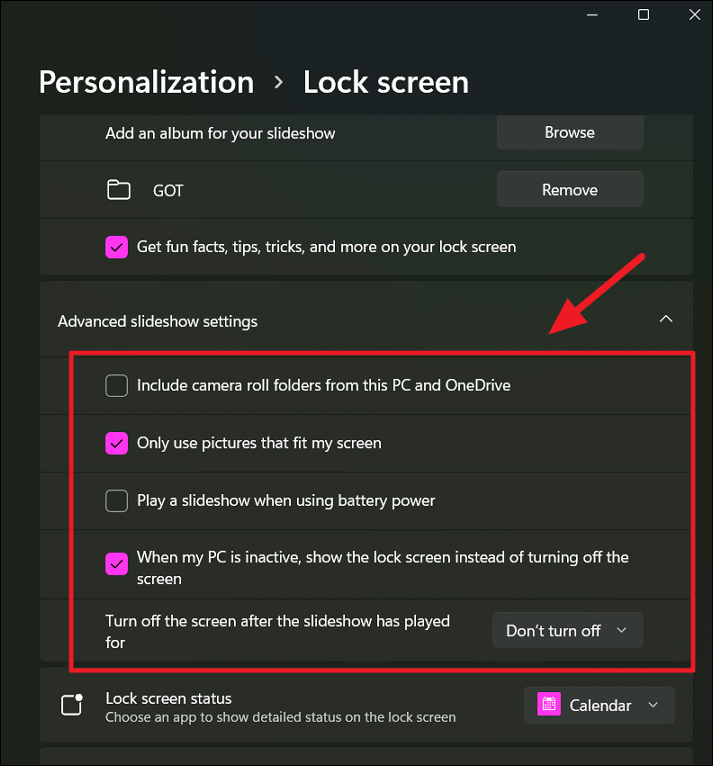
If you want to include the camera roll folder that contains your photos in the album, you can enable the first option. If you only want to use the pictures that fit your screen resolution from the folder, then check the ‘Only use pictures that fit my screen‘ option. Check the ‘Play a slideshow when using battery power‘ to run the slideshow even you are running on battery. If your PC is inactive, you can set the lock screen to show instead of turning off the screen.
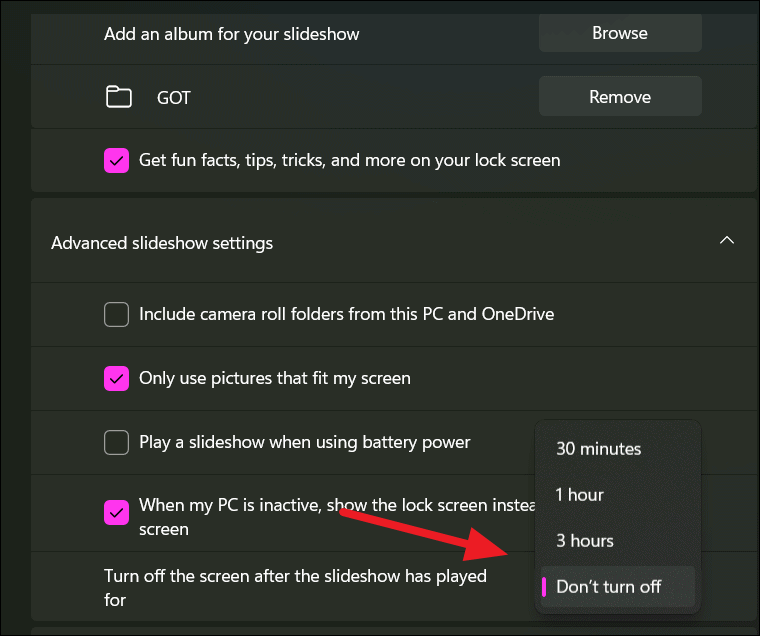
You can use the ‘Turn off the screen after the slideshow has played for’ drop-down to turn off the display after the slideshow has played for ’30 minutes’, ‘1 hour’, or ‘3 hours’. If you want to keep the slideshow playing until you turn off the PC/screen manually or log into the PC, select the ‘Don’t turn off’ option.
You can uncheck the ‘Get fun facts, tips, tricks, and more on your lock screen’ option if you don’t want to see fun facts about the spotlight images, windows tips, tricks, and more on your lock screen.
There are two more settings on the Lock screen settings page that you can use:
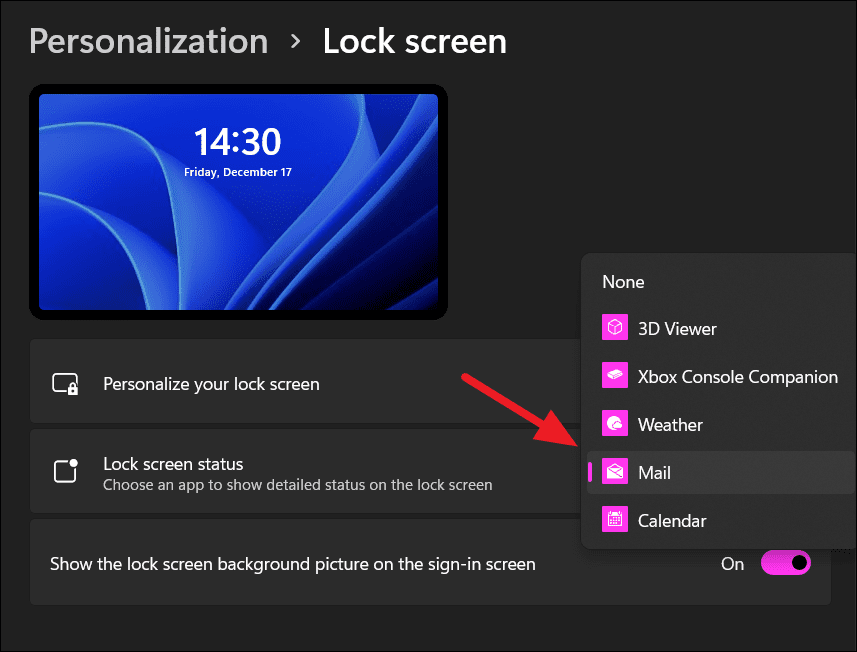
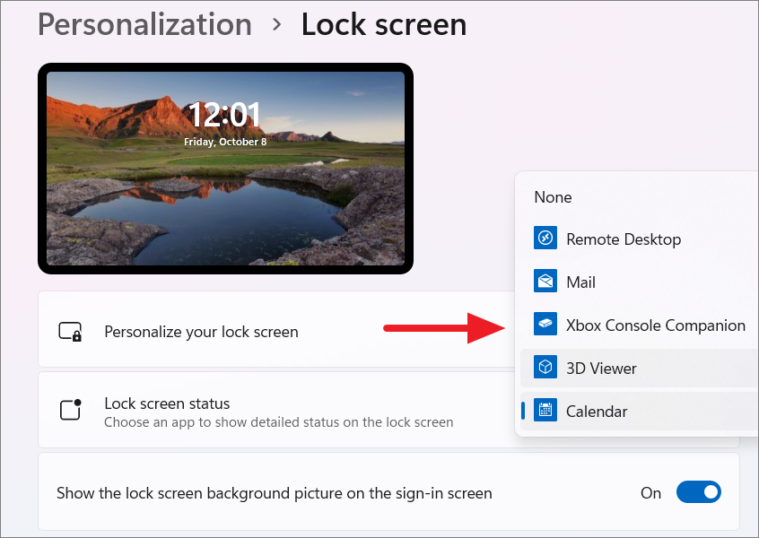
Lock screen status
Windows 11 can show notifications or detailed status of an app on the lock screen. For instance, it can display how many unread emails are in your inbox, schedules from the calendar, the weather, etc.
Click the ‘Lock screen status’ drop-down list and choose which apps you want to show details (status) on the Lock Screen. If you don’t want any notification or status on the lock screen, choose ‘None’.
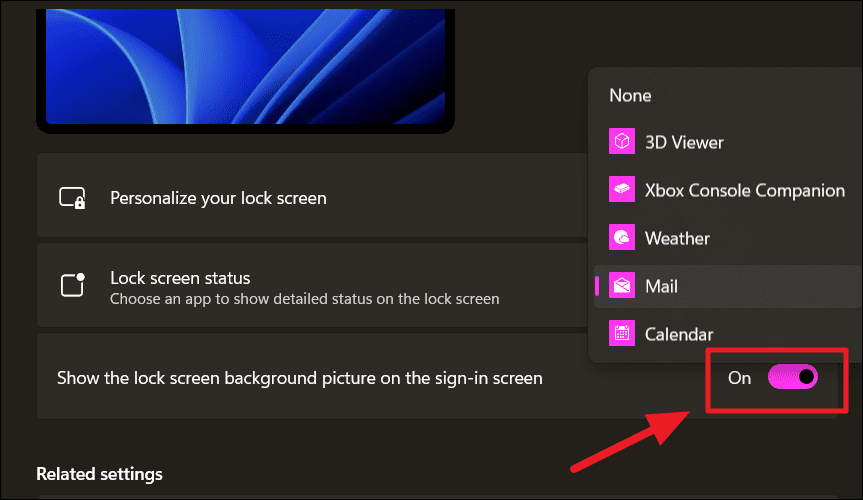
Show the lock screen background picture on the sign-in screen
When you turn on, lock, or sign out of your Windows 11 PC, it will take you to the lock screen. But only when you press a key on the keyboard, click the mouse, or swipe up on a touchscreen, it move to the sign-in screen (where you enter your password, PIN, or others).
If you want to see your lock screen background picture on the sign-in screen as well, turn on the ‘Show the lock screen background picture on the sign-in screen’ toggle.
Personalize Windows Themes on Windows 11
The most common way and easiest way to fully change the look of Windows 11 or any device is to apply a differnt theme. A theme is a collection of one or more background images, color settings, system sounds, mouse cursor style, and some other elements. Applying a theme will change the appearance and sounds of various elements of Windows 11 together at the same time.
Windows 11 allows you to customize your own theme with background image, mouse cursor, color, and sounds of your choice or pick one of the pre-designed stock themes. Or you can also download themes from the Microsoft Store (most of them are free, and others are paid).
To apply, create or manage themes, open the Settings app and go to the ‘Personalization’ section of the menu. Then, click the ‘Themes’ option on the right pane.
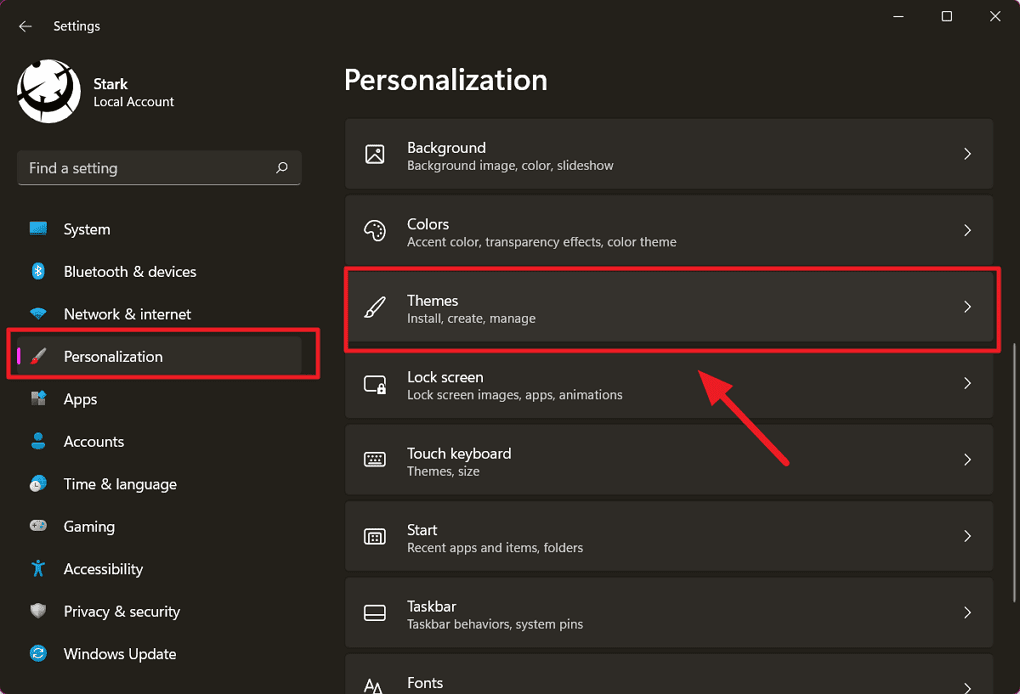
Change Themes
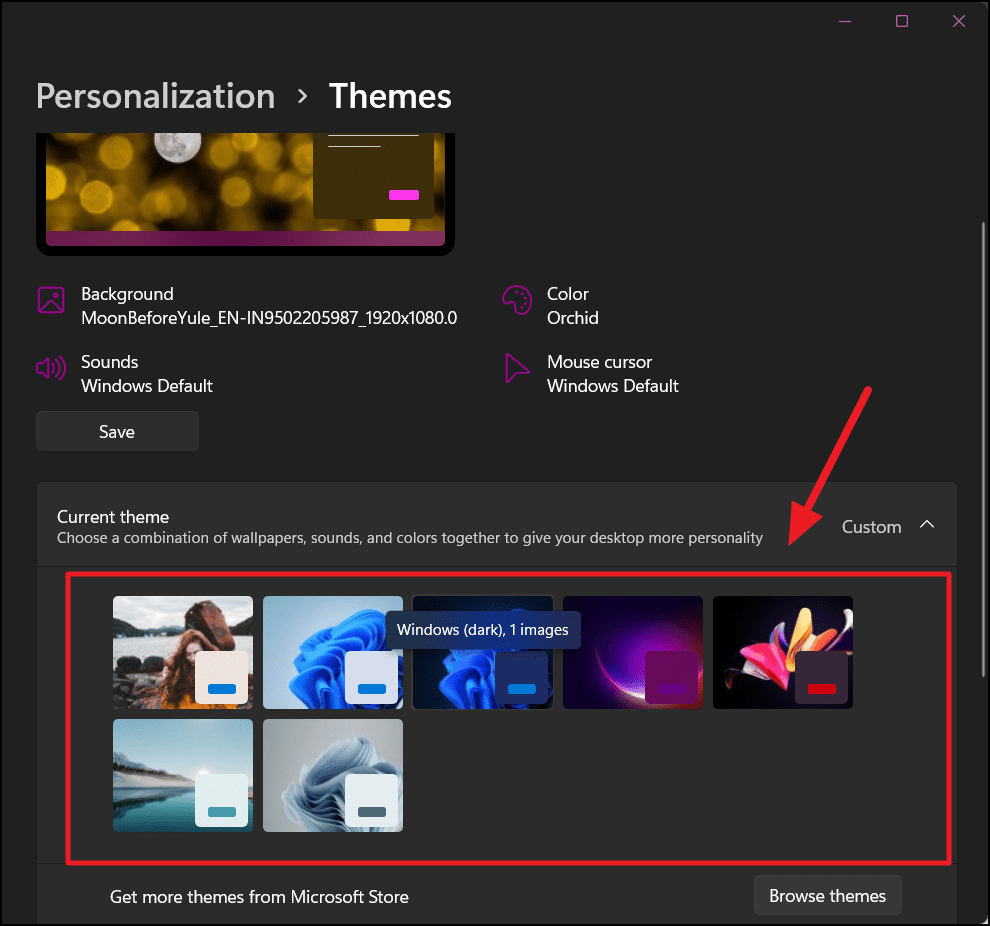
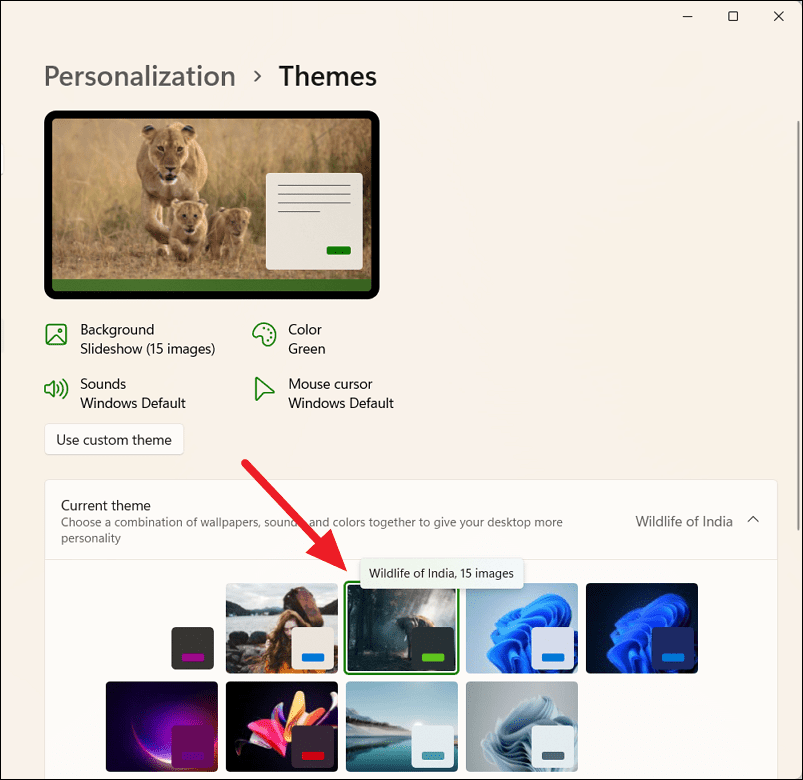
Once the Themes settings page opens, you will see a collection of preset themes under the ‘Current theme’ section. When you hover over a theme thumbnail, you see the name of the theme, mode, and how many images are in the package. Simply, click on a thumbnail to switch to the theme.
Customize Themes
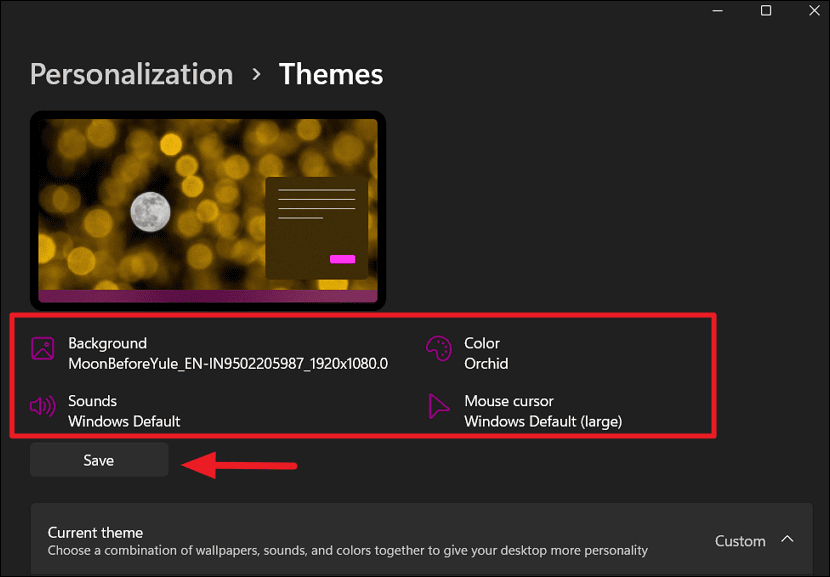
You can create your own theme with the personalization settings you have set for the background, accent color, dark or light mode, mouse cursor style, and sound.
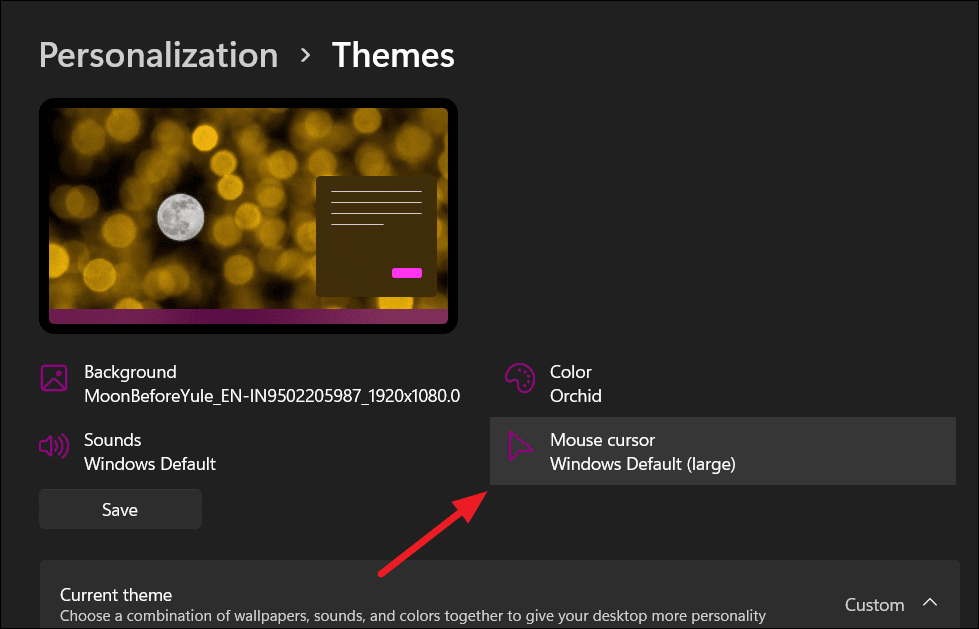
At the top of the Themes settings page, you will see the current configuration of the desktop background, accent color, mouse cursor style, and sound scheme. You can save the current personalization settings collectively as a theme by clicking the ‘Save’ button below.
If you haven’t personalized the settings yet, you can click on the quick links at the top Themes page to go to the respective settings directly and configure them.
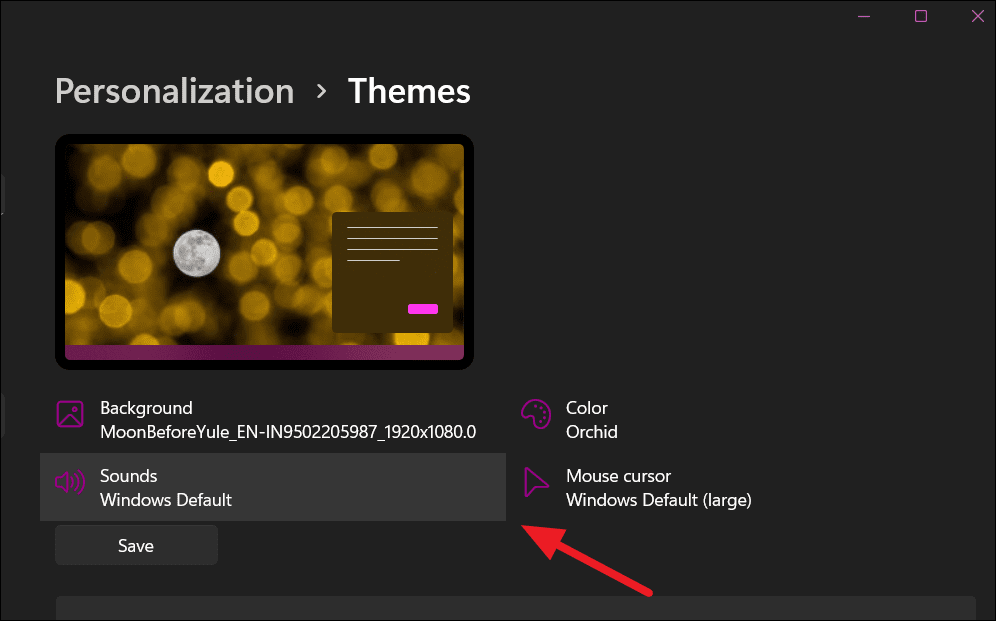
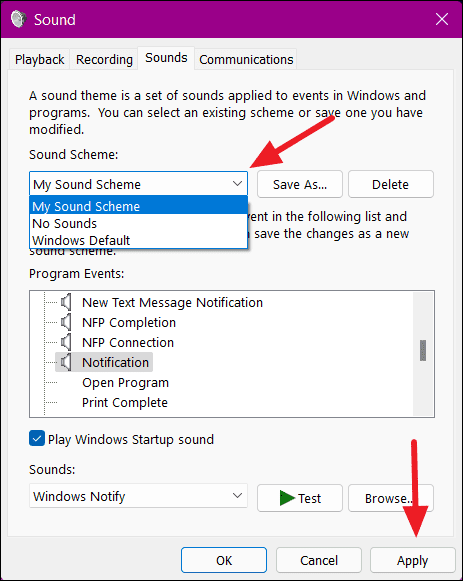
For instance, if you want to change your sound scheme, simply click the ‘Sounds’ link. It will take you to the Sounds control panel.
Here, you can set sounds for various events in Windows and programs. Select a program from the ‘Program Events’ box and choose a sound for that event from the ‘Sounds:’ If you want to set your own sound for an event, click the ‘Browse’ button to choose a sound from your local drive.
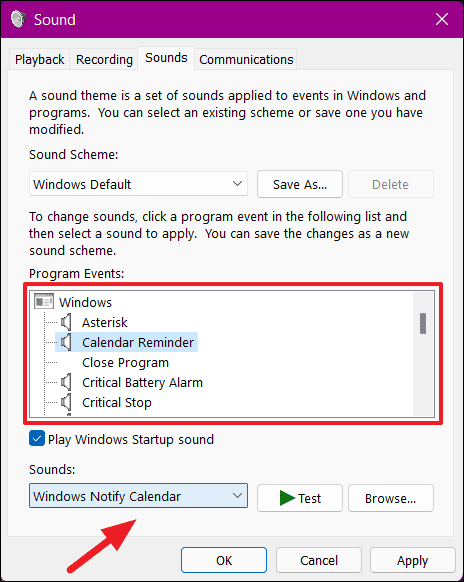
You can save the changes as a new sound scheme by clicking the ‘Save As..’ button. If you already have a saved sound scheme, choose it from the ‘Sound Scheme’ drop-down. Then, click ‘Apply’ and ‘OK’ to close.
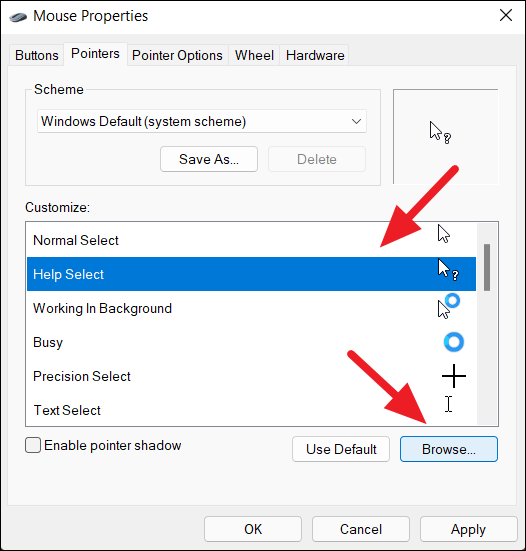
To customize the mouse pointer theme, click the ‘Mouse cursor’ link at the top of the Themes page.
In the Mouse Properties control panel, you can personalize the appearance of the mouse pointer including pointer size, color, and type.
From the ‘Scheme’ drop-down, you can use any of the built-in cursor schemes or your custom cursor scheme you want to apply to the different types of cursors.
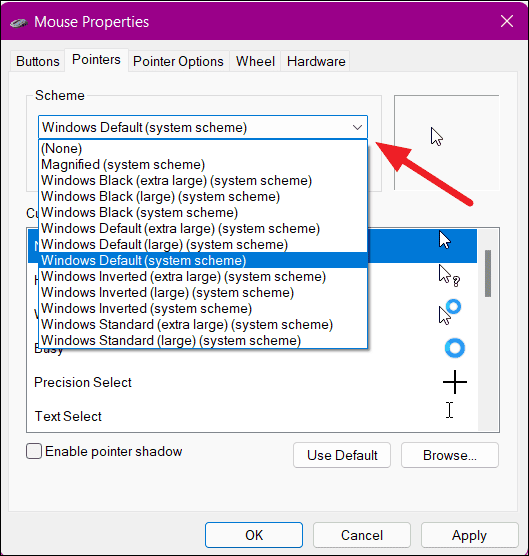
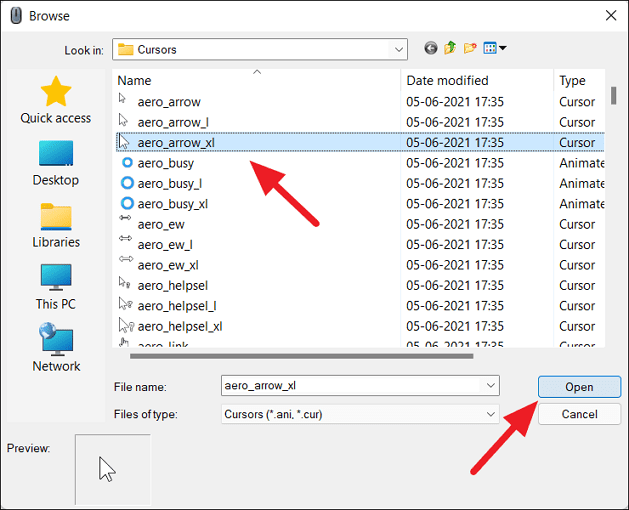
Each scheme has 17 cursors that appear for different actions which are listed in the Customize box. You can also change each cursor of a scheme. To change the appearance of a cursor, select the cursor you want to change and click the ‘Browse’ button.
Then, select the cursor and click ‘Open’.
After the changes, click ‘Apply’ and press ‘OK’.
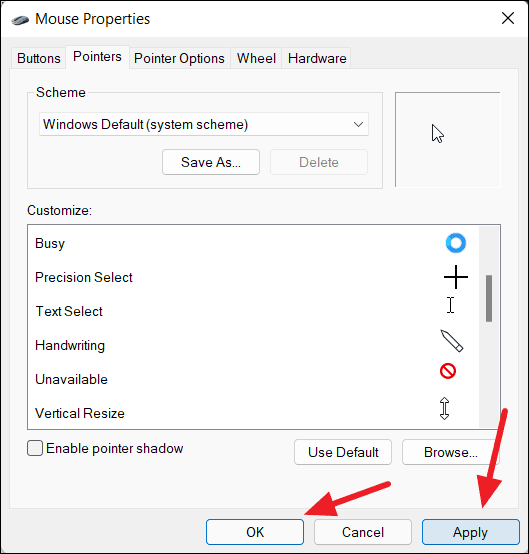
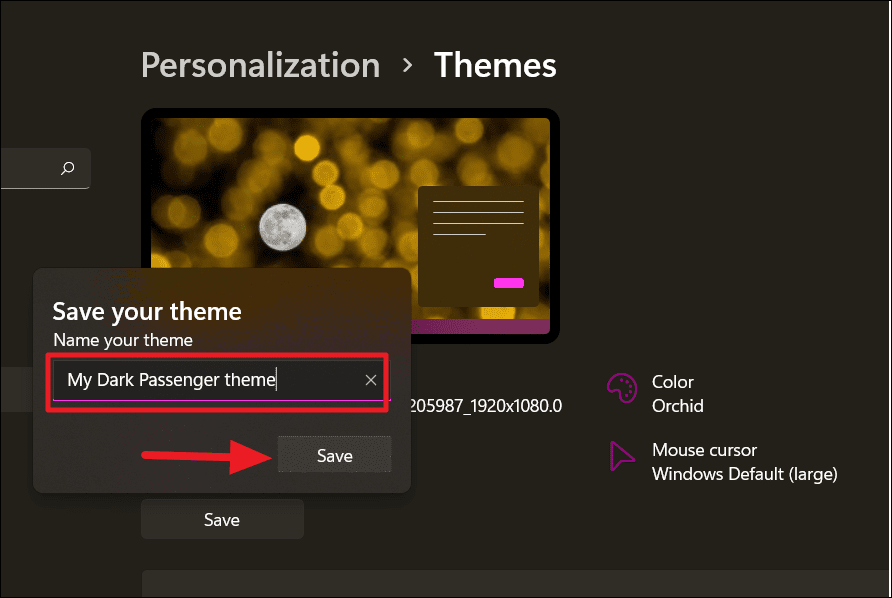
We have already seen how to change the backgrounds and colors of Window 11 in the previous sections. Once, you made all changes to the theme elements, simply click the ‘Save’ button to save it as your custom theme which can be used later.
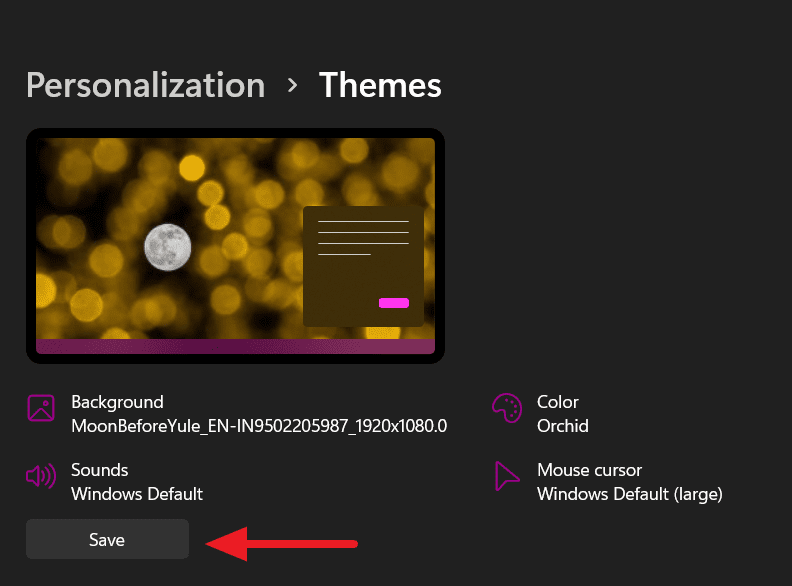
Then, enter your theme name in the ‘Save your theme’ prompt and click ‘Save’.
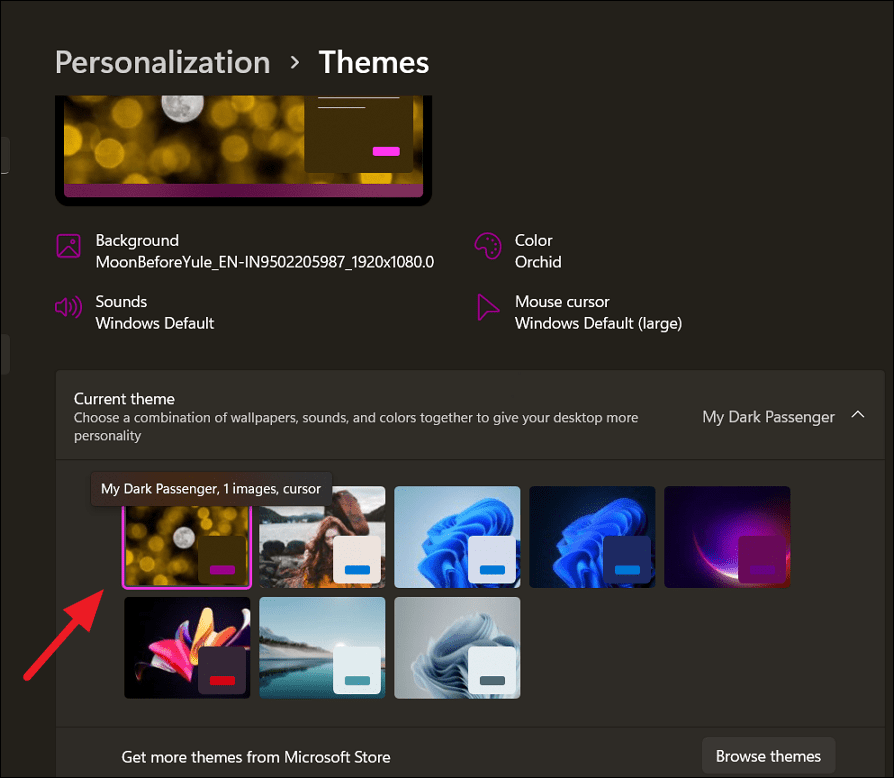
Once saved, your theme will be added to the list of themes available on the Themes page. You can edit the saved theme as well as share it with someone else.
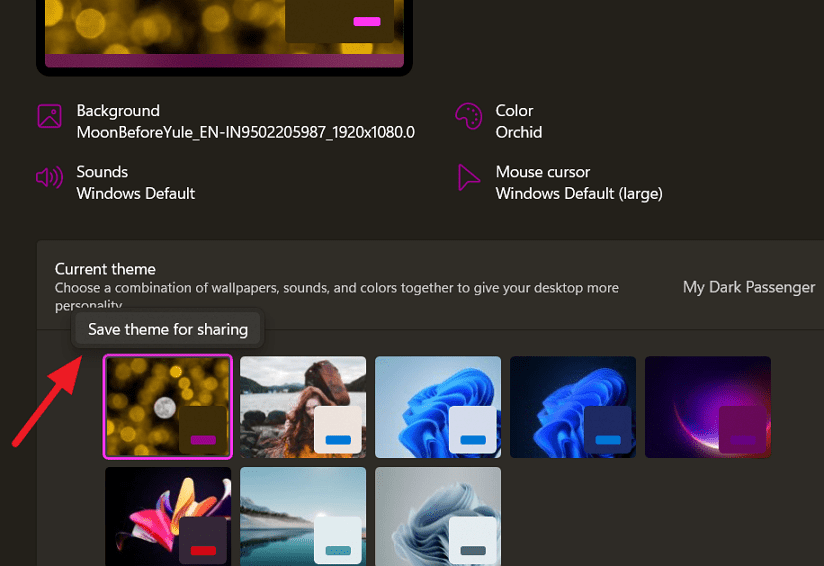
If you want to share your custom theme, you need to save it as a Windows Desktop Theme Pack file. To do that, first, apply the theme you want to share, then right-click and select ‘Save theme for sharing’.
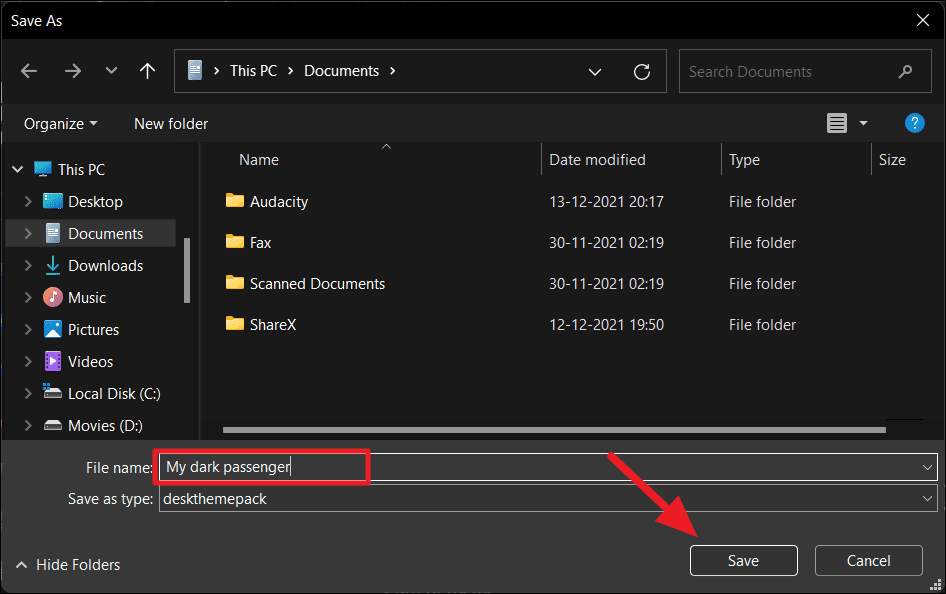
In the Save As prompt box, enter your theme name in the ‘File name’ field and select ‘Save’. This will save your theme as a ‘.deskthemepack’ file which can be shared with others or used on another Windows 11 computer.
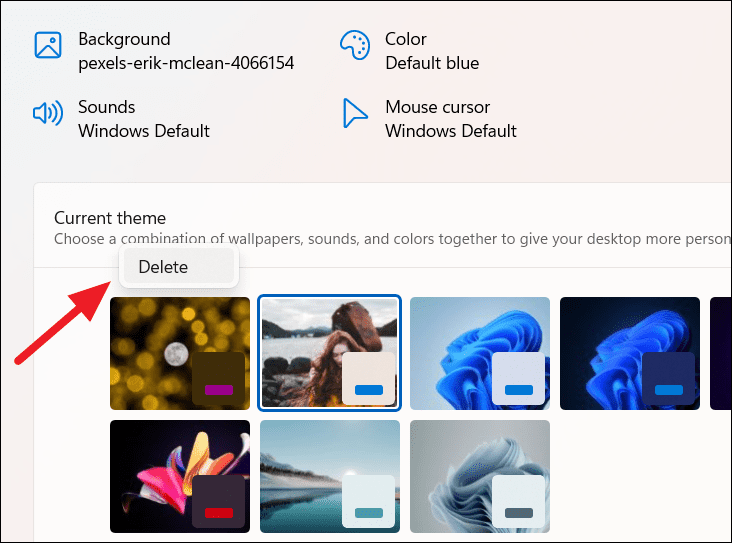
If you want to remove your custom theme pack, first, switch to another theme. Then, right-click the theme pack you want to remove and select ‘Delete’.
Download Themes
If you’re not happy with the stock themes or your own themes, you can download more themes from the Microsoft Store.
To do that, go to the Themes settings page, and click the ‘Browse themes’ button next to ‘Get more themes from Microsoft Store’.
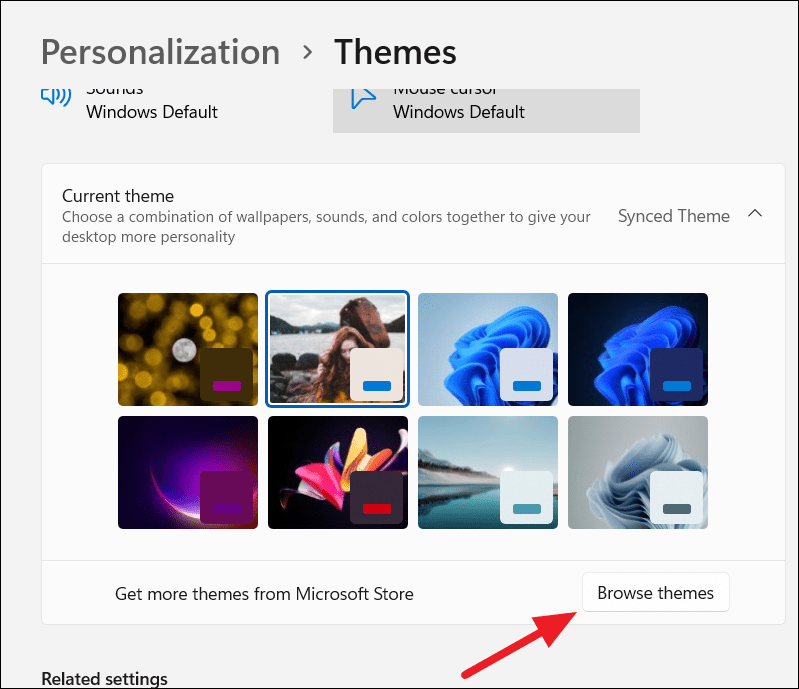
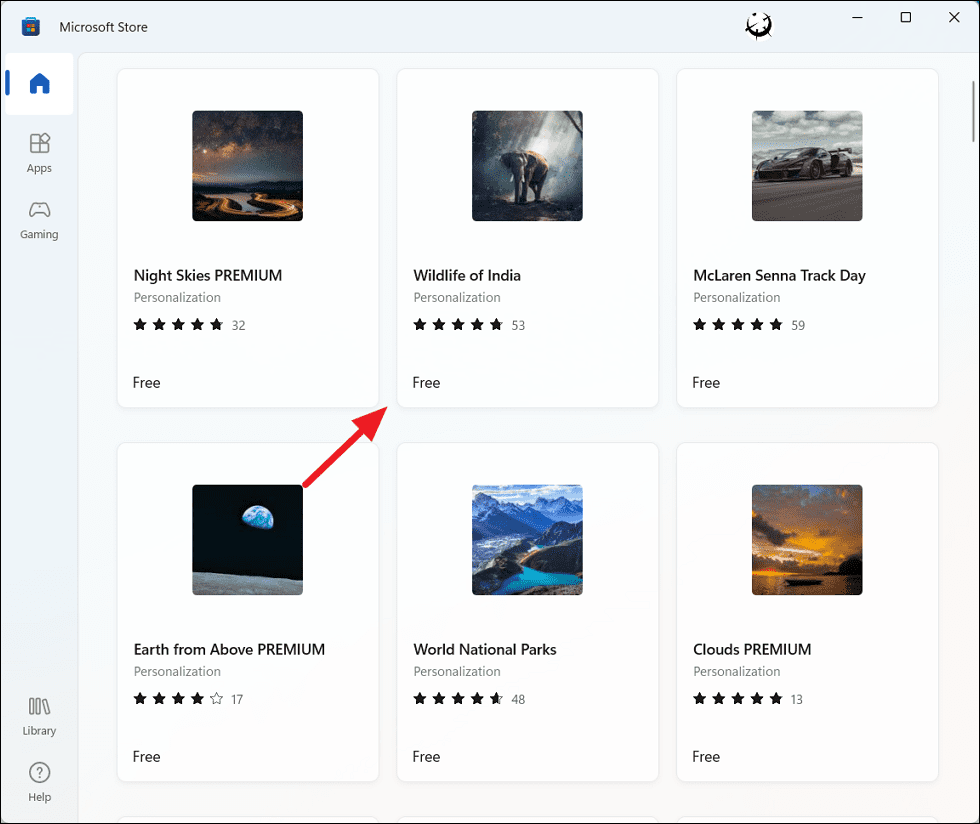
This will take you to the Themes section in Microsoft Store app. Here, you will find a list of pre-built themes, most of them are free of charge while some of them are paid theme packages.
Next, browse through the theme collection and simply click on the theme you want to download.
When you open a theme page, you will get a preview of that theme package. Now, just click the ‘Get’ button to download the theme. Then, click the ‘Open’ button.
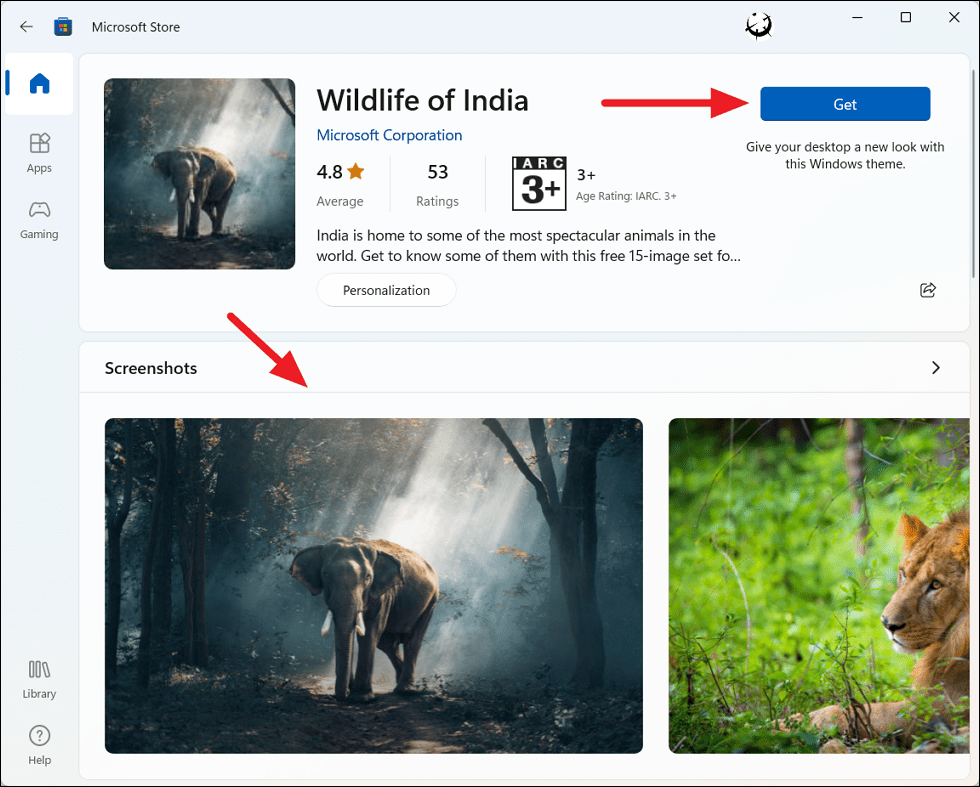
If you see a theme that shows a cost (in your local currency) below the thumbnail, you can purchase that theme using your Microsoft account.
Once the theme is downloaded, it will be added to your collection of themes under the ‘Current theme’ section. To apply a downloaded theme, just click its thumbnail and it will take effect immediately.
Apply Contrast Themes
A high contrast theme or Contrast theme is an accessibility feature in Windows 11 that maximizes contrast while simplifying the colors to make the user interface easier to use. It is mostly used by people with low vision or photosensitivity, but anyone can use these themes. Follow these steps to apply a contrasting theme in Windows 11:
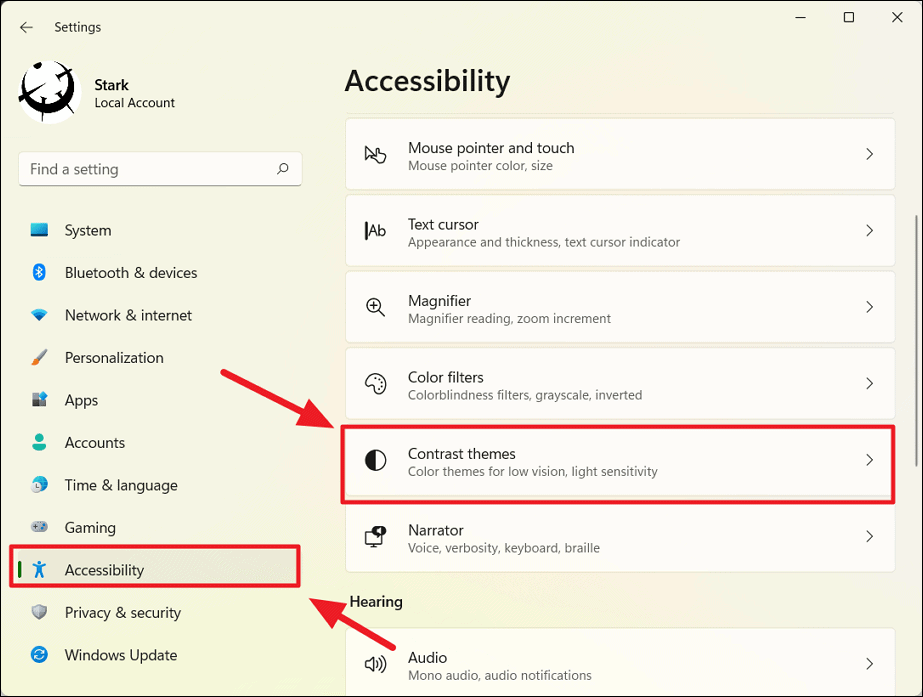
Open Settings, click on ‘Accessibility’ on the left menu and select the ‘Contrast themes’ option on the right side.
Alternatively, you can go to Settings > Personalization > Themes and click ‘Contrast themes’ under Related settings.
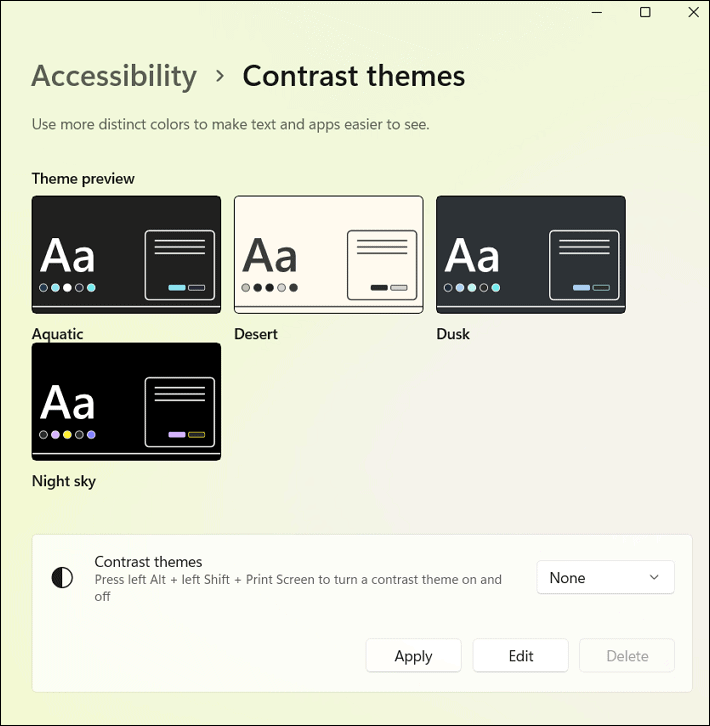
Under the ‘Contrast themes’ settings page, you will have previews of four contrast themes: Aquatic, Desert, Dusk, Night sky.
From the ‘Contrast themes’ drop-down, select one of the available themes and click ‘Apply’ to set the theme.
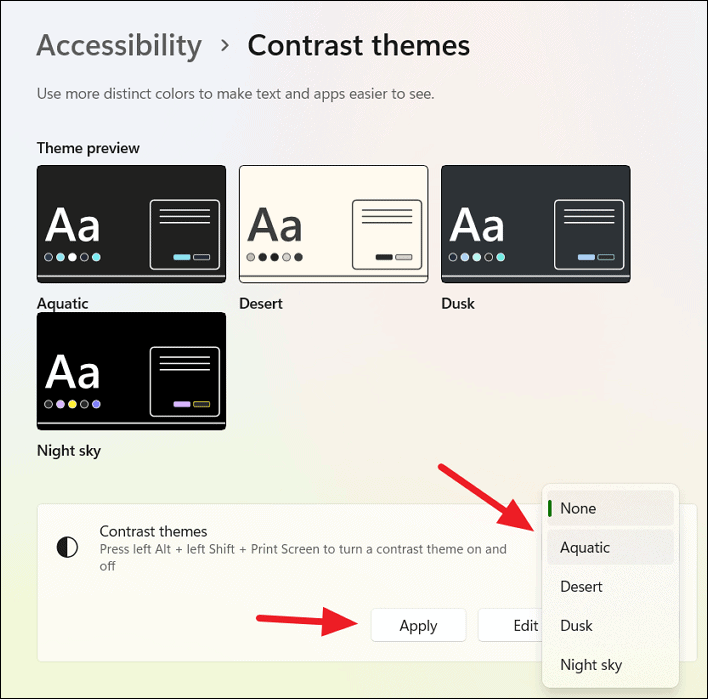
After applying the theme, you can use the Left Alt key+ Left Shift key+Print screen keyboard shortcut to turn on or off the contrast theme.
To customize the contrast colors of a theme, click on the ‘Edit’ button.
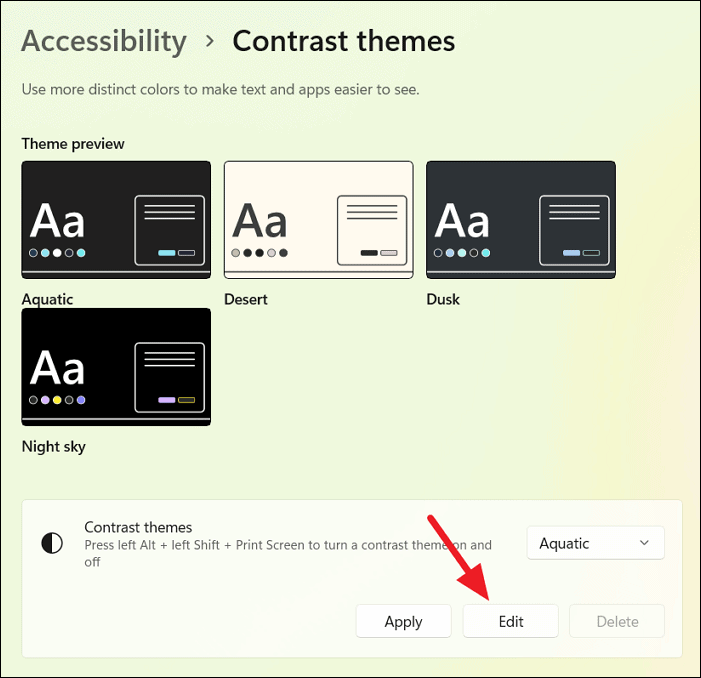
Then, click on the colored square to change colors for the respective elements and select ‘Save as’ to save the changes.

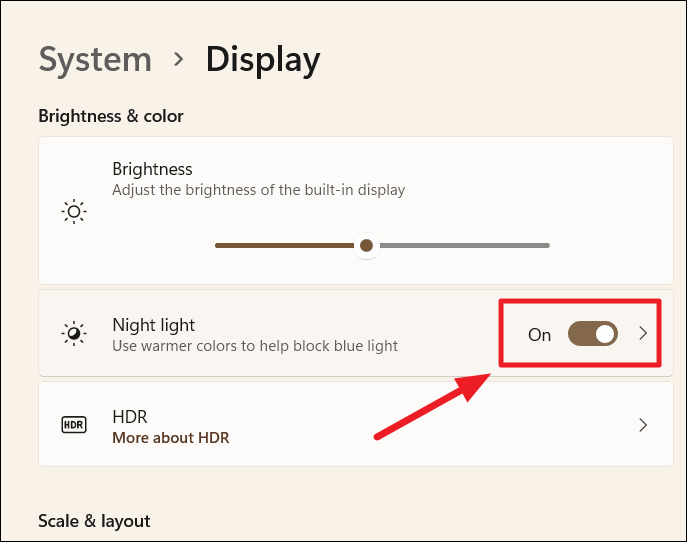
Enabling Night Light in Windows 11
You can also try enabling the ‘Night light’ feature to change the colors displayed on your screen into warmer colors and help reduce overall eye strain. Enabling the Night light will filter out harmful blue light and warm up your computer display at night.
You can toggle the night light in Windows 11 via the Quick settings or the Display settings.
Open the Quick settings by clicking the combined button of Network, battery, and sound, and then toggle the ‘Night light’ button to enable or disable it. If you don’t see the ‘Night light’ button, you can add it by editing the Quick settings. We will see how to edit the Quick settings in one of the later sections.

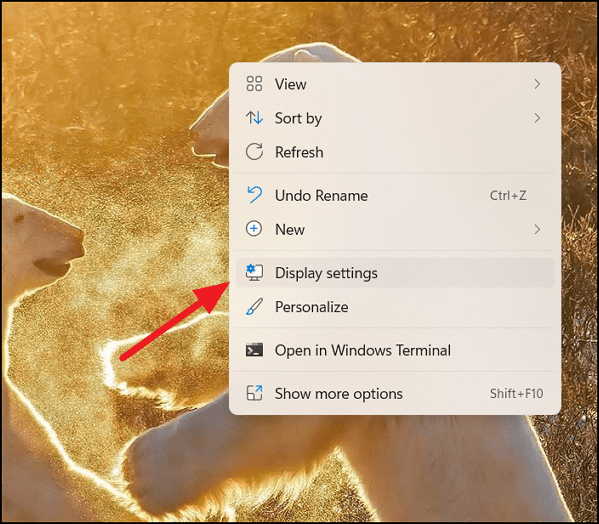
Or, right-click an empty area of the desktop and select ‘Display settings’.
Then turn on the ‘Night light’ toggle under the ‘Brightness & color’ section to enable it.
Customize Touch Keyboard on Windows 11
If you are using Windows 11 on a touch-enabled device or tablet, you may want to customize the layout, background, size, theme, and other virtual aspects of the touch keyboard. Follow these instructions to customize the touch keyboard in Windows 11:
Change Keyboard Size
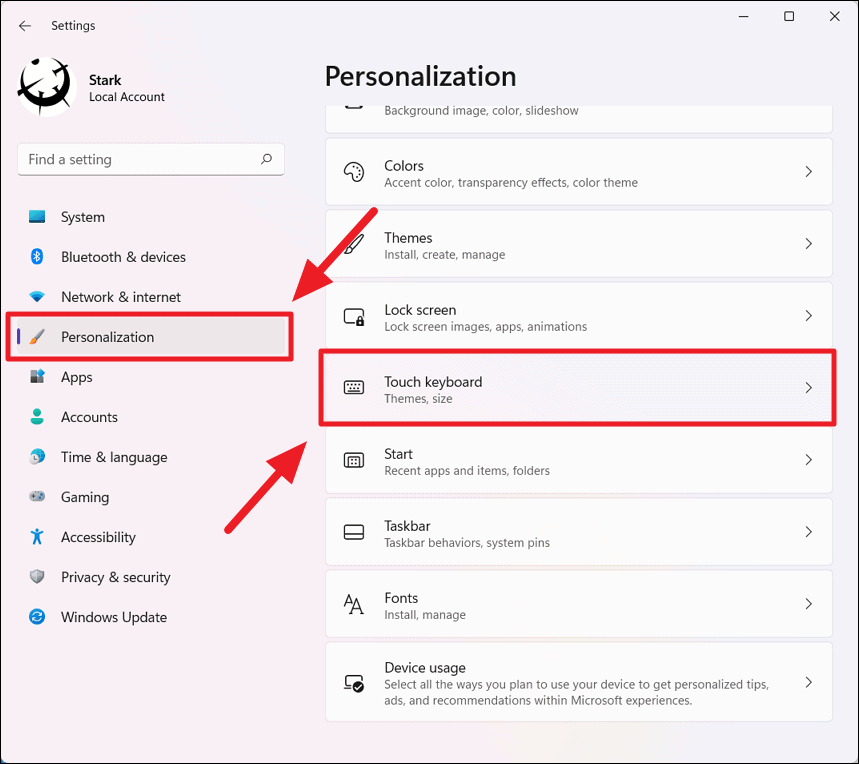
You can resize the keyboard size using Touch keyboard settings. To do this, open Settings, click on ‘Personalization’ on the left and then select ‘Touch keyboard’ on the right.
Then, adjust the ‘Keyboard size’ slider to change the size.
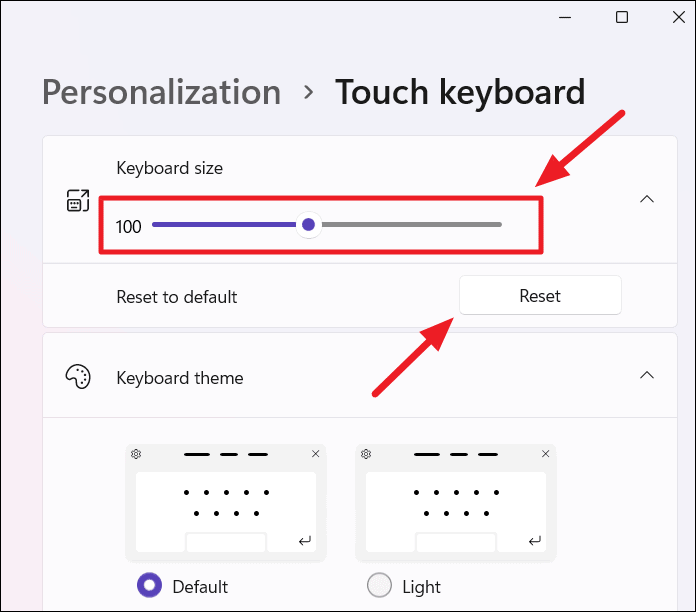
You can also expand the ‘Keyboard size’ setting and click the ‘Reset’ button to return to the default size.
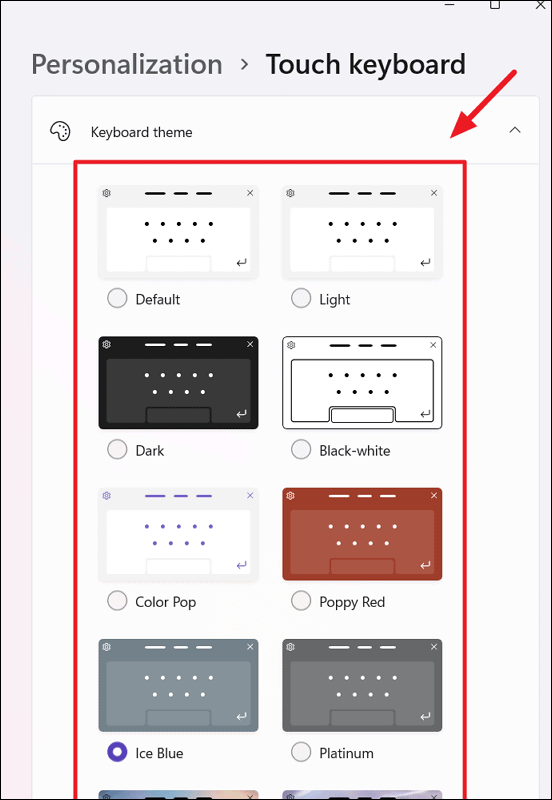
Change Keyboard Theme
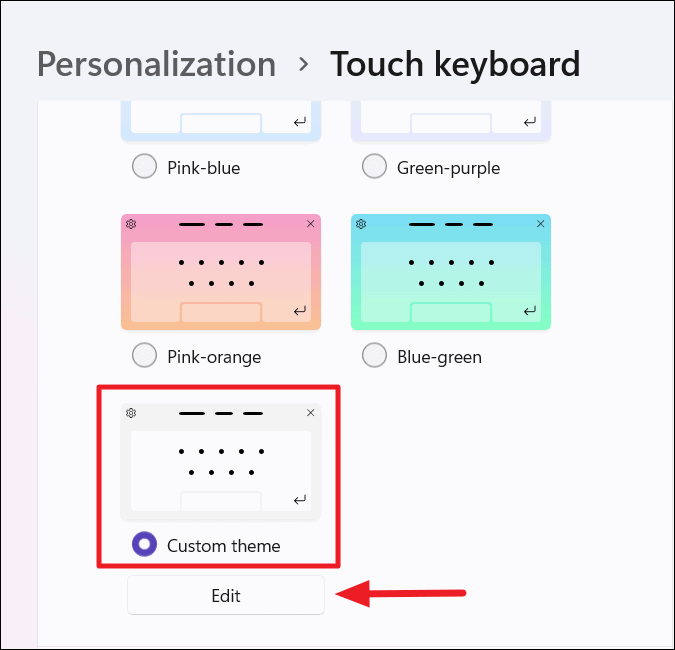
To change the touch keyboard theme, open the ‘Touch keyboard’ settings, and choose one of the 16 themes under the ‘Keyboard theme’ section.
To create a custom theme for your Windows 11 touch keyboard, select ‘Custom theme’ at the bottom of the list of themes, and click ‘Edit’.
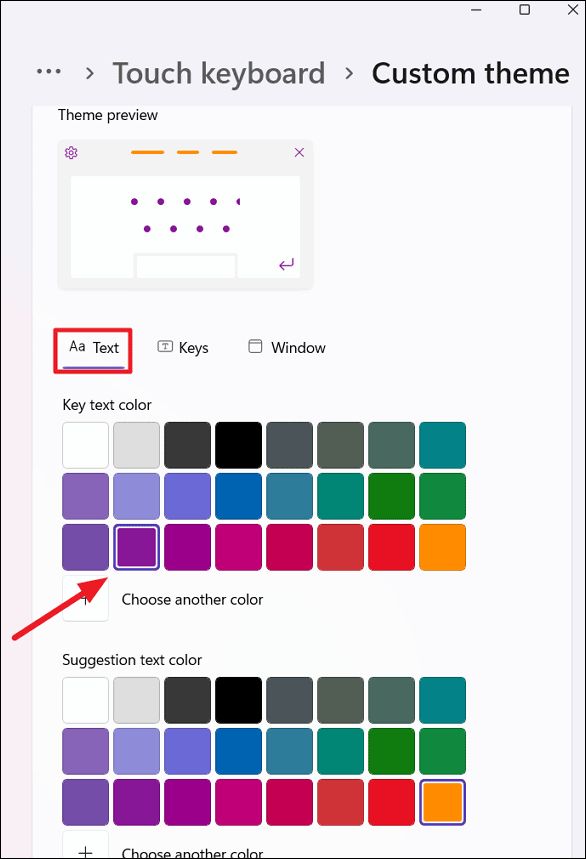
On the Custom theme page, you can customize text color, keyboard background color, key transparency, and keyboard background.
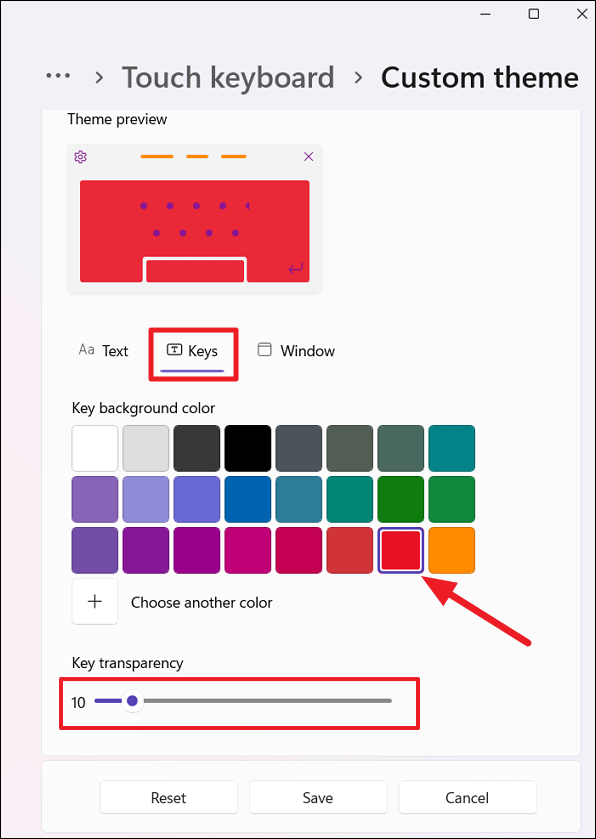
Under the ‘Key’ tab, select the key text color to change the text color. You can also select the color for the text in the suggestion area under the ‘Suggestion text color’ section.
Then, switch to the ‘Keys’ tab and select a key background color under the Key background color section. You can also use the slider below to adjust the level of key transparency for the background.
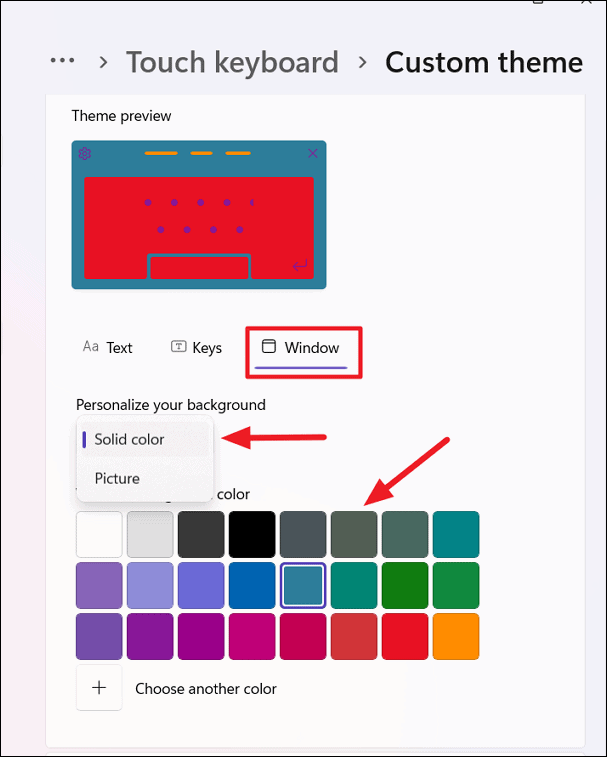
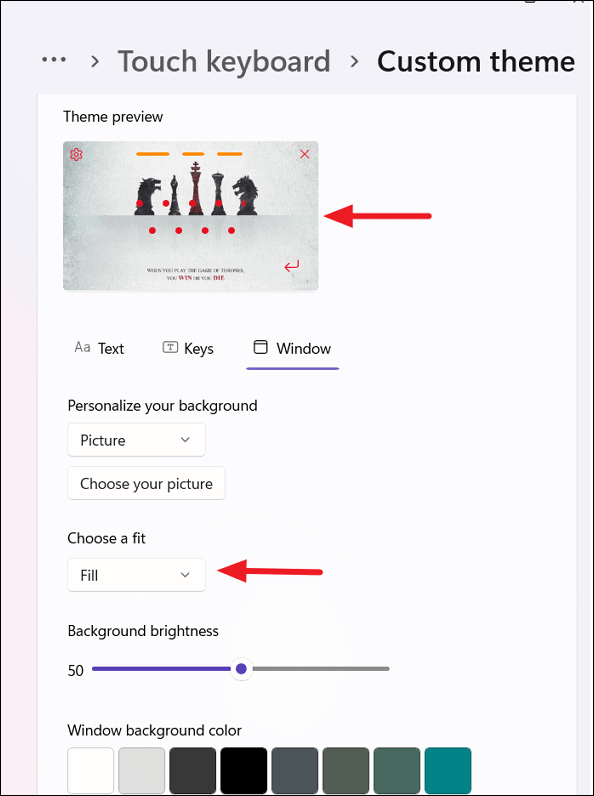
To change keyboard background, go to the ‘Window’ tab, and choose keyboard background type from the ‘Personalize your background’ drop-down menu. You can set a custom ‘solid color’ or your own ‘picture’ for the background.
If you choose the ‘Solid color’ option, select a color for the keyboard background.
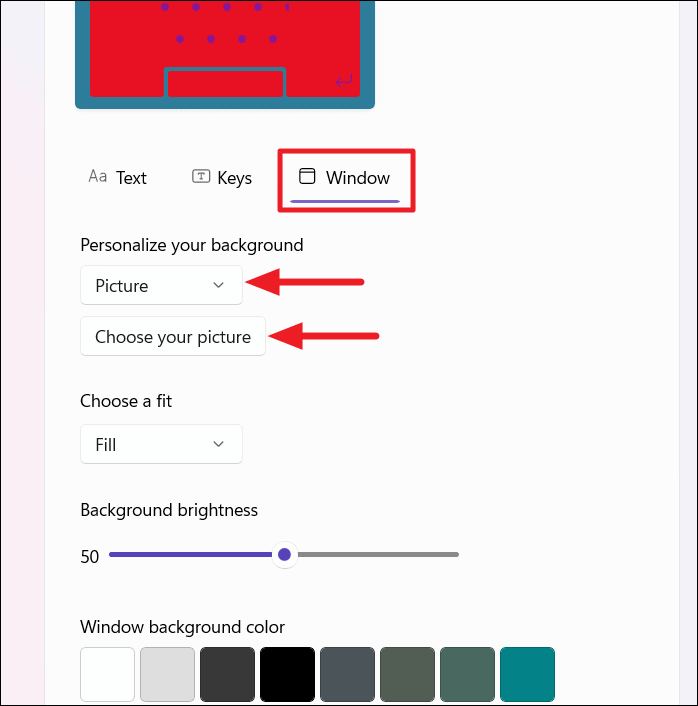
If you want to set a background for the touch keyboard, choose the ‘Picture’ option from the ‘Personalize your background’. Then, click the ‘Choose your picture’ button.
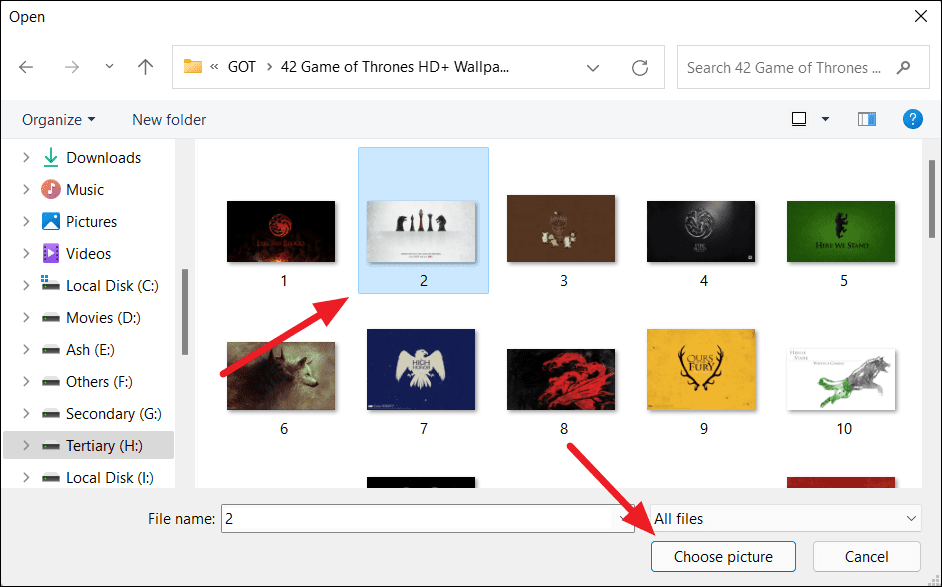
Then, navigate to the picture you want to use, select the picture, and click ‘Choose picture’.
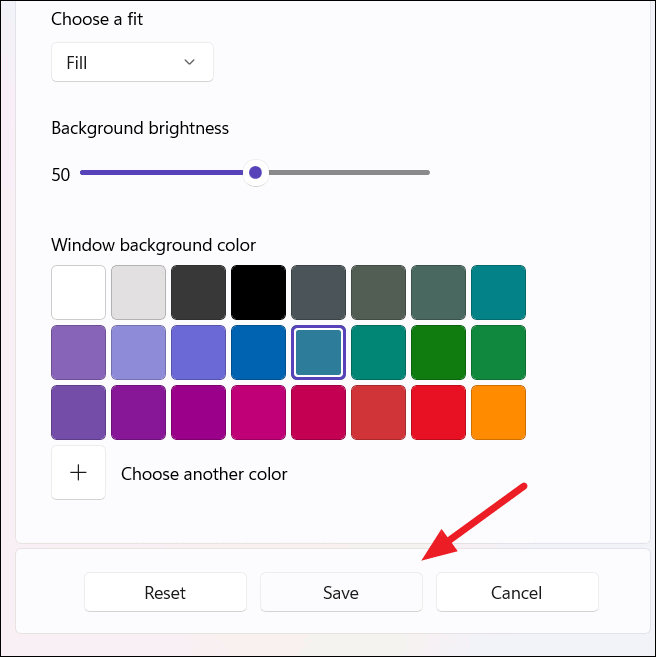
You can also use the ‘Choose a fit’ drop-down menu to select the fitting for the picture. If you want to adjust the brightness of the background, use the slide under ‘Background brightness’.
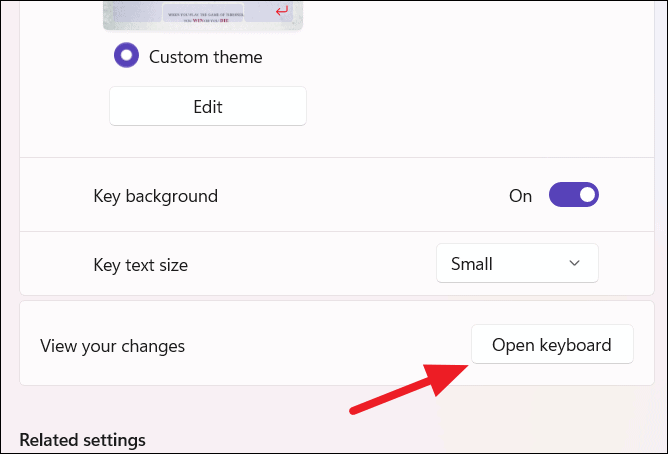
Once you created the custom theme, click the ‘Save’ button at the bottom of the page to save it. If you made mistake mistakes, click the ‘Reset’ button to begin anew.
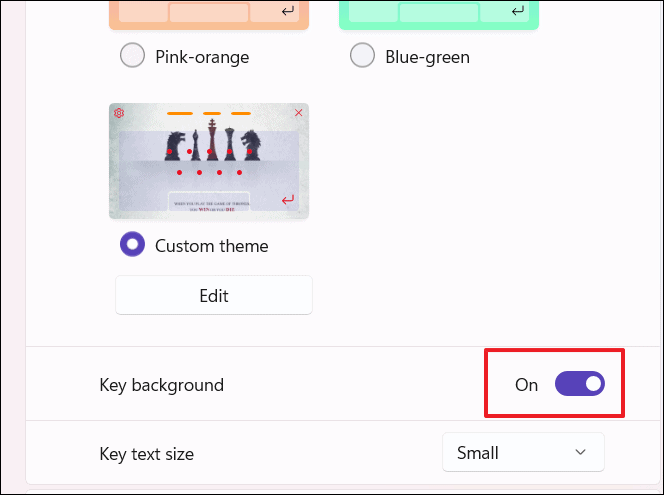
If you want to enable or disable the key background, toggle the ‘Key background’ switch in the Touch keyboard settings page.
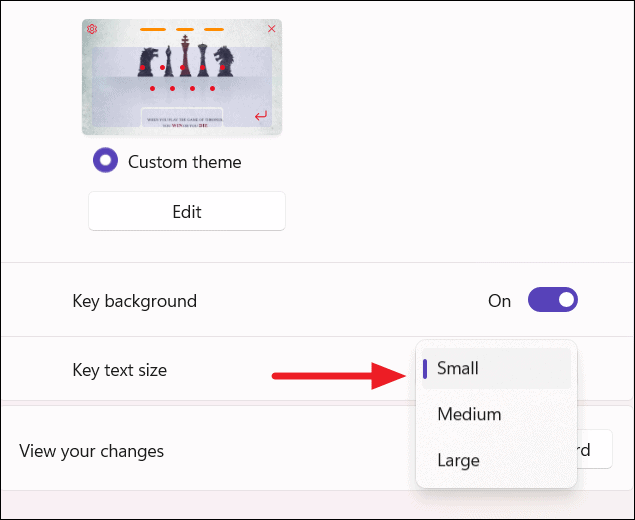
To change the size of the keyboard keys, use the ‘Key text size’ drop-down menu and it has three options – Small, Medium, and Large.
After customizing the theme, you can either click the ‘Open keyboard’ button or the keyboard button in the taskbar corner to view the changes.
Customize the Start Menu in Windows 11
One of the biggest changes in Windows 11 from its old version is the Start menu. Unlike other versions of Windows, the Start menu of Windows is located at the center of the Taskbar to be more touch-friendly. Windows 11 allows you to configure the Start menu to change the ratio of pinned apps or more recommendations. Follow the below instructions to customize your Start menu to your more liking:
Pin or Unpin an App in Start Menu
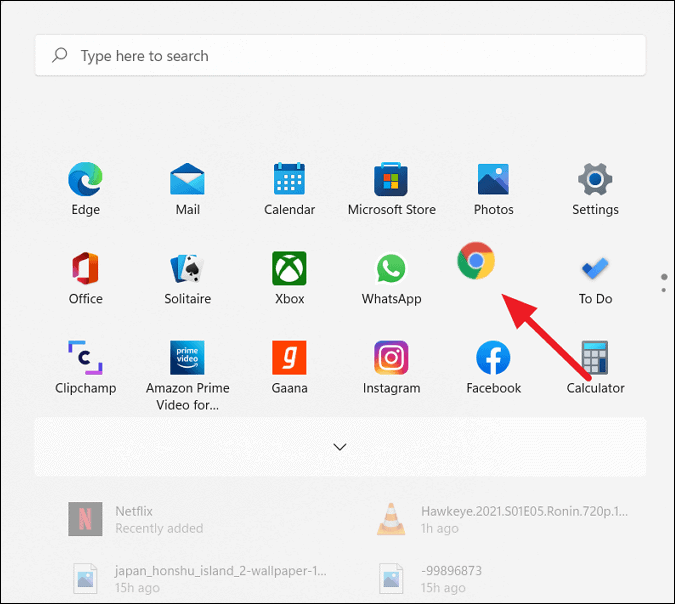
When you open the Start menu, you will see a list of built-in apps under the ‘Pinned’ section, these include Microsoft Store, Microsoft Edge, Settings, Mail, To do, Calculator, etc.
You can pin an app that you want to see in the Start Menu or remove the apps that you don’t want.
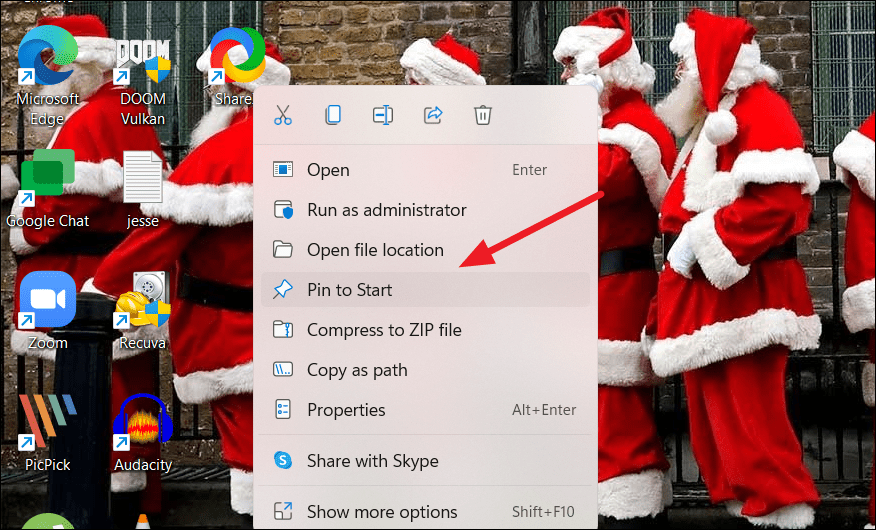
To pin apps to the Start menu, first, search for the app using the search bar in the Start menu. Then, right-click the app you want to pin from the result and click the ‘Pin to Start’ option.
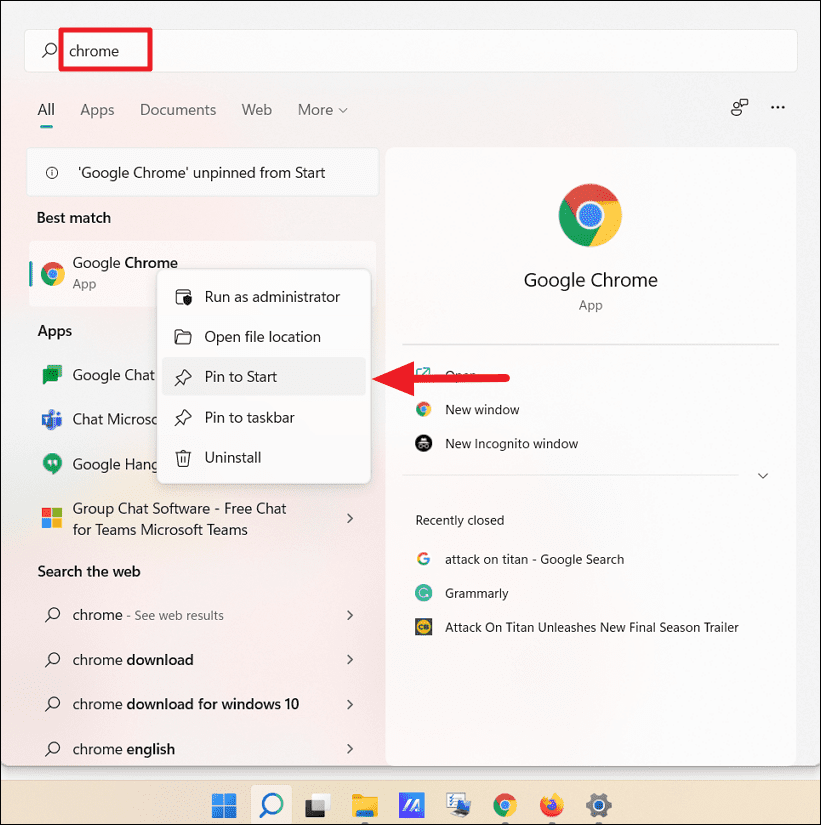
You can also right-click an app or app shortcut and select ‘Pin to Start’ to add it to the Start menu.
To remove an app from the Start menu, right-click on a pinned app and select the ‘Unpin from Start’ option.
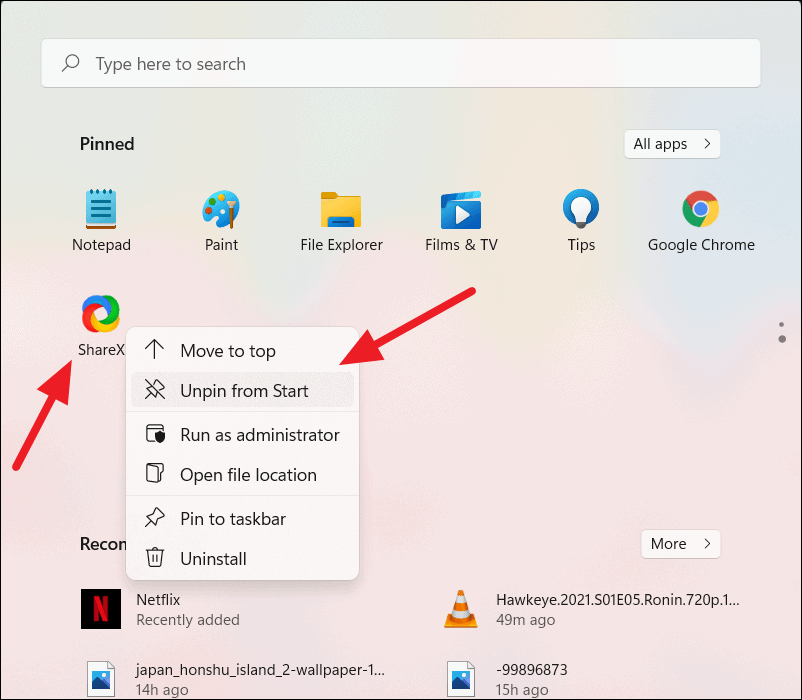
The recently pinned apps are added to the bottom of Pinned apps section. You can rearrange apps in the Start menu so that you can quickly access them whenever you need them.
To move the app to the top of the Start menu, simply right-click the pinned app and select ‘Move to top’.
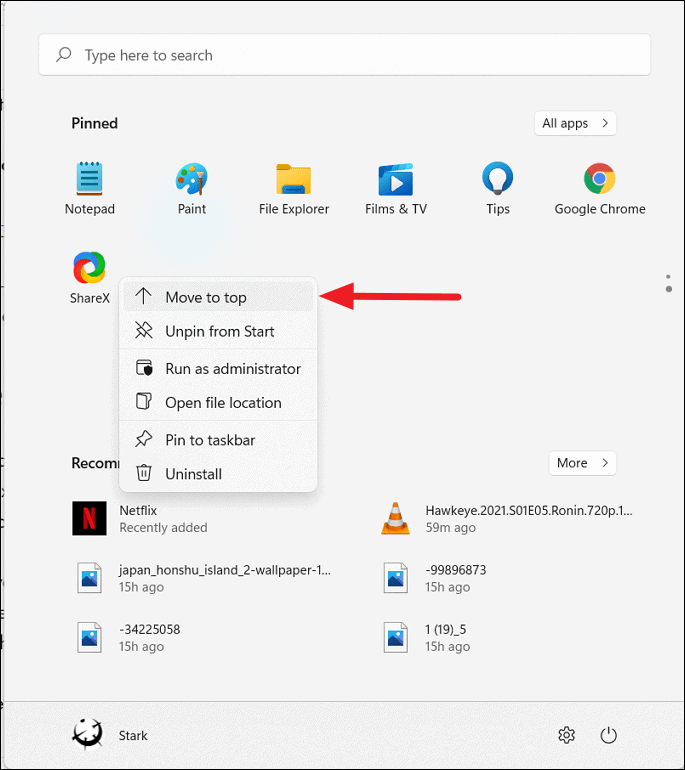
If you want to move the app icon to some other location, simply click and hold the app icon and then drag the app to the desired position.
Show/Hide Recently Added/Most Used Apps/Recently Opened Items on the Start Menu
Windows 11 Start menu can show you the recently installed apps, most used apps, and recently opened items in the Start menu, jump list, and File Explorer. If you want to customize these settings, follow these steps:
First, open Settings by pressing the Windows key+I hotkey and then click ‘Personalization’ on the left side of Settings. Next, click the ‘Start’ page on the right side.
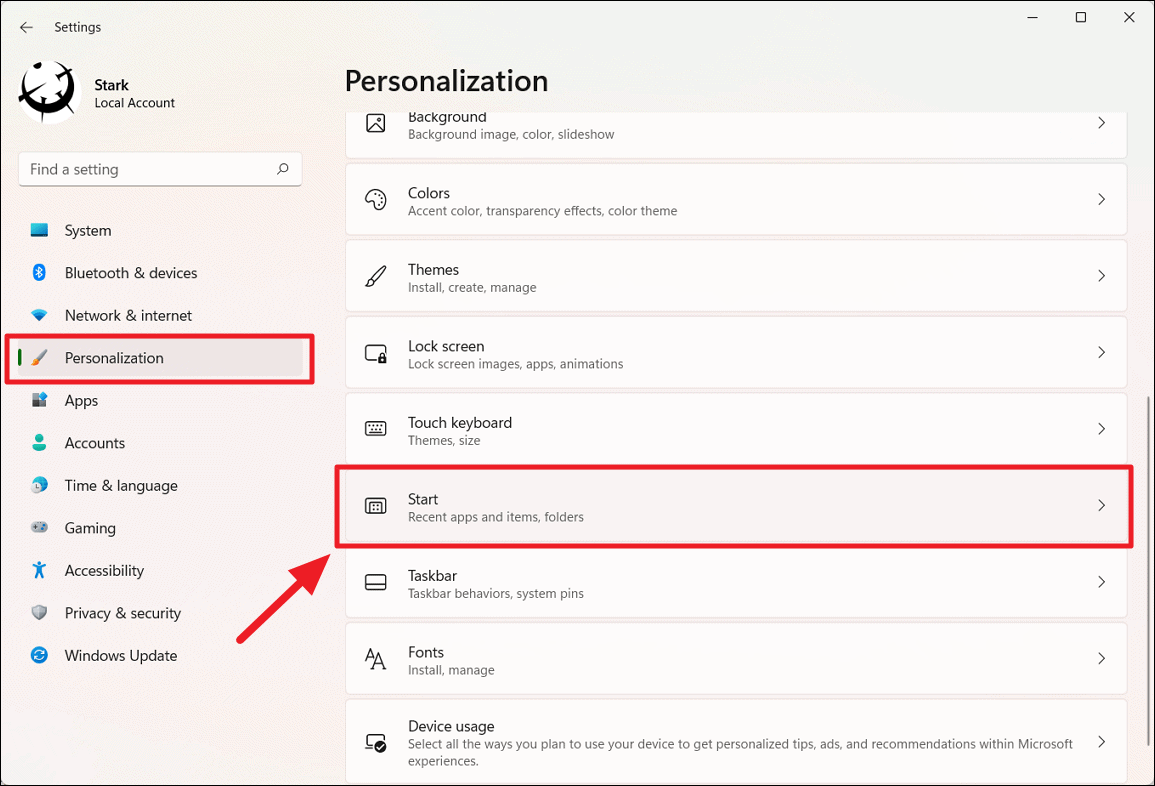
Here, you will see a list of settings under the Start page.
To show the recently installed apps on the Start menu, turn on the ‘Show recently added apps’ toggle switch. To hide the recently added apps, turn off the toggle.
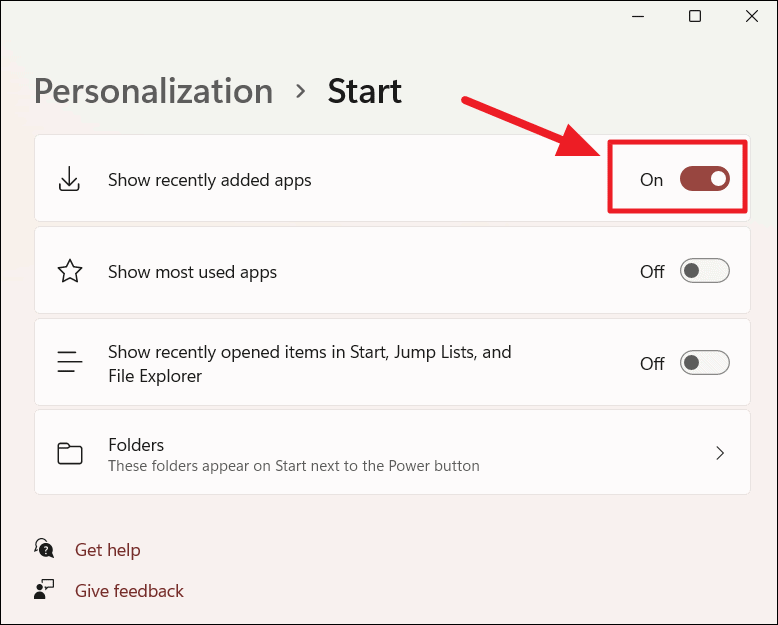
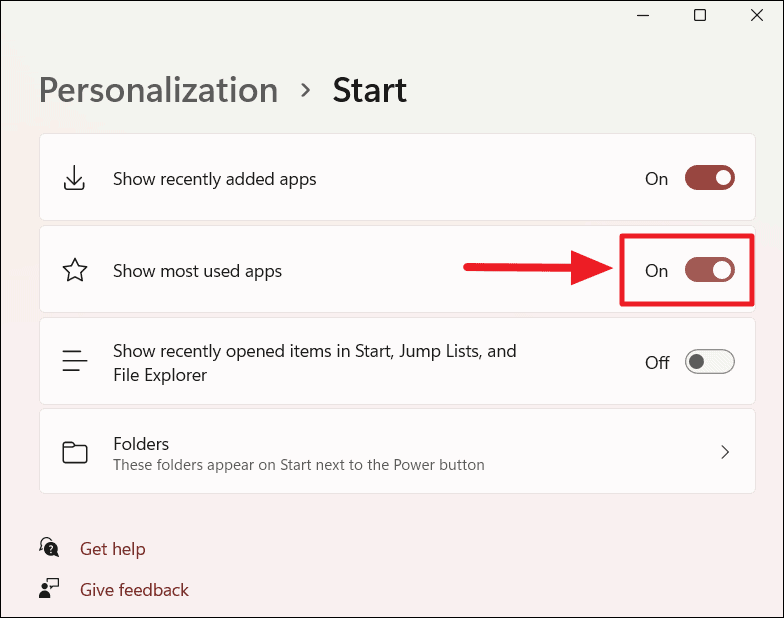
To show the most used apps on the Start menu, turn on the ‘Show most used apps’ option. To hide the most used apps, turn off the toggle.
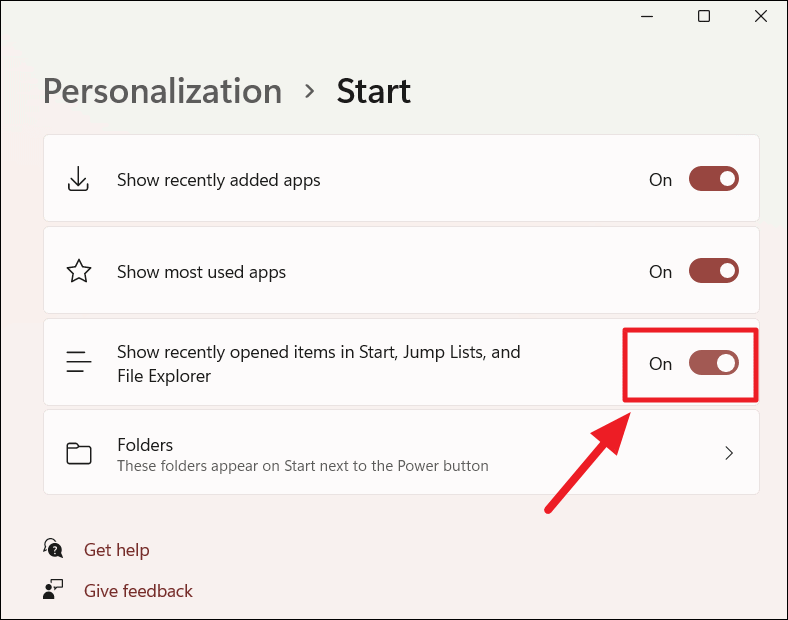
To show the recently used items on the Start menu, turn on the ‘Show recently opened items in Start, Jump Lists, and File Explorer’ option. To hide the recently used items, turn off the toggle.
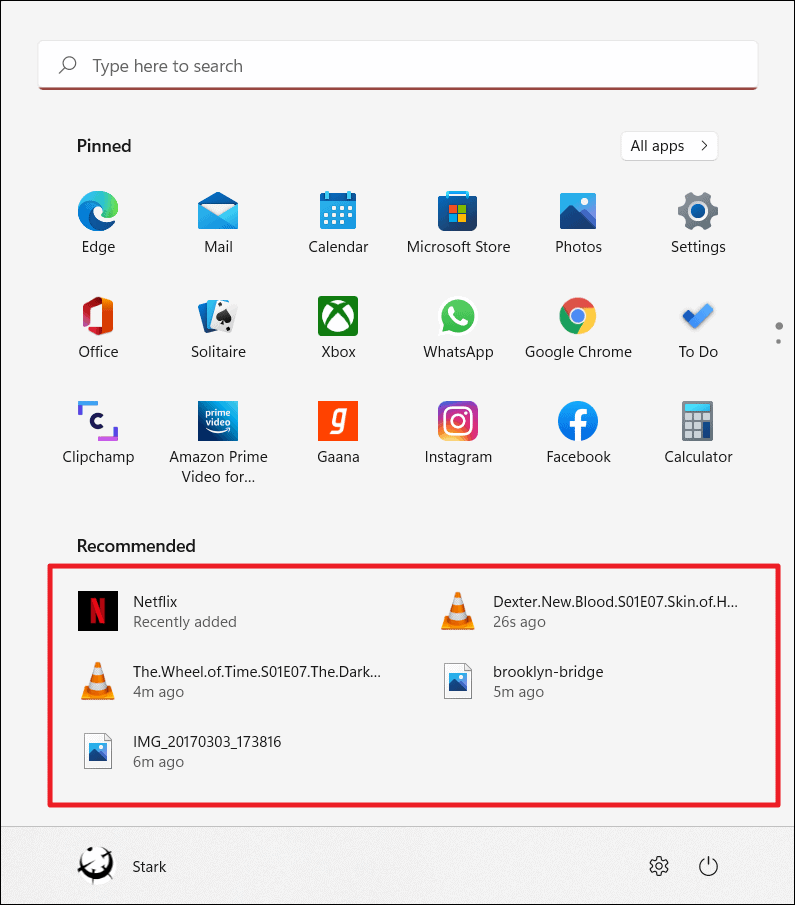
The recently added apps, recently opened items, and most-used apps will be listed under the Recommended section of the Start menu.
Add or Remove Folder Shortcuts on the Start Menu
At the bottom of the Start menu, Windows only shows the account name and the power button. However, you can add shortcuts to specific folders and the Settings app on the Start menu, so they can be more easily accessible. You can add quick access to different library folders and locations like Settings app, File Explorer, Documents, Downloads, Music, Pictures, Videos, Personal folder (User folder) as well as Network folder. To show or hide quick access folders to the Start menu, follow these steps:
First, open the ‘Start’ settings page under Personalization. Next, select the ‘Folders’ setting.
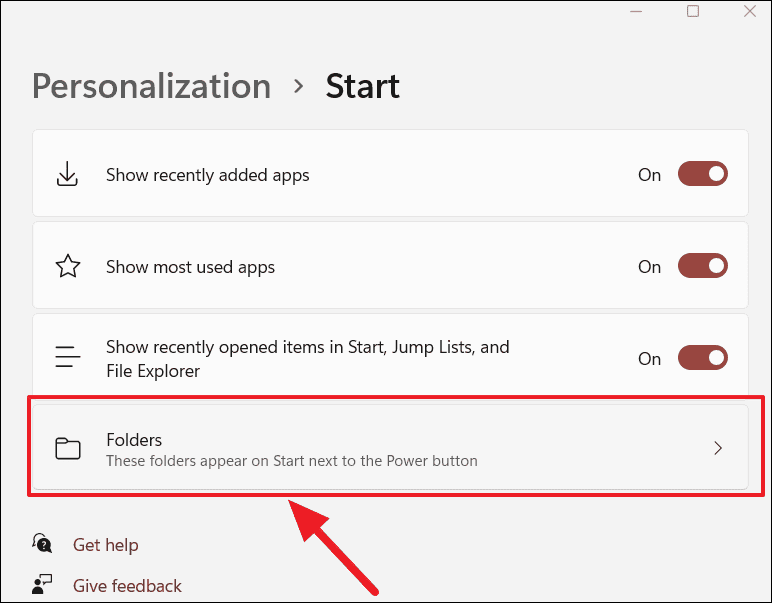
Here, you will see the list of apps that can appear on the Start menu. Just turn on the folder or items you want to appear next to the power button in Start.
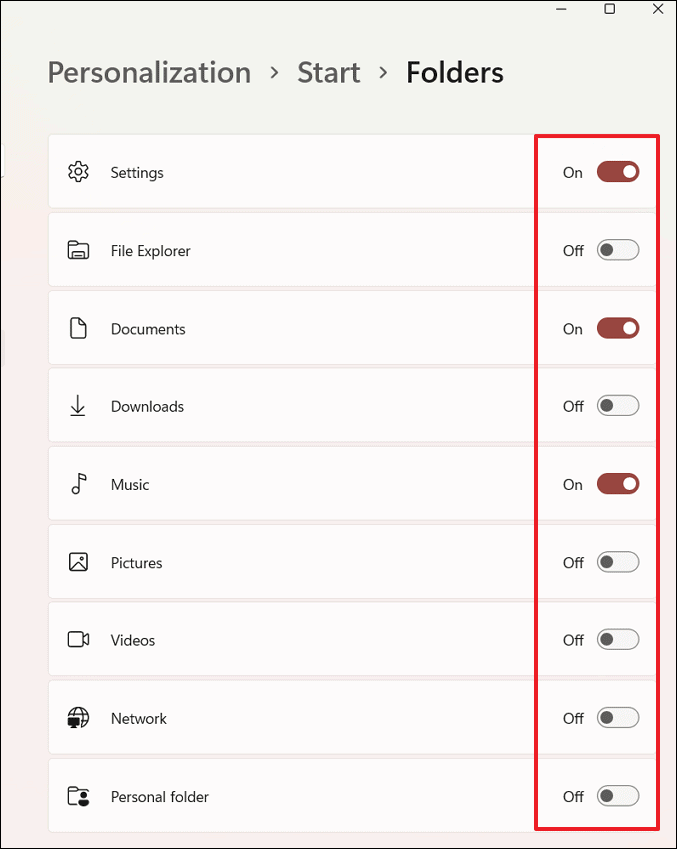
To hide a specific folder from the Start, turn off the toggle next to it.
Once you turn on the toggles, the shortcut buttons will appear next to the power button in the Start menu as shown below.
Move the Start Menu to the Left
One of the biggest changes that Microsoft made in Windows 11 is centralizing its Start Menu and Taskbar icons. If you don’t like the Start menu’s new home, you can move back to its old place, to the left corner of the taskbar. Here’s how you do it:
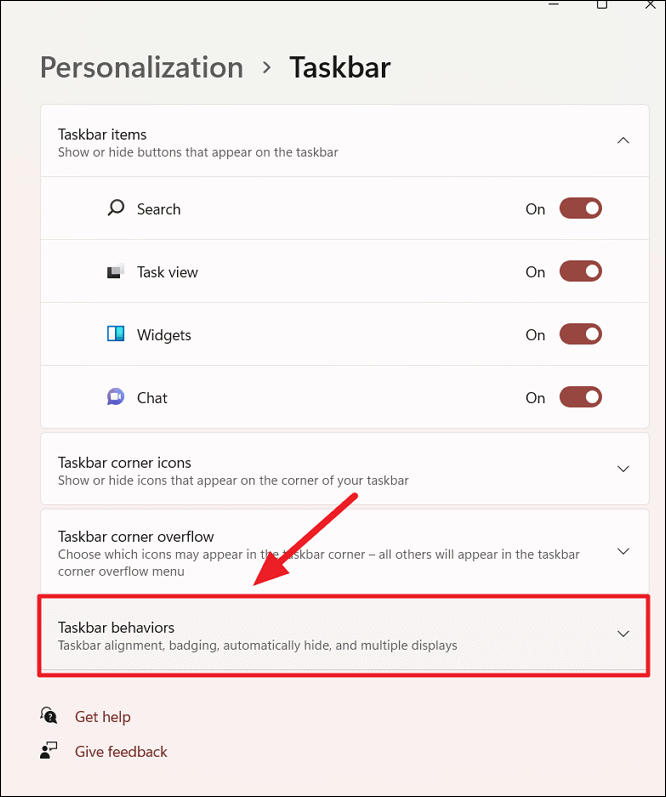
To move the Start menu to the left of the taskbar, launch the Settings and click on ‘Personalization’. Then, select the ‘Taskbar’ setting on the right side.

Next, expand or open the ‘Taskbar behaviors’ drop-down at the bottom.
Click on the ‘Taskbar alignment’ drop-down menu and select ‘Left’.
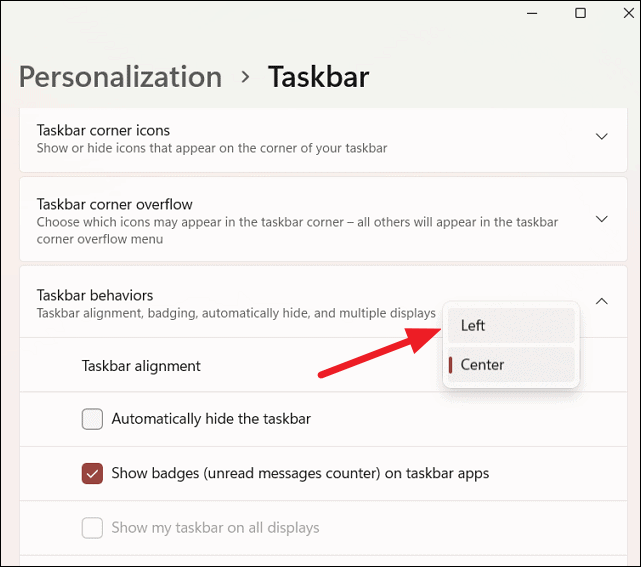
This will move the Start Menu towards the left as shown below. However, you cannot move your Windows 11 taskbar and Start menu to the other 3 sides of the screen as you can with Windows 10.
If you want to change the color of the Start menu, please go through the instructions in the above section.
Customize Taskbar on Windows 11
The Taskbar is a key component of Windows and it is home to the Start menu, app icons, search button, widgets, system tray, running programs, and many more. Windows 11 taskbar is as not as customizable and flexible as the Windows 10 Taskbar or any other before that. However, you can still tweak various settings to change its look and behavior. You can show or hide taskbar buttons, show/hide icons appear in the Taskbar corner, pin/unpin apps, Taskbar alignment, and manage various settings.
Show or Hide Taskbar Buttons
By default, Windows 11 taskbar shows Search, Task View, Widgets, and Chat buttons next to the Start menu at the center of the taskbar. You can decide which buttons you want to show or hide on the taskbar through settings. To customize the buttons that appear next to the Start menu, follow these steps:
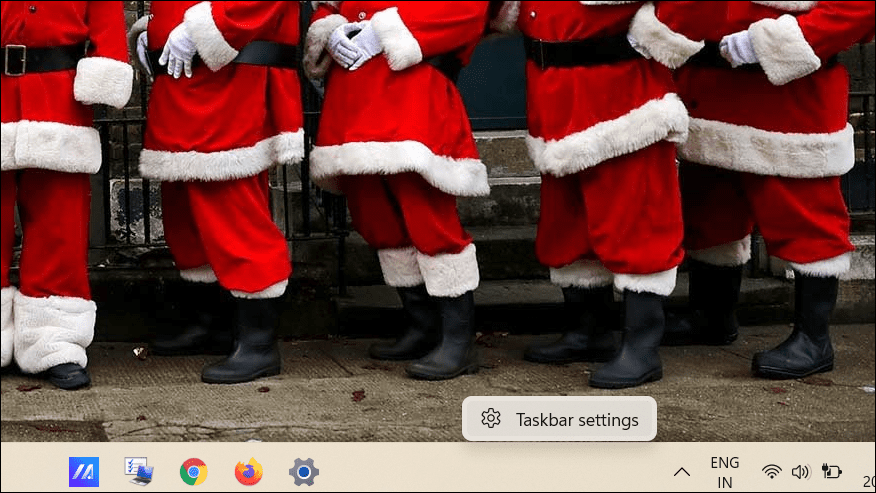
Right-click on the empty space of the Taskbar and select ‘Taskbar settings’. Alternatively, you can also go to Start > Settings > Personalization > Taskbar.
Once the Taskbar settings page opens, you will see several settings to adjust the Taskbar. Under the ‘Taskbar items’ section, turn off the buttons or items you don’t want to see in the Taskbar.
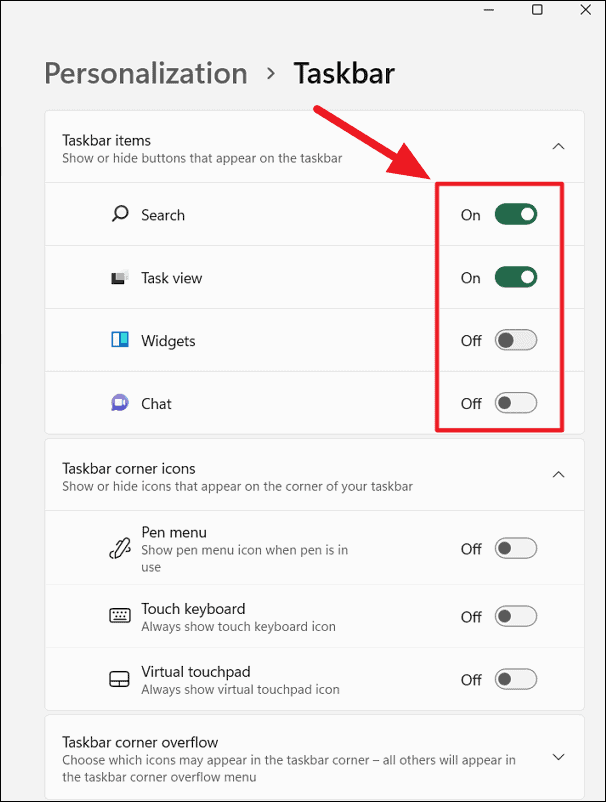
To show the buttons, simply turn on the toggles for the items you want to see in the taskbar.
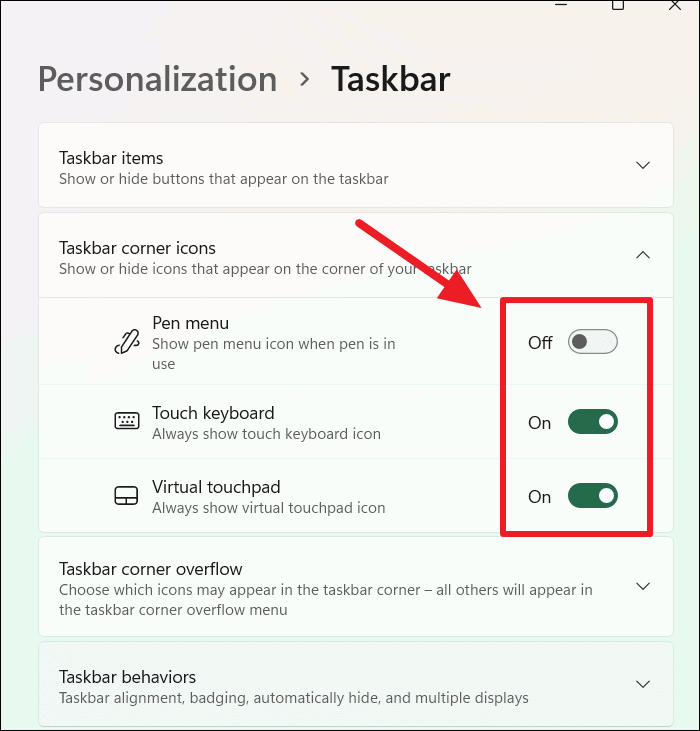
Show or Hide Icons in the Taskbar Corner
You can decide which input option icon you want to see in the Taskbar corner. To do this, right-click the Taskbar and select ‘Taskbar settings’ to open the taskbar settings page. Then, turn on/off the icons you want to show/hide on the corner of the taskbar, including:
- Pen menu
- Touch keyboard
- Visual touchpad
Show or Hide App Icons in the Taskbar Corner
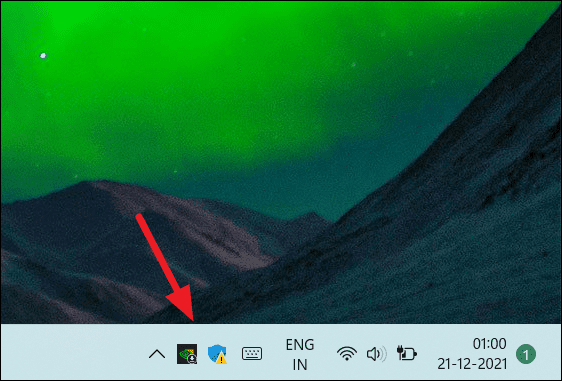
When a program or its process runs in the background, you will see its icon on the taskbar corner overflow or System tray. To access a program, you would have to open the overflow menu and click the icon. However, you can also choose which icons you want to appear in the taskbar corner by the date and time for easy access.
To do this, open Taskbar settings, enable the toggles for the app icons you want to see in the right-hand corner of the taskbar by the clock.
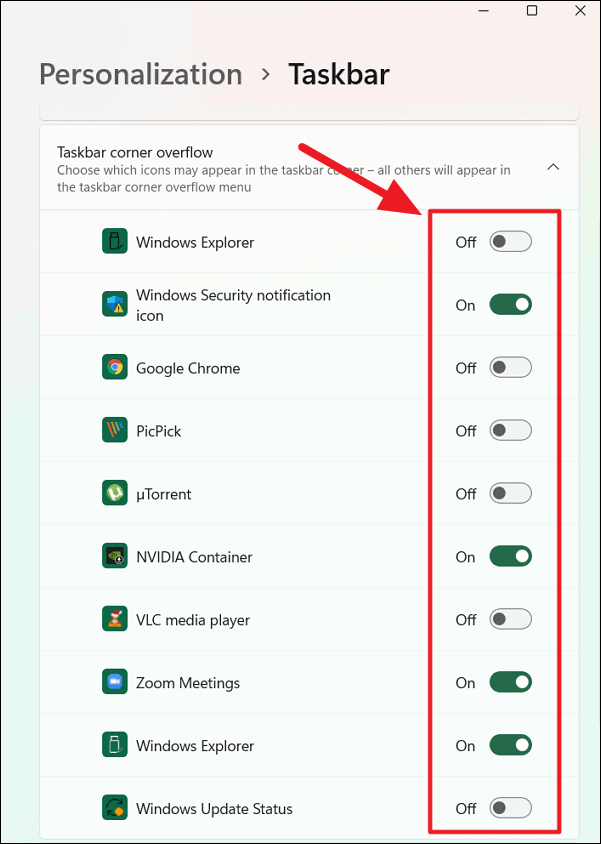
And turn off the toggles for the icons you don’t want to see in the taskbar corner.
Change Taskbar Behavior
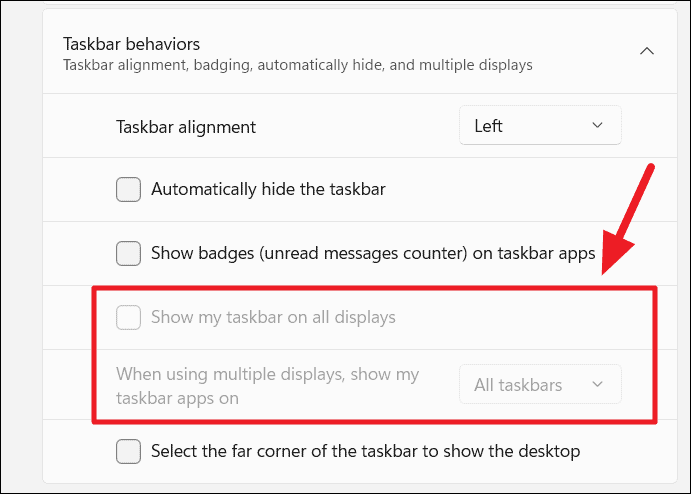
Under Taskbar behavior settings, you configure various taskbar settings, including, taskbar alignment, show/hide badges for apps, auto-hide, and multiple displays.
To hide the Taskbar automatically on Windows 11, check the ‘Automatically hide the Taskbar’ option.
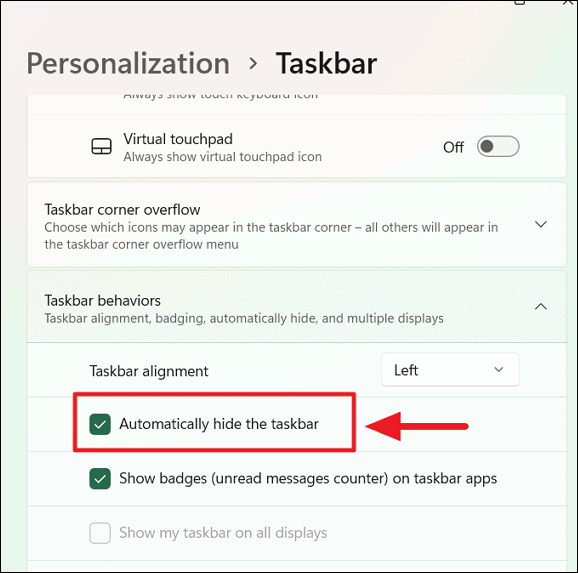
If you want to move the Start menu and icons to the left corner, change the ‘Taskbar alignment’ to ‘Left’.
When a taskbar app receives a notification like unread messages, it will display a small badge counter above the app icon.
To hide/clear the badges for the taskbar apps, simply ‘Show badges (unread messages counter) on taskbar apps’ option. To show the app badges again, re-enable the above option.
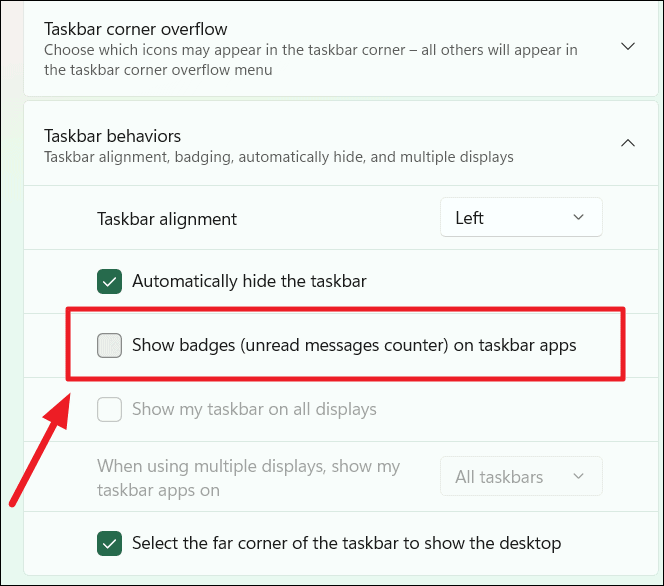
If you want your current Taskbar to appear on all connected monitors, tick the ‘Show my taskbar on all displays’ option. This setting is only available if you have multiple displays connected to your computer.
You can also use the ‘When using multiple displays, show my taskbar apps’ to choose whether you want to show the taskbar apps on all taskbars or specific taskbar.
The Show desktop is a feature that allows you to minimize or restore all open windows together to make the desktop visible. It is a small hidden button (small horizontal bar) located in the far corner (right corner) of the Taskbar. It only appears when you hover the cursor over it.
By default the Show desktop button is enabled in Windows 11, however, If you don’t use this button, you can easily disable it.
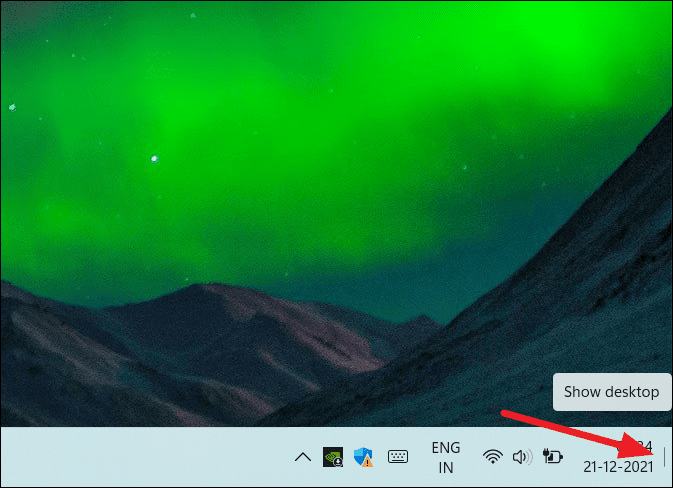
To disable the Show desktop button on Windows 11, uncheck the ‘Select the far corner of the taskbar to show the desktop option’ under the Taskbar behaviors setting.
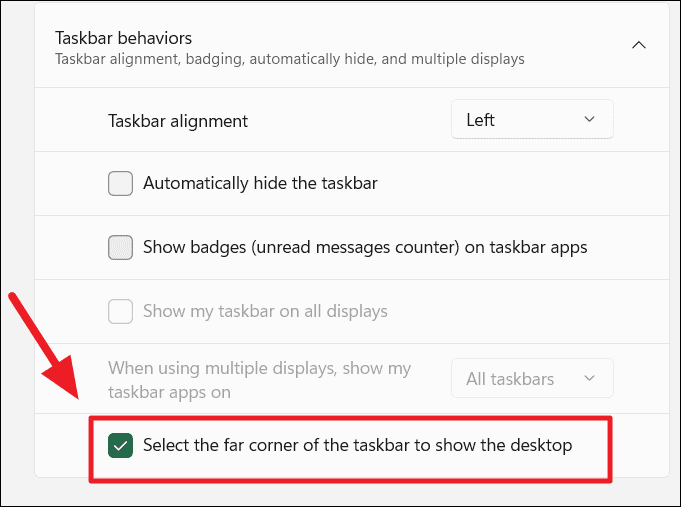
To re-enable the Show desktop button, just check the above option.
Pin/Unpin Apps to/from the Taskbar
You can easily add or pin applications to the Taskbar which makes it easier to access them.
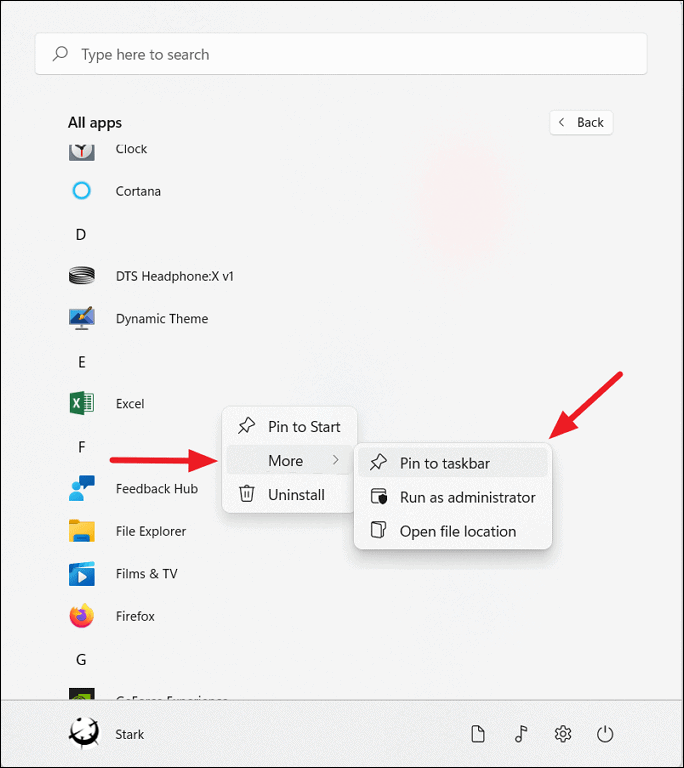
To pin apps to the Taskbar, launch the Start menu and click the ‘All apps >’ button at the top left corner.
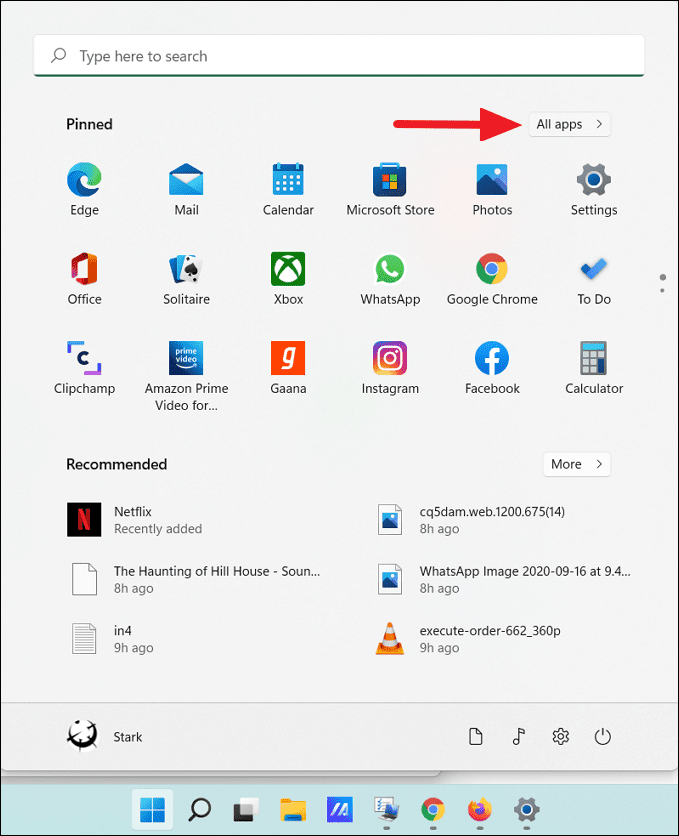
Next, find the app in the list of apps. Then, right-click the app you want to add to the taskbar, hover over ‘More >’, and select ‘Pin to taskbar’.
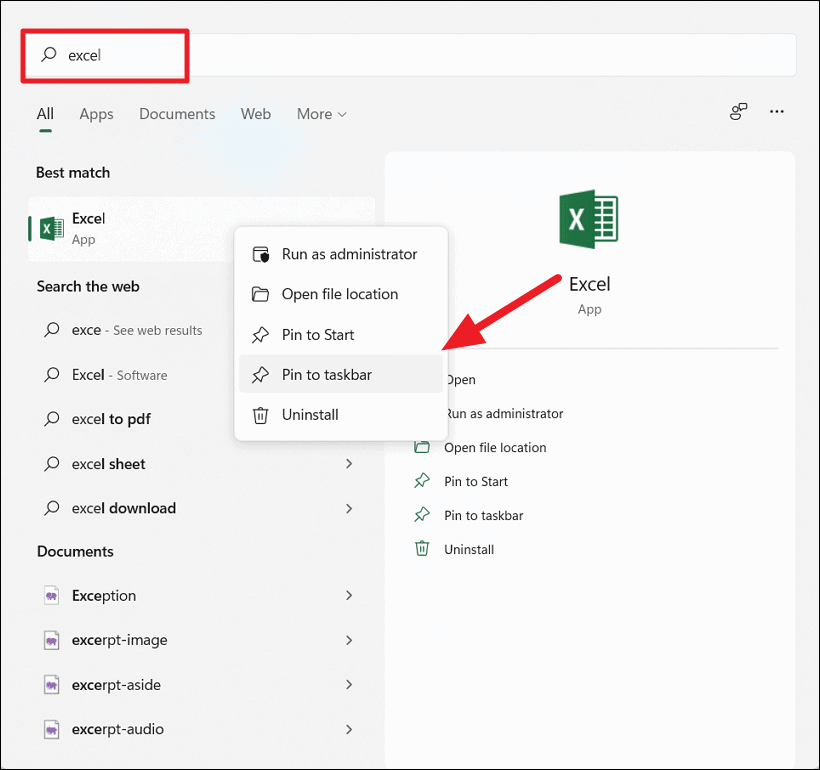
Alternatively, you can also search for the app, right-click the app from the result, and select ‘Pin to taskbar’
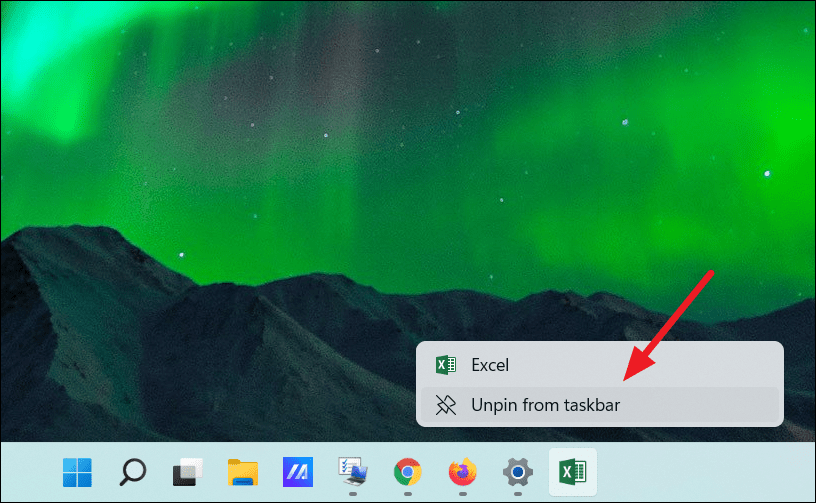
To unpin or remove the apps from the taskbar, right-click the app from the taskbar and click ‘Unpin from taskbar’.
In the previous Windows version, you could easily access Task Manager by right-clicking the Taskbar, but in Windows 11 that option is removed. If you’re wondering how to quickly access the Task Manager, then you can right-click the ‘Start’ menu and select it from the menu. Or, you could pin it to the Taskbar for easy access.
Customize Quick Settings flyout
The Quick Settings is a new flyout panel that allows you to quickly toggle essential system settings without digging through menus. You can access it from the taskbar corner or through a shortcut. You can also add or remove items from the Quick Settings flyout using these steps:
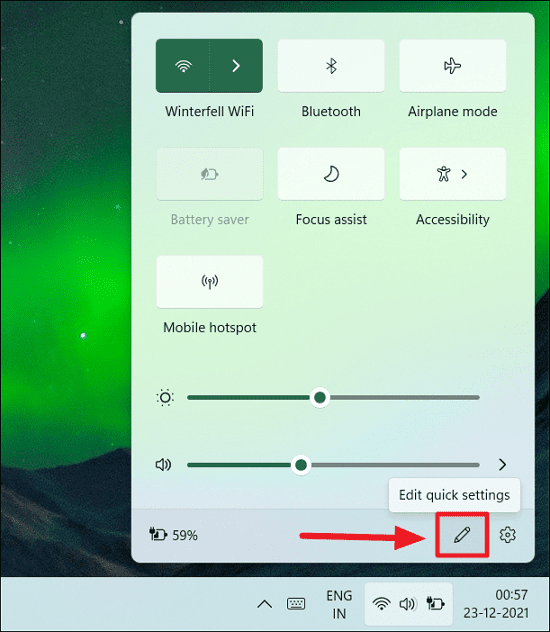
Click on the combined ‘network, volume, and battery’ button in the right corner of the taskbar or press Windows+A to open the quick settings.

To edit the items, click the ‘Edit Quick Settings’ (Pen) button.
To add a new item, click the ‘Add’ button and select the settings you want to add from the menu. Here’s we’re adding ‘Night light’ which is one of the most useful settings you can have in the Quick Settings.
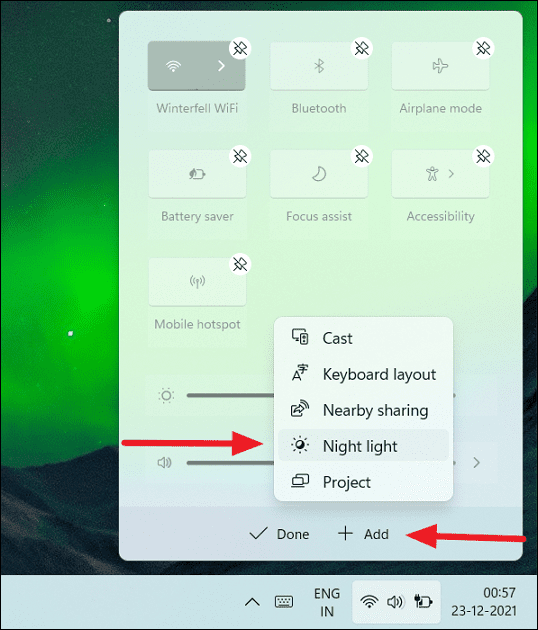
To remove an item from the panel, click the ‘Unpin’ button at the top of the item.
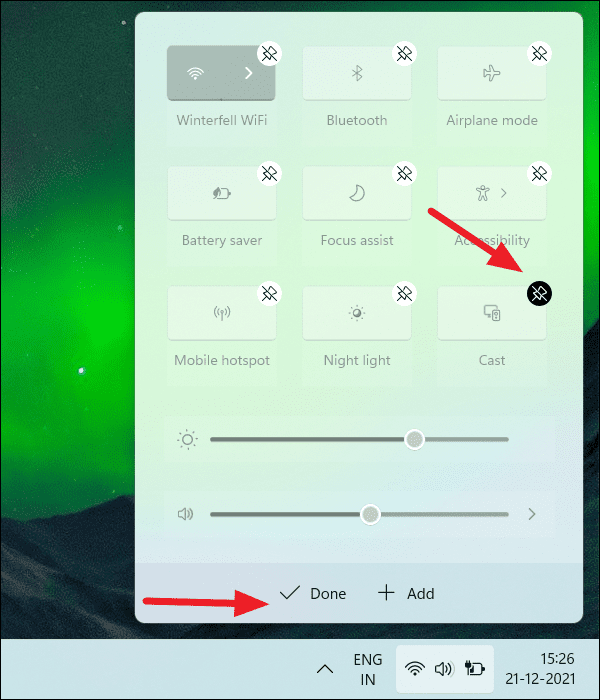
You can also move the setting, by dragging the item to the position you want. When you’re done, click ‘Done’ to save the changes.
You can also change the color of the Quick settings along with other elements by changing the lighting mode or accent color.
Customize Desktop Icons on Windows 11
You can also customize the Desktop and its icon to change the look and feel of Windows 11.
Change Desktop Icons
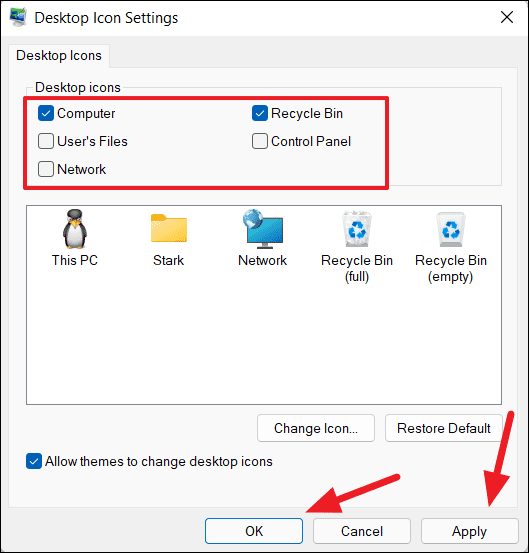
To change the Desktop icons for This PC, Network, Recycle bin, User’s Files, and Control panel, follow these steps:
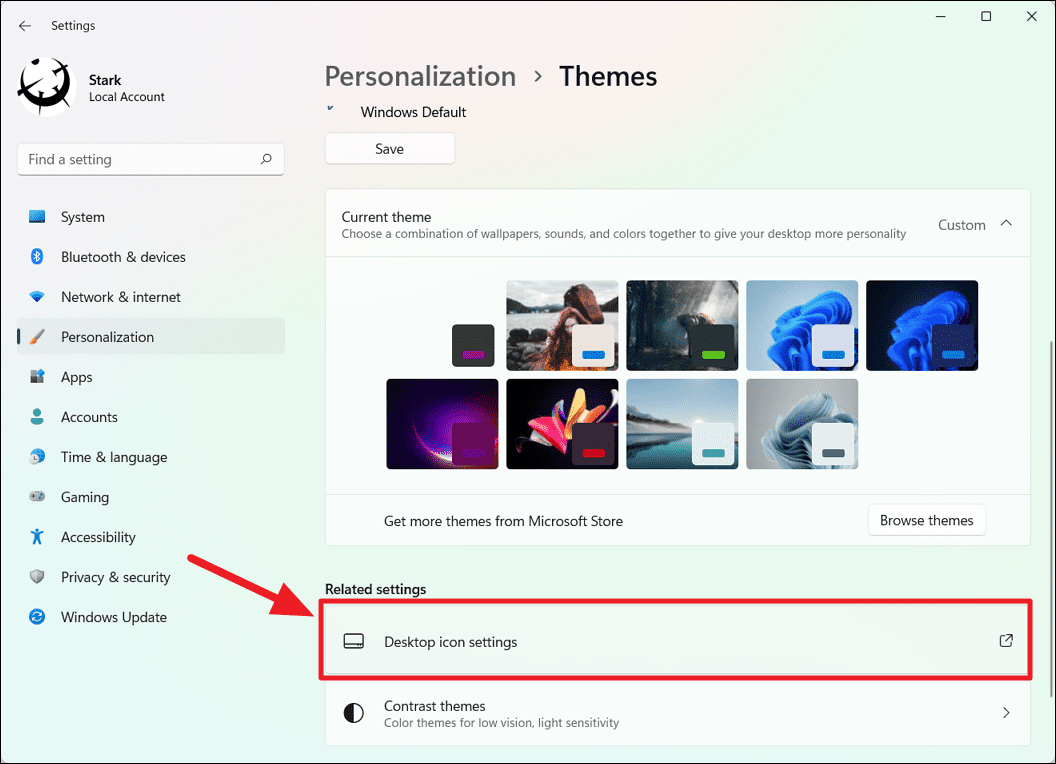
Go to Settings > Personalization > Themes and select the ‘Desktop icon settings’ option under Related settings.
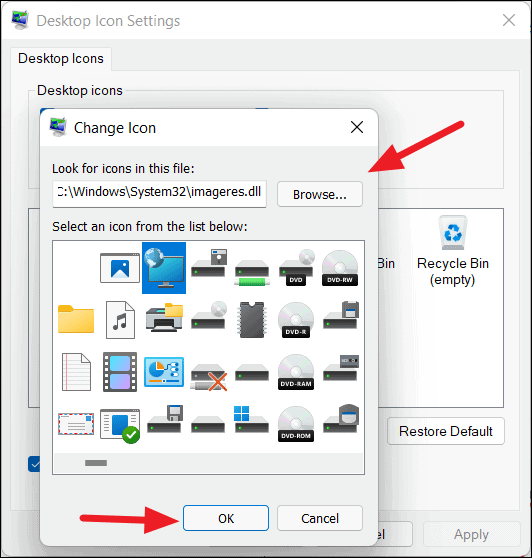
This will open up the Desktop Icon Settings dialog box. To change a desktop icon select the icon and click the ‘Change icon’ button.
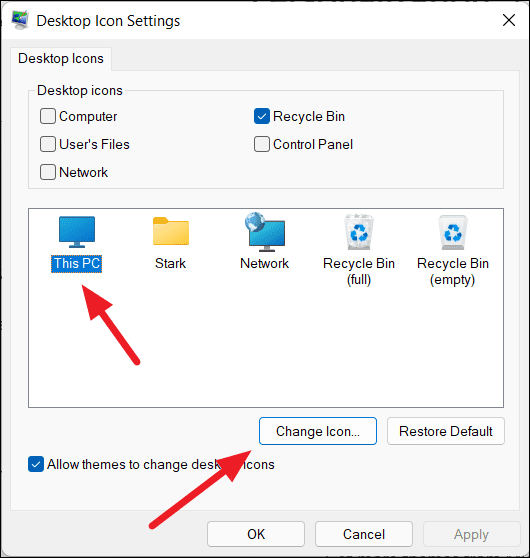
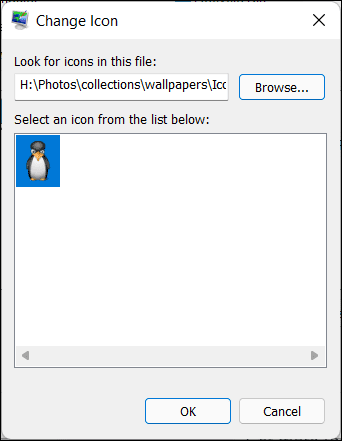
Then, select an icon from the list of icons and click ‘OK’. However, if you want to set your own custom icon, click the ‘Browse…’ button.
If you have your own icon, select it from the local drive and click ‘OK’

Then, click ‘OK’ again in the Change Icon box.
By default only ‘Recycle Bin’ shows on the desktop of Windows 11. If you want to include other desktop icons, check those icons under the ‘Desktop icons’ section. Then, click ‘Apply’ and then ‘OK’.
Hide Desktop Icons
If you feel your Desktop is cluttered with too many shortcuts, icons, files, and others, you can easily hide all desktop icons and files. Hiding the Desktop icons will make your desktop clean with only the background. Here’s how you do this:
Right-click on an empty section of the desktop and click the ‘View’ option from the context menu. Then, click the ‘Show desktop icons’ option from the View sub-menu.
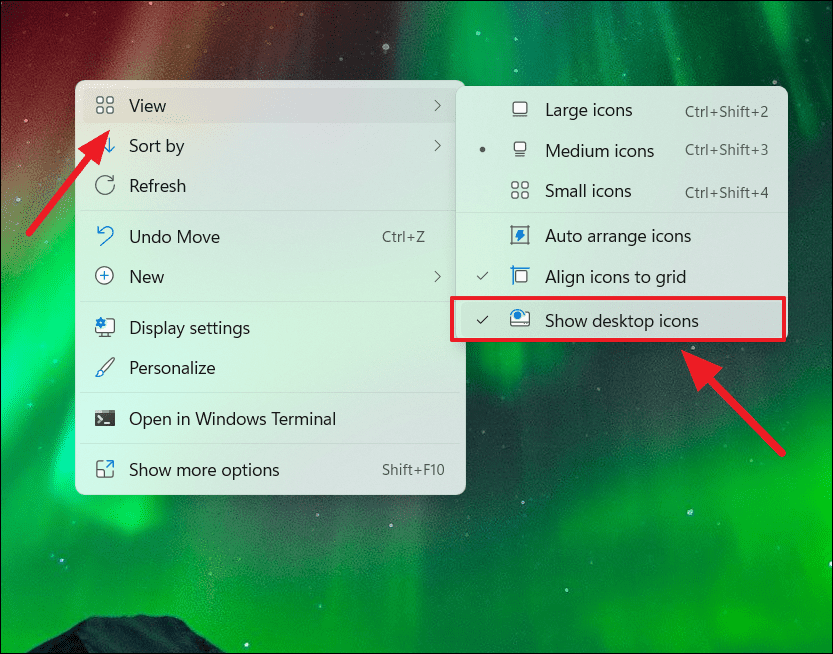
This will hide all the desktop icons from the desktop as shown below.
To display the desktop icons again, toggle the ‘Show desktop icons’ option from the context menu again. From the same View sub-menu, you can also change the size of the desktop icons.
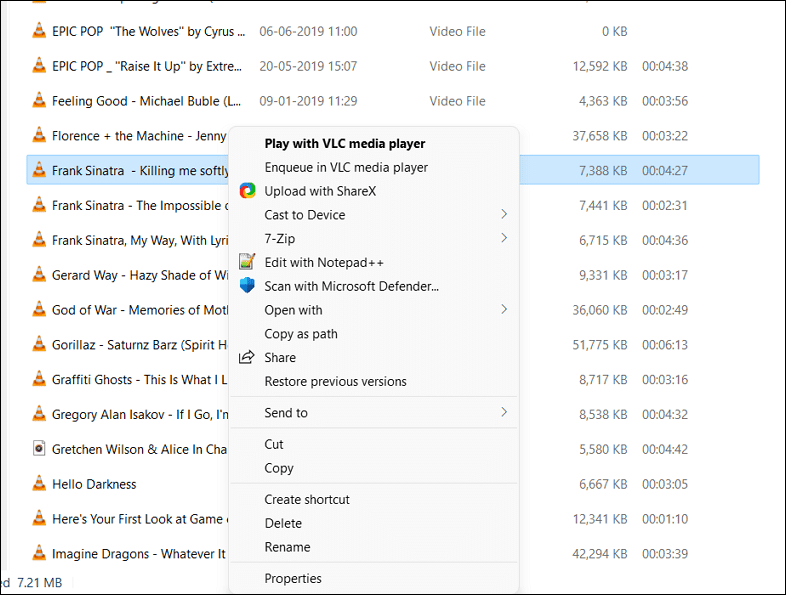
Get the Classic Context Menu on Windows 11
In the new minimalized right-click or context menu of File Explorer and Desktop, Windows 11 compresses all the pro options into a ‘Show more options’ button. If you don’t like the new context menu or you’re tired of going through the ‘Show more options’ button to get to the full context menu options, you can get back to the classic context menu of Windows 10.
Bringing back Windows 10 Context Menu to Windows 11 can change the Windows look and experience in many ways. Here, how you can bring back the old context menu:
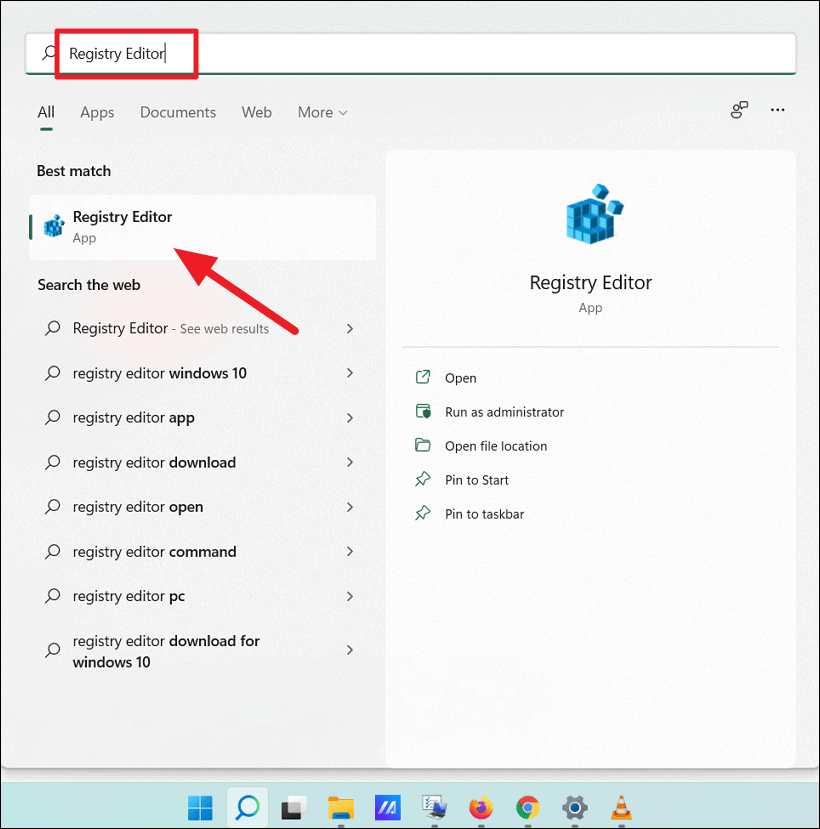
To get back the classic context menu on Windows 11, open the Windows ‘Registry Editor’ by searching for the ‘Registry Editor’ in the Windows Search and selecting the top result.
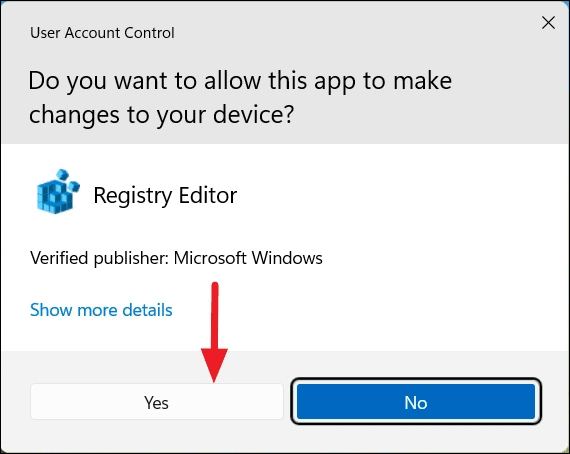
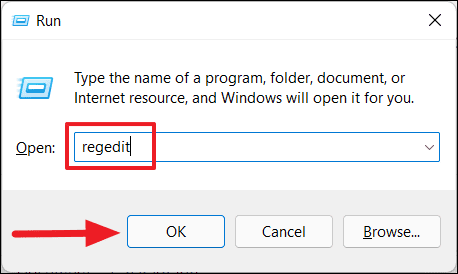
Or, press Win+R, enter ‘regedit’ in the Run command, and hit Enter. Then, click ‘Yes’ if asked for permission by User Account Control.
Once registry editor opens, navigate to the following folder or copy and paste the below path in the address bar of the Registry Editor and press Enter:
HKEY_CURRENT_USER\SOFTWARE\CLASSES\CLSIDNext, right-click the ‘CLSID’ folder, click ‘New’, and then select ‘Key’. Or go to the ‘CLSID’ folder, then right-click on an empty space in the right pane and select ‘New’ > ‘Key’.
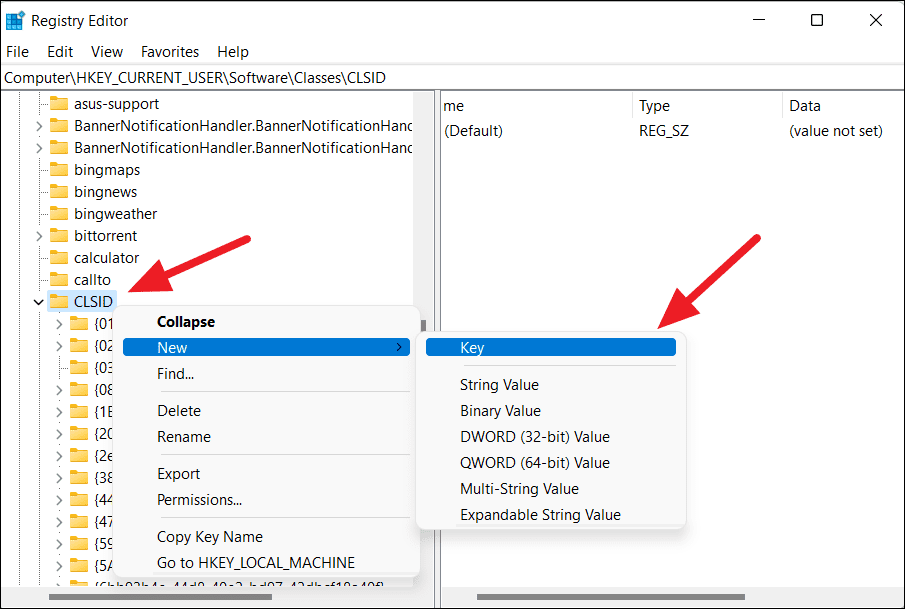
This will create a new key (folder) under the CLSID folder.
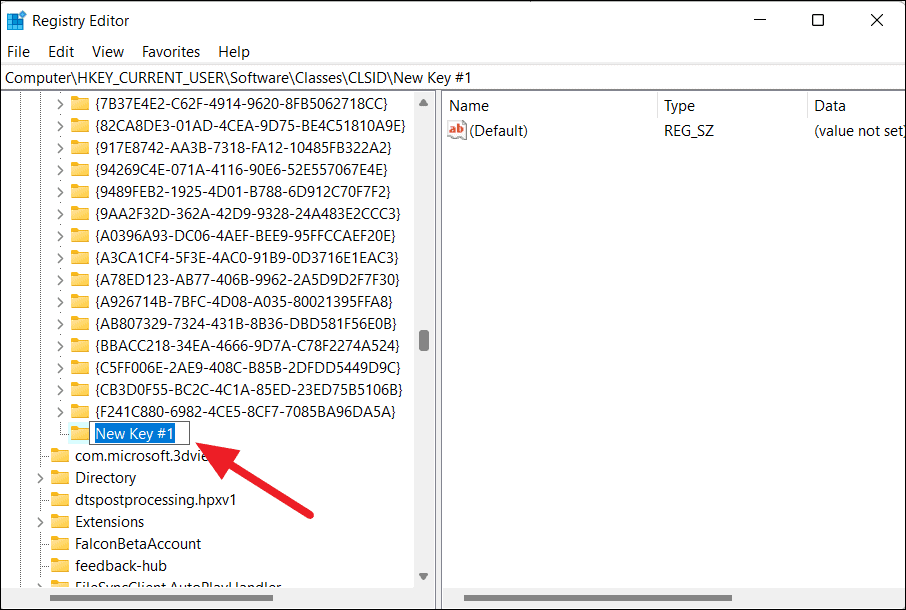
Then, rename the key to the following string or copy-paste the below string to the key name:
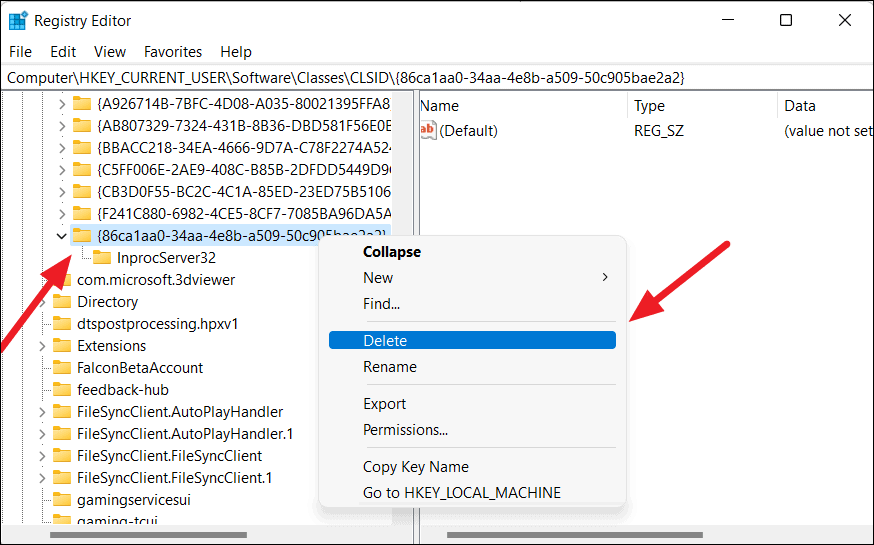
{86ca1aa0-34aa-4e8b-a509-50c905bae2a2}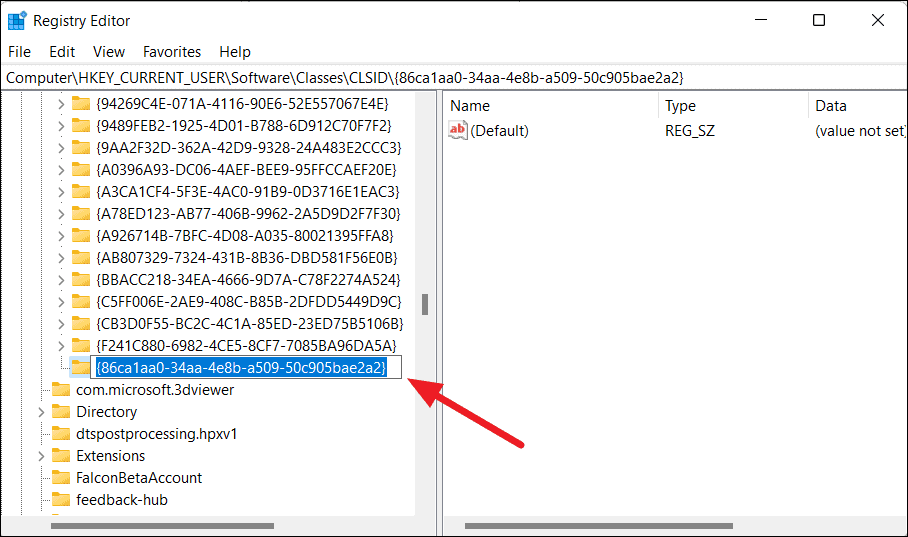
Now, right-click on the newly created and renamed key, and select ‘New’ > ‘Key’ again to create a sub-key.
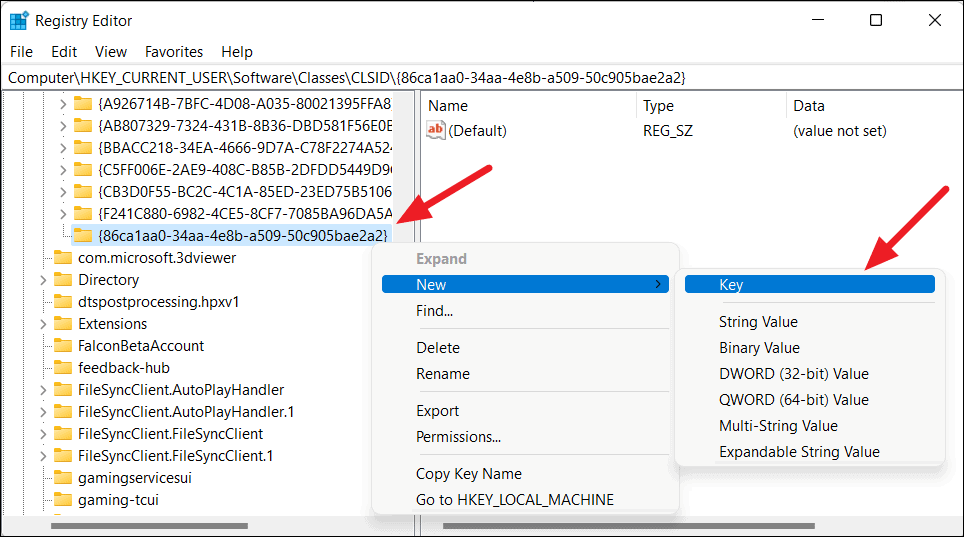
Then, rename this new subkey to InprocServer32.
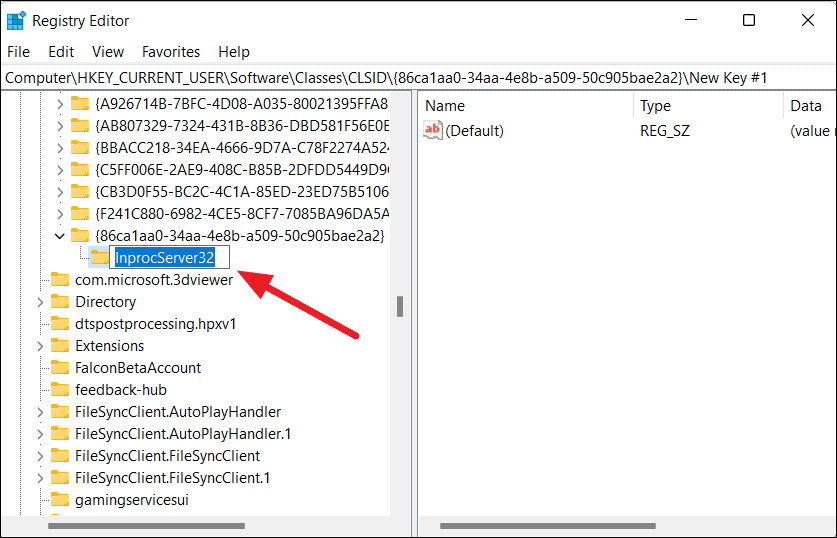
Next, double-click on the ‘Default’ registry file in the right pane of the ‘InprocServer32’ key to edit it.

In the Edit String dialog box, leave the ‘Value data’ field blank and click ‘OK’ or press Enter. Remember the value field must be left empty not 0.

Then, close the Registry Editor and restart your computer. After the system restarts, right-click on the File Explorer or on the desktop to see the full classic content menu.
If you have trouble editing the registry, you can download this registry file, extract and run the file to enable or disable the classic context menu.
To restore the new Windows 11 context menu, locate the newly created key i.e. {86ca1aa0-34aa-4e8b-a509-50c905bae2a2} and delete it from the Registry editor.
After that, restart your system to restore Windows 11’s default context menu.
Bring Back Windows 10 File Explorer to Windows 11
Windows 11 ships with a simplified File Explorer which lacks a helpful Ribbon menu and many other options that you see in Windows 10’s File Explorer. The new File Explorer only has functions such as Copy, Cut, Paste, Sort, etc. as buttons at the top of the file explorer.
If you don’t like the new File Explorer on Windows 11, you can restore the old ribbon-style File Explorer by tweaking your registry. Follow the steps below to restore the classic File Explorer on Windows 11:
First, launch the Registry editor as you did above. Open the Run box by pressing Win+Rshortcut, type regedit, and then press Enter.
In the Registry Editor, navigate to the following path or paste the below command in the address bar of the Registry Editor and press Enter.
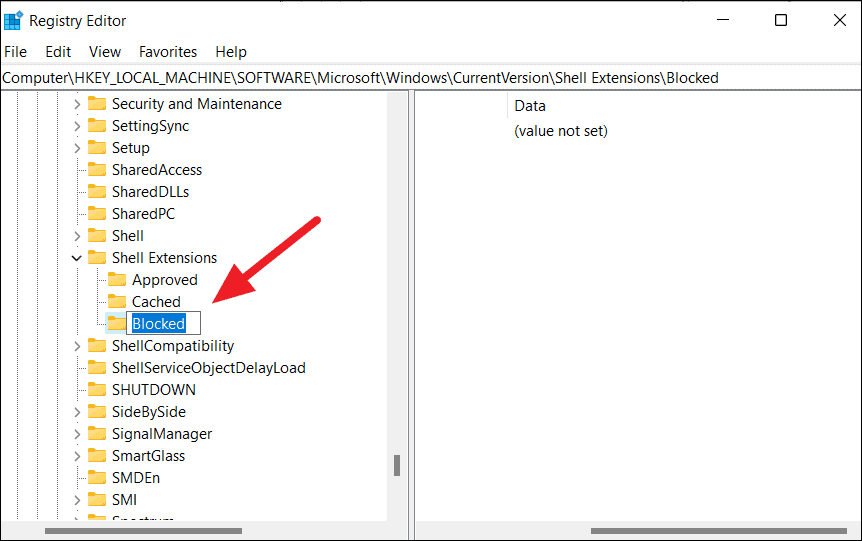
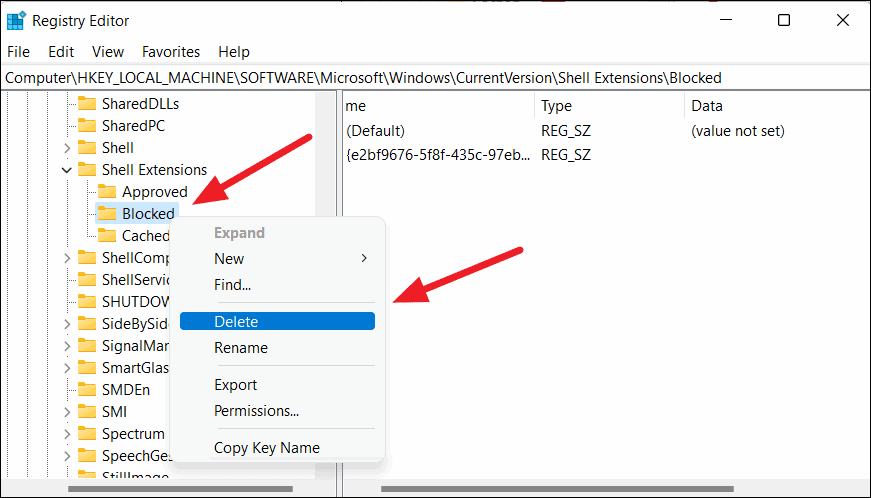
Computer\HKEY_LOCAL_MACHINE\SOFTWARE\Microsoft\Windows\CurrentVersion\Shell ExtensionsNext, right-click the ‘Shell Extension’ folder on the left-hand side and click ‘New > Key’.
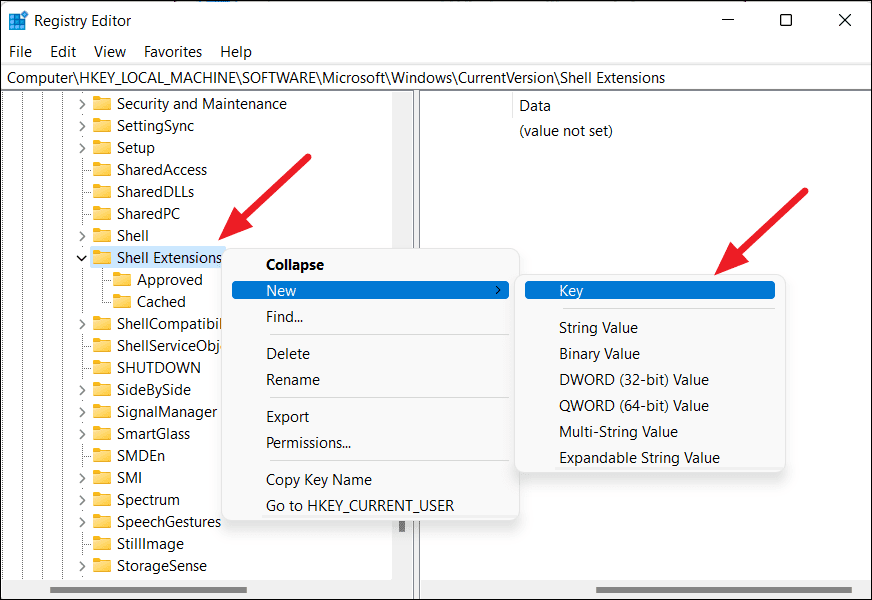
Then, name the new key as ‘Blocked’.
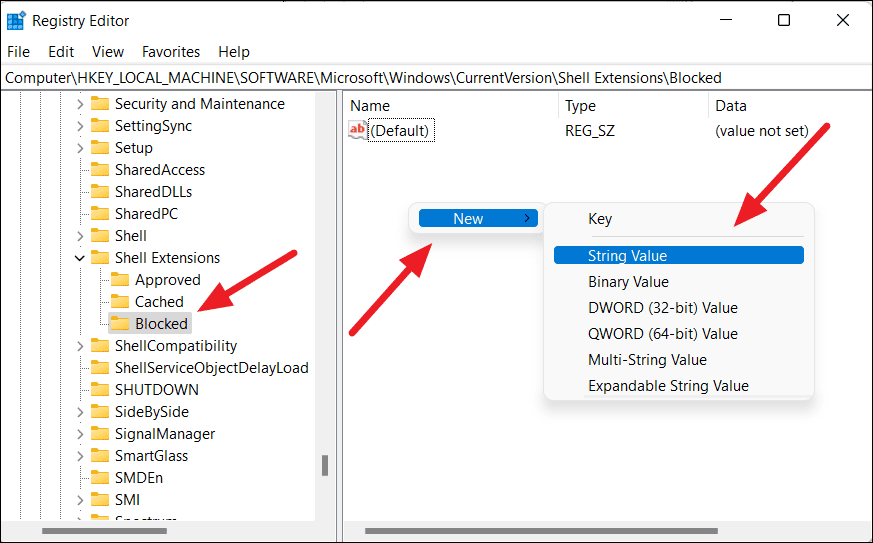
Now, select the newly created Blocked key and then right-click on the empty space on the right side. Then, select ‘New > String Value’ to create a new string value.
Now, name the new String Value to the string mentioned below and press Enter:
{e2bf9676-5f8f-435c-97eb-11607a5bedf7}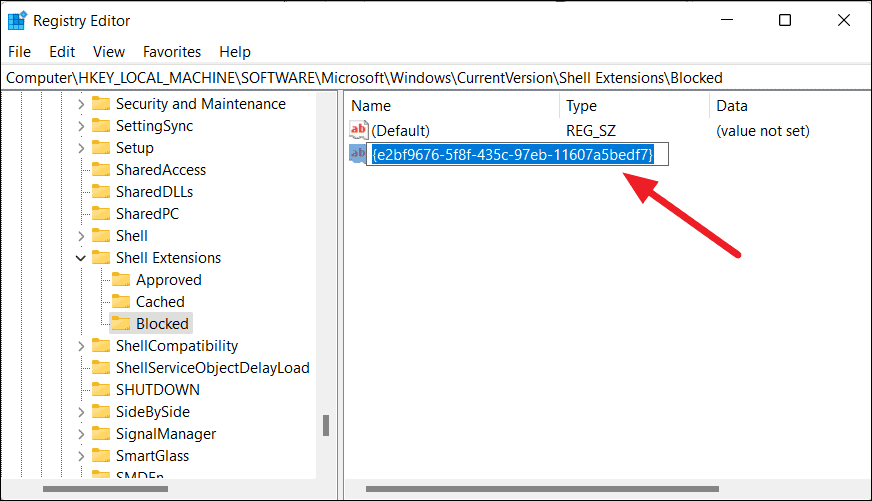
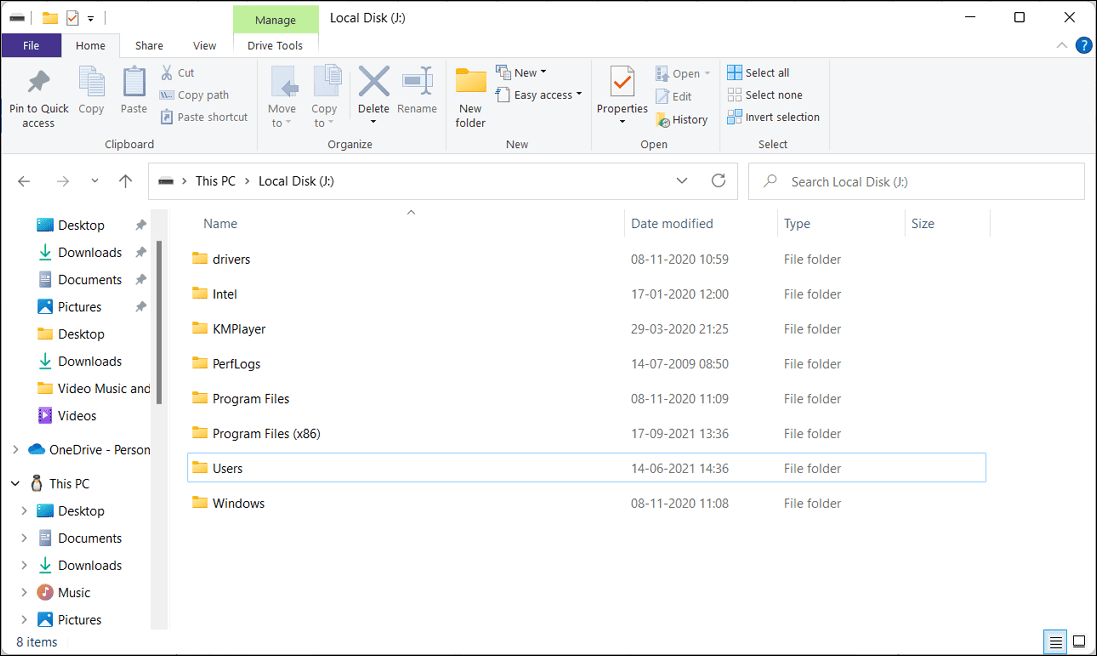
After that, close the Registry Editor and restart your PC. Once your system boots up, you will see the classic Windows 10 File Explorer in Windows 11 but some options may be slightly different (as shown below).
To restore the new default Windows 11 File Explorer, simply delete the ‘Blocked’ key (folder) you created in the Registry Editor.
That’s it.


