
The Blue Screen of Death (BSOD), also referred to as the Stop Code error, is a common occurrence for Windows users. Originating from Windows NT 3.1, this error continues to persist. It’s essential to understand how to manage it when it arises. The BSOD error manifests during critical system errors, indicating an issue with the computer’s hardware or software.
Upon detecting a significant error, Windows halts all operations, displays an error message with the stop code (SYSTEM_SERVICE_EXCEPTION), and initiates a reboot to minimize potential harm to the device.
The System Service Exception is a frequent issue in Windows, occurring during activities such as gaming, hardware overclocking, driver installation, and Windows updates. Identifying the services, programs, or drivers causing the issue can help you resolve the error through the suitable troubleshooting steps.
This article presents several troubleshooting methods to address the Blue Screen SYSTEM_SERVICE_EXCEPTION errors in Windows 11.
What is System Service Exception Error and Why Does it Happen?
The ‘SYSTEM_SERVICE_EXCEPTION’ error is a type of Blue Screen of Death (BSOD) that may occur in Windows 11 due to various factors. This error typically implies that certain programs, drivers, or incompatible hardware are interfering with your system services. Often, the specific cause of the problem is mentioned in parentheses next to the System Service Exception error code, providing insight into the service or program at fault.
This error may occur once or repeatedly, potentially leading to unexpected system crashes and potential data loss. After a BSOD event, Windows will attempt to auto-recover by restarting the system. If this automatic recovery process fails, manual repair of your computer may be necessary.
The following are common factors that may trigger the ‘System Service Exception’ error in Windows 11:
- Faulty or Outdated hardware drivers, especially GPU drivers
- Running an Older Version of Windows
- Damaged system files
- Viruses, malware, or other malicious programs.
- Bugs or errors in new Windows updates.
- Graphic user interface errors
- Improperly seated or Corrupted RAM
- Overclocking GPU or CPU
The stop code is typically followed by the name of the service or drive, such as Dxgkrnl.sys, Ntfs.sys, or 0x0000003b, that triggered the error. This information aids in identifying and resolving the issue.
Here are some frequently encountered SYSTEM_SERVICE_EXCEPTION stop codes:
- SYSTEM_SERVICE_EXCEPTION 00000000`, c0000005
- SYSTEM_SERVICE_EXCEPTION 0x0000003b
- SYSTEM_SERVICE_EXCEPTION DellInstrumentation.sys
- SYSTEM_SERVICE_EXCEPTION dxgkrnl.sys, Dxgmms2.sys
- SYSTEM_SERVICE_EXCEPTION Win32kbase.sys, ks.sys
- SYSTEM_SERVICE_EXCEPTION Asmtxhci.sys
- SYSTEM_SERVICE_EXCEPTION Ntfs.sys
- SYSTEM_SERVICE_EXCEPTION Rtkvhd64.sys
- SYSTEM_SERVICE_EXCEPTION Igdkmd64.sys
- SYSTEM_SERVICE_EXCEPTION Nvlddmkm.sys
- SYSTEM_SERVICE_EXCEPTION Registry.sys
- SYSTEM_SERVICE_EXCEPTION tm.sys
1. Update your Device Drivers
Windows Update usually keeps your drivers up-to-date. If the Windows Update doesn’t solve this problem, you need to manually update or re-install your device drivers. The BSOD error is also caused by incompatible or faulty drivers. Here’s how you do this:
Type ‘Device manager’ in the Start menu search bar and select the Best match or Open the Run command, type devmgmt.msc and hit Enter.

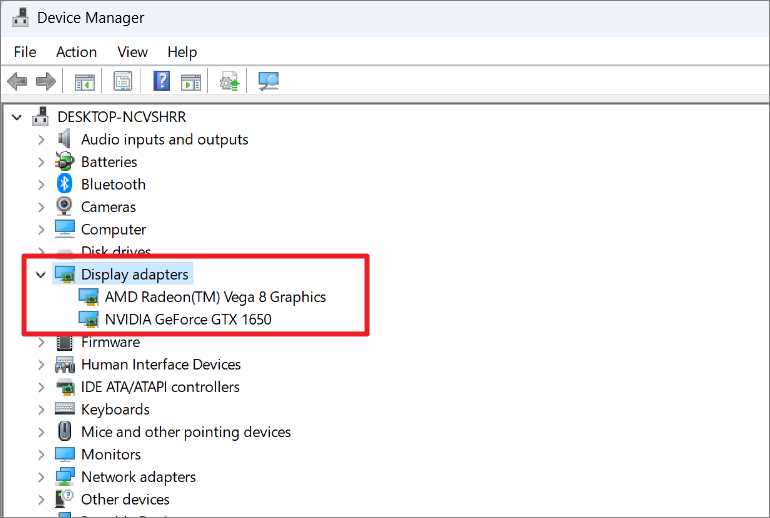
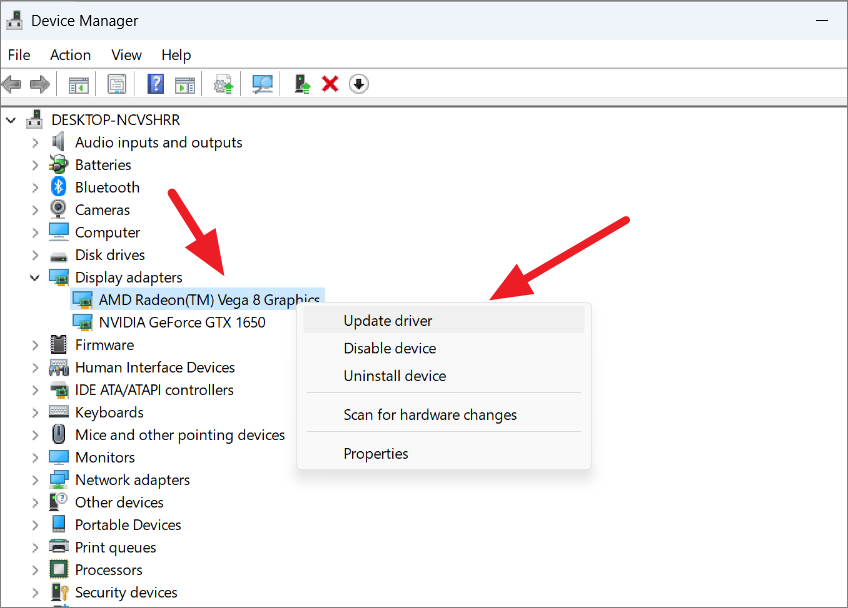
In the Device Manager, click on the arrow button to expand the driver category. Expand each device category and check for an error symbol in any of the device names. If so, update that driver by right-clicking on the device name and selecting the ‘Update driver’ option.
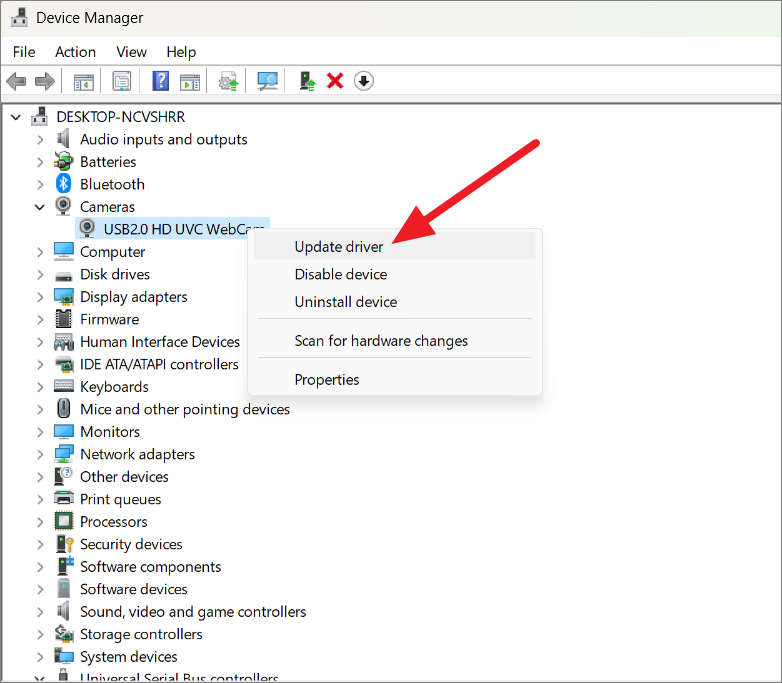
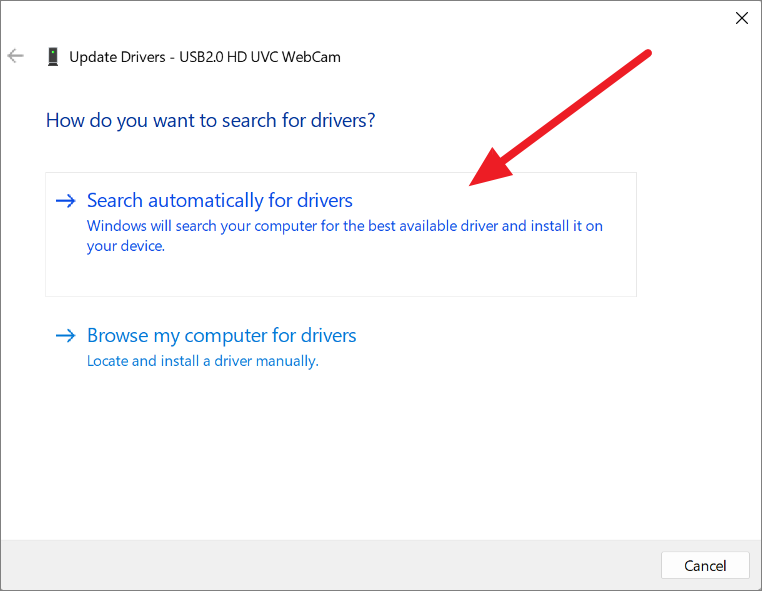
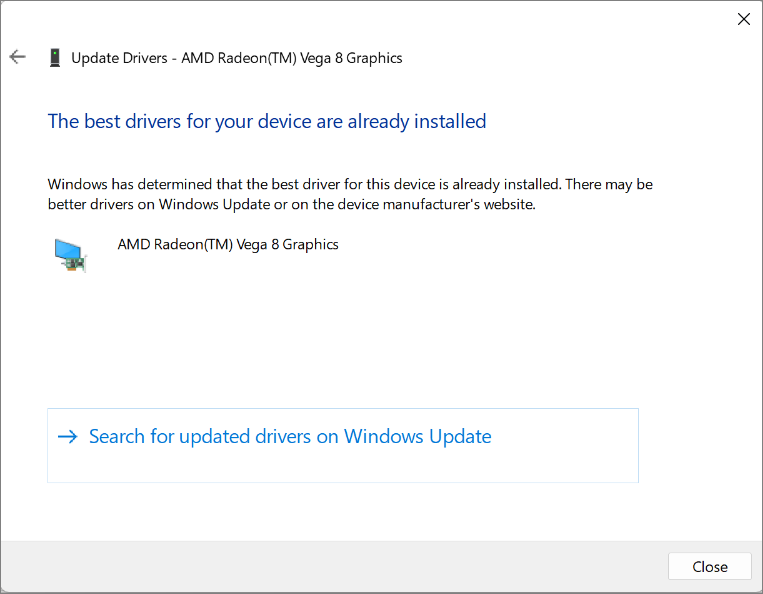
Then, select the ‘Search automatically for drivers’ option. The device manager will automatically search for the latest driver and update it. If the error symbol still remains, you can head to the device Manufacturer’s website and then download and install the respective drivers.
Even if there aren’t any errors on drivers, make sure to update the important drivers that might cause the BSOD errors. The important device drivers that need to be updated are Cameras, display adaptors, graphics drivers, audio drivers, etc. You can also visit your manufacturer’s website, download the latest drivers for devices and install them.
Also, there are automatic driver updater programs that can do this for you. Some of these include IObit Driver Booster, Snappy Driver Installer, DriverFix, etc.
2. Run System File Checker
System File Checker is a command-line utility built into Windows that will inspect all of the important Windows files and replaces incorrect, corrupted, or damaged files with a cached copy. In the event of a System Service Exception blue screen error, you can run an SFC scan to fix the error. Follow these steps to perform an SFC scan:
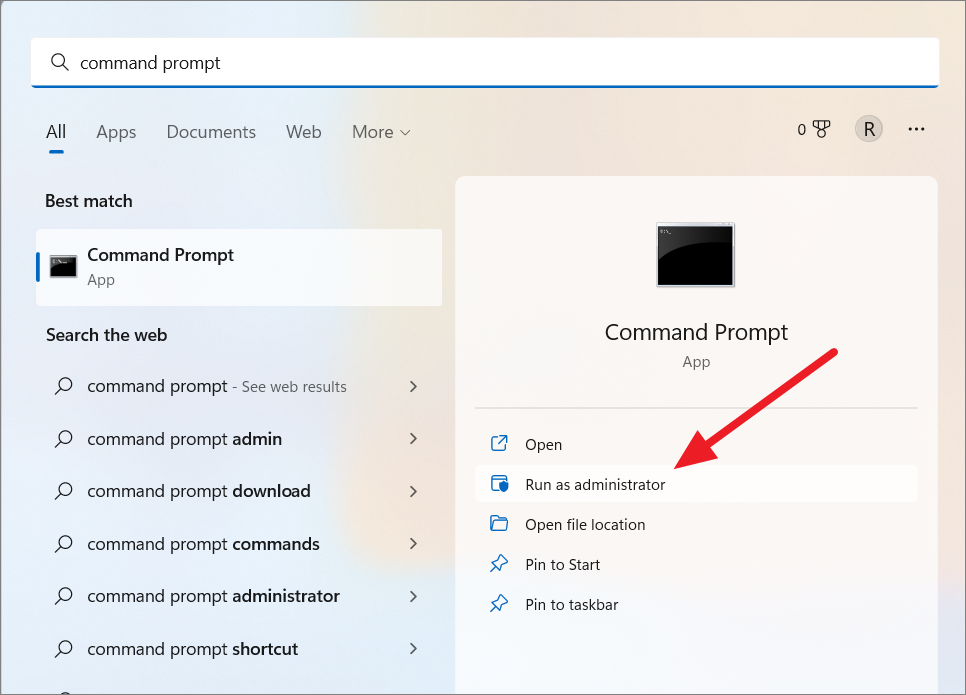
To start with, search for ‘Command Prompt’ or ‘Cmd’ in the ‘Start Menu’, right-click on the search result, and then select ‘Run as administrator’ from the context menu. Next, click on ‘Yes’ in the confirmation box that pops up.

In the ‘Command Prompt’ window, enter the following command and then press ENTER to execute it.
sfc /scannow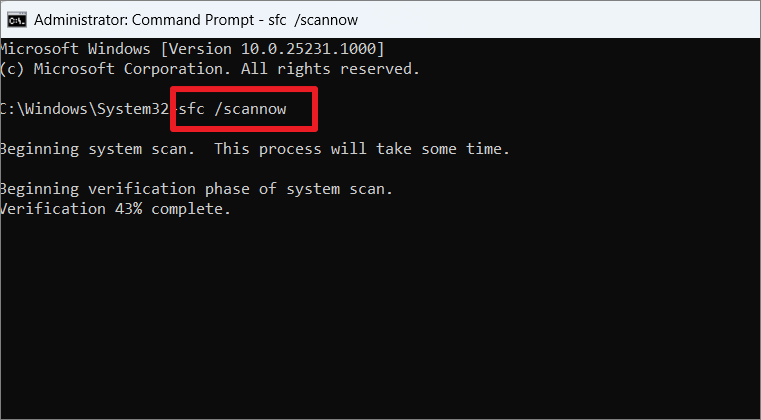
It will take a while to complete the scan. The system file checker will check for corrupt files and automatically replace them for you. Once it is complete, restart your computer and check if the error is fixed.

If Windows Resource Protection did not find any errors, you can run the CHKDSK and DISM command-line tools.
3. Run CHKDSK to Repair Disk and System Errors
Next, try running Windows Check Disk tool from the Command Prompt. Unlike the Sfc scan, it scans the whole drive rather than just the system files. CHKDSK is another command line that verifies the file system and fixes some issues with certain settings.
First, open Command Prompt as administrator. To run the Check Disk scan, enter the following command in Command Prompt and then press Enter to execute it.

The above-mentioned command will scan the C: drive. To scan other drives on your system, replace the driver letter, C, at the end with the drive letter of the drive you want to scan next.

This command will scan your disk for bad sectors and errors in the system files and repair them.
4. Repair Windows Component Store with DISM Command
DISM (Deployment Image Servicing and Management) is a command-line tool that allows administrators and experts to scan and repair Windows images including, Windows Recovery Environment, Windows Setup, and Windows PE (WinPE). It can be used for online and offline health scans and repair of the compromised Windows component store.
DISM will automatically download the required images and files from the Microsoft server and replace the corrupt files. For this to work, you will need an active internet connection.
Open Command prompt with administrative privileges and type the following commands one after the other.
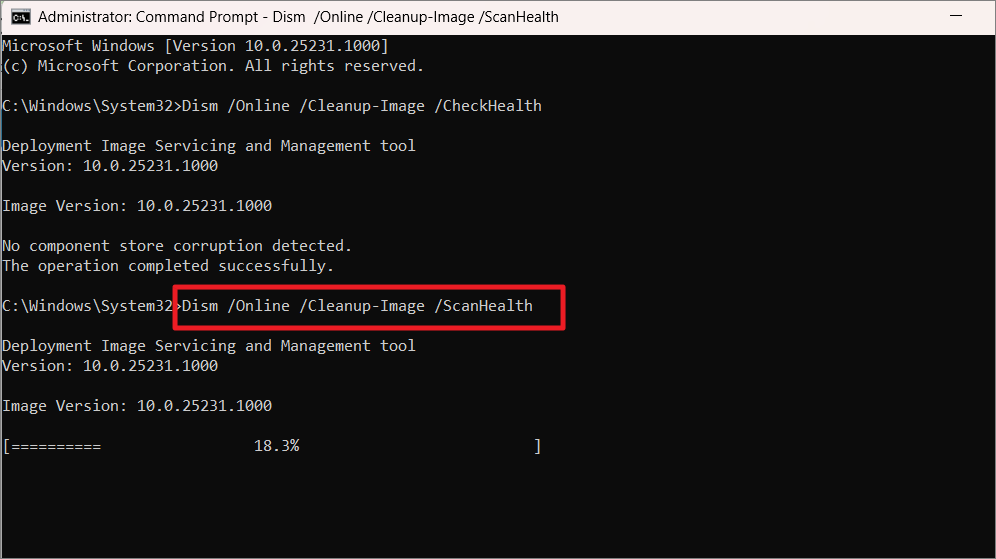
First, use the CheckHealth option with the DISM tool to determine any corruptions inside the local Windows image:
Dism /Online /Cleanup-Image /CheckHealth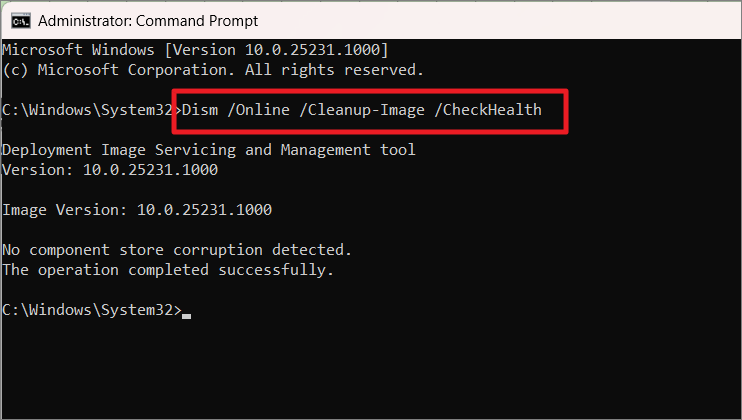
If no corruption is detected, you can use the ScanHealth switch to perform a more advanced scan to find out whether the image has any problems:
Dism /Online /Cleanup-Image /ScanHealthThis will take a few minutes to complete the process.
Finally, use the RestoreHealth option to download and replace the windows image using the Windows update:
Dism /Online /Cleanup-Image /RestoreHealth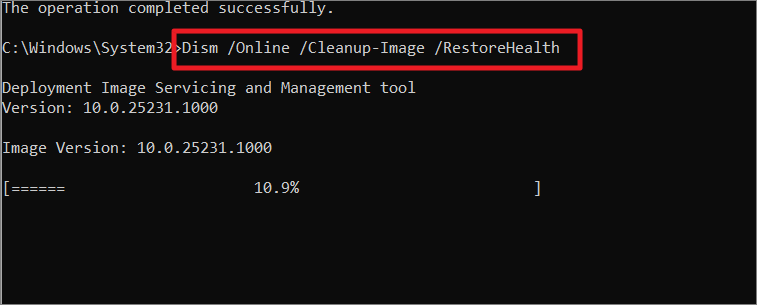
This will take 15 mins or more to complete the process, depending on the level of corruption.
5. Update Windows or Roll Back Updates
Most Windows errors can be fixed by Windows Update. Here’s how you run Windows Troubleshooter. If you’re running an outdated Windows build or if there are any bugs in the previous build, it can trigger this error. Here’s how you do this:
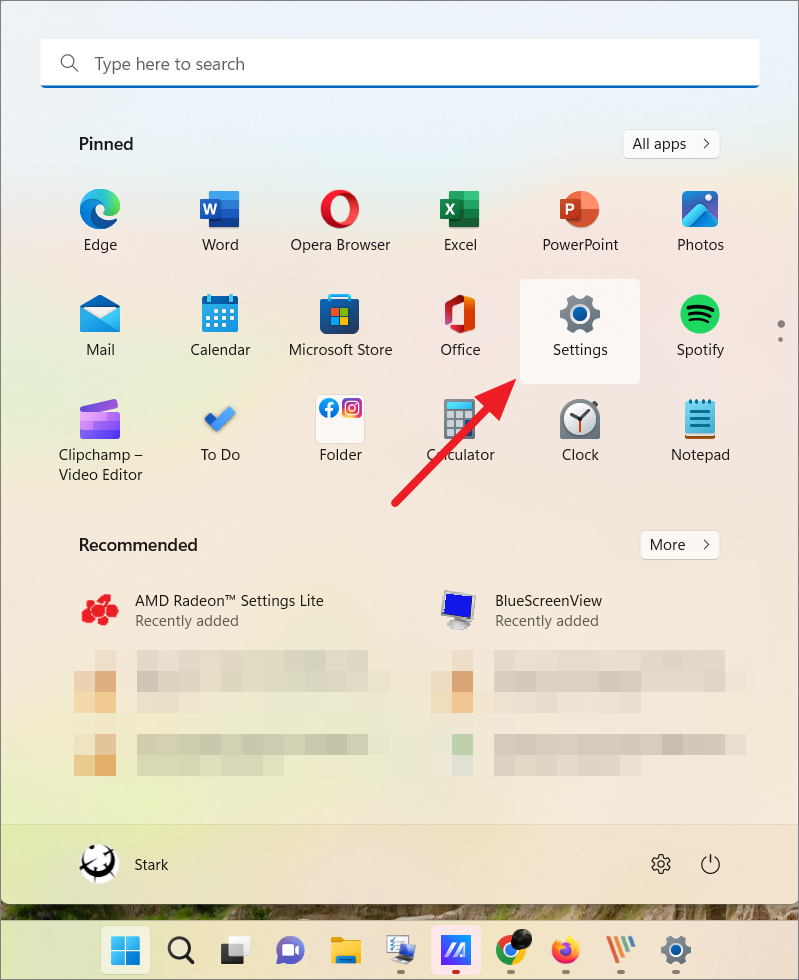
Launch Windows Settings by opening the Start menu and selecting ‘Settings’.
In the Windows Settings, select the ‘Windows Update’ tab on the left pane and click the ‘Check for updates’ button on the right-side pane.
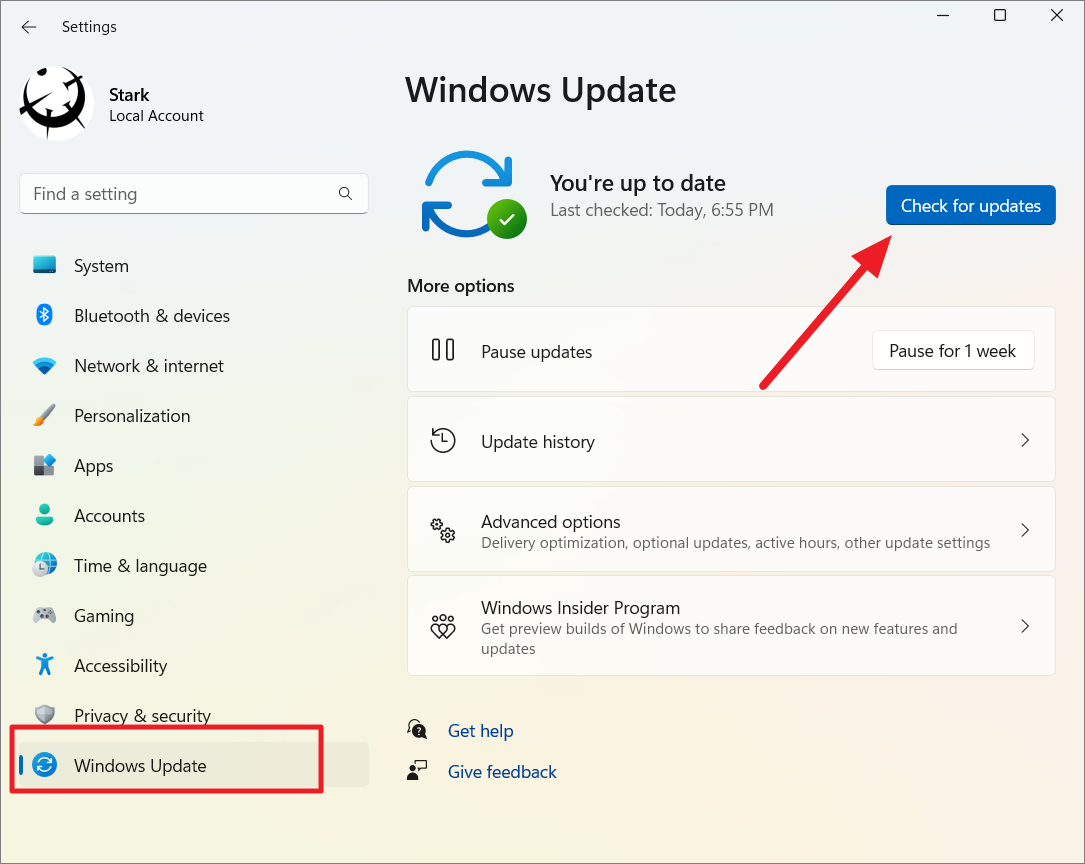
In case there is an update available, Windows will automatically download and install it through Windows Update. Sometimes, you have to manually select the ‘Install’ button to install the available updates.

After the update is finished, restart your computer.
Rollback Installed Updates
If the error started appearing after installing certain cumulative or feature updates that were not present before, then you need to uninstall that particular update. Let us see how to do that:
Open the Settings app, go to the ‘Windows Update’ section on the left sidebar, and click the ‘Update history’ option on the right.
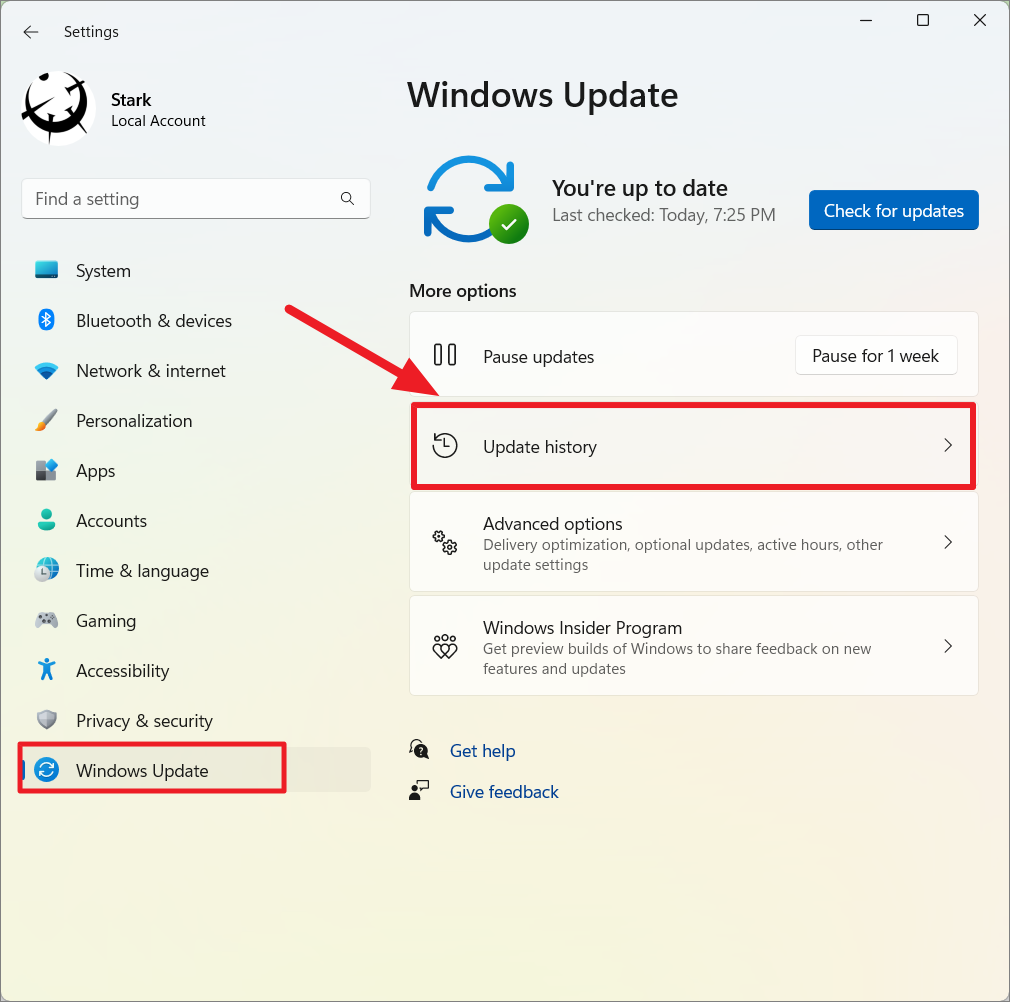
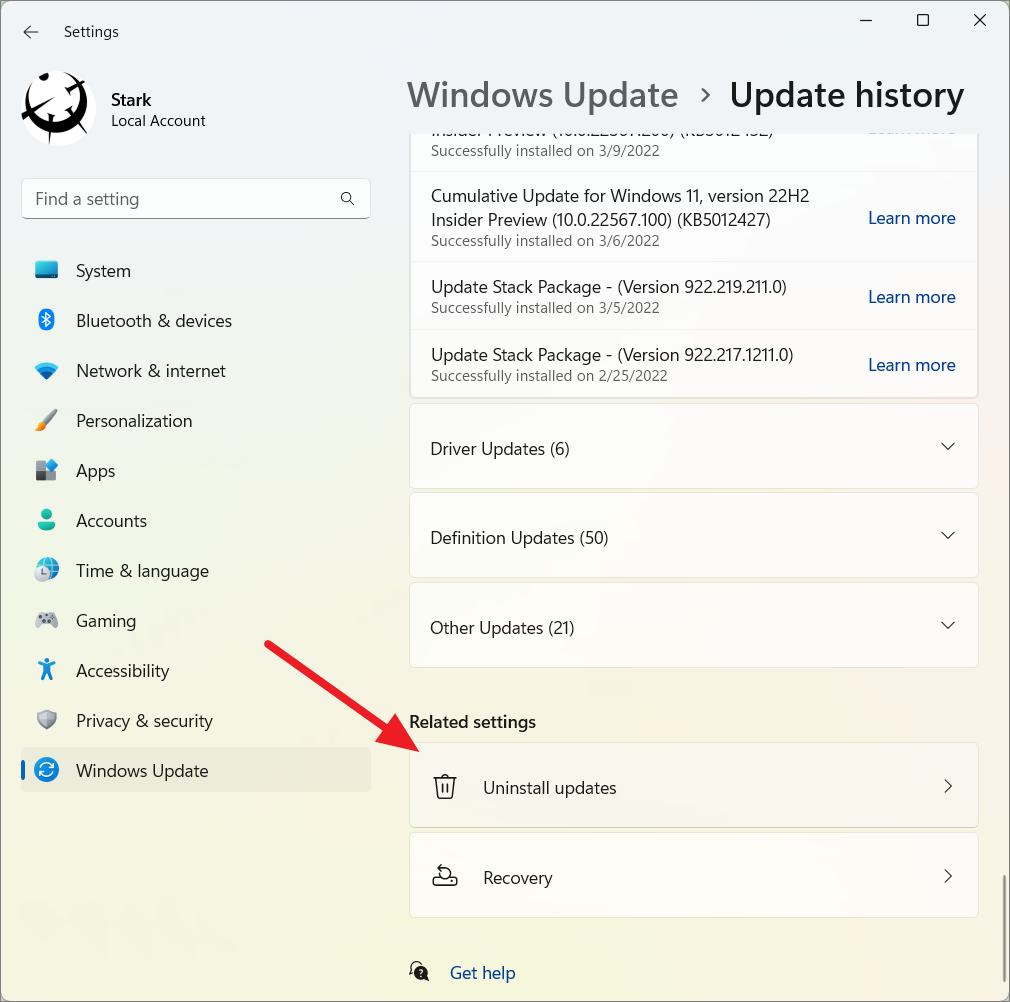
Under the Update history page, you can see the list of features, quality, driver, and security updates you have recently installed on your computer. Then, scroll down to the bottom of the Update history settings page, and click ‘Uninstall updates’ under Related settings.
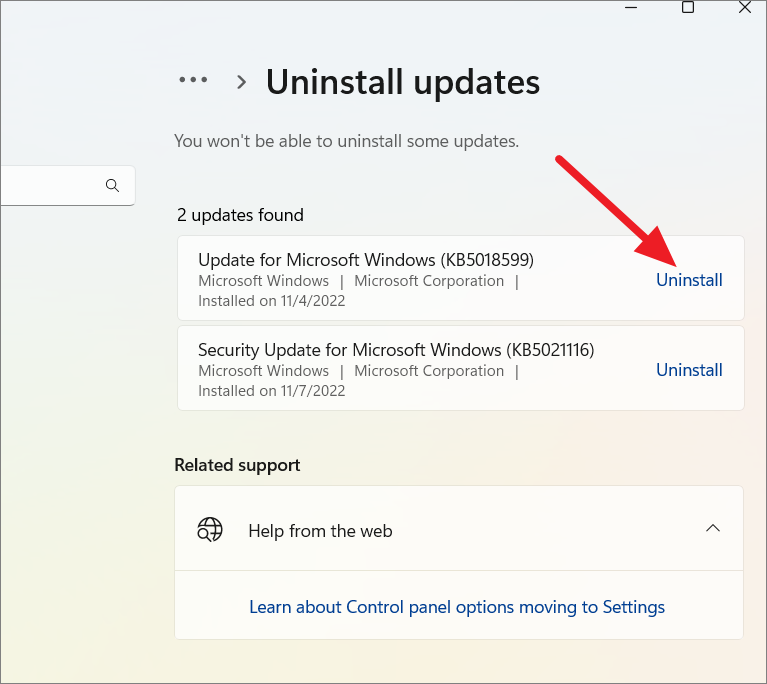
Here, you will see a list of updates that can be uninstalled. Click the ‘Uninstall’ button next to the update you want to uninstall.
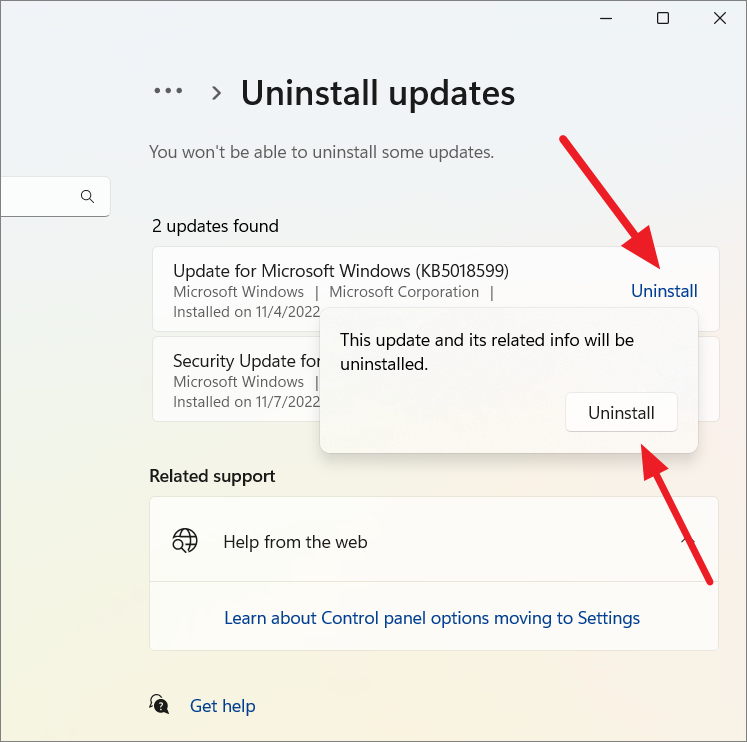
Then, click ‘Yes’ to the prompt.
Pause Update or Block Updates
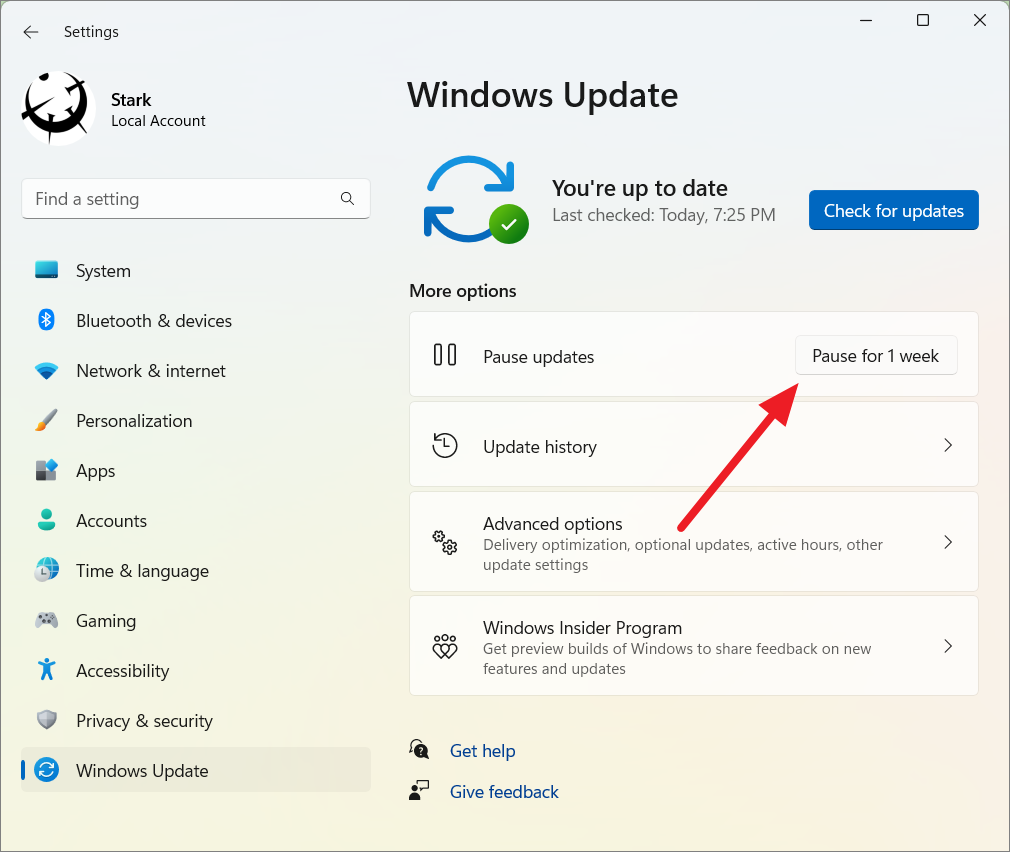
After uninstalling a problematic update, it will try to download and install itself again in the background, especially cumulative updates. To prevent this, you can pause the Windows updates for a while until the problem is fixed or more stable releases.
To pause updates temporarily for at least a week, open the Settings app again and go to the ‘Windows Update’ section. Then, click the ‘Pause for 1 week’ button under More options.
Windows 11 doesn’t allow you to completely turn off automatic updates. But you can still permanently turn off automatic updates with group policy or registry editor tweak. If you wish to until the problem is fixed or manually install different updates, you can turn off automatic updates permanently.
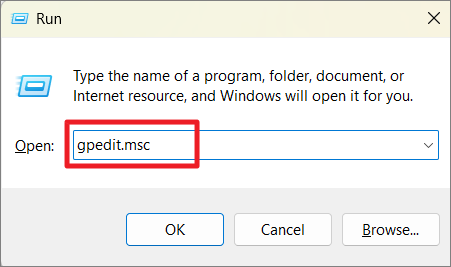
To permanently disable automatic updates, open the Local Group Policy Editor by typing gpedit.msc and hitting Enter.
Then navigate to the following location of the Local Group Policy Editor using the left navigation panel:
Computer Configuration > Administrative Templates > Windows Components > Windows Update > Manage end user experience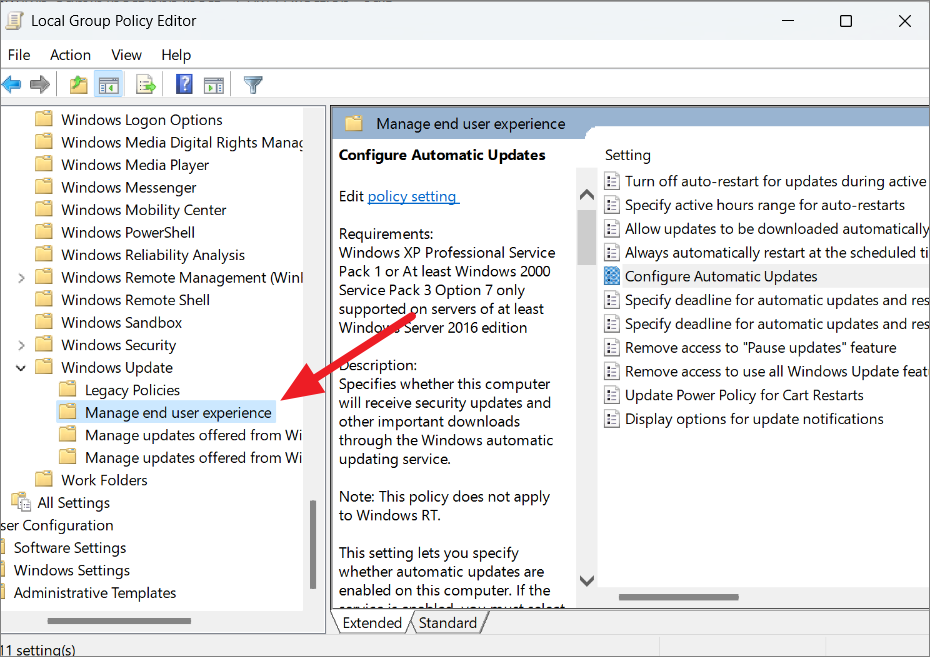
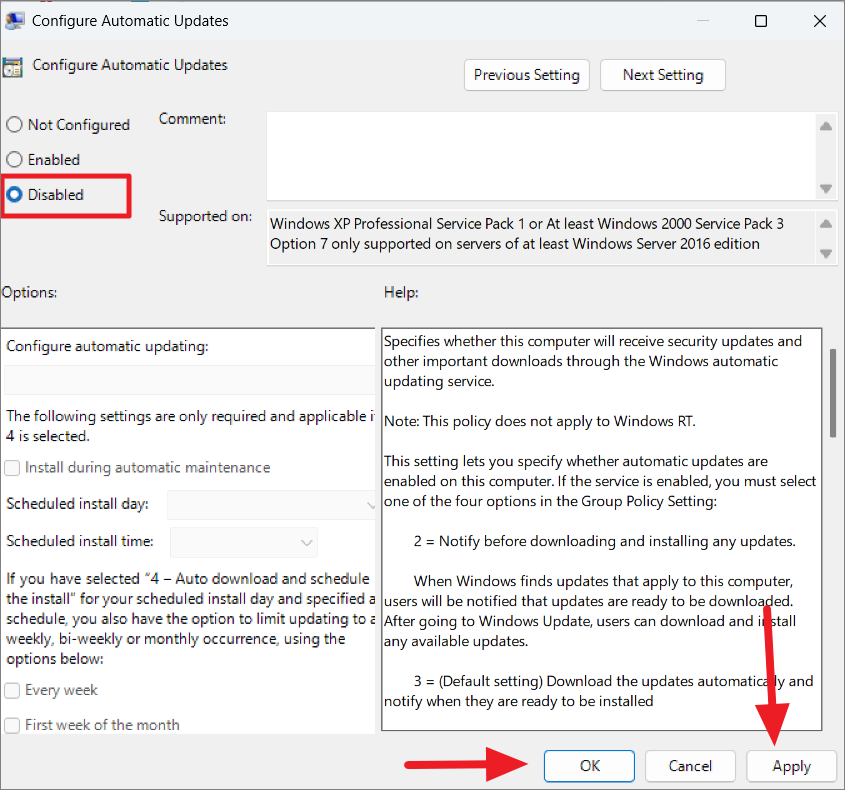
Now, locate and double-click upon ‘Configure Automatic Updates’ on the right-side panel.
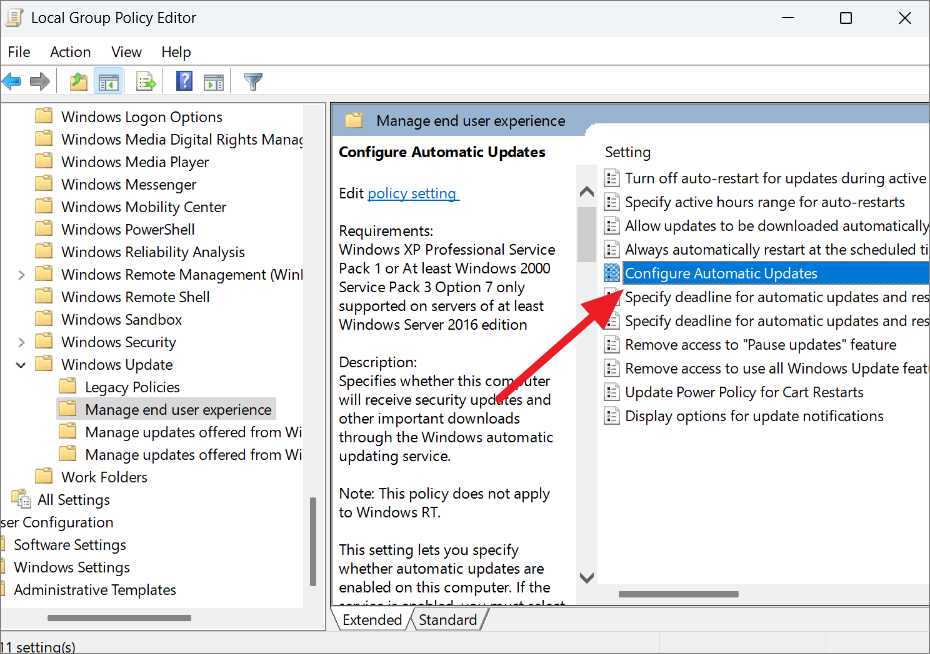
Then, select the ‘Disabled’ radio button, click ‘Apply’, and then ‘OK’.
6. Turn Off Google Update Service From Startup
In some cases, the System Service Exception STOP error code is caused by Google Update Service. Google update service keeps the Google apps on your device updated on your device. You can try disabling the Google update service from the startup to see if it solves the problem.
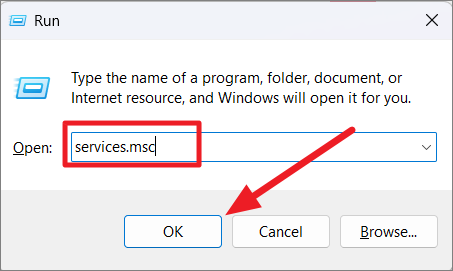
To start with, press Win+R to launch the Run dialog box, type services.msc and click ‘OK’.
When Service Manager opens, scroll down the list til you find the ‘Google Update Service (gupdate)’ service. Then, right-click on the service and select ‘Properties’ from the context menu.
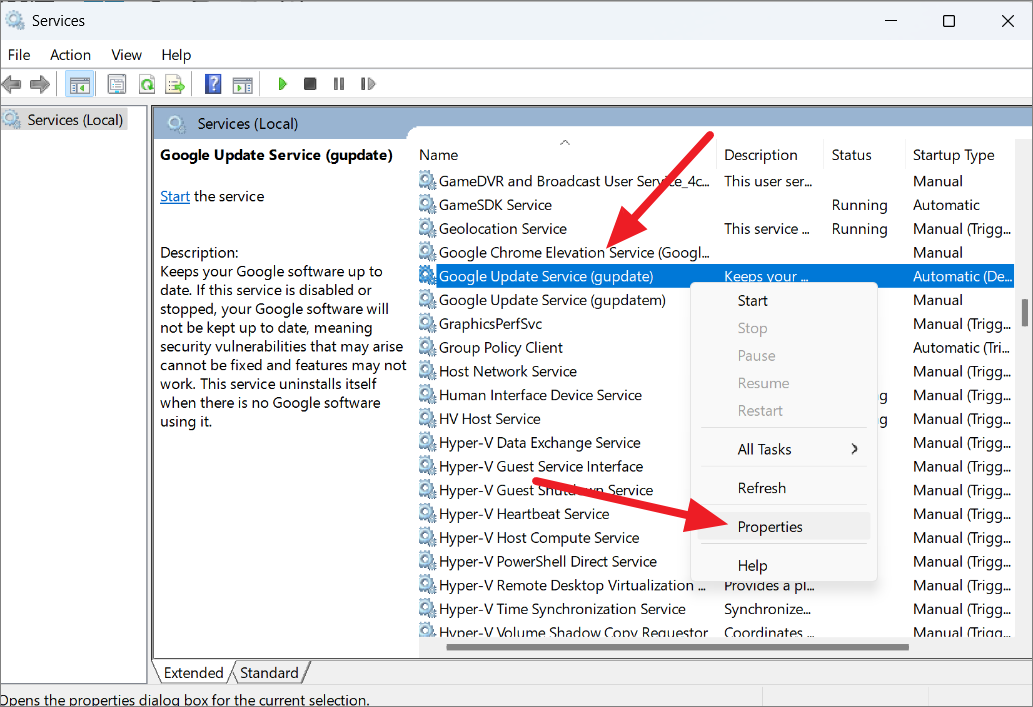
Keep in mind that you don’t need to change Google Update Service (gupdatem) service.
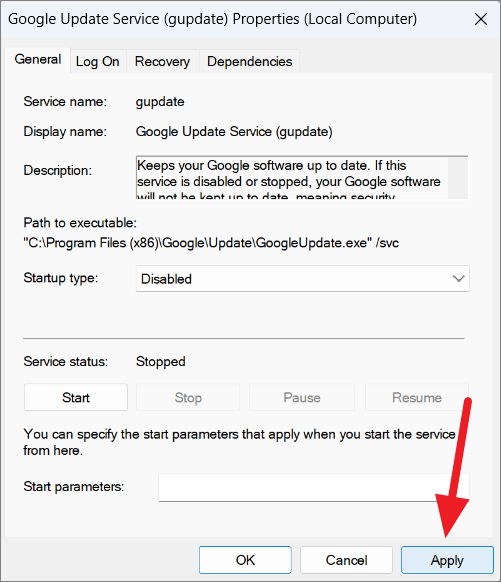
From the ‘Startup type’ drop-down menu, choose ‘Disabled’.

Then, click ‘Apply’ and select ‘OK’. After disabling the Google update service, restart your PC and see if you still receive the error.
7. Perform Virus and Malware Scan
The ‘System Service Exception’ error could also be caused by malware or virus, that has infected your system. So running a full virus scan on your PC using the Windows Defender Antivirus program or trusted third-party antivirus software can fix the issue. You can use the built-in Windows Security tool to scan and remove all the viruses, malware, and threats from your computer.
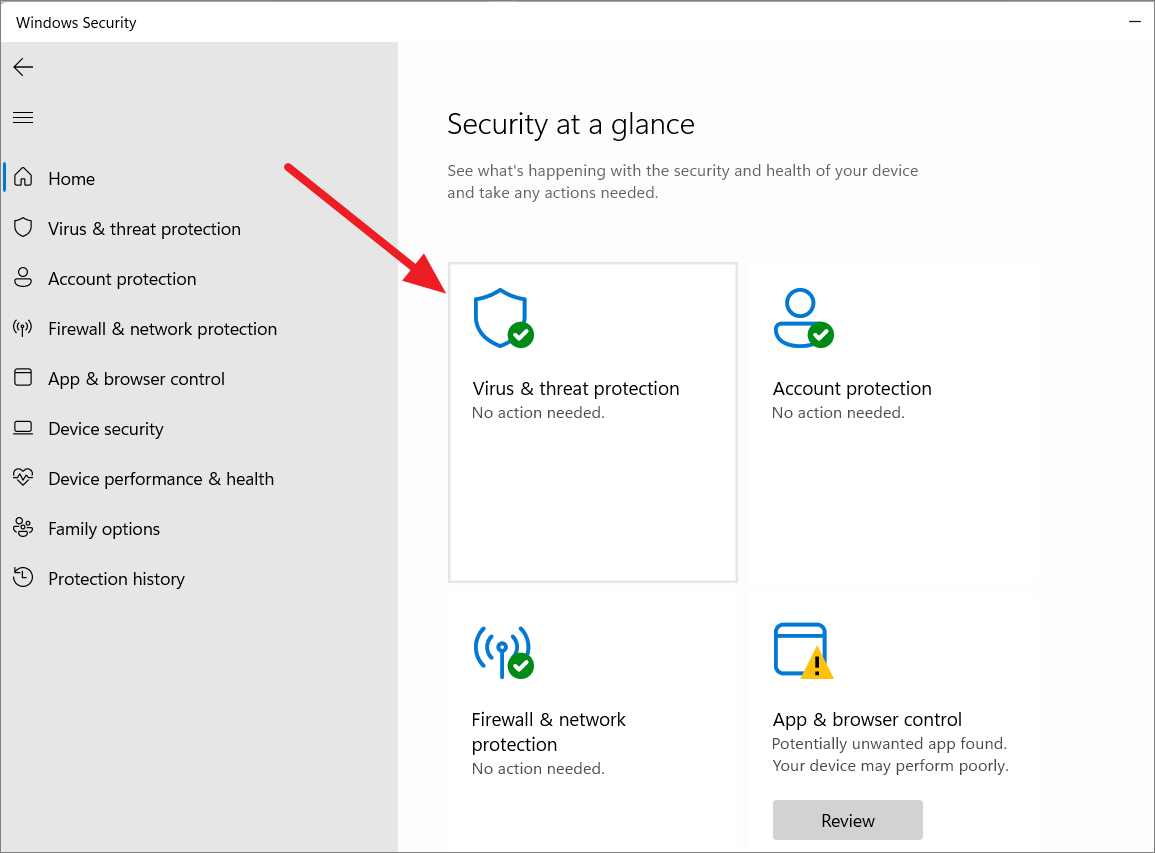
To run a virus scan, first search for ‘Windows Security’ in the ‘Start Menu’, and then select the top result to launch the app.

Once the ‘Windows Security’ app opens, select the ‘Virus & threat protection’ tile on the right side.
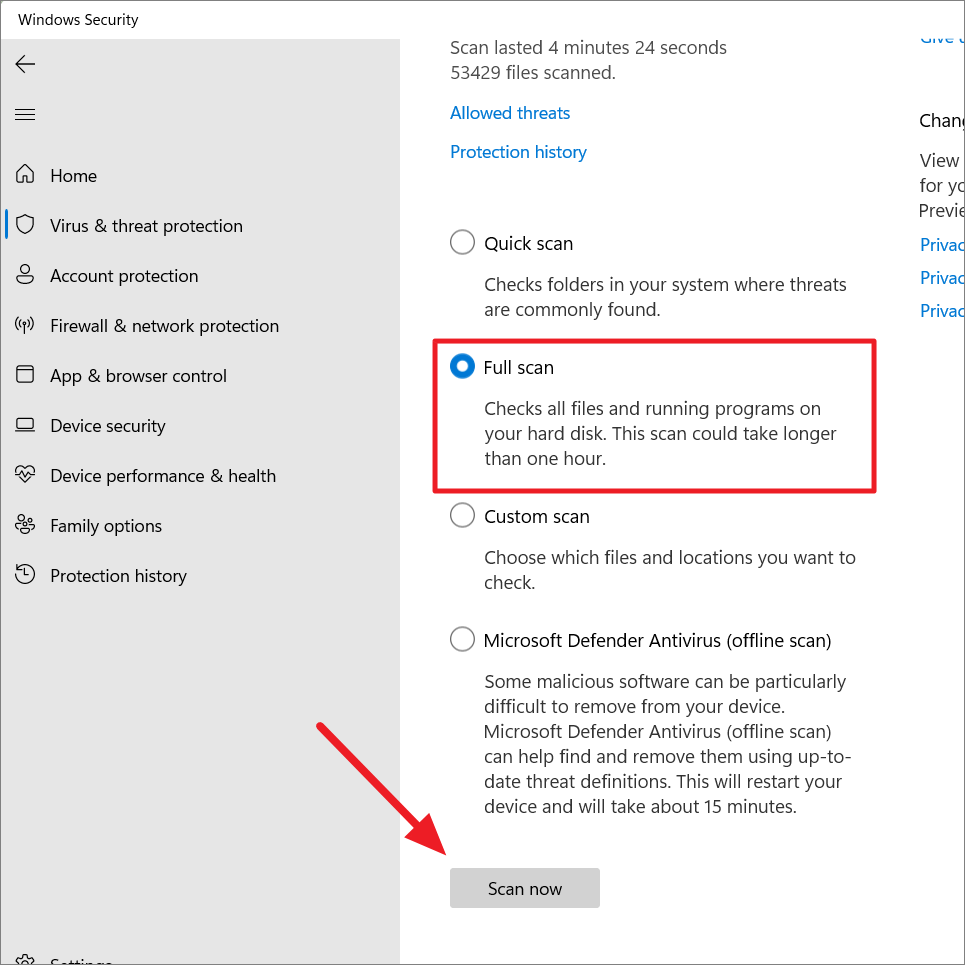
On the next page, click the ‘Scan options’ option under Virus & threat protection section.

Now, select the radio button for ‘Full scan’, and then click on ‘Scan now’ at the bottom.
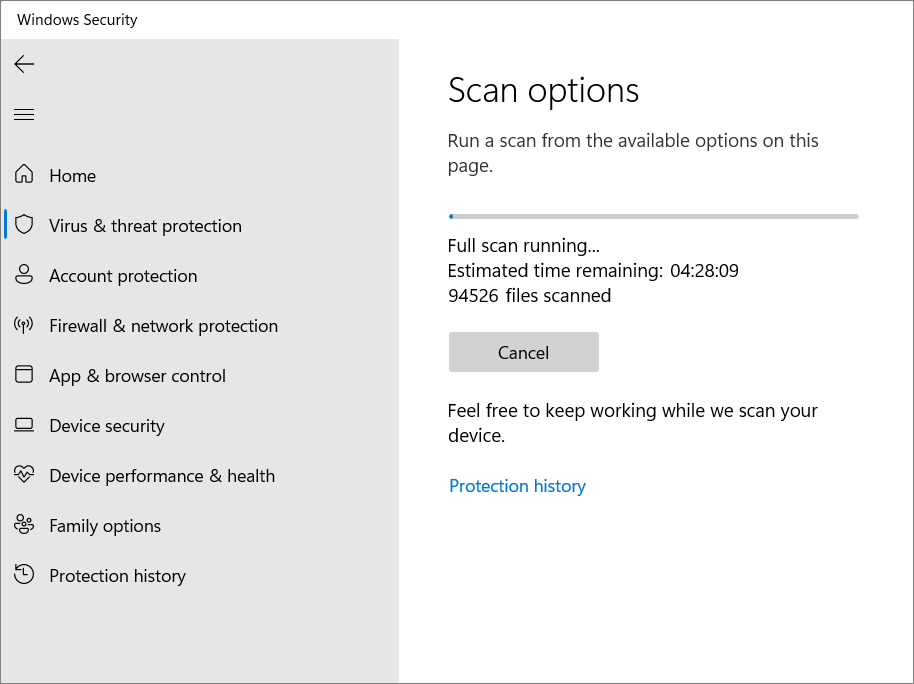
You can continue working on your system while the virus scan is running in the background.
If there are any viruses or malware present on the system, Windows security will automatically identify and remove them.
After the scan is finished, restart your PC and check if the System Service Exception is fixed.
8. Update or Reinstall the Graphics Drivers
Another common cause for ‘System Service Exception dxgkrnl.sys’ error on Windows 11 is incompatible or outdated graphics drivers. Reinstalling or updating graphics drivers will most likely fix these issues. You can uninstall, reinstall, and update drivers in the Device Manager control panel applet or download and install drivers from the manufacturer’s website.
Updating Graphics Drivers
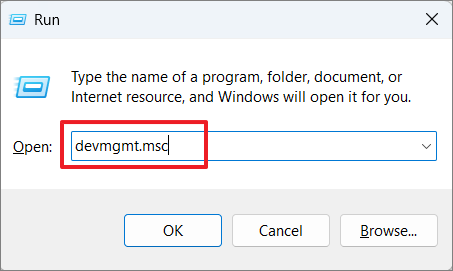
First, let’s try updating the graphics driver before uninstalling it. To do this, first, search for ‘Device Manager’ in the Windows search box and open it. You can also open Device Manager by launching the Run dialog box (Win+R) and typing devmgmt.msc in the box and hit Enter.
In the list of devices, expand the ‘Display adapters’ menu by double-clicking it. Under the Display adapters, you will see your Graphics card adapter(s). Some computers come with only integrated graphics cards while others have dedicated graphics cards or both. Most of the inbuilt graphics are either Intel HD Graphics or AMD.
To update a driver, right-click the graphics drivers you want to update and select the ‘Update driver’ option.
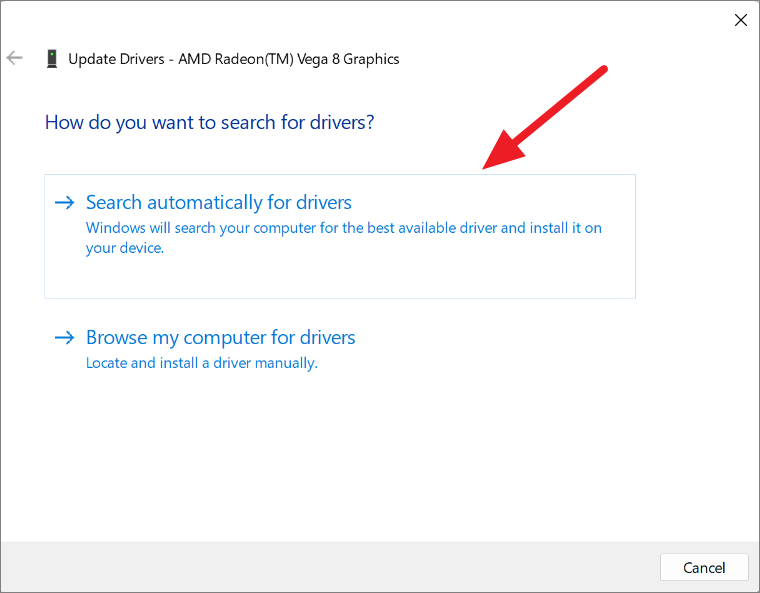
In the next window, choose the ‘Search automatically for drivers’ option or ‘Browser my computer for drivers’ option (if you already downloaded the update file from the manufacturer’s website and saved it on your computer).
It will automatically install the updates for your driver. You can also visit your computer manufacturer’s website or use Windows Update to download and install updates.
If you have a dedicated graphics card (like NVIDIA), you can install driver updates from the graphics card companion app. If you are using an AMD video card, you would have the ‘Catalyst Control Center’ or ‘Radeon settings’ app and if you’re using an NVIDIA card, you would have the ‘Geforce Experience’ app.
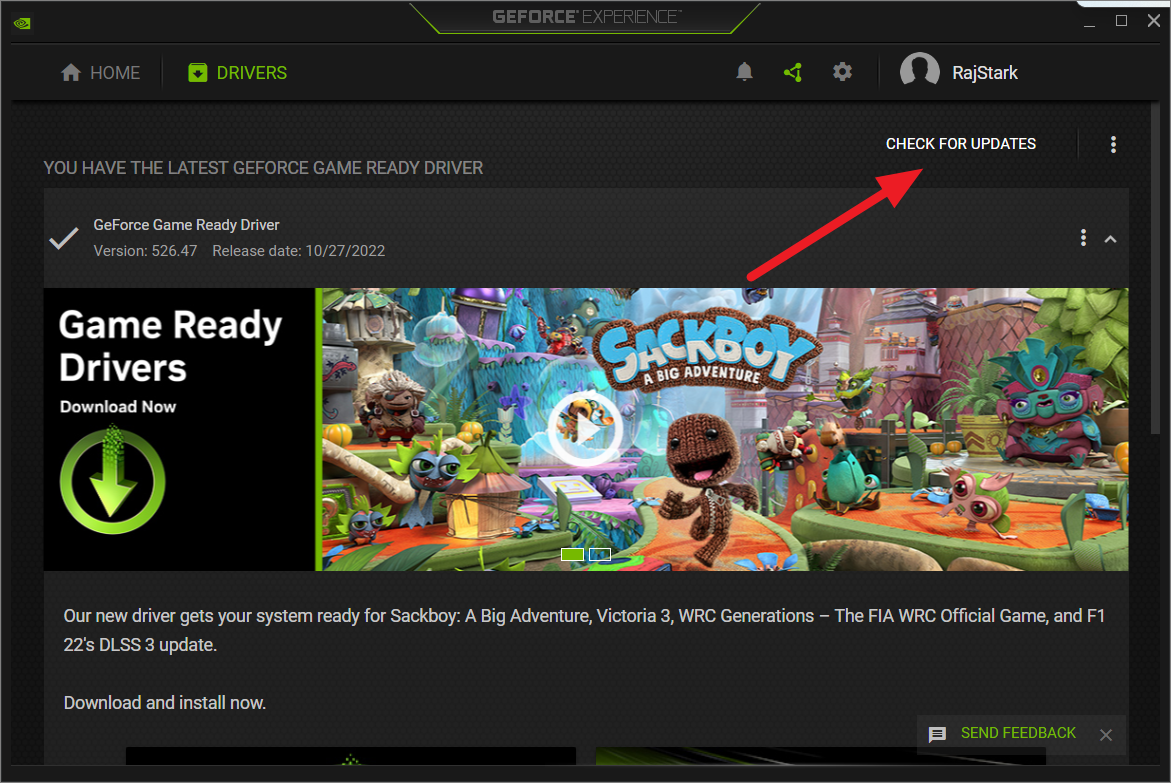
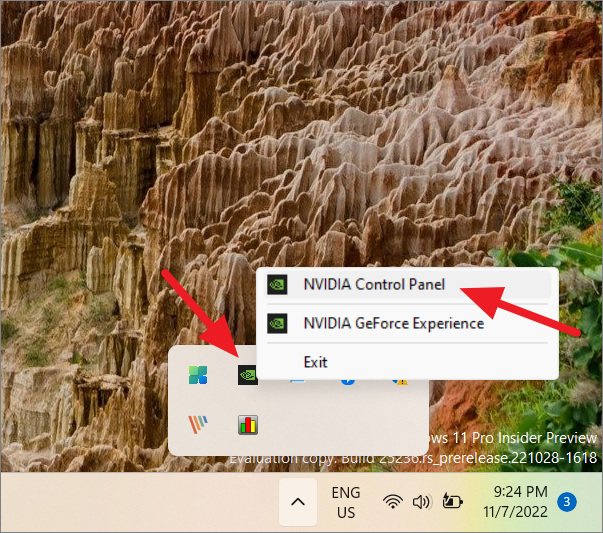
You can find the graphics companion running in the Windows notification area. If you’re using an NVIDIA card, right-click the app icon from the Notification area and select the ‘NVIDIA GeForce Experience’ option.

In the GeForce Experience app, go to the ‘Drivers’ tab and click the ‘CHECK FOR UPDATES’ option. Then, download and install the updates if there are any.
Uninstalling and Reinstalling Graphics Drivers
If updating your graphics didn’t fix it, try uninstalling and reinstalling your graphics driver. If you have both inbuilt (AMD) and dedicated (NVIDIA) graphics cards, try reinstalling the inbuilt driver first. If it doesn’t work, reinstall the dedicated graphics card driver as well.
To uninstall your graphics driver, go to the ‘Device Manager’, right the graphics driver, and select the ‘Uninstall device’ option.
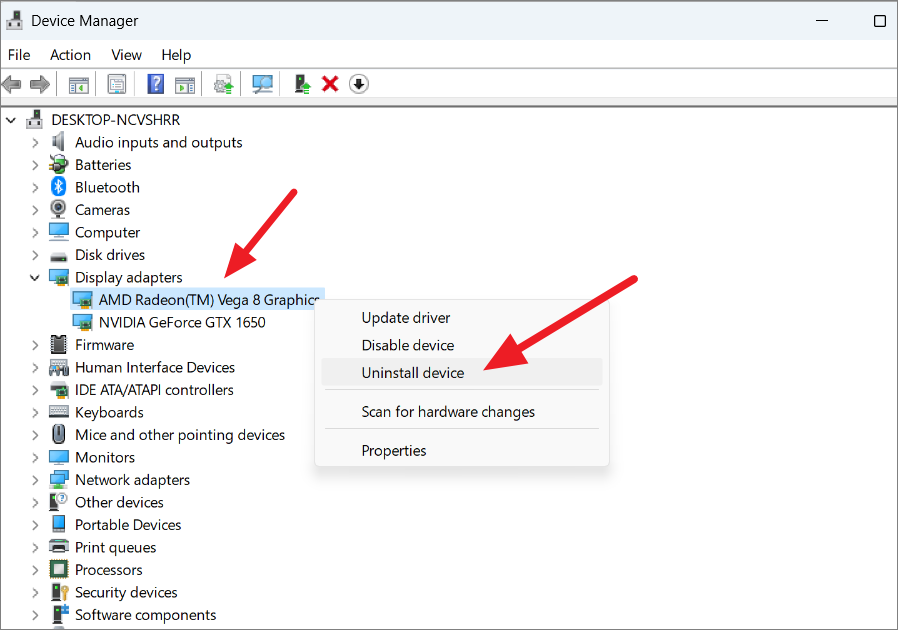
But before uninstalling the driver note down your graphics driver model name, so you can use it to search for drivers online.
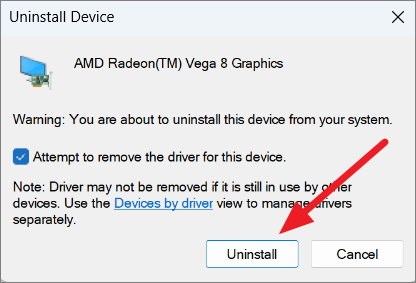
In the Uninstall Device box, check the ‘Attempt to remove the driver for this device (if you have one), and click the ‘Uninstall’ button. Once the driver is uninstalled, reboot your system. When you restart your system Windows will automatically reinstall the driver from the Windows update. If not, you need to manually download the driver and then reinstall it.
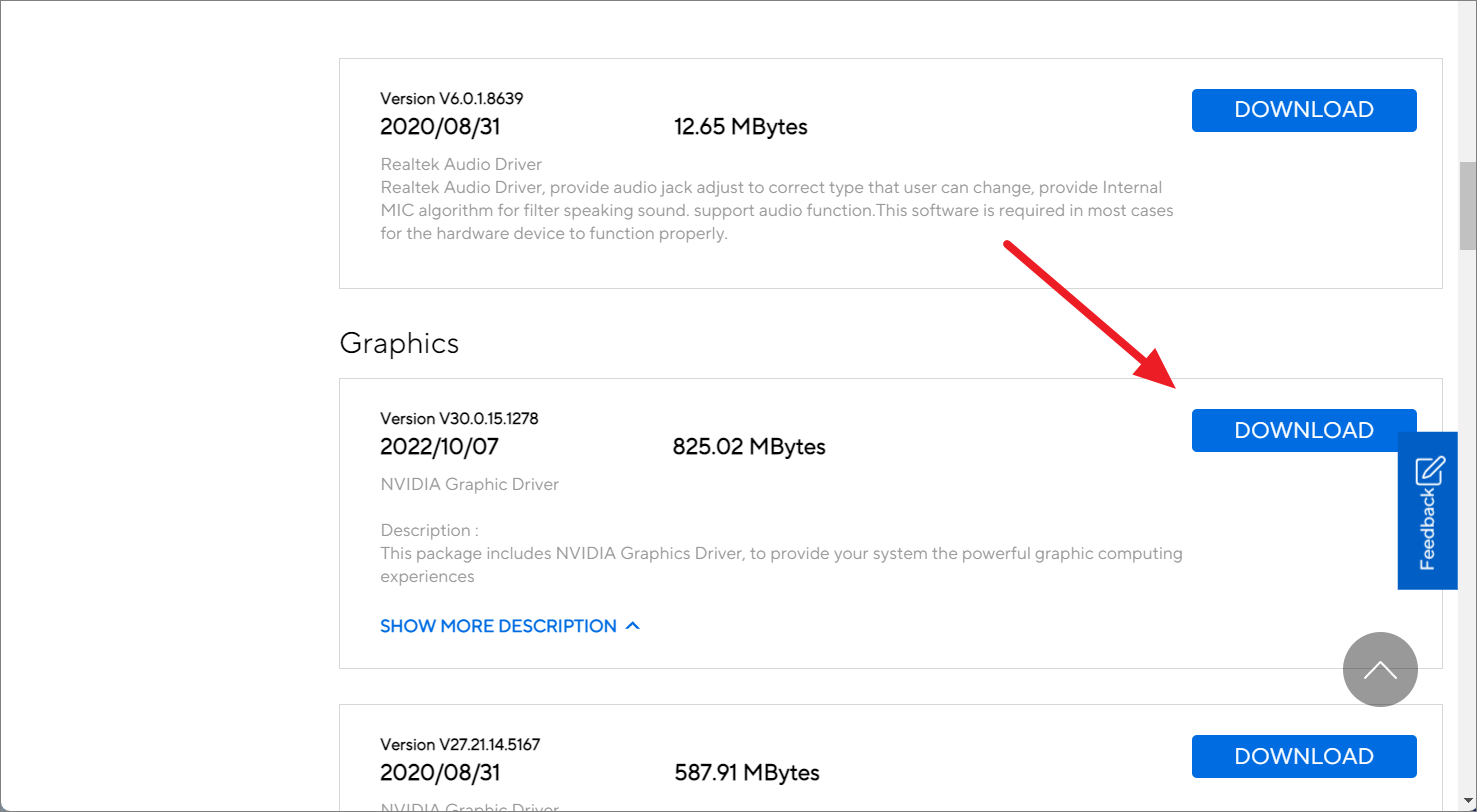
You can find your graphics drivers on your computer’s manufacturer’s website or the graphics card manufacturer’s website. Go to your manufacturer’s website and look for the ‘graphics driver’ or ‘video driver’ or ‘display driver’ for your GPU hardware and download it.
To download the correct driver for your computer, you need to know your PC model (or the graphics card model), and the OS version. You can also type your PC model and OS version in the search engine (Google) to find the correct website where you can download it.
9. Roll Back Device Drivers in Windows 11
As we mentioned, a faulty or incompatible device driver is one of the most common causes of System Service Exception errors in Windows 11. If updating a particular driver doesn’t fix the issue for you, you can try rolling back to the previous versions of the installed driver that worked better with the device. After narrowing the device driver that is responsible for the BSOD error using the Driver Verifier, you can roll back the driver to fix the issue.
Open the Device Manager and find the newly installed device driver that you think is causing the BSOD error. Then, right-click that driver and select ‘Properties’.
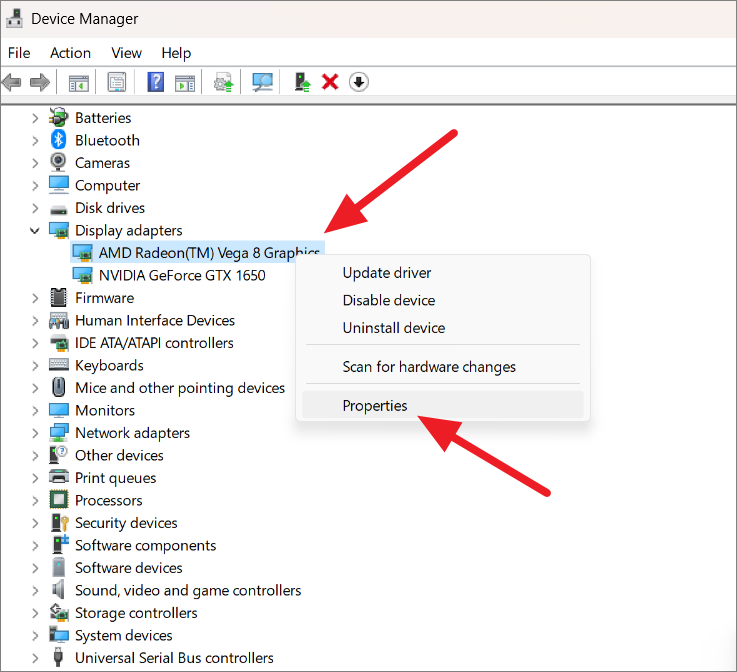
In the driver properties window, switch to the ‘Driver’ tab and click the ‘Roll Back Driver’ button.
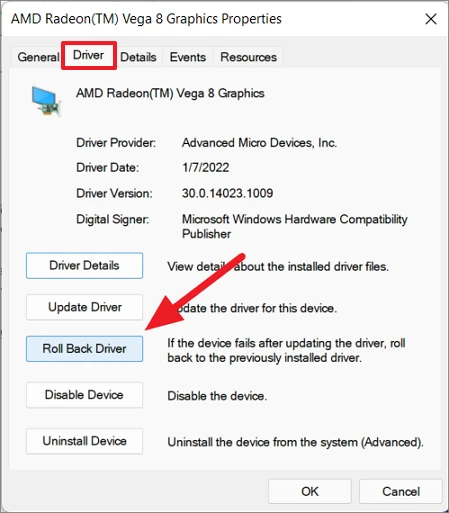
In the confirmation dialog box, select one of the appropriate options, then click ‘Yes’ to roll back to the previous driver.
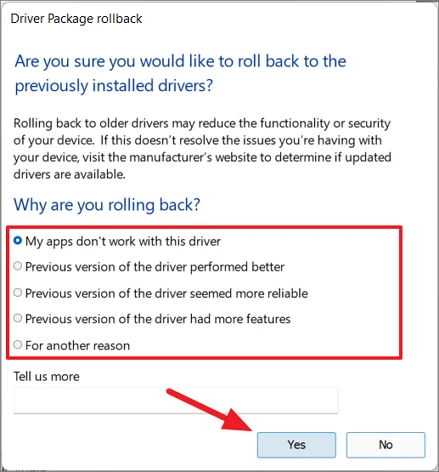
Now, check and see if this fixed the problem, if not try the next method.
Disable Device Driver
If rolling back a particular drive doesn’t solve the problem either, you can also opt for disabling or uninstalling the device.
To disable a device, open the Device Manager and select the driver that’s causing the problem. Right-click on it and select ‘Properties’.
Then, click ‘Yes’ to confirm.
10. Uninstall Third-party Applications
If you are encountering the System Service Exception error in Windows 11, it could also be caused by programs that you have recently installed on your computer. Conflicting programs, bad updates, or an outdated version of the software can also cause this error.
Here are some of the applications that have been reported to cause this issue:
- McAfee
- BitDefender
- Virtual Clone Drive
- Cisco VPN
- Xsplit Broadcaster
- Asus GameFirst Service
- MSI Live Update, etc.
If you have recently installed any of these apps on your computer, uninstall them. Or, if the problem began after installing (or perhaps updating software) some other application, remove that application.
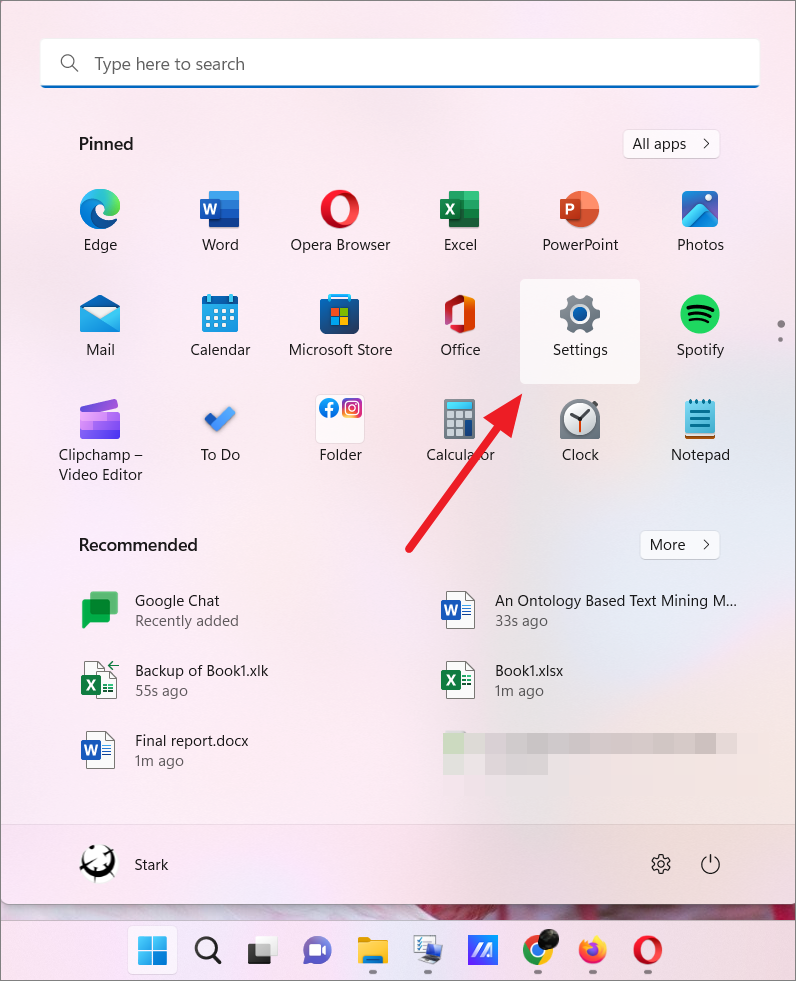
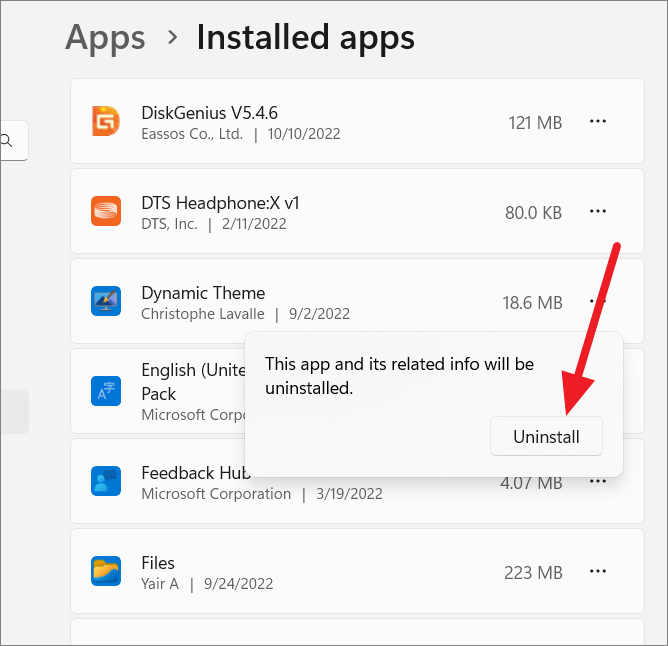
To uninstall an app, open the Start menu and select ‘Settings’.
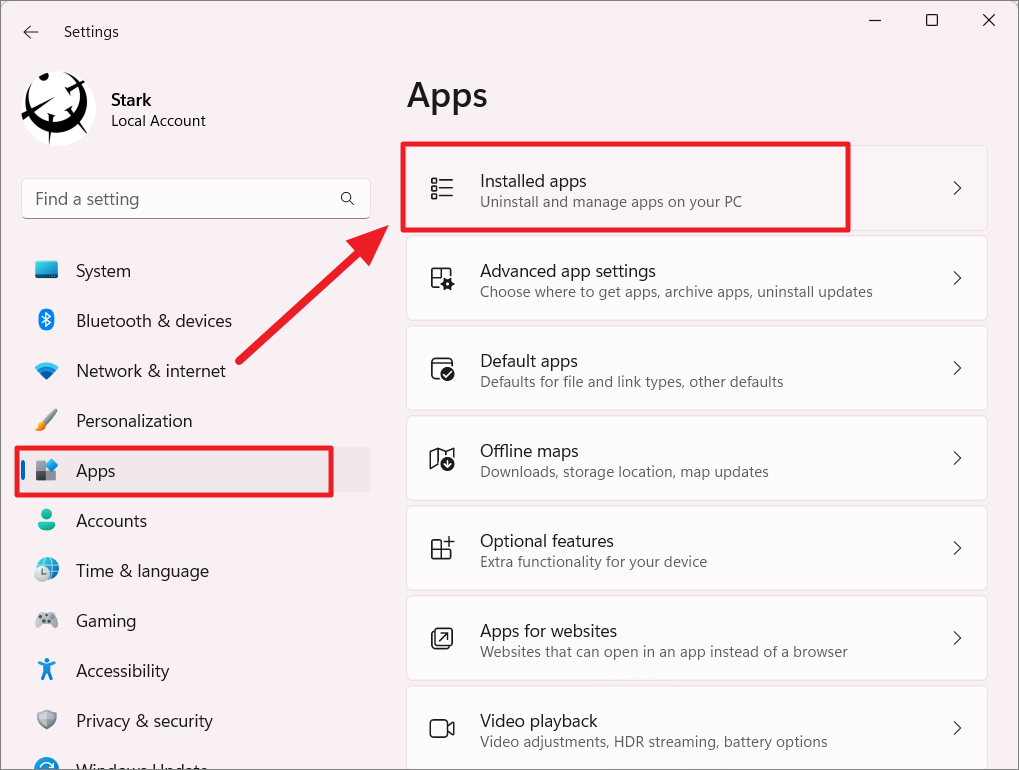
Move to the ‘Apps’ section and select ‘Installed apps’.
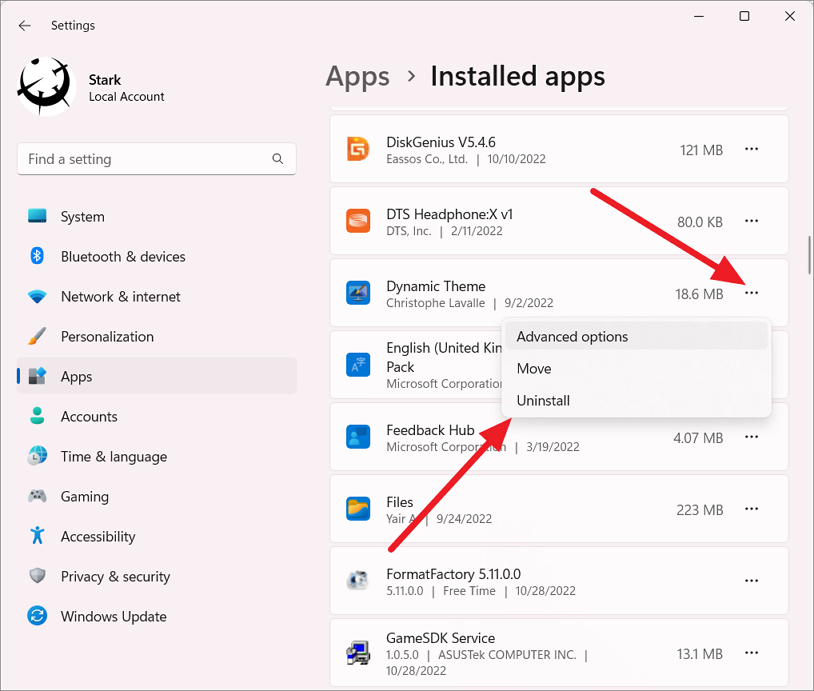
From the list of installed applications, locate the software that you believe might be the cause of the error. Each application will have the manufacturer’s name and the date on which it is installed, below the name of the application. You can use that information to identify the culprit app.
Once you found the app, click the three dots menu next to it and select ‘Uninstall’.
Then, select ‘Uninstall’ again and follow the onscreen instructions to remove the program. After you uninstall the app, reboot your PC and check if you still encounter the error.
If you are still getting the same error, uninstall the next app that you think might be the cause, and so on. Even after uninstalling all the problematic software if you are getting the error, then it’s time to try the next method.
11. Perform Startup Repair on Windows 11
Running startup repair can help fix several types of system_service_exception blue screen errors. If you have trouble starting up Windows normally, you have no choice but to fix that problem with startup repair or from the safe mode.
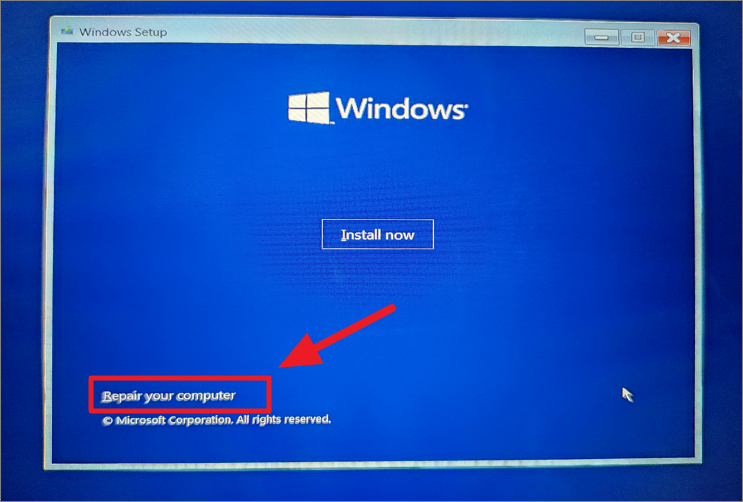
To access the Startup Repair from the Advanced Options, you will need to boot your computer from a Windows installation media (USB or DVD). If you don’t know how to create Windows 11 bootable media, check out this article to learn how to do that.
First, boot your computer from the Windows 11 bootable media. If you do that, you will see the Windows Setup screen where you will have two options: ‘Install’ and ‘Repair your Computer’. Now, click the ‘Repair your Computer’ option at the lower-left corner of the Window.
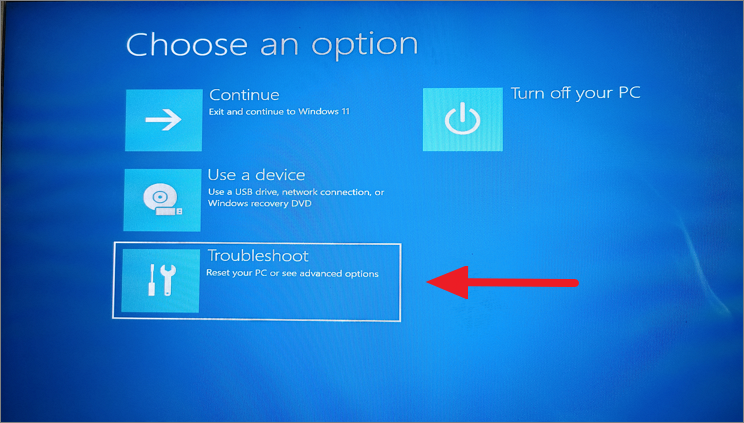
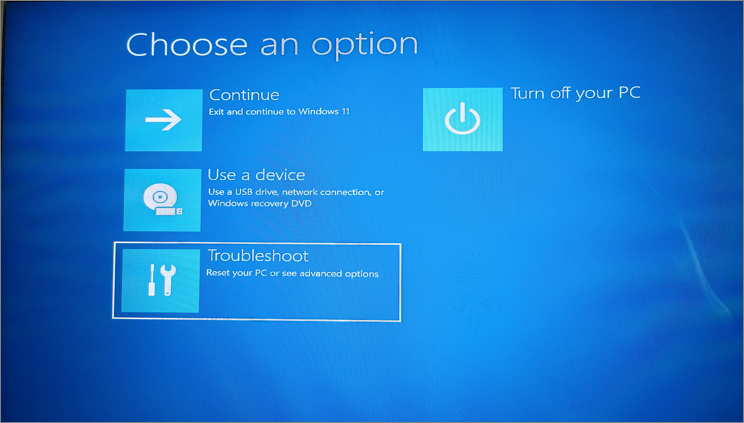
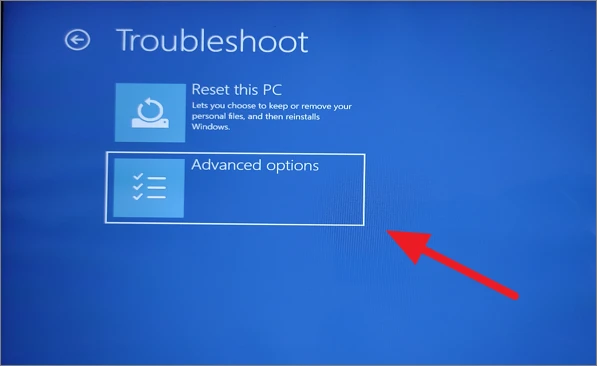
This will open up the Choose an option screen (Windows Recovery Environment), here, select the ‘Troubleshoot’ option.
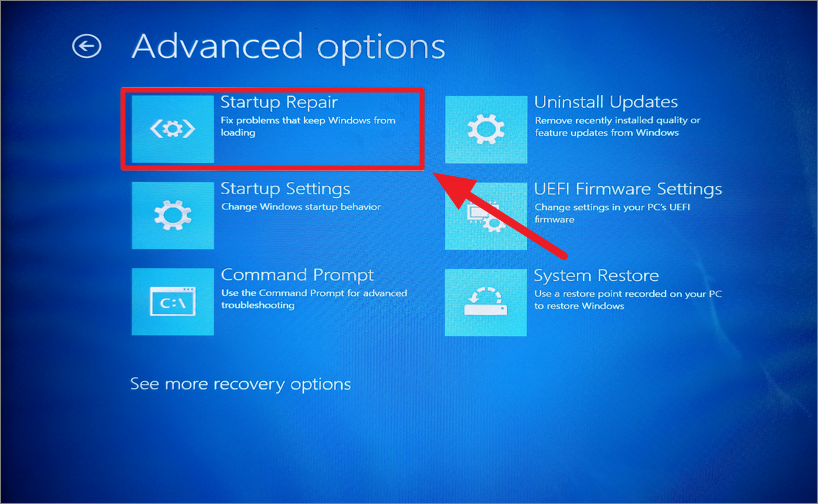
In the next screen, click the ‘Advanced options’ option.
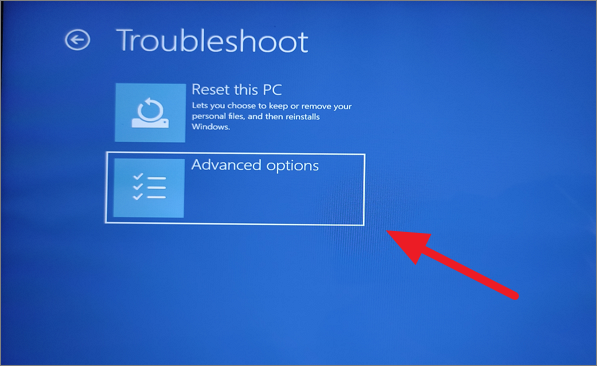
Now, select the ‘Startup Repair’ option as shown below.
Method 2:
If you don’t know have bootable Windows Installation media, there’s another trick that you can use to access the Windows Recovery Environment. Here’s how you can do that:
First, restart or start your computer, and as soon as you see the loading screen, hold the power button for 5 sec to shut down the computer. Keep repeating the same process three to four times until you enter the Windows Recovery Environment window.

Here, click the ‘Advanced options’ button.
Then, select the ‘Startup Repair’ option.
Once you do that, Windows will restart automatically, scan for errors, and fixes them.
Method 3:
Alternatively, you can also access Advanced options from the Windows Settings. Here’s how you can do this:
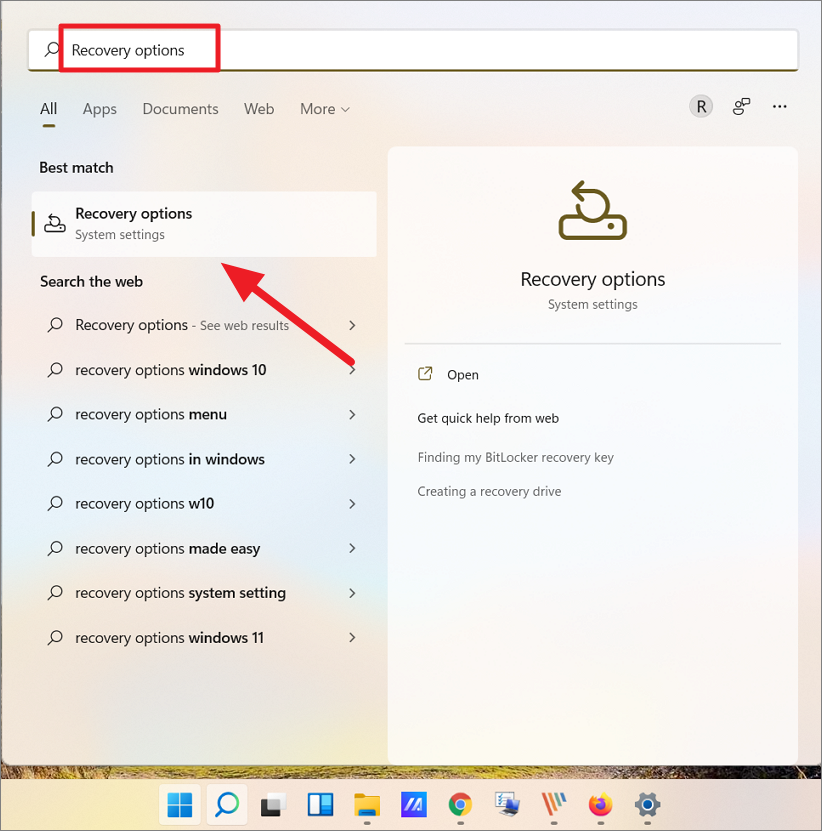
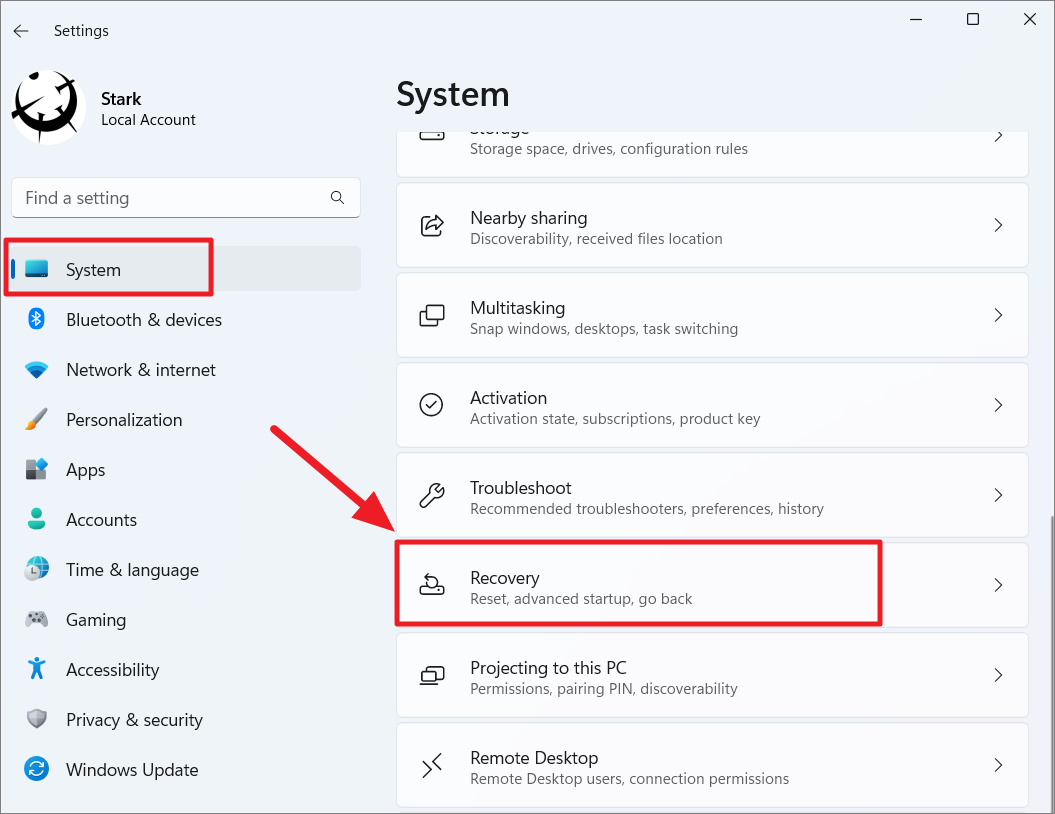
Click the Start menu and search for ‘Recovery options’ and select the best-matched result. Or open Settings and select the ‘Recovery’ option in the System tab.
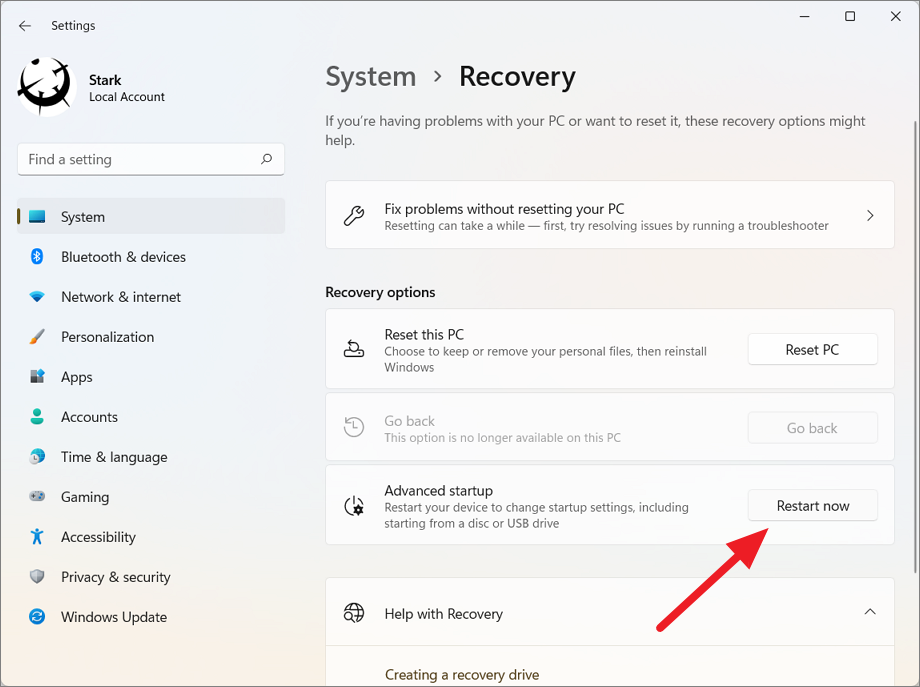
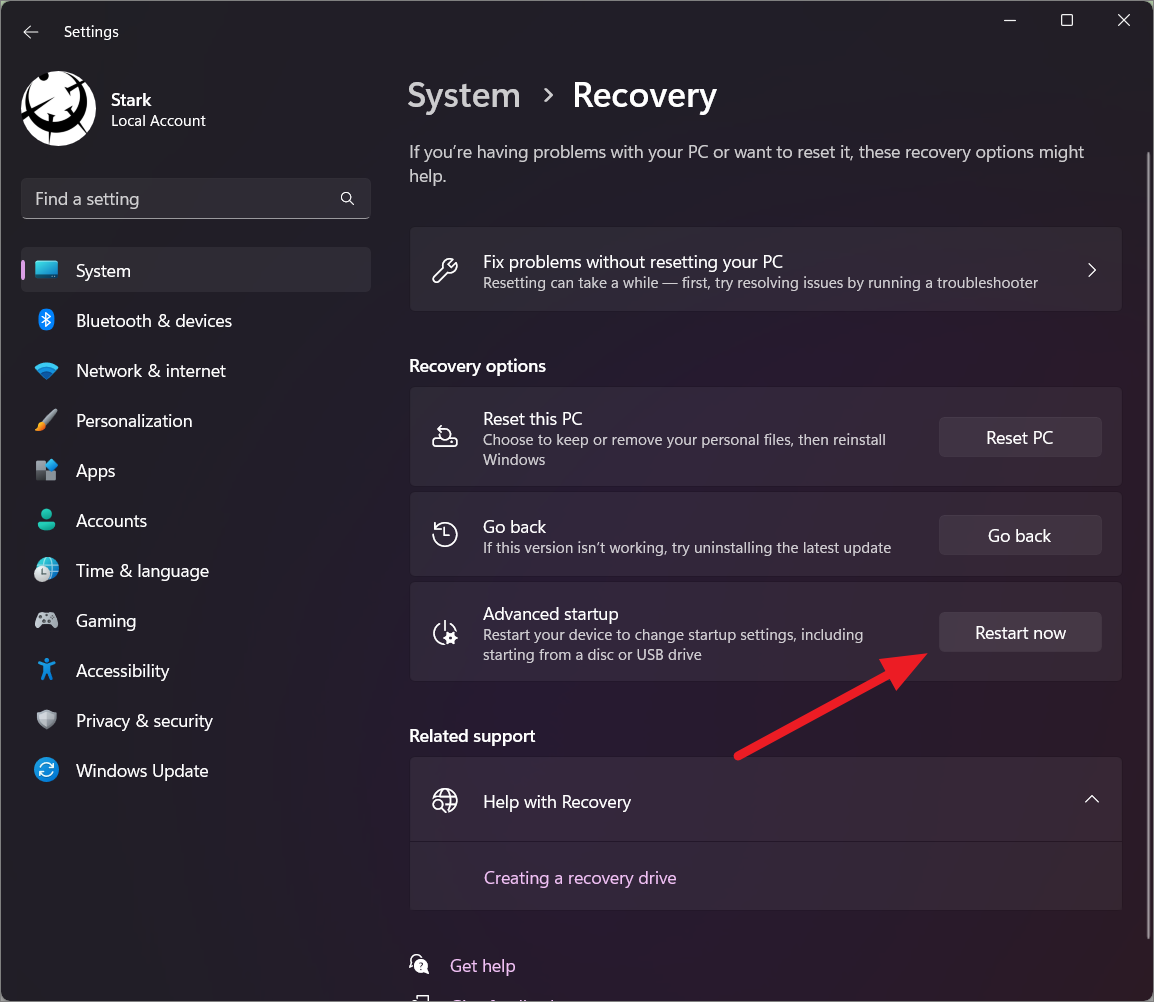
In the Recovery settings page, click the ‘Restart now’ option next to Advanced startup.
This will reboot your computer and show the Windows Recovery Environment, from here you can navigate to the ‘Startup repair’ option as we did in the above method.
12. Disable Windows Biometric Service
Windows Biometric Service or WbioSrvc allows users to authenticate access to any of their devices by using fingerprints, Iris Scanners (eye scanners), or facial recognition. WbioSrvc uses support assistant tools to carry out various tasks that can trigger the ‘SYSTEM_SERVICE_EXCEPTION’ error. Especially if you are using the Dell Support Assistance tool, you may get the ‘DellInstrumentation.sys failed SYSTEM_SERVICE_EXCEPTION’ error. Here’s how you do this:
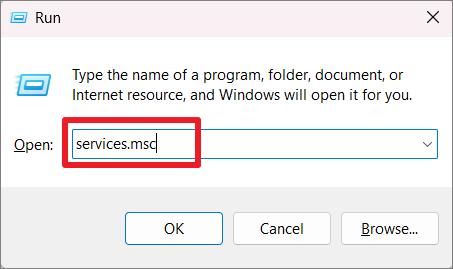
Open the Run command box (Win+R), type services and hit Enter.
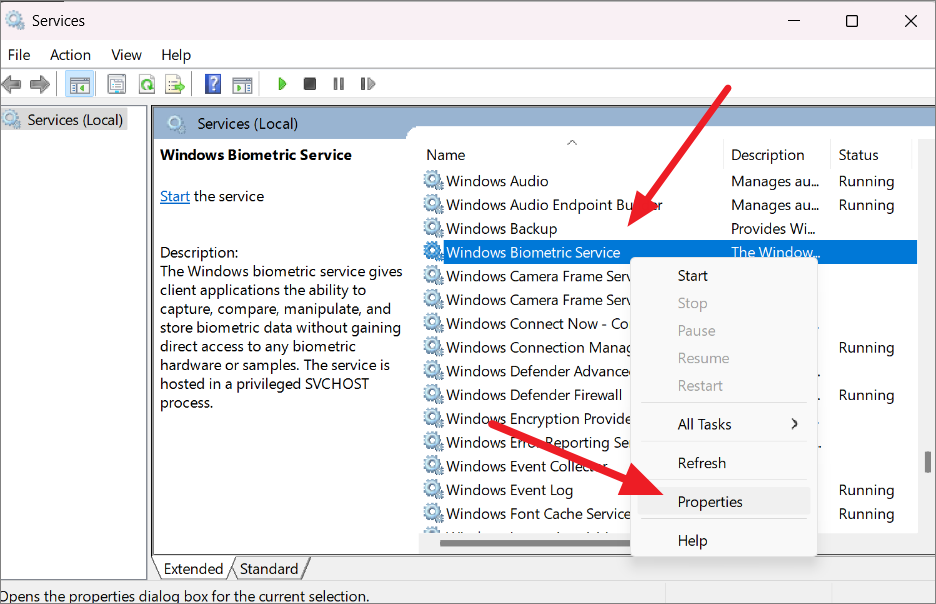
Once the Services window launches, scroll down and locate the service named ‘Windows Biometric Service’. Right-click on it and select ‘Properties’.
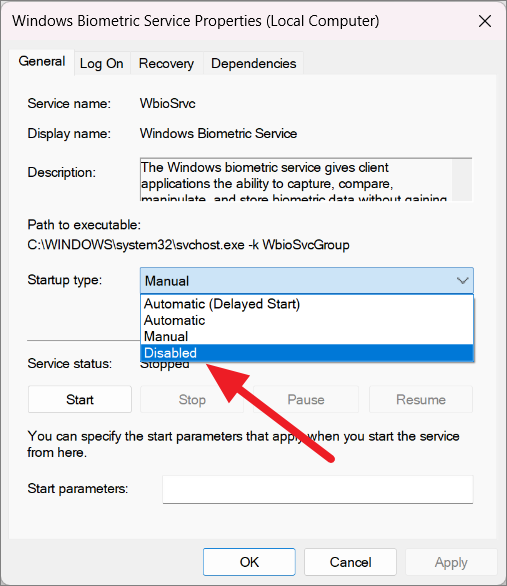
Click on the ‘Startup type’ drop-down and choose ‘Disabled’.
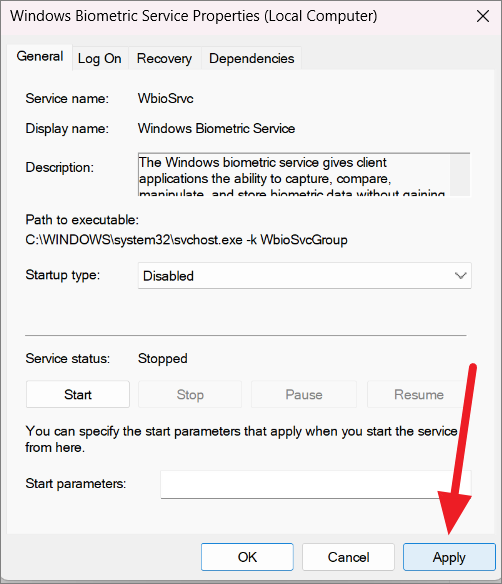
Then, click ‘Apply’ and then ‘OK’.
After this service is disabled, reboot your computer and see if the problem resolved now.
13. Free Up Space using Disk Cleanup
If your hard drive is full, it can slow down your PC, even causing freezes and crashes like the SYSTEM_SERVICE_EXCEPTION stop code. To fix this, you just need to free up space by clearing up clutter, removing unused apps, deleting enormous files, etc. Window’s Disk Cleanup tool is a maintenance tool that allows you to remove temporary files, system files, cache, and other unwanted junk files and free up some disk space. You can also use Microsoft’s PC Manager app to clean up your PC. Let us see how to clean disk using Disk Cleanup:
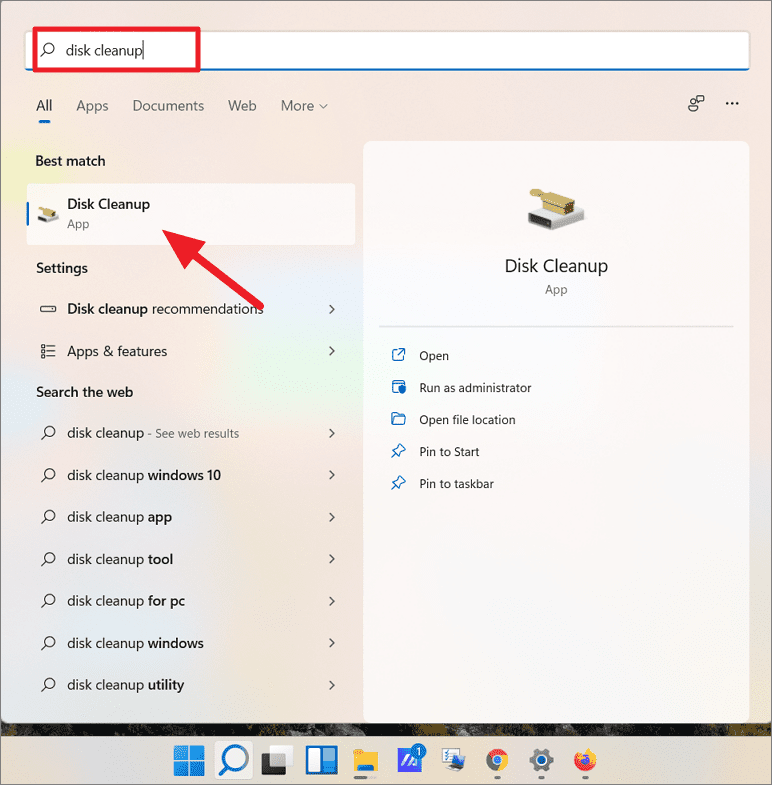
First, click the Start menu, search for ‘disk cleanup’, then select the ‘Disk Cleanup’ app from the list of results.
Alternatively, you can press the Windows+R keyboard shortcut to open the Run command box. Then, type in cleanmgr and hit Enter.
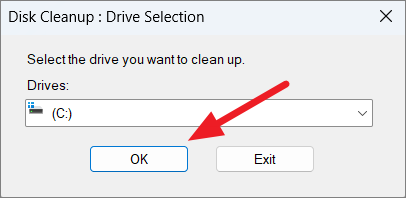
You will see a pop-up window where you can select the drive to scan. By default, the operating system drive (C:) will be selected, click ‘OK’ to scan the drive. You can clean all of your drives using Disk Cleanup, but cleaning the system drive is necessary.
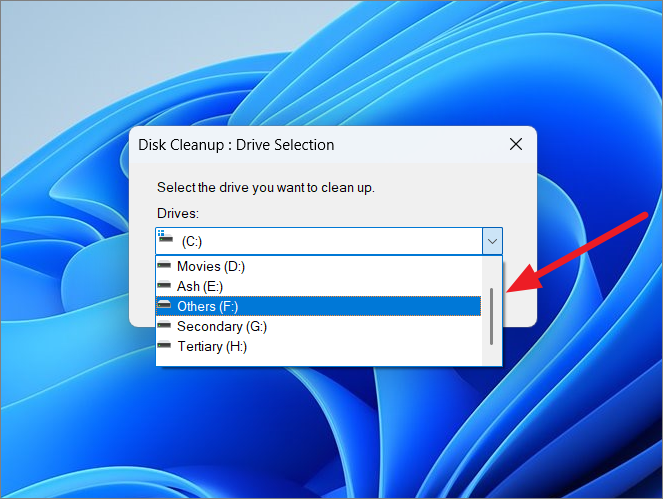
To scan a different drive, click the ‘Drives:’ drop-down and select the drive you want to scan, and click ‘OK’.
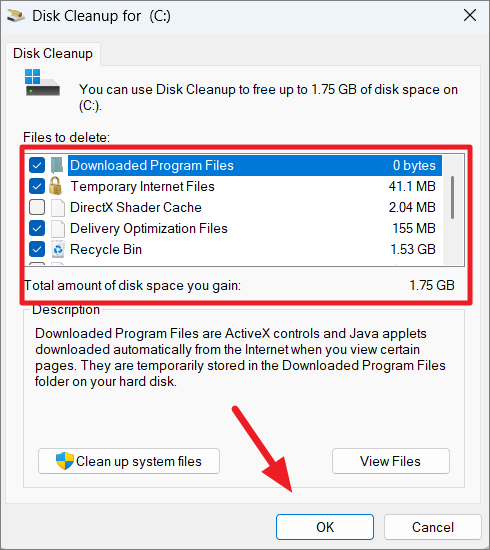
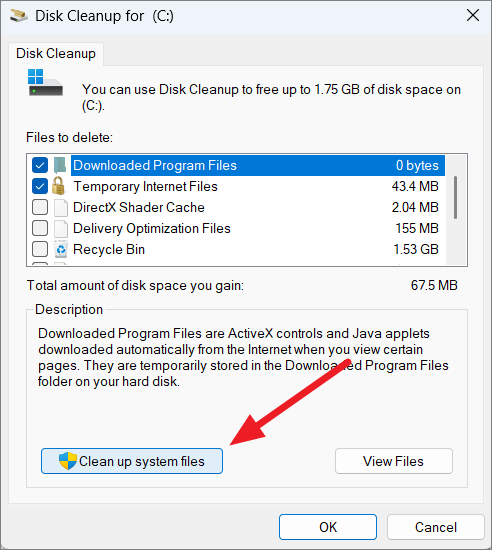
On the Disk Cleanup windows, you will now see a list of unnecessary, temporary, and junk files on your system inside the Files to delete box. It will list Downloaded Program Files, Temporary Internet Files, Delivery Optimization Files, DirectX Shader Cache, Recycle Bin, etc. The downloaded program files, temporary internet files, and thumbnails are selected by default but you can also select other items like Recycle bin, temporary files, etc.
Here, check the boxes next to the type of files you want to delete and click ‘OK’ to remove them. To see a description of the file, click on the file name.
However, it doesn’t list all the temporary and unwanted files in the box. To view additional temporary file types, including large junk files such as Previous Windows installation(s), System error memory dump files, and more, click the ‘Clean up system files’ button.
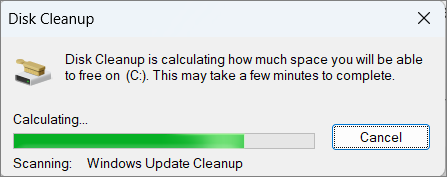
Then, choose the Windows-installed drive from the Drive Selection window again. It will take a few seconds to scan the files.
After the scan is complete, you can start selecting the items you want to remove in the Files to delete box. Items like Previous Windows Installations, and Recycle bins can take up so much on your hard drive. As you select the files, you can see the total amount of disk space you gain from deleting these files.
Once, you’re done selecting the files to delete, click ‘OK’.
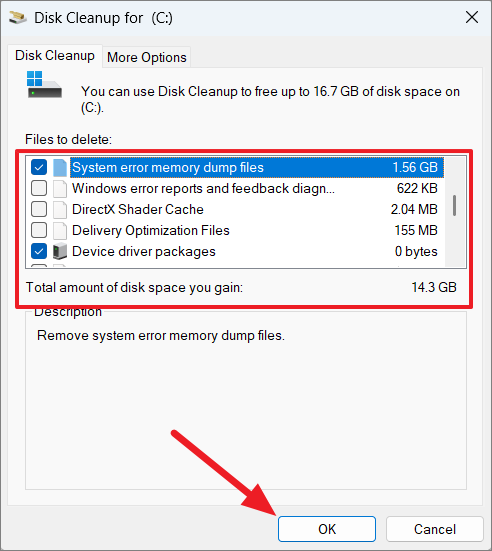
Here, we can free up to 14.3 GB of space from the C: drive. When you are deleting files, make sure you don’t delete any files that you might need in the future.
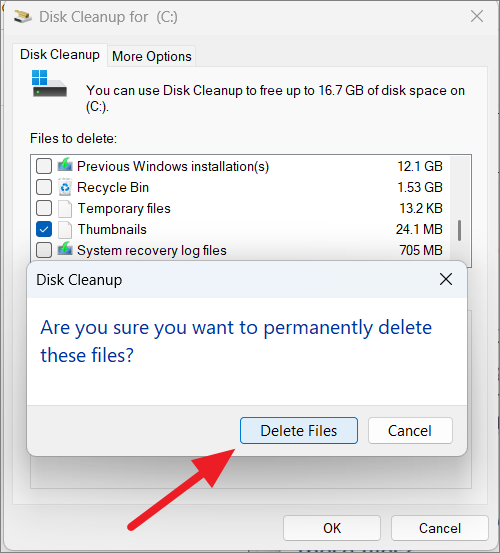
Then, click ‘Delete Files’ on the confirmation box to delete the selected items.
After the cleanup process is complete, it should free up some disk space on your device.
You can also free up space by clearing unused apps and system restore points from your system. To do this switch to the ‘More Options’ tab in the Disk Cleanup window.
To remove the unused apps on your system, click the ‘Clean up…’ button under the Programs and Features section.
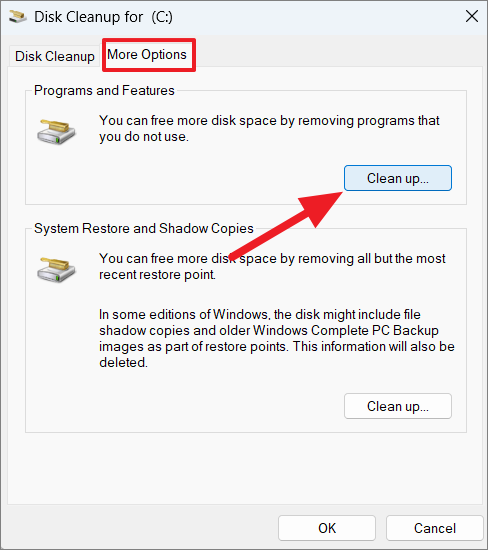
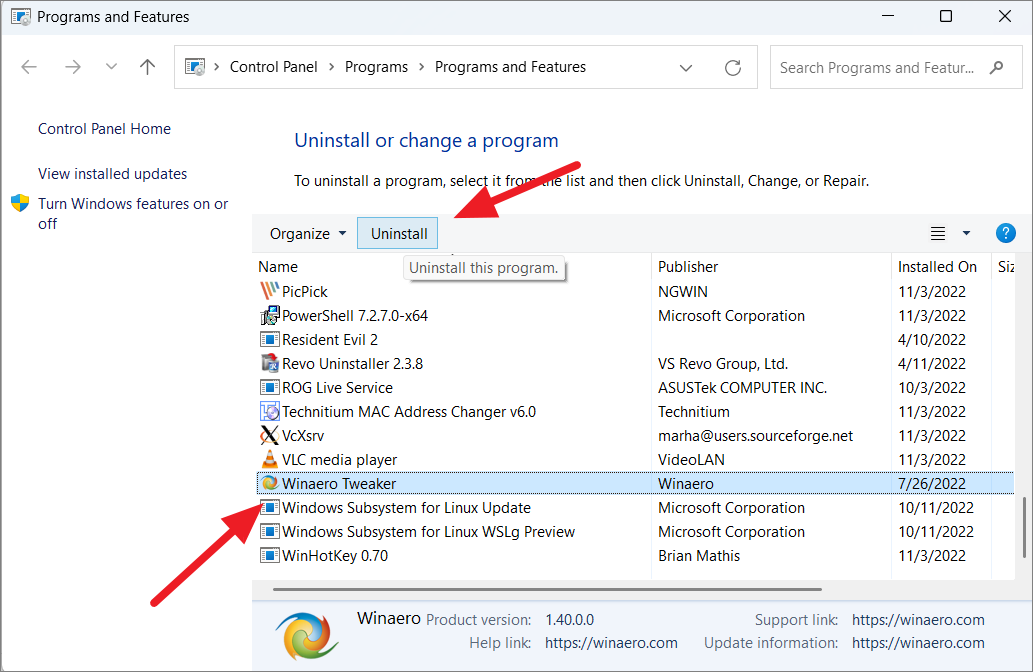
This will open the Programs and Features control panel. Here, select the program that you don’t use or need individually and click ‘Uninstall’.
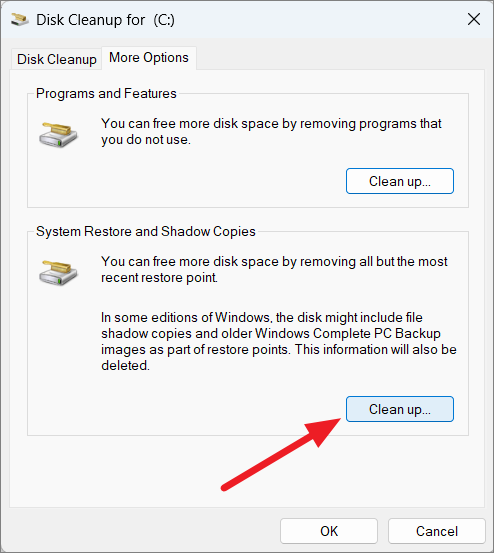
Some Windows versions might keep shadow copies of themselves and previous Windows complete backup images as part of restore points. You can gain some free disk space by removing these files. To remove, all but the most recent restore points and shadow copies, click ‘Clean up…’ under System Restore and Shadow Copies section.
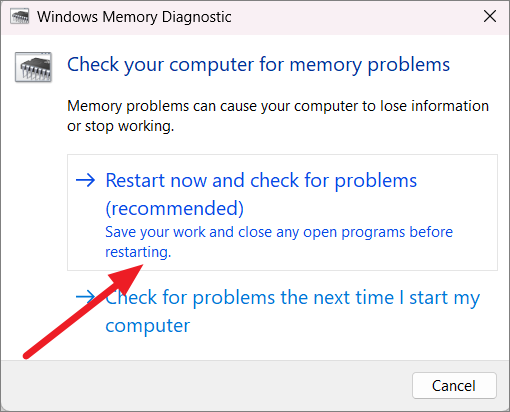
14. Run Windows Memory Diagnostic Tool
The 0x0000003b System_Service_Exception stop error is usually caused by problems in your system’s memory. So checking your RAM for problems using Windows Diagnostic tool could help fix the error. Let us see how to do that:
Open Windows search, type ‘Windows Memory Diagnostic’ and select the Best match result.
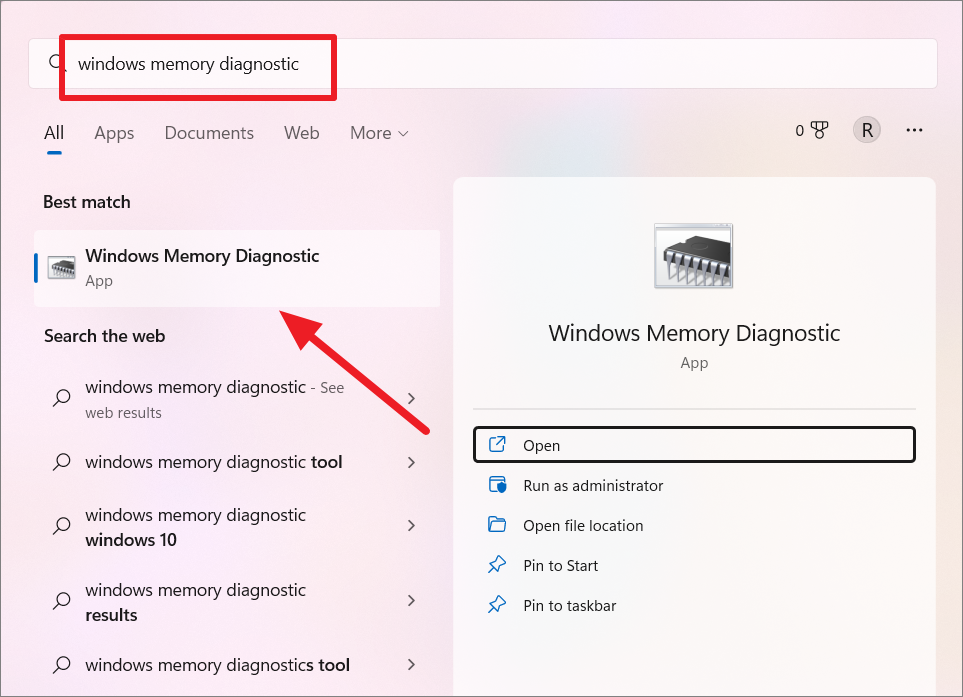
In the Windows Memory Diagnostic window, click the ‘Restart now and check for problems (recommended)’ option. This restarts your computer and checks for memory problems.
During the reboot, this diagnostic tool will check your RAM for problems and show you the results.
If there are any issues with the RAM, you should disassemble the system and remove the RAMs from their slot. Then clean your RAM and system of any dust.
Then insert the RAM back into the slot, boot your system and check if the error goes away. If you have multiple RAMs, insert each one at a time into a different slot and boot each time to check the RAM. You can also try a spare RAM if you have one. In case you have faulty RAM, make sure to replace it with a functioning RAM.
15. Disable your WebCam
Disabling the Webcam device from your computer is also known to fix the Service Exception error in Windows 11. Be it a built-in webcam device or an external web camera, if you are getting the BSOD error, then try disabling the web camera. Here’s how you do this:
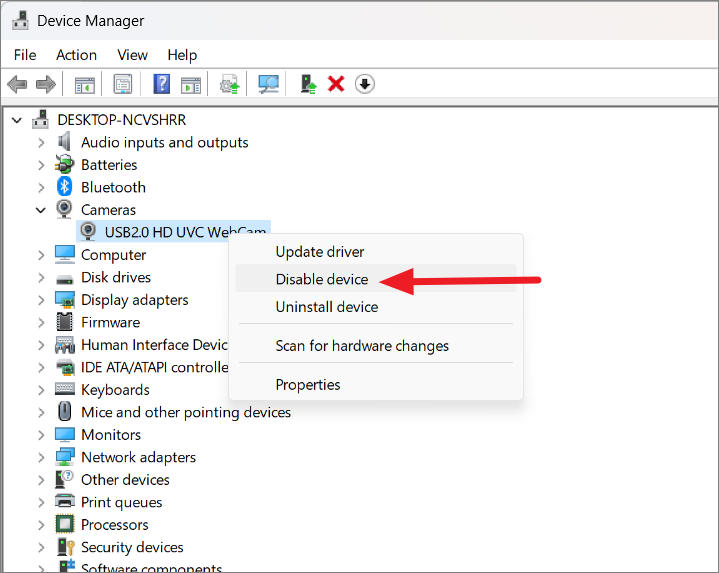
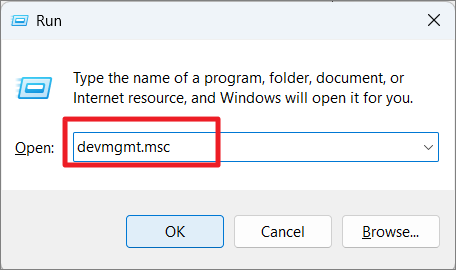
Open the Run command, type devmgmt.msc , and click ‘OK’ to launch the Device Manager tool.
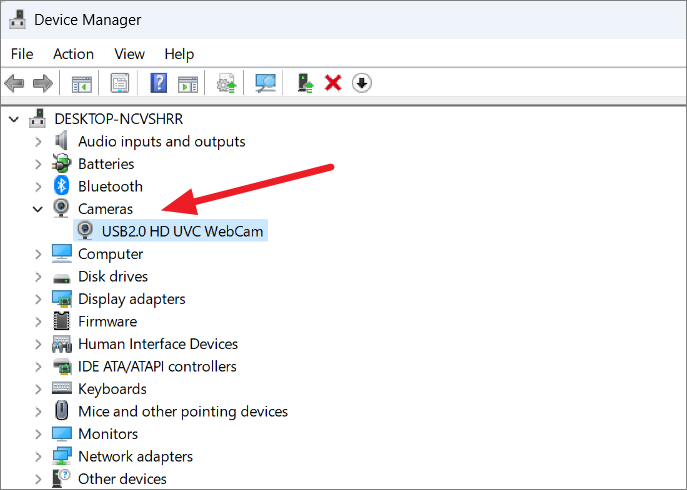
In the Device Manager, locate and expand the Camera section.
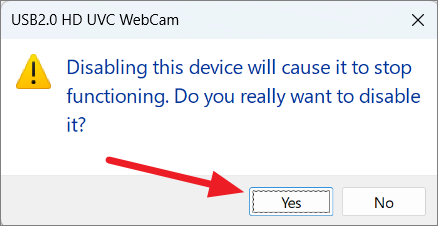
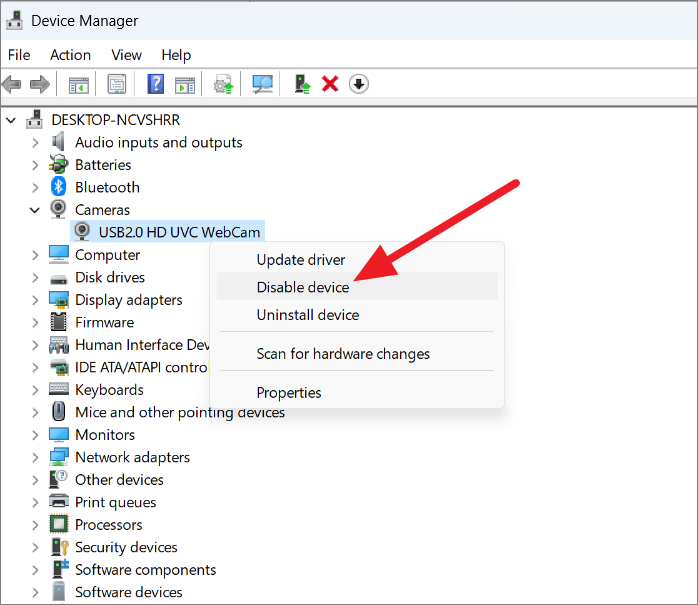
Now, right-click on the camera and select ‘Disable’ from the context menu.
After that, check if the error still appears in your Window.
16. Run Driver Verifier Tool
Since some protected system code can only be accessed by certain devices, a bad, corrupted, or outdated device driver can easily cause System Service Exception errors (BSOD) errors. Sometimes, a new device driver for brand-new hardware can also lead to a Blue screen of death error.
Windows has a built-in utility called Windows Driver Verifier that can help you figure out which driver is malfunctioning. This tool monitors and stresses drivers to verify their integrity and stability.
Driver Verifier is designed to detect the device driver bugs that cause the error, if it encounters an issue it immediately triggers the same or additional System Service Exception errors. So don’t run this tool when you are doing some important work on your PC.
While running the Driver Verifier, your device may become stuck in a BSOD error loop caused by the tool itself, so it is highly recommended to you create a system restore point and backup important data in case something goes wrong.
Enable Minidumps for Crash Reports
Before we enable Driver Verifier, you need to ensure that you have enabled minidump on your computer. Minidumps (.DMP) are small memory files that are automatically saved to your computer each time the computer stops unexpectedly, which contain information about the system crash and the event leading up to it.
Windows Driver Verifier doesn’t always show you the driver that causing the error, but it always stores information related to the blue screen errors in the memory dumps (.dmp file). That is why we need to make sure memory dump is enabled. Here’s how you enable Minidumps in Windows 11:
First, press Win+I to launch Windows Settings. Under the ‘System’ tab, scroll down to the bottom of the settings and select the ‘About’ option.
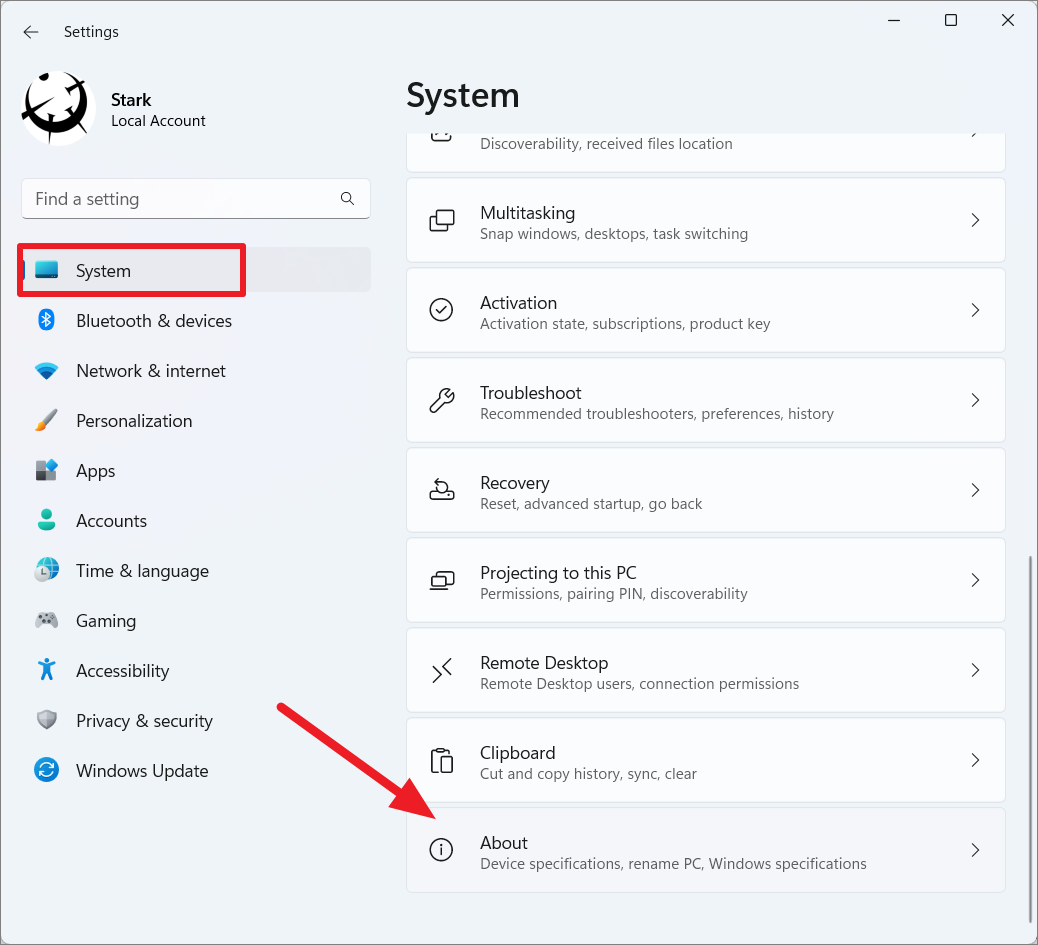
On the About page, click the ‘Advanced system settings’ link under Related links.

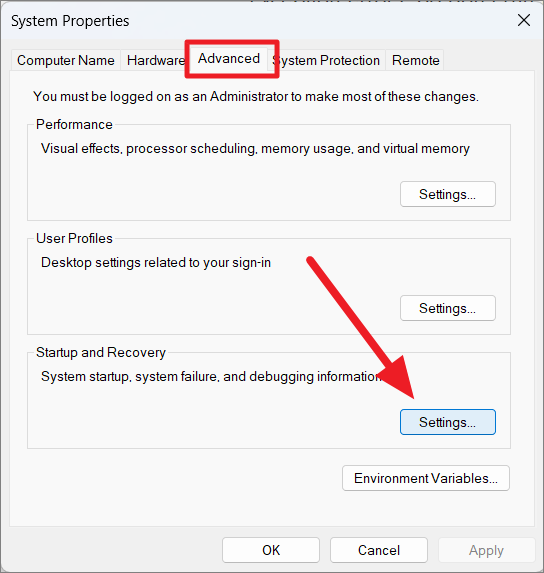
This will open the System Properties control applet. In the Advanced tab, click on the ‘Settings’ button under the ‘Startup and Recovery’ section. Alternatively, launch the Run command (Win+R), type sysdm.cpl in the text box, and hit Enter.
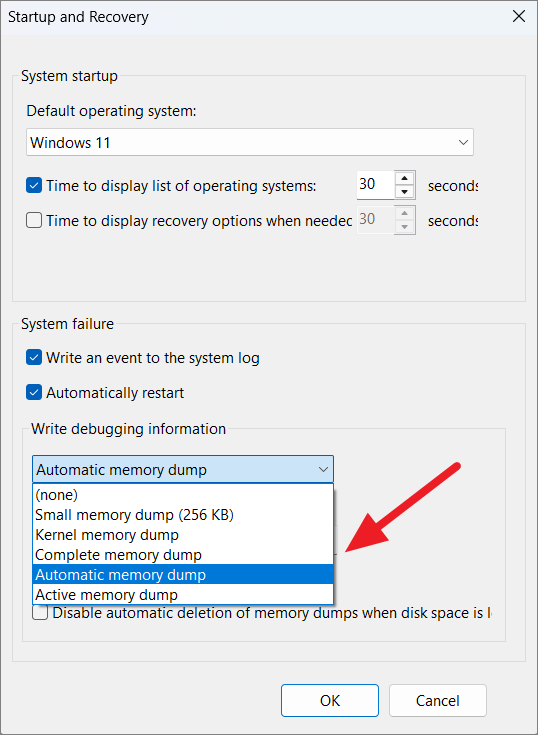
Another control panel window will appear. Here, click on the drop-down under ‘Write debugging information’ and choose the ‘Automatic memory dump’ option.
After that, ensure that the ‘Dump file’ value is set to %SystemRoot%\MEMORY.DMP.
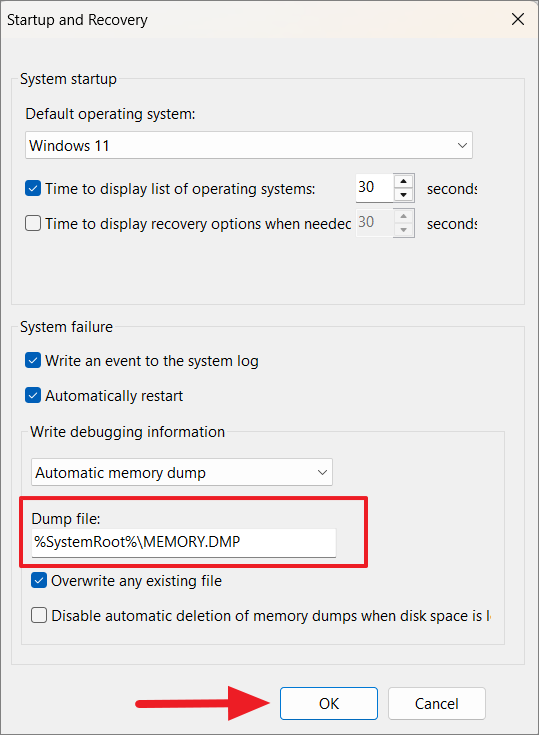
Then, click ‘OK’ and then restart your computer.
Run Driver Verifier to Find faulty Drivers
Once you confirmed that minidump is enabled, you can run the Driver Verifier to find a malfunctioning driver that causes the SYSTEM_SERVICE_EXCEPTION BSOD error.
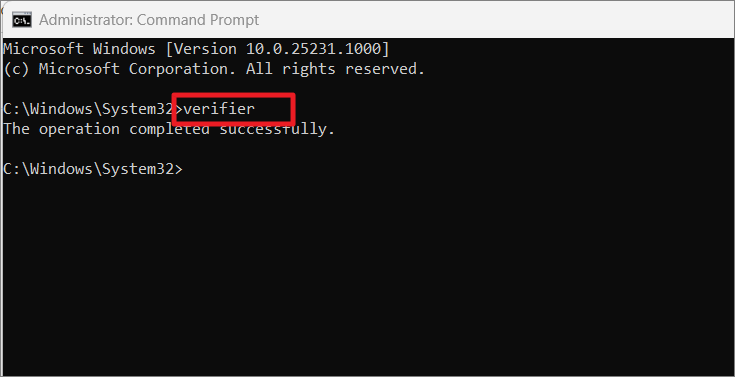
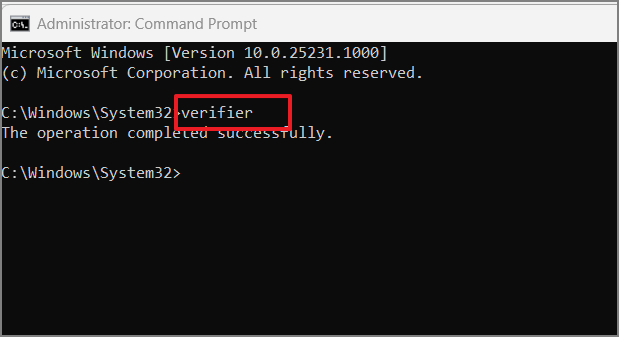
To start with, search for ‘Command Prompt’ in the Windows search and click on ‘Run as Administrator’ under the result.
When the Command Prompt launches, type Verifier and press Enter to execute it.
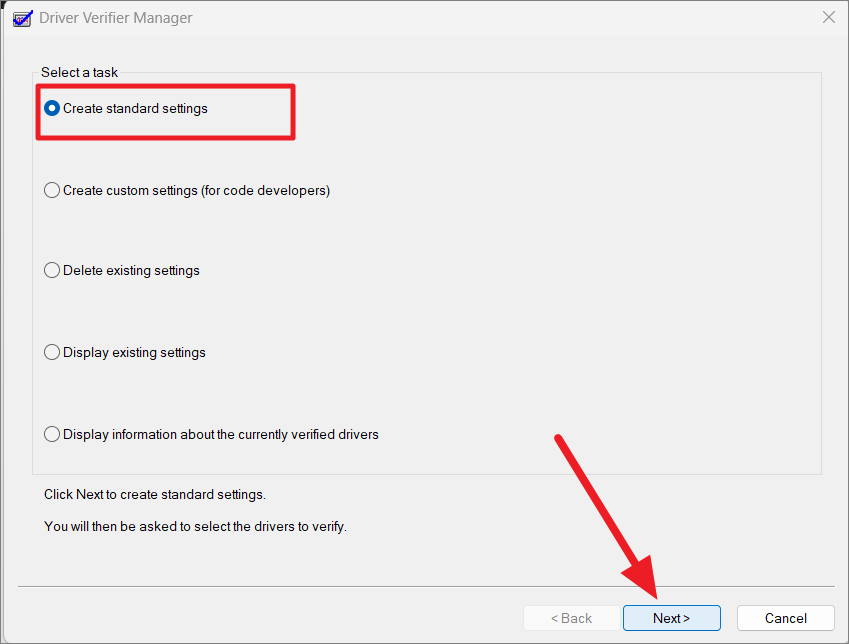
In the Driver Verifier application window that opens, Choose the ‘Create standard settings’ option and click on the ‘Next’ button.
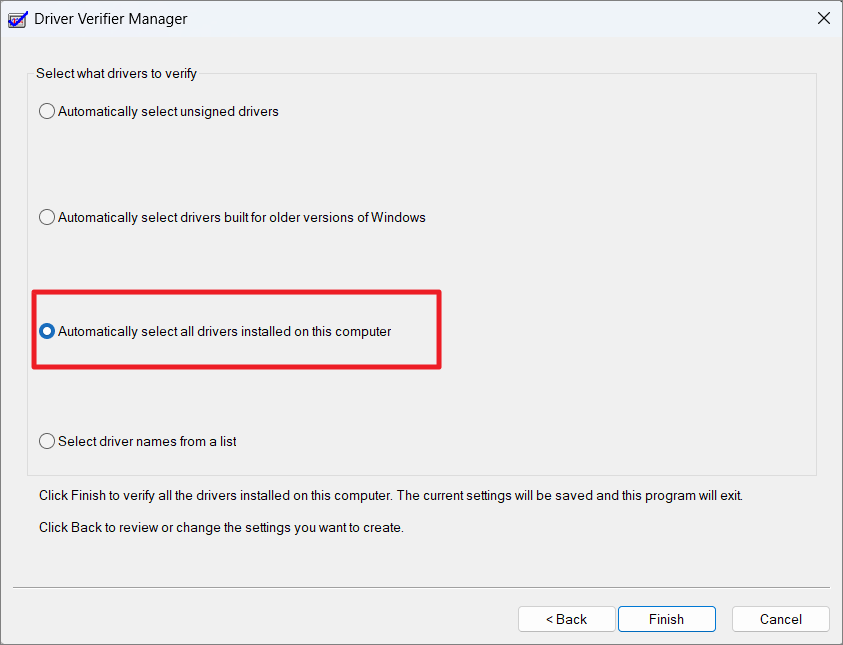
If you wish to check all the drivers installed on your PC, select ‘Automatically select all drivers installed on this computer’, and click ‘Finish’. However, you don’t necessarily need to test all the drivers, since the BSOD errors are usually caused by third-party drivers you can skip Microsoft drivers. This will take hours to test all the hundreds of drivers on your computer.
To scan only the specific set of drivers, select the ‘Select driver names from a list’ option and click ‘Finish’.
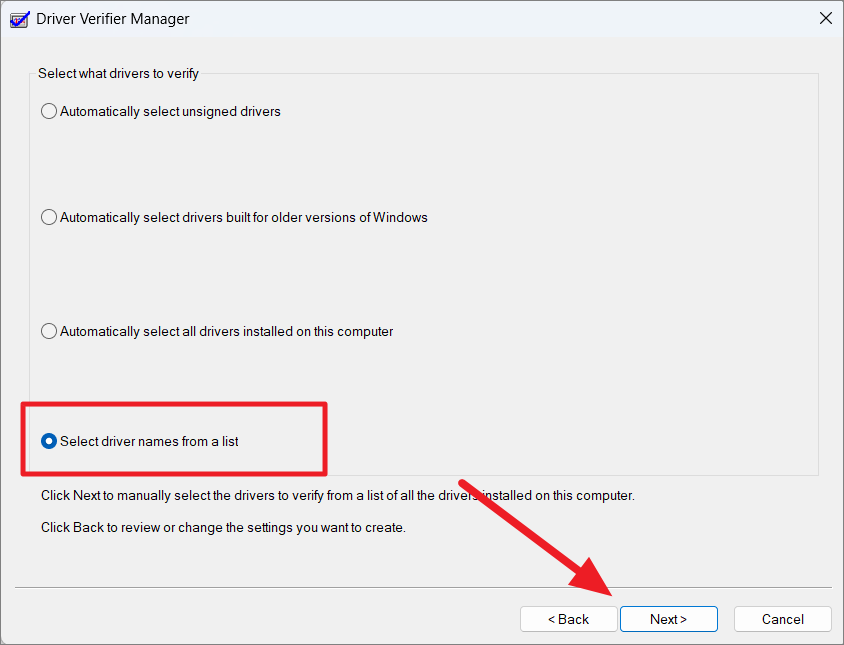
On the next window, select all drivers except the ones provided by Microsoft Corporation and click ‘Finish’. If you already have doubts about certain drivers, you can just select only those drivers instead of all.

Then, in the prompt box click ‘OK’ and then restart the computer to scan the drivers.
After you restart your computer the Driver Verifier will run in the background and diagnose the drivers while logging information about everything related to drivers. Wait for your computer to crash or display a blue screen of death error. If you have experienced BSOD errors while carrying out particular actions before, report those.
Driver verifier needs to encounter the blue screen error in order to determine which malfunctioned and caused the error. So, wait patiently and keep using your PC normally, as it may take several minutes or hours until the crash occurs.
To confirm if the Driver Verifier is running in the background, open Command Prompt with administrative privileges, type verifier /query or verifier /querysettings, and press Enter.
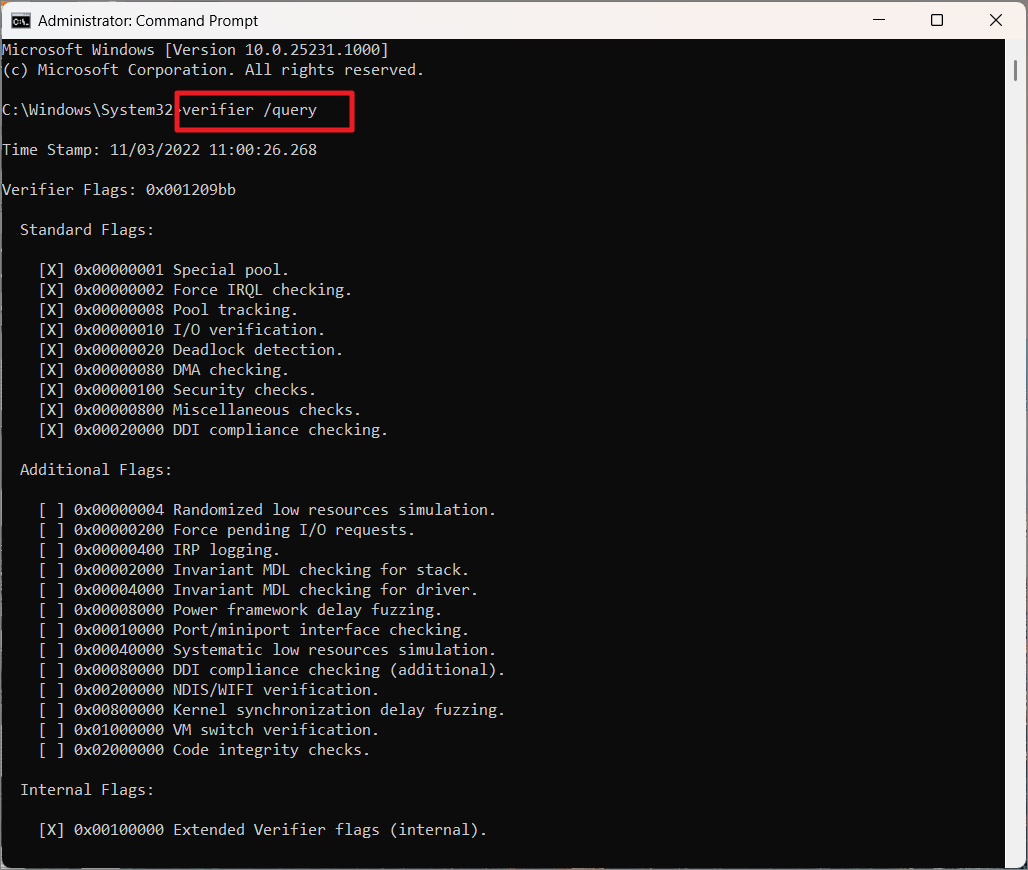
This will show you the test results and statistics of the Driver verifier.
Read Driver Viewer Crash Reports (DMP files)
Once your system crashes or the Blue Screen of Death error occurs, the Windows Driver Viewer will gather all the information and store them in a DMP file. The DMP file can’t be read like any other document, you will need specialized software to analyze crash dumps.
You can use software like Windows Debugger (WinDbg) or NirSoft BlueScreenView. NirSoft BlueScreenView is easy to use and diagnose Windows BSOD errors.
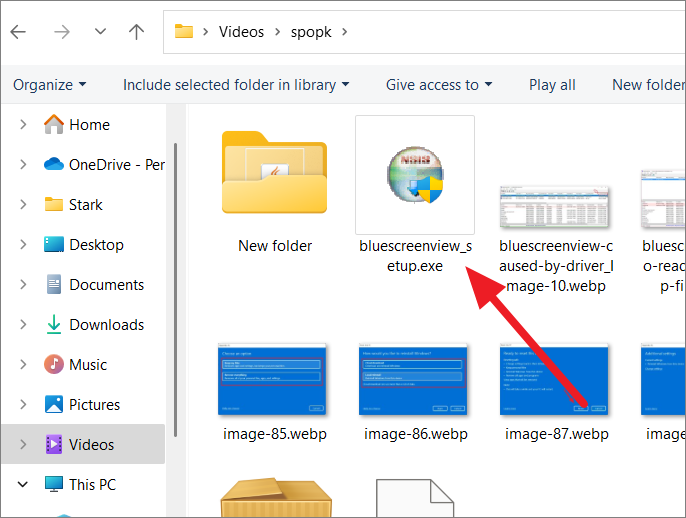
First, download the NirSoft BlueScreenView software with the given link. Then, install the downloaded setup file (bluescreenview_setup.exe) and launch the application.
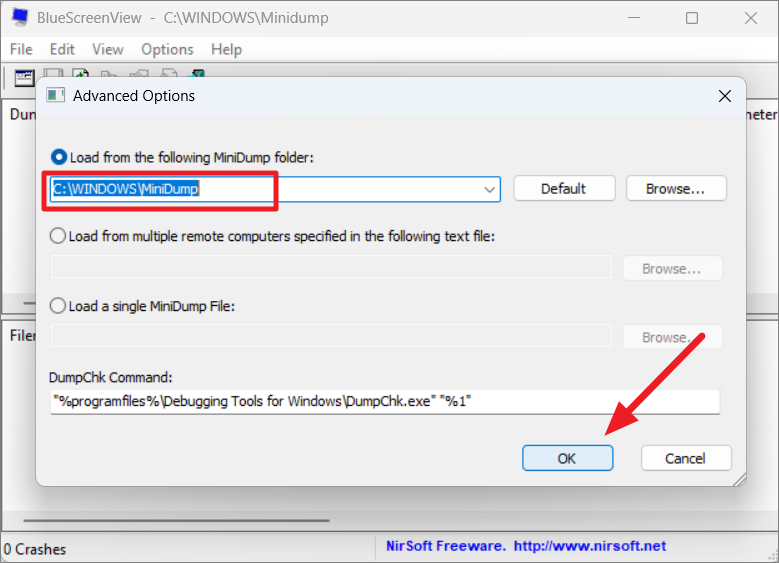
When the BlueScreenView opens, it will automatically load all .dmp files from the C:\Windows\Minidump folder. If doesn’t, click the ‘Advanced Options’ button right below the File menu.

Then, select the ‘Load from the following MiniDump folder’ option and ensure the path is set to C:\WINDOWS\MinDump, and click ‘OK’. In case you saved the DMP files somewhere else, click the ‘Browse…’ button and select the directory.
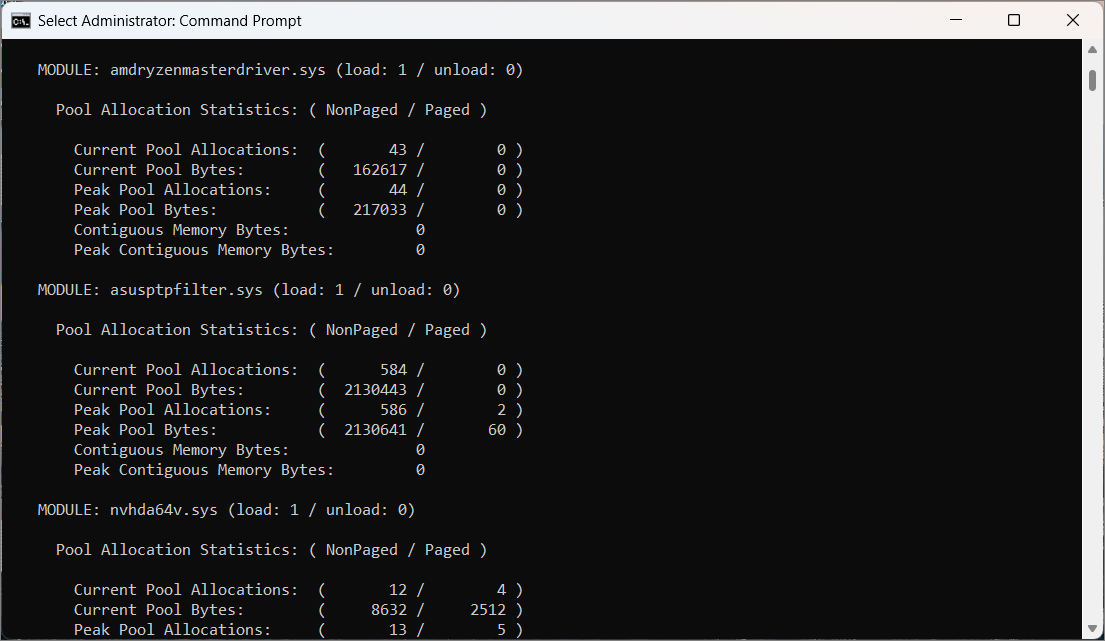
Next, select the most recent dump file from the list and scroll to the right until you find the ‘Caused By Driver’ section. Under the Caused By Driver section, you can find the driver that caused the BSOD. You can’t exactly see the name of the driver itself but the file that is associated with the driver.
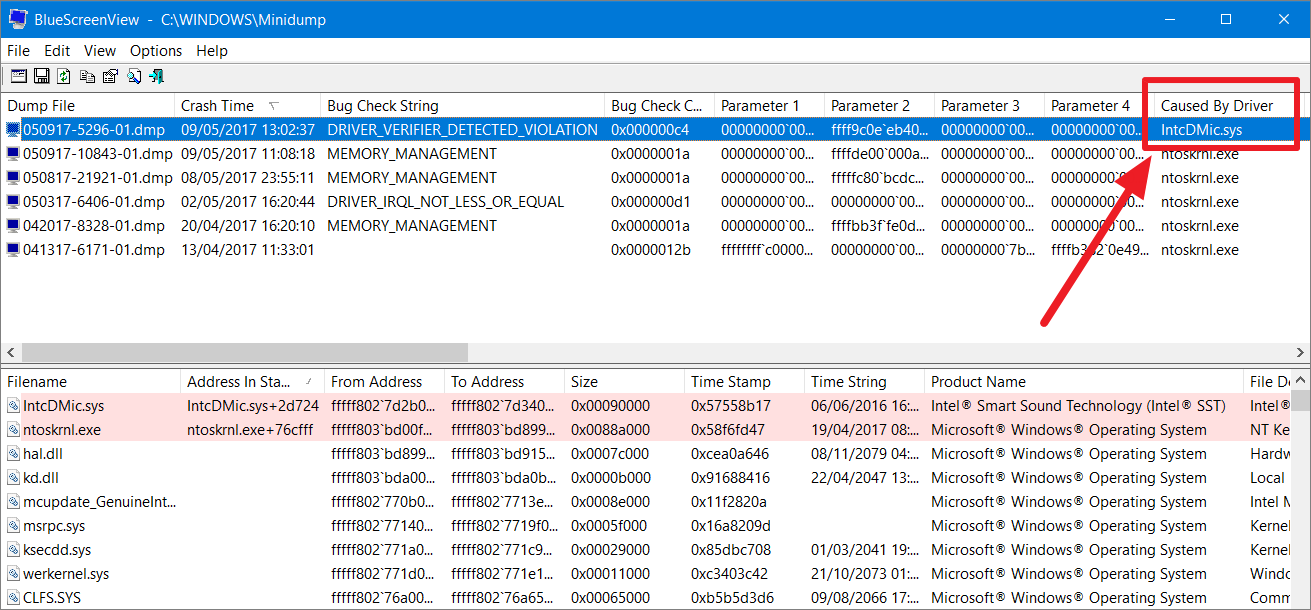
Note down or copy the file name. Then, search the file name on the internet to find the device driver that it is associated with. For example, when you search ‘IntcDMic.sys’ from the above screenshot reveals that it is related to Intel® Smart Sound Technology (Intel® SST) audio driver.
After finding which driver caused the BSOD error, you need to update the driver or roll back the driver to the previous version if you recently updated it.
Stop Driver Verifier or Stop Driver BSOD Loop
As we have mentioned earlier, the Driver Verifier deliberately triggers BSOD errors when it encounters bugs in the device driver. The Driver Verifier may also trigger additional BSOD errors which cause your system to stuck in a Blue Screen of death reboot loop. Usually, upgrading or replacing your drivers will fix this problem.
You can easily fix this by booting into Safe Mode first and then disabling the Driver verifier from running in the background. Also, it is always recommended to stop Driver Verifier in safe mode. There are various other ways for booting into safe mode in Windows 11:
Method 1:
The easiest way to boot into safe mode is by using the System configuration tool.
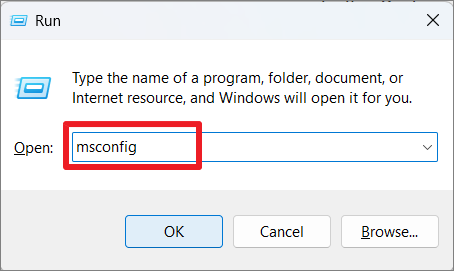
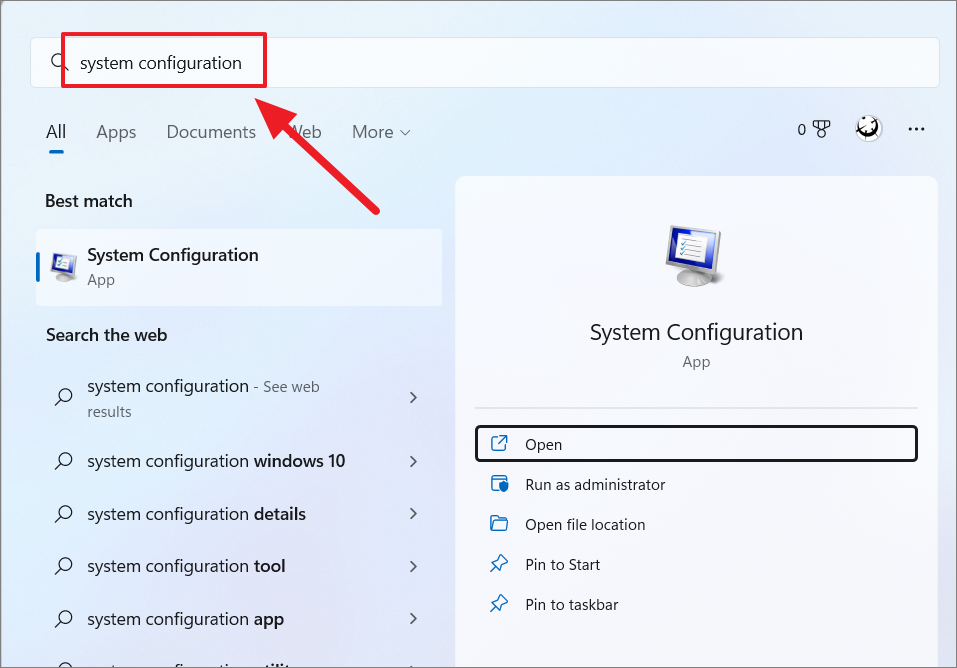
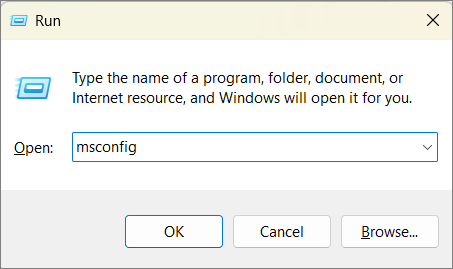
Open the Run command by pressing Win+R, type msconfig, and press Enter. You can also search for ‘System Configuration’ in the Windows search and open it.
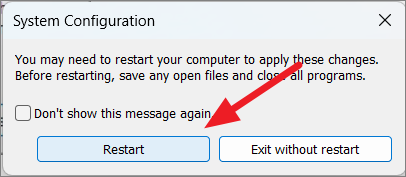
In the System Configuration tool, switch to the ‘Boot’ tab and check the ‘Safe boot’ option under the Boot options section. Then, select the ‘Minimal’ option under it, and click ‘OK’.
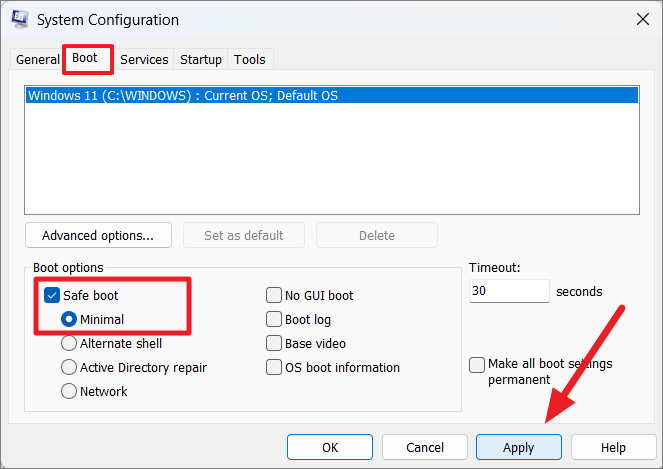
After that, click the ‘Restart’ button to reboot the PC and enter safe mode.
Method 2:
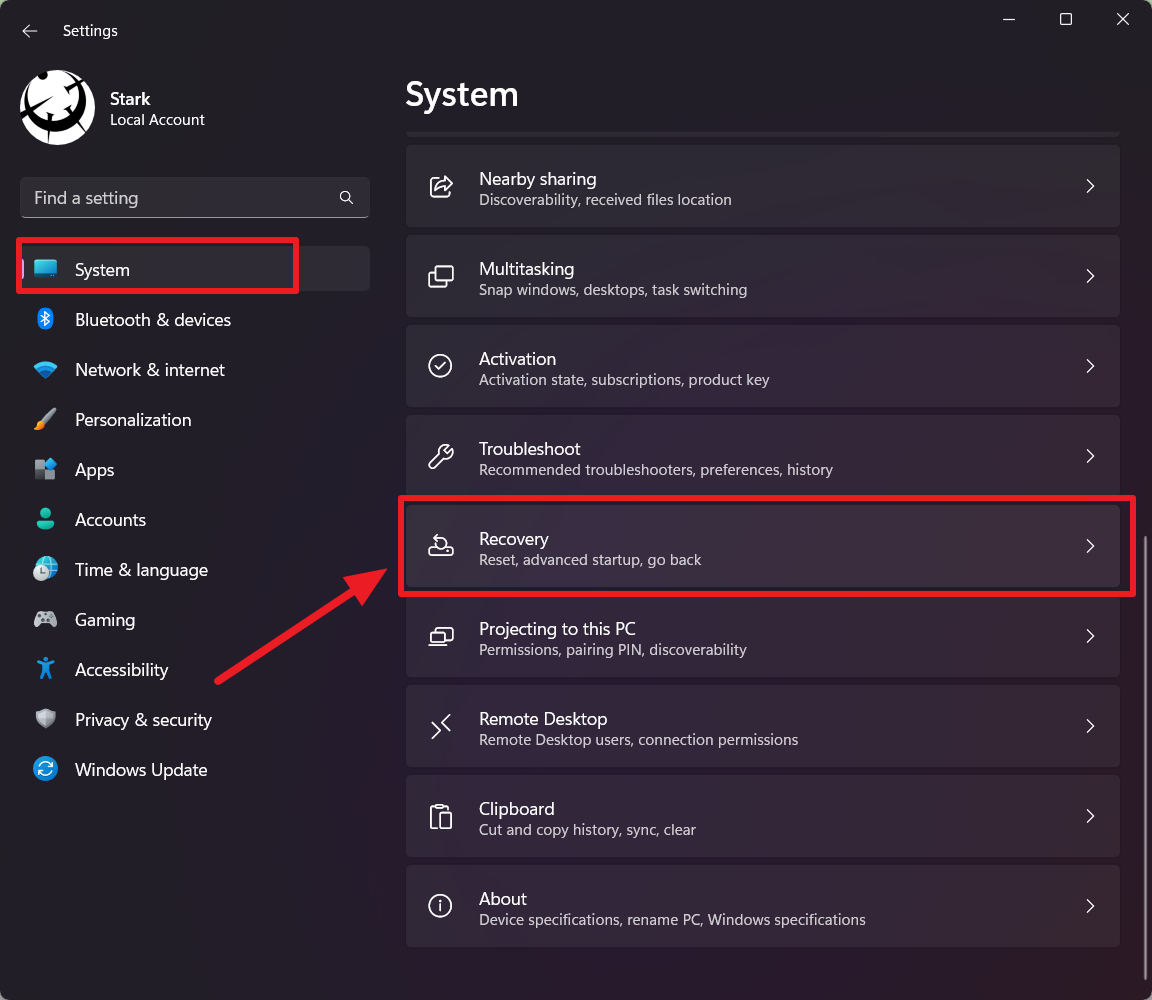
Another way to enter safe mode is through Windows Recovery Environment. To do that, open Settings and select the ‘Recovery’ option in the ‘System’ tab.
In the Recovery settings page, click the ‘Restart now’ option next to Advanced startup.
When Windows starts, it will boot into safe mode.
If Windows isn’t booting up properly to access the above settings, you can enter Windows Recovery Environment with hard reboots.
First, restart or start your computer, and as soon as you see the manufacturer’s logo or Windows logo, hold the power button for 5 sec to shut down the PC. Repeat the same process at least twice and then the third time let the system boot properly. It will boot into the Windows Recovery Environment screen.

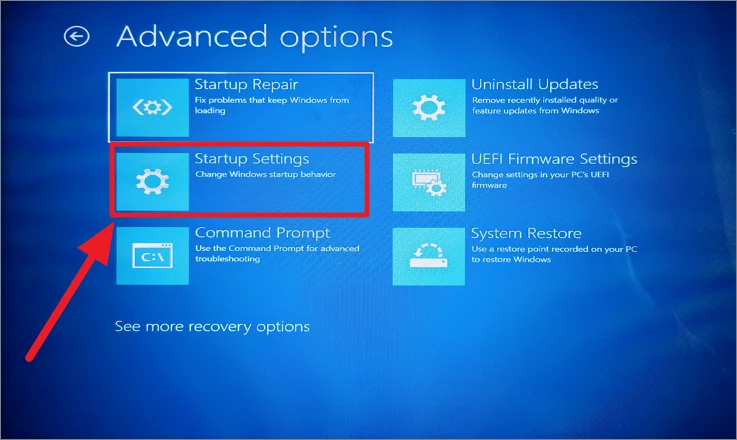
Here, click the ‘Advanced options’ button.
Then, select the ‘Startup Settings’ option.
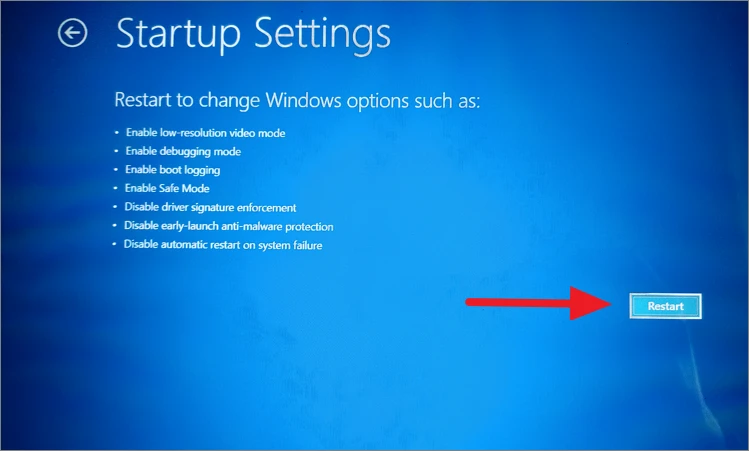
On the next screen, click ‘Restart’ to change the Windows options.
After that, your system will restart and show you the following screen. Here, press the number key 4 or F4 to enter the safe mode.
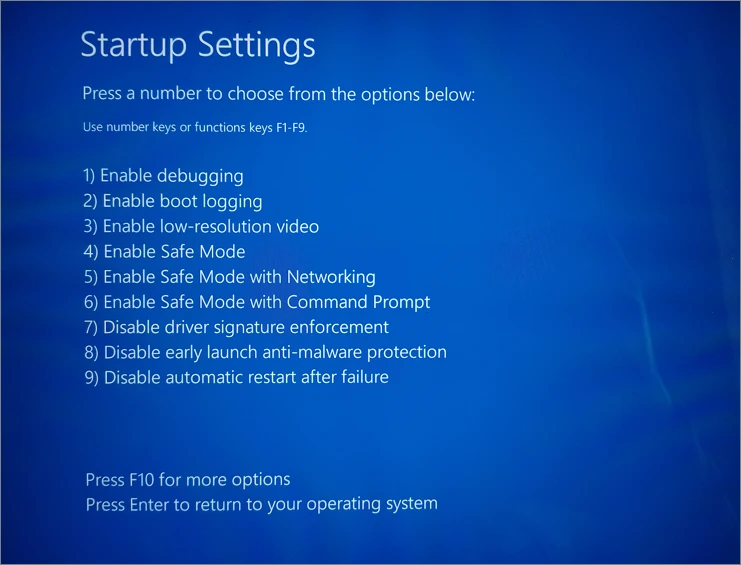
Now, Windows will boot into safe mode.
Disable Driver Verifier on Windows 11
When you are done fixing the driver or if you find yourself stuck in a BSOD loop, disable Driver Verifier via Driver Verifier Manager or Command Prompt.
Disable Driver Verifier via Driver Verifier Manager
First, open Command Prompt as administrator. Then, type verifier in the Command Prompt to open the Driver Verifier tool.
In the Driver Verifier window, select ‘Delete existing settings’ and click on ‘Finish’.
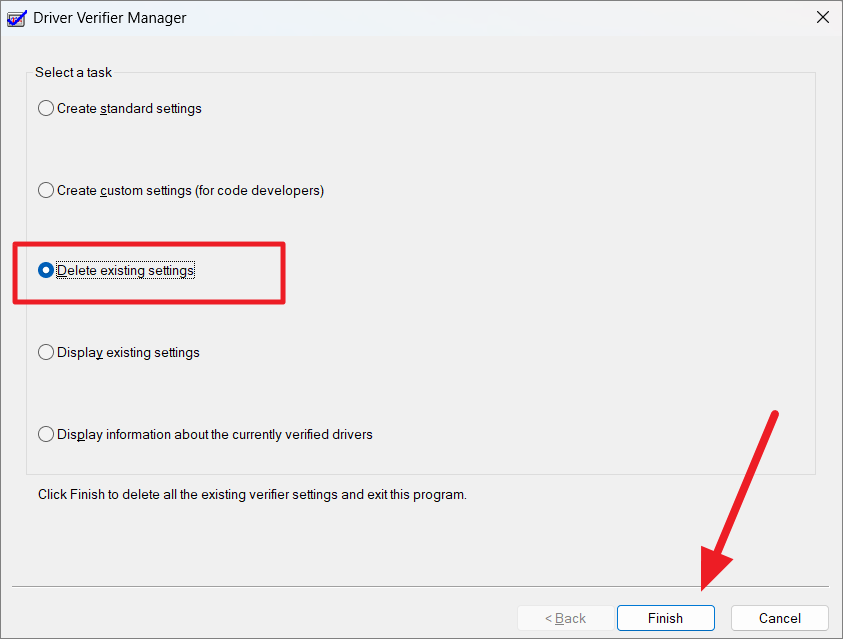
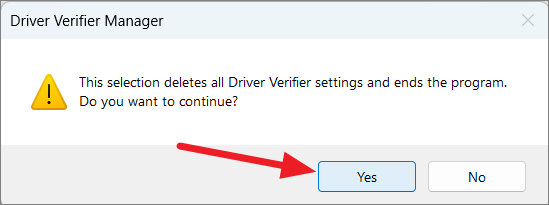
Then, click ‘Yes’ in the confirmation box.
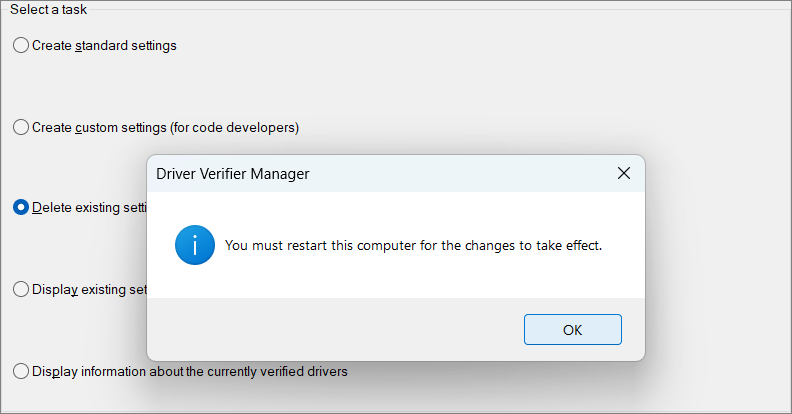
Then reboot your computer to apply the changes.
Disable Driver Verifier via Command Prompt
Open Command Prompt with administrative privileges. Then type verifier /reset and hit Enter.

After that, restart your PC to apply the changes.
In case you used the System Configuration tool to enter Safe Mode, follow these steps to disable safe mode.
To do that, open the Run command by pressing Win+R, type msconfig, and press Enter.
In the System Configuration tool, switch to the ‘Boot’ tab and uncheck the ‘Safe boot’ option under the Boot options section.
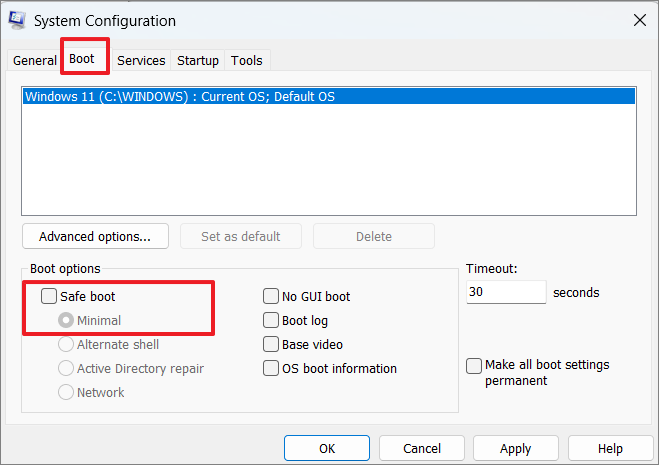
After that, click the ‘Restart’ button to reboot your computer normally.
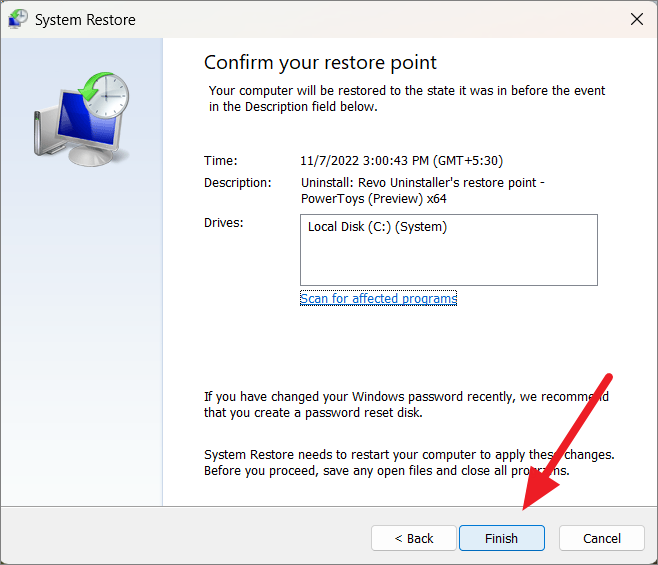
17. Restore Your System using System Restore
In case the System Service Exception error started appearing after a certain change in your system like a major update, software installation, or others, you can use system restore to restore your computer to a previous state. Also, if you can’t get out BSOD loop even after disabling Driver Verifier in the safe mode, you can use a restore point you created before you enabled Driver Verifier to reset your PC back to an earlier point. Here’s how you do this:
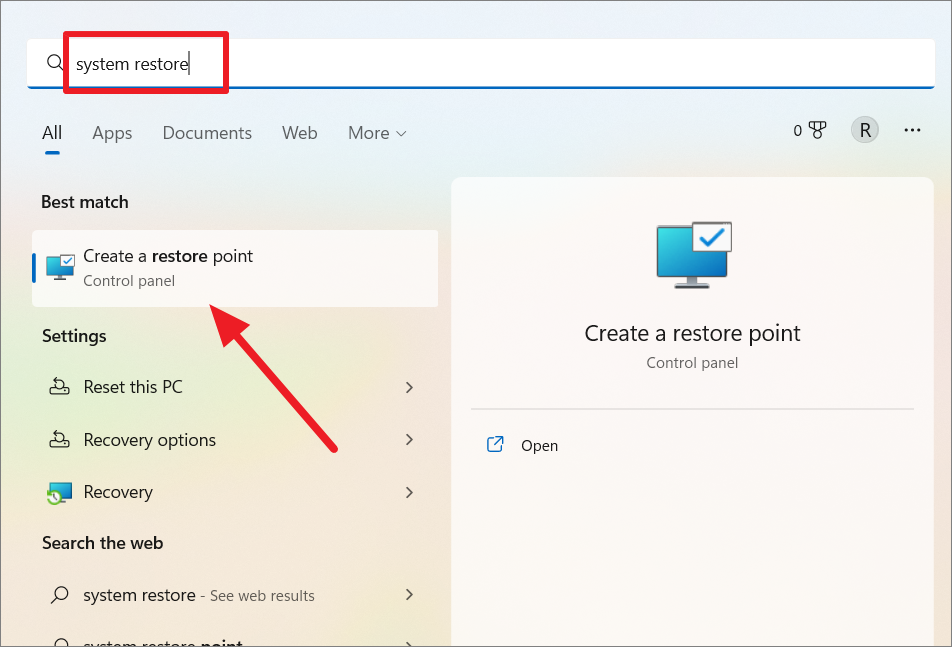
If you are able to boot Windows, open the Start menu and search for ‘System restore’, and choose the ‘Create a restore point’ control panel.
If you are not able to boot Windows normally, boot into Windows Recovery Environment to access the System Restore option.
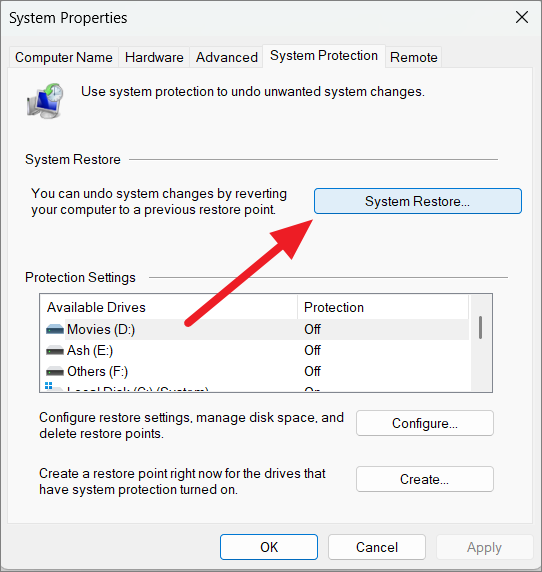
When the System Properties control panel opens, click the ‘System Restore’ button.
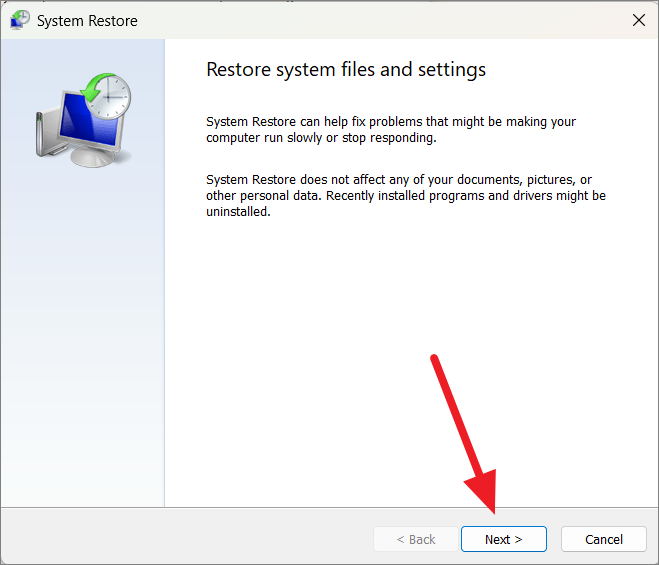
In the System Restore tool, click ‘Next’ to continue.
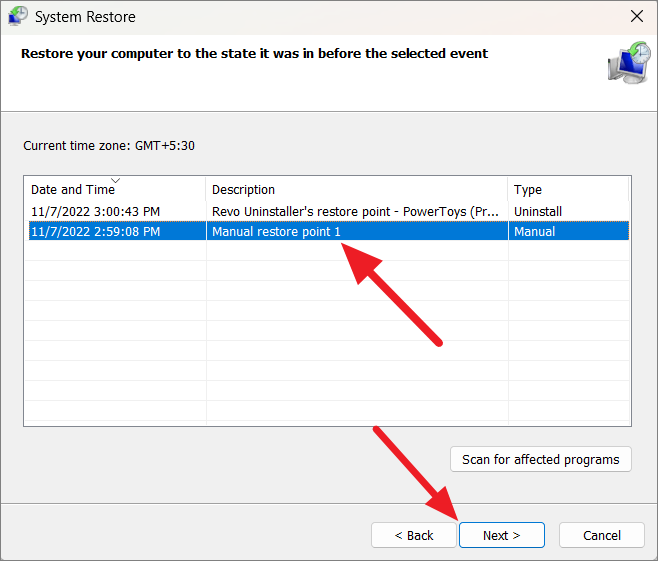
On the next screen, you will see a list of system restore points, choose the right one and select ‘Next’. If created a restore point before you the BSOD loop, choose that restore point or before that and click ‘Next’.
Finally, click ‘Finish’ to confirm the restore point.
18. Disable Antivirus
Many users have reported that antivirus programs like McAfee and BitDefender caused the error. Sometimes the background process of Antivirus programs can interfere with the system process which leads to BSOD errors in some computers.
If this is the case, disable the ‘Real-time protection’ feature in the app’s settings and check if the problem goes away. If the error disappears then your antivirus is the problem, uninstall the antivirus altogether. If you encounter the error after disabling the antivirus, uninstall the antivirus anyway and see if it fixes the error. However, if the error appears after uninstalling the antivirus tool, then your antivirus is not the issue and you can re-install it.
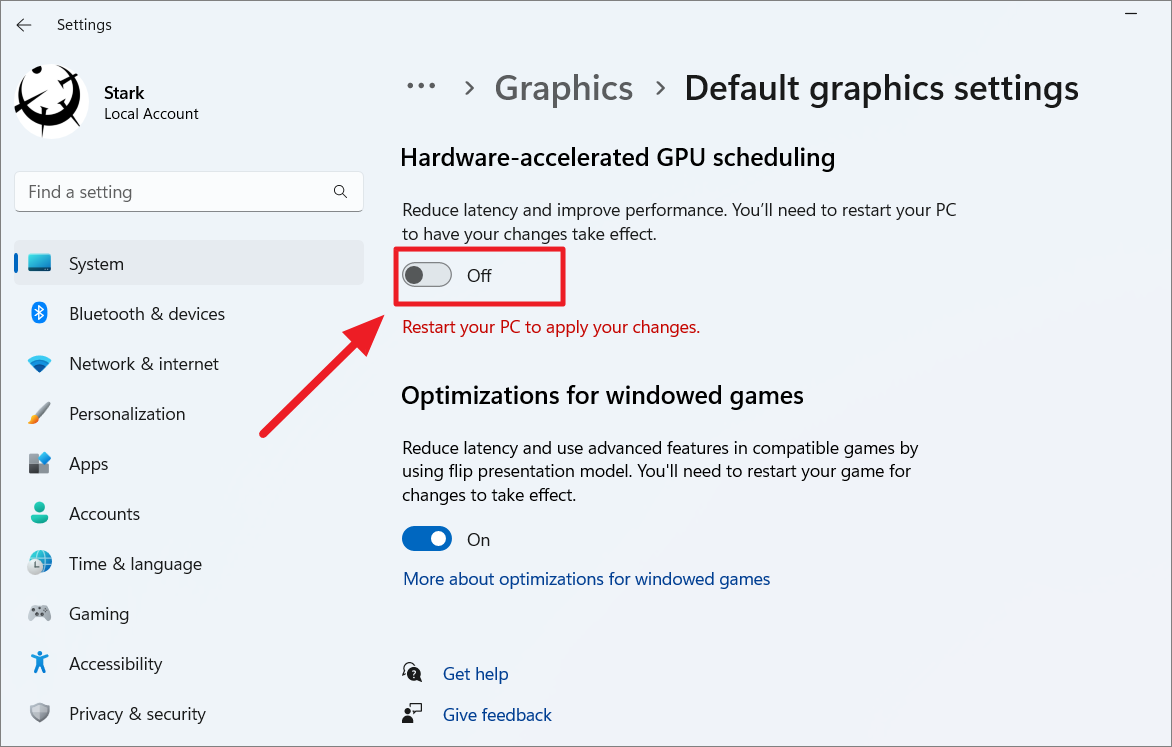
19. Disable Hardware Acceleration
Hardware-Accelerated GPU Scheduling is a Windows feature that allows graphics cards to use their own dedicated scheduling processor and memory (VRAM) to reduce latency and improve the PC’s performance. It can also cause Blue Screen dxgmms2.sys error on Windows 11. So disabling the Hardware Acceleration should fix it.
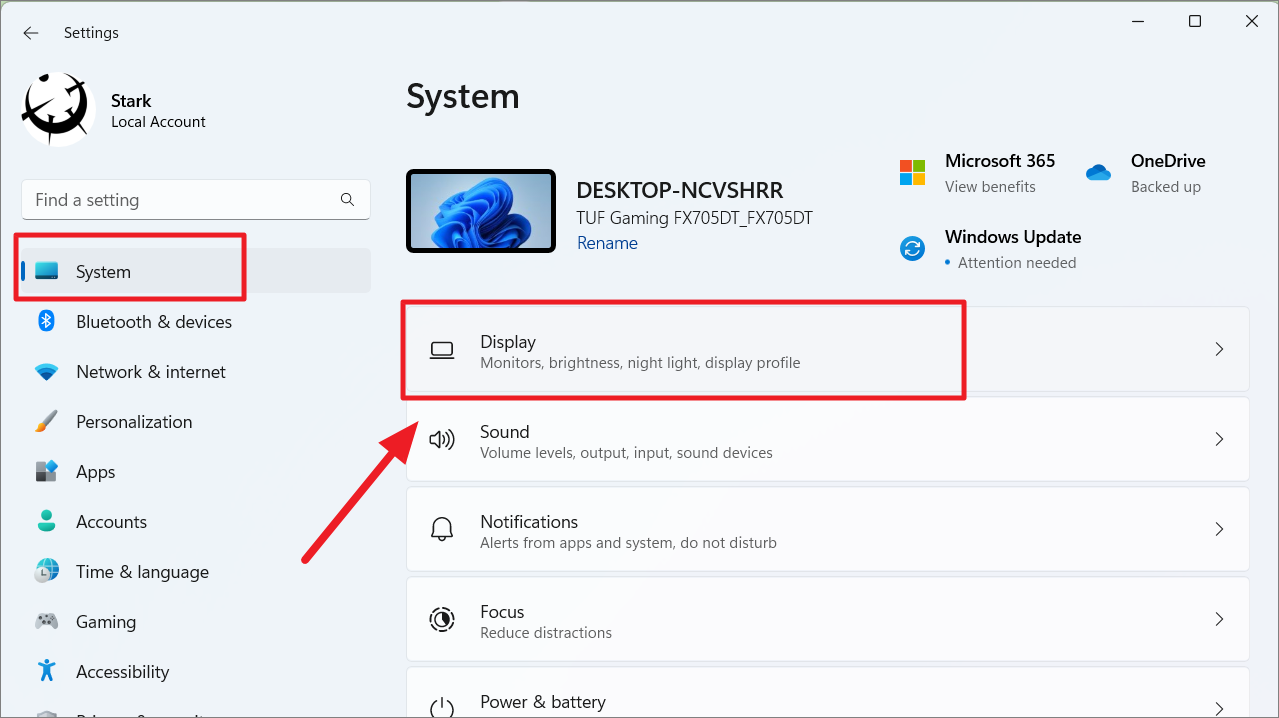
Open Windows Settings (Win+I). Under the System tab, select the ‘Display’ tile on the right.
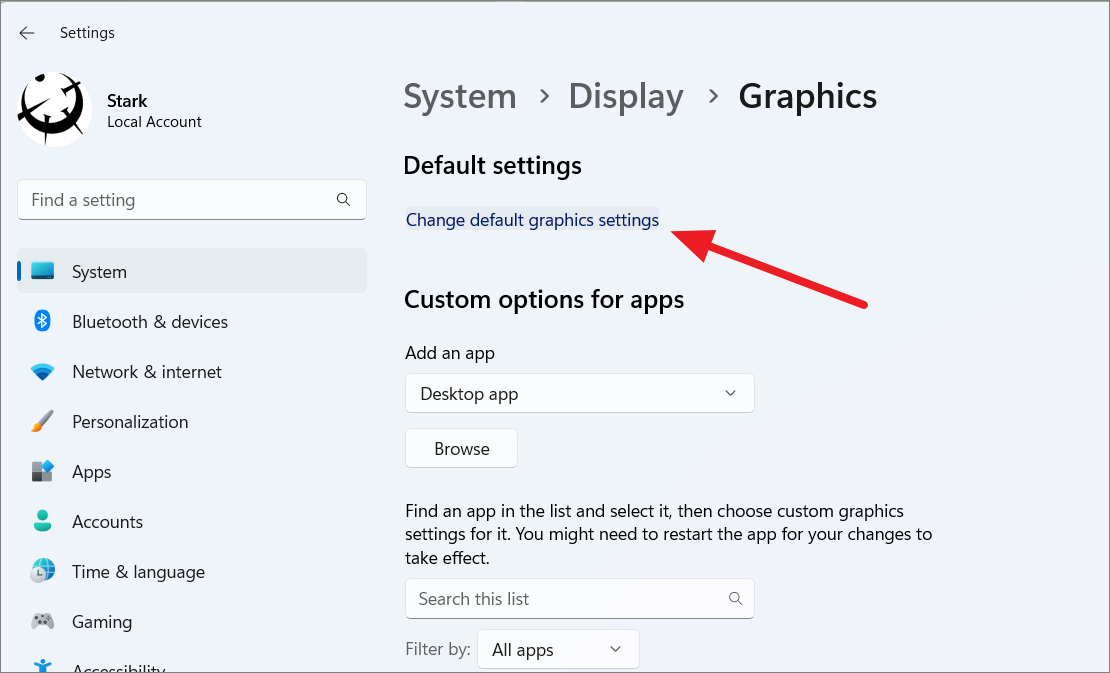
Next, select the ‘Graphics’ option under the Related settings.

Then, click on the ‘Change default graphics settings’ link under Default settings.
On the next page, turn off the ‘Hardware-accelerated GPU Scheduling’ toggle and restart your computer.
20. Disable SLI and NVIDIA Surround in NVIDIA Settings
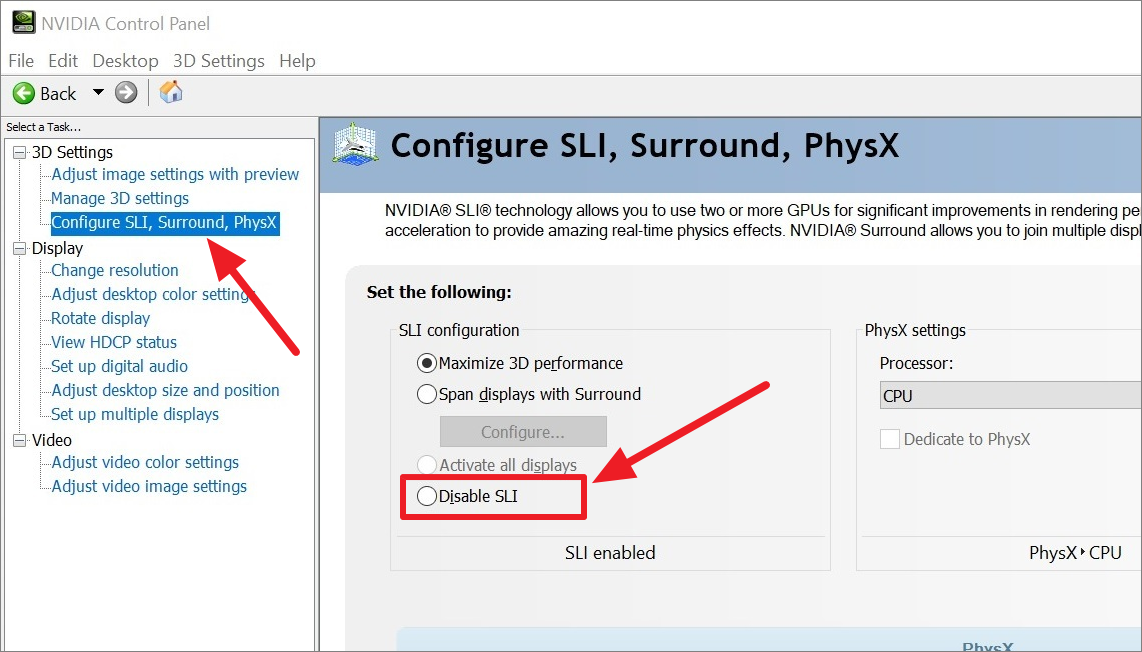
If you are encountering the ‘SYSTEM_SERVICE_EXCEPTION (dxgkrnl. sys)’ error in Windows 11, it is most likely caused by SLI (Scalable Link Interface) and NVIDIA Surround configuration in NVIDIA settings. SLI (Scalable Link Interface) is a technology used by NVIDIA to link two or more video cards together to produce a single output.
If you have multiple GPUs installed on your device, you must have SLI enabled. Disabling SLI and NVIDIA Surround can help fix SYSTEM_SERVICE_EXCEPTION (dxgkrnl. sys) error.
Open Windows search, type ‘NVIDIA Control Panel’, and select the result or right-click the NVIDIA Settings icon from the System tray and select ‘NVIDIA Control Panel’.
When the NVIDIA Control Panel opens up, expand the ‘3D Settings’ option and click on ‘Configure SLI, Surround, PhysX’ or ‘Surround, PhysX’ on the left panel. Then, select ‘Disable SLI’ or ‘Disable SLI technology’ under the SLI configuration section.
21. Perform Clean Boot in Windows 11
Clean Boot is a troubleshooting method that helps you isolate errors by booting Windows with only crucial drivers and programs. As you know when Windows Starts normally, hundreds of programs, drivers, and settings run in the background interacting with each other. Sometimes, these non-Windows programs and drivers interfere with system functions leading to critical errors and BSODs.
By booting your Windows in Clean boot, you can easily identify the program or service that is causing the problems. If the program malfunctions even in a Clean boot, then you know that program is the cause of the BSOD error. Let us see how to Start Windows in clean boot.
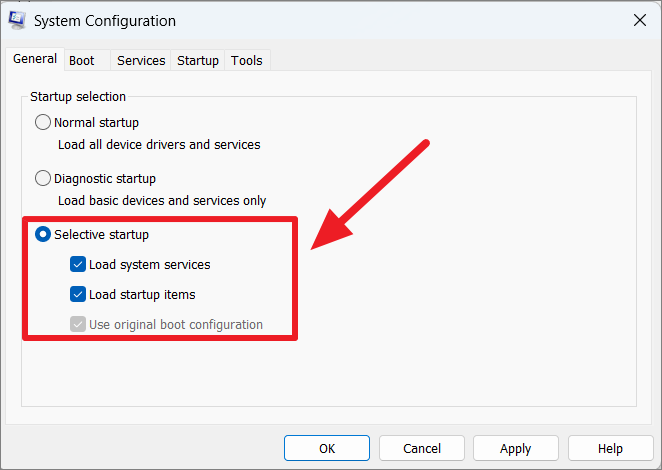
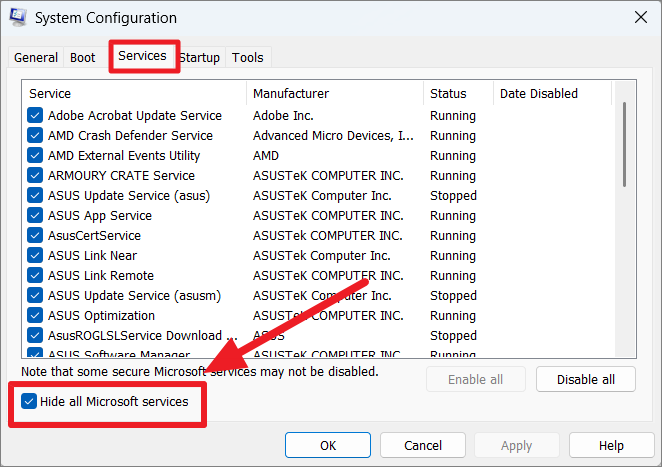
Open the Start menu and search for ‘System Configuration’ or ‘sysconfig’ and select the app under Best Match.
Under the ‘General’ tab, select the ‘Selective startup’ option and ensure that the ‘Load System Services’, ‘Load Startup Items’, and ‘Use Original boot configuration’ options are checked under it.
Then switch to the ‘Services’ tab and check the ‘Hide all Microsoft services’ box at the bottom left corner.
Then, click the ‘Disable all’ button at the bottom right corner.
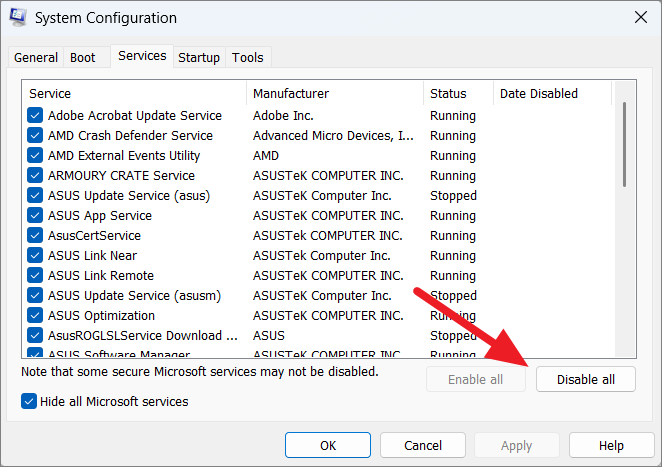
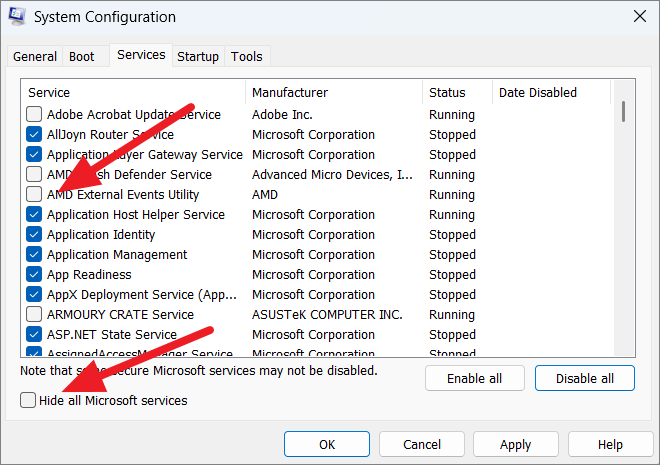
This will disable all third-party services. You can also uncheck the ‘Hide all Microsoft services’ box and deselect Microsoft services that you don’t think necessary for the clean boot. This is optional but it can further narrow down your search for errors.
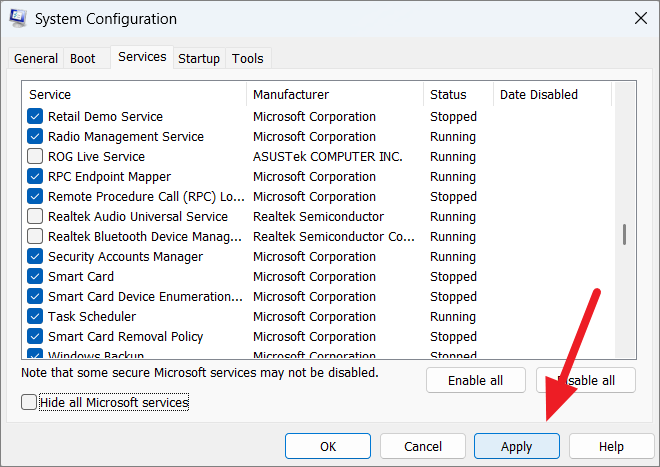
After that, click ‘Apply’.
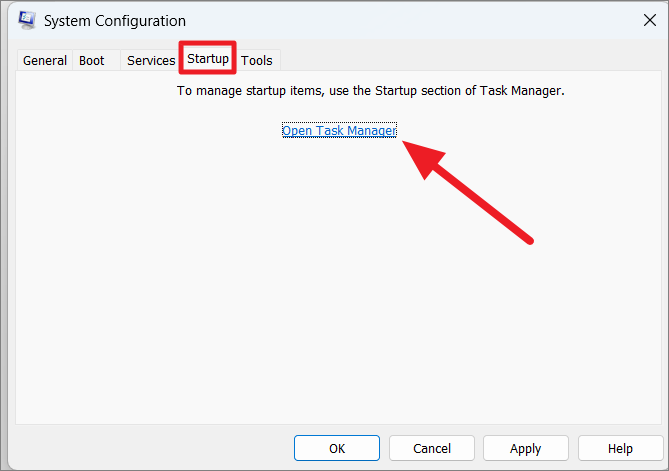
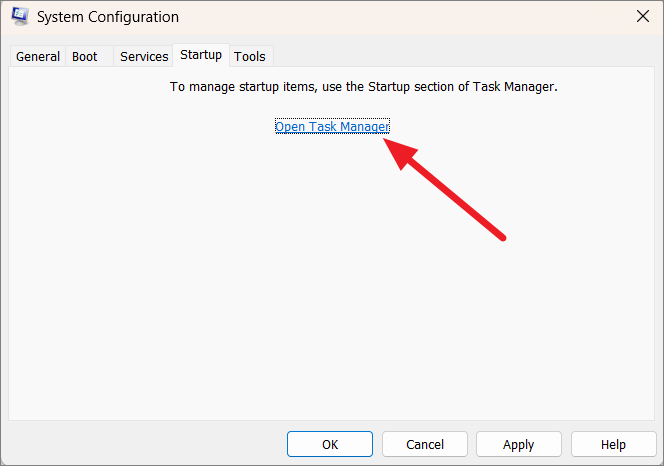
Next, switch to the ‘Startup’ tab and click on ‘Open Task Manager’.
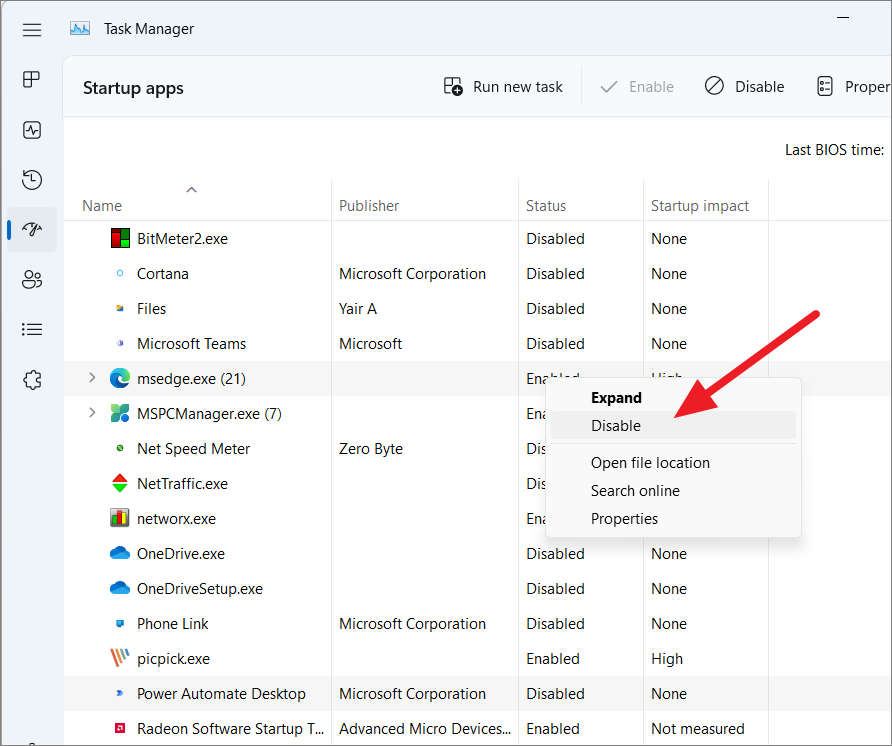
In the Task Manager window, right-click each startup app one by one and select ‘Disable’. We don’t want startup apps interfering with the diagnostic process either, that’s why we are disabling them.
After that, close both Task Manager and System Configuration tools and restart your computer. Once your computer restarts, only the minimal set of drivers and startup programs will start.
While you are in clean boot mode, you should see if the error appears. Try using the computer as you normally would. If the problem persists while using Windows in the Clean boot mode, it could be caused by Windows system files and services.
If the error doesn’t appear, then it is time to narrow down the program or service that’s causing it. Try running or installing the program or service that you think might be causing the error, if the error surfaces again then you can be sure that it is the root of the problem.
However, if the error doesn’t show up, you have to re-enable a few non-Microsoft services at a time and see if any of them causes the error. To do that, open the System Configuration tool again, go to the ‘Services’ tab, and check the ‘Hide all Microsoft services’ option. Then, re-enable only 5 or 10 non-Microsoft services at a time, apply and then restart your computer.

Then, test to see if the error is back. If it isn’t, go back to the System Configuration tool again and try re-enabling the next set of services. Repeat the process until you checked them all. This way you can easily narrow down the responsible service and remove it.
After testing all the programs, if the error doesn’t appear, you can rule out the services from the suspects.
Getting back to Normal Bootup
After completing your troubleshooting process, you can get your PC back to running normally using the following steps:
Open the System Configuration tool by entering msconfig command in the Run box.
Select the ‘Normal startup’ option under the General tab, and click ‘Apply’.

Then, go to the ‘Startup’ and select ‘Open Task Manager’.
Now, re-enable the startup you want and then restart your computer to boot normally.
22. Use DirectX Diagnostic Tool
If you are getting the “SYSTEM_SERVICE_EXCEPTION (dxgmms2.sys)” error code, it could be caused by an old, corrupted graphics driver or DirectX Graphics MMS service.
If you have already tried upgrading, reinstalling, and rolling back the graphics driver, you can try re-installing or updating your Direct X. DirectX is a set of application programming interfaces that multimedia software like games and video players use to work with your audio and video hardware. Let us see how to check for DirectX-related errors and fix them.
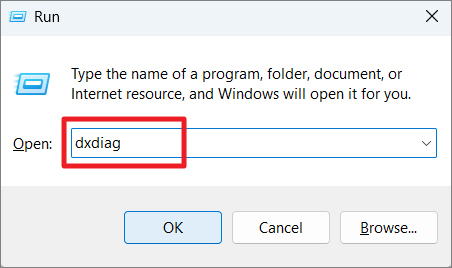
Launch the Run Command, type dxdiag and press Enter to open DirectX Diagnostic Tool.
The tool will start diagnosing the DirectX libraries and components. Wait for it to finish the diagnostic process.
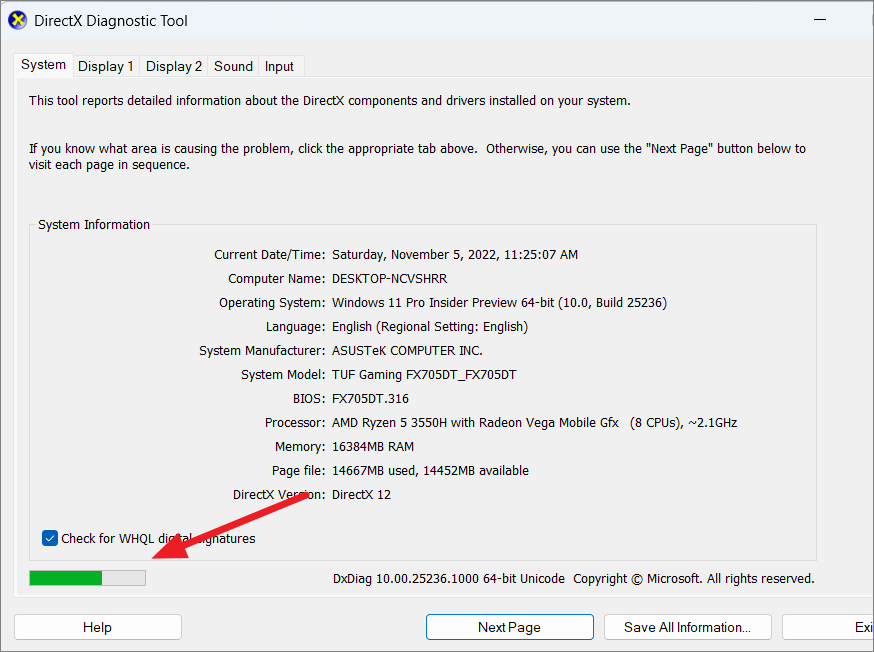
Then, go to the Display tab by clicking ‘Next Page’, and check the ‘Notes’ section at the bottom. If there are any errors, the tool will show them here.

Then, switch to each tab (Sound, Input) and check for errors there.
After that, visit the Microsoft website, select the language, and download the DirectX End-User Runtime Installer.

Then run the installer (dxwebsetup.exe) to install the latest DirectX runtime components on your device.
23. Reverse Recent System Changes
Another cause for blue screen errors is the recent changes you have made to your computer. If you recently installed new software, update or added new hardware, remove them and check if the error goes away. Also, you can get BSOD errors, if your system doesn’t meet the minimum requirements for running Windows 11. If so make sure to upgrade your hardware, especially RAM and Graphics cards.
24. Remove UI Customization Apps
Several customization apps that allow you to make changes to your Windows 11 user interface (UI) and desktop (apps such as Winaero Tweaker, ThisIsWin11, Lively Wallpaper, Rainmeter, etc.). These tools allow you to change various UI elements such as themes, skins, menus, taskbar, fonts, etc.
Disable or uninstall these UI customizing tools and see if it fixes the System Service Exception error.
25. Disable CPU and GPU Overclock
Overclocking your CPU and GPU exerts an additional load on the system resource making it operate at a much higher speed than the default value set by the manufacturer. Pushing your processor too much can overheat your system and lead to drivers and programs malfunctioning. Disabling CPU Overclocking is also known to fix the Blue screen error.
To stop your PC from Overclocking, you have to reset the BIOS back to factory settings or reverse all the changes you made in the BIOS/UEFI firmware.
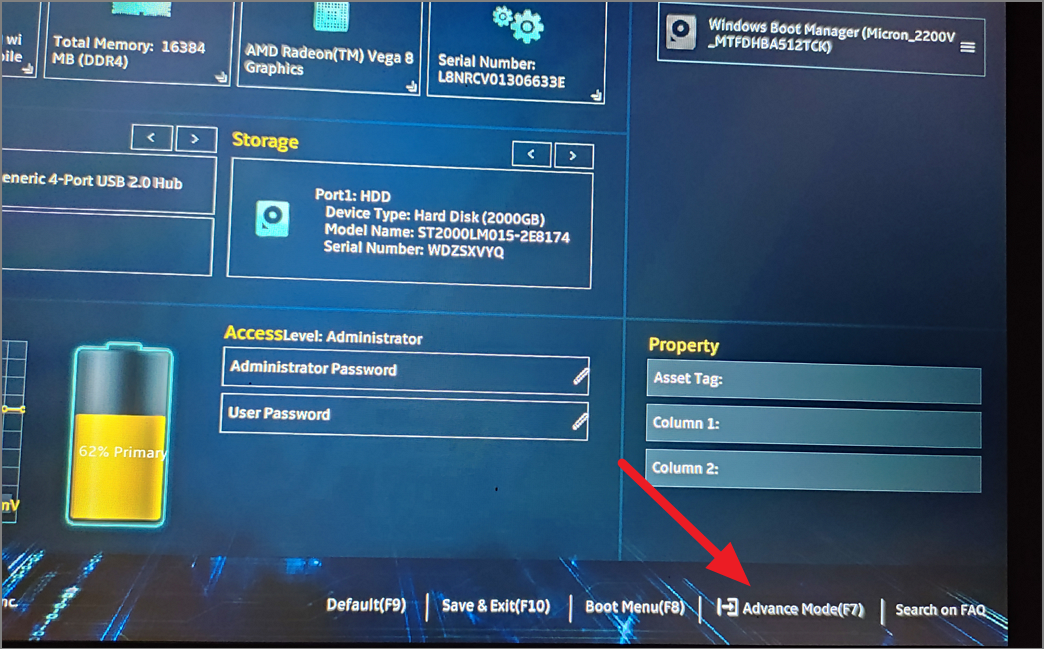
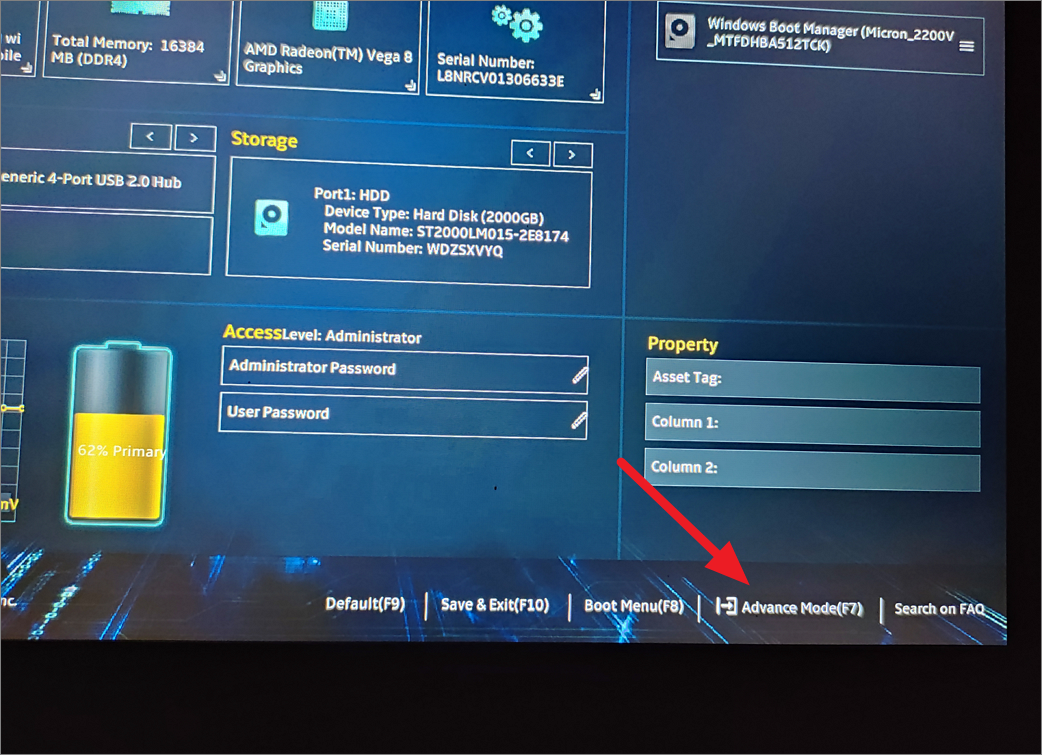
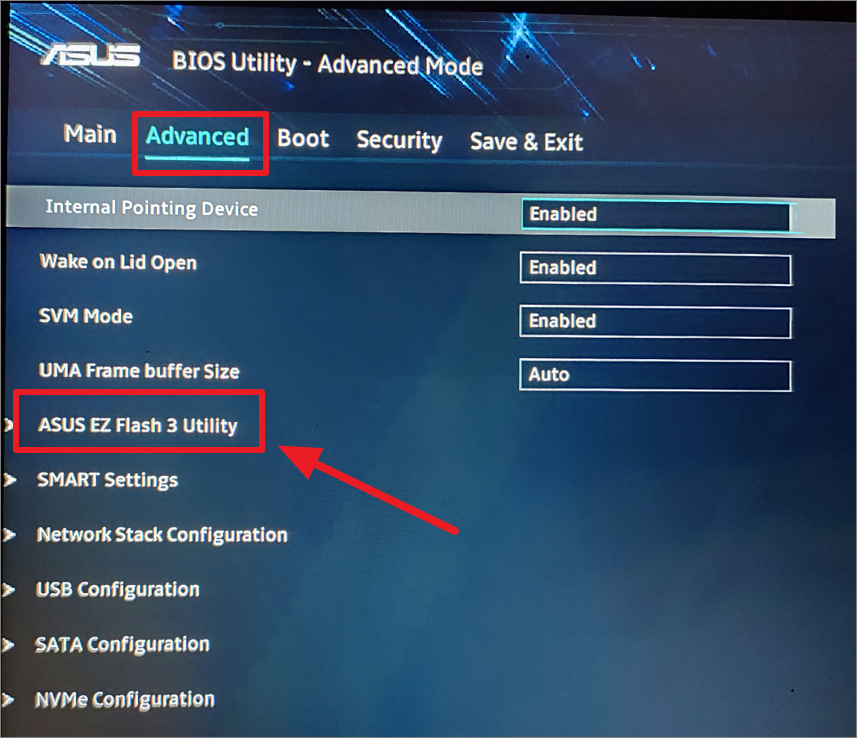
To enter the BIOS or UEFI, restart your computer and keep pressing the respective key until the BIOS settings appear. For most computers, you can enter BIOS using the F2, F12, Delete, or ESC keys.
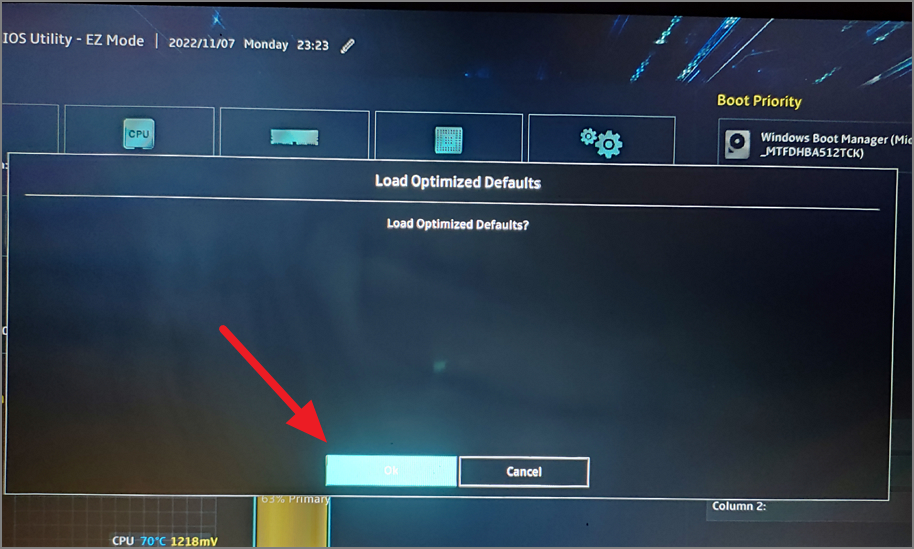
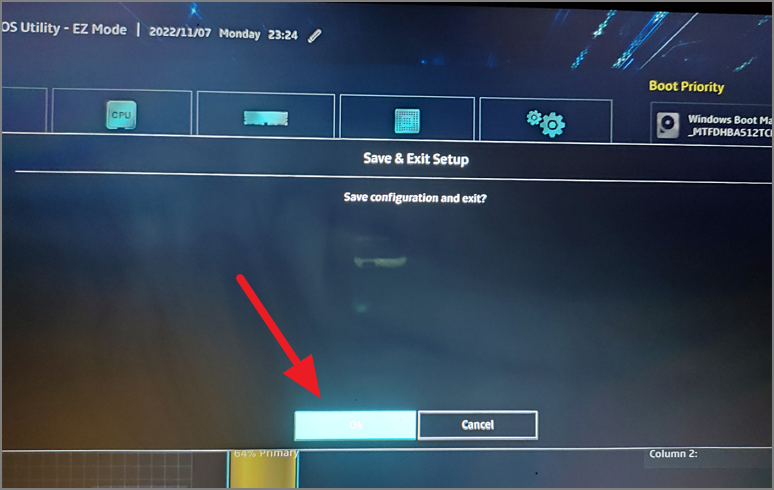
Once you are in the BIOS settings, press F9 to load the default settings and select ‘Yes’ on the prompt to confirm the action.
After that, press F10 and click ‘Yes’ to save the new settings and exit the BIOS settings. Your system will automatically restart and boot normally.
However, if you are using third-party software like AMD Ryzen Master, MSI Afterburner, etc. to overclock your PC, you need to disable or uninstall the application and check whether the issue is fixed.
26. Update the BIOS or UEFI firmware
An outdated BIOS or UEFI firmware could cause compatibility issues with newer operating systems like Windows 11 leading to an SYSTEM_SERVICE_EXCEPTION error.
Unlike Device Drivers and Windows, BIOS doesn’t automatically update. But your device manufacturer may offer updates and security patches to the BIOS that can improve your system performance, which you can manually download and install from the manufacturer’s website. Here’s how you do this:
First, visit your motherboard manufacturer’s support site. For example, go to your manufacturer’s website, select ‘Support’, and choose ‘Drivers’.

Then, enter the model name of your product or select the product with the given options to search for drivers and utilities.
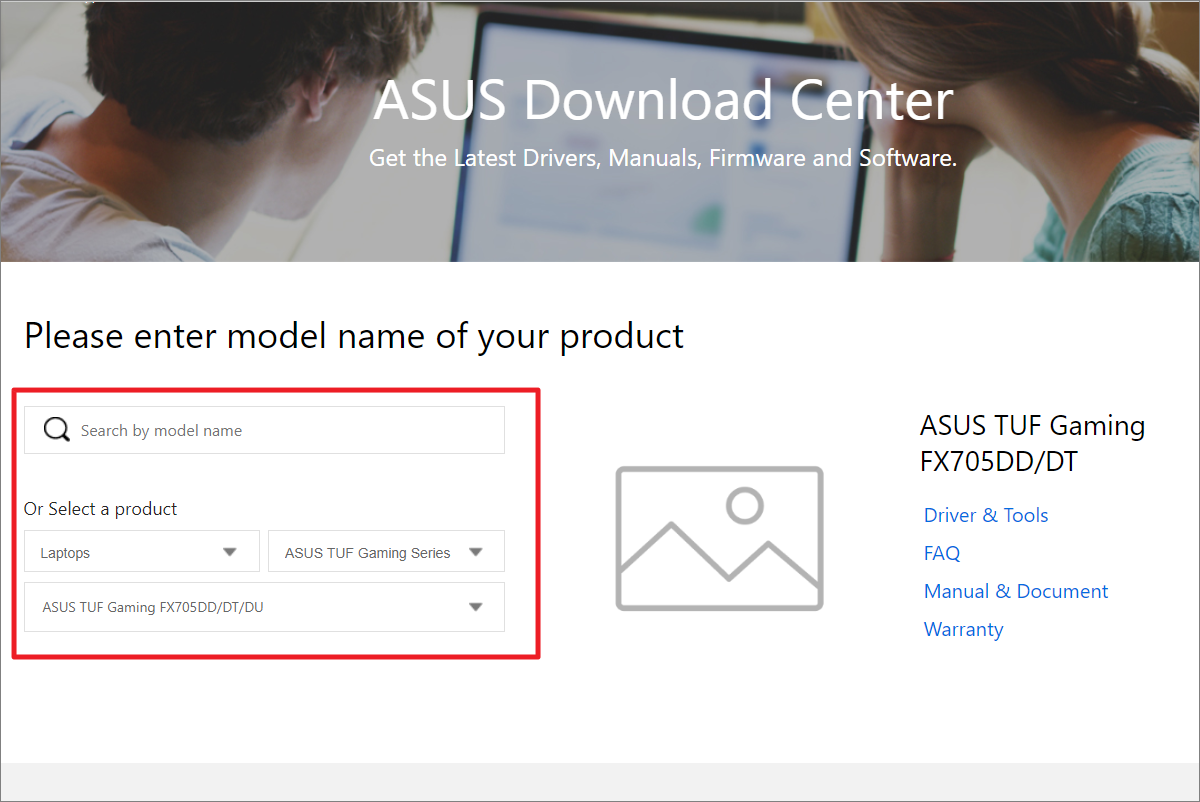
After that, select the operating system and download the latest update for BIOS/UEFI firmware. Before you download, double-check your motherboard and computer model.
Some manufacturers provide BIOS updates as an installer which can be directly installed through Windows like any other software while others provide BIOS flash updates which can only be installed through BIOS settings. And some manufacturers offer updates for both options.
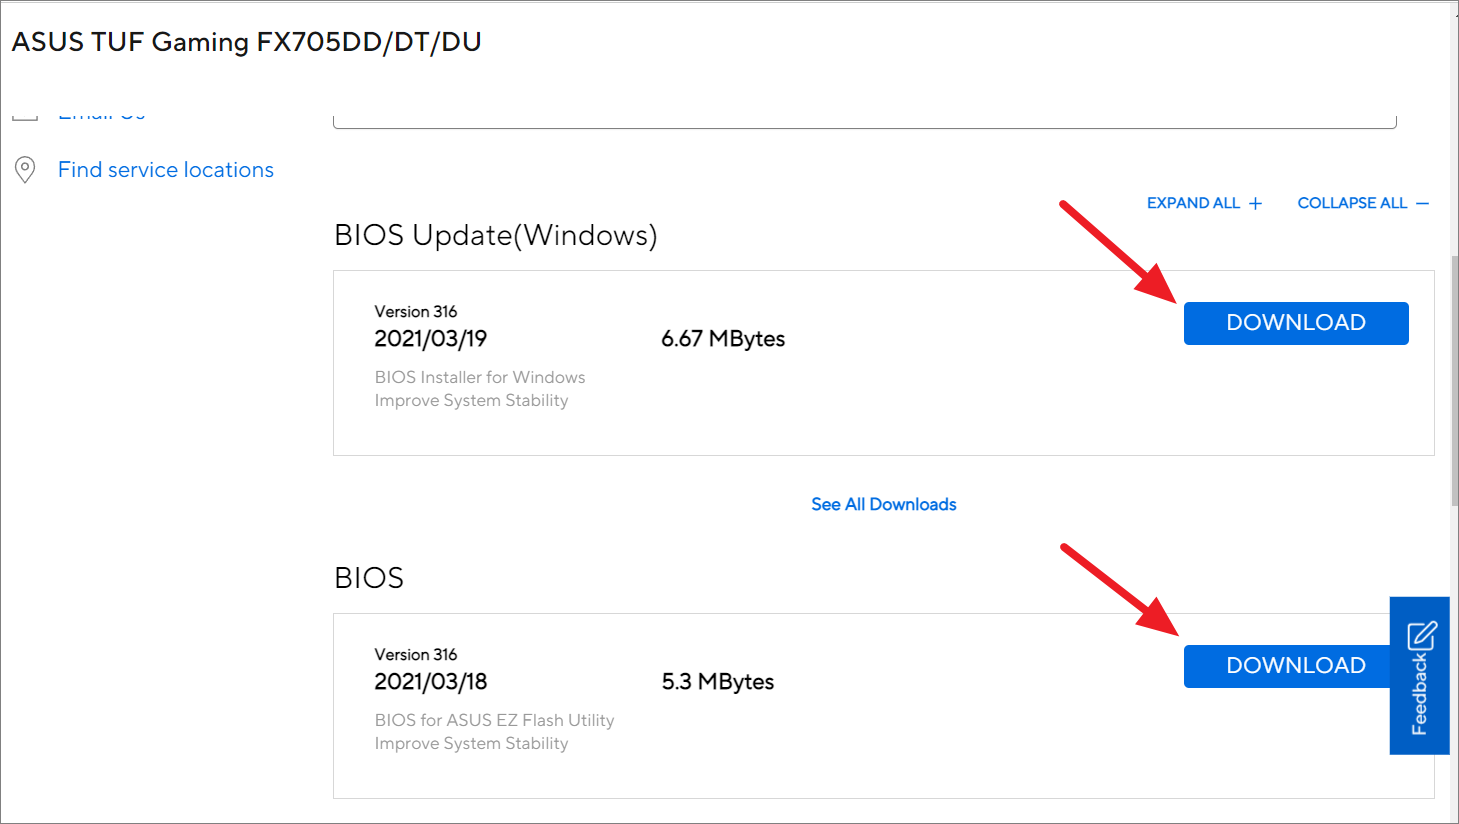
If BIOS update is available as an installer, you can simply download and run the installer. Then, follow the instructions to install it.
If the update is only available for flashing, then download the file and copy it to a USB flash drive. In case, the file comes as a ZIP or RAR file, extract its contents and copy it to a USB drive. Before you copy the update to the USB, make sure to format the drive or delete all its contents.
Ensure to back up your personal and important files before upgrading BIOS. Also, check your manufacturer’s site for any specific instructions for upgrading BIOS on your computer.
Then, keep the USB drive plugged in and reboot your computer. When your PC boots up, press the F2, F12, Delete, ESC keys, or any other respective keys repeatedly to enter the BIOS or UEFI settings.
Once you are in the BIOS settings, find the Update option. It’s mostly located under Advanced options.
The update settings will be named something like BIOS update, BIOS Flash, Flash Utility, Update, etc. Navigate to the update or flash option.
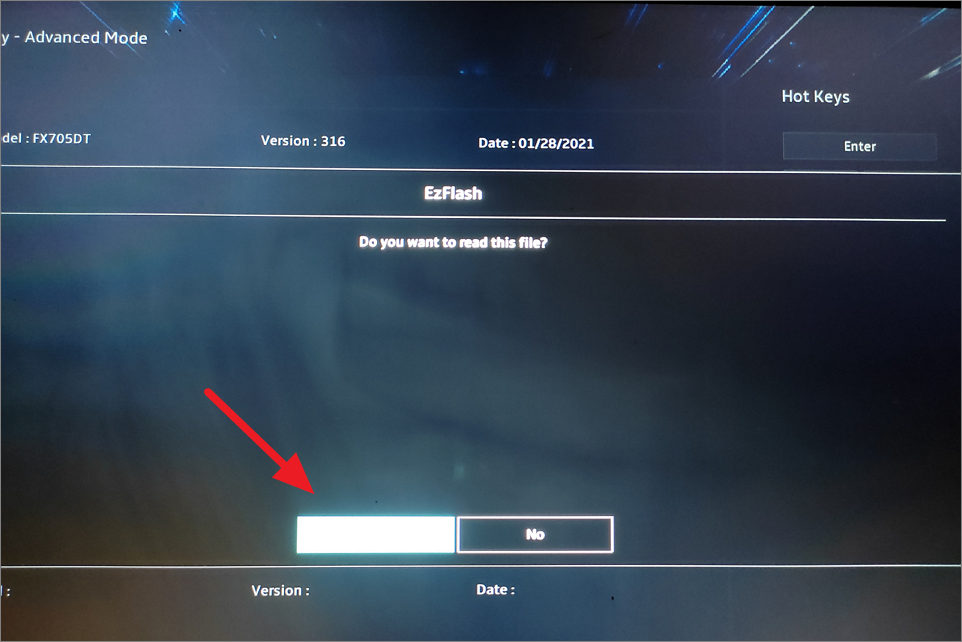
Then, select the USB drive and select the update file you download from the drive.

After that, click ‘Yes’ to read the file.
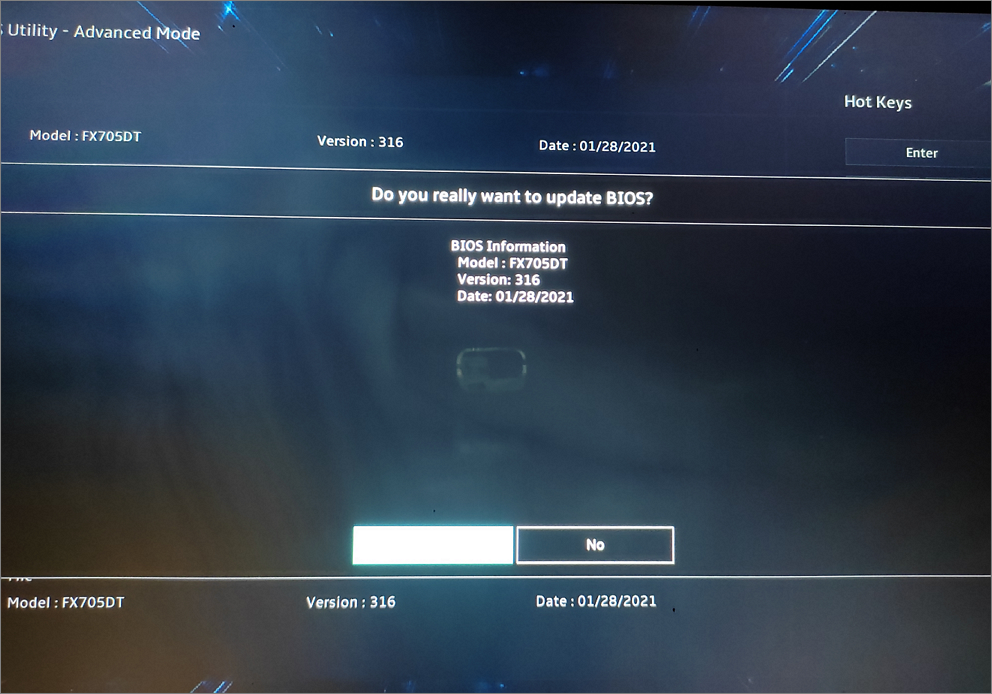
Then, confirm the motherboard model and BIOS version and click ‘Yes’ to update the BIOS.
27. Reset Your PC (Last Resort)
If none of the above methods worked, then you can reset your Windows PC to fix the System Service Exception blue screen error. Resetting Windows will reinstall the Windows 11 OS from the backup image or cloud service. When reinstalling Windows, you can choose to keep your personal files while removing all the apps and settings.
This method will remove all the third-party apps, drivers, and settings. The computer will be restored to the default state when you installed the OS. Follow these instructions to reset your Windows 11 PC:
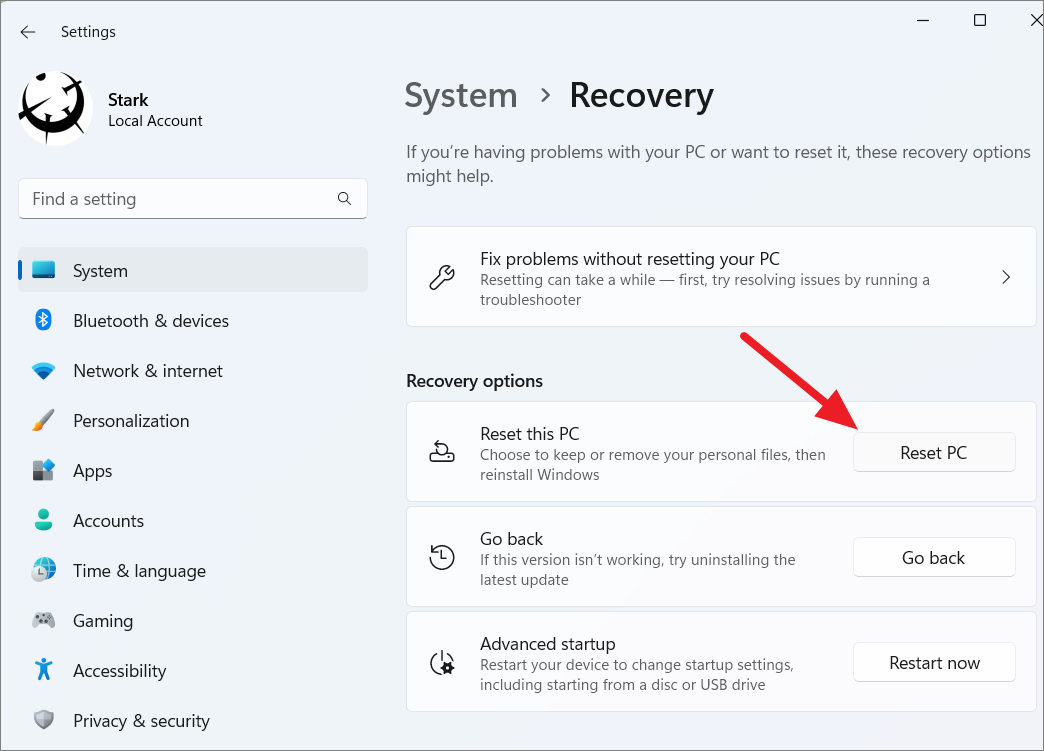
Open the Windows 11 Settings app by pressing Win+I. In the Settings app, choose the ‘System’ tab, and on the right, scroll down and click the ‘Recovery’ option.
Under the Recovery options section, click the ‘Reset PC’ button.
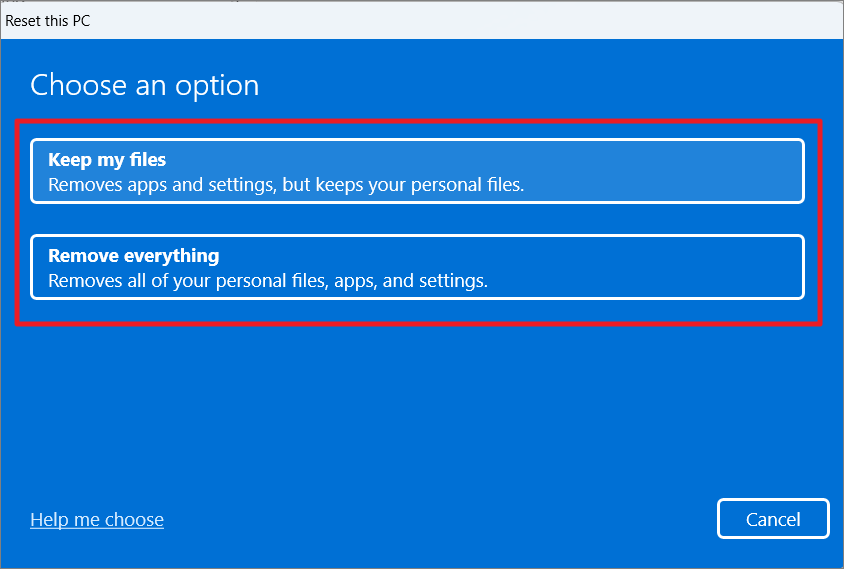
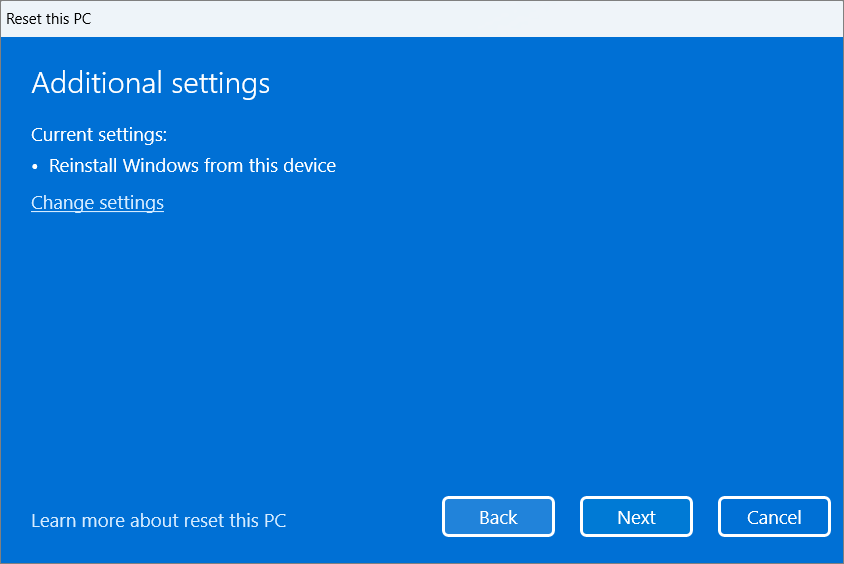
This opens the Reset this PC dialog box, where you can choose whether you want to ‘Keep your files’ but remove apps and settings or ‘Remove everything’ including your personal files from the libraries. Select an option out of the two.
Next, choose how would you like to reinstall Windows – whether with a local backup image from your device or Cloud download and reinstall Windows.
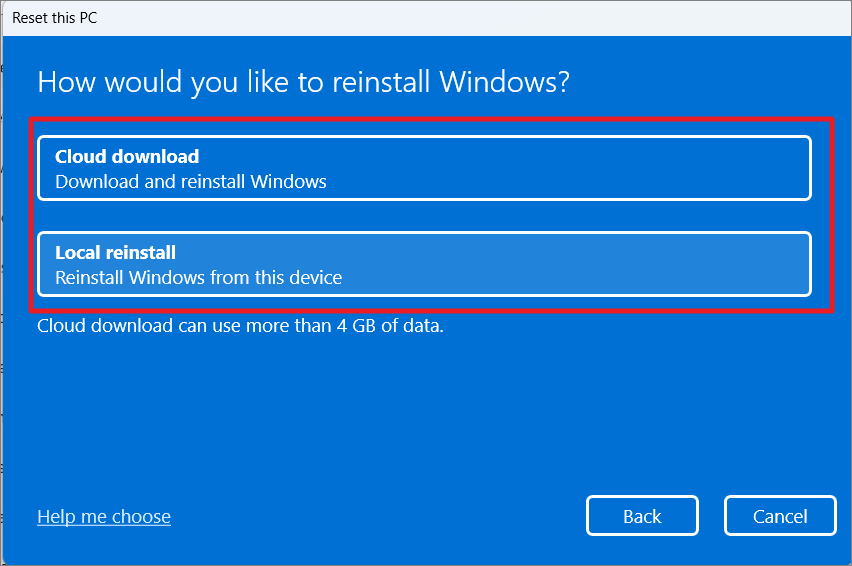
If you choose ‘Cloud download’, it will download and reinstall the latest build of Windows 11 but it will need internet and 4GB of data.
But if you choose ‘Local reinstall’, it will reinstall the same build of the OS from the backup image in the device.
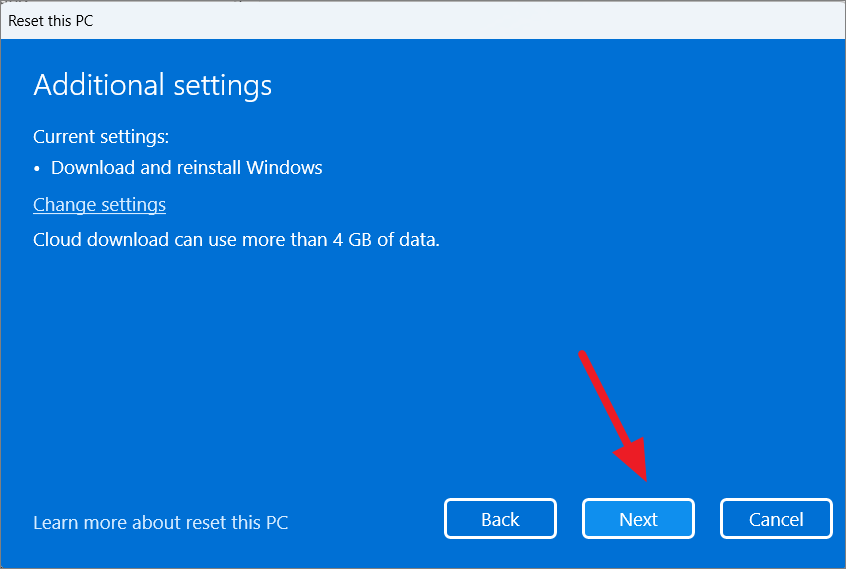
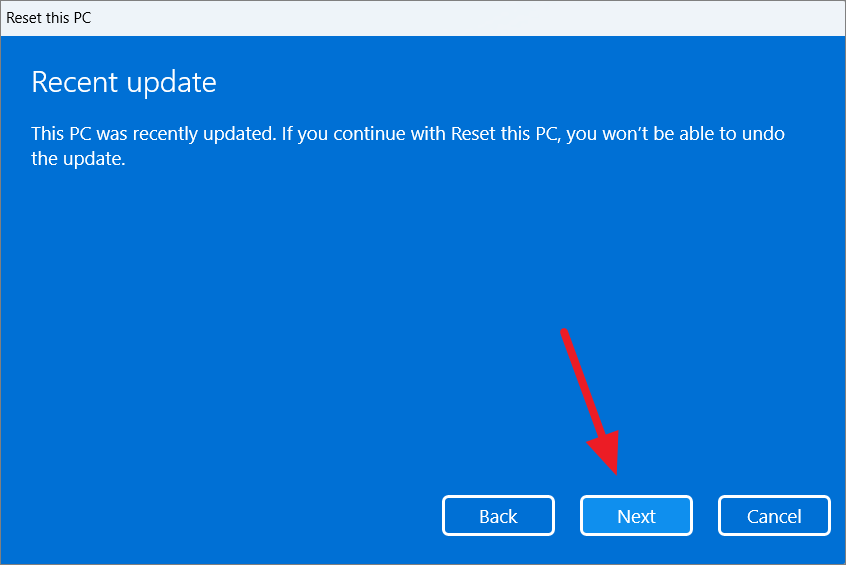
If you recently updated OS built recently, you won’t be able to undo the update. Click ‘Next’ to continue.
Finally, click the ‘Reset’ button to start the resetting process.
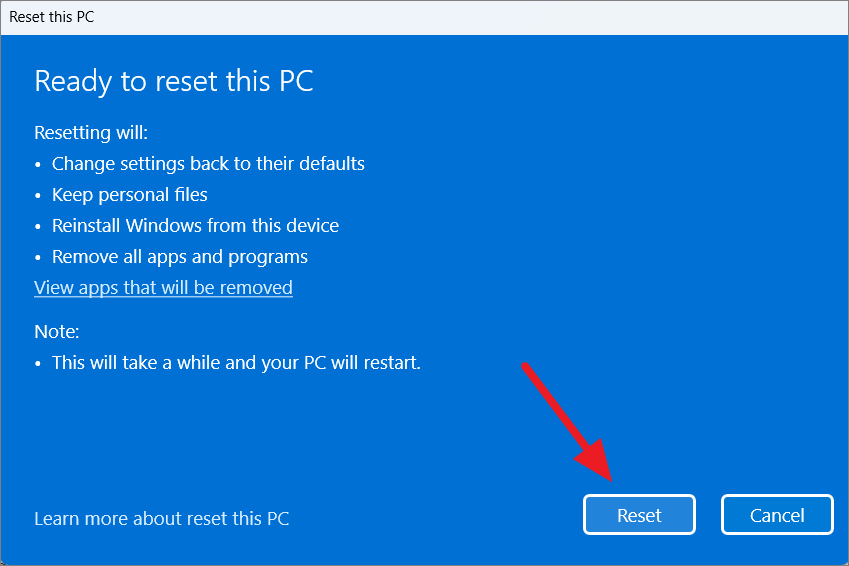
The process will take some to finish and will automatically restart the system to a fresh OS.
We hope this article helps you get rid of the Service Exception error in your Windows 11 device.


