Zankou headlines the first half of Neverness to Everness Version 1.3 as an S-Class Incantation main DPS with a Gas-type Arc. She is a form-swapping carry: she builds damage in her Reality stance, flips into Illusion to stack and spread damage-over-time effects, then flips back out to trigger a two-part Ultimate. Because almost every part of her kit multiplies critical damage on DoTs, her gear priorities are unusually narrow.
Quick answer: Equip Ravenous Blade, run a four-piece Crimson: Twin Butterflies module set, prioritize CRIT Rate and CRIT DMG with an Incantation DMG main stat, and field her with Lacrimosa, Sakiri, and an Anima support such as Iroi or Linko.
Best Arc for Zankou: Ravenous Blade
Ravenous Blade is Zankou’s signature Arc from her limited board, and the gap between it and everything else is large. It hands her a flat block of CRIT Rate and then adds CRIT DMG every time she deals Incantation damage, refreshing on each trigger. Since every hit in her rotation is Incantation damage, the stacks effectively stay live from the moment combat starts.
If you skip her banner weapon, the fallbacks are all crit or ATK sticks rather than kit-specific tools. Expect a noticeable drop in ceiling, but none of them are unplayable.
| Arc | Why it works |
|---|---|
| Ravenous Blade | Signature Arc. Large CRIT Rate boost plus stacking CRIT DMG on Incantation damage. |
| Contemplative Cat | Pure CRIT DMG stat stick, useful when you lean on Scorch damage. |
| Fluff of Finesse | ATK substat with stacking damage, but every stack requires a Critical Dodge. |
| Cosmos Daze, Wild Reverie | Budget option. Damage bonus after a Support Skill, limited to once every 20 seconds. |
| Watch Your Heads! | Alternate crit-focused option if the others are unavailable. |
Cartridge: Crimson: Twin Butterflies
There is no real competition here. Crimson: Twin Butterflies gives 10% Incantation DMG at the Epic two-piece tier, and the Legendary four-piece grants 6% ATK whenever a nearby enemy takes Incantation damage from your team. That stacks up to six times, each stack lasting 10 seconds, and it is always active while equipped.
The set matters because Zankou feeds it herself. Her Illusion-form attacks and her DoTs all count as Incantation damage, so she refreshes the ATK stacks without needing a teammate to trigger them. Add a Scorch or Hexed partner and the stacks simply never fall off.
Module layout and stat priority
Zankou’s console specialization rewards Type III modules with 16% CRIT DMG each, which is the single biggest reason her build tilts so hard toward crit rather than raw attack. Build the grid around fitting as many Type III pieces as the layout allows.
| Type | Information |
|---|---|
| Layout | 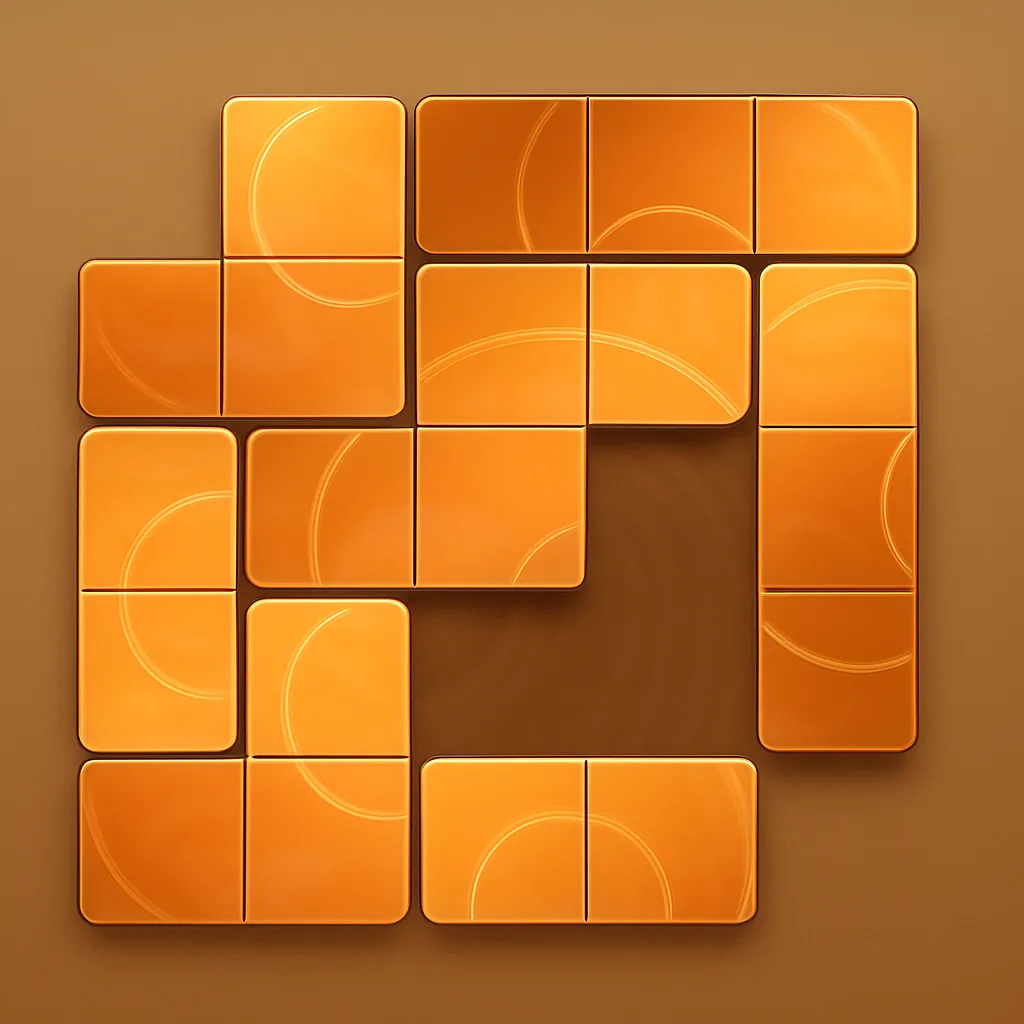 |
| Required modules | Type II (Vertical), Type III (Horizontal), Type III (┛), Type IV (S) |
| Console bonus | +16% CRIT DMG per Type III module equipped |
| Main stats | Incantation DMG > CRIT DMG > CRIT Rate > ATK Bonus |
| Sub stats | CRIT Rate and CRIT DMG > Universal DMG Bonus > ATK% |
Keep CRIT Rate and CRIT DMG roughly balanced rather than dumping everything into one. If you own Ravenous Blade, its flat CRIT Rate lets you shift main stats toward CRIT DMG; without it, you will need more CRIT Rate from substats to avoid whiffed DoT ticks.
How the Reality and Illusion rotation works
The gear only pays off if you time the two form swaps. Both of her Redirect Skills have enhanced versions that only fire inside specific windows, and missing them costs a large chunk of damage as well as her second Ultimate.
Note: every attack Zankou lands during Illusion counts as follow-up attack damage, so follow-up damage bonuses apply across the entire window. After Soulcross ends Illusion, she briefly holds Hunt and Delusion at the same time. That overlap is the highest-damage stretch of the rotation, so spend your burst there.
Best Zankou teams in NTE
Zankou fits two reaction shells. Hexed pairs her with an Anima unit and is the stronger option overall, while Scorch and Discord builds lean on Chaos partners and Break pressure. She wants field time in all of them, so the fourth slot usually goes to sustain or a buffer.
| Team | Members | Notes |
|---|---|---|
| Hexed / DoT | Zankou, Lacrimosa, Iroi, Linko | Best overall. Linko arrives in the second half of 1.3, so Sakiri fills the slot until then. |
| DoT (Scorch lean) | Zankou, Lacrimosa, Daffodill, Sakiri | Lacrimosa adds Chaos damage and a second DoT, making Sakiri’s DoT buffs stronger. |
| Discord | Zankou, Daffodill, Sakiri, Haniel | Break-focused. Daffodill’s Phantom Step chews the Break Gauge, Haniel and Sakiri trigger Nova and Scorch. |
| Free-to-play | Zankou, Daffodill, Mint, Adler | Only needs Zankou as a limited unit. Mint heals, Adler shields and boosts Scorch. |
Useful swaps: Iroi replaces Linko for survivability, grouping, and Hexed triggers. Baicang slots in for Sakiri as an Incantation sub-DPS, and Adler covers the same slot if you need shields instead. Fadia can take Haniel’s place in Discord teams for party-wide HP redistribution and Nova buffs.
Skill upgrade order and awakening priority
Level her Redirect Skill first, then the Ultimate, then Basic Attack, and leave QTE for last. Her Skill carries both form swaps and the bulk of her DoT applications, so it is the most efficient investment per material spent.
On awakenings, A1, A4, and A6 are the ones worth chasing. A1 makes Hunt and Delusion permanent rather than stance-locked and pushes Hunt’s damage bonus to 40% and Delusion’s DoT CRIT DMG to 50%. A4 activates her second Ultimate the moment her main Ultimate is ready. A6 scales the final hit of Annihilation by 12% per DoT stack on the target, up to 240%.
Ascension materials to pre-farm
Nestguard Fragment is the bottleneck. Taking her from Lv.20 to Lv.80 costs 525,000 Beetle Coins alongside 86 Nest Guard Fragment, 18 Unsolved Numeral, 17 Blurred Numeral, and 15 Distorted Numeral. Maxing all four combat abilities to Lv.10 runs another 1,748,000 Beetle Coins plus the associated ability books.
Her banner, Alluring Shadows, runs until September 9 at 5:59 AM (UTC+8), which gives you a window to stock Annulith and Fabricated Dice before Linko takes over the second half of Version 1.3. If you are pulling for both, the Hexed team is the one that eventually wants them together.