Damage in Legacy Piece is not one number you upgrade. It is a stack of separate multipliers that all feed into the same hit, and most players plateau because they max two or three of them and ignore the rest. Getting into the millions means every layer is switched on at once.
Quick answer: Put every stat point into the one damage category you actually use (Style, Weapon, or Ability), then enhance and gem that same spec or weapon, ascend it at the Sovereign of Fates, roll SS or SSS Potential and a high-tier Trait, unlock Haki V2 (Ryou), equip a matching Title and aura, and push your Bounty to 10M for the full +100% damage multiplier.
Every damage multiplier in Legacy Piece and where to get it
These are the systems that change your damage number. Nothing here is optional if you are chasing the top end, but the order matters, because the flat stat layer is what everything else multiplies.
| Damage source | Where to set it |
|---|---|
| Stat points (Style, Weapon, Ability) | Player Stats menu |
| Mastery Level bonuses | Style menu, earned by using a Style |
| Race and Clan | Rerolls in Inventory Storage |
| Aura and Accessories | Aura Crates, Accessories inventory tab |
| Fish passives | Fish Storage, stocked by fishing |
| Prestige rank buffs | Prestige Overseer, Legacy Island |
| Trait and Potential | Trait NPC and Potential menu, Legacy Island |
| Armament Haki and Haki V2 (Ryou) | Rayleigh on Ice Island, then Legacy Island |
| Spec enhancement and Gems | Enhancement NPC and Sovereign of Fates, Ice Island |
| Spec Ascension | Sovereign of Fates, Ice Island |
| Bounty multiplier | Earned in combat, caps at 10M Bounty |
| Index Rank and Titles | Index Messenger, Grave Island |
| Hunter Marks | Bounty Skill Tree on the Quest Board |
Allocate stat points to one damage type
The Player Stats menu splits your points across Style, Defense, Weapon, and Ability. Style scales fighting styles, Weapon scales swords and other equipped weapons, and Ability scales spec moves. Spreading points across two of the three offensive stats halves the benefit of both, so pick the one your main kit uses and commit to it.

Styles carry their own tier ranking, and higher-tier options such as The Procurator are worth switching to. Each Style also builds a Mastery Level as you use it, and those mastery bonuses add extra points to your ability stat on top of what you allocated by hand. That makes sticking with one Style far stronger than rotating through several.
Reroll Race, Clan, Trait, and Potential
Four separate roll systems sit underneath your character, and each one is a permanent multiplier once you land a good result. Race Rerolls and Clan Rerolls are both used from Inventory Storage. Bladeborn is a strong race outcome, and Berserker is a strong clan outcome for a damage build.
Traits are rolled at the Trait NPC, where you are aiming for Mythical or Legacy grade. Potential is a separate menu with its own letter grades, and SS or SSS is the target there. Both are worth rerolling repeatedly, since a low grade caps your ceiling no matter how much gear you stack on top.
Equip auras, accessories, and fish passives
Auras come from Aura Crates opened in your inventory, and the high-end ones such as Cosmic Entity carry direct stat boosts. Open the crate, then equip the aura from the same screen so the boosts apply.
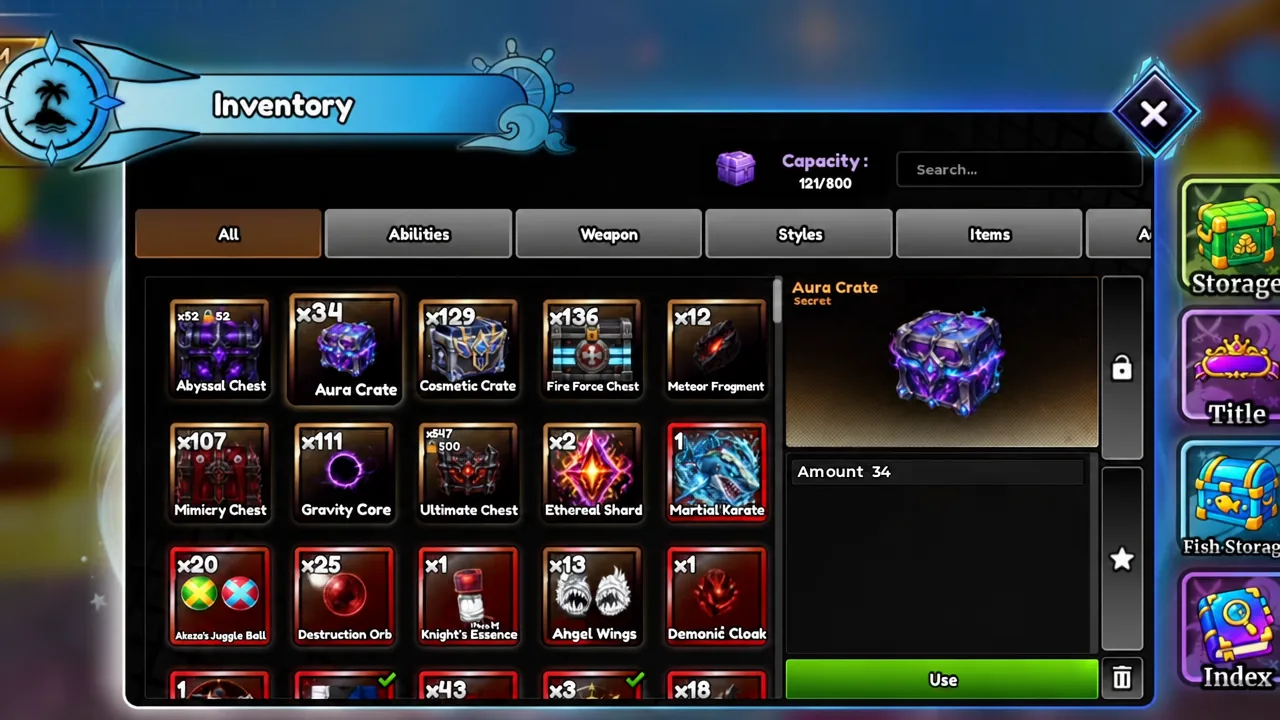
The Accessories tab in the same inventory holds a second set of stat items, and Fish Storage holds a third. Fish are caught by fishing and carry both stats and passives, with Yin-Yang Koi and Crimsonblade Leviathan among the ones worth keeping equipped. These three slots are quiet, easy to forget, and account for a noticeable chunk of a finished build.
Prestige for higher stat multipliers
Prestige is handled by the Prestige Overseer on Legacy Island. Each rank has requirement tasks attached, and clearing them raises your level cap while applying stat buffs that cover luck, money, shards, and CTR. Because prestige lifts the cap, it also unlocks the extra stat points you need for the allocation step above.

Enhance, gem, and ascend your spec or weapon on Ice Island
This is the largest single jump in damage, and it all happens on Ice Island. The process is identical whether you main a spec like Gojo or a weapon like Acheron, with one important difference in which gems you slot.

The same NPC also handles special passives through a pity system and substat rolls, so it is worth clearing your materials there in one session rather than dipping in between farming runs.
Unlock Armament Haki and Haki V2 (Ryou)
Armament Haki is taught by Haki Master Rayleigh on Ice Island, and Observation Haki is acquired separately. The upgrade that matters for damage is Haki V2, also called Ryou, which is unlocked back on Legacy Island and raises both damage and defense. Leaving Haki at V1 caps your output regardless of how well your spec is geared.
Push Bounty to 10M for the +100% damage multiplier
Bounty is a straight percentage multiplier that scales as the number climbs. At 10M Bounty it reaches its maximum of +100% damage, which effectively doubles everything you built in the sections above. It is the cheapest large multiplier in the game because it costs no materials, only time spent fighting.
Bounty also feeds a second system. Open the Quest Board and select the Bounty Skill Tree, then spend Hunter Marks on the attack nodes. Skip the utility branches until the damage nodes are filled.
Index Rank and Titles on Grave Island
The Index Messenger on Grave Island hands out quests that raise your Index Rank, and each rank grants HP and damage buffs. These are permanent once earned and stack with everything else, so clearing the available Index quests is a reliable way to lift a build that has run out of materials elsewhere.

Titles are the other half of this. Many come from bosses, and they apply conditional damage buffs. The Honored One, for example, grants a 10% damage buff while you are using Gojo. That condition is strict, so a title equipped alongside the wrong spec contributes nothing.
Confirm the damage build is working
Open the Player Stats menu and check the total stats damage summary. That figure combines your allocated points, mastery bonuses, race and clan, aura, accessories, fish, prestige, trait, potential, haki, enhancement, gems, ascension, bounty, index rank, title, and hunter marks. If a system you just changed does not move that number, it did not apply.
The three most common reasons the number stays flat are gems slotted into the wrong item type, a title equipped while the spec it requires is unequipped, and stat points spread across Style, Weapon, and Ability instead of concentrated in one. Fix those first before assuming a roll was bad.
Tip: Test against a live boss rather than trusting the summary alone. Running a geared spec into a boss such as Chiharu at Ruin City shows you the real per-hit numbers, and a finished damage setup should end that fight in a handful of abilities.
None of these layers is dramatic on its own. A 10% title, an aura, a fish passive, and an SS ascension roll all look minor in isolation, which is exactly why they get skipped. Stacked together and doubled by a maxed Bounty, they are the difference between chipping away at a boss and deleting it.