
Apple introduced iCloud+ last year and it has become a favorite since then. It’s also constantly evolving and adding support for new features. With all the other wonderful features like Hide My Email and Private Relay, iCloud+ also added the feature to use custom email domains on your iPhone.
This functionality lets you add a custom email domain name you own to iCloud right from your iPhone running iOS 15.4 or higher and use it with iCloud Mail. Now, with iOS 16, you can even buy a domain using the custom email domain feature itself.
It’s available with the iCloud+ subscription at no extra cost. But before setting up a custom email domain with iCloud, let’s see what a custom email domain is and why you would want to use it with iCloud Mail.
What is a Custom Email Domain?
An email domain is the part of the email address that comes after the ‘@’. Typically, you’re used to seeing email domains like gmail.com, yahoo.com, and hotmail.com. But a custom email domain can be anything. It can be your name, your business’s name, or anything else you want it to. So, [email protected] would be what your email address would like in that case. It can be for your business or any other venture.
The only catch – you must own the domain you want to use the custom email domain for. That is you must own ‘yourdomain.com’ from the above example.
If you don’t own a domain already, you can also buy it while setting up the Custom Email Domain with iCloud. iCloud uses Cloudflare to make the purchase.
Note: The option to buy a domain using iCloud is only available in iOS 16 and above.
Now, when you already own the domain, what do you need iCloud for? To send and receive emails with your custom domain, you must either have an email host for that domain or you’ll need to alter the MX records pointing to Gmail for which you’d need to pay a fee.
If you’re an iCloud+ subscriber, you’re already paying a fee. But even if you’re not, an iCloud+ subscription starts with as little as $0.99 per month. And you get access to all the other features including extra cloud storage. So, iCloud+ is one of the best options out there currently for custom email domains for Apple users.
How Does Custom Email Domain with iCloud work?
You can add your email domain to iCloud Mail using your iPhone, iPad, or even iCloud.com and share it with your family members. If you had any email addresses at that domain, you can even move them to iCloud during setup. But even if you don’t have any email addresses on your domain, you can create them after moving your domain to iCloud.
When you use iCloud to buy a domain, you don’t even have to worry about any extra steps like moving your email addresses or manually configuring your DNS settings.
If you’re sharing the email domain with your family sharing group, each member in the group can create up to three email addresses per domain.
Since you’ll be using iCloud Mail for your custom email domain, you’ll receive your emails anywhere you’re signed in to iCloud Mail on your devices. It even works with Outlook on a Windows computer or at icloud.com from any browser.
You can use iCloud Mail to use up to 5 custom domains.
Note: Mails you receive on your custom email domain will use your iCloud storage. If you run out of storage, you won’t be able to send or receive more emails until you get more storage or make some space.
Things to Know Before you Begin
By now, we’ve already established that you need an iCloud+ subscription, but there are a few other things you need to keep in mind before beginning for it to be a seamless experience.
First, you must have two-factor authentication enabled for your Apple ID. You also need to have a primary iCloud Mail email address set up.
If you plan to share it with your family members, you must also have Family Sharing set up. And members of the family sharing group should also have two-factor authentication and a primary iCloud Mail email address.
Now, if your domain already has email addresses, you should also make a list of them so you can configure them for iCloud Mail during setup. You can also assign them to your family members.
Create a Primary Email Address for iCloud Mail
If you already have a primary iCloud Mail email address set up, you can skip this step and get on with setting up a custom email domain in the next section.
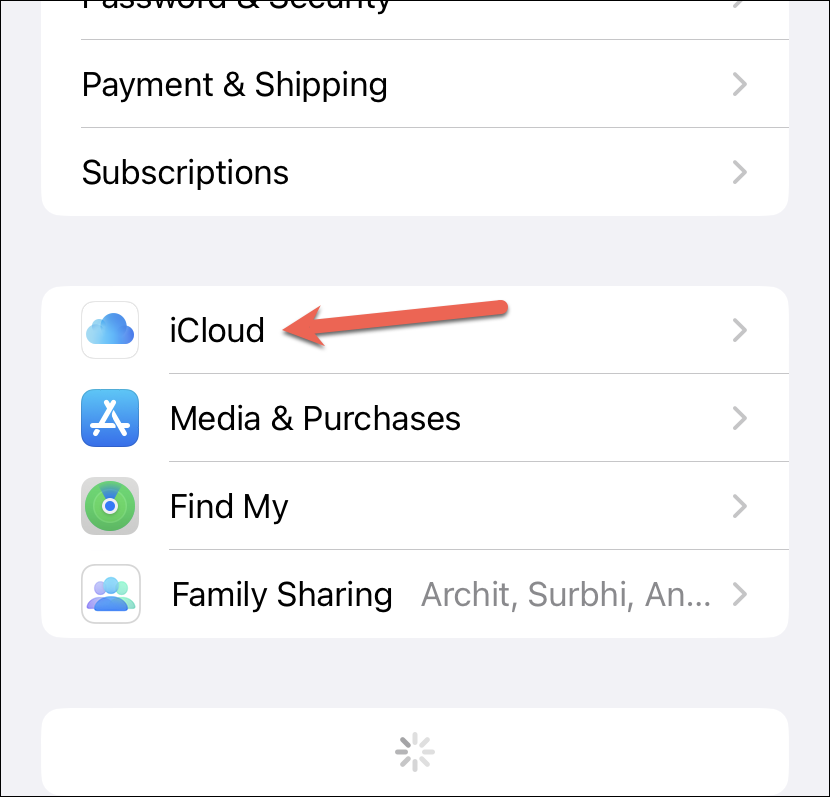
You can create a primary email address for iCloud Mail from your iPhone. Open the Settings app on your iPhone. Then, tap your name at the top.
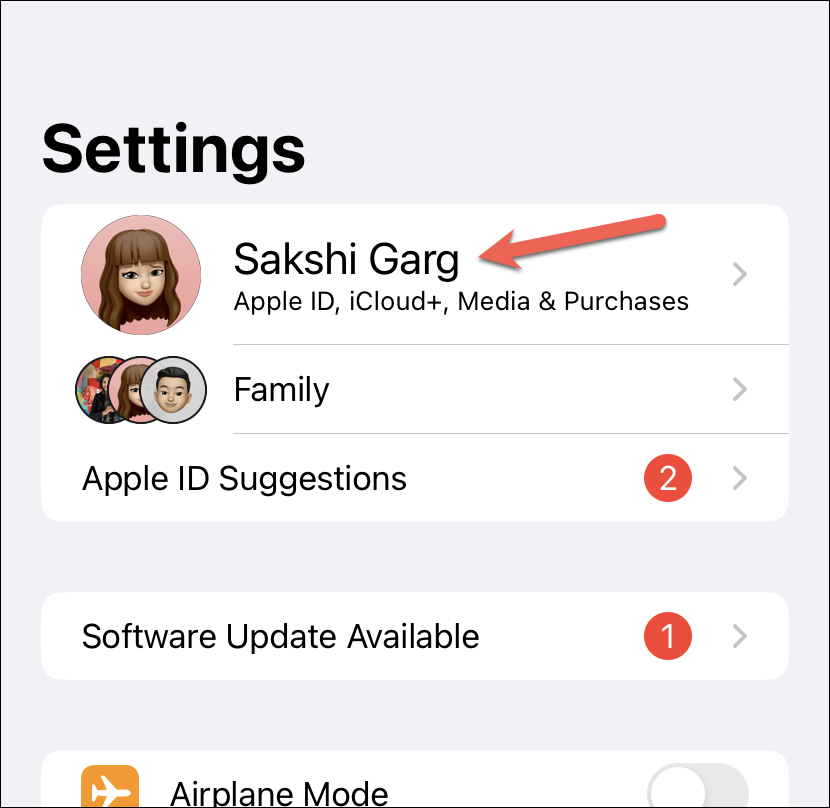
From your Apple ID settings, tap the option for ‘iCloud’.

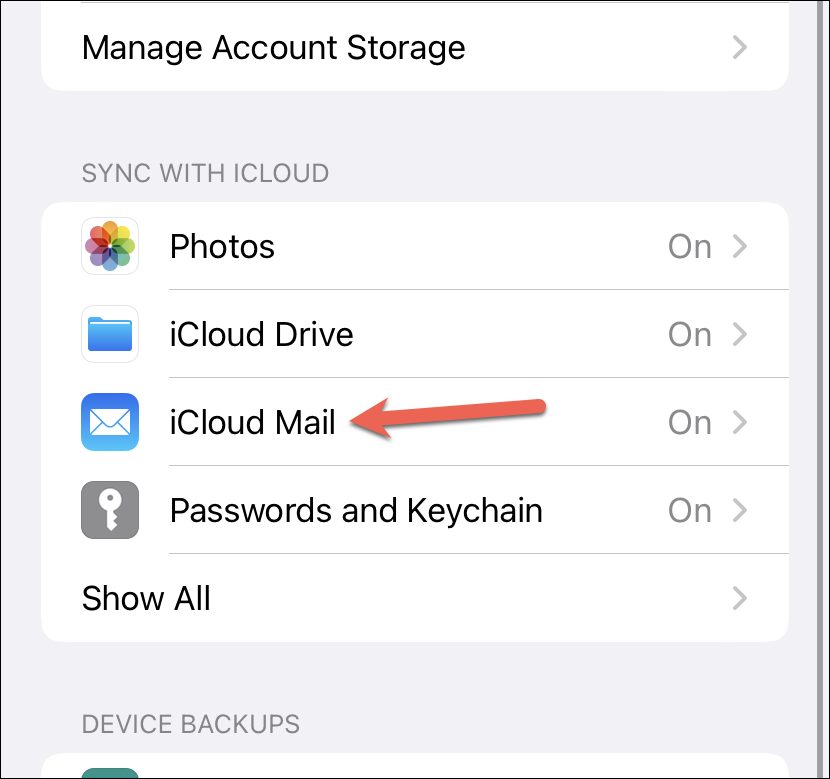
Then, tap the option for ‘iCloud Mail’.
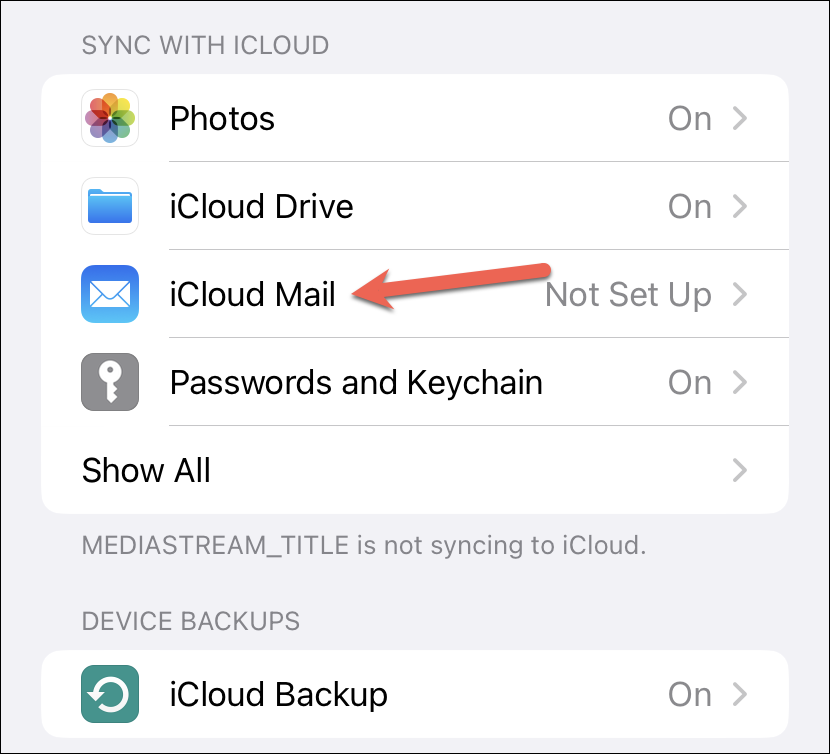
Turn on the toggle for ‘iCloud Mail’ or ‘Sync this iPhone’ depending on the iOS version you’re on.
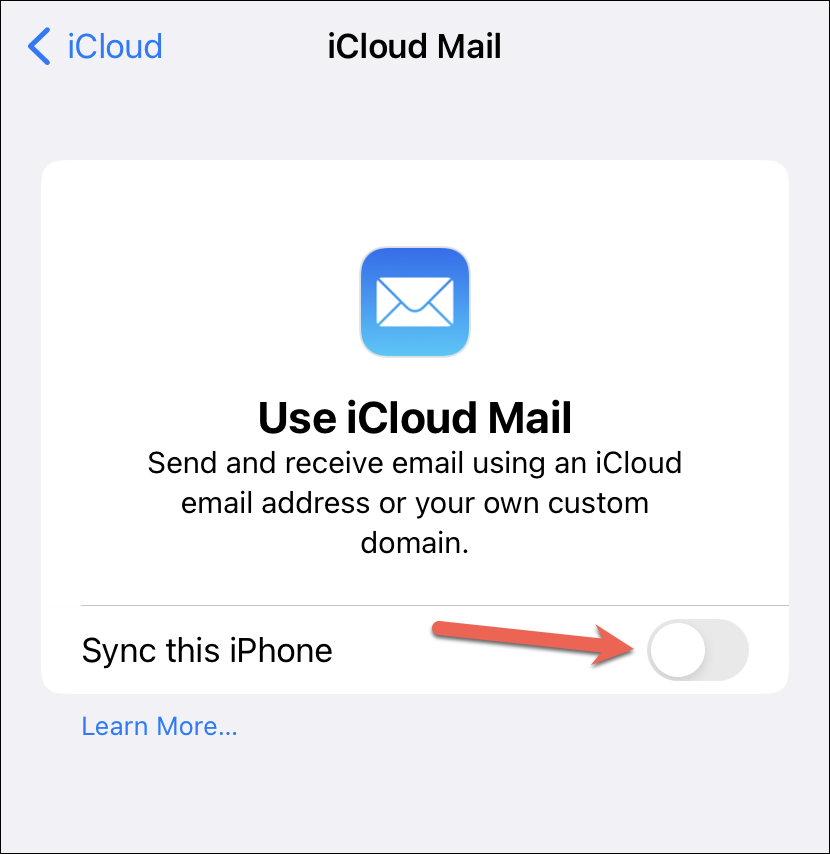
Note: You won’t see any of the below steps if you already have a primary email address on iCloud.
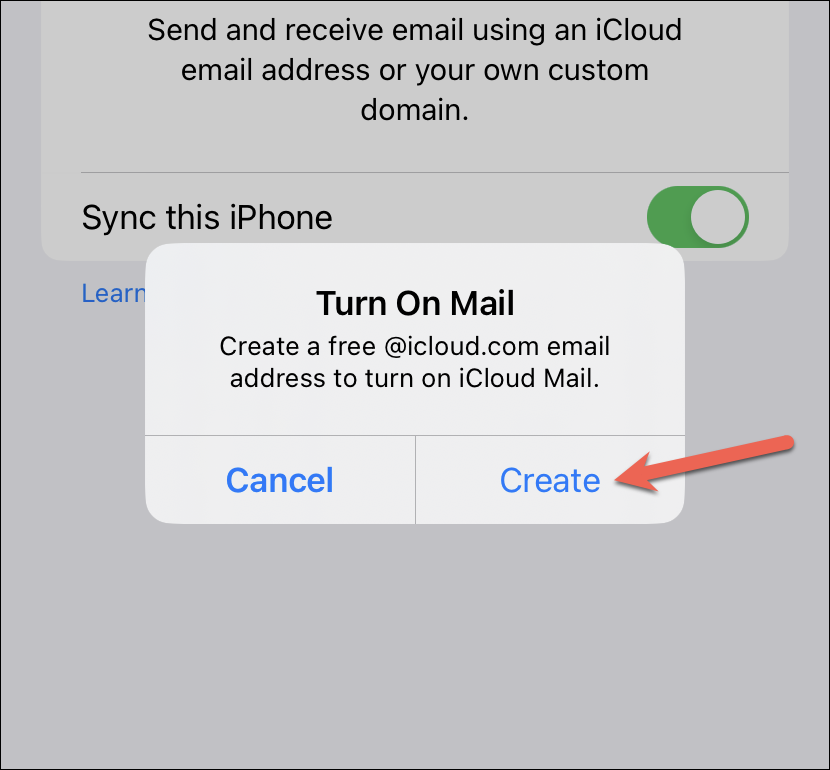
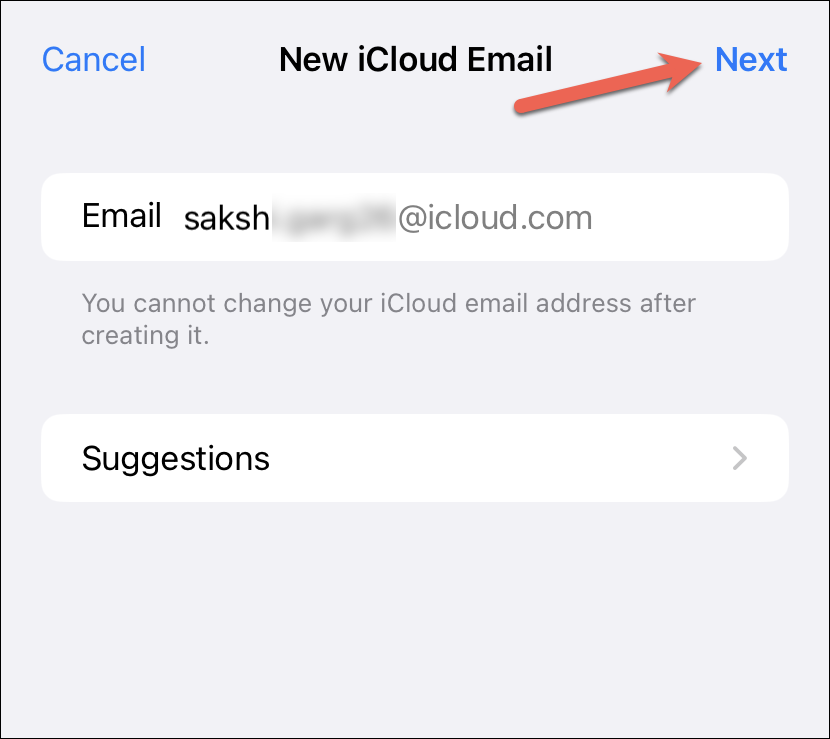
A prompt will appear on your screen instructing you to create an @icloud.com email address to enable this option. Tap on ‘Create’ to continue.
Then, enter the username for the account and tap ‘Next’. You cannot change this iCloud email address once you create it, so choose the name accordingly. If the address you chose is not available, try another or use one from Apple’s suggestions.
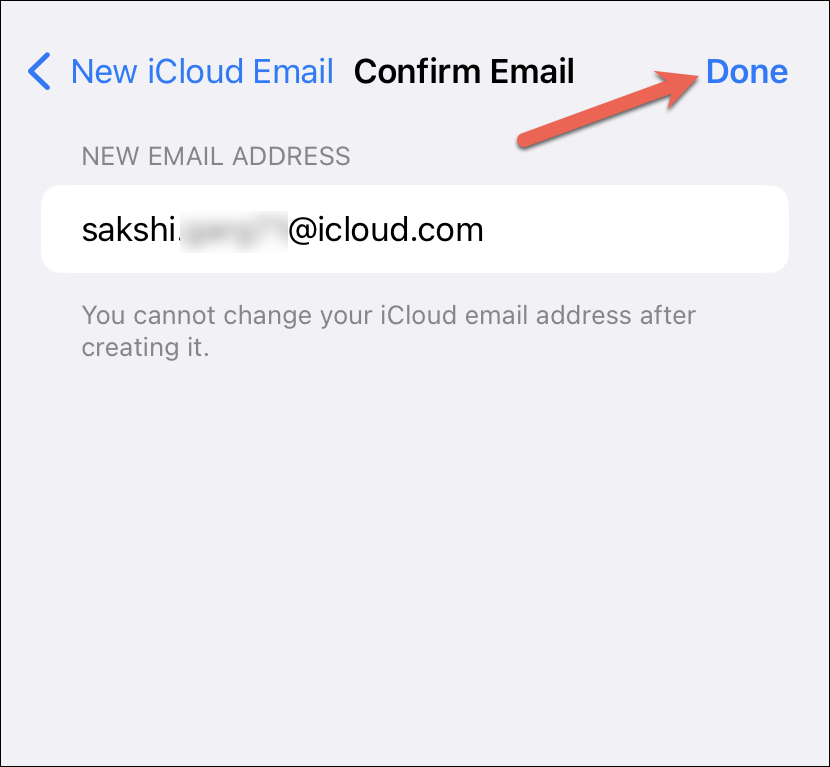
Confirm your email address and tap ‘Done’ in the upper-right corner to create an @icloud.com email address and turn on iCloud Mail.
Using iCloud to Buy and Set Up a Custom Email Domain
If you’re on iOS 16, you don’t have to buy your domain elsewhere. You can buy a domain within iCloud itself, which uses Cloudflare to complete the purchase, and your domain will be ready to use with iCloud Mail.
Open the Settings app on your iPhone and tap your name at the top.

Then, tap the option for ‘iCloud’.

Tap ‘iCloud Mail’ from iCloud settings.
Now, tap the option for ‘Custom Email Domain’.

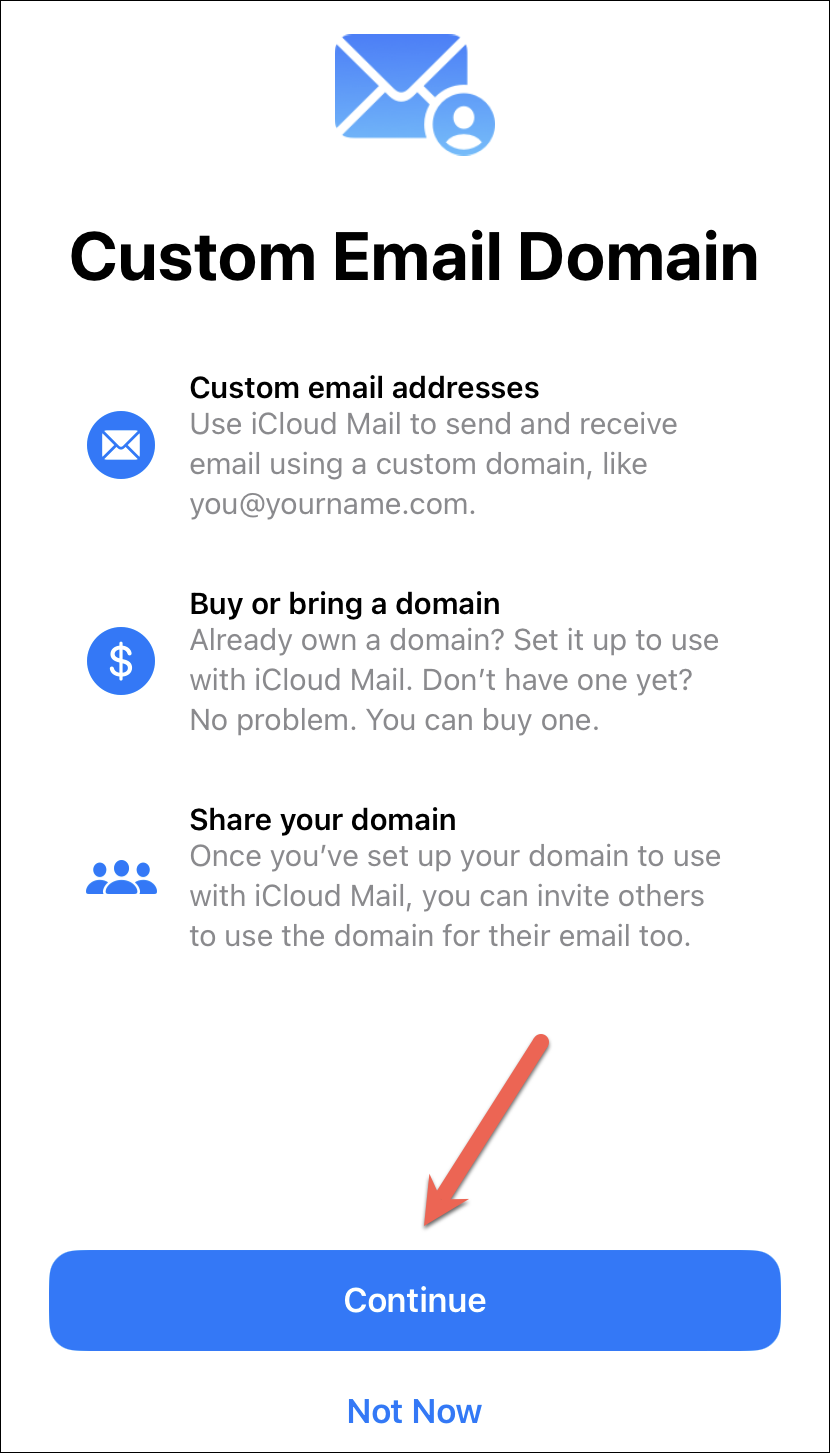
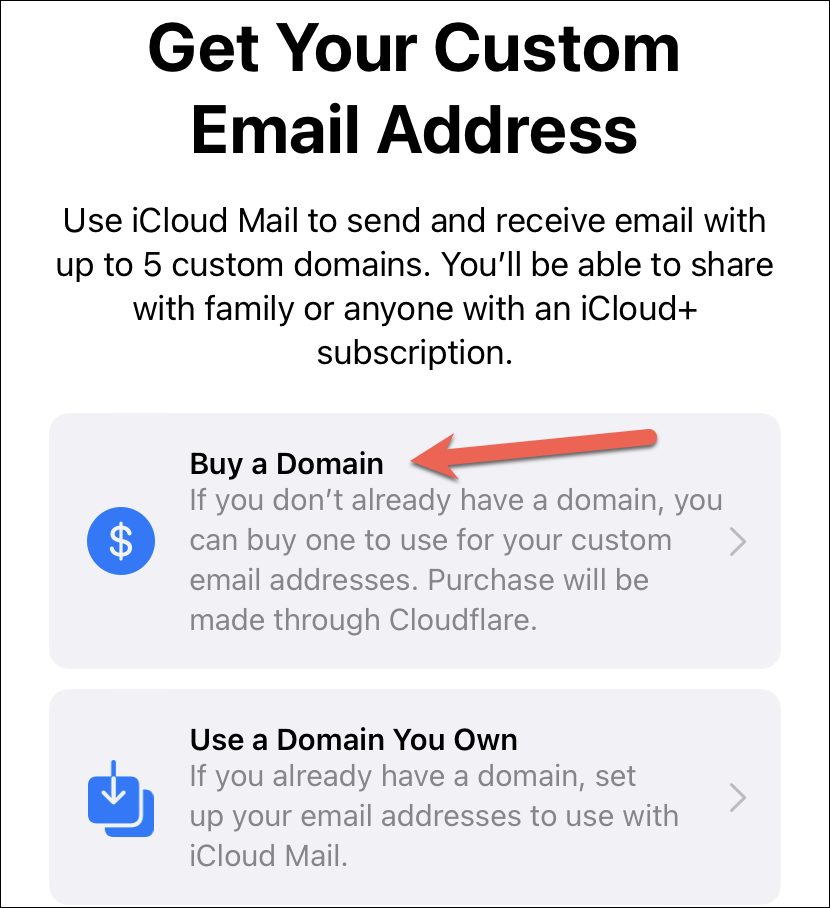
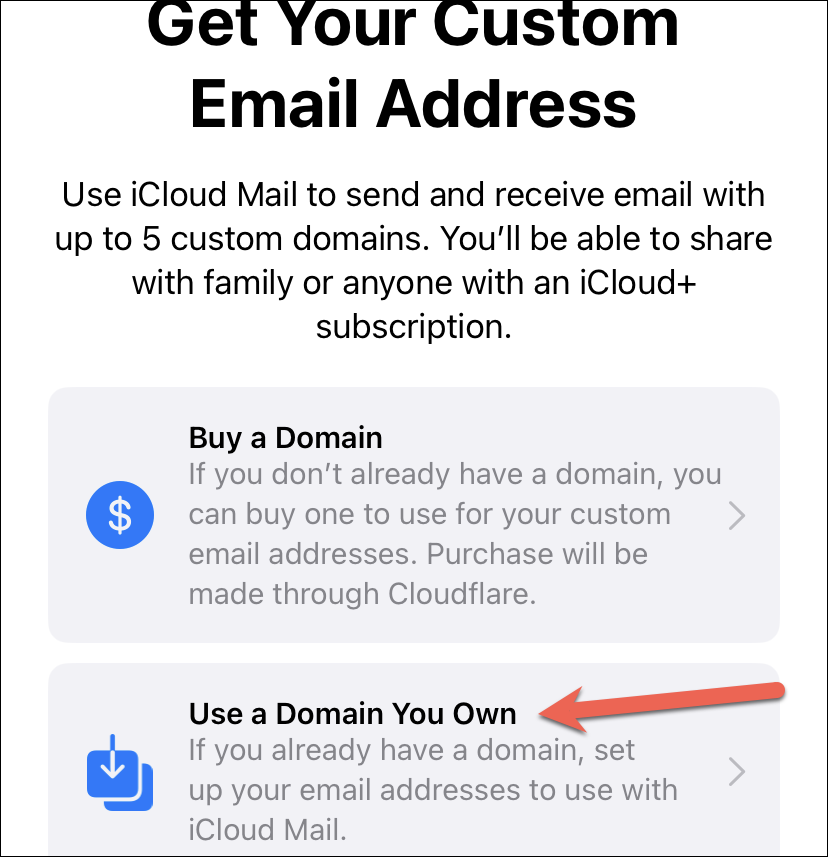
An onboarding screen will appear if this is the first time you’re using the Custom Email Address feature. Tap the ‘Continue’ button.
You’ll now see two options: ‘Buy a Domain’ or ‘Use a Domain You Own’. Tap the former.
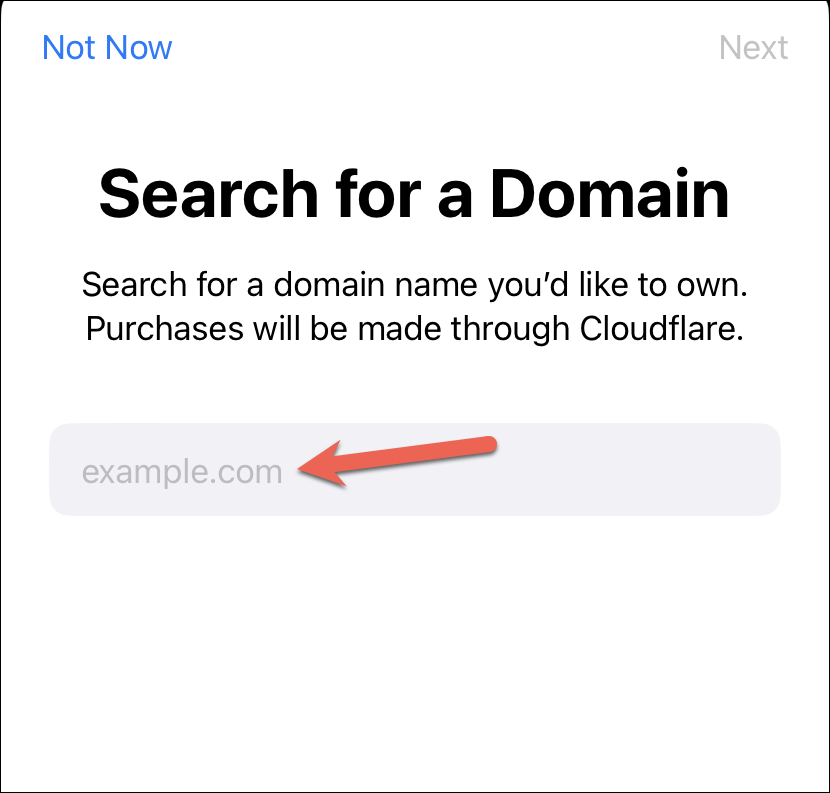
The option to search for a domain you want to buy will appear. Tap the search field and type the domain name you want to buy.
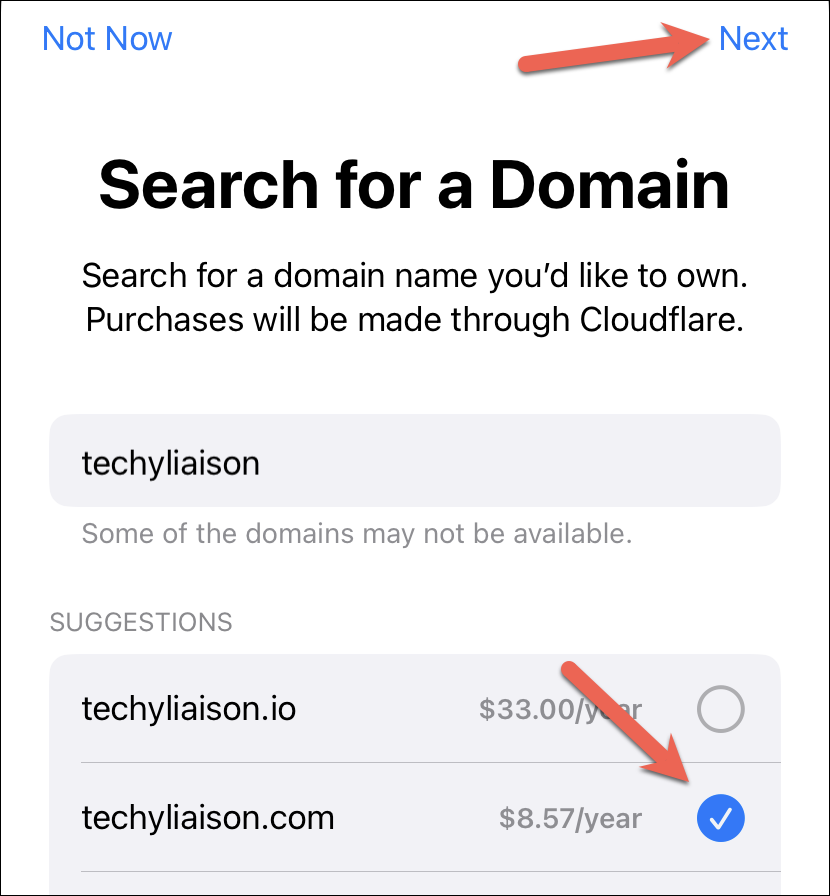
The available options, along with their price, will appear. Select the domain you want by tapping the radio button on its right. Then tap on ‘Next’ in the upper-right corner of the screen.
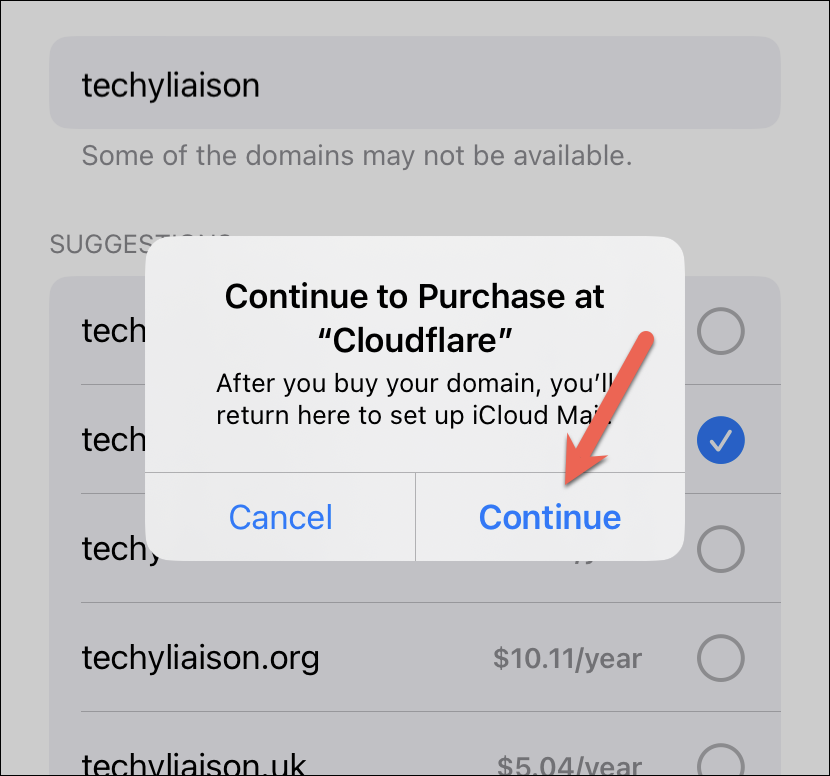
A prompt will appear asking you to continue to Cloudflare to buy the domain, tap ‘Continue’.
Cloudflare will open in an overlay window.
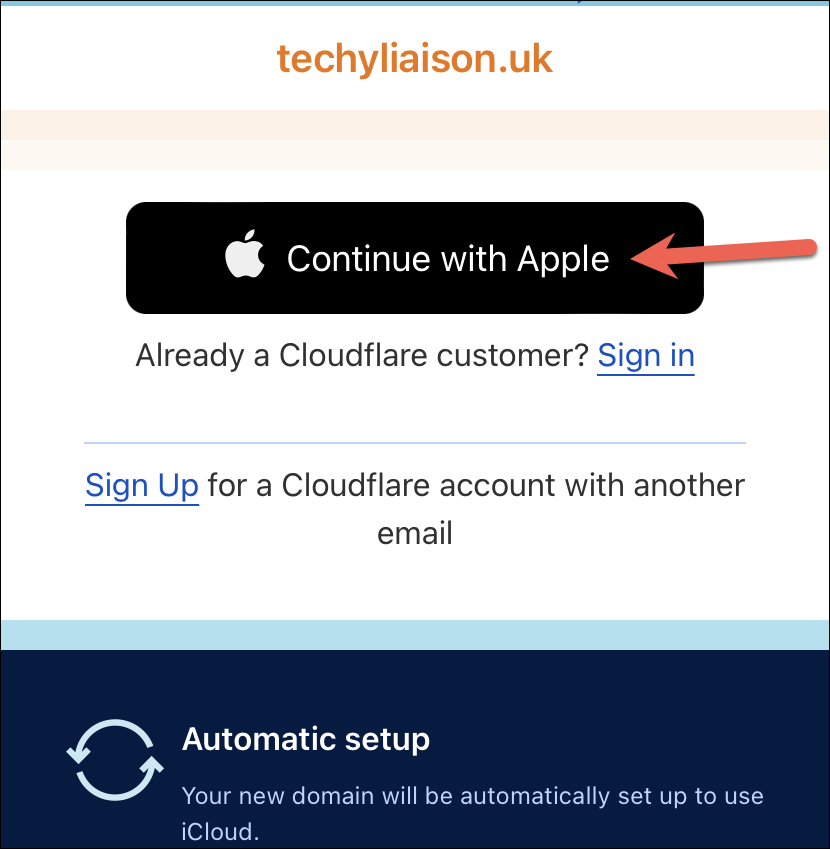
If you have an account on Cloudflare, sign in to your account. Otherwise, you can use your Apple ID for a quick sign-up. Tap ‘Continue with Apple’ and authenticate with Face ID, Touch ID, or your Apple ID password to sign in.
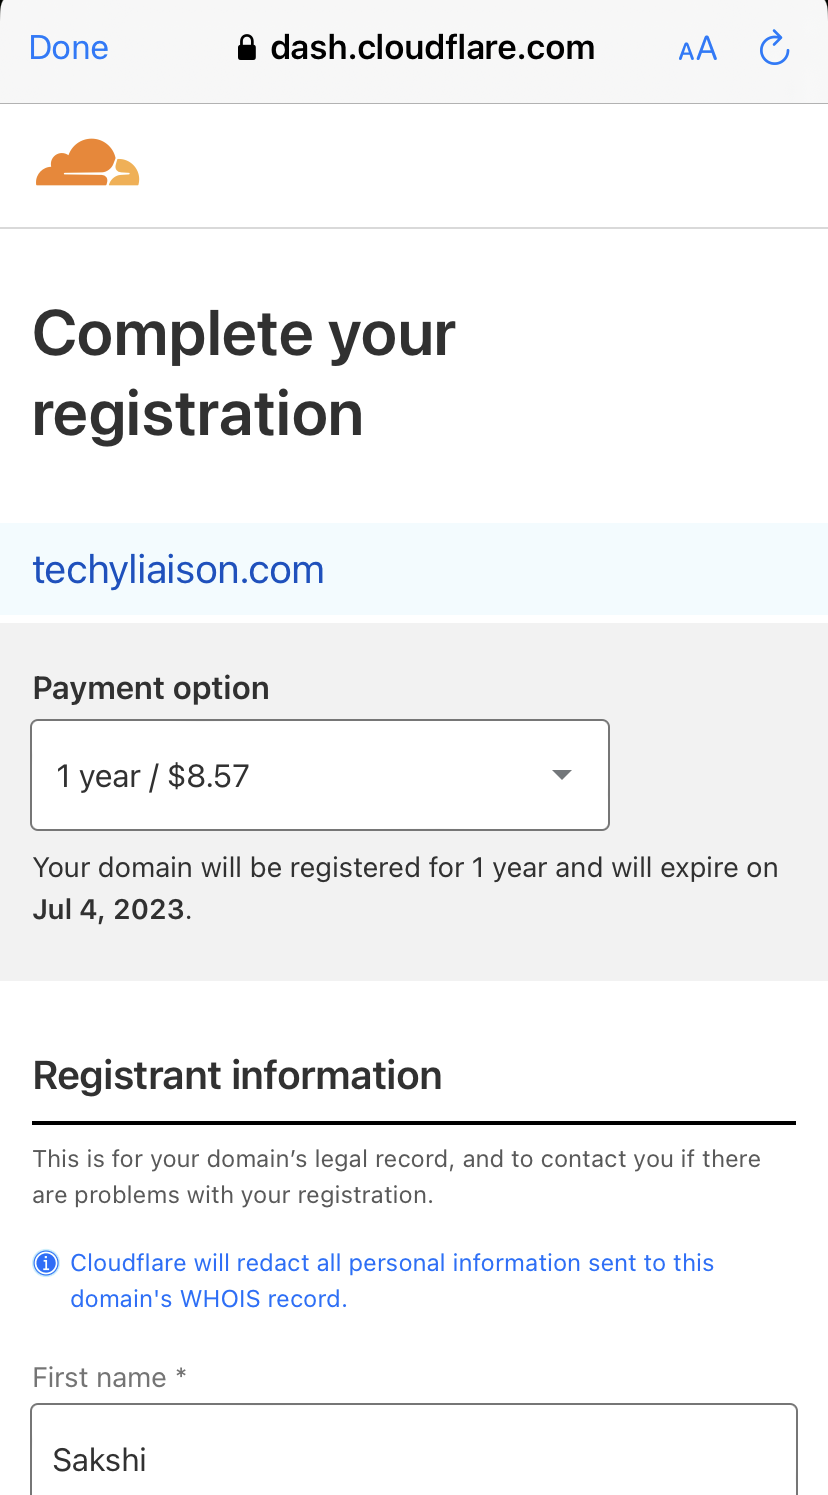
Once you sign in, Cloudflare’s dashboard will open where you can complete the registration details, like your name, email address, address, etc. You can also select the registration period for the domain; by default, it will only be for a year but you can choose longer. You can also choose whether you want to auto-renew the domain after the current registration period expires.
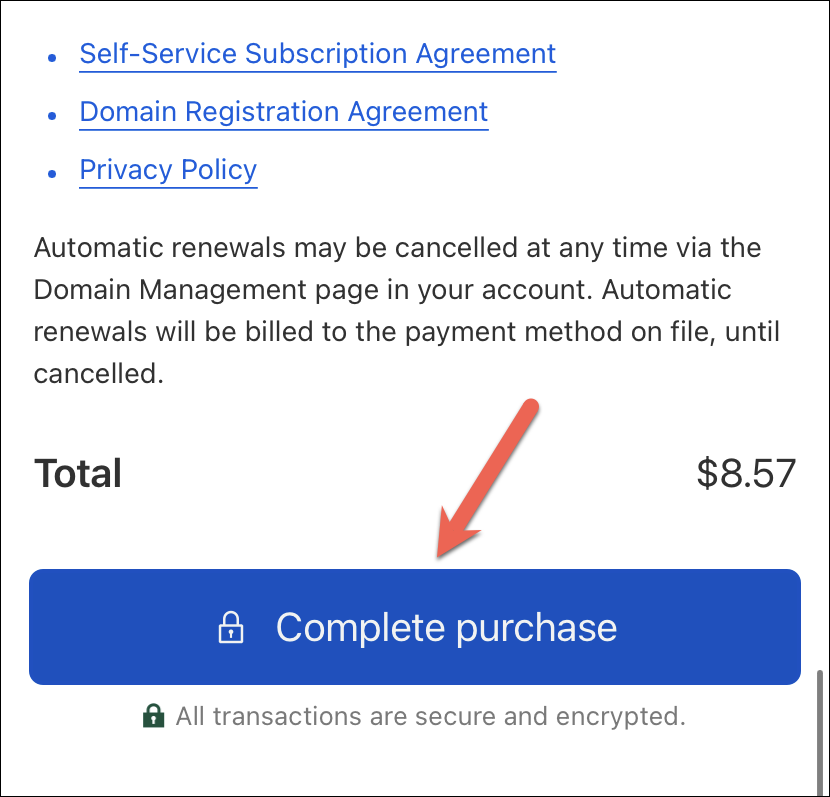
Then complete the payment using either a credit/ debit card or PayPal. Tap ‘Complete Purchase’ or ‘Complete with PayPal’ to buy the domain once you fill in all the registration details.
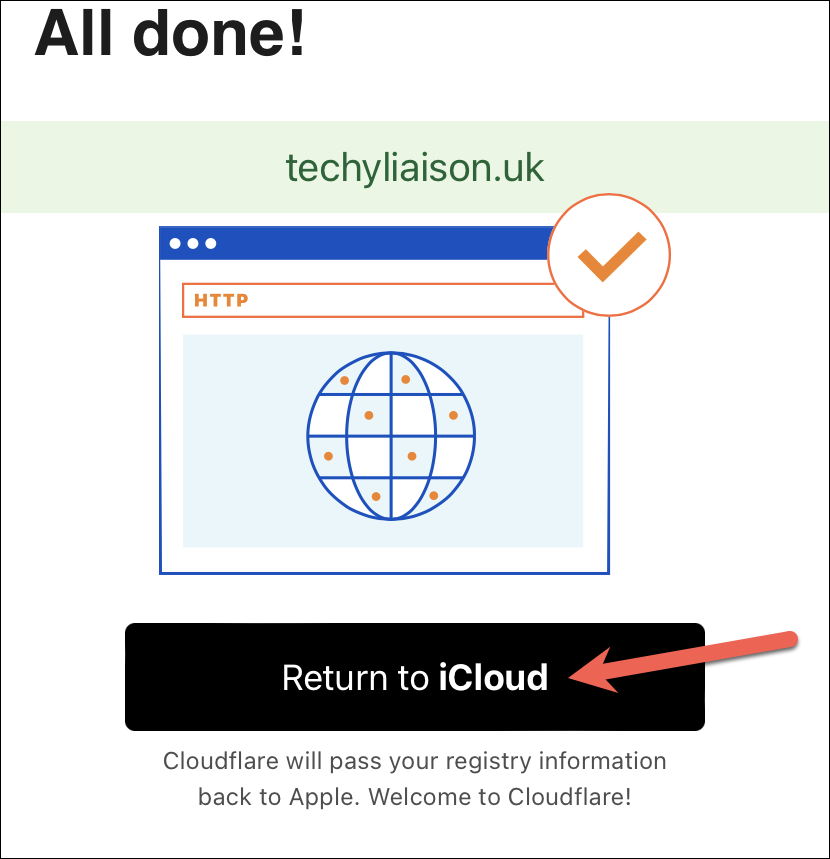
Once you complete the payment, tap ‘Return to iCloud’, and your domain will be all set up to use with iCloud Mail.
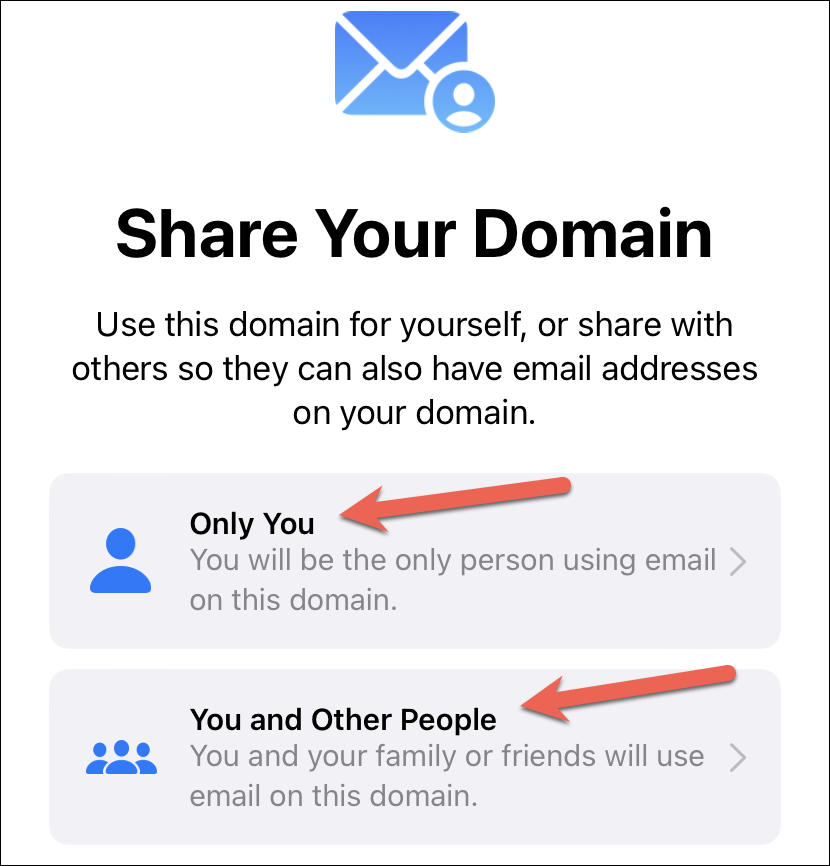
As soon as you return to iCloud, a screen will appear asking you whether you want to share your domain with friends and family or want to use it by yourself. Tap ‘Only You’ if you don’t want to share and ‘You and Other People’ if you want to share it via Family Sharing.
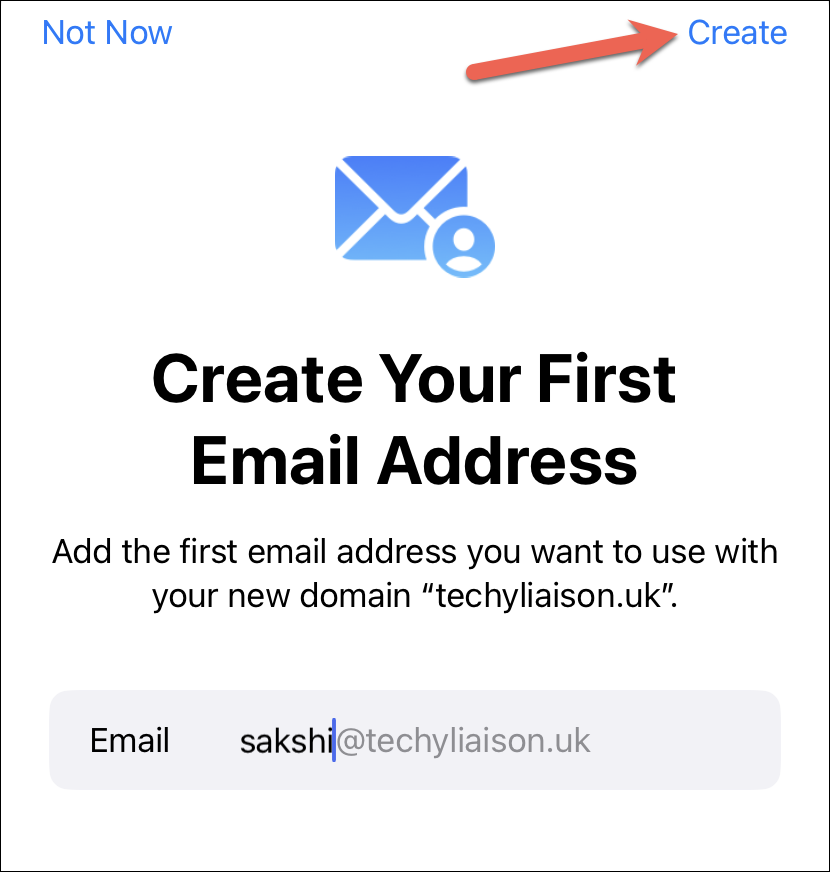
And that’s it. You’ll be able to create your first custom email address for the domain. Simply enter the username for the email address and tap ‘Create’ in the upper-right corner.
You can also skip creating a custom email address for now and do it later. We have covered the steps separately later in this guide.
Setting Up Custom Email Domain When You Own a Domain
If you’re not on iOS 16 yet (since it’s in beta at the time of this writing) and can’t use iCloud to buy a domain or you simply already have a domain, you can add that to iCloud as well. To set up a Custom Email Domain from your iPhone, open the Settings app and tap your name at the top.

Then, tap the option for ‘iCloud’.
From iCloud settings, go to ‘iCloud Mail’.

Now, tap the option for ‘Custom Email Domain’.

Then, the option to buy a domain or continue with your own domain will appear. Tap the option for ‘Use a Domain you Own’.
Note: If you’re not on iOS 16, you would not see the option to buy a domain.
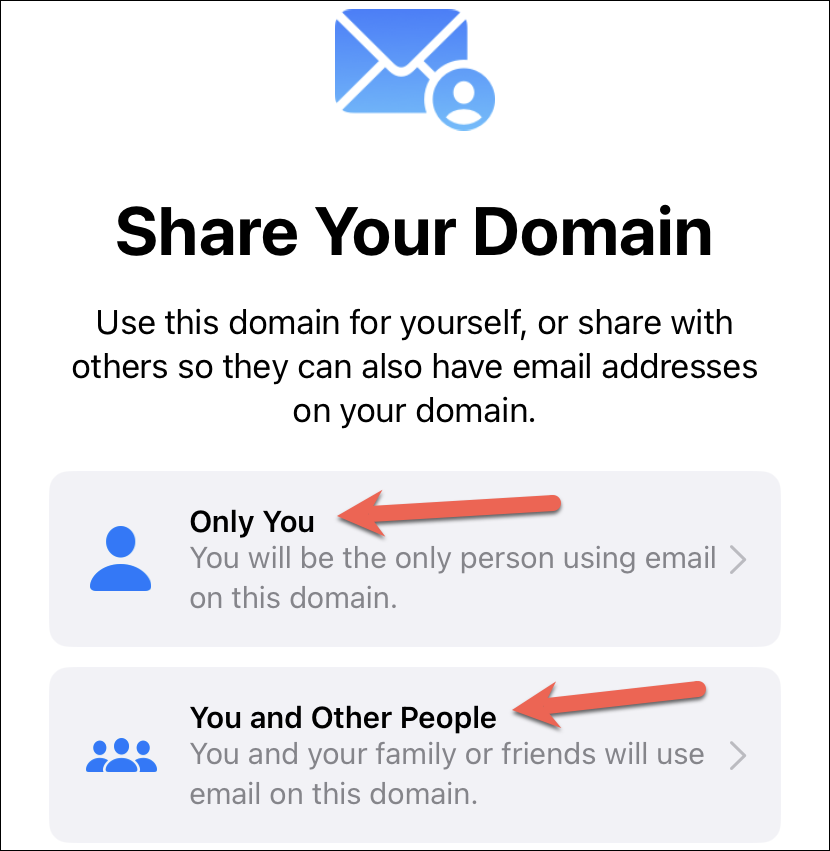
Now, on the next screen, select who will be using your domain. If you want to share the domain with friends and family, then tap the option for ‘You and Other People’. Otherwise, tap the option for ‘Only You’.
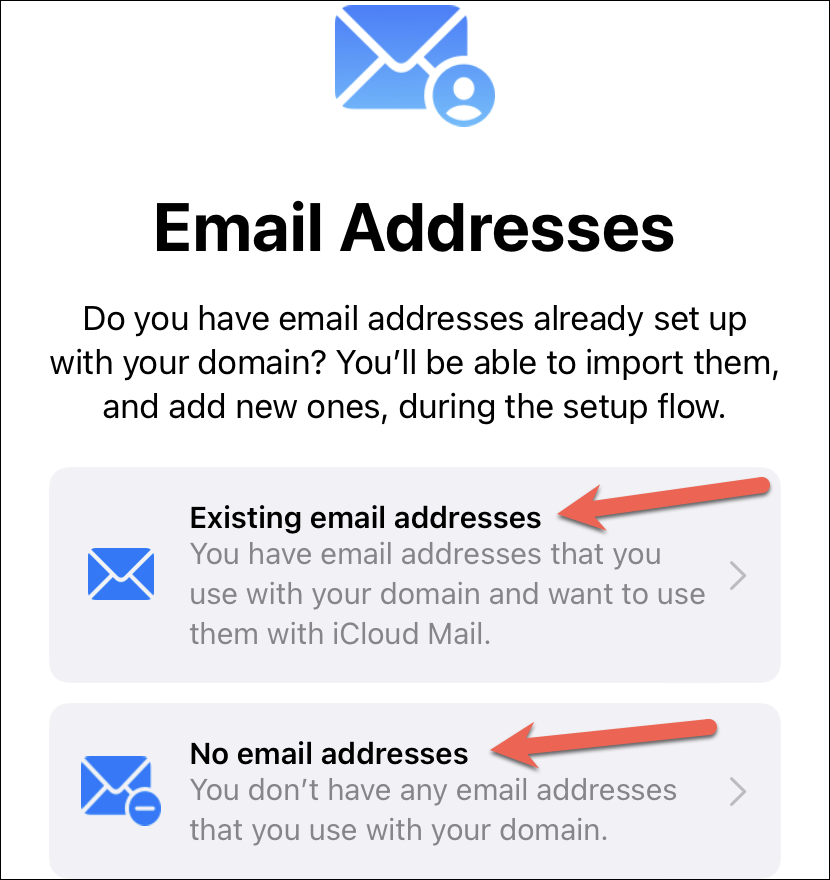
Now, if you have existing email addresses on your domain, tap the option for ‘Existing email addresses’ so you can configure them to use with iCloud Mail. Otherwise, tap ‘No email addresses’ to proceed.
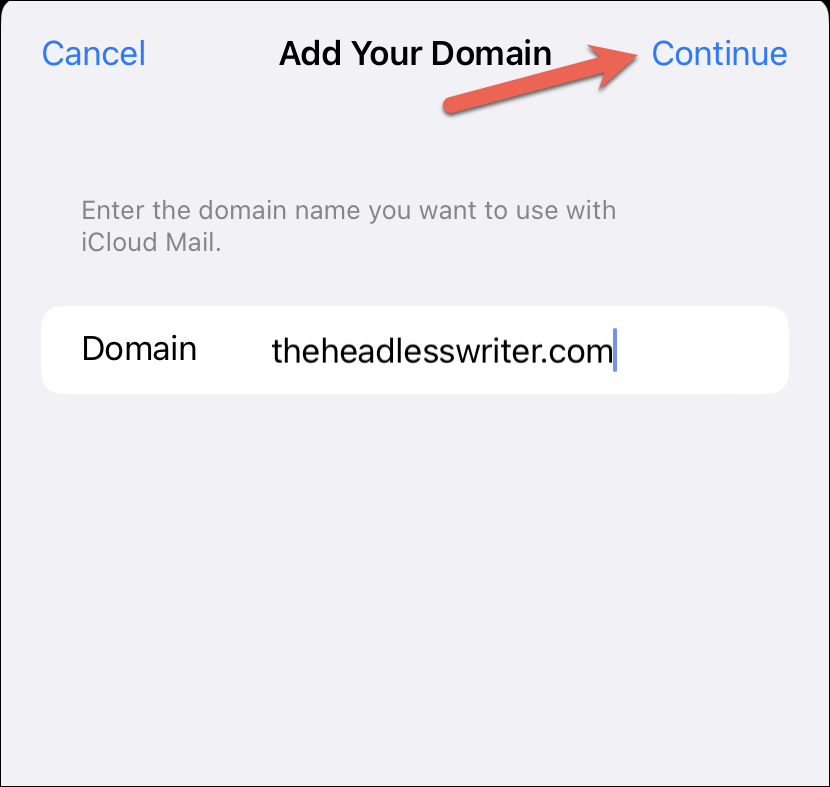
Then, enter the domain you want to use with iCloud Mail and tap on ‘Continue’.
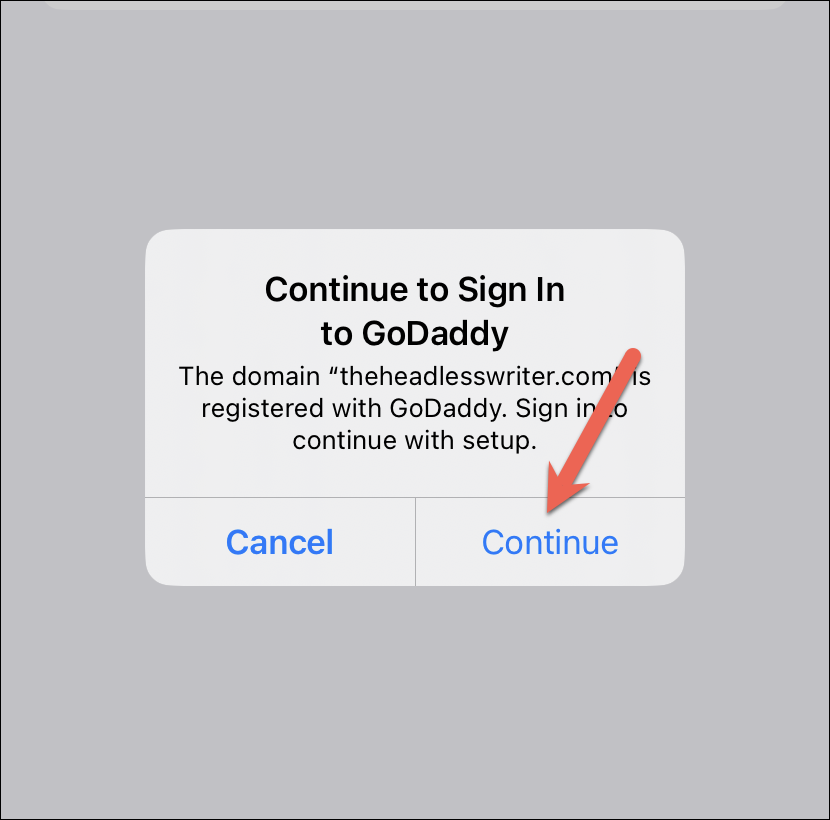
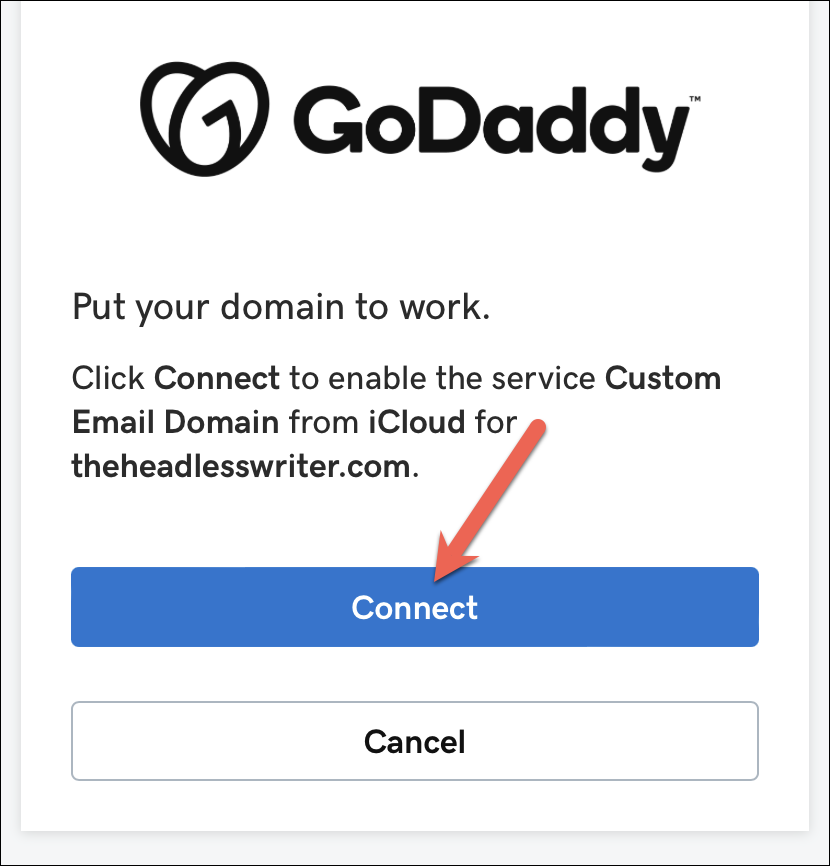
A prompt will appear on the screen. You’ll be asked to sign in with your domain provider from where you bought the domain; tap on ‘Continue’ and sign in to your account on the domain provider’s website.
Tap the option for ‘Connect’ on your domain provider’s website to connect your domain to iCloud Mail. The options might be different for you depending on the interface provided by your domain provider, but the principle will be the same. You’ll need to connect your domain to iCloud Mail.
Note: If your domain isn’t automatically connected to iCloud Mail, go to the next section to find out how you can manually connect it by altering the DNS records.
Tap ‘Close’ to return to the Settings screen and finish the setup. It only takes a few minutes for your domain to be connected to iCloud Mail, but sometimes it can take up to 24 hours.

Manually Updating DNS Records
Depending on your domain, you would either be prompted to sign in to your domain registrar so your records can be updated automatically or you’ll have to manually update your DNS records.
If it was the former, you won’t even need to bat an eyelash. But if it’s the latter, you’ll have to alter the DNS records on your domain host’s website manually. Although Apple will also send you instructions on how to do that if that’s the case, here’s a list of records you’ll have to change.
You’ll need to change the MX, TXT, and CNAME records with your domain host. Delete the existing MX records and enter these records instead. You’ll have to individually add each record.
TXT:
Record Type: TXT
Host: @
Value: [Enter the personal TXT record you were provided with during set up]
MX:
Record Type: MX
Host: @
Value: mx01.mail.icloud.com.
Priority: 10
MX:
Record Type: MX
Host: @
Value: mx02.mail.icloud.com.
Priority: 10
SPF:
Record Type: TXT
Host: @
Value: “v=spf1 include:icloud.com ~all”
If an SPF record is already present, simply add “include:icloud.com” to the record present before “~all”.
DKIM:
Record Type: CNAME
Host: sig1._domainkey
Value: sig1.dkim.example.com.at.icloudmailadmin.com.
Note: If you can’t enter @ as the hostname because your domain provider doesn’t support it, add your domain name in the host field.
Save your changes and verify the changes in iCloud Mail custom domain settings. It might take some time for the saved changes to get verified. Once the changes are saved, your domain will be ready to use with iCloud Mail.
Creating a Custom Email Address
Now that your custom email domain is all set up, you can finally create your custom email address. Whether you used iCloud to buy a domain or you used a domain you owned, these steps to create a custom email address are the same for both. Even if you previously added an email address, you can use these steps to create another custom email address.
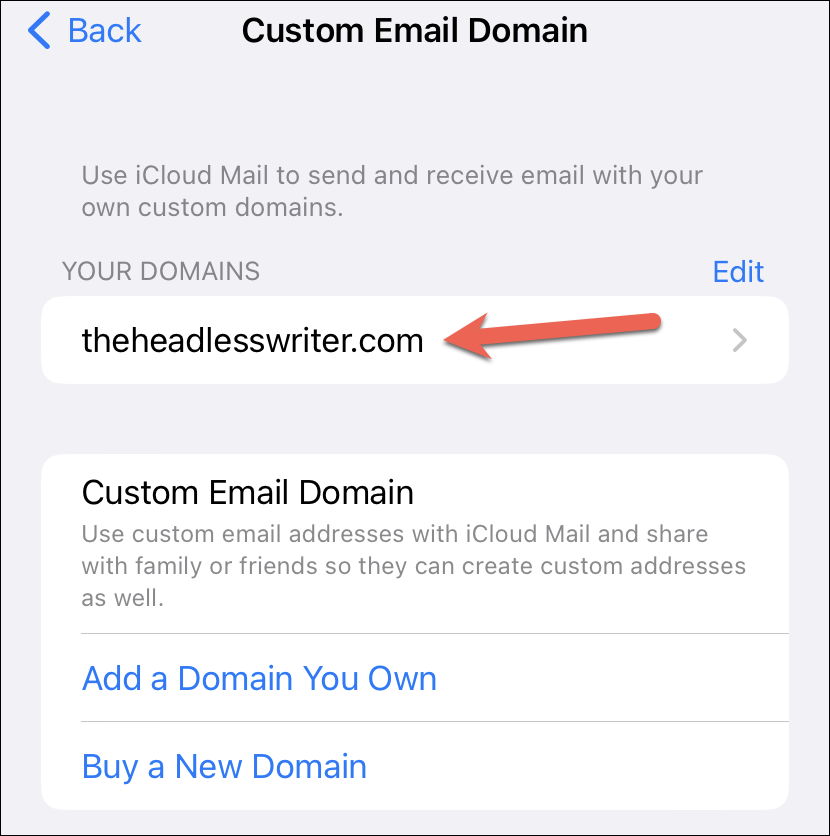
If you had to wait for the DNS settings to update, navigate to the Custom Email Domain settings and tap your domain name under the ‘Your Domains’ category.
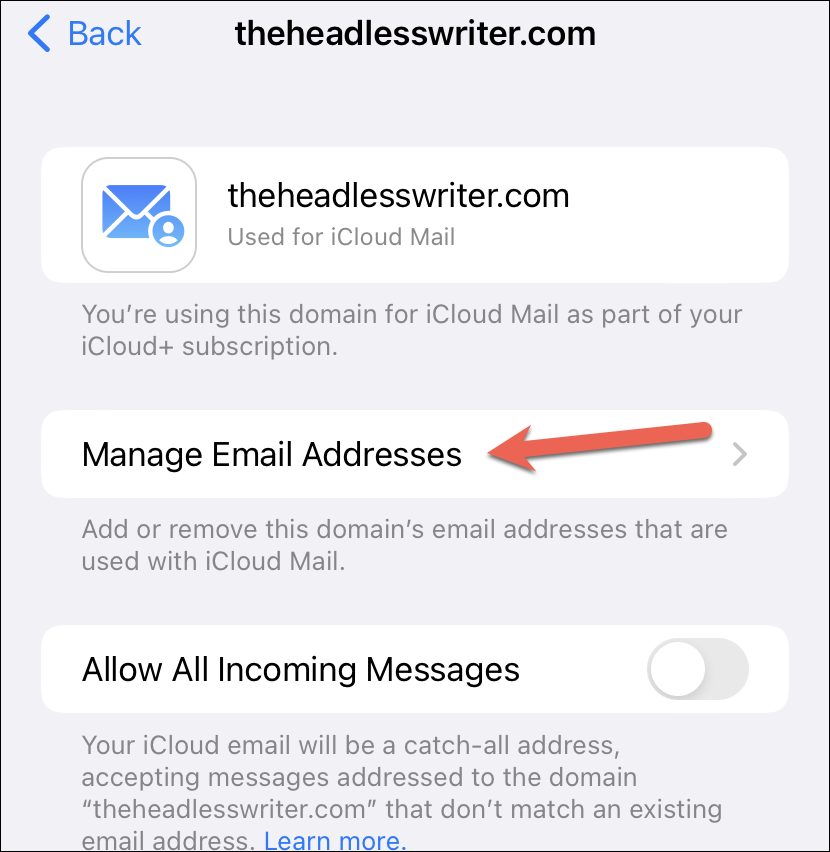
Then, tap the option for ‘Manage Email Addresses’.
Now, tap the option for ‘Create Email Address’.
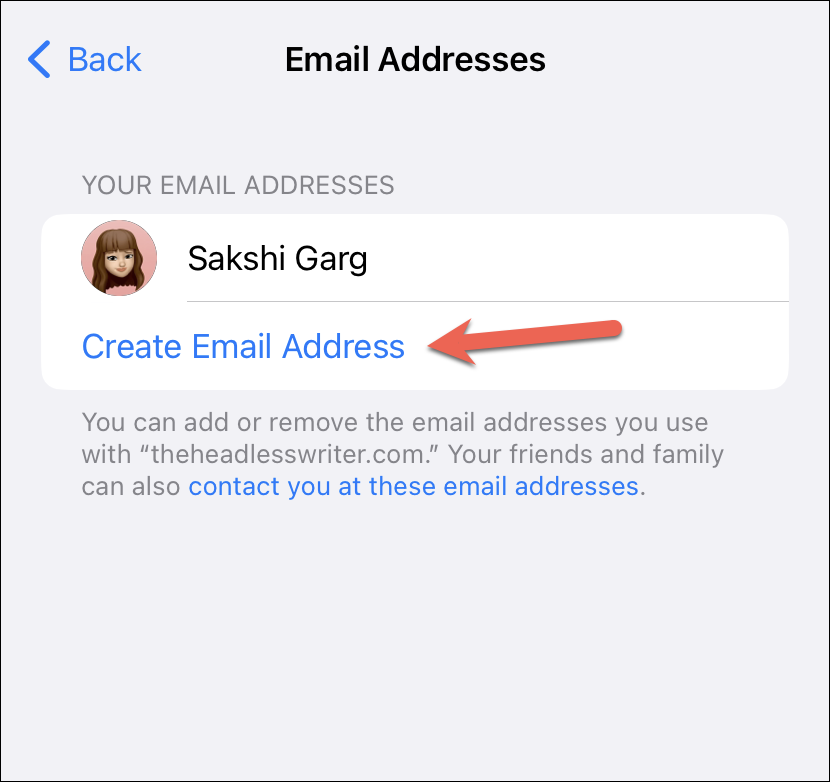
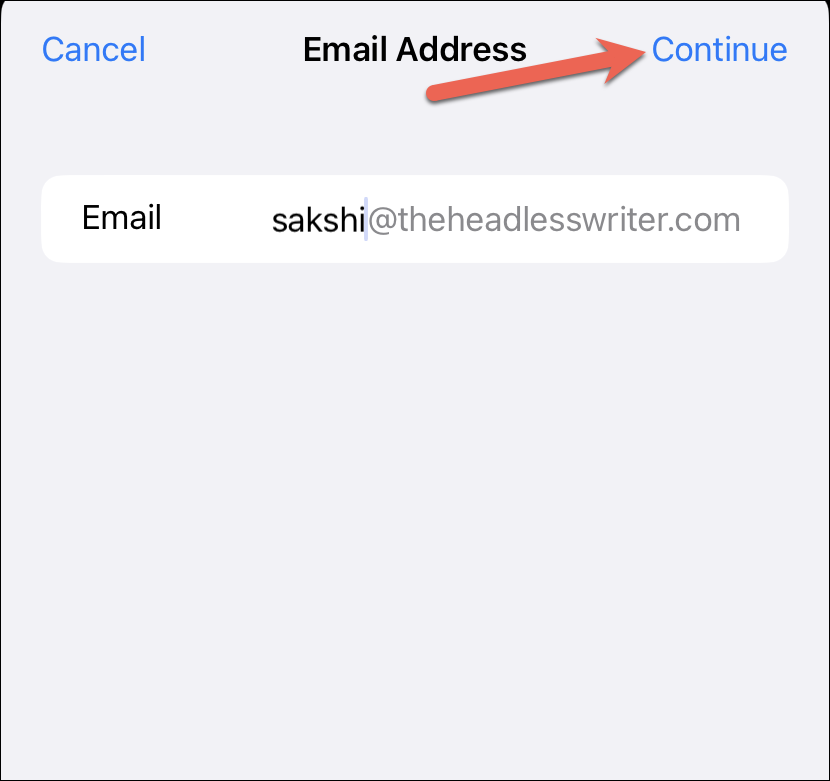
Enter the name for the email address. It can be anything you want, like your name or something else. Then, tap ‘Continue’ in the top-right corner of the screen.
And voila! You have created your first custom email address with a domain name you own.
Similarly, you can add more email addresses.
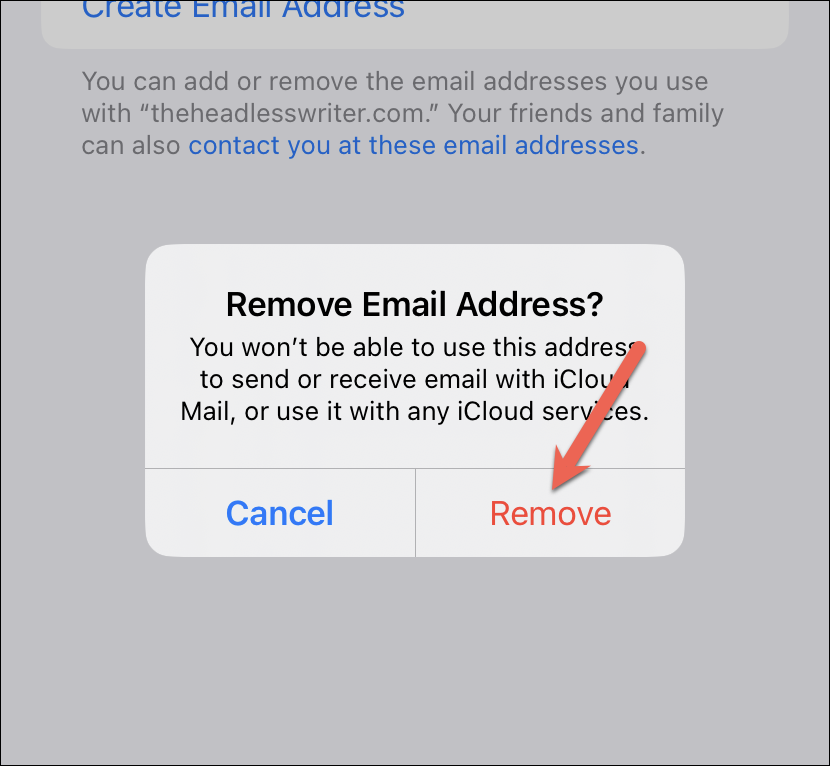
To delete an email address, simply swipe left on the email address and tap the ‘Delete’ option that appears.
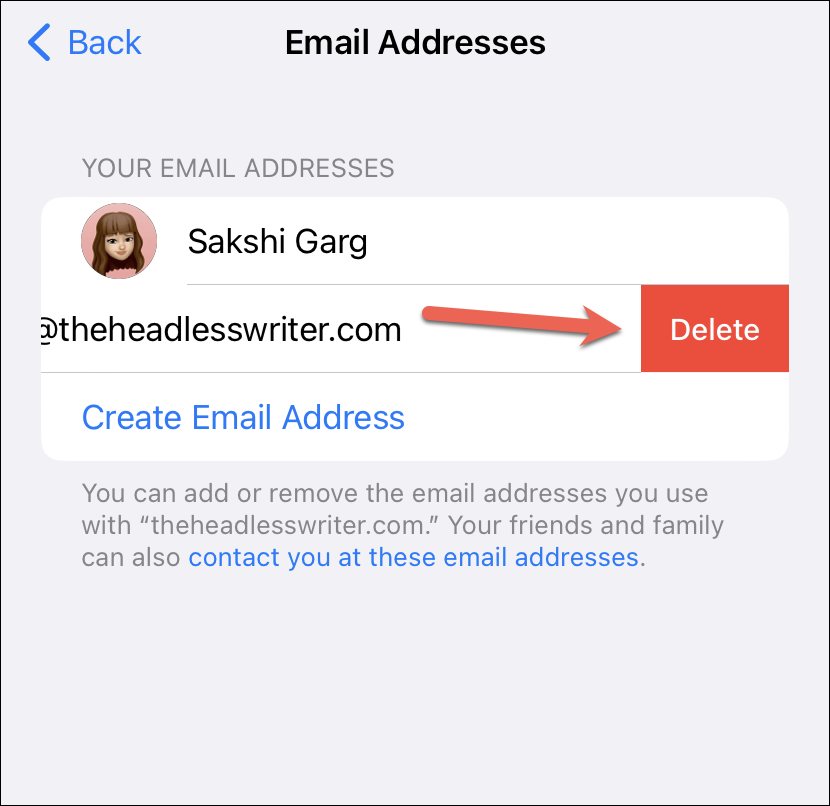
A confirmation prompt will appear; tap ‘Remove’ to delete.
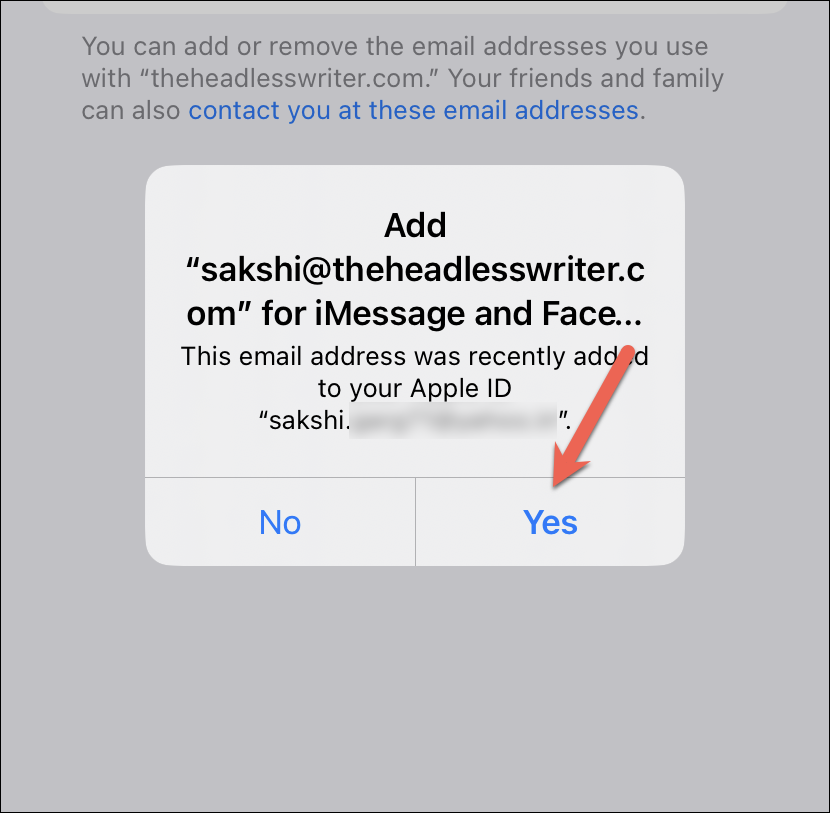
You can even use these custom email addresses with FaceTime and iMessage across your Apple devices. A prompt asking you to add the custom email address for FaceTime and iMessage will appear almost as soon as you create the address. Tap ‘Yes’ from the prompt to confirm.
Removing the Custom Domain
To stop removing the custom domain with iCloud Mail, navigate to custom email domain settings again.
Then, tap the option for ‘Stop Using This Domain’.
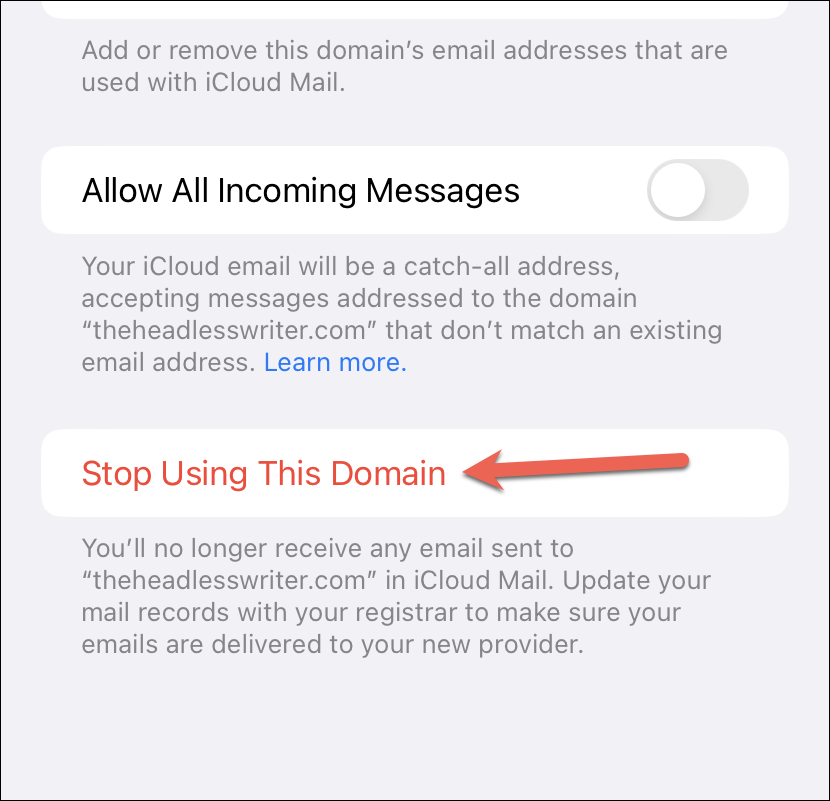
An overlay screen will open. Tap ‘Stop Using’ in the upper-right corner of the screen.
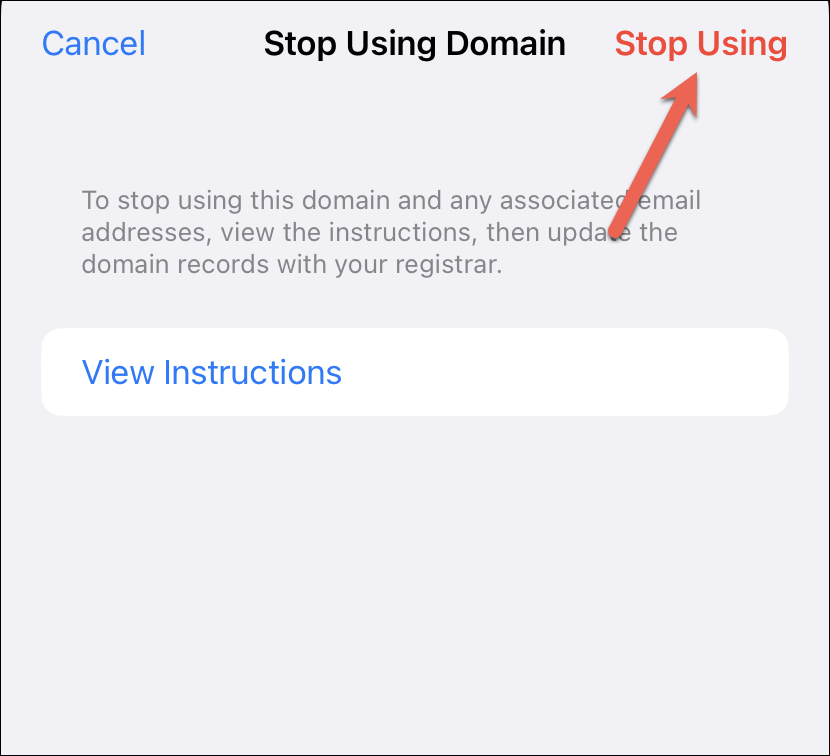
When you stop using the domain with iCloud, you won’t be able to send or receive any emails for your domain in iCloud Mail.
Now, if you’re moving to a new domain provider, you’ll need to go to your domain provider’s website and update the domain records accordingly. You’ll also need to delete any records related to iCloud.
When the feature was first launched, you could only set up a custom email domain from icloud.com on the browser. But using iCloud Mail to set up a custom email domain on iPhone makes everything a lot easier. So, whether you already own a domain or you’re thinking of getting a custom email domain, let iCloud be your go-to service – given that you have or are willing to get an iCloud+ subscription, of course. The whole process is seamless and your custom email address will be up and running in no time!


