Boons of Salvation are permanent, save-wide upgrades you buy with Karma Shards in Fire Emblem: Fortune’s Weave. They speed up leveling, cut shop prices, and reduce the Divine Sand cost of army-wide Blessings. Because Karma Shards trickle in and many Boons only shave a few gold off narrow purchases, the order you buy them in matters more than the total count.
Quick answer: Buy Increase EXP (10%) first, then Increase Class EXP, then the weapon proficiencies your deployed army actually uses. After that, prioritise Blessing discounts and Rich Deposits, followed by Meals and Carriage discounts.

How Boons of Salvation work
Completing Notable Deeds awards Karma Shards for unlocking Boons. These achievement-style goals cover activities like mining ore, inspecting search locations, and viewing Support conversations. Their progress is shared by all Flame Lords instead of being tracked individually. You can always review the full objective list, then collect the rewards from a Pale Raven’s Perch or the Shrine of Causality.
Every Boon you unlock applies across the entire save, so a bonus bought on one route carries into the others and into replays. Two more details shape your spending. Boons can be toggled on or off after purchase, and the stronger upgrade tiers stay locked until you finish Part 1 paths.
- Base tiers are available from the start.
- Second tiers generally require one completed Part 1 path.
- The highest EXP and proficiency tiers need two or three completed paths.
Increase EXP, for example, opens at 10 percent, climbs to 30 percent after your first completion, and reaches 50 percent once you have altered causality for three or more people. Revisit the Perch or the Shrine after finishing each route to grab the newly available tiers.
Karma Shards have a second use in Part III, where they Merge Causality between duplicate recruits so a combined unit keeps the highest stats. You can unlock every Boon well before running out of Notable Deeds, so early Shards are best spent on the Boons below.

Purchase priority and costs
| Priority | Boon | Upgrade tiers | Karma Shards |
|---|---|---|---|
| 1 | Increase EXP | 10% / 30% / 50% | 500 (first tier) |
| 2 | Increase Class EXP | +1 / +2 | 300 |
| 3 | Weapon EXP (your army’s types) | +1 / +2 / +3 | 300 |
| 4 | Kalla’s Blessing Discount | 20% / 50% | 300 |
| 5 | Aurora’s Blessing Discount | 20% / 50% | 300 |
| 6 | Rich Deposits | 10% / 20% / 30% | 300 |
| 7 | Meals Discount | 20% / 40% | 300 |
| 8 | Carriage Discount | 20% / 40% | 300 |
Most Boons cost 300 Karma Shards per tier, while the first Increase EXP tier is 500. Base shop and skill discounts also start at 300, so early spending is about picking the right effect rather than saving for something expensive.
Experience boons: buy these first
Increase EXP is the strongest first purchase because it touches nearly every battle and every character. Faster leveling reduces the grinding needed to keep a roster ready for each chapter’s required fight, and it helps new recruits close the gap with your established units. Grab the 10 percent tier before any specialised bonus, then upgrade to 30 and 50 percent as they unlock.
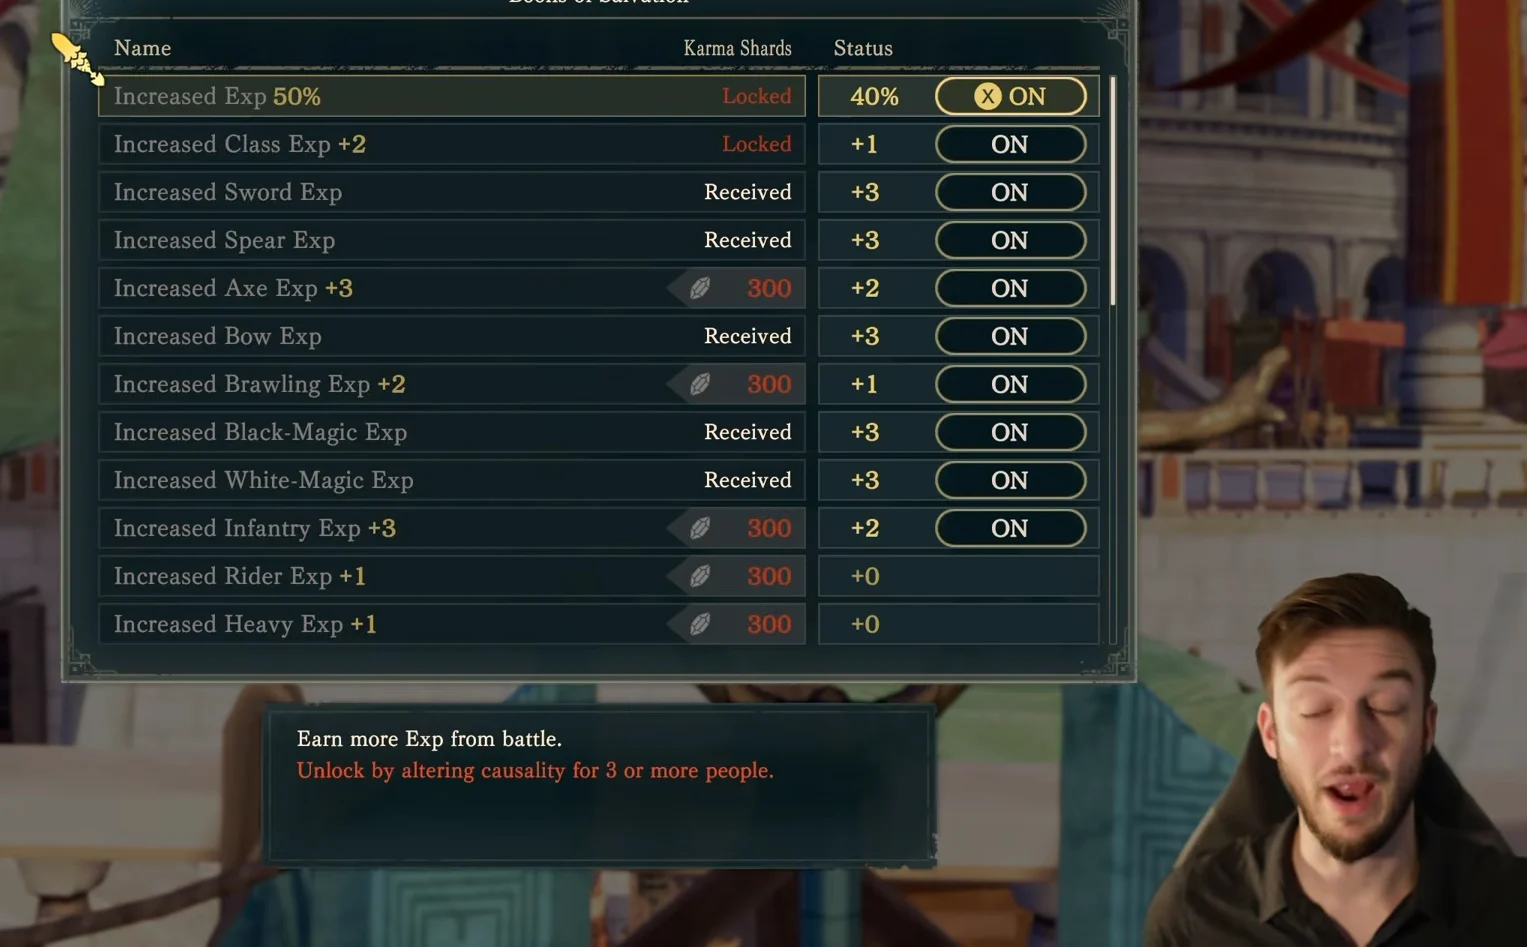
Increase Class EXP is the next broad pick and unlocks after your first completed Part 1 path. Faster class mastery hands out skills sooner and makes experimental builds far less painful, since class skills stay useful even after Reclassing. That lets a unit collect an ability without being stuck in a class that does not suit its stats.
Weapon and skill proficiency boons
Proficiency Boons add flat skill EXP from battle for a single category, and each stacks up to +3. Weapon EXP feeds directly into certification exams and unlocks stronger weapons, skills, and Combat Arts, so target the proficiencies your deployed army leans on rather than buying every option. Swords, Spears, and Bows are the usual candidates for most rosters.
Magic proficiencies are worth an early look too. White-Magic EXP brings healing spells like Physic online sooner, while Black-Magic EXP speeds access to high-tier, long-range spells such as Thoron. Infantry EXP is also handy for the utility passives tied to that skill line, though many units raise Infantry and Heavy proficiency easily through Training.
Proficiency Boons apply to battle EXP only and do not affect Training. Tailor them to whoever you are currently playing, for example Swords for Dietrich or Bows for Leda, and factor in which certification exams you plan to take next.
Authority EXP is the exception to buy carefully. Battalions and their buffs only exist on Theodora’s route, so this Boon is dead weight on the other three paths.
Blessing discounts save Divine Sand
Blessing discounts beat generic shop savings because Divine Sand controls how often you can trigger your strongest army-wide effects. Cutting a Blessing’s cost means you can fire it more times per battle without draining your supply. Kalla’s Blessing Discount comes first, then Aurora’s.
Kalla is extremely powerful, but on Hard its undiscounted price is 40 Divine Sand. Reaching the maximum 50 percent discount reduces that cost to 20 Sand, so maintaining its Avoid bonus becomes much easier. Aurora takes the second slot because it is the most dependable defensive Blessing and remains useful well into Part 3. Mars, Smyrnos, Jurah, and Credna can receive discounts as well if you use them.
Material and travel discounts
Rich Deposits raises the drop rate of materials from breakable objects in dungeons, up to 30 percent. More materials feed weapon refinement and later construction requirements, giving it better long-term value than ordinary price cuts. Its top tier unlocks after you have cleared the game once.
On a second Part 1 route, Meals Discount and Carriage Discount provide benefits quickly. Meals are spent again and again to recover Motivation and raise Support for recruitment, allowing the lower base price to accumulate value throughout the campaign. A Carriage reduces world-map travel to one turn rather than five or more; its cheaper fare is especially valuable when exploration, weekly activities, and deadlines all draw from the same limited turns.
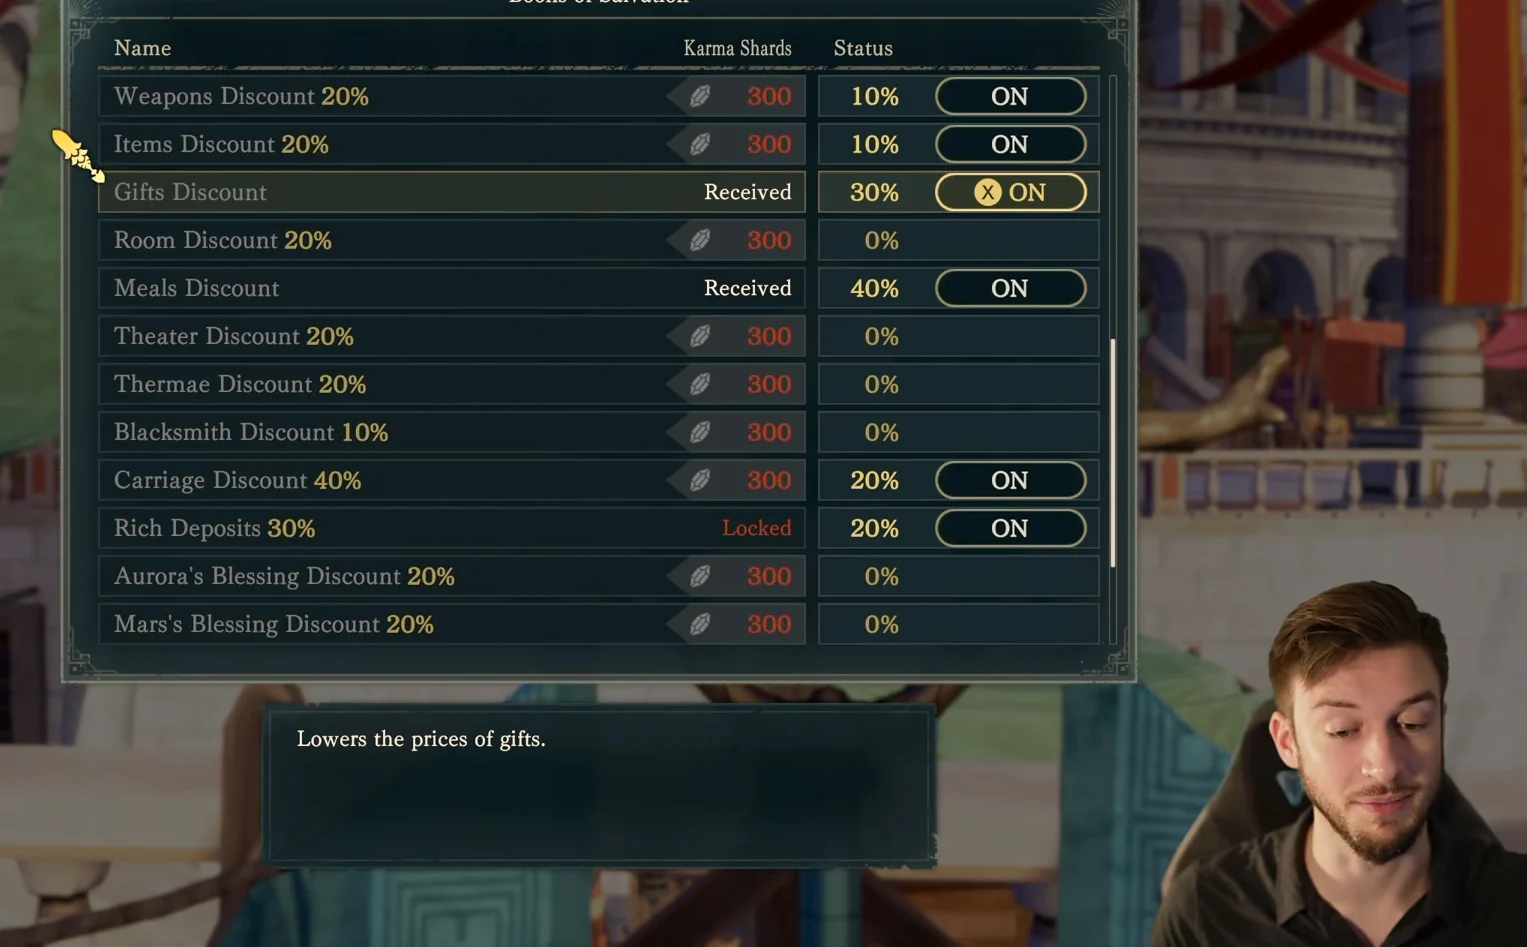
If recruitment is your main gold drain, Gifts Discount is a strong alternative early pick. Each character can accept one gift per in-game week, so the savings scale with how many recruits you are courting at once. Together with Meals Discount, it takes a real bite out of a recruitment-heavy run.
Weapons, Items, Room, Theater, Thermae, and Blacksmith discounts sit lower on the list. They help if a specific expense is squeezing your gold, but weapons in particular pile up from dungeon exploration and quest rewards, so their discount rarely earns an early slot.

Where to unlock Boons and confirm they are active
Open the Boons of Salvation menu at a Pale Raven’s Perch in Dagsion or at the Shrine of Causality in the Obelisk Chamber. Both are available on every route. Select a Boon, spend the listed Karma Shards, and its Status flips to ON in the menu. A purchased Boon shows as Received with its current tier, and you can switch it OFF at any time if you want to play without it.
Because tiers stay gated behind completed paths, the practical rhythm is simple. Buy the base tiers you need now, finish a Part 1 route, then return to the Perch or Shrine to pick up the upgraded EXP, proficiency, and discount tiers that only appear once you have altered causality across more of the cast.