The Necromancer turns the Summoner into an undead area-damage caster that lets minions hold the front line while you group enemies and drop heavy magic on top of them. The build leans on one weapon, one stat direction, and a small set of summon-scaling skills, so the character stays effective even as Early Access balance shifts. In SpiritVale you unlock the class once your job level reaches 50, and the strongest current setup is built around Death Nova and a core roster of undead summons.
Quick answer: Build INT first, then DEX, then VIT, equip the Binding Spirits Staff with two magic cards, use the Mind Set with a Sapphire Crown and Scholar Glasses, run the Corporeal artifact set, and spend points on Summon Mastery, Skeleton Mastery, Bone Spear, Bone Spikes, and Death Nova. Never equip a shield, since it cancels your two-handed stance and its 25% bonus to physical and magic attack.
Stat priorities and the no-shield rule
Nearly all of your damage is magic, so Intelligence is the stat that matters most. Push INT hard, then add DEX so casting stays reliable, and keep VIT as the third stat that lets you survive standing near packs while you pull them onto your summons. A public level 150/70 Necromancer profile sits at 99 INT, 99 DEX, and 79 VIT, which works as an endgame target rather than a fixed leveling order.
The one hard rule is to never equip a shield. Putting a shield on cancels your two-handed stance, and that stance grants a 25% bonus to both physical and magic attack. Losing it is a large damage cut for a class that already invests its resources into summons.
| Priority | Stat | Why it matters |
|---|---|---|
| 1 | INT | Primary multiplier for undead magic damage. |
| 2 | DEX | Smooths out casting and accuracy. |
| 3 | VIT | Keeps you alive while pulling packs onto summons. |
| 4 | Other | Only invest when a specific item or breakpoint requires it. |
Binding Spirits Staff and cards
The Binding Spirits Staff is the anchor of the build. It reduces cast speed, which matters because you will often be swarmed and any long windup can be interrupted before the spell lands. It also raises the damage of Death Nova and Death Coil, the two spells this setup relies on most.
The staff supports two card slots, so stacking double magic cards on it pushes your damage multipliers higher. Public endgame loadouts pair the staff with two magic-focused cards and continue that magic-card theme across the rest of the gear.
Armor, accessories, and artifacts
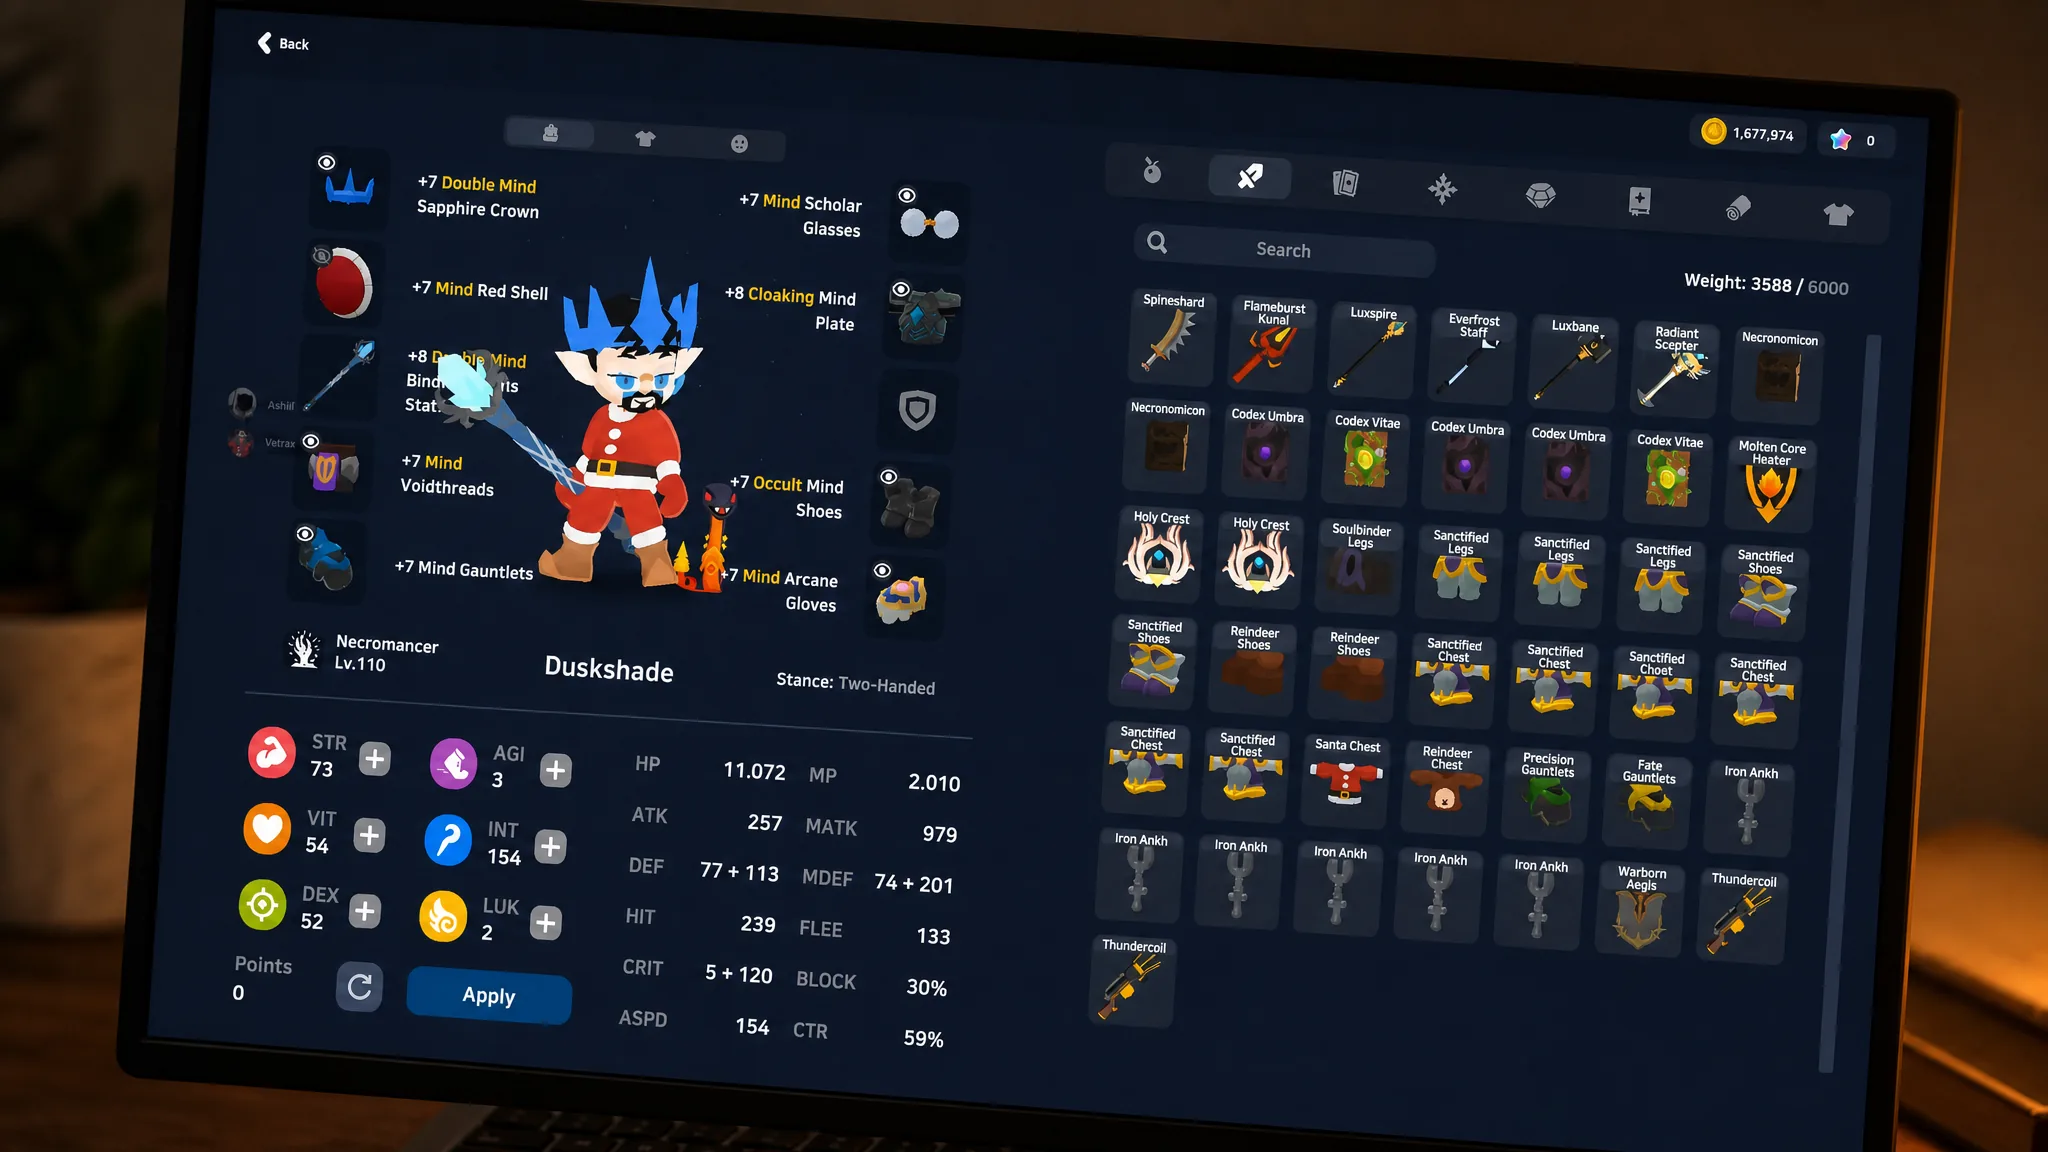
Gear is chosen to raise magic output and casting speed while keeping your summons durable. The Mind Set covers several defensive and offensive stats at once, and a Sapphire Crown with Scholar Glasses stacks the Intelligence and Magic Attack that feed every spell.
| Slot | Recommended piece | What it gives |
|---|---|---|
| Headgear | Sapphire Crown | Intelligence and Magic Attack. |
| Face | Scholar Glasses | More Intelligence and Magic Attack. |
| Legwear | Voidthreads | Defense and faster spell casting. |
| Chest, shoes, accessory | Mind Set | Magic Attack, movement speed, and defense. |
| Accessory | Arcane Glove | Defense per refine; grants Heal and Haste at level 5. |
| Utility | Red Shell | Extra weight limit for consumables. |
For the artifact, the Corporeal set is the standout choice because it strengthens your summons directly and adds elemental bonuses. Each piece raises Poison, Undead, Shadow, and Holy damage, which lines up with the undead-magic theme of the class. An alternative summon-first kit swaps to the Soulbinder Set across chest, shoes, and legs, pairs Bronze Crescent and Iron Ankh accessories with the Grim Reaper card, and uses a Jack-o’Lantern headpiece that can autocast Death Coil to quietly heal your pets during long fights.
Skill priorities across both trees
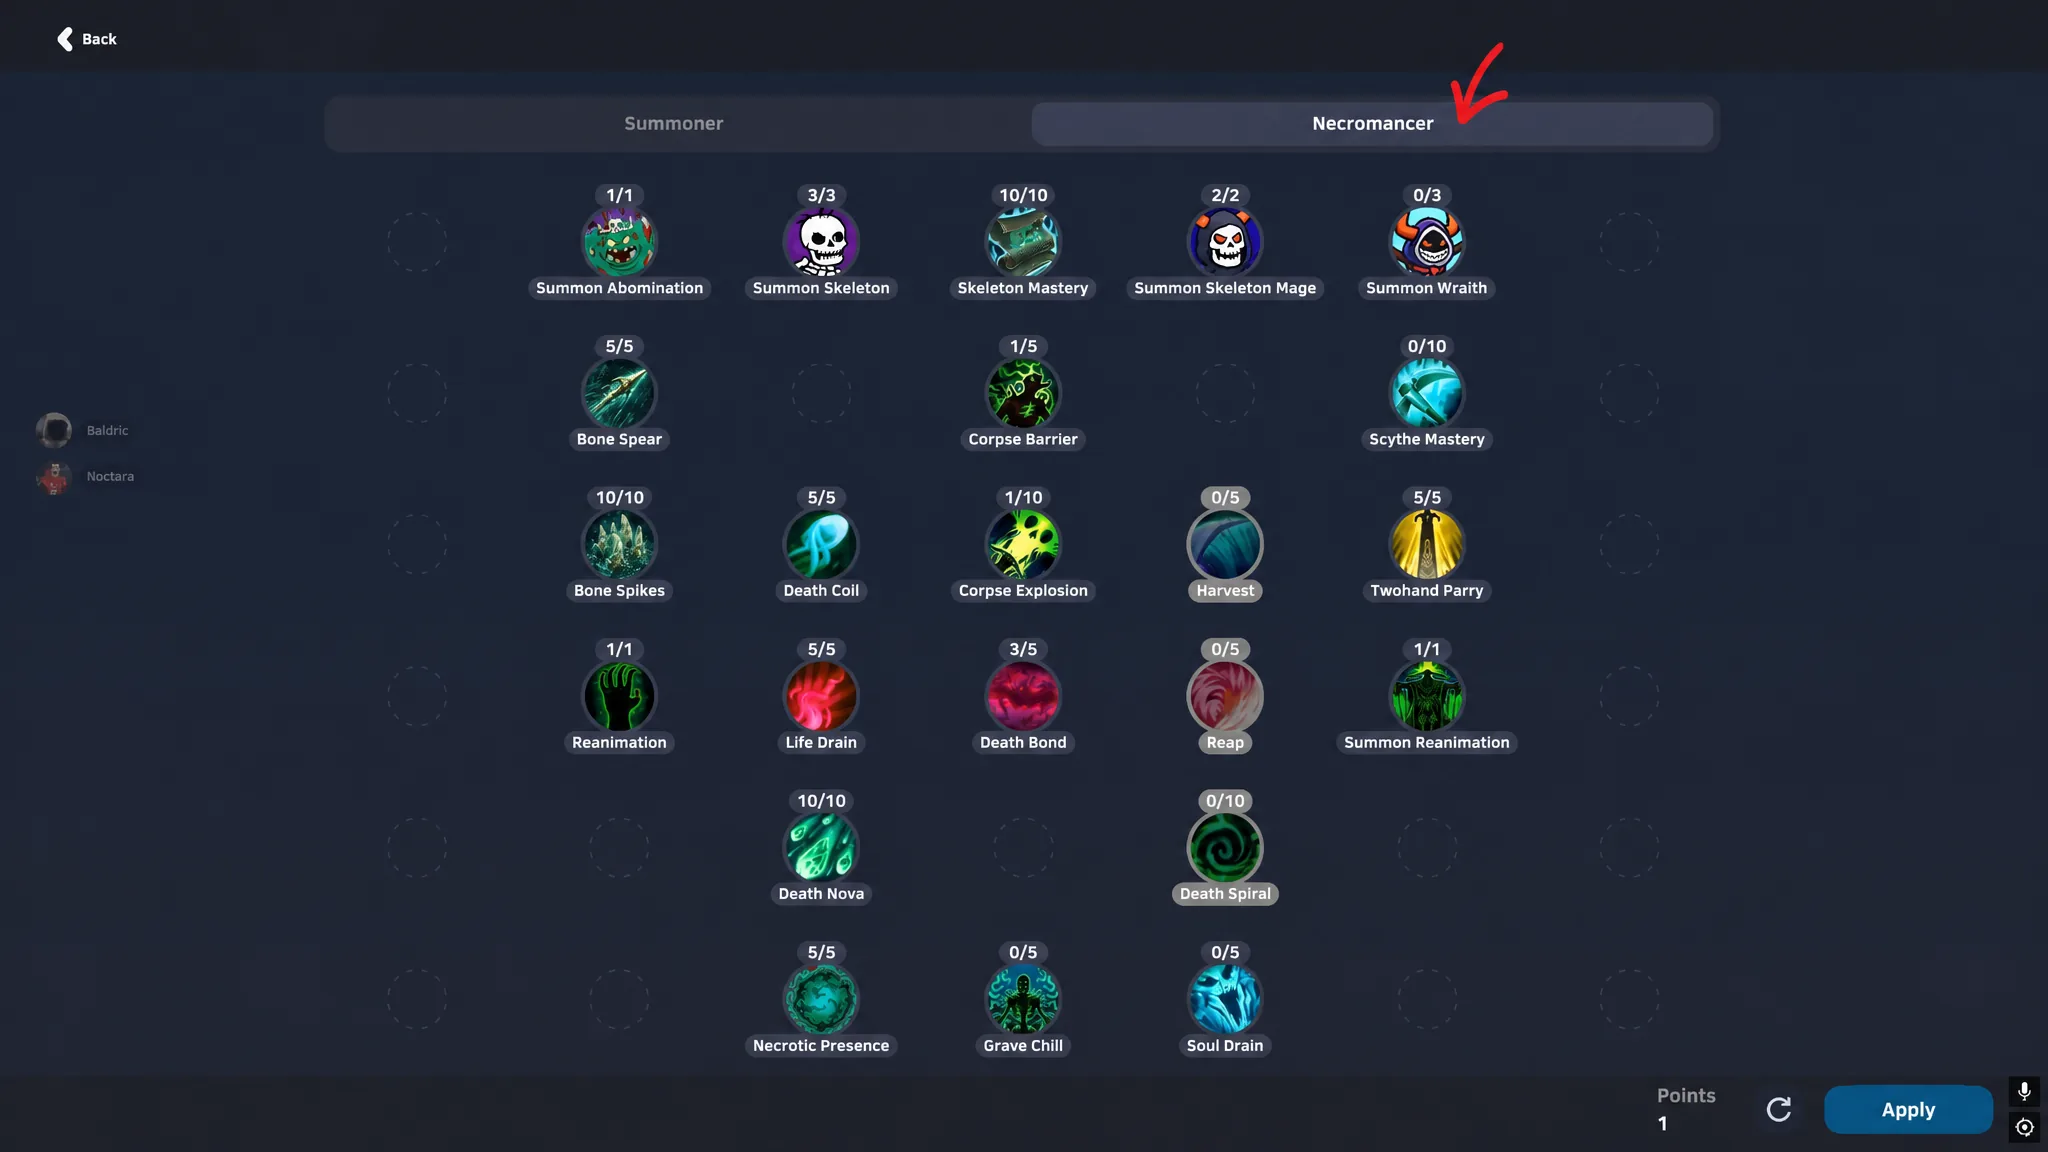
Your points split between the Summoner tree you keep and the Necromancer tree you gain at advancement. The two mastery passives, Summon Mastery and Skeleton Mastery, are the backbone. They let your minions inherit your gear stats, so a well-geared caster produces much stronger pets. Without them, your summons stay weak no matter how much INT you stack.
| Tree | Skills to take |
|---|---|
| Summoner | Summon Angel, Summon Mastery, Resonance Well, Suppression Field, Soul Strike, Banishment Field, Dissonance Well, Guardian Bond, Fury Bond, Invoker |
| Necromancer | Summon Abomination, Summon Skull, Skeleton Mastery, Summon Skeleton Mage, Bone Spear, Bone Spikes, Reanimation, Death Cell, Life Drain, Death Nova, Necrotic Presence, Death Bond, Twohand Parry, Summon Reanimation, Corpse Barrier, Corpse Explosion |
Death Nova is the center of the damage plan. It requires one point in Life Drain first, has a 5-second cooldown, and can be raised toward level 10 as long as the live tooltip keeps scaling well. Because it deals damage around the caster and leaves a decaying field, positioning is part of the skill rather than an afterthought. Bone Spear adds a hard-hitting projectile that can apply Decay, and Bone Spikes erupts from the ground to cover an area.
For minions, the Abomination, Skeleton, Mage, and Wraith form the core roster. Summon the Wraith last in any fight because it has the longest cooldown, so you want it out and staying out instead of wasted on a quick pull. Guardian Bond regenerates your own health through a bonded summon, while Fury Bond raises offensive summon output.
How the combat loop plays out
Resetting the build if it underperforms
Nothing here is locked in. Visit the Waybinder NPC in Nevaris near the Waypoint to reset your stats and skills and test a different direction without abandoning the character. Take a screenshot of your current stats, skills, and gear first, so you can compare clear speed and survivability afterward and confirm the change genuinely helped rather than just looking better on the character screen.
SpiritVale is in Steam Early Access, so summon values, skill scaling, and gear stats can move as the game is tuned. If a number shifts, the priorities still hold. Keep Intelligence high, skip the shield, feed your mastery passives, and build every piece of gear around the summons you send in first.