Most lost matches in WARDOGS are not lost in gunfights. They are lost because one team sprints at the hot zone all game while the other quietly captures towers, learns the code, and parks the zone on top of a fortified Forward Operating Base. The scoring system rewards presence and positioning, and both of those can be engineered.
Quick answer: Points come from bodies in the hot zone, where each player counts double. Capture towers to reveal the four-digit code that summons the zone, or build a drill inside a FOB to drag the zone to you.
How the hot zone scores points in WARDOGS
The hot zone is the only thing that meaningfully moves the scoreline. Every player standing inside it counts as two people for scoring purposes, so a squad of five in the zone is worth ten bodies sitting on a hillside 400 metres away picking off stragglers. Kills outside the zone do not tick the score. Presence does.
That maths explains why lopsided 100-to-12 blowouts are so common. The losing team is usually playing a deathmatch while the winning team is standing in a circle. It also explains why the smarter play is rarely to run at the zone the moment it moves.
If you go and like full send, and go straight to the HotZone every time, you are going to have a rough time; like that’s not really — as the Meta evolves, what you’ll kind of see is people use the HotZone LESS, and they’ll use it more Strategically.
Joe Brammer
Using it strategically means one of two things. Either you move the zone onto ground you already hold, or you make the ground the zone lands on impossible for the enemy to contest. Towers and drills are the two tools for that.
Tower codes: How to pull the hot zone where you want it
There are four towers on the map, and capturing one reveals a single digit of a four-digit code. Once you have the full code, you can input it at any of the four towers, and the hot zone is attracted to that tower and stays there for a set period. Towers themselves are indestructible, which makes them unusually good real estate.
- Each captured tower gives you one digit of the code.
- The code does not change for the entire match — get it once and you own it.
- Capture three towers and you can brute-force the fourth digit, then call it out in chat.
- A tower goes on cooldown after you use it, so you cycle between towers rather than spamming one.
- The code can be triggered up to five times across a match.
Holding two or three towers does double duty. It gives your team the summoning points, and it denies the enemy the digits they need to pull the zone away from you. A team that controls the code controls where the fighting happens for the rest of the match.
Scan enemies with a recon tool to spot them, which broadcasts their live position on the map. Press M periodically before committing to a tower push so you are not walking into a defended one.
Drills: Bringing the hot zone to your FOB
The other way to stop chasing is to build a drill inside a Forward Operating Base. A drill acts as a hot zone magnet — activate it and the zone comes to your walls, which means your team scores from behind cover it already built and supplied. This is the single biggest reason to bother with a FOB at all.
Drills run on batteries. The High Capacity Battery costs $300, weighs 2 kg, and recharges drills and defibrillators. It unlocks at Wardog level 45 for a one-time fee of $50,000. Keep spares in the FOB inventory, because a drill with a dead battery is just an expensive ornament.
A FOB without a drill rarely wins a game on its own. Camping a fort while the hot zone sits somewhere else is functionally the same as not playing the objective. Either get to the zone or bring it to you.
Building a FOB that can hold a drill
The Forward Operating Base is an item you buy from the equipment vendor before you leave your safe zone. It costs $7,500, weighs 6.5 kg, and takes up 2×3 slots in your backpack — it will not fit in the free backpack, so bring a larger one. Once placed, it creates a square zone of influence on the map where your team can build and the enemy cannot.
The FOB ships with a small and a medium hammer plus some light infantry supplies in its inventory, so the first builder on site is never empty-handed. Here is what the rest of the kit costs.
| Item | Price | Weight | Unlock |
|---|---|---|---|
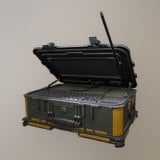 Forward Operating Base Forward Operating Base | $7,500 | 6.5 kg | — |
| Medium Hammer | $800 | 1.23 kg | Support level 3 ($25,000) |
| Build Supplies | $10 | 0.02 kg | — |
| Ammo Supplies | $10 | 0.03 kg | — |
| Ammo Supply Pallet | $400 | — | — |
| High Capacity Battery | $300 | 2.0 kg | Wardog level 45 ($50,000) |
Build Supplies are the universal resource for every buildable and need a hammer to spend. Ammo Supplies reload emplaced weapons and only work inside a FOB radius, so mortars and anti-air are dead weight without a steady stream of them. The Medium Hammer covers large and basic buildables at a moderate build speed, which is enough for perimeter work and most support structures.
Where to drop it
Towers are the obvious pick because they cannot be destroyed, so a wall line around one turns an already permanent structure into a real strongpoint. Churches and similar landmarks work for the same reason — their built-in structures are indestructible, and they tend to sit on high ground with limited approaches and a road leading in.
Small FOBs outside the control zone have their uses too. A hidden mortar nest can counter-battery an enemy FOB that is shelling yours, and a tiny refuelling FOB keeps armour and mobile artillery in the field instead of driving home. Anti-air and drone FOBs placed between an enemy base and the control zone choke their routes in.
Do not put the main FOB console on top of a tower. Until pallet drops start arriving, every loose supply has to be hand-carried up the tower, and that will bleed your build tempo dry.
Keeping a FOB supplied: pallets, Urals, and payouts
Drills, mortars, and walls all eat supplies faster than any single player can carry them. Logistics runs are the least glamorous job in the game and also one of the best paid. A pallet of supplies costs $400 and pays out $2,500 the moment it is dropped inside a FOB’s zone of influence.
Dropping it is not the last step. Walk up to the pallet and press F to push its contents into the FOB inventory, otherwise nobody else can draw from it. Small and large crates are worse — those have to be shuttled into the inventory by hand before the FOB can use them.
Ammo Supply Pallets are also fragile. They are destroyed by high-speed impacts, with roughly a 90-metre free fall as the maximum survivable drop, so helicopter deliveries need to come down low and slow rather than being kicked out at altitude.
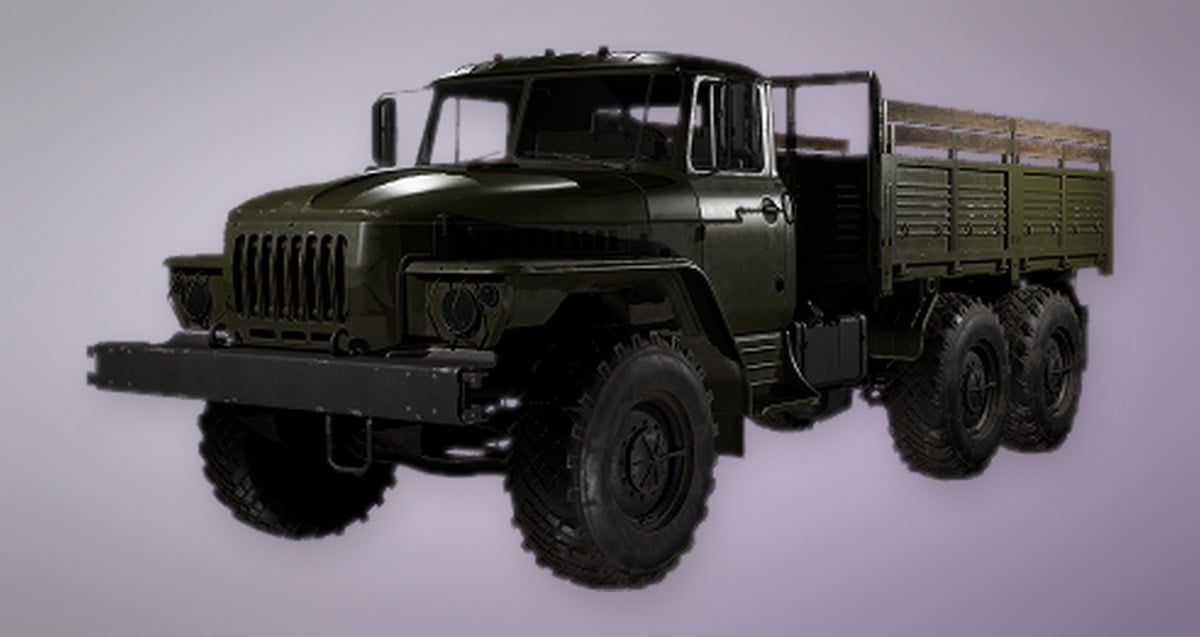
The Ural is the workhorse for ground runs. It is bought from the vehicle vendor in your faction’s safe zone and never appears out in the world during a match, so if you want one you have to buy and drive it out yourself.
| Ural | Value |
|---|---|
| Price | $5,000 |
| Class | Transport |
| Top speed | 79.0 km/h |
| Fuel capacity | 85.0 litres |
| Fuel burn | 4.0 litres per km |
| Seats | 3 |
| Unlock | Driver level 3 ($35,000) |
At four litres per kilometre, an 85-litre tank gives you a little over 20 km of driving before you need fuel, which is worth planning around if your FOB is deep in contested ground.
FOB raiding: Hacking the console and killing the drill
The fastest way to break an enemy drill strategy is to take their FOB rather than grind through its walls. The FOB console can be hacked, and in the opening minutes of a match it is usually sitting completely exposed while the defending team is still laying out its perimeter. A single player who beelines for an enemy FOB before the defences go up can flip it outright.
Defending against that is equally simple. The first thing you build after dropping the case should be a green single door and a double-high HESCO wall around the console, topped with wire. Proper walls and emplacements come after the console is safe.
Doors are the other common failure point. Only the team that controls the FOB can open and close them, which makes an open door a free entrance for the enemy. Close it every single time, and look back to confirm it is fully shut — a door closed while you are still passing through it does not latch, even though it can look closed from your side.
Perimeter rules that survive a raid
- High walls with barbed wire on top, and nothing nearby that lets an attacker climb over.
- One main entrance only — every extra door is another spot the enemy can blow open.
- Airlock every entrance with two consecutive doors or gates so one dead friendly never opens the base.
- Barbed wire outside the walls, which also catches infantry riding vehicles up to them.
- Barbed wire funnels just inside entrances to stop intruders scattering left and right into cover.
- Elevated firing positions inside the FOB so you can shoot along the outside of your own walls.
- Minimal interior walls — a maze of cover helps the attackers more than it helps you.
Expect artillery. Any FOB holding a drill is a magnet for mortars, and how you space and stack your structures determines whether a barrage cracks it open or just scuffs the HESCO. Parking your team’s APC inside the walls is worth doing as well, since it stays protected while letting teammates spawn straight into the control zone.
How to confirm the hot zone actually moved
After entering the four-digit code at a tower, open the map. The hot zone marker relocates to that tower and remains there for a set period, and the tower you used drops into cooldown — that cooldown is your confirmation the input registered. If the zone has not moved and the tower is still available, the code was wrong.
For a drill, the check is the same. Activate it with a charged battery and watch the hot zone migrate toward your FOB on the map. For supply drops, the confirmation is the $2,500 payout landing when the pallet touches down inside the FOB’s square of influence, followed by the supplies appearing in the FOB inventory once you interact with the pallet.
Once you have the code and a drill running, the loop stops being a race across the map and starts being a schedule. Cycle the zone between the towers you hold, keep the pallets flowing, and let the other team burn their match sprinting toward a circle that keeps moving away from them.