
Playing videos on the computer has been around for ages and does not seem to end anytime soon, even with the phones becoming more popular than ever. We all prefer the big screen of the computer over the small display on phones. However, computers running on Windows 10 may sometimes through an error while playing videos. Fret not? We will help you understand the various errors and walk you through the fixes.
Why Are Videos Not Playing on Windows 10?
There are a plethora of issues that could be leading to video playback issues. In some cases, the video might be blurry, choppy, lagging or there might be no sound while in other cases, the video might not play at all. Listed below are some of the common issues that prevent videos from playing on Windows 10.
- You are using outdated drivers.
- You are running an older version of Windows 10.
- The video format is unsupported.
- The Video file is corrupt.
- A recently installed program could lead to the error.
- Your power plan settings may be affecting video playback.
- Malware might have infected your computer.
Any of the above issues may affect Windows 10 and prevent videos from playing accurately. If you too have been facing similar issues, execute the fixes below in the sequence that they are mentioned to fix the error.
Related: 9 Ways to Fix Windows 10 Video Player Problems
1. Run Audio Troublshooter
If you are facing issues with the audio, the first thing you should check is the speakers. If you are using external speakers, ensure that the connections are proper at both ends and the wire is in good condition. Try playing other videos as well to verify if you are facing issues with a particular video or all videos on the system.
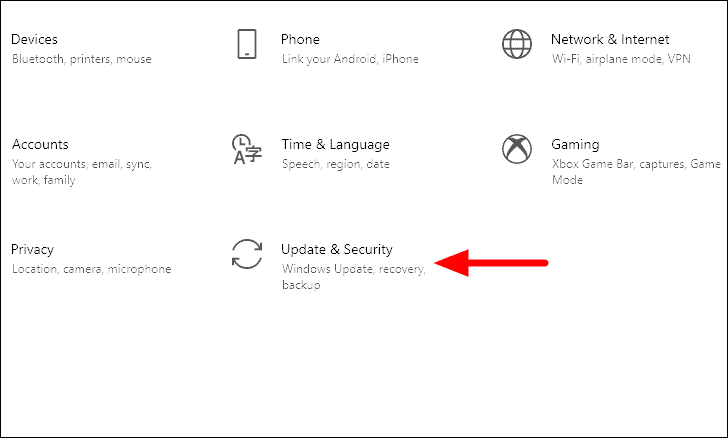
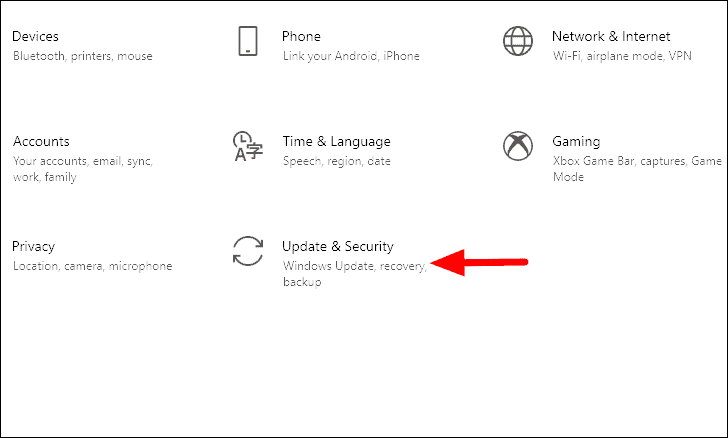
If the issue was not pertaining to connections, you should run the troubleshooter. To run ‘Audio Troubleshooter’, press WINDOWS + I to launch the system ‘Settings’ and then click on ‘Update & Security’.
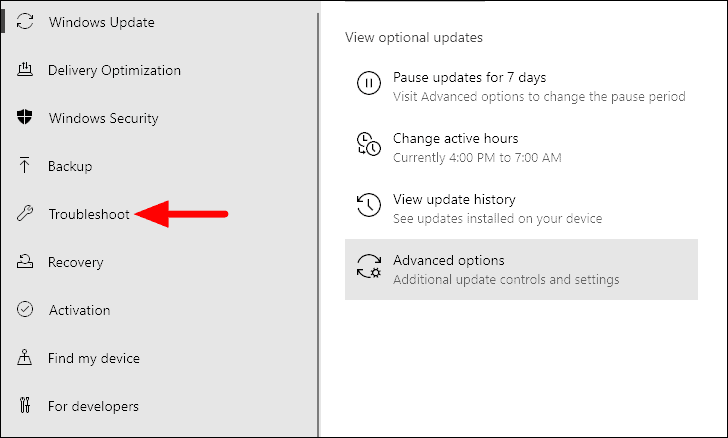
The ‘Windows Update’ tab will open by default. On the left of the screen, you will find various tabs listed, click on the ‘Troubleshoot’ tab.
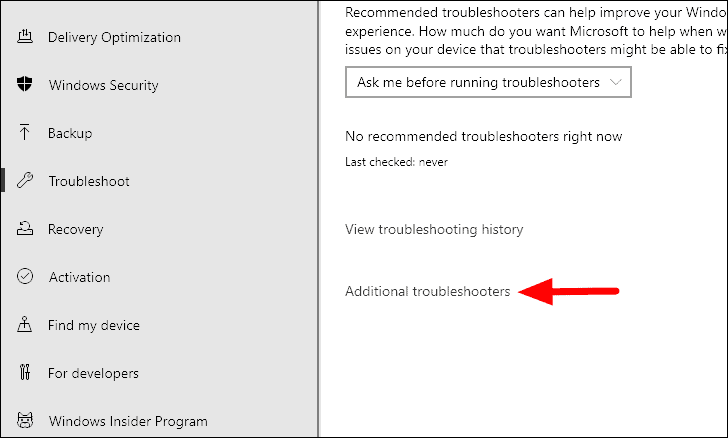
In the ‘Troubleshoot’ tab, click on the ‘Additional troubleshooters’ option on the right.
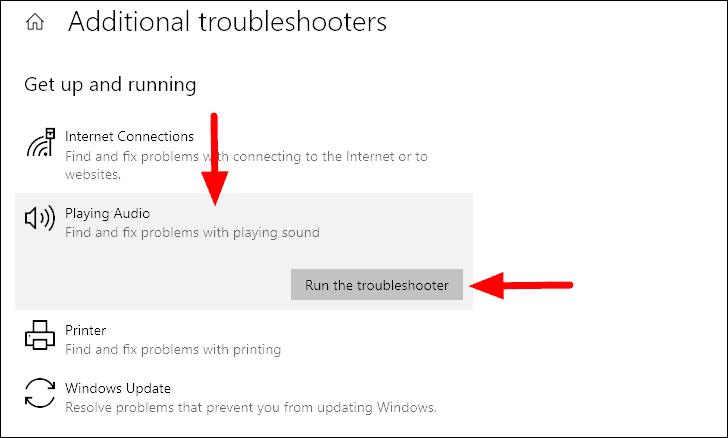
Next, select the ‘Playing Audio’ option under ‘Get up and running’ and then click on the ‘Run the troubleshooter’ option that appears.
The troubleshooter will now start running and identify and fix any problems that are found. Once the issues are fixed, check if the audio error when playing videos is fixed. If not, move to the next method.
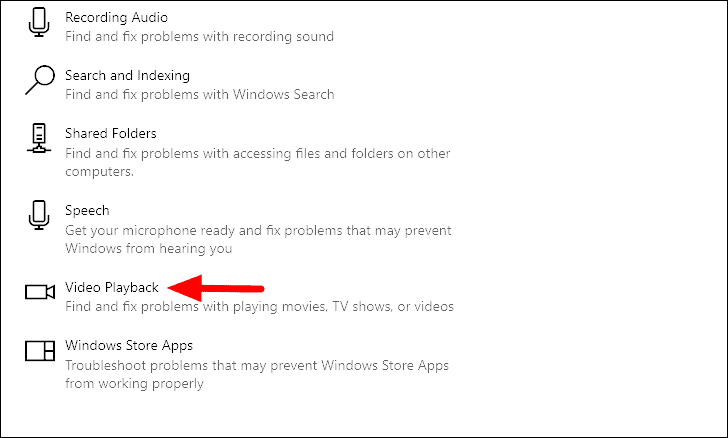
2. Run Video Playback Troubleshooter
If you are facing issues only with video playback, your primary approach should be to let Windows 10 identify and fix the problem. To do so, all you have to do is run the relevant troubleshooter, i.e., Video Playback.
To run the ‘Video Playback’ troubleshooter, select the same from the list of troubleshooters on the ‘Additional Troubleshooters’ screen.
The troubleshooter will now run and identify the problem. Follow the on-screen instructions to fix the issues and check whether you are now able to play video on Windows 10.
3. Update Media Player
Many a time, there is a chance that you are running an older version of the media player. Most users continue using the same version until they receive an error or face video playback issues. If that’s the case, try updating the media player.
In most cases, the update option is located within the media player application. You can also go to their official website to understand the whole update process. After you have updated the media player, check if the error is fixed. In case the error is not fixed or there are no updates available, try the next fix.
4. Try Another Media Player
If you were unable to find an update, try playing the video on another media player. There are various media players available on the web and the Microsoft Store that are just as good. However, we recommend using the VLC Media player, since it’s an open-source player, supports almost all the video formats, and have a simple interface. Moreover, apart from the video playback, it offers tons of other features including editing and converting the video file format.
To download the VLC Media player, go to videlan.org/vlc and click on the ‘Download VLC’ option. After the download is complete, launch the installer and follow the on-screen instructions to complete the installation process.
Now, play the same video in VLC and check if you are still facing issues playing the video.
5. Update Windows
If you are still unable to play videos on Windows 10, it could be because of a bug or error. If that’s the case, try searching for Window’s update as there is a high chance the issue with fixed in the following updates.
To update the Windows, press WINDOWS + I to launch system ‘Settings’ and then click on the ‘Update & Security’ option.
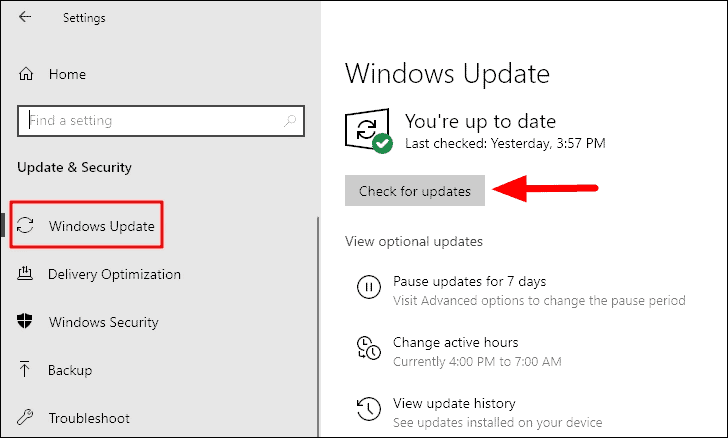
In the ‘Update & Security’ settings, the ‘Windows Update’ tab will open by default. Click on the ‘Check for updates’ option on the right. Windows will now lookup for any available updates and then download and install them on your computer.
After you have installed the recent version of Windows 10, you would now easily be able to play videos.
6. Compress Video
Many a time, the size or resolution of the video might be too high, thus leading to the playback error. This is a common issue and can be fixed by compressing the video. There are various aspects of compressing a video and you can do the same by changing its format, decreasing its resolution, decreasing the bitrate or frame rate, cropping the video.
There are many third-party apps that can be used to convert a video, but none beats the VLC Media player. The process to compress a video on Windows 10 on VLC Media Player is simple and can be done within a few minutes once you get acquainted with the process.
After you are done compressing the video, check if the video is not playing on the media player in Windows 10.
Related: FIX: Video Lagging or Stuttering Issues on Windows 10
7. Restore Default Power Plan Settings
In some cases, the power plan settings may be affecting the video from playing. If you have made any changes to power plan settings, it’s time you revert them. In case, you don’t remember making the changes, restore default power plan settings altogether.
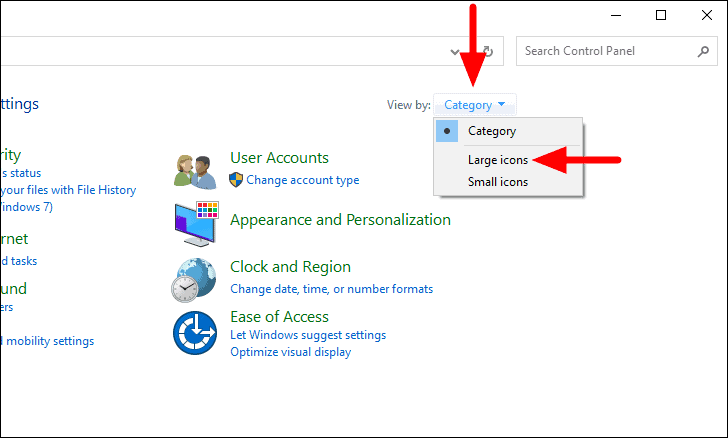
To restore default power plan settings, search for ‘Control Panel’ in the ‘Start Menu’ and then launch the app from the search results by clicking on it.

Next, click on the ‘Category’ option near the top-right and then select ‘Large icons’ from the drop-down menu.
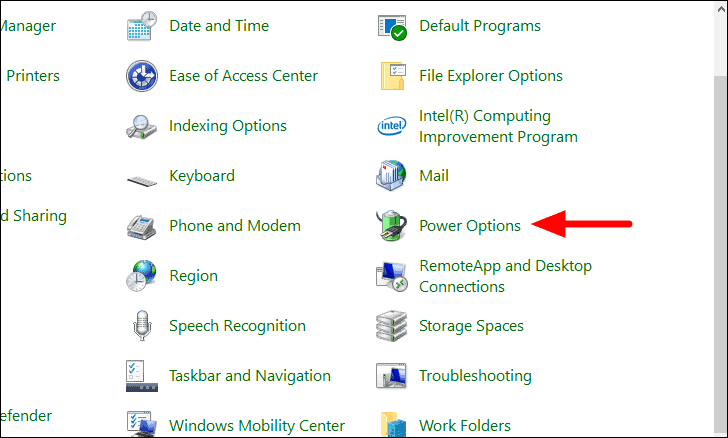
Now, locate ‘Power Options’ in the list and click on it.
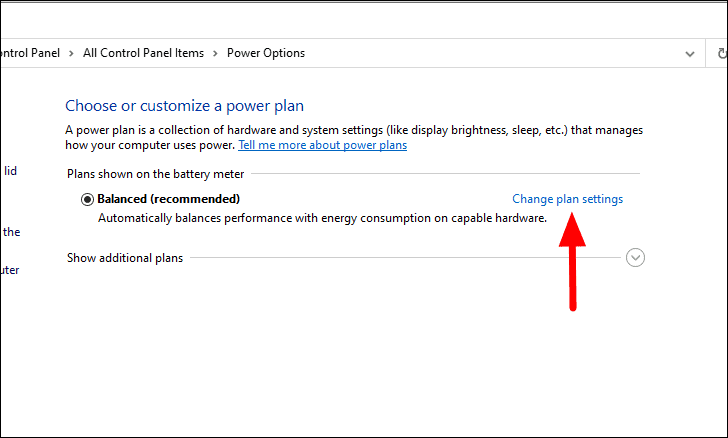
Your current power plan will now be displayed on the screen. Click on the ‘Change plan settings’ option to proceed.
Finally, click on ‘Restore default settings for this plan’ option at the bottom.
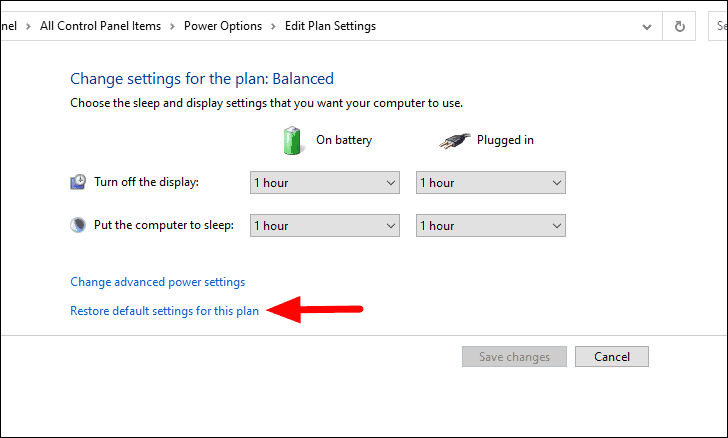
A confirmation box will now appear on the screen, click on ‘Yes’ to confirm the change.

The power plan settings will now be restored to default. Now, try playing the video that you were earlier unable to play and check if the error is fixed. If not, move to the next fix.
8. Run System Restore
Many people start facing the error after updating the OS, making changes in system settings, or installing a new program. This is where ‘System Restore’ comes to your aid by restoring your Windows to an earlier point where things worked fine.
Running system restore is straightforward and can be done in a few simple steps. Also, when you restore the Windows, it doesn’t remove any files, however, programs and settings might be removed.
Once the restore process is complete, you will now be able to play videos without any error on Windows 10.
The fixes mentioned above are the most effective ones and will fix the error in playing videos on your computer. After the error is fixed, play some of your favorite videos on the system without any interruption whatsoever.


